
◁ Phlox
Phlox are small, five-petal flowers named after the Greek word for fire, due to the brilliant colors of some varieties. The wide range of colors includes white, pale blue, violet, vibrant pink, and deep red. Buttercream phlox can be arranged attractively in clusters on cupcakes and look lovely scattered about as fillers or accents in an arrangement.
You’ll imitate the colors of a ‘Blue Paradise’ phlox, which appears more violet than blue.
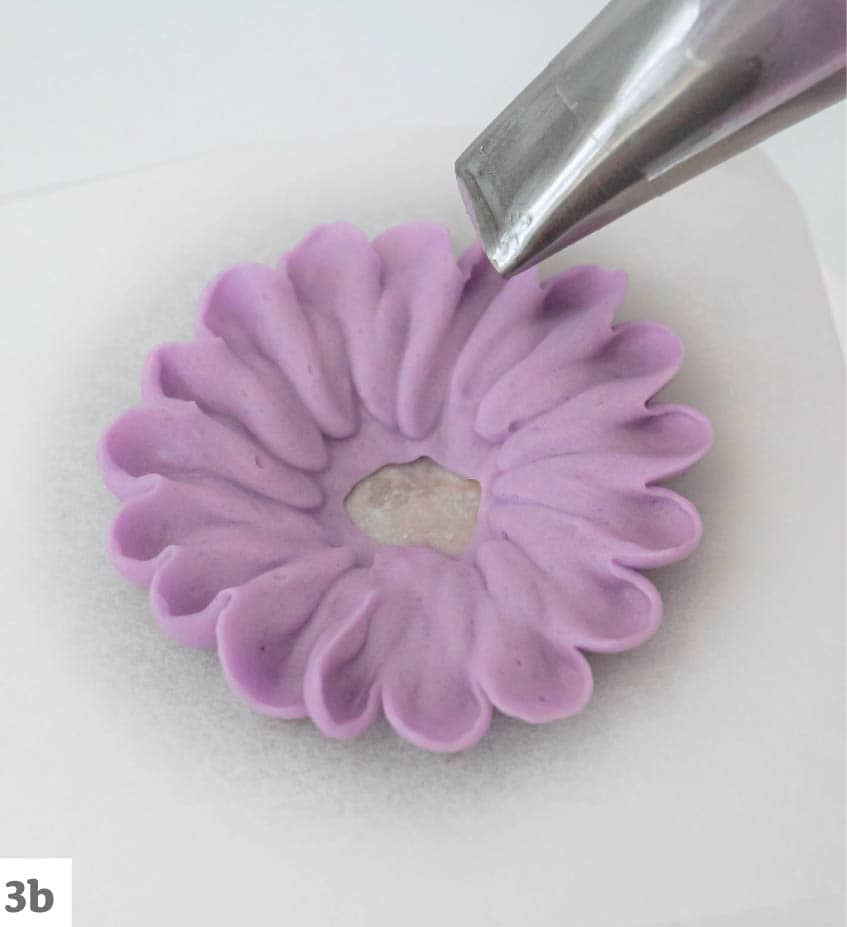
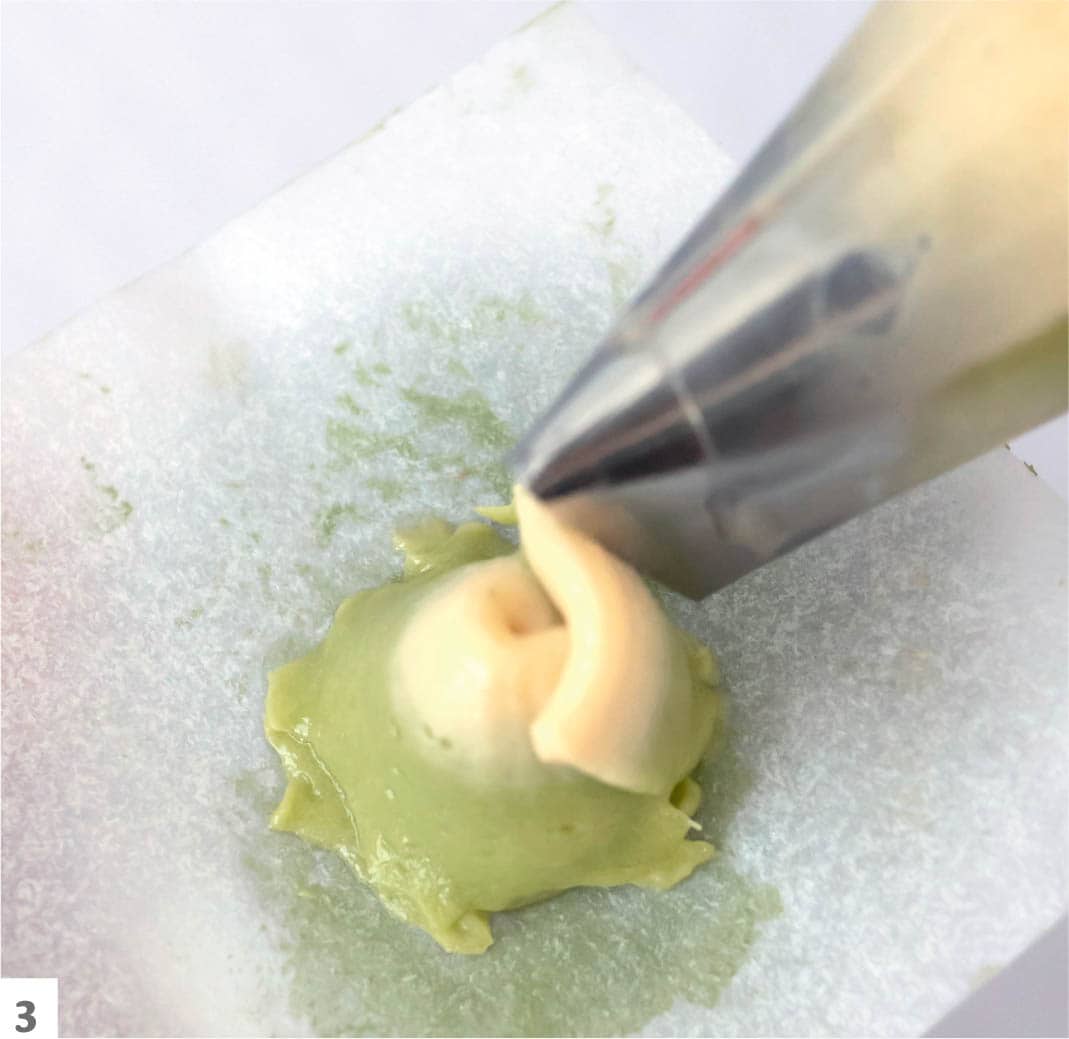
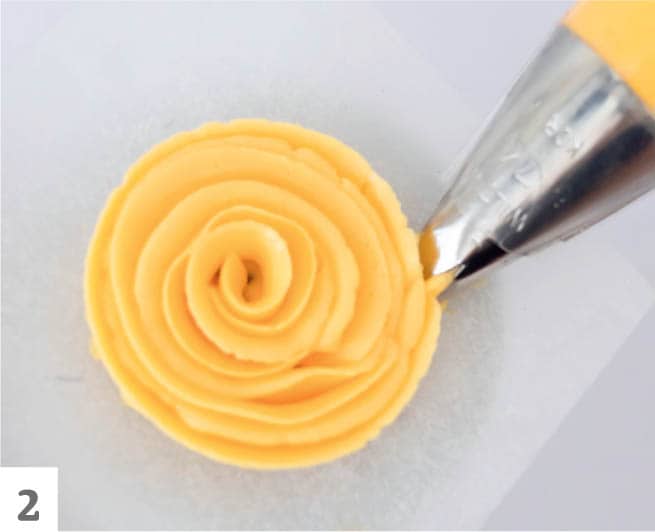
- 1Prepare two batches of buttercream, one colored with purple and placed in a piping bag fitted with the #102 petal tip and the other colored burgundy and placed in a piping bag fitted with the #1 or #0 round tip (prepare less burgundy buttercream because it will be used for the flower centers only). Place the widest end of the petal piping tip in the center of the flower nail. The piping bag should be almost parallel with the flower nail.
- 2Squeeze the piping bag and create a slight buttercream arc, ending back at the center. This should produce a single petal.

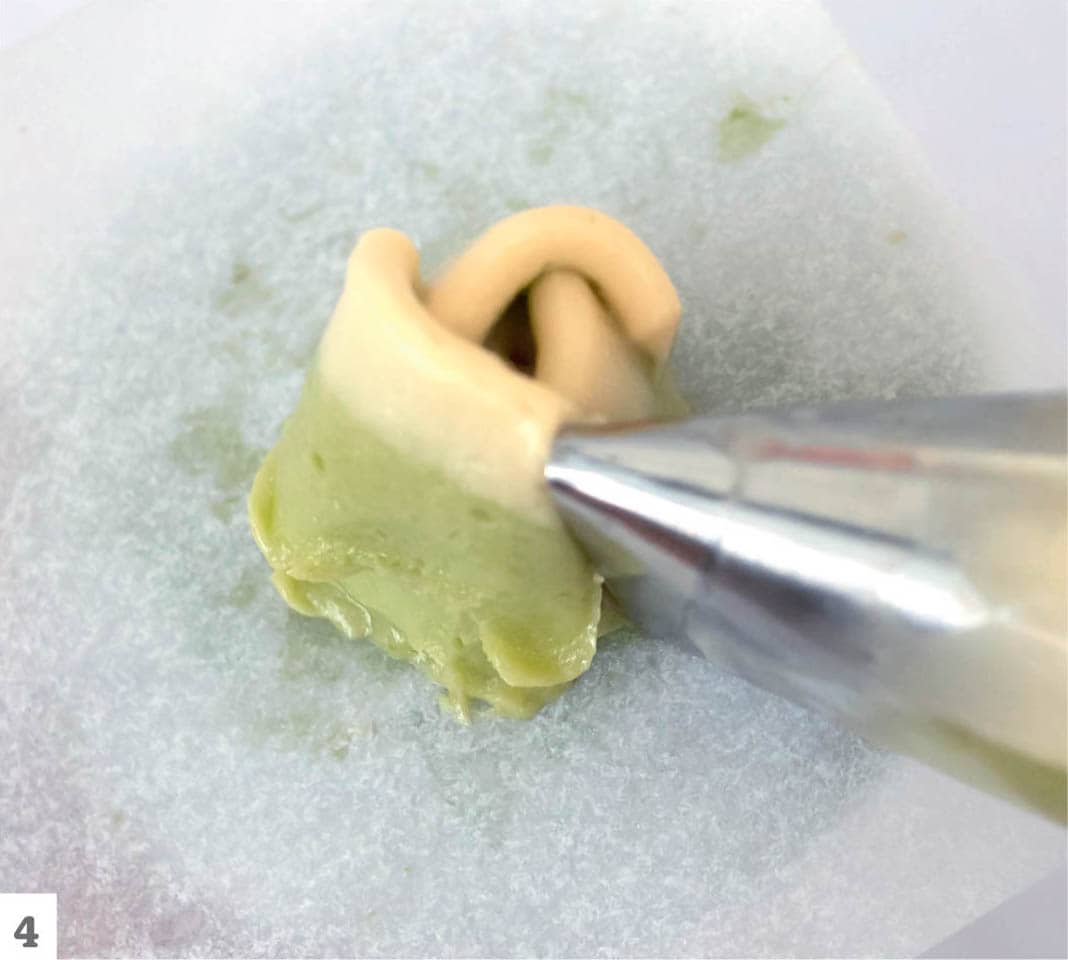
- 3Turn the flower nail and reposition the piping bag to the starting position in step 2, placing the widest end of the petal piping tip at the center. Repeat the arc, creating another petal, and return to the center again. This second petal should sit beside the first petal.
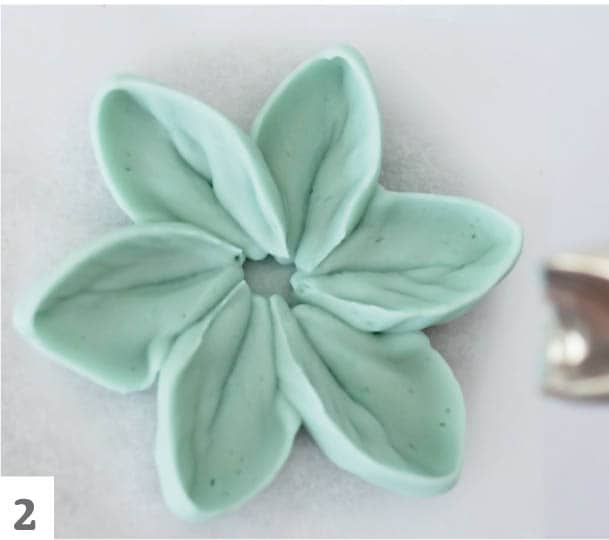
- 4Now that you have two adjoining petals, repeat steps 2 and 3 and pipe three more petals, for a total of five.
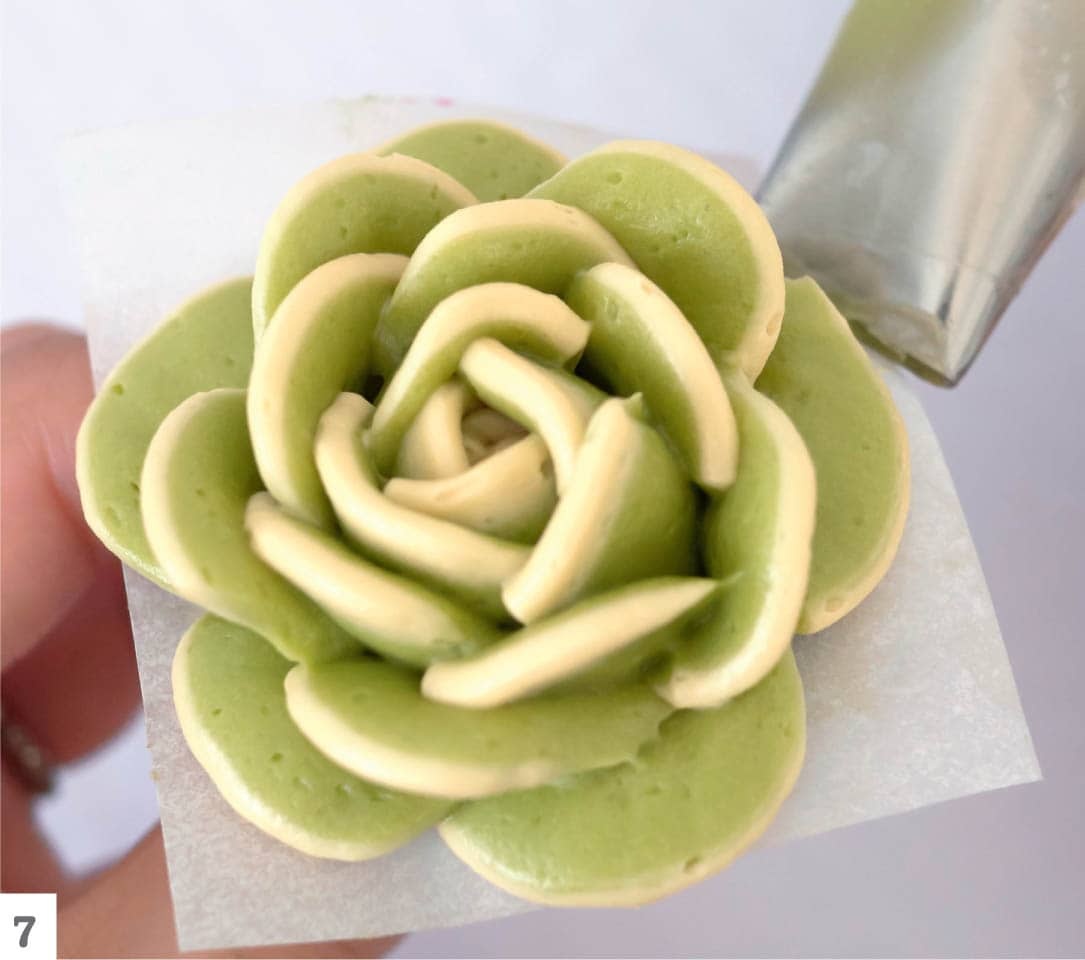
- 5Add a center to the phlox. Pipe a small dot of burgundy buttercream just outside the middle of the flower. Add more tiny dots of buttercream, creating a complete ring of color. Leave the center of the flower bare (see the finished flower, here).

◁ Fruit Blossom
Fruit tree blossoms are one my favorite signs of spring. Blossoms fill once-bare branches with fluffy petals of white or pink, giving the trees such an ethereal feel. For this flower, I took inspiration from the cherry blossom, using a light hand when adding soft pink gel to create the petal color. I used a warm yellow for the stamens in the center of the blossom.
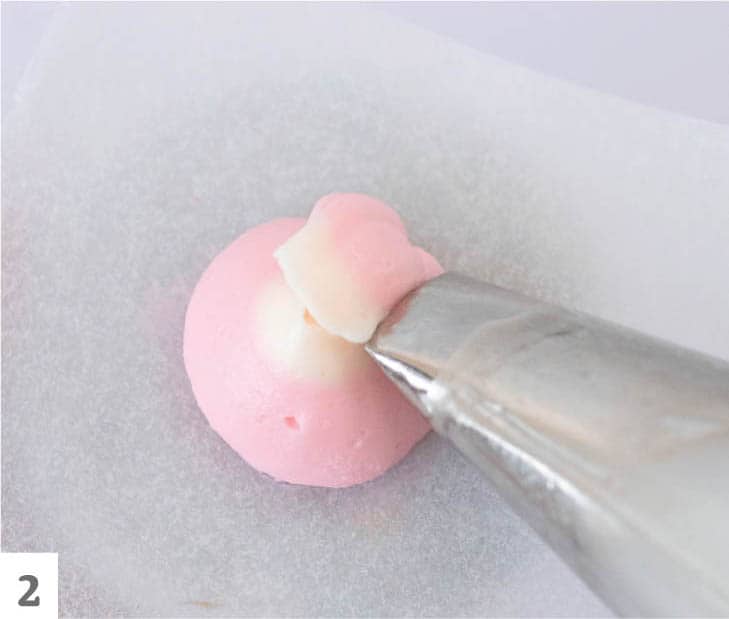
- 1Prepare two batches of buttercream, one colored with pink and added to a piping bag fitted with the #60 curved petal tip and the other colored yellow and placed in a piping bag fitted with the #1 round tip (prepare less yellow buttercream because it will be used for the flower centers only).
- 2Place the widest end of the curved petal tip in the center of the flower nail. The bag should be almost parallel with the flower nail. Squeeze the piping bag as you create a slight arc, ending back at the center. This will produce a single petal, and you should notice a cupped appearance formed by the curved petal tip.

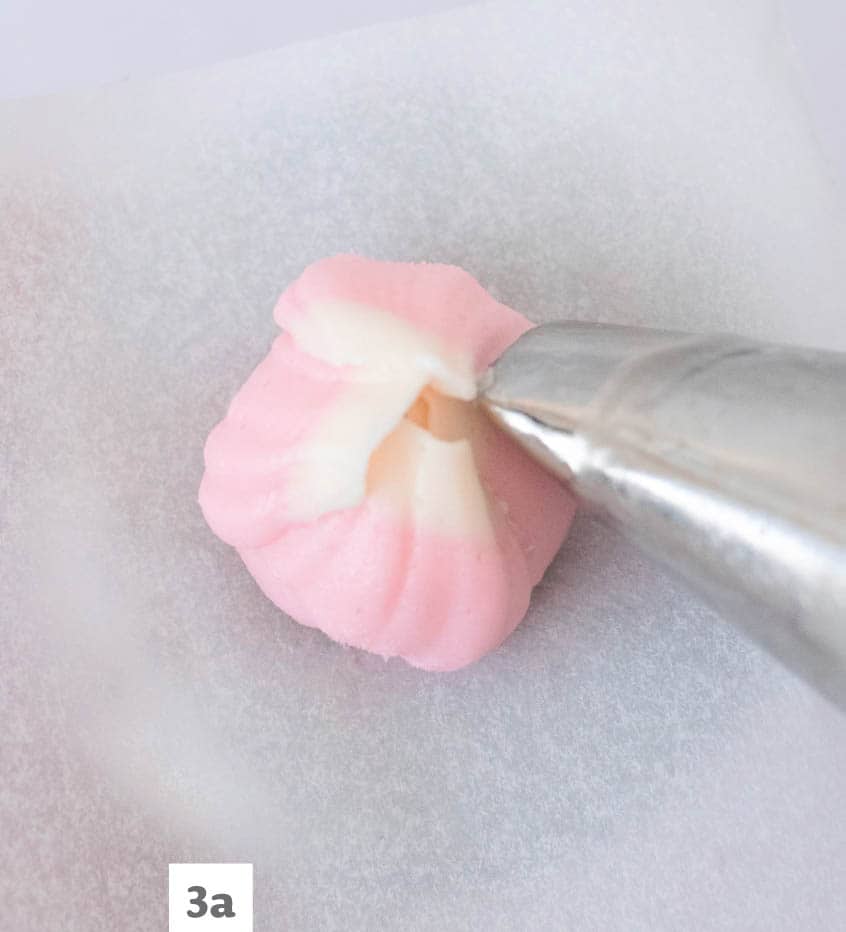
- 3Turn the flower nail and reposition the piping bag to the position you started with in step 2, with the widest end of the piping tip at the center. Repeat the arc and return to the center again. This second petal should sit beside the first petal.

- 4Repeat the process and pipe three more petals, for a total of five petals.
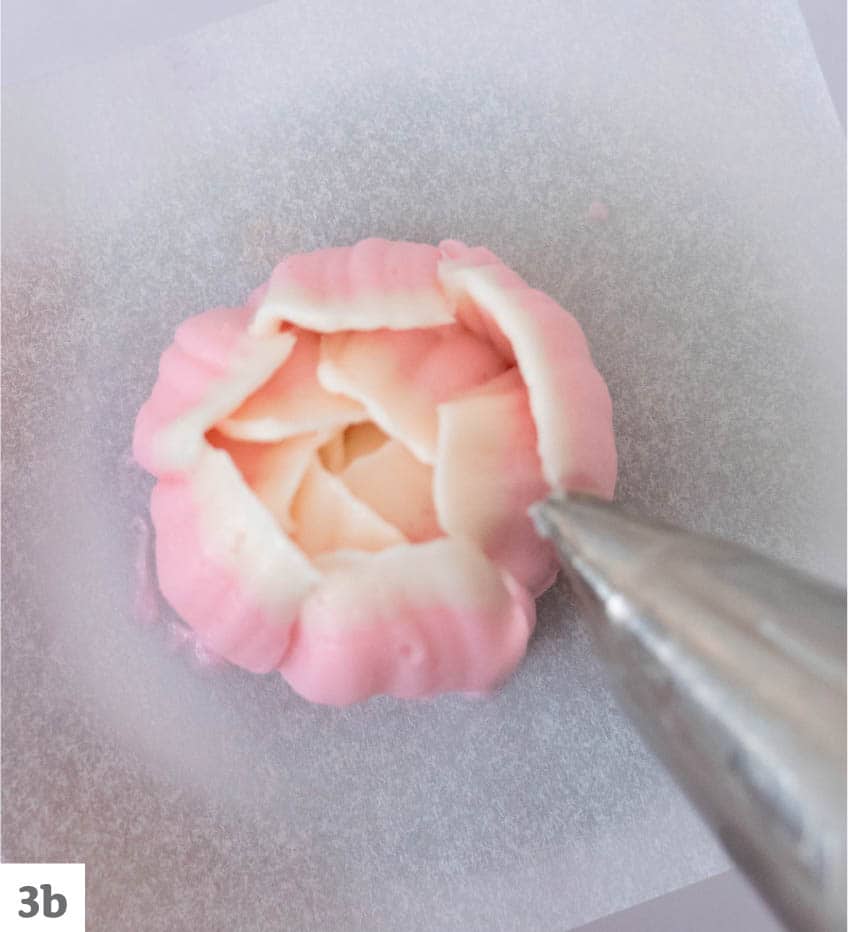
- 5Add the center accent to the fruit blossom. With the yellow buttercream, gently touch the center of the fruit blossom with the piping tip, squeeze the bag, and pull outward. Repeat until you have a small cluster of pointed stamens that stand upright.

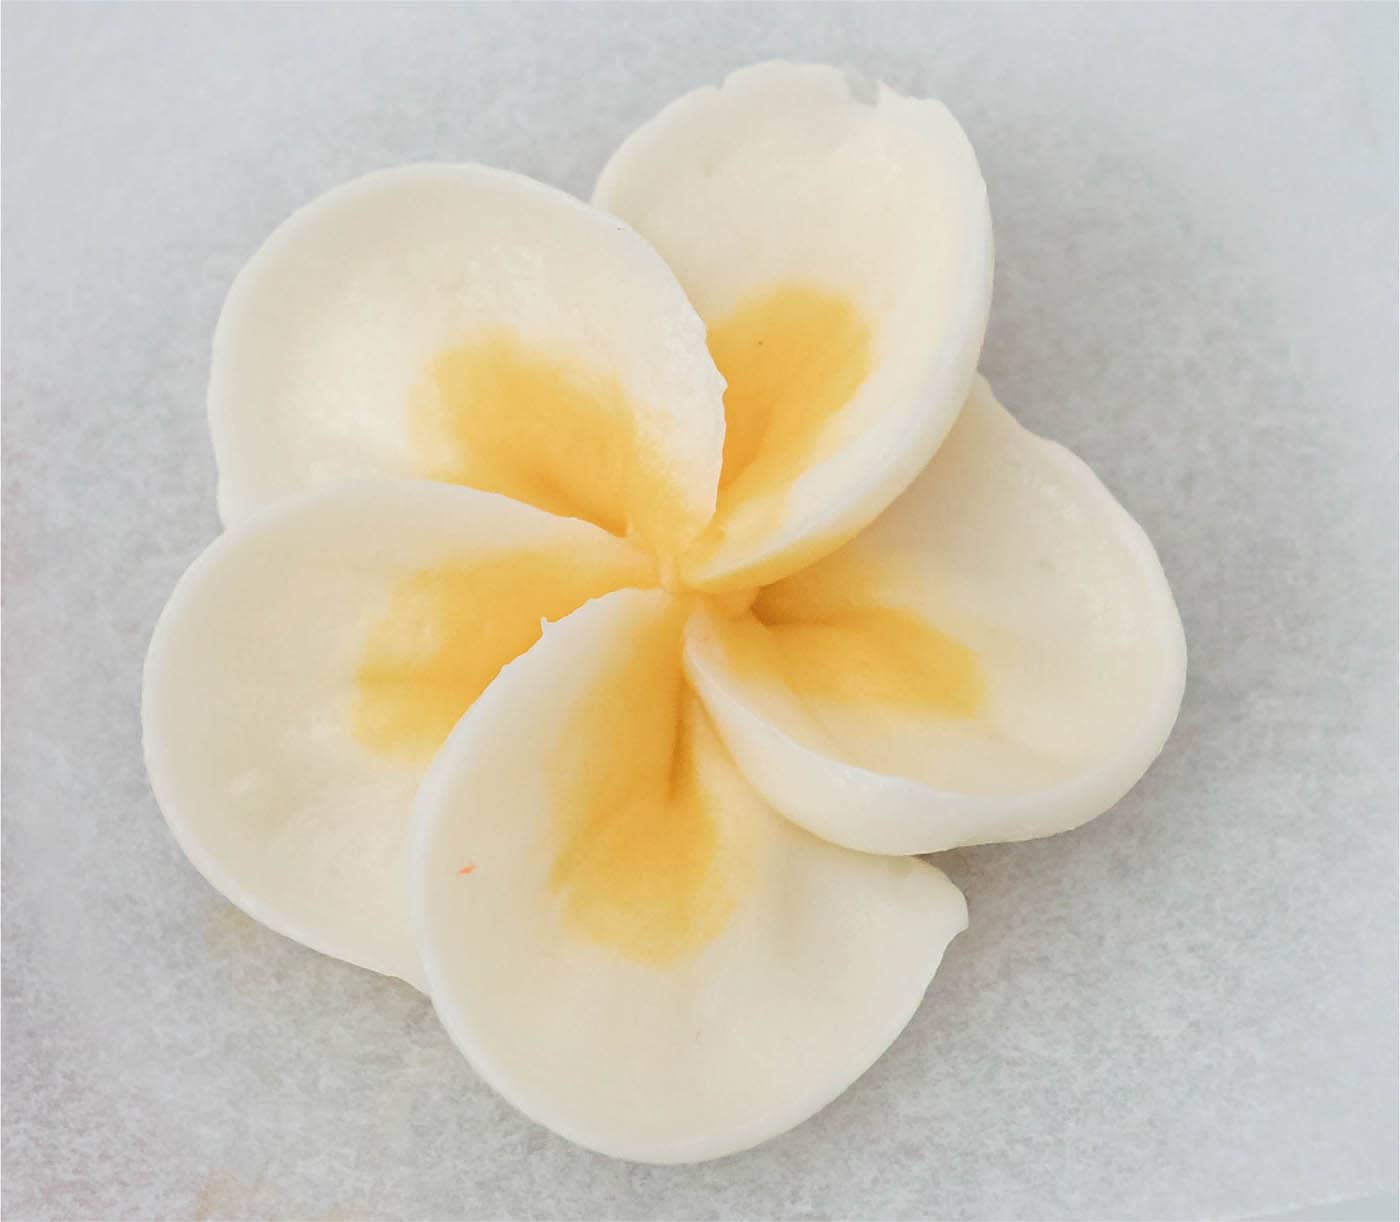
◁ Plumeria
Plumeria, also known as frangipani, are native to warm climates and often used in tropical arrangements. These make great filler flowers in buttercream arrangements and can also be a focal component of an arrangement when clustered together. The white and yellow plumeria is the most recognizable, but plumeria blooms can also be found in shades of pink and red with accents of yellow.
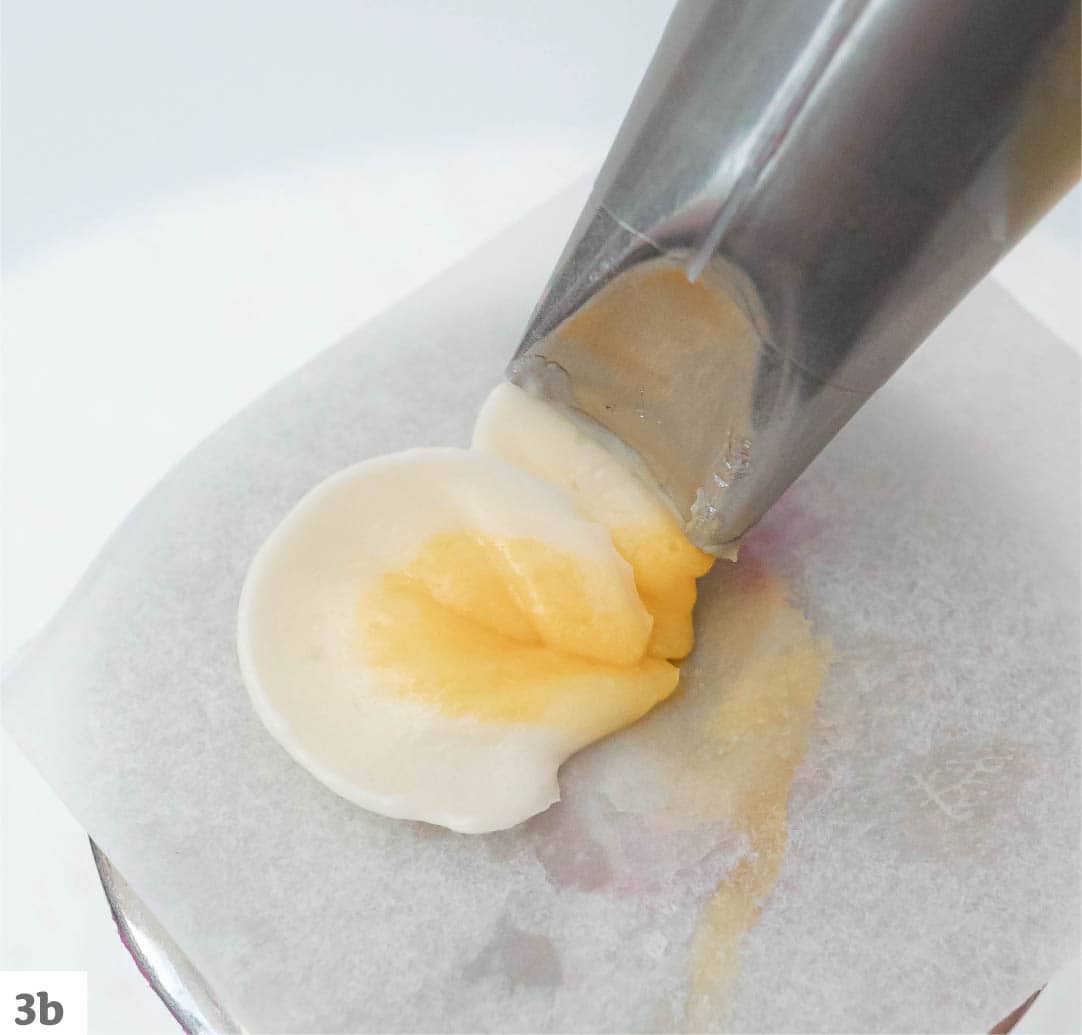
- 1Prepare the yellow and white buttercreams and use them to fill and stripe a piping bag fitted with the #120 curved petal tip (see here). Make sure the widest end of the piping tip is aligned with the yellow buttercream and the narrow end with the white. As in the piping exercises you have practiced, you will start by creating one singular petal. Place the widest end of the piping tip in the center of the flower nail, keeping the bag almost parallel with the nail.
- 2Squeeze the piping bag as you create a slight arc, ending back at the center. This should produce one petal with the yellow buttercream on the inside and the white on the outside. These petals will be larger than those of the fruit blossom because this uses a larger piping tip.

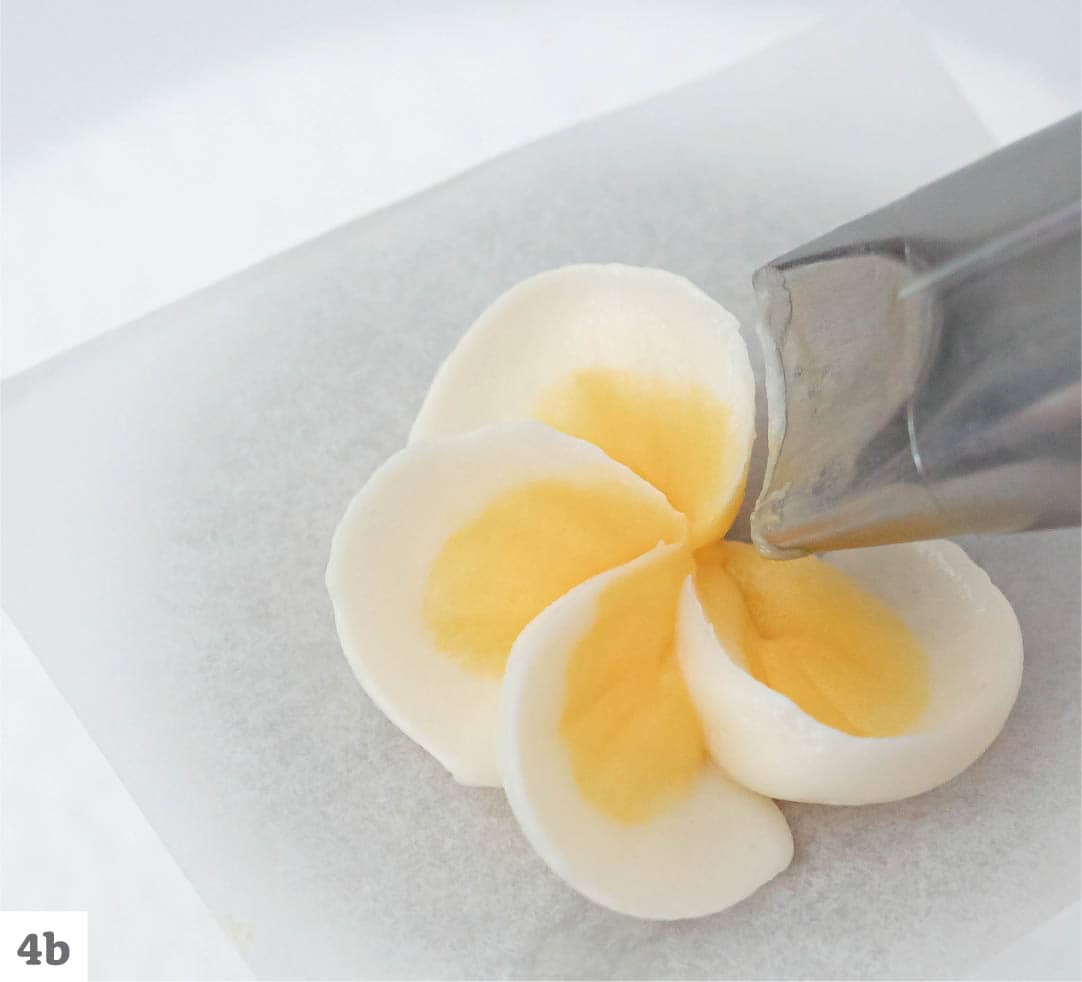
- 3Turn the flower nail and reposition the piping bag to the position in step 2 (a), with the widest end of the piping tip at the center, just slightly tucked behind the first petal. Repeat the arc (b) and return to the center again (c).

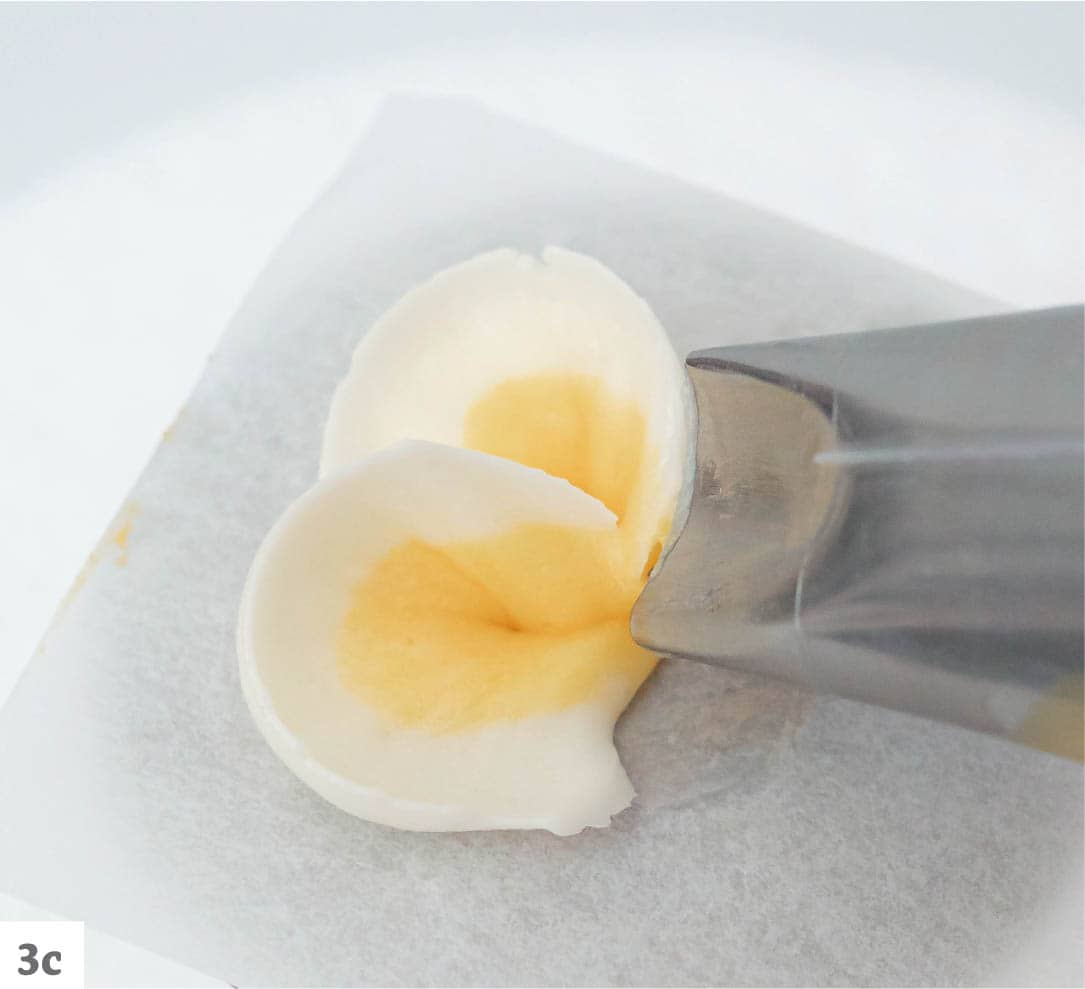
- 4Create a third petal by tucking the piping tip behind the second petal (a) and repeating the process (b), piping two more petals, for a total of five petals.

◁ Hibiscus
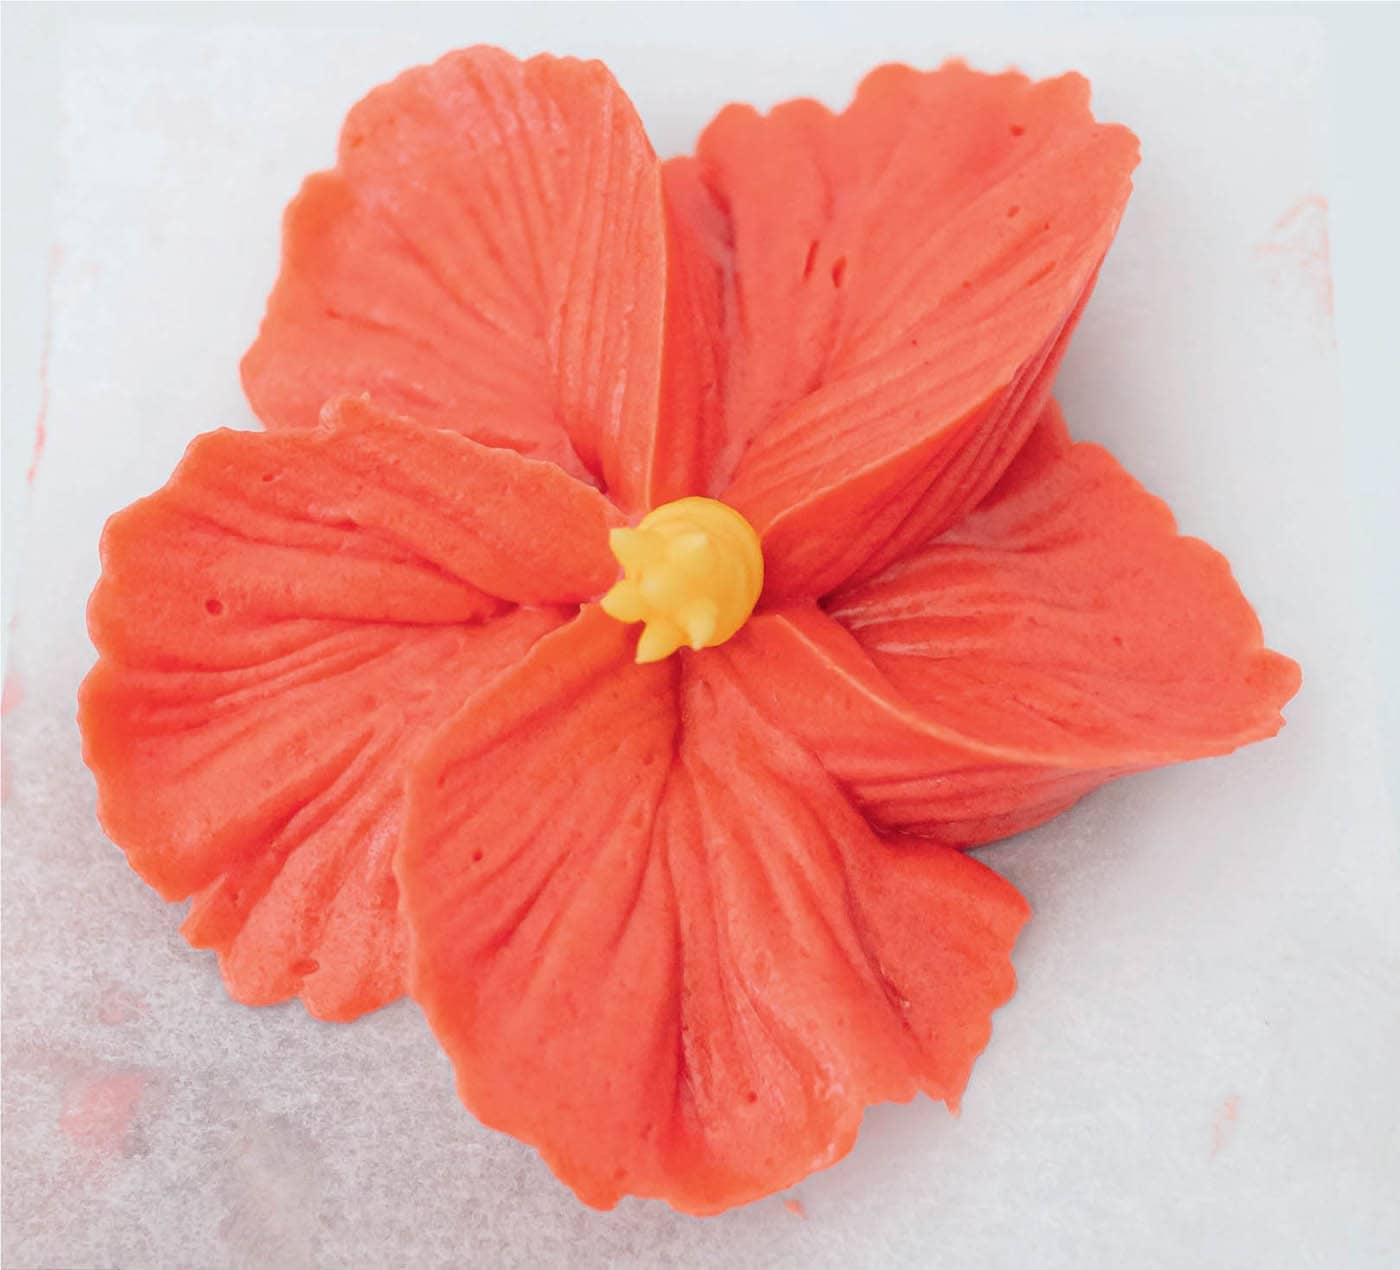
Hibiscus flowers are an iconic tropical flower that make a great addition to arrangements with a tropical or beachy aesthetic. They can be found in a wide variety of colors, such as yellow, peach, coral, pink, bright pink, red, and white, or with combinations of any of these.
To emulate the ruffled petals, wiggle your wrist during the piping process. This produces petals with a rippled or ruffled appearance.
- 1Prepare two batches of buttercream, one colored with red and added to a piping bag fitted with the #127 large petal tip, and the other colored yellow and placed in a piping bag fitted with the #1 tip (prepare less yellow buttercream because it will be used for the flower centers only).
- 2Place the widest end of the large petal piping tip in the center of the flower nail, keeping the piping bag almost parallel with the nail.
- 3Squeeze the piping bag, creating a slight arc. Gently wiggle your wrist as you pipe to create a ruffled petal. This wiggling motion will produce a more dimensional petal.

- 4Turn the flower nail and reposition the piping bag to the position in step 2, slightly tucking it behind the first petal. Repeat the ruffled arc and return to the center again.
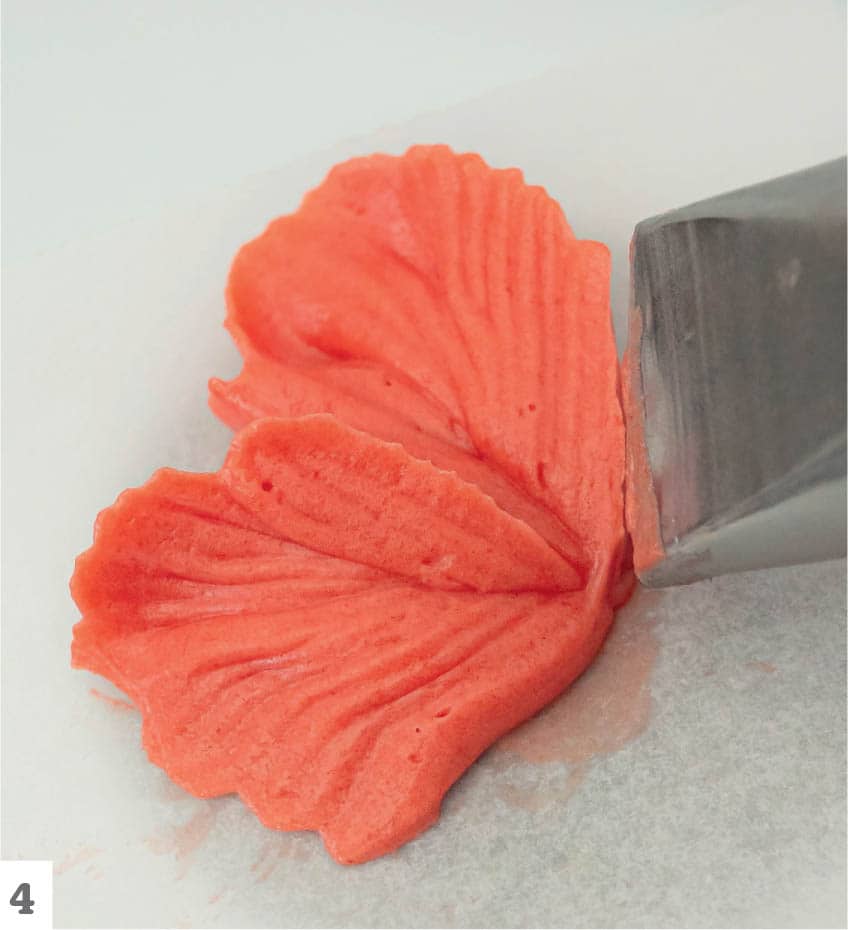
- 5Create a third petal by tucking the piping tip behind the second petal and repeating the process, piping three more petals.

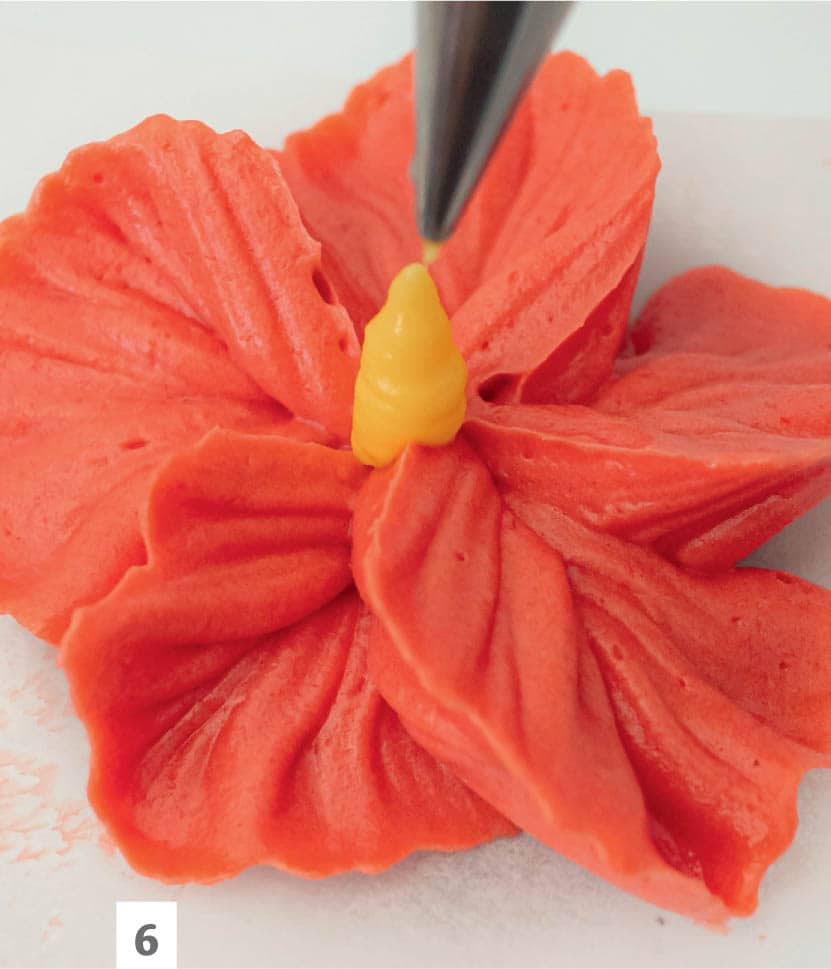
- 6Create the flower center with the yellow buttercream. Deposit the buttercream in the center of the flower by squeezing the bag and pulling it upward, gradually releasing pressure to create a center that is wide at the base and pointed at the tip.
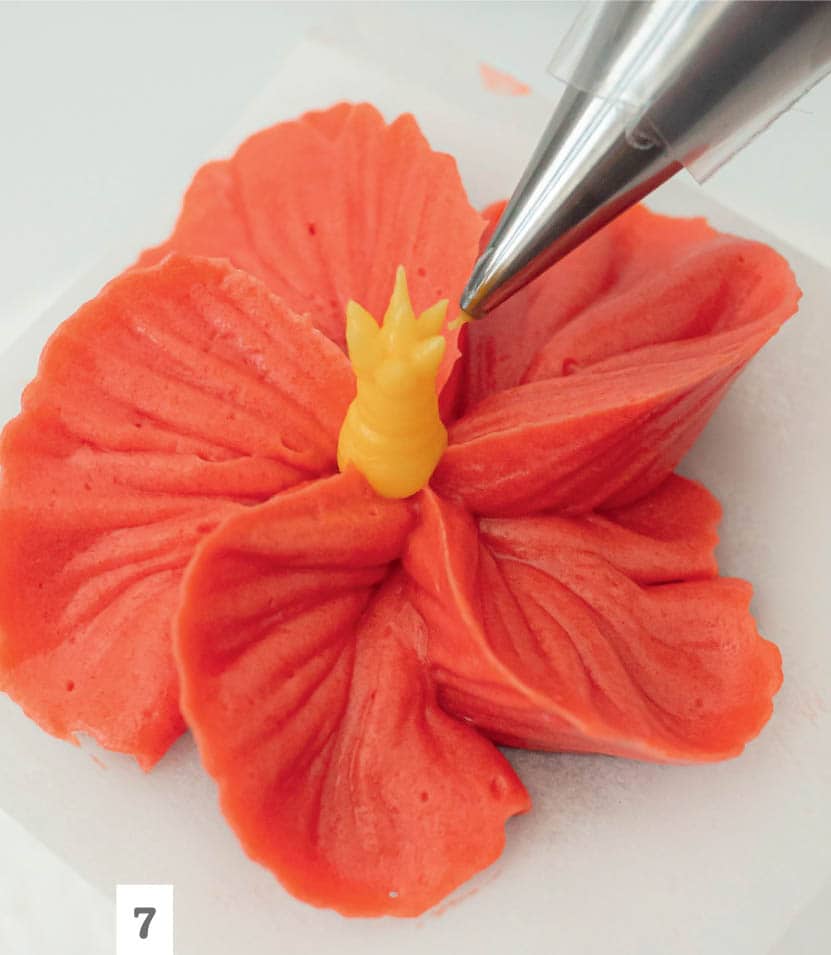
- 7Add tiny stamens to finish by touching the tip of the flower center with the piping tip, squeezing the bag, and pulling outward. Repeat until you have created a few stamens.

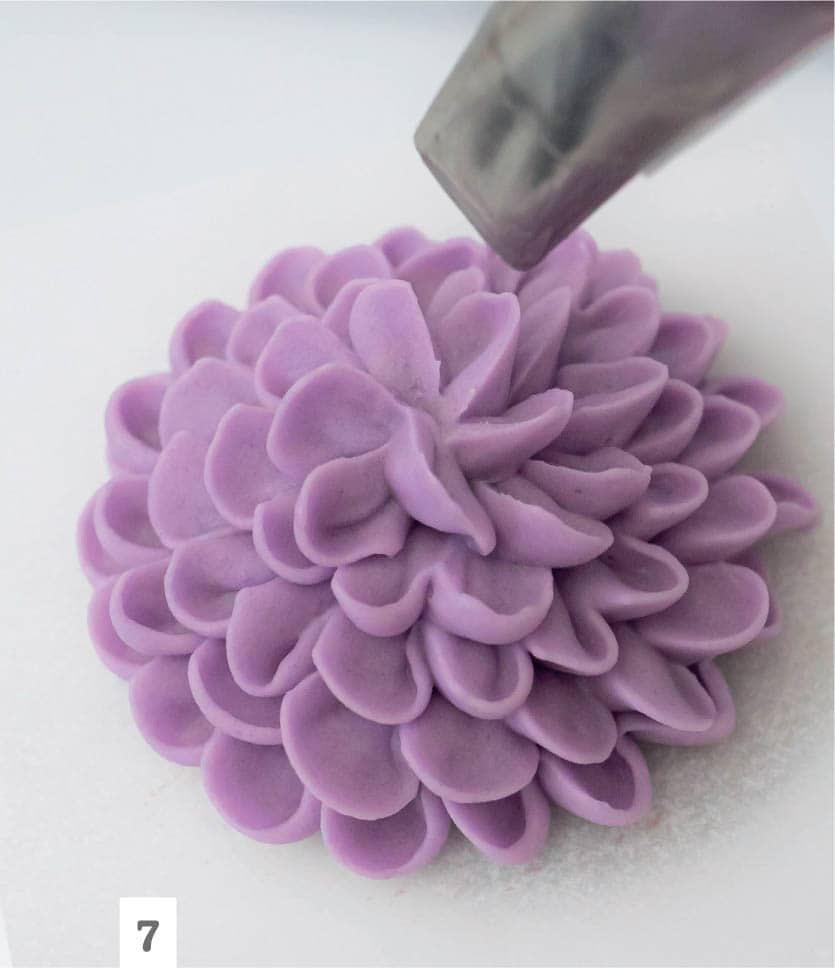
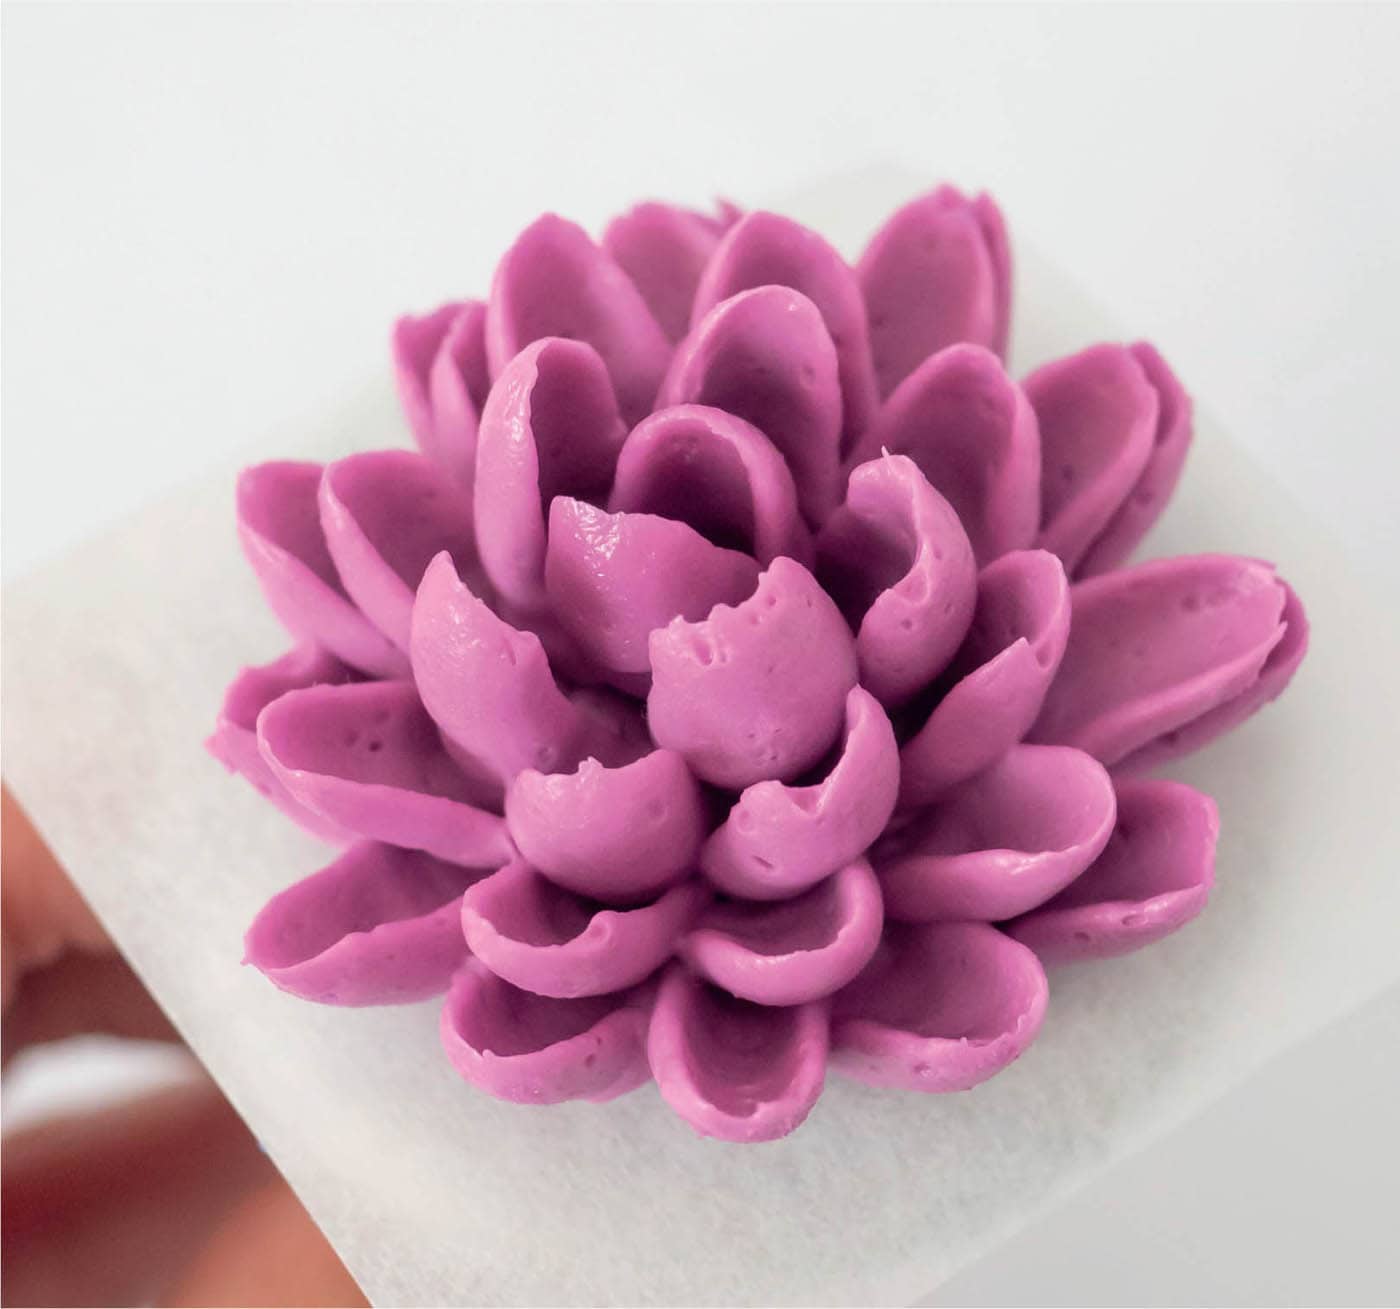
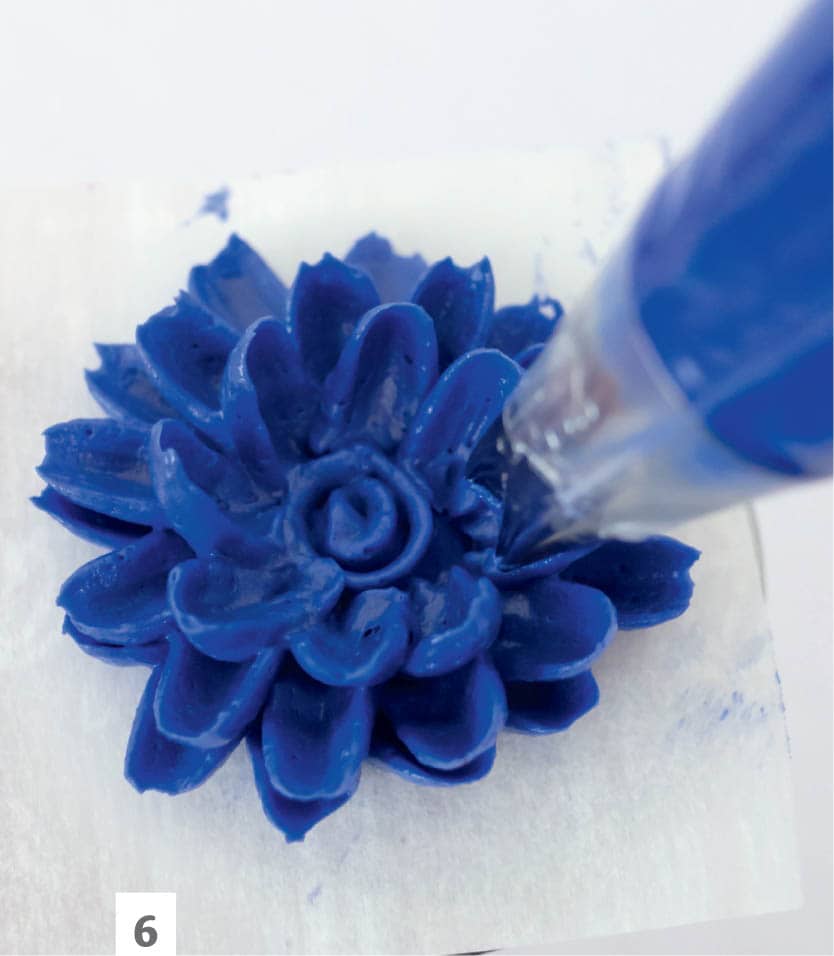
◁ Pompom Dahlia
This variety of dahlia is known as a pompom for its round, fluffy structure. Dahlias are some of the most diverse flowers with hundreds of varieties and come in shades of white, red, pink, orange, yellow, purple, and combinations of these colors. The pompom dahlia is a playful addition to any buttercream arrangement, contributing lots of texture and interest.
- 1Prepare a batch of your chosen shade of buttercream and fill a piping bag fitted with the #102 petal tip. Place the widest end of the piping tip in the center of the flower nail with the piping bag parallel with the flower nail.
- 2Squeeze the piping bag and turn the flower nail to pipe a ring. This will be a guide to help keep your dahlia round and provide a platform for the petal layers.

- 3Starting on the outside of the ring, pipe a circle of short, arced petals, using the same technique as with the previous petals (a). Repeat several times to produce a complete circle, creating the first layer of petals (b).
- 4Turn the flower nail and reposition the piping bag as in step 1, with the widest end of the piping tip at the center of the petal ring.
- 5Repeat step 3, creating another set of petals on top of the first. Make the petal arcs shorter to produce a smaller, more narrow petal. Complete another ring of petals.

- 6Continue making layers of ringed petals until there are a total of four or five layers, with each layer being slightly smaller than the previous one to produce a domelike shape.

- 7To finish the dahlia, deposit five to six small petals in the center.
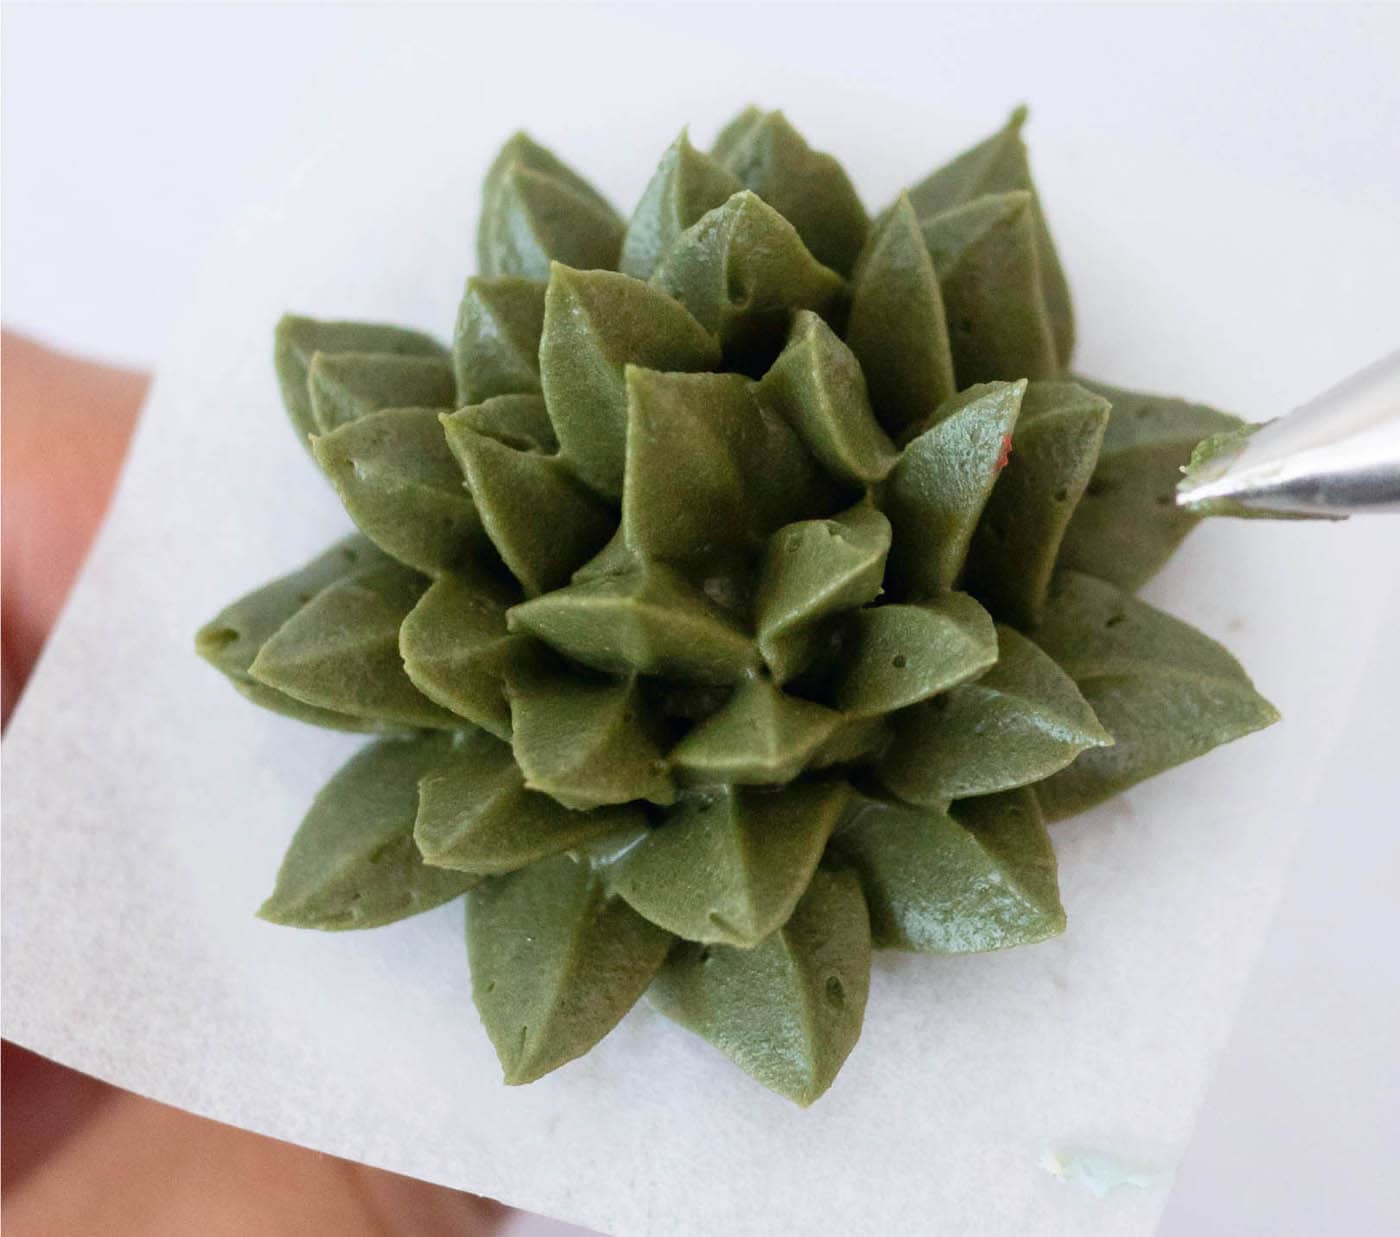
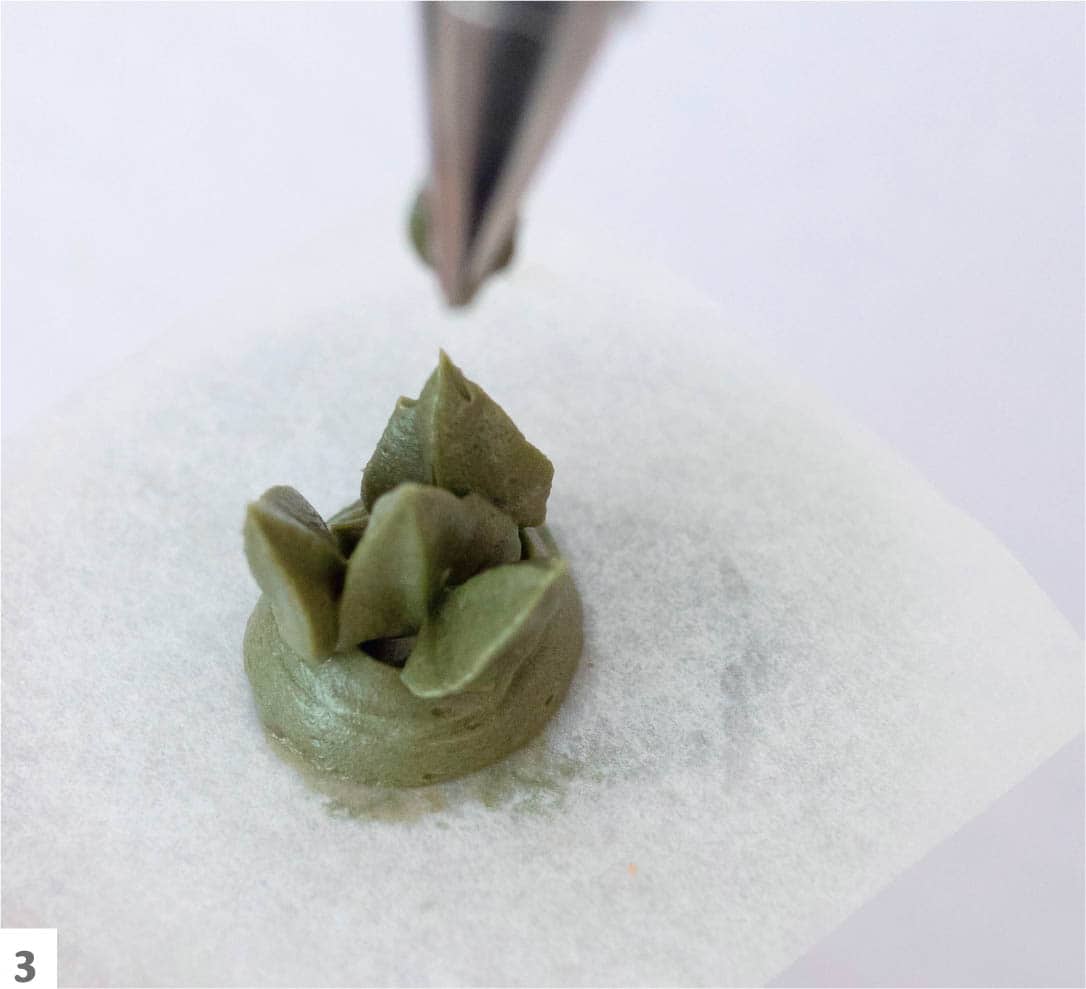
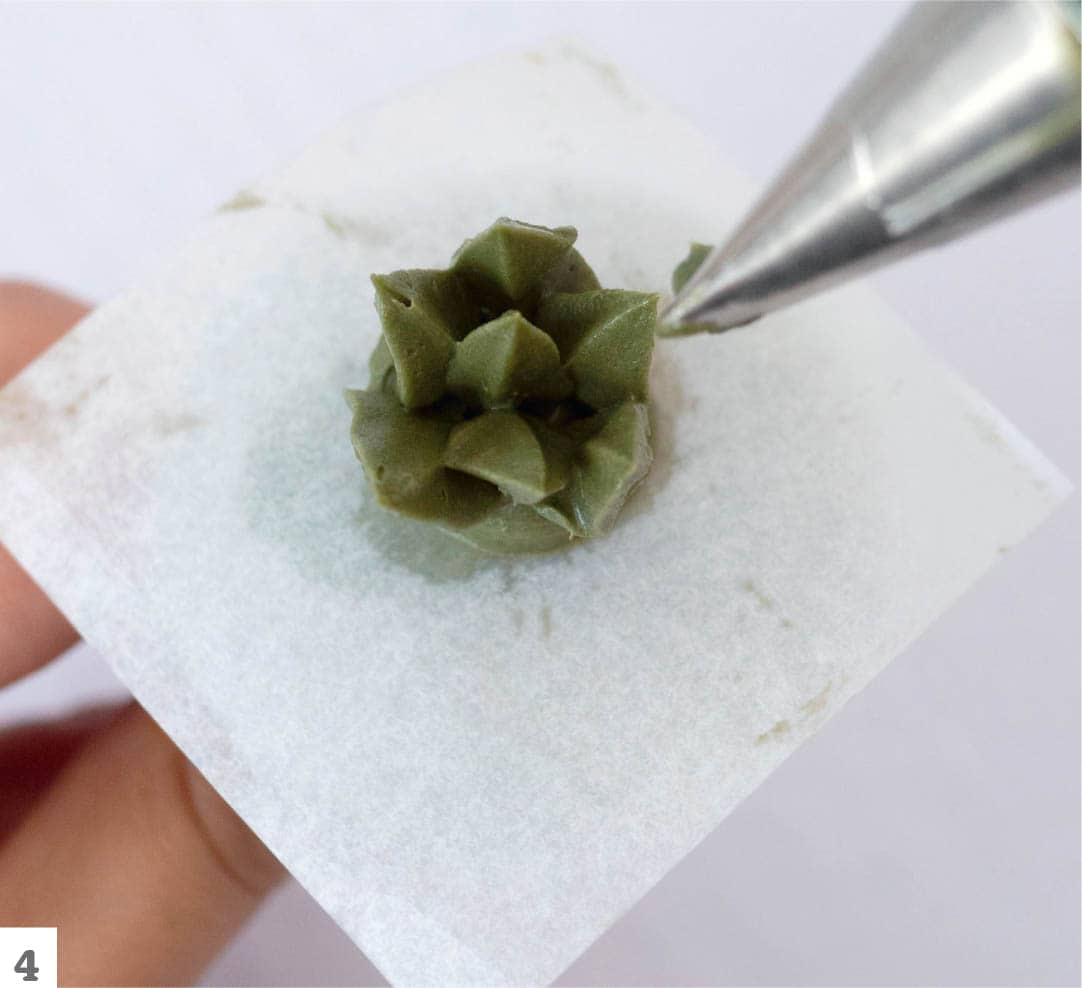
◁ Small Sedum Succulent
Sedum, also known as stonecrop, are a classification of small, compact succulents that grow in clusters. These plants can be found in various shades of green, silvery blue, and yellow, sometimes with pops of color such as purple, pink, and deep maroon. Because of their small size, sedum make great additions to any buttercream arrangement as fillers.
- 1Prepare a batch of buttercream colored a soft green. Fit a piping bag with the curved petal tip #60 and fill it with the buttercream. Place the widest end of the piping tip in the center of the flower nail with the piping bag almost parallel to the nail.
- 2Squeeze the piping bag to create a slight arc, ending back at the center. Make this leaf slightly more narrow than in the previous lessons because this botanical requires six petals.
- 3Turn the flower nail and reposition the piping bag as in step 1. Make another buttercream arc and return to the center again.

- 4Repeat steps 2 and 3 and pipe four more leaves.
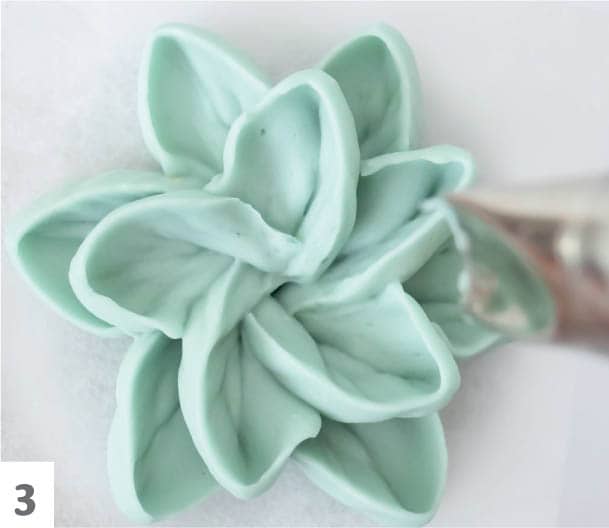
- 5Create another ring of leaves as you did in steps 2 through 4, layering it on top of the first ring. Start this ring between two of the leaves from the first layer and make the arc shorter to produce a smaller, narrower leaf.
- 6Repeat steps 2 through 4 until you have a complete second set of leaves on top. Note that there may be space for five leaves instead of six.

- 7Complete the succulent by tilting the piping bag upright at a 90-degree angle. Deposit a petal of buttercream with a gentle squeeze, then pull upward and away to create a short, narrow petal.

- 8Repeat step 7 until you have completed three to six more of these petals to finish the succulent (see finished succulent, here).
A cupcake goes bold and tropical with a coral-colored hibiscus and a few basic leaves.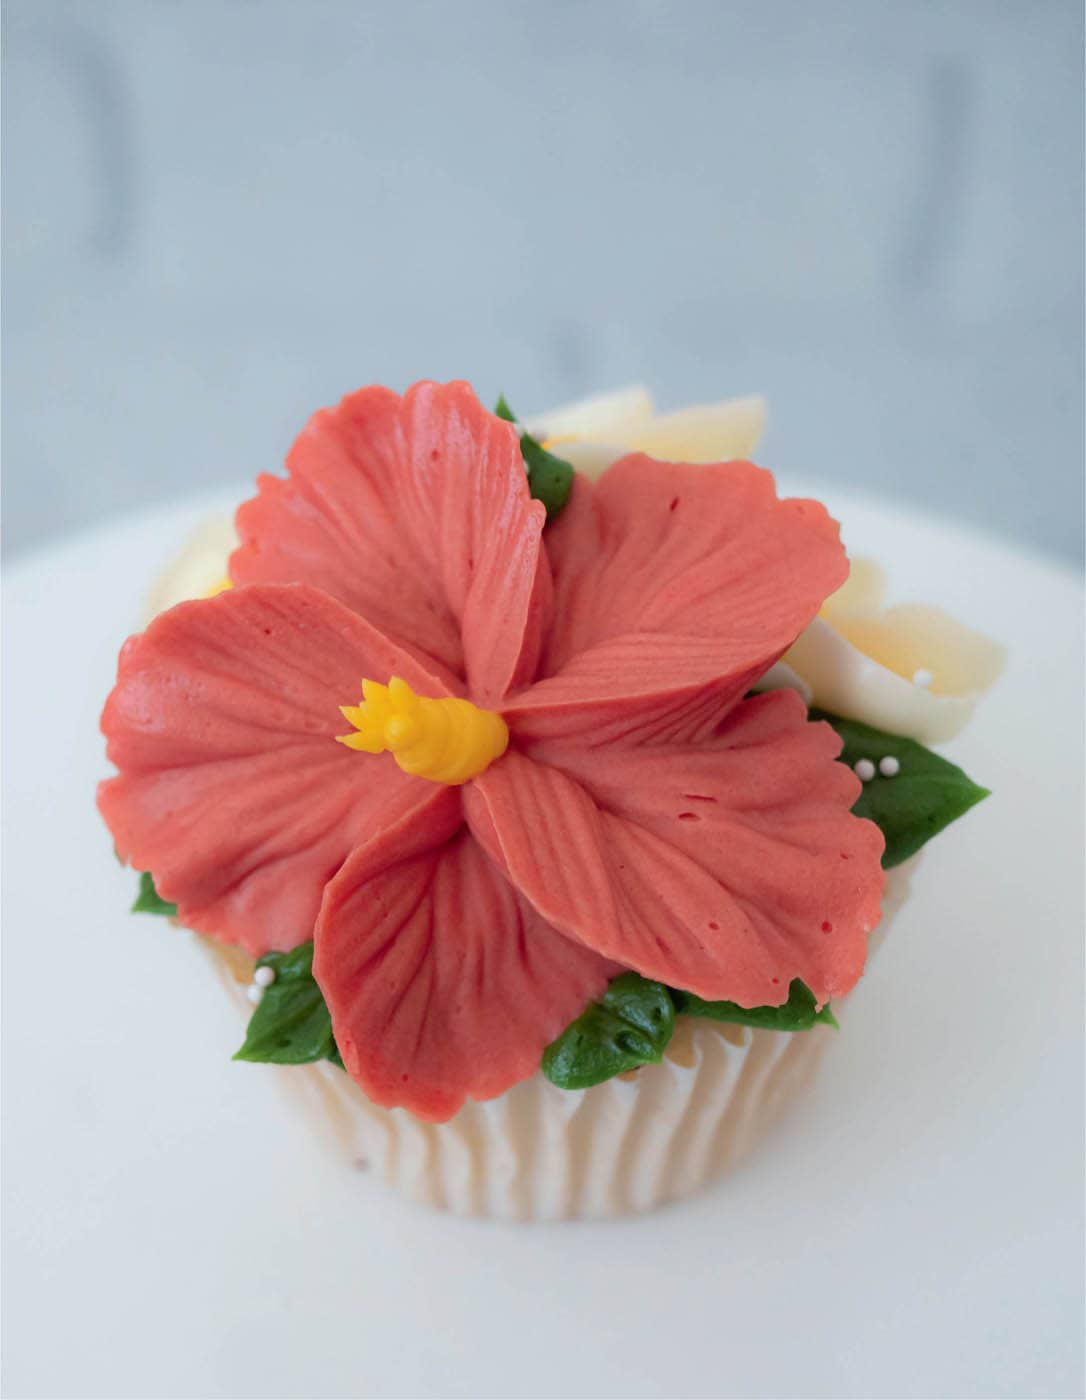

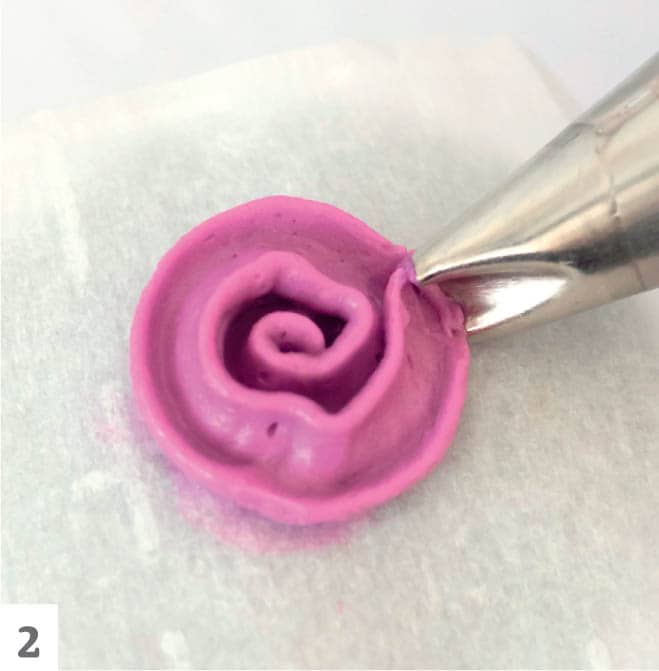
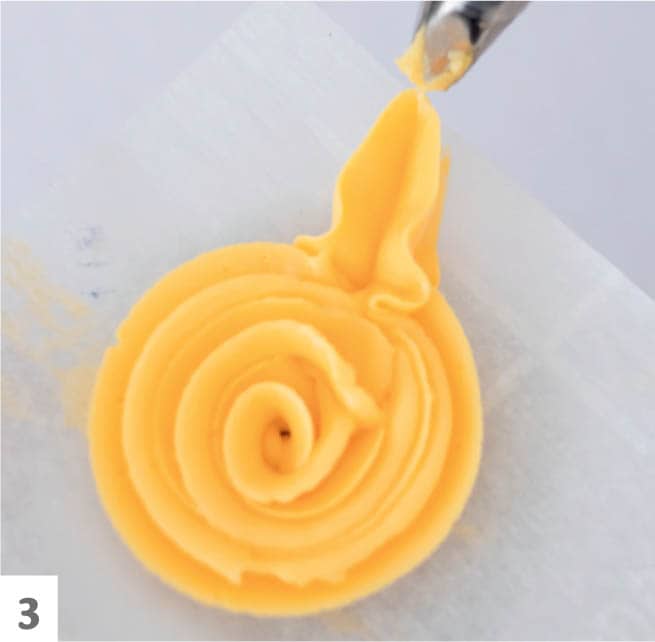
◁ Classic Rose
The rose is arguably the most recognizable and universal flower. This classic rose technique creates a flower with a defined and spiraled center surrounded by unfurling petals, with an eye toward simplicity. Rather than piping unlimited petals and ultimately losing the rose’s definition, this simplified approach creates a numbered sequence of petals that keeps the overall structure defined while maintaining the integrity of the rose.
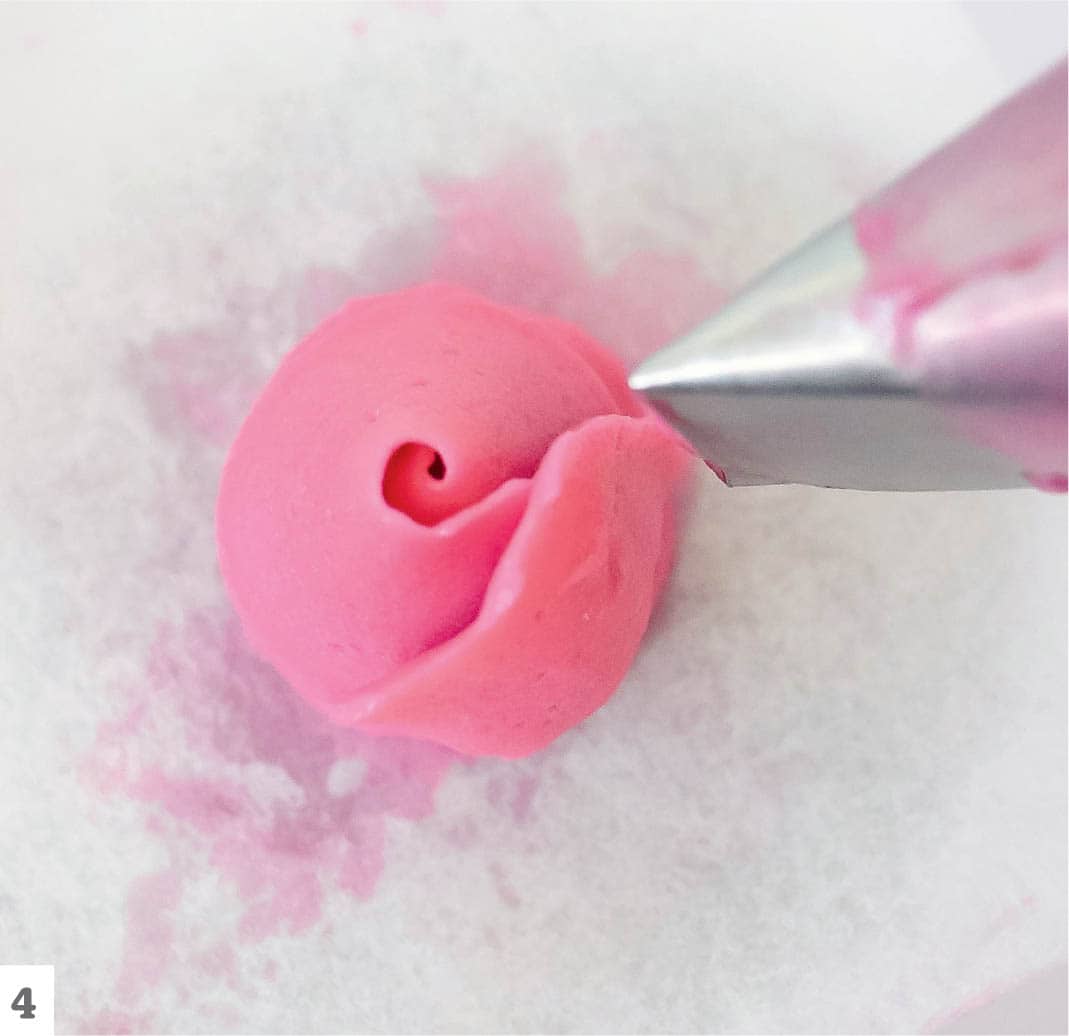
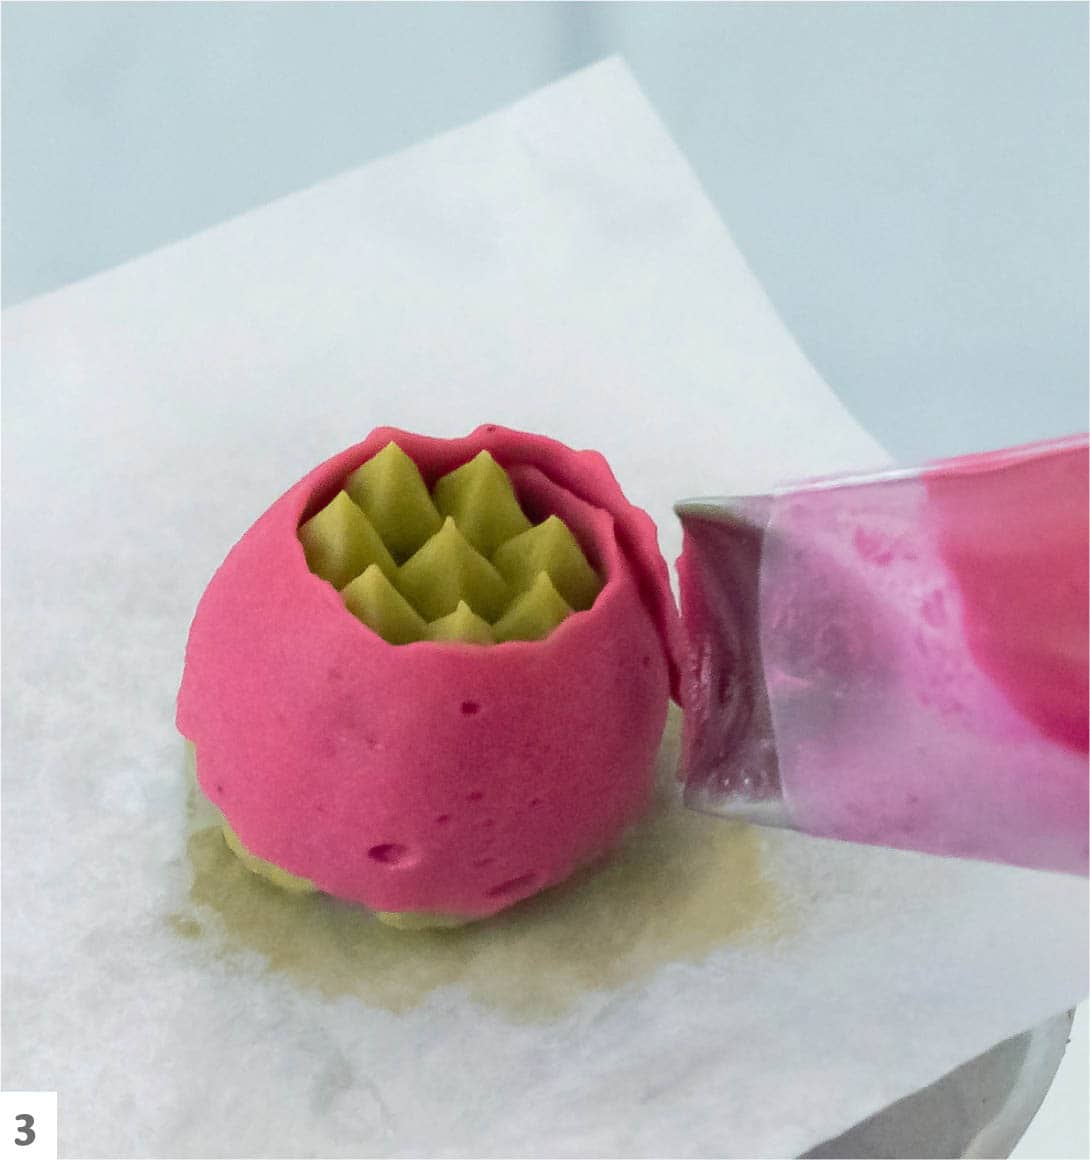
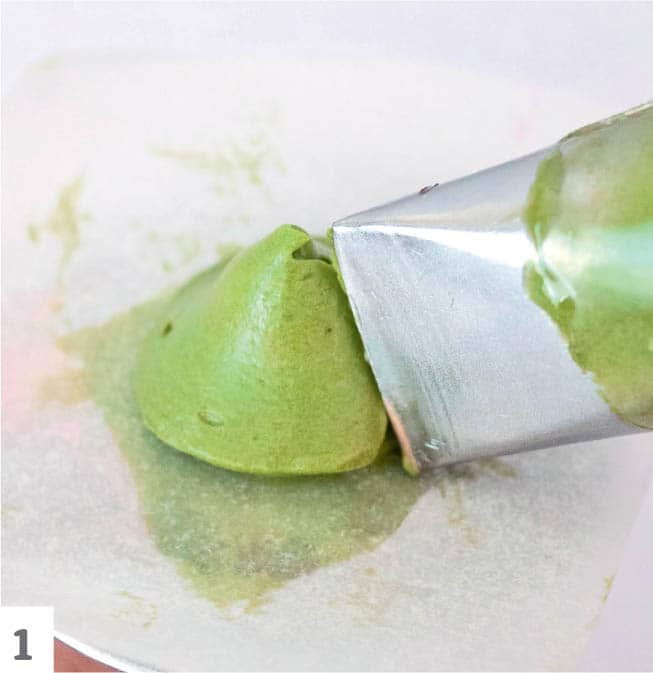
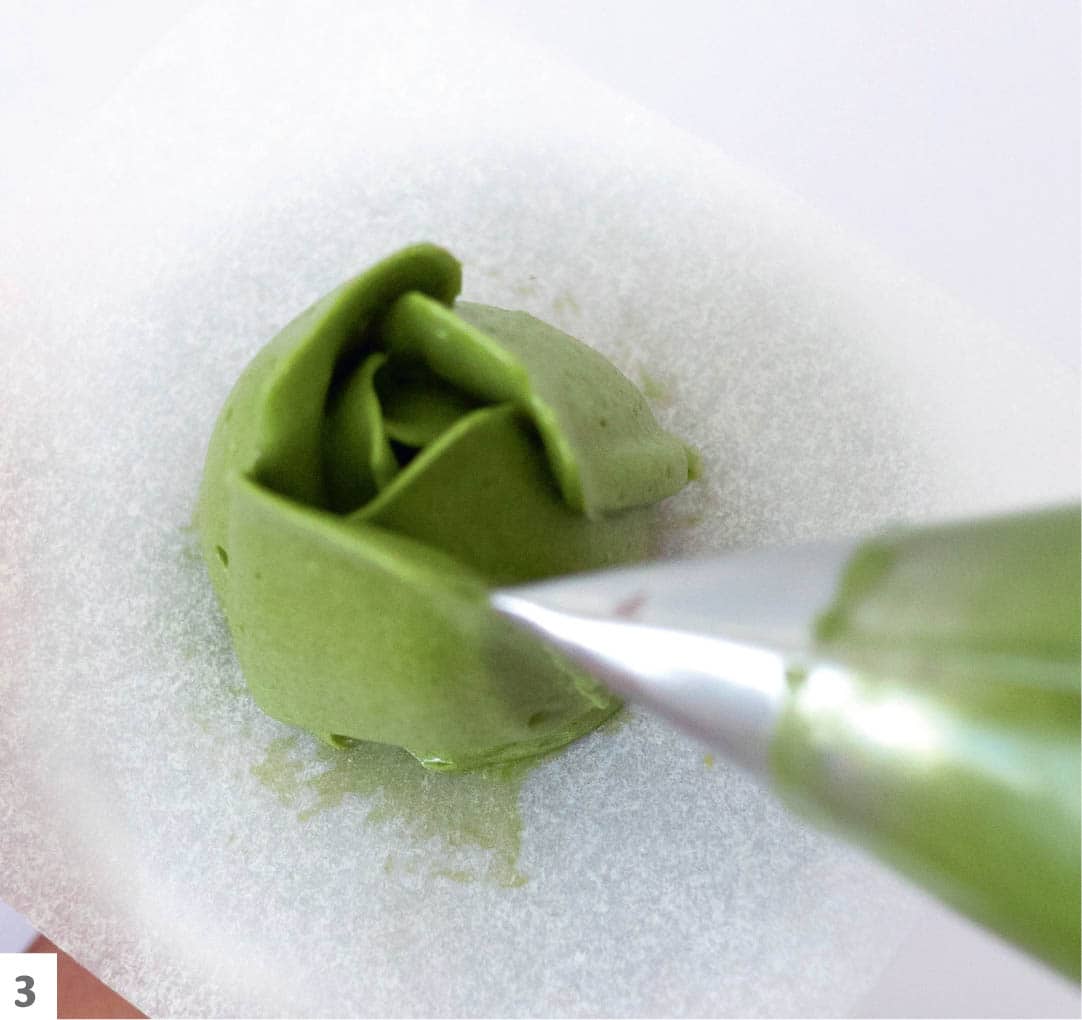
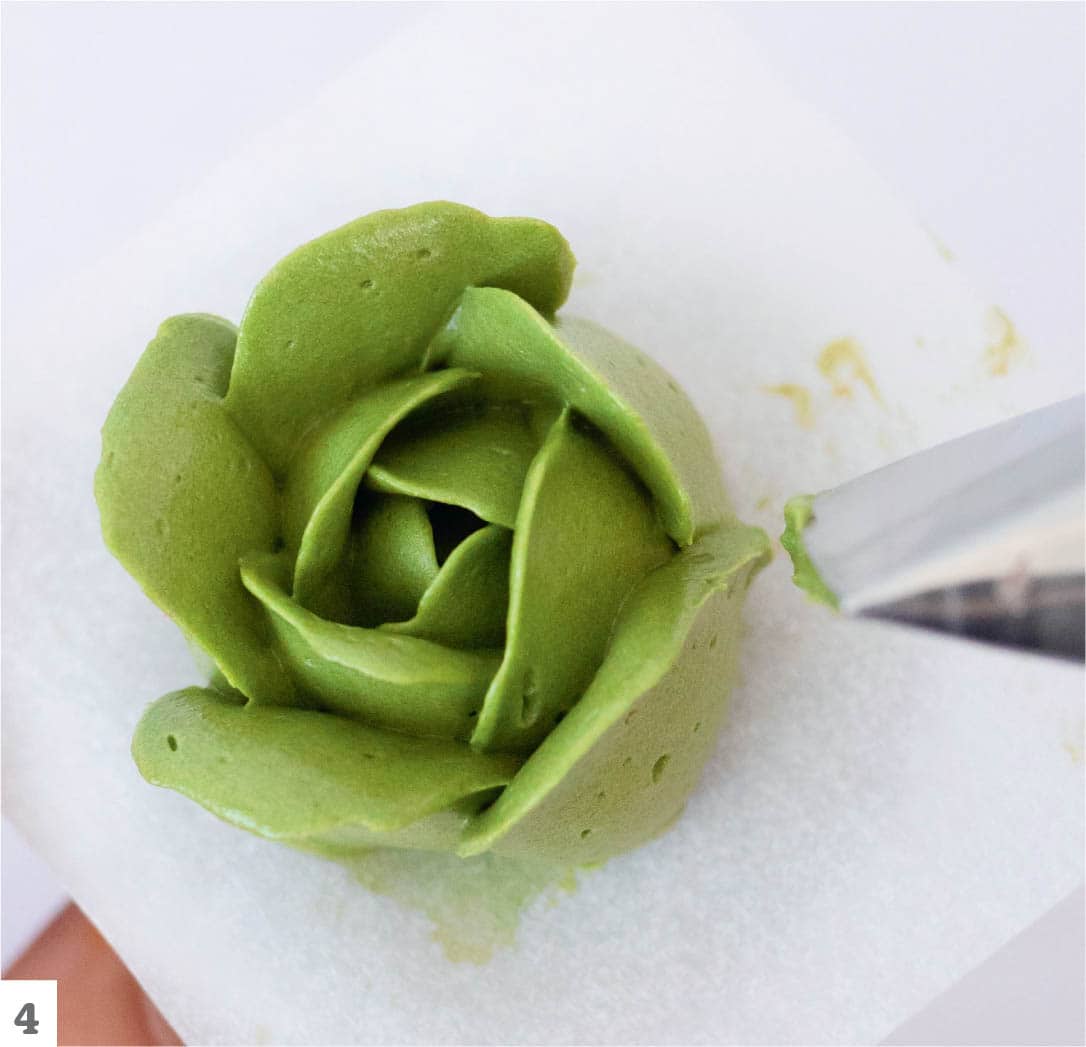
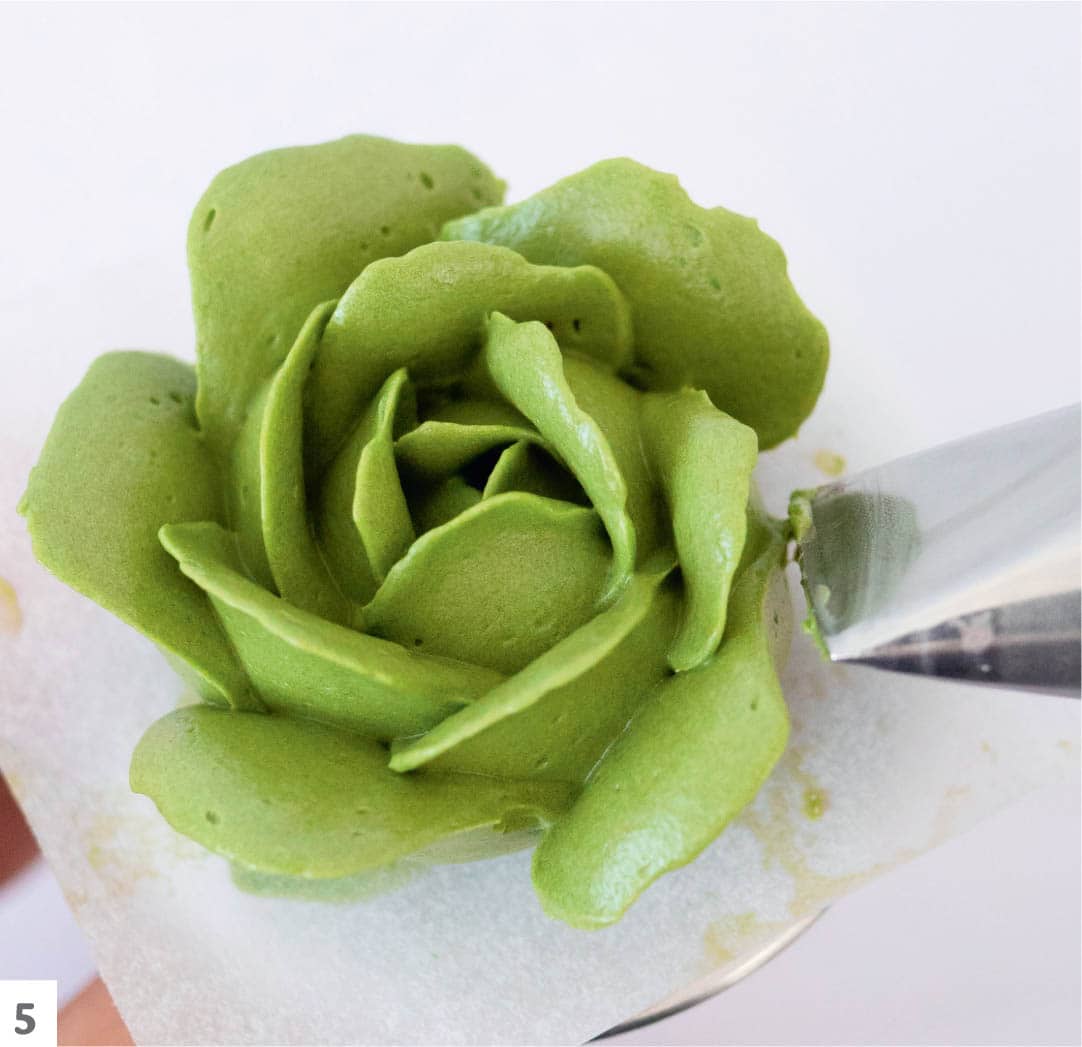
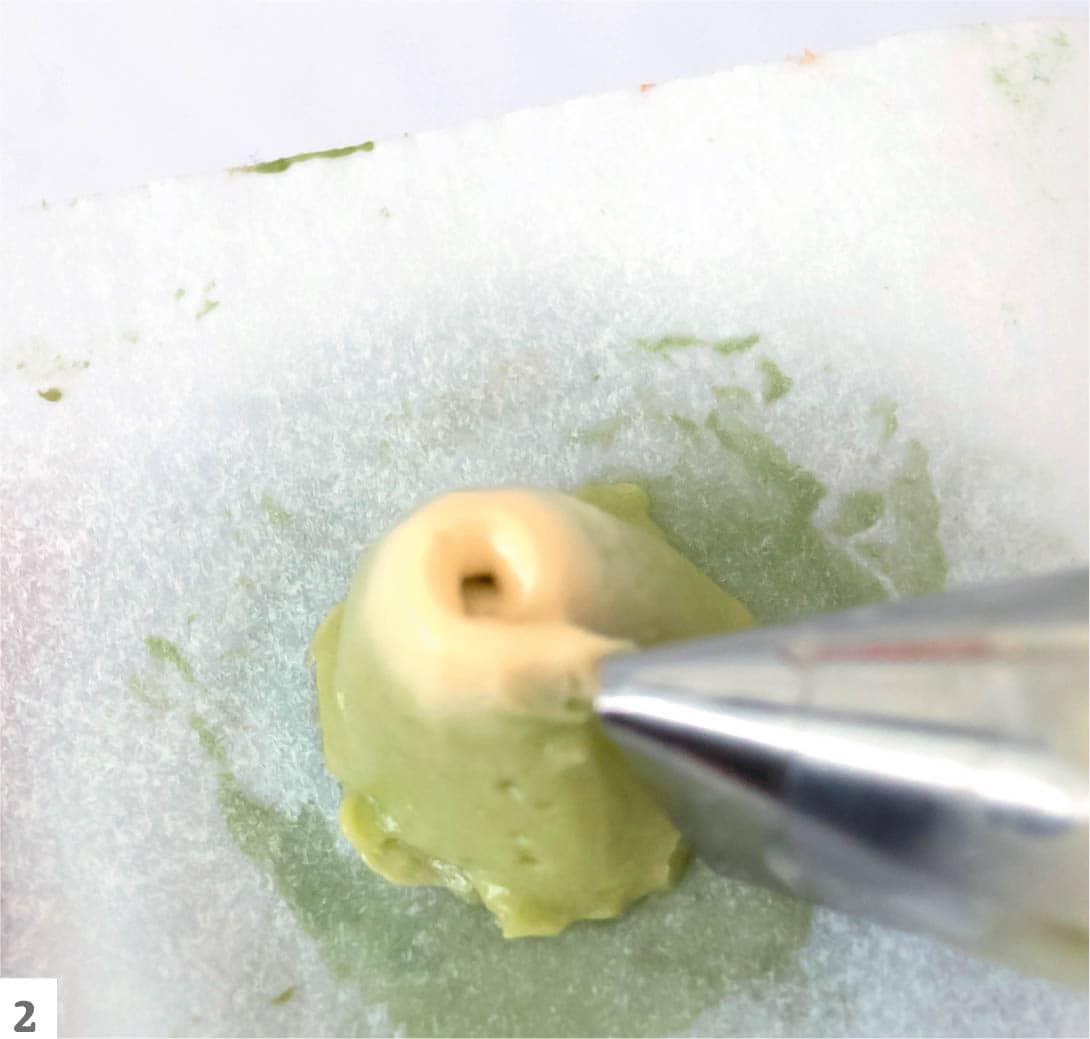
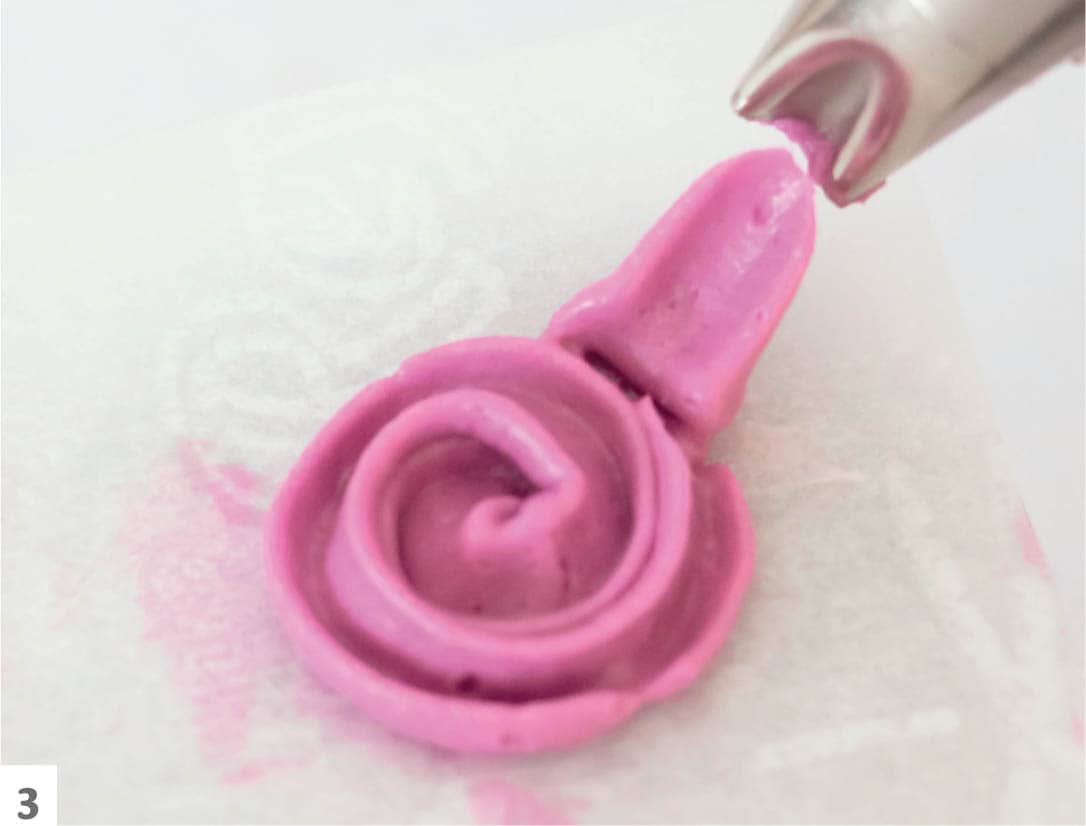
- 1Prepare a batch of burgundy colored buttercream. Fit a piping bag with the #125K or #125 petal tip and fill it with the buttercream.
- 2Create a cone-shaped base on the flower nail. Hold the piping bag at a 45-degree angle, squeeze firmly, then gradually release pressure and pull upward to create a conelike shape that is wide at the base and narrow at the top. The base should be no larger than ½" (1.3 cm) high. A taller base will result in a top-heavy structure that will be difficult to control, leading to the flower toppling over midway through the process. Every petal will sit on this base, which will give the flower its shape and the impression of it opening or unfurling.

- 3Starting near the top of the cone-shaped base, squeeze the piping bag, rotate the flower nail, and wrap a ribbon of buttercream around the top. This is the center of the rose, and it should look like a spiral. If the center appears to lack definition, wrap another ribbon again until a spiral is achieved.

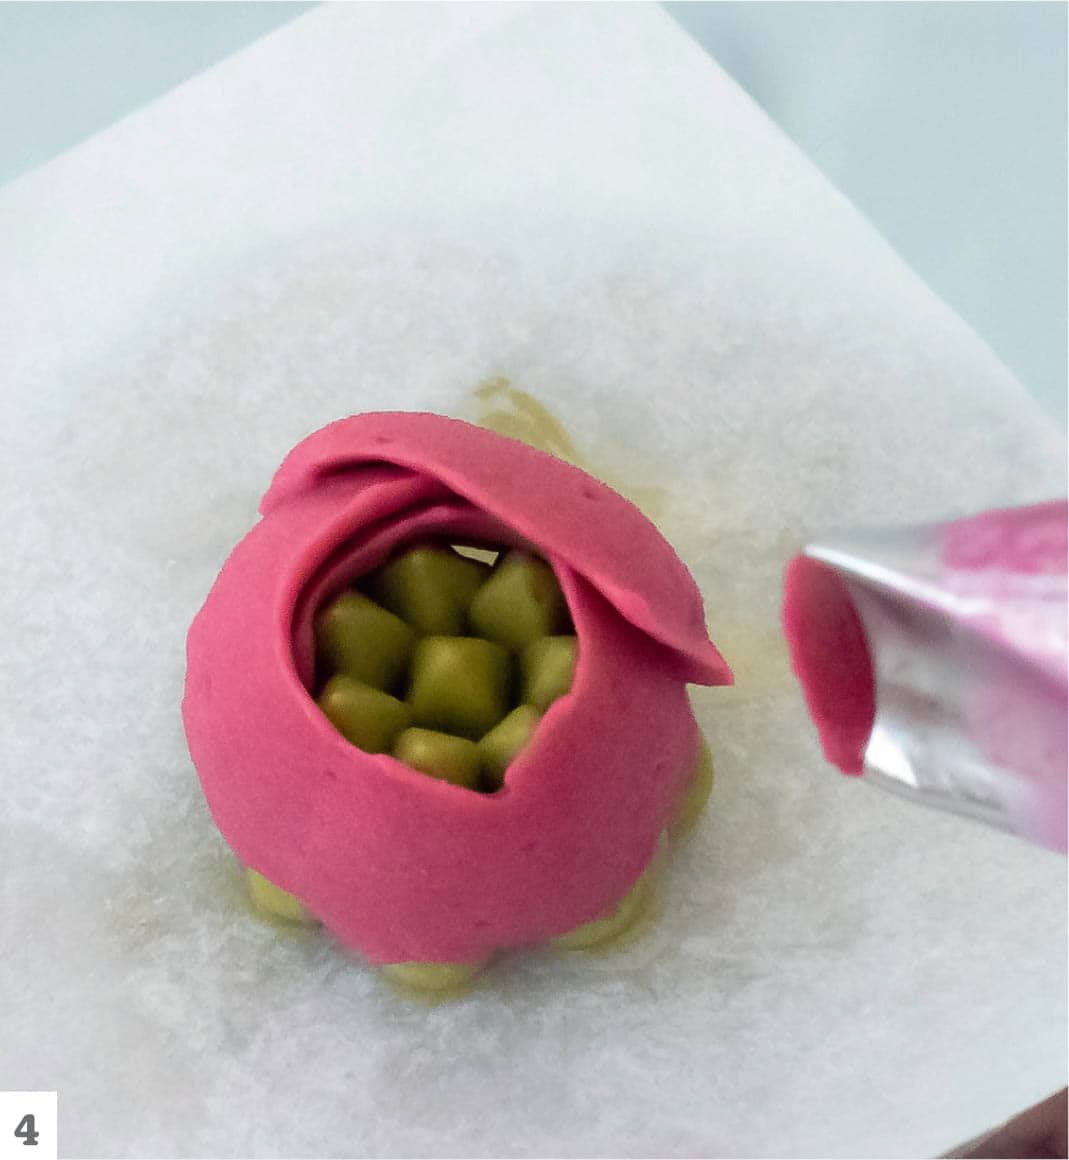
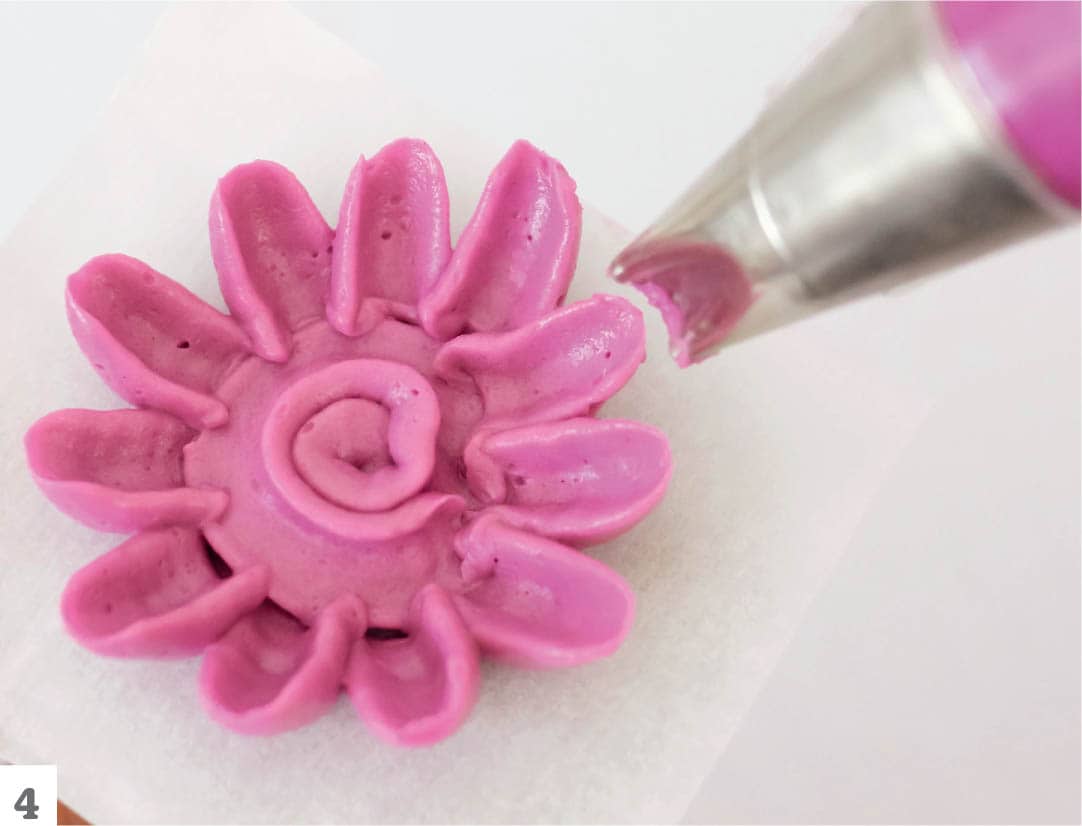
- 4Begin the first sequence of petals. Create a single arced petal that takes up no more than one-third of the space around the spiraled center.
- 5Make two more petals the same way. Viewing the rose from the top it should appear triangular, not round, and the center spiral should be clearly visible.

- 6Pipe a second layer of arced petals, this time angling your piping bag outward slightly to create three more slightly overlapping petals. This set of petals should be offset from the first so the petals aren’t layered on top of each other.
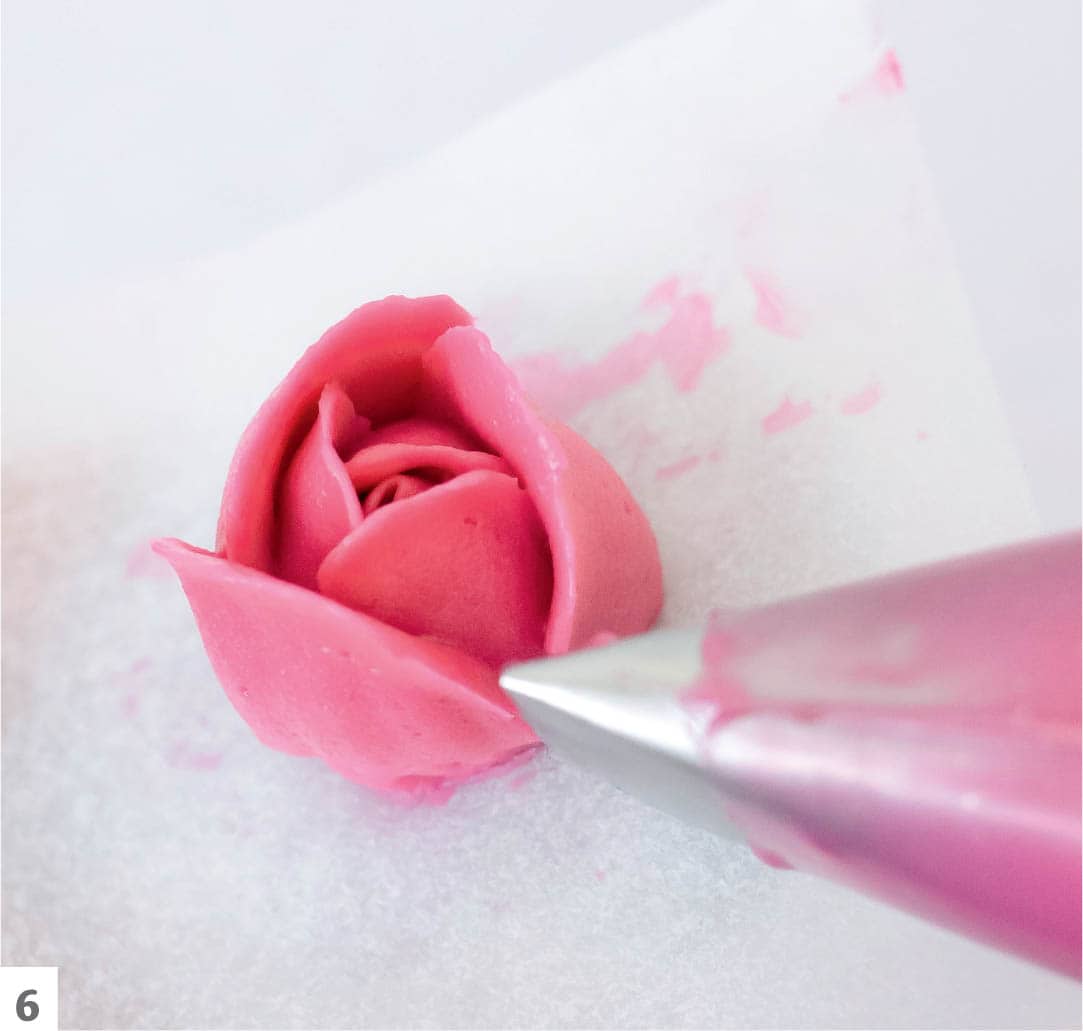
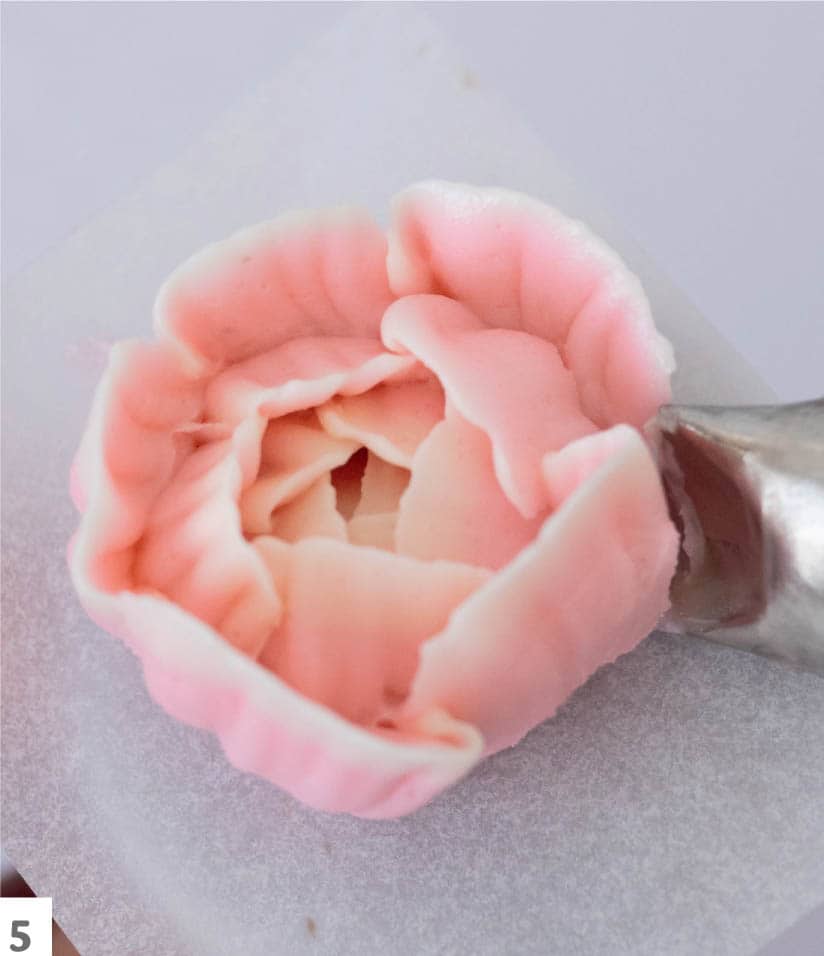
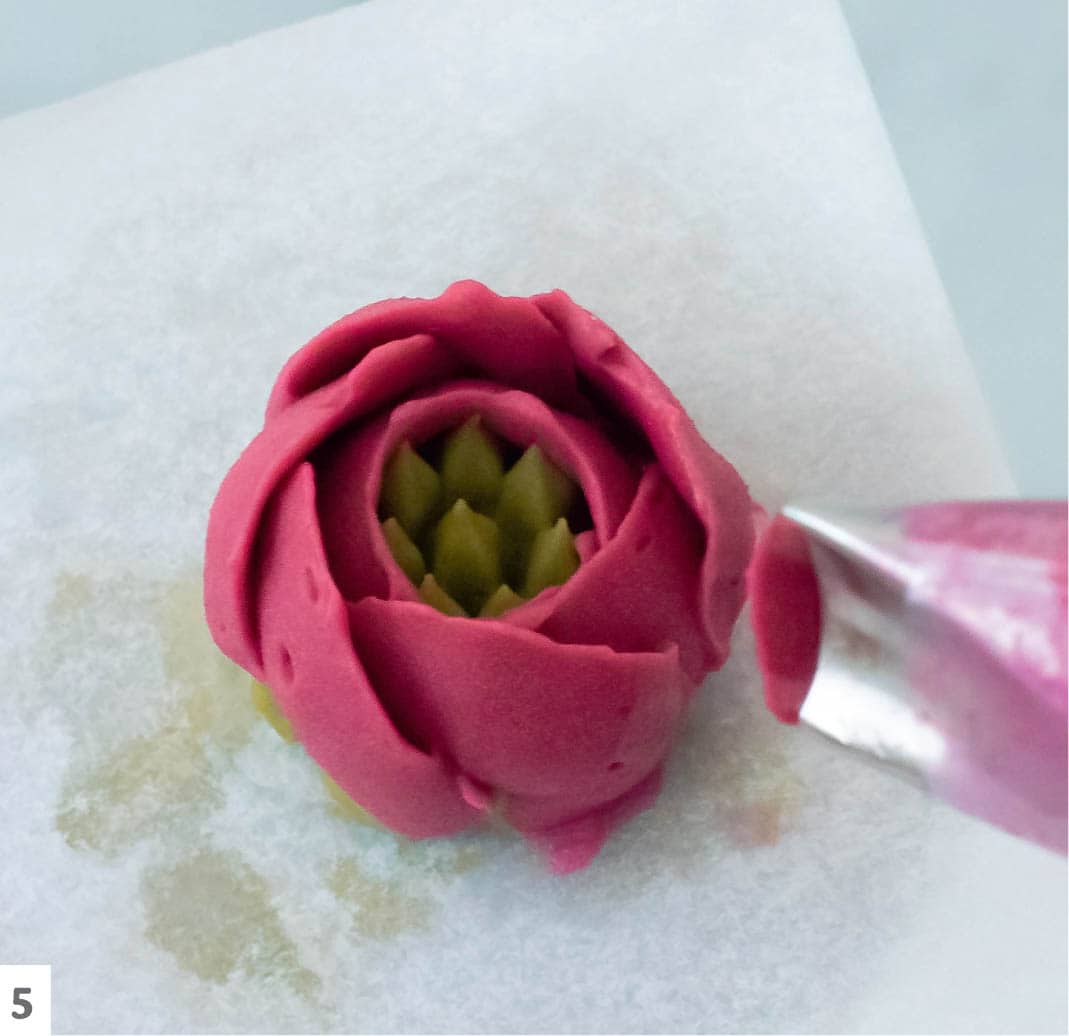
- 7Repeat step 6, this time creating five petals and angling the piping bag even farther outward. This angle should be almost parallel with the flower nail. If the petals are flopping over, remove them and apply firmer pressure while piping the rose petals. Using firmer pressure deposits more buttercream, making the petals a little thicker and with a stronger structure. Make sure the new petals come in contact with the base or previously piped petals so they’re stable.

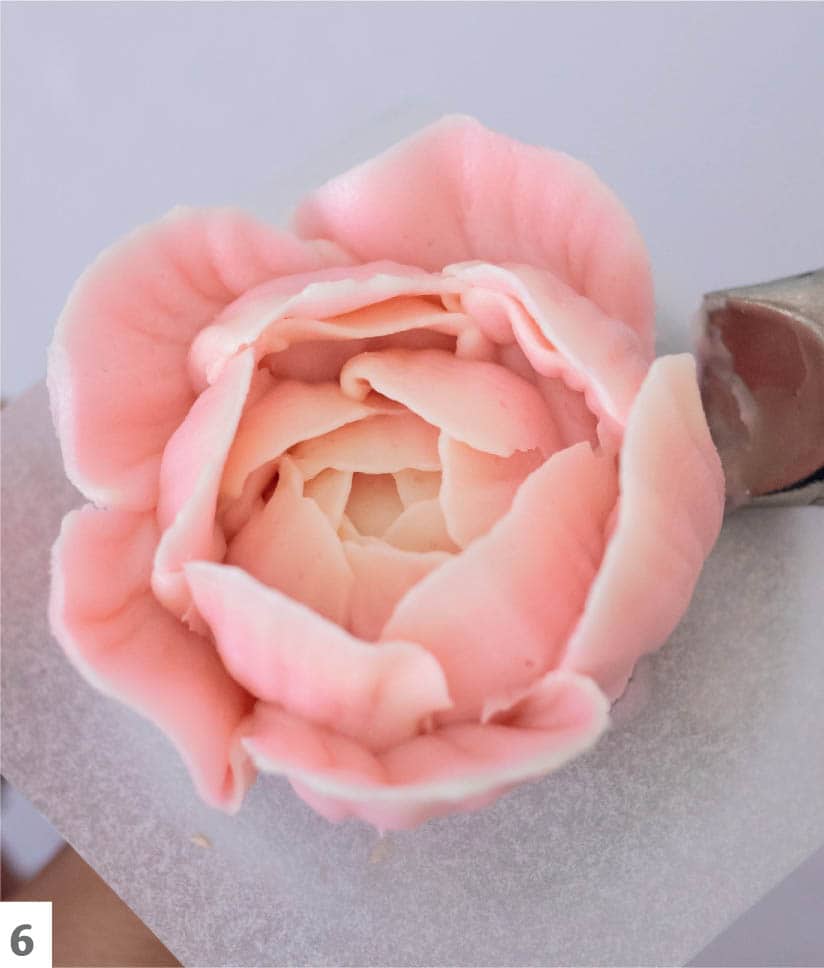
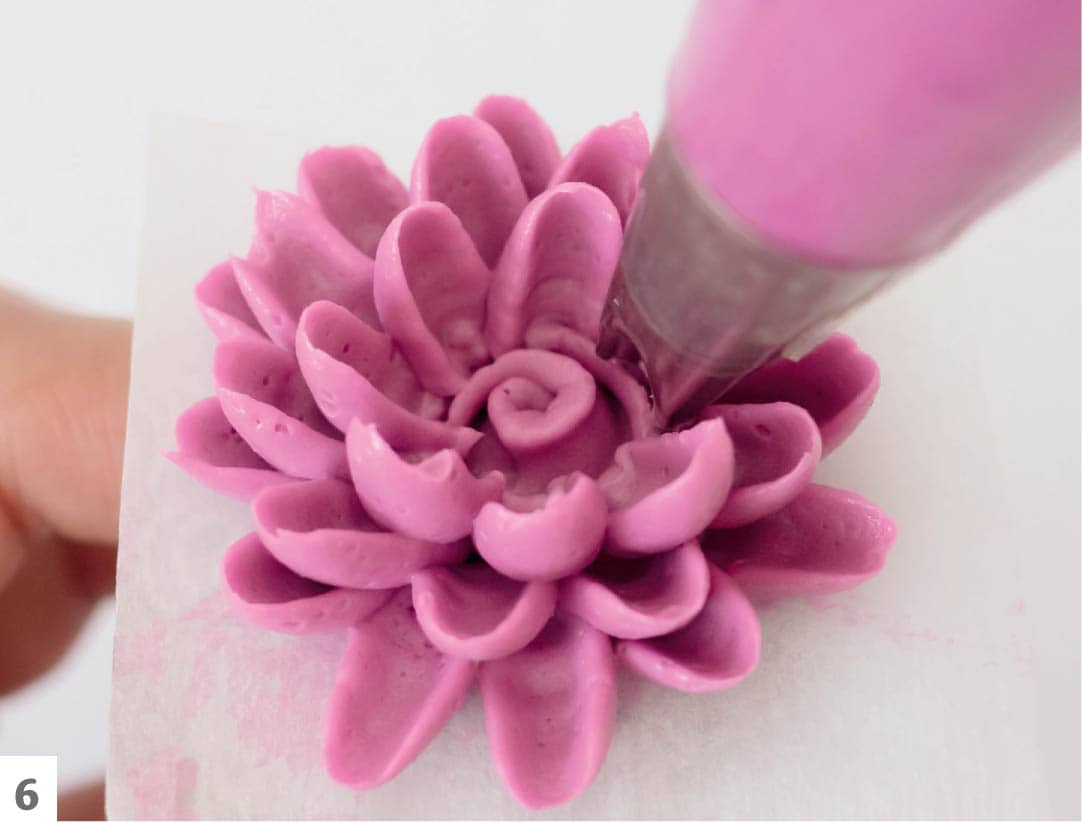
- 8Repeat step 7 with a second set of five petals. Note that as you go, you’ll need to angle the piping tip even farther outward, until it’s almost parallel with the flower nail. As an option, add a third set of five petals for a larger, voluminous rose (see the finished rose, here).


◁ Peony
The peony is a glorious and showy flower. Peonies are much like roses in their structure but with amplified volume and a striking presence. Peonies begin with tight overlapping petals and gradually expand to reveal their voluminous, ruffled form. These are great standalone flowers, so a single peony can be added to any arrangement as a focal point or to showcase alone. They also collaborate well with other ruffled flowers such as garden roses or botanicals with a contrasting structure such as echeveria and ranunculus. You’ll use a curved petal tip for this flower, which allows the petal and overall shape to form organically.
- 1Prepare a batch of colored buttercream. Fit the piping bag with the piping tip and fill it with the buttercream. Pipe a mounded base on the flower nail (see here). Squeeze the piping bag and rotate the flower nail to create the mound. This will serve as the majority of the peony’s volume.

- 2Starting from the top of the mound, tilt the piping tip inward and pipe a short, arced petal, allowing the petal to rest against the mound.
- 3Repeat step 2, creating more short, arced petals. Allow each to overlap and continue all the way around the mound until you’ve piped three or four rows of petals (a). Keep the piping tip angled inward as you go. The center of the peony should look very similar to a tight ranunculus (b) (see here).
- 4To create the middle petals of the peony, angle the piping tip slightly outward. Pipe an arced petal (similar to the classic rose, here), but jiggle your wrist as you pipe to produce a ruffled petal. This petal should take up approximately one-fifth of the outer perimeter, and the inner mound of petals should still be clearly visible.

- 5Repeat step 4, creating a total of five ruffled petals surrounding the inner mound of tight petals.
- 6Repeat step 5, piping another five ruffled petals and angling the piping tip even farther outward. The gradual angling of the piping tip is vital to the shape of the peony, helping it resemble the flower in bloom.
- 7Repeat step 6 and continue adding three to four more outer layers of petals (see the finished flower, here). As you pipe, angle the piping tip even farther outward, until it is almost parallel with the flower nail, to create the petal shapes. If the petals flop over, remove them and apply firmer pressure while re-piping the petals. The new petals should touch the base or previously piped petals so they’re stable.
◁ Ranunculus
The ranunculus, also known as buttercup, is a bloom with tightly packed petals and a charming, round shape. These flowers can be found in shades of cream, pale yellow, peach, vibrant pink, orange, and purple. The ranunculus complements almost any flower in an arrangement and pairs perfectly with roses, peonies, and dahlias.
Making the ranunculus requires three different piping tips: A large grass tip forms the textured base, a small round tip is used for the center accent, and a curved petal tip creates the flower’s rounded form.
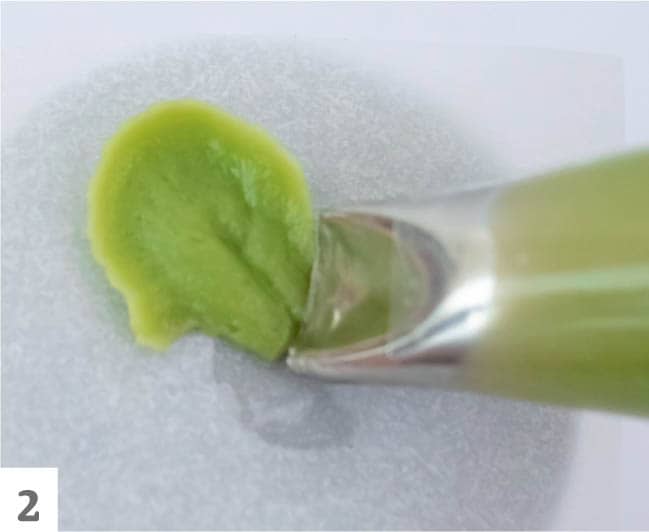
- 1Prepare batches of colored buttercreams. Fit one piping bag with the grass tip and fill it with the avocado buttercream, fit another with the curved petal tip and fill it with the burgundy buttercream, and fit another with the round tip and fill it with the juniper buttercream.
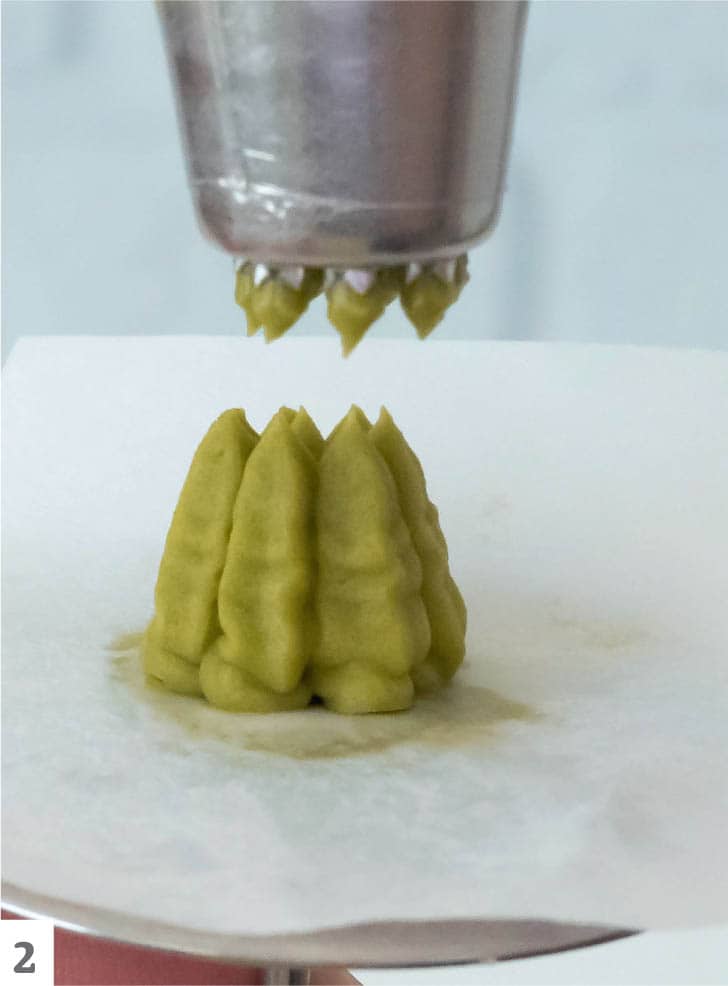
- 2Create the flower base upon which the petals will be built. Using the piping bag with the grass tip, pipe a small mound of buttercream on the flower nail.
- 3Build the flower center. Position the curved piping tip so the wide end is touching the flower nail and the narrow end faces upward. Squeeze the piping bag while simultaneously rotating the flower nail counterclockwise to wrap the base in a ribbon of buttercream. This serves as a barrier to prevent the next layers of petals from collapsing over the base and eclipsing the base color, as a little of that color should peek through.
- 4Begin piping the first layer of six petals. Squeeze the piping bag, arcing the tip as you make a single petal to cover about one-third of the center. Allow the petal to rest on the center. To pipe the second petal, begin at the middle portion of the first petal, repeating the same arced motion to create a similar petal that overlaps the first.
- 5Repeat step 4 for the remaining four petals until the first layer of ranunculus petals wraps completely around the center. For this portion, the sixth petal can meet with the edge of the first petal or overlap it. Because you’ll be adding outer petals, the juncture doesn’t have to be precise.
- 6Create a second layer of petals, repeating the arcing motions and overlapping petals from steps 4 and 5. This time, however, create seven petals with slightly wider arcs than the first set. Making wider petals is necessary because they’re layered on the base, the center, and the first set of petals.

- 7Repeat the petal sequence once more, this time creating a layer of eight slightly wider petals that wrap around the second layer. For this outer portion, the eighth petal should overlap the first petal of this sequence.
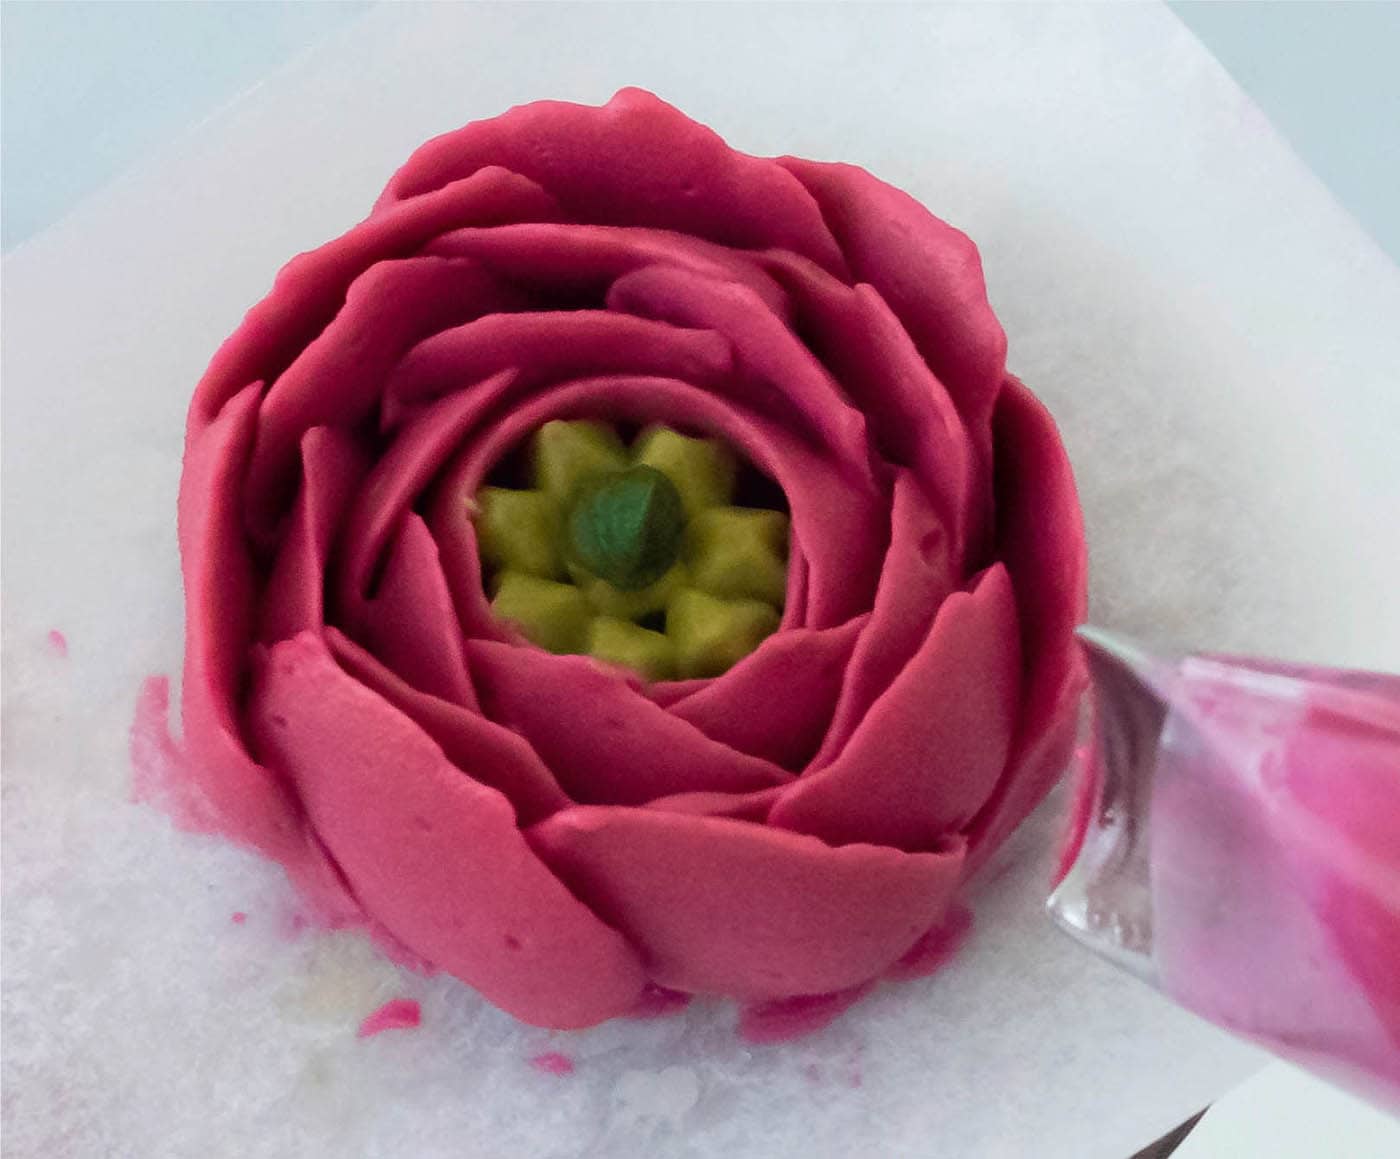
- 8To create a larger ranunculus, continue the overlapping petal sequence, adding nine petals (see the finished flower, here). The overall size of the ranunculus should not exceed 1¾" (4.5 cm) in diameter.
- 9When the ranunculus form is complete, add final touches to the center. Using juniper buttercream and the small round piping tip, pipe a slightly oblong pearl in the center of the flower, leaving as much of the base color showing as possible. This accent should emulate the button detail of an actual ranunculus, not fill the center of the flower (see the finished flower, here).

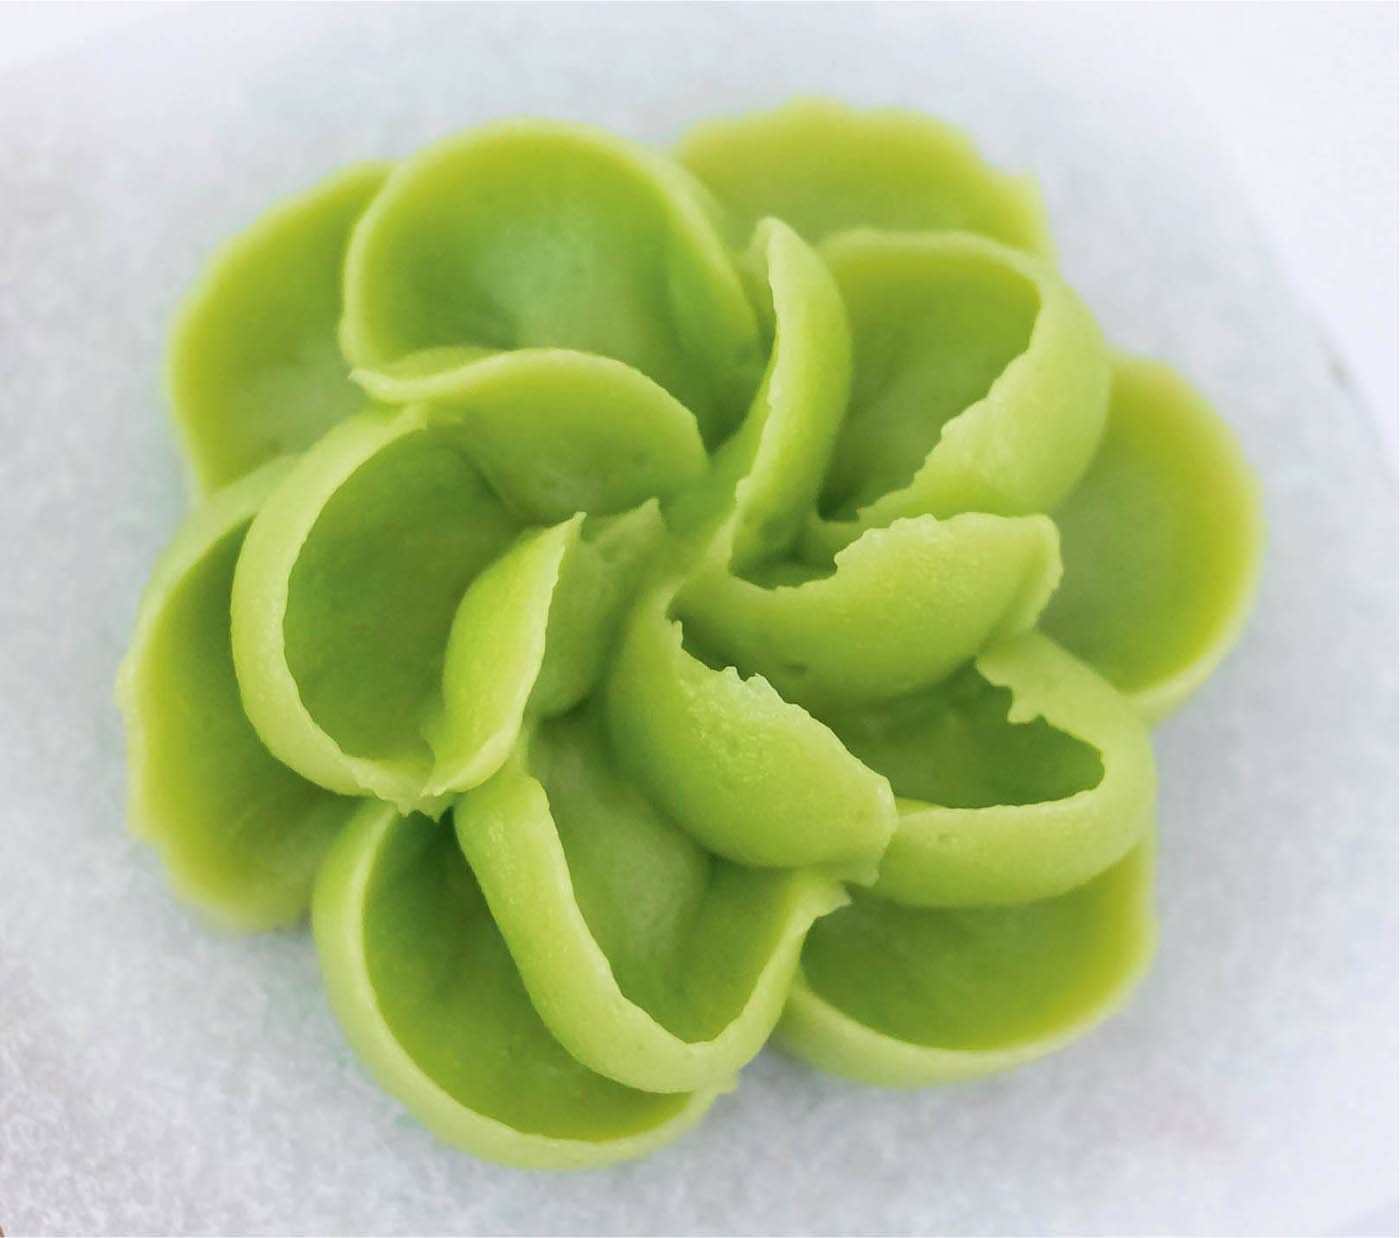
◁ Echeveria Succulent I
Succulents have made their way into the botanical buttercream arena in recent years. These plants add an unexpected, playful yet sophisticated element to any arrangement. Most succulents come in shades of green creating beautiful compositions on their own. They also fit in nicely with any grouping.
This echeveria succulent I has a similar structure to the classic rose and even uses the same petal tip.
- 1Prepare a batch of colored buttercream. Fit a piping bag with the #125 tip and the buttercream. Create a cone-shaped base on the flower nail. This base is where all the leaves of the echeveria will sit to create the succulent’s shape that gives the impression of “opening” or “unfurling.” Hold the piping bag at a 90-degree angle, squeeze firmly, and then gradually taper off the pressure and pull upward to create a conelike shape that is wide at the base and narrow at the top. This base should not exceed a height of ½" (1.3 cm). Too tall of a base will result in a top-heavy structure that will be difficult to control, leading to the succulent toppling over midway through the process.
- 2Begin the first sequence of leaves. Create a single arced leaf that takes up no more than one-third of the space around the base. Repeat to create a total of three leaves that slightly overlap each other.

- 3For the second sequence of leaves, repeat the arced leaves, this time angling the piping bag outward slightly, to create a total of six slightly overlapping leaves.
- 4Repeat the process once more with a sequence of six leaves, angling the piping bag even farther outward. This angle should be almost parallel with the flower nail. If you find the leaves flopping over, remove the fallen ones and apply a firmer pressure while repiping them. Make sure the new leaves come in contact with the base or existing leaves so they’re stable.
- 5If more volume is desired, pipe a third set of six leaves.

◁ Echeveria Succulent II
This echeveria variation is one of my signature buttercream botanicals. It is similar to its counterpart on this page but with an innovative twist in technique. Just a few simple adjustments make this version one of the most realistic and eye-catching buttercream succulents. These botanicals look great in single shades of green, but adding an accent color for the tips makes for an elevated presence.
Unlike with the first echeveria technique, you’ll flip the piping tip and use the widest part of the tip to create leaves that are thicker in appearance. This small trick gives the leaves a unique look.
- 1Prepare batches of green and ivory colored buttercreams. Fit a piping bag with a #125 tip and fill and stripe the piping bag with the two buttercreams (see here).
- 2Create a cone-shaped base on the flower nail (see here). This base is where all the leaves of the succulent will sit to create a shape that gives the impression of opening. Hold the piping bag at a 90-degree angle, squeeze firmly, and then gradually taper off the pressure and pull upward to create a conelike shape that’s wide at the base and narrow at the top. The base shouldn’t be higher than ½" (1.3 cm). If the base is too tall, the structure will be top-heavy and difficult to control, and the succulent may collapse during the process.
- 3To create the first series of leaves, position the piping tip so the widest end faces outward and the ivory color is on top. This will create thicker leaves than the ones you created for the echeveria succulent I (here). Pipe a single arced leaf that takes up no more than one-third of the area around the base.
- 4Repeat step 3 to create a total of three leaves that slightly overlap each other.
- 5Repeat the series of three more leaves, staggering their placement.

- 6Repeat steps 3 and 4 to create a third layer of arced leaves, but this time angle the piping bag outward slightly and pipe five slightly overlapping leaves.

- 7Pipe one to two more sequences of five petals, angling the piping bag even farther outward. This angle should be almost parallel with the flower nail. If some of the leaves flop over, remove them and apply firmer pressure while piping the leaves. Make sure the new leaves are touching the base of the existing leaves so they’re stable.
- 8To finish the succulent, use your index finger to tap the outer edge of each petal, then gently flick it outward. This creates a pointed edge for each leaf of the succulent, creating a realistic look. You may use your pinky finger for the smaller succulent leaves.

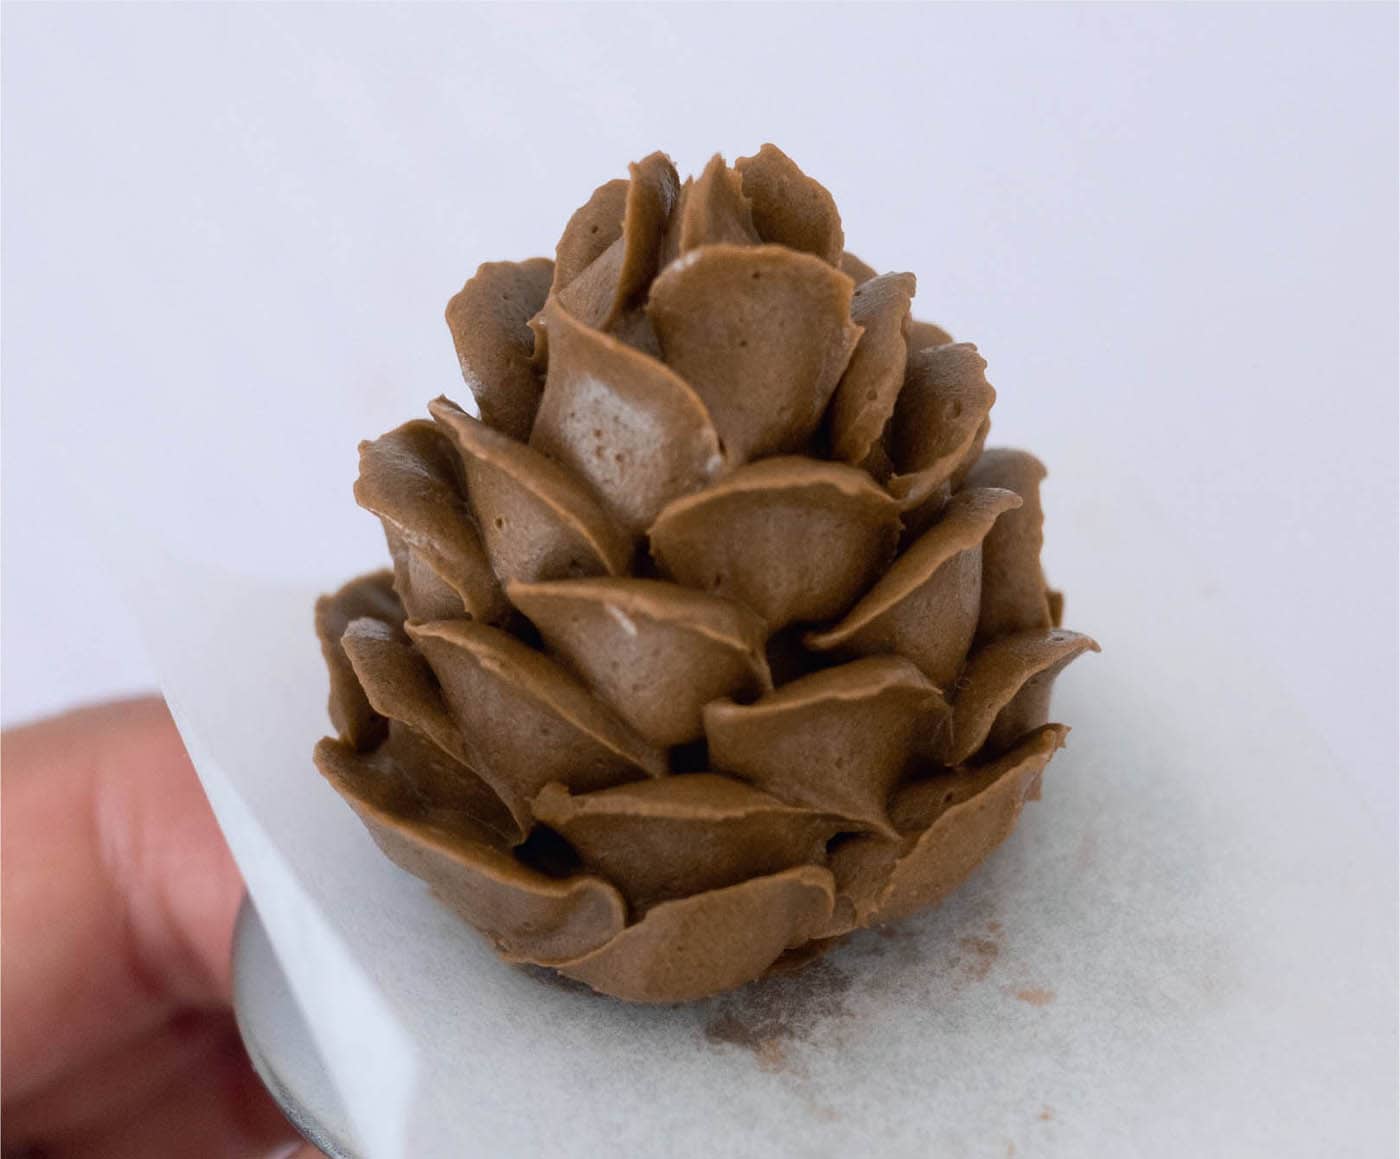
◁ Pine Cone
Pine cones are wonderful fall and winter botanicals that are perfect to display on their own in a variety of sizes or accompanied by other seasonal botanicals. Try pairing pine cones with sunflowers for an autumnal arrangement or with poinsettias and holly for a festive winter holiday bouquet.
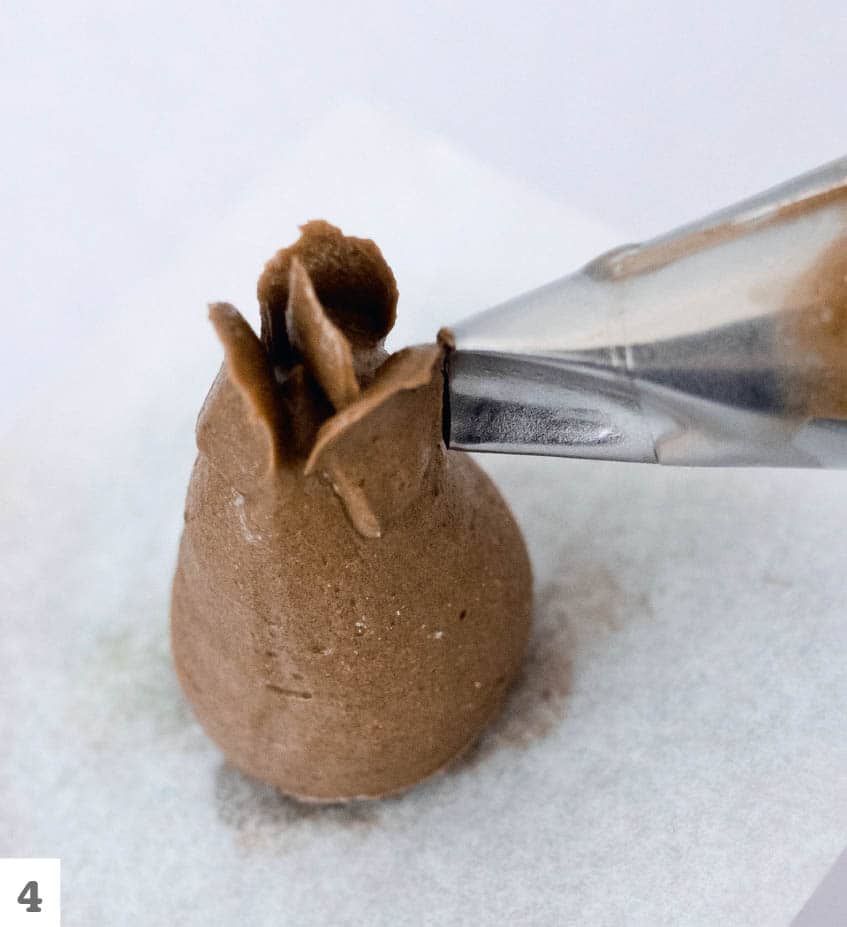
To create a pine cone, you’ll use two piping tips: one for the base and the other to pipe the scales, those petal-like elements attached to the center.
- 1Prepare a batch of colored buttercream. Fit one piping bag with a large round tip (or coupler without the ring attachment) and another with a small, curved petal tip and fill both with the buttercream.
- 2On a flower nail, create a cone-shaped base on which the scales will sit to create the pine cone’s signature form (see here). Hold the round-tip piping bag at a 90-degree angle, squeeze firmly, and gradually taper off pressure and pull upward to create a conelike shape that’s wide at the base and narrow at the top. The base should not be higher than 1½" (4 cm). A base that’s too tall creates a top-heavy structure that may cause the pine cone to fall during the piping process.

- 3Switch to the curved petal tip piping bag. With the narrow end facing straight up, pipe a single narrow scale at the very tip of the base. There is no need to use an arced motion this time as we are only creating a narrow width; the curvature of the petal tip creates the shape for us.

- 4Holding the bag at a 90-degree angle, move slightly down the base and pipe three scales that surround and support the single scale. The first scale should still be longer than the three right below it.
- 5Move down the cone-shaped base again and pipe five arced scales that surround the previous ring. Be sure to stagger placement of these five scales so the previous set of scales is visible.

- 6Continue moving down the base, piping rows of narrow scales and staggering their placement until the mound is covered in scales and resembles a pine cone. You will probably need four or five additional rows to almost complete the shape.
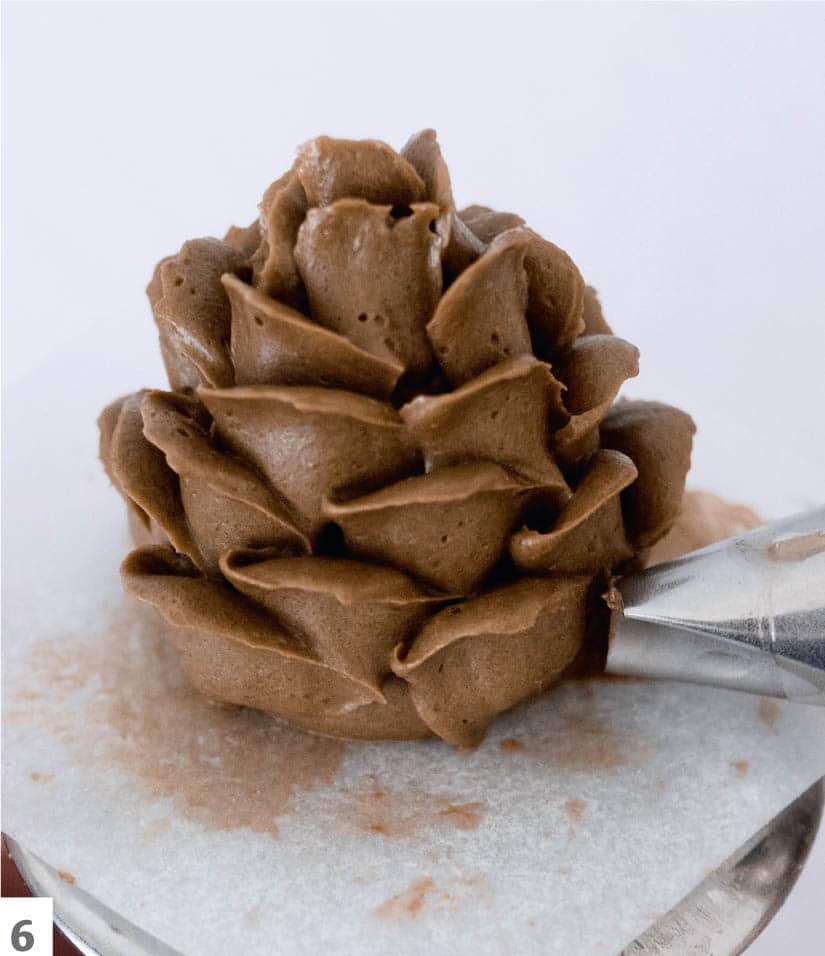
- 7For the final bottom row of scales, hold the piping bag at a 10- to 20-degree angle to complete the pine cone shape.

This cake is iced in soft pink with a horizontal texture (see here) and is paired with deep pink classic roses, flower buds, leaves, and nonpareils.
A festive stitched cake is adorned with pine cones, hellebores, and icy sugar snow.
◁ Chrysanthemum
With their compact, abundant petals and unique texture, chrysanthemums are great additions to arrangements that include botanicals that incorporate the blossom and rose techniques. The size is easily modified by adjusting the dimensions of the base. Chrysanthemums require U-shaped petal tips to achieve the right width and curvature.
- 1Prepare a batch of colored buttercream. Fit a piping bag with a #80 tip and fill it with the buttercream.
- 2Create a spiral base on the flower nail (see the spiral technique, here). Place the piping tip in the center of the flower nail while keeping the bag parallel to the nail and rotate the nail while simultaneously squeezing the piping bag, creating a spiral of buttercream. Pipe a spiraled base of about ½" (1.3 cm) in diameter.
- 3Hold the piping bag at a 10- to 20-degree angle from the flower nail with the U-shaped tip facing upward. Touch the piping tip against the outermost part of the spiral base and squeeze one petal onto the base. Apply pressure and gently pull the tip away, gradually releasing pressure and staying at a 10- to 20-degree angle.
- 4Shift the piping tip so it’s next to the first petal and repeat step 3, piping elongated petals around the perimeter of the base.
- 5Pipe another row of petals on top of the first set, starting slightly inward from the first row and releasing pressure at a 30- to 40-degree angle from the flower nail. Beginning with this second row, the number of petals will begin to decrease.

- 6Pipe a third tier of petals, this time releasing pressure while holding the bag at a 50- to 60-degree angle.
- 7Fill the flower center with two to four petals, holding the bag at a 70- to 80-degree angle from the flower nail to round out and complete the shape of the chrysanthemum (see the finished flower, here).

◁ Sunflower
With their large, textured centers and petals in shades of warm yellow, sunflowers are an expressive sign of late summer and autumn. Sunflowers are larger than some buttercream botanicals, so they work well as the focal point of an arrangement along with other autumnal accents, such as autumn leaves (see here) and branches (see here).
- 1Prepare batches of yellow and brown buttercreams. Fit one piping bag with the leaf tip and fill it with the yellow buttercream and fit the other with the star tip and fill it with the brown buttercream.
- 2Create a spiral base on the flower nail (see here). Holding the bag parallel to the flower nail, place the leaf tip at the center of the flower nail and rotate it while simultaneously squeezing the piping bag. Pipe a tight spiral base that’s about 1" (2.5 cm) in diameter.
- 3Starting from the outer perimeter of the base, touch the leaf tip against the base and squeeze one petal onto the base. Apply pressure to the piping bag and gently pull the tip away, gradually releasing pressure at a 0-degree angle to allow the petal to lie flat against the flower nail.
- 4Shift the piping tip so it’s next to the first petal and repeat step 3.

- 5Continue piping petals around the perimeter of the base.

- 6Pipe a second row of petals on top of the first set, making sure to start slightly inward from the first row and releasing pressure on the bag while holding it at a 10- to 20-degree angle. The second row should have fewer petals than the first row.

- 7Create the flower center using the piping bag fitted with the star tip and brown buttercream. Start from the outermost section of the center spiral and squeeze the piping bag to deposit a slightly flattened buttercream star. Follow the shape of the center to create a ring of stars.
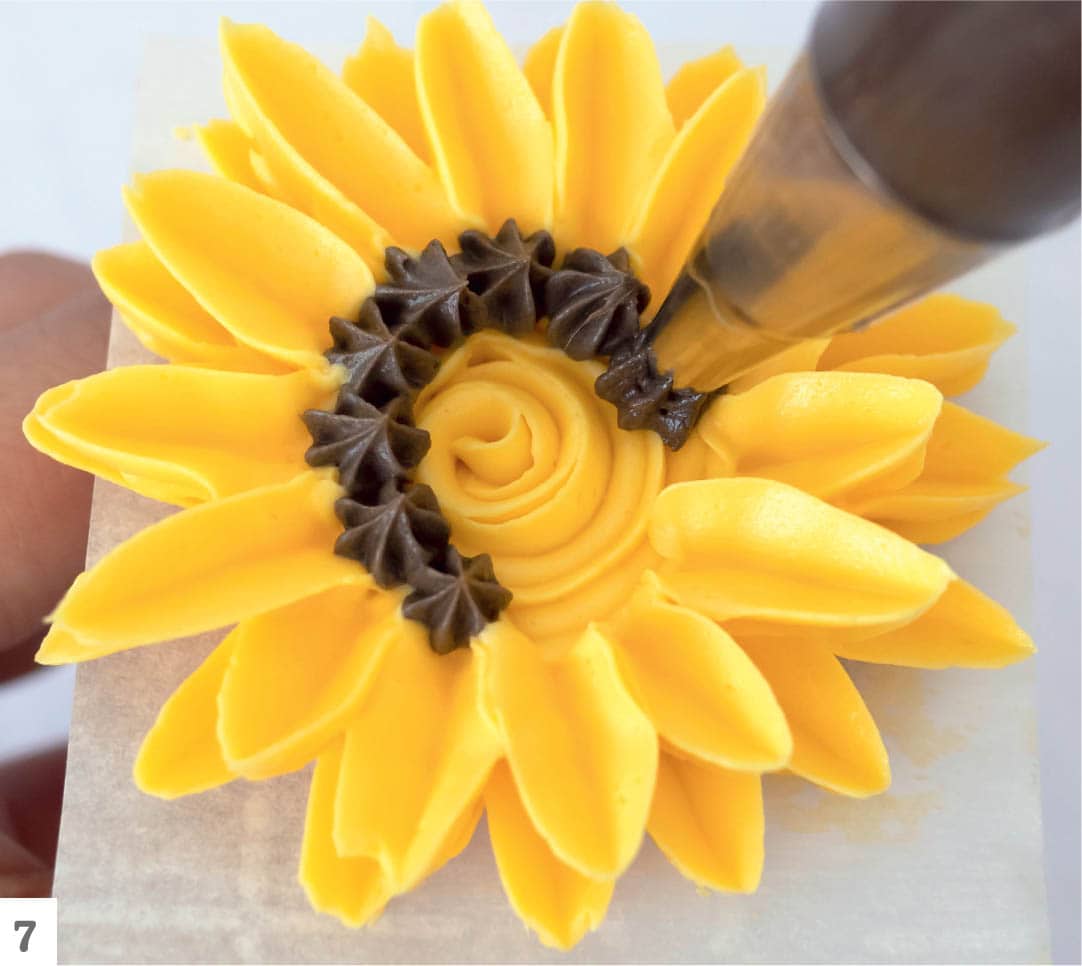
- 8Fill in the ring by placing more stars evenly in the center until it’s filled (see the finished flower, here).
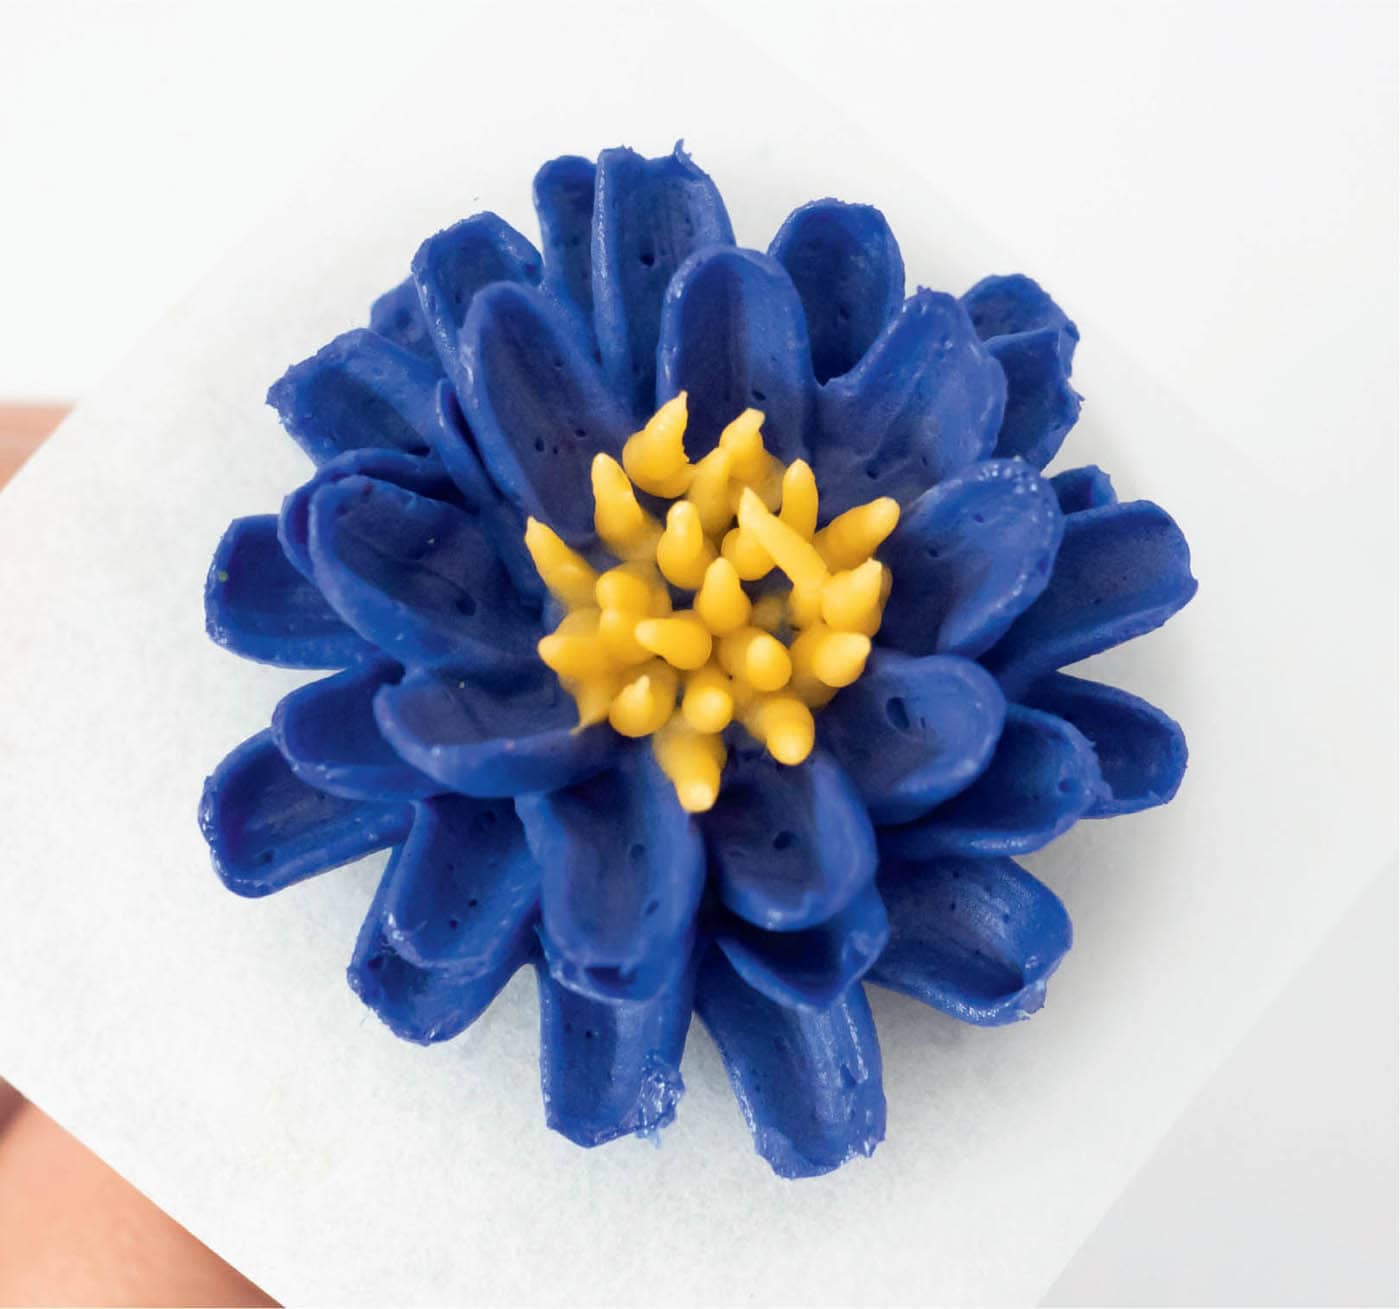
◁ Aster
Asters have a similar structure to chrysanthemums but feature open centers displaying contrasting stamens. Compact in size, but often very bold in color, asters are beautiful additions to compositions containing chrysanthemums or displays that need accents of texture and vivid color.
- 1Prepare batches of purple and blue buttercreams. Fit one piping bag with the U-shaped petal tip and fill it with the purple buttercream. Fit another piping bag with the small round #1 tip and fill it with the blue buttercream.
- 2With the U-shaped tip, create a spiral base on the flower nail (see here). Hold the piping bag parallel to the flower nail and place the piping tip in the center of the flower nail and rotate while simultaneously squeezing the piping bag to pipe a base about ½" (1.3 cm) in diameter.

- 3Starting from the outer perimeter of the base, touch the piping tip against the base and squeeze one petal onto the base. Apply pressure and gently pull the piping bag away, gradually releasing pressure while holding the bag at a 10- to 20-degree angle.

- 4Move the piping tip next to the first petal and repeat step 3, piping elongated petals around the perimeter of the base.

- 5Pipe a second row of petals on top of the first set, starting slightly inside the first row and releasing pressure on the piping bag while holding it at 30- to 40-degree angle. The second row should have fewer petals than the first row.
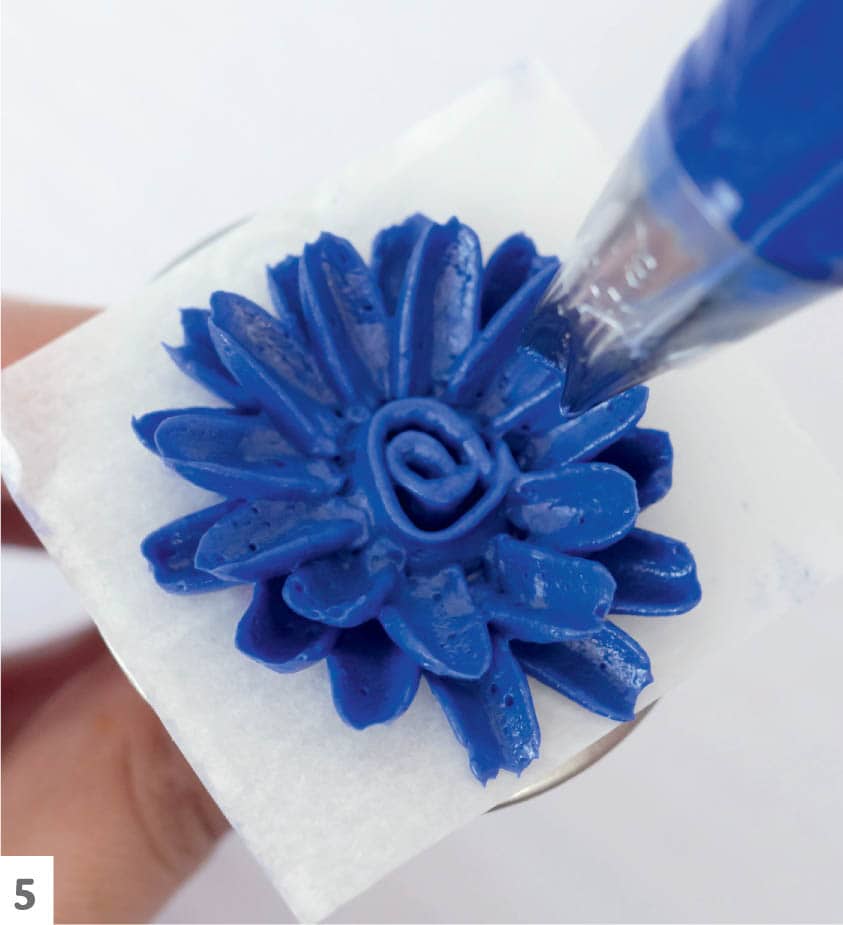
- 6Pipe a third ring of petals, this time releasing pressure on the bag while holding it at a 50- to 60-degree angle.
- 7To create the center stamens of the aster, use the bag fitted with the #1 tip. Place the tip in the center and squeeze while pulling upward to produce a single strand of icing. Repeat until the center is filled in.

◁ Sempervivum Succulent
Sempervivums are varieties of succulents with compact, pointed tips. Also known as semps and hens and chicks, these spiny succulents offer a distinctive texture to an arrangement. They pair well with other succulents or with any mixture of botanicals.
- 1Prepare a batch of colored buttercream. Fit a piping bag with the leaf tip and fill it with the buttercream. Create a spiral base on the flower nail (see here). Hold the piping bag parallel to the flower nail and place the tip at the center of the flower nail and rotate the nail while squeezing the piping bag. Pipe a base about ½" (1.3 cm) in diameter.

- 2With the piping bag held at a 90-degree angle to the flower nail, pipe a single leaf at the center tip of the base. Squeeze the piping bag and pull upward, gradually tapering off the pressure. This will produce a single leaflike shape that stands upright.

- 3While continuing to hold the piping bag at a 90-degree angle, pipe three leaves to surround (and support) the single leaf. The first leaf should be longer than the other leaves.
- 4Move the piping tip out from the existing group of leaves and pipe five narrow leaves that surround the existing leaves, holding the piping bag at a 60- to 70-degree angle.
- 5Move down the base, piping rows of narrow leaves and staggering them so one is not directly behind another. Continue piping until the base is surrounded with leaves. You will likely need four or five rows of leaves to almost complete the shape.

- 6Pipe the final bottom row of leaves while holding the piping bag at a 10- to 20-degree angle to complete the sempervivum shape.
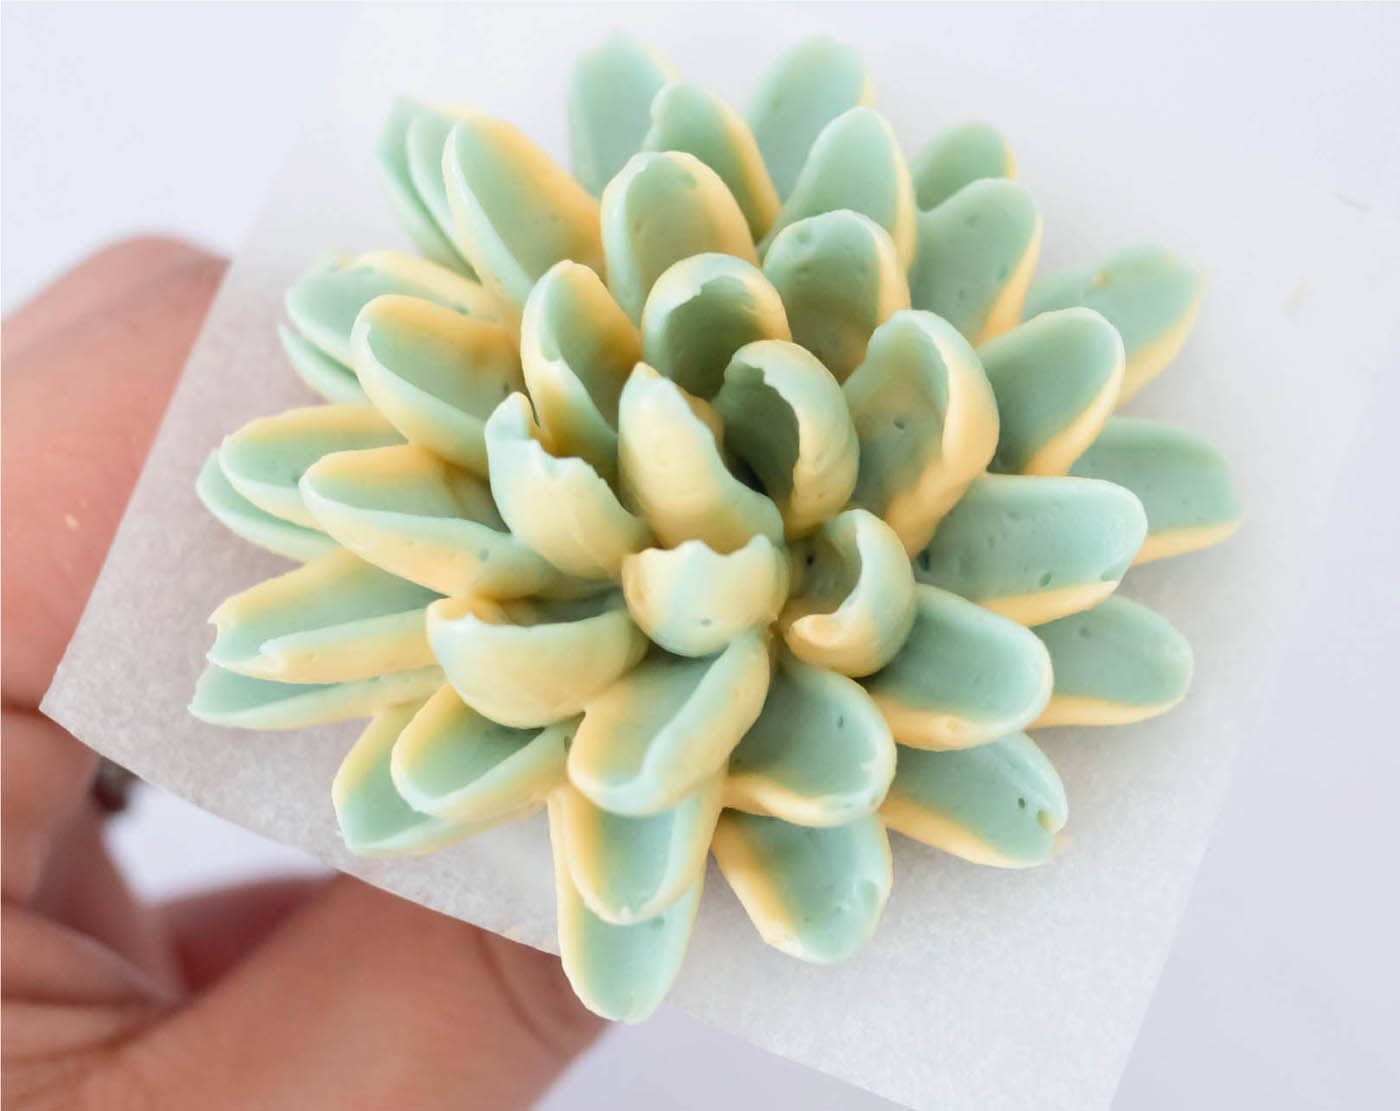
◁ Agave Succulent
Agave plants are a large variety of succulent, with rows of upward-facing leaves. Their colors are often subdued shades of green or silvery blue, sometimes variegated or accented with shades of ivory or soft yellow along the leaves. The structure of this agave incorporates the piping techniques of a chrysanthemum (see here). By using a two-toned buttercream, you’ll create soft, silvery blue leaves accented with ivory on the outer edges to mimic the look of a variegated blue agave.
- 1Prepare batches of blue and black buttercreams. Fit a piping bag with the U-shaped tip. Fill and stripe the piping bag with the two shades of buttercream (see here).
- 2Create a spiraled base on the flower nail (see here). Hold the piping bag parallel to the flower nail, place the piping tip at the center of the flower nail, and rotate the nail while simultaneously squeezing the piping bag. Pipe a base about ½" (1.3 cm) in diameter.
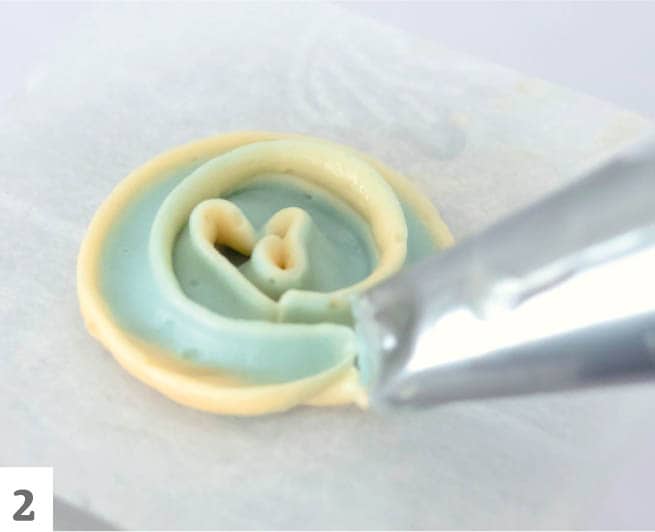
- 3Starting from the outer perimeter of the base, touch the piping tip against the base and squeeze one leaf onto the base. The curved part of the piping tip should be touching the flower nail while the ends should be pointed upward. Apply pressure to the piping bag as you gently pull it away, gradually releasing pressure while holding the bag at a 10- to 20-degree angle.

- 4Shift the piping tip so it’s next to the first leaf and repeat step 3, piping elongated leaves around the perimeter of the base.

- 5Pipe a second row of leaves on top of the first set, starting slightly inside the first row. As you pipe, release pressure on the piping bag while holding it at a 30- to 40-degree angle. This row will have fewer leaves than the previous one.
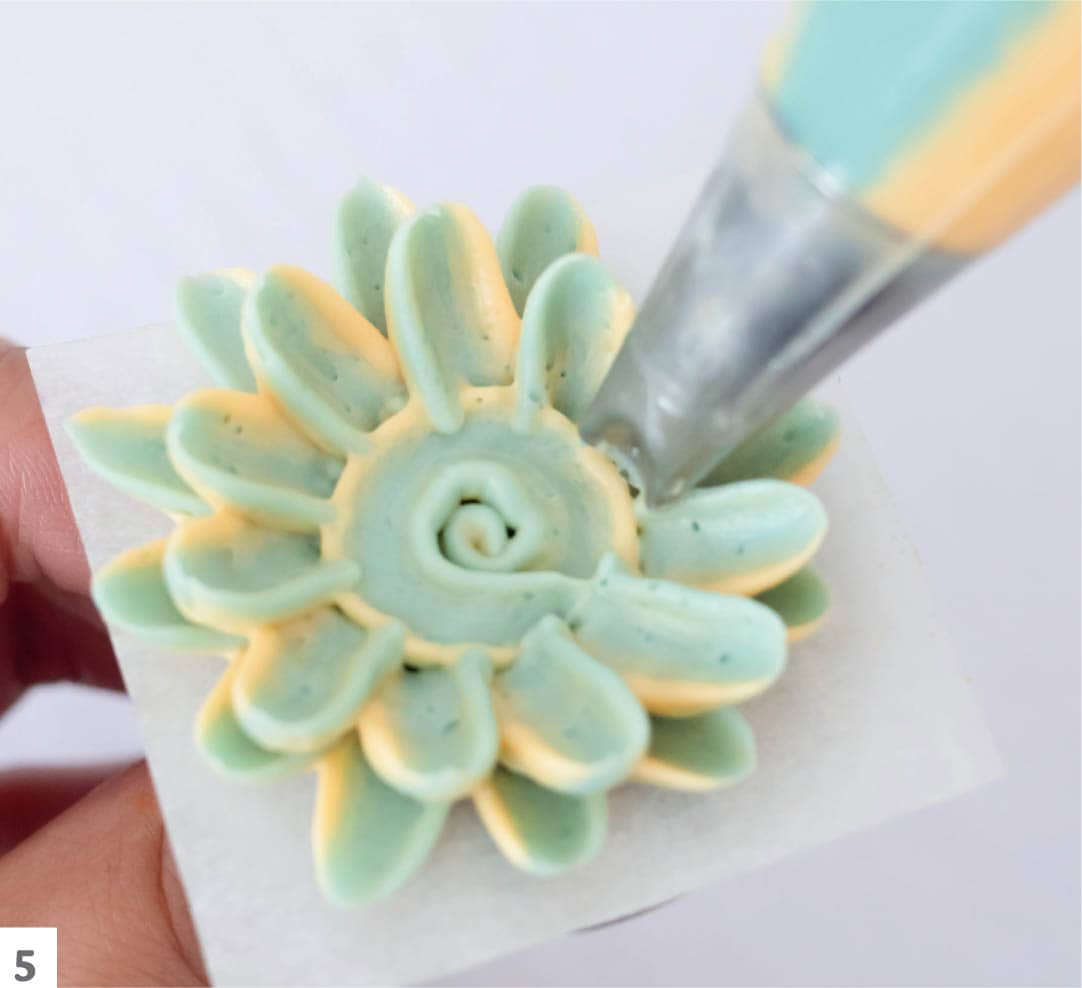
- 6Pipe a third row of leaves, this time releasing pressure on the bag while holding it at a 50- to 60-degree angle.

- 7Once the third layer of leaves is complete, fill in the center with two to four leaves, holding the piping bag at a 70- to 80-degree angle to round out and complete the shape of the agave.

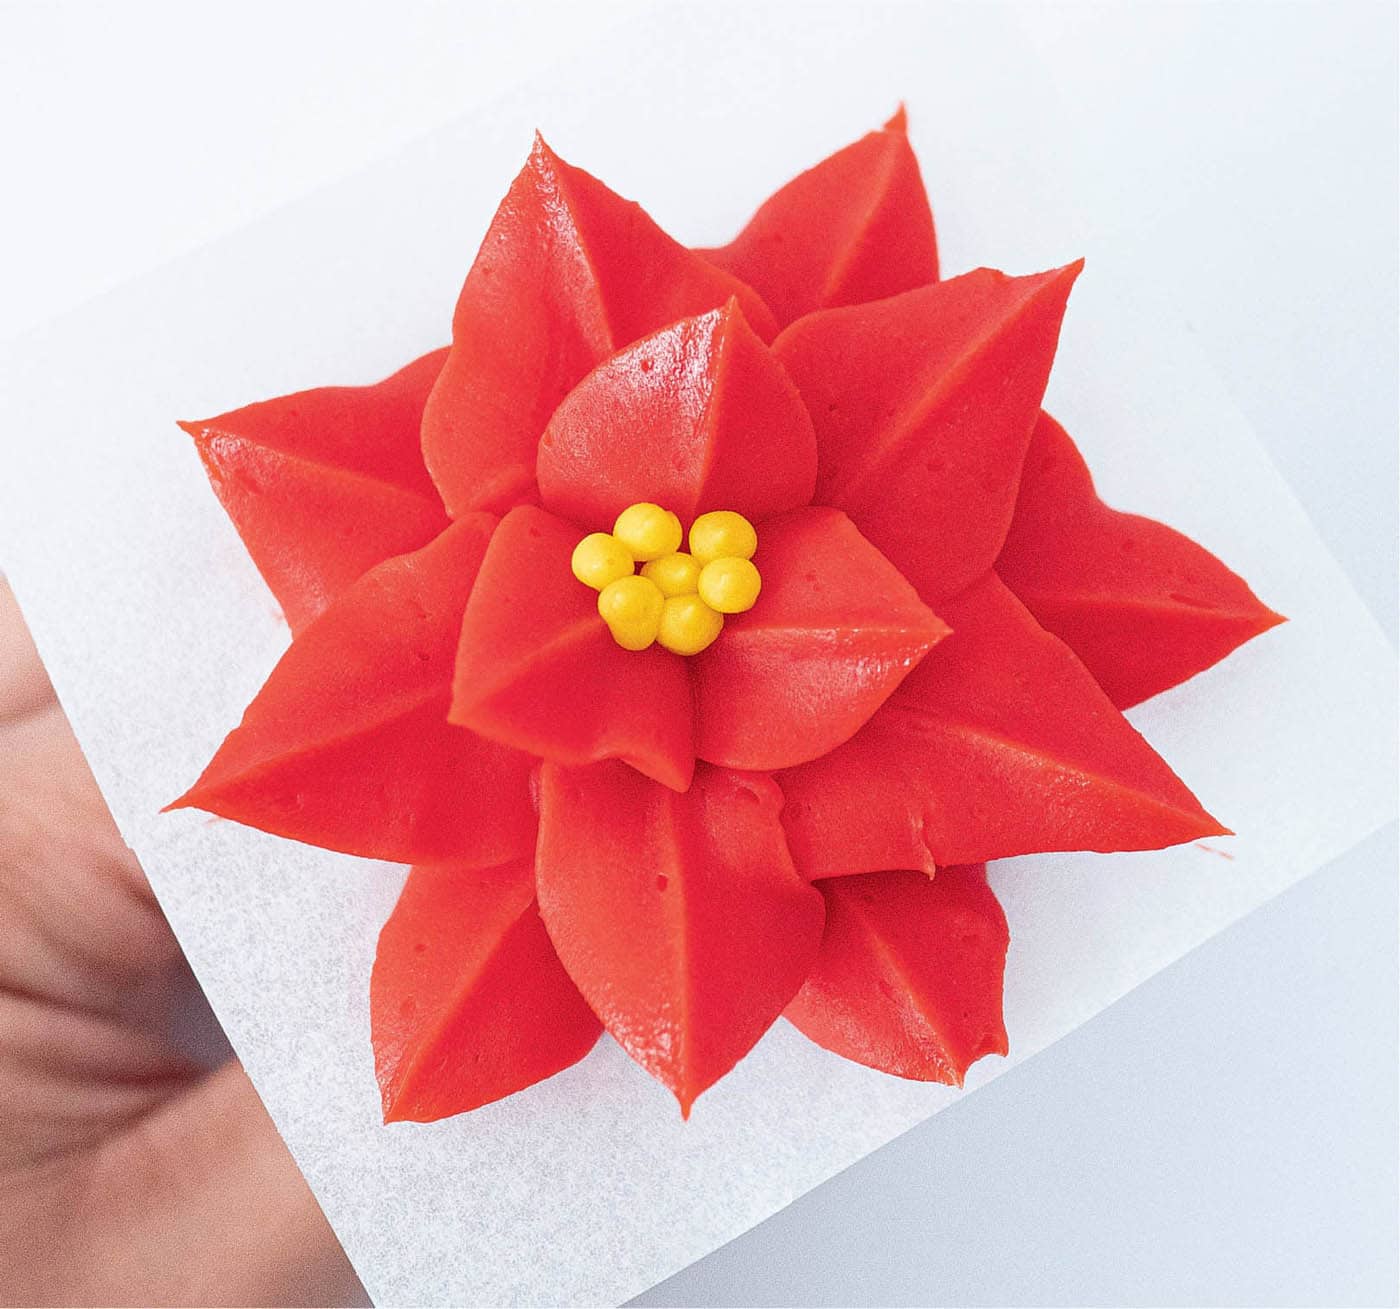
◁ Poinsettia
The showy and unmistakable poinsettia is known for its bold red and green foliage and is most often used in winter and Christmas displays. Although poinsettias are commonly found in red, they can also have light red, pink, or cream foliage. Poinsettias are usually the star of the show, but they also pair wonderfully with other winter elements, such as pine cones (here), branches (here), and icy sugar snow (here).
- 1Prepare batches of red and gold buttercreams. Fit one piping bag with the large leaf tip and fill it with red buttercream. Fit another piping bag with the small round tip and fill it with the gold buttercream. With the red buttercream, create a flat, spiral base on a flower nail (see here). Hold the piping bag parallel to the flower nail and place the leaf piping tip at the center of the flower nail and rotate the nail while simultaneously squeezing the piping bag. Pipe a base about 1" (2.5 cm) in diameter.

- 2Starting from the outer perimeter of the base, touch the piping tip against the base and squeeze one petal onto the base. To make sure that the piping tip is oriented correctly, position the piping bag so that the most prominent points of the piping tip are touching the flower nail and top of the spiraled base. Apply pressure to the piping bag as you gently pull it away, gradually releasing pressure while holding it at a 0-degree angle. This allows the petal to lie flat against the flower nail.
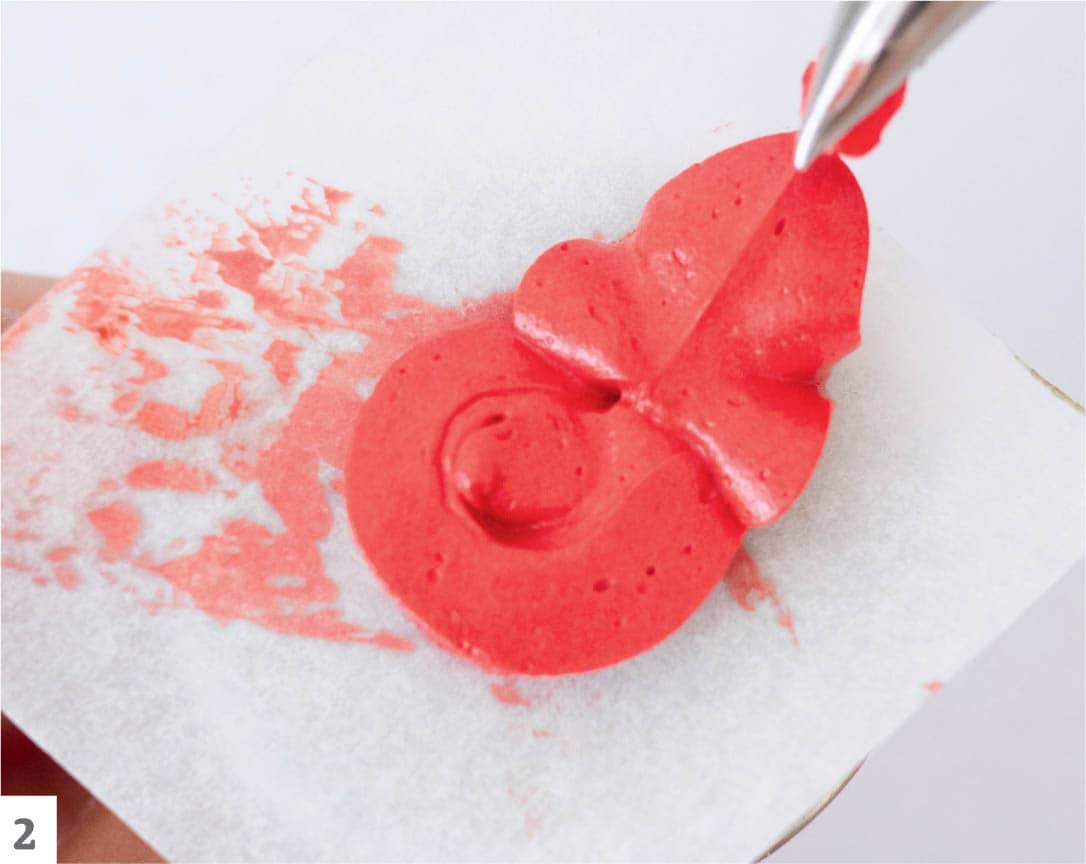
- 3Move the piping tip next to the first petal and repeat step 2. Continue piping, creating five petals around the perimeter of the base.
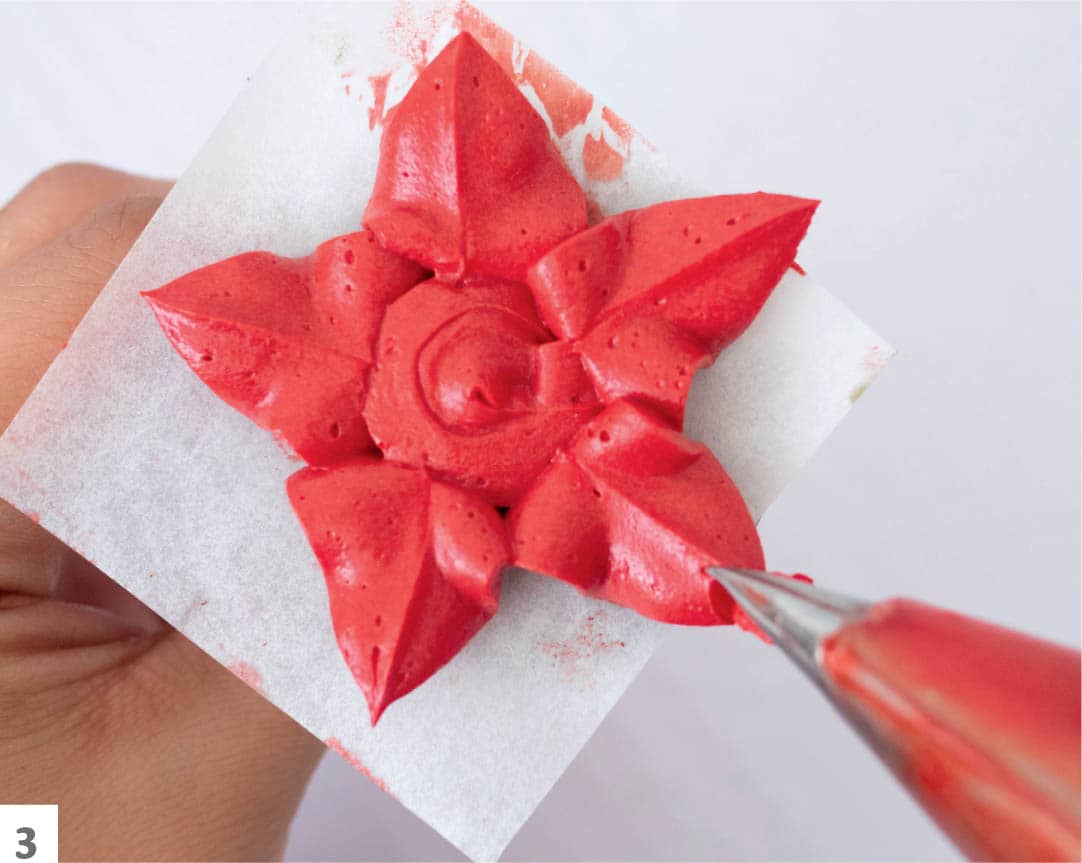
- 4Pipe a second row of five petals on top of the first set, starting slightly inside the first row. For this row, pipe the petals holding the piping bag at a 10- to 20-degree angle from the flower nail as you release pressure on the bag.

- 5Add three more petals in the center, leaving enough room in the center to add the final detail in the next step.

- 6To create the center, use the piping bag fitted with the small round tip #1. Pipe a cluster of about seven small pearls of buttercream (see the finished flower, here).
Sweet contrasting colors are displayed with mixed botanicals.
Leaf I
This first take on a classic leaf is an essential shape that’s incredibly versatile. Being creative with the color of these leaves opens enormous possibilities.
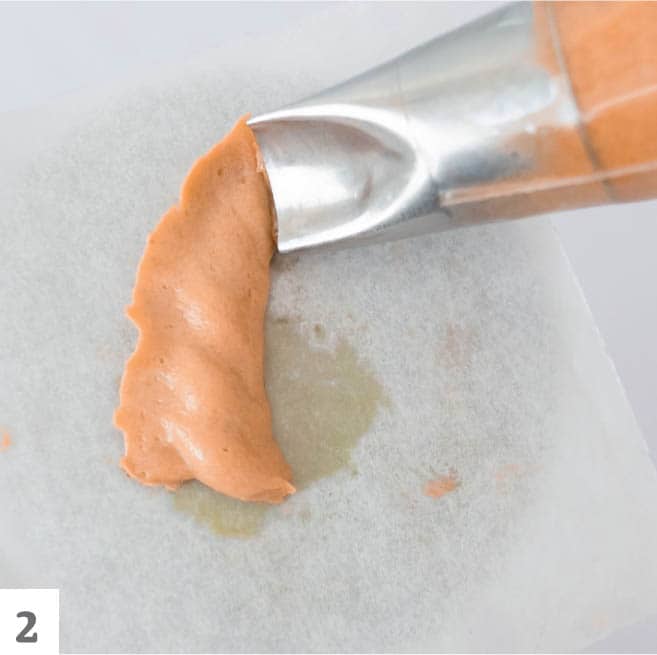
- 1Prepare a batch of colored buttercream. Fit a piping bag with the small petal tip and fill it with the buttercream. Place the piping bag so the petal tip is lying almost on its side on the flower nail, with the widest end facing the center of the nail.

- 2Squeeze the piping bag and drag the piping tip upward, slightly curving it. Release pressure on the bag and pull the tip away. This should produce a single, curved ribbon.

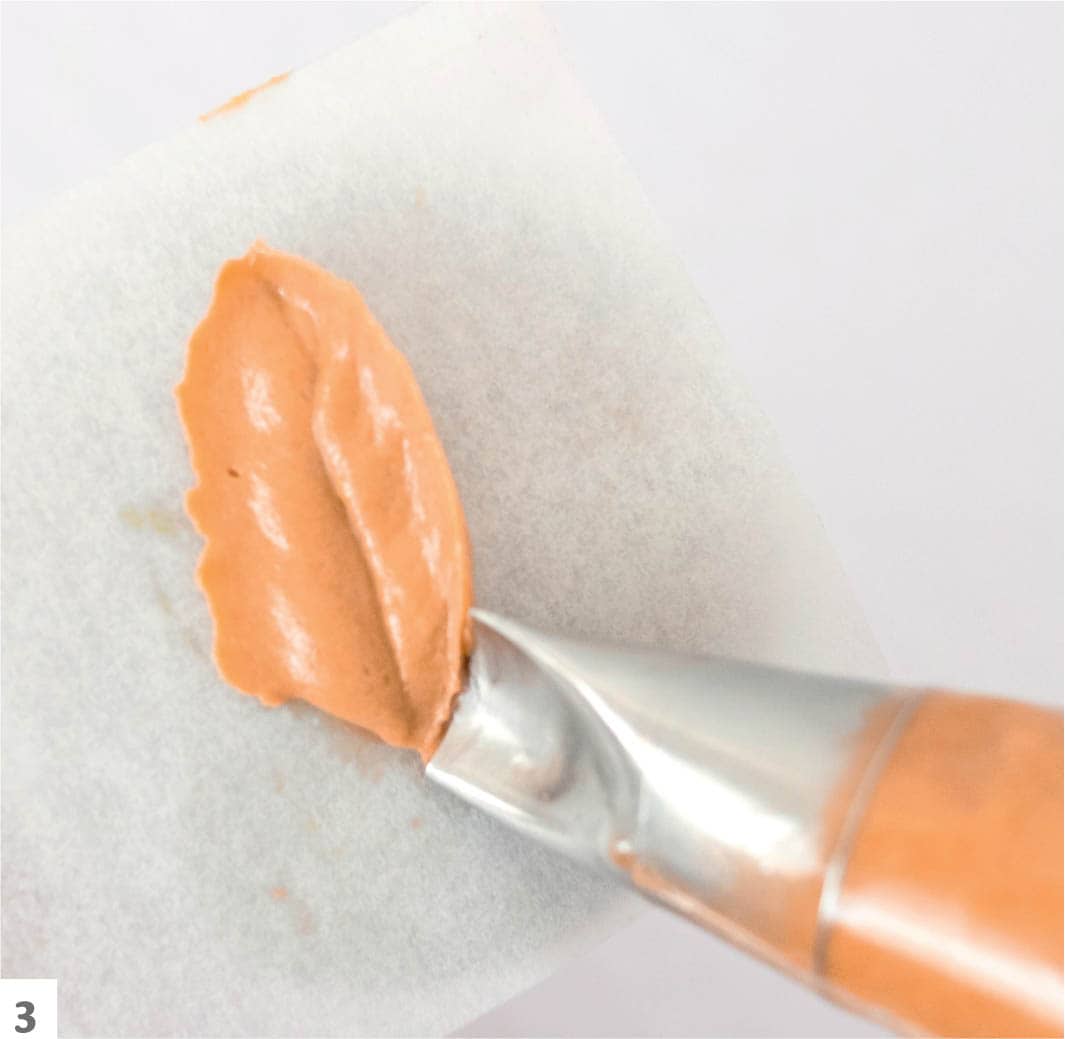
- 3Pipe the other half of the leaf. Start at the top of the ribbon, with the widest end of the tip touching both the flower nail and the first half of the leaf. Follow the curve down to the beginning of the leaf and release pressure to complete the leaf.

Leaf II
This second leaf technique produces a leaf with jagged edges, reminiscent of rose or holly leaves. This type of foliage pairs well with almost any buttercream botanical. Use it with leaf I to add complex texture to your arrangements.
- 1Prepare a batch of colored buttercream. Fit a piping bag with the small petal tip and fill it with the buttercream. Place the piping bag so the petal tip is lying almost on its side on the flower nail, with the widest end facing the center of the nail.
- 2Squeeze the piping bag and drag the piping tip upward, slightly curving it and simultaneously zigzagging it.

- 3Release pressure on the bag and pull the tip away. This should produce a single rippled ribbon.

- 4To create the other half of the leaf, start at the top of the ribbon, positioning the tip so that the widest part is touching both the flower nail and the first half of the leaf. Pipe another ribbon, following the curvature down to the beginning of the leaf using the same zigzag motion. Release pressure on the bag to complete the leaf.

◁ Autumn Leaves
Incorporating autumn leaves into a design is a simple way to dramatically change its seasonal aesthetic. Pair these leaves with a grouping of warm-toned botanicals or craft a cascade of autumn leaves in various shades of brown and orange to create a feeling of fall.
- 1Prepare a batch of colored buttercream. Fit the piping bag with the curved petal tip and the buttercream. Place the piping bag so the petal tip is lying almost on its side on the flower nail, with the wider end facing the center of the flower nail.
- 2Squeeze the piping bag and drag the piping tip upward, creating a slight curve. Release pressure on the bag and pull the tip away. This should produce a single curved ribbon.
- 3For the other half of the leaf, start piping at the top of the ribbon, touching both the flower nail and the first half of the leaf, and then following the curve down to the beginning of the leaf. Release pressure to complete the middle point of the leaf.
- 4Repeat steps 2 and 3 and add two slightly smaller leaves piped on each side of the middle leaf.

- 5Repeat steps 2, 3, and 4 to add two smaller leaves on either side of the ones just piped to complete the autumn leaf.


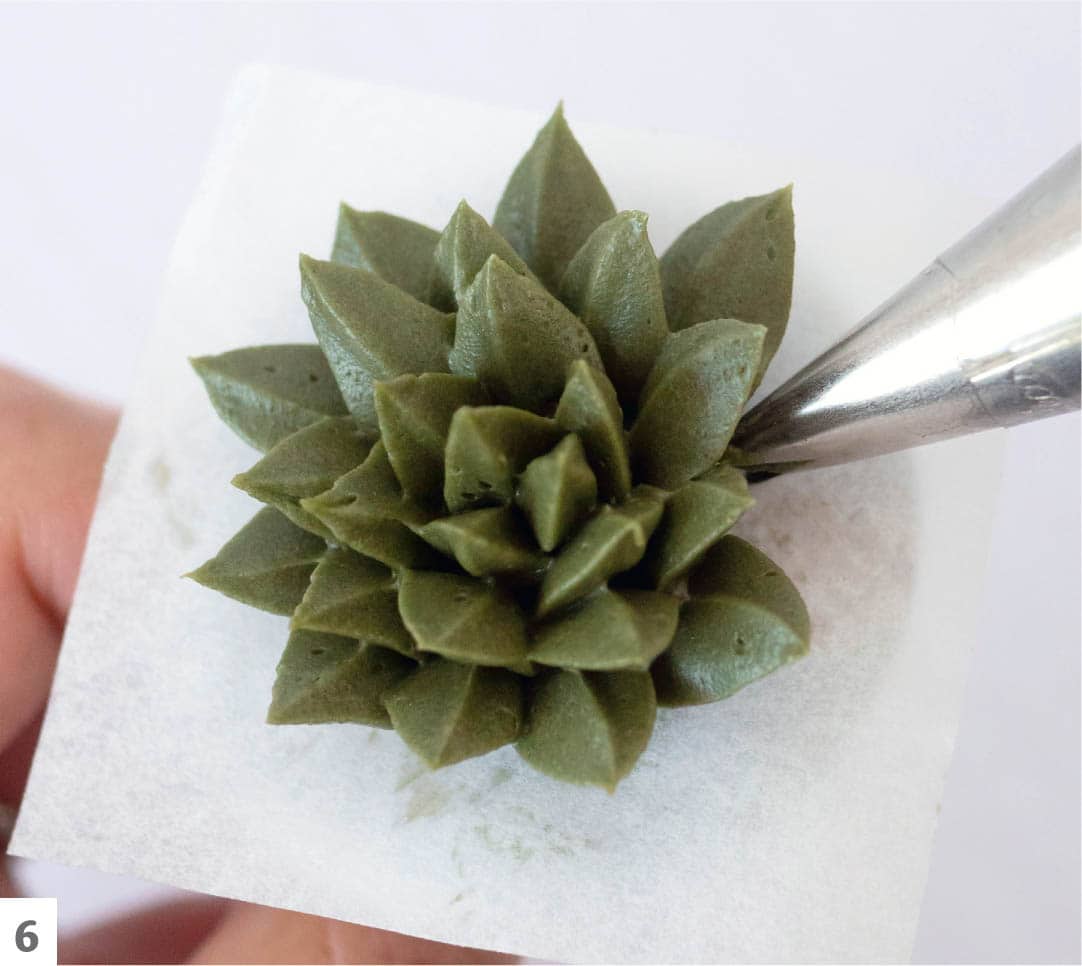
◁ Echeveria Succulent III
This lovely plant is created by combining the leaf technique with the blossom technique to produce a botanical with a complex appearance.
- 1Prepare a batch of colored buttercream. Fit a piping bag with the curved petal tip and fill the bag with the buttercream. Place the piping bag so the petal tip is lying almost on its side on the flower nail, with the wider end facing the center of the nail. Squeeze the piping bag and drag the piping tip upward with a slight curve, and then release pressure and pull the tip away. This should produce a single curved ribbon.
Pipe the second half of the leaf by starting from the top of the ribbon, touching the flower nail and the first half of the leaf, and then following the curve down to the beginning of the leaf. Release pressure on the bag to complete the main point of the leaf.

- 2Repeat steps 1 and 2 to pipe a second leaf next to the first. Repeat the process, piping a total of six leaves, with the last one abutting the first.
- 3Pipe another set of leaves on top of the first. The first piped leaf should be between two leaves on the first row. Repeat until you have a complete second set of five or six leaves on top.
- 4Tilt the piping bag upright to a 90-degree angle. Pipe a buttercream leaf by gently squeezing the piping bag, then pulling upward to create a short, narrow leaf. Repeat until you have created three to six of these leaves (see the finished plant above).
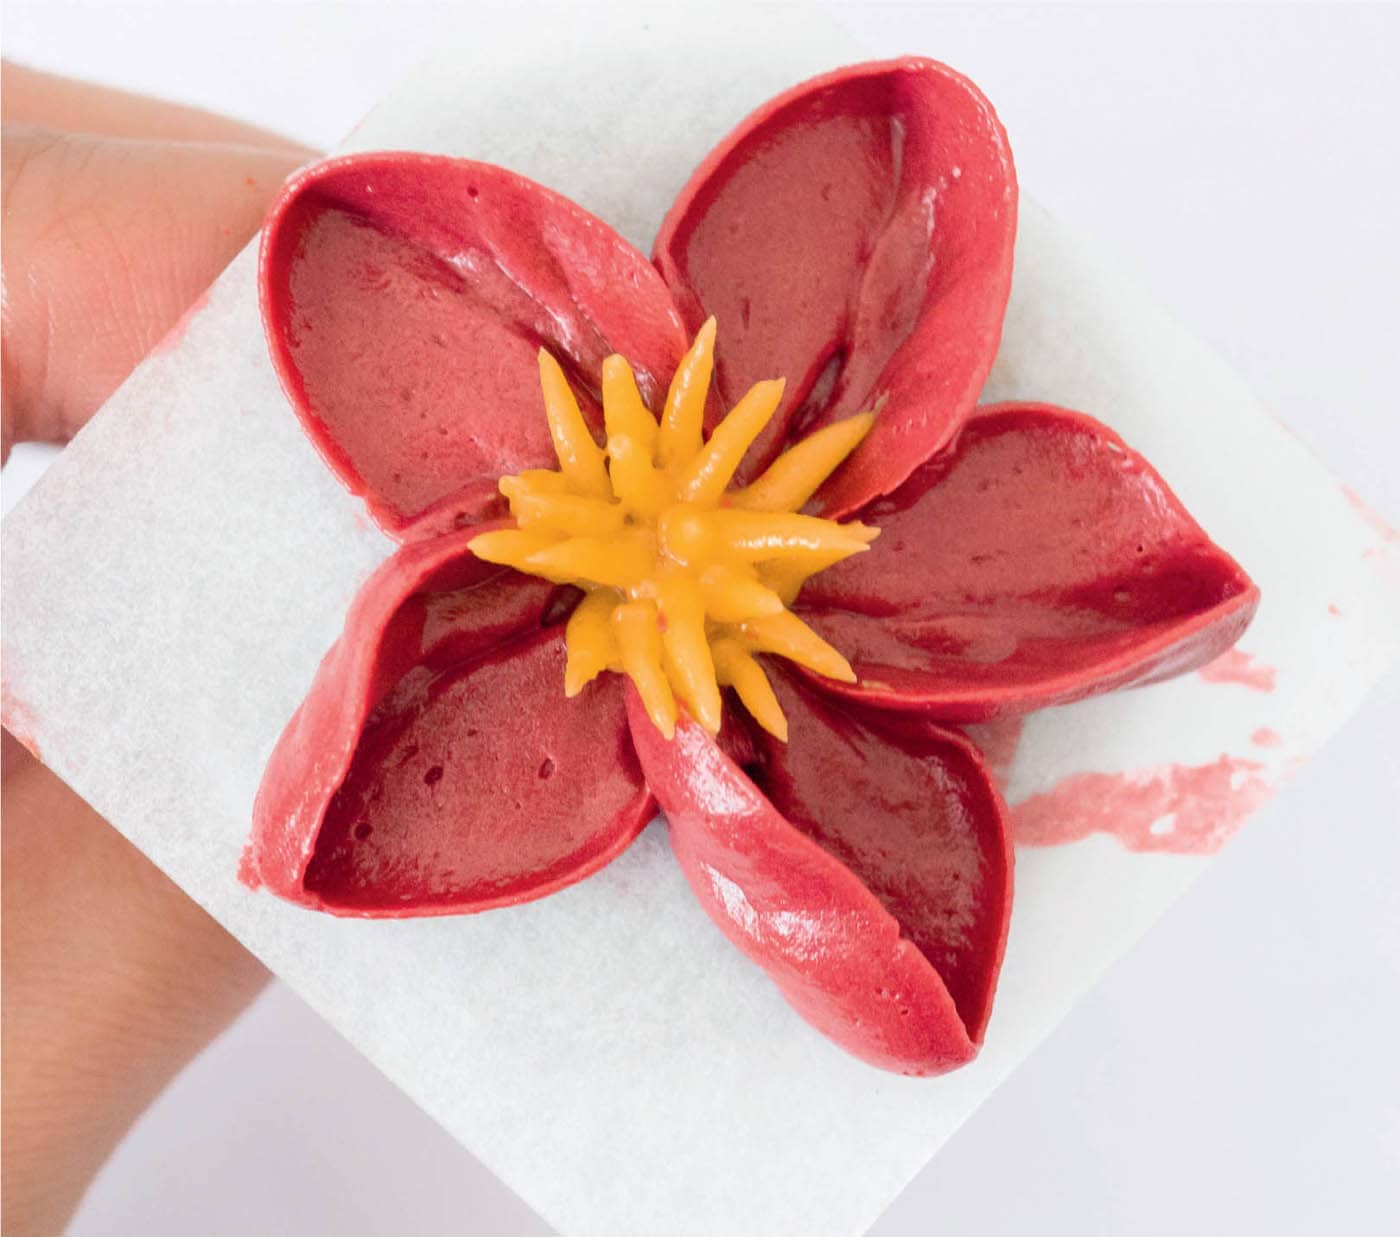
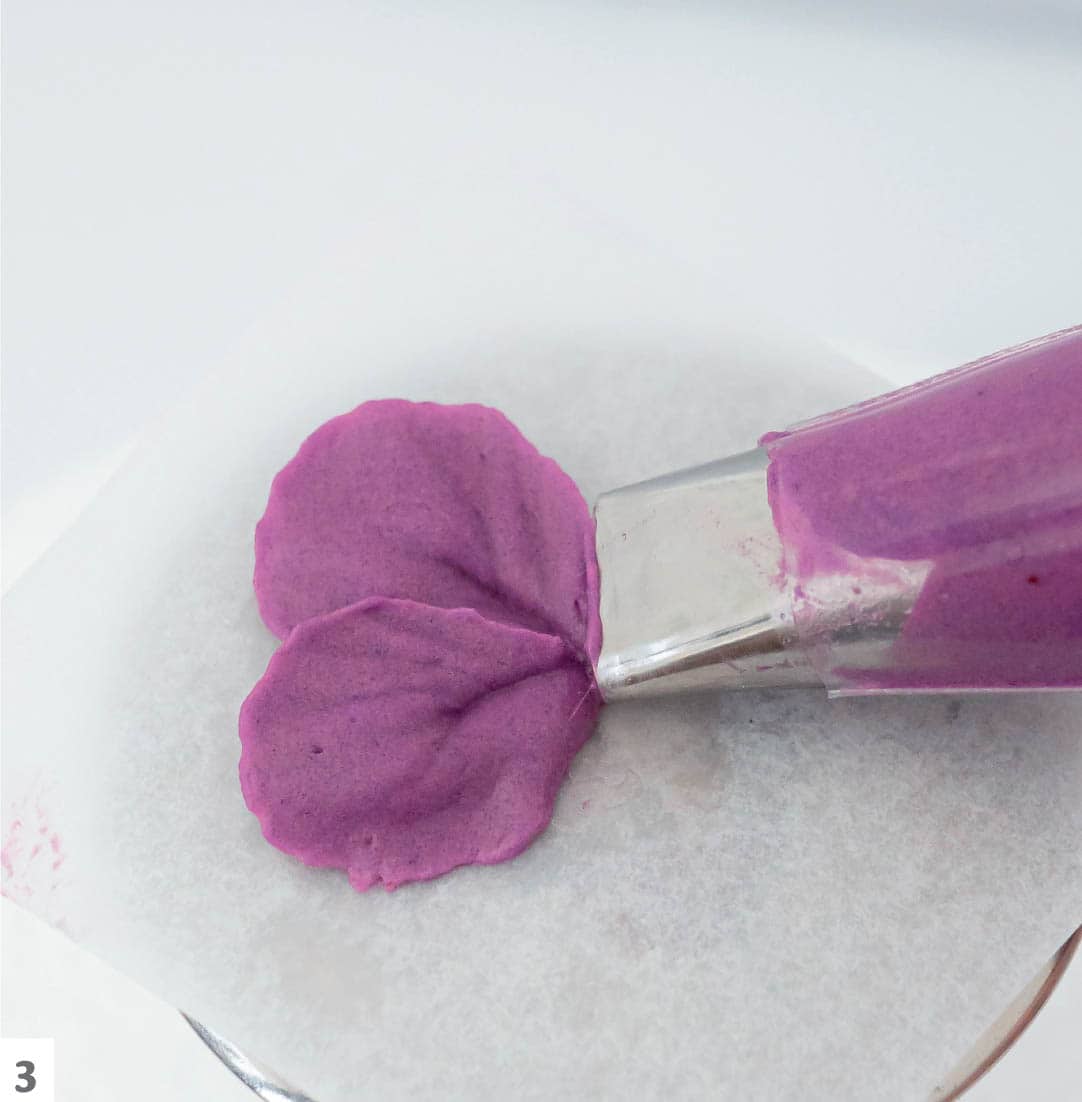
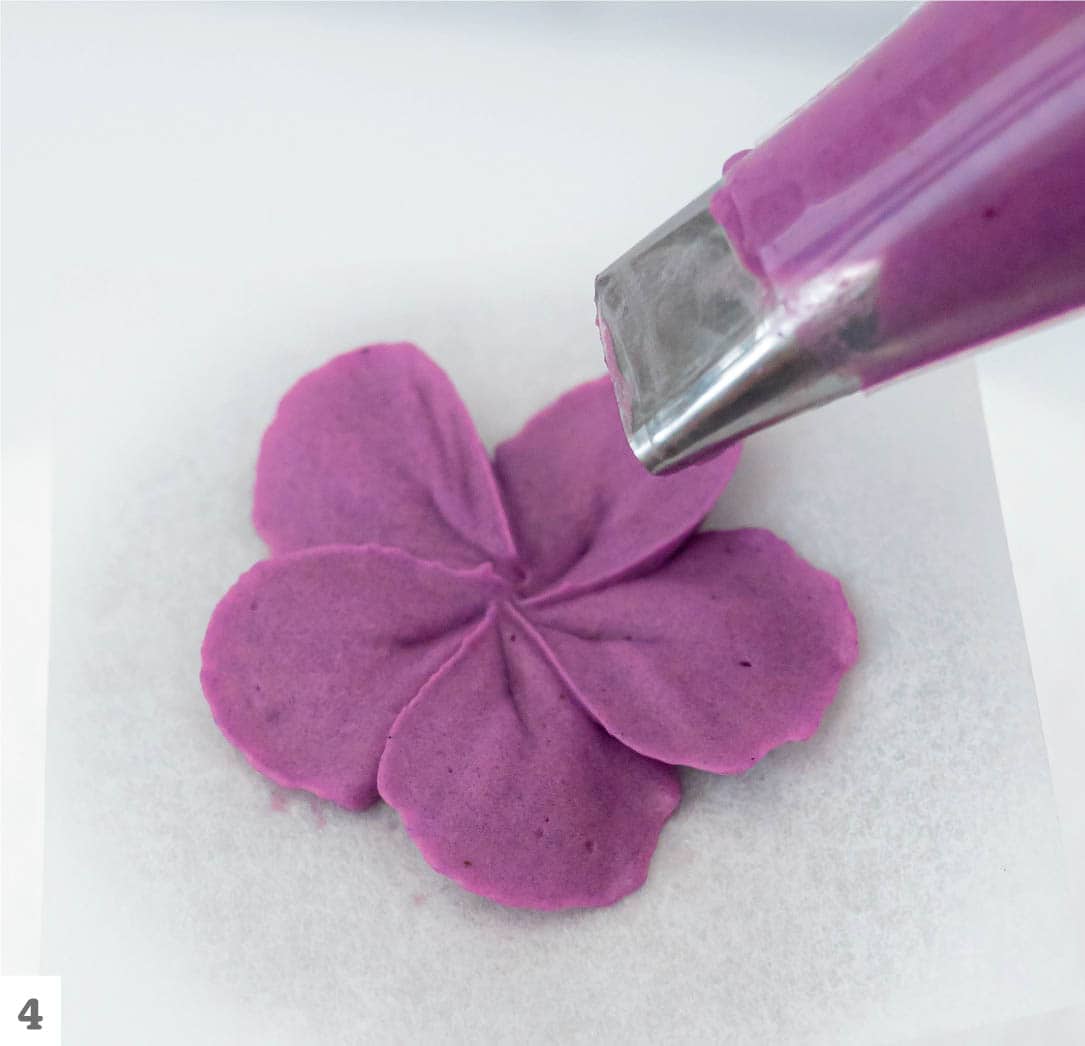
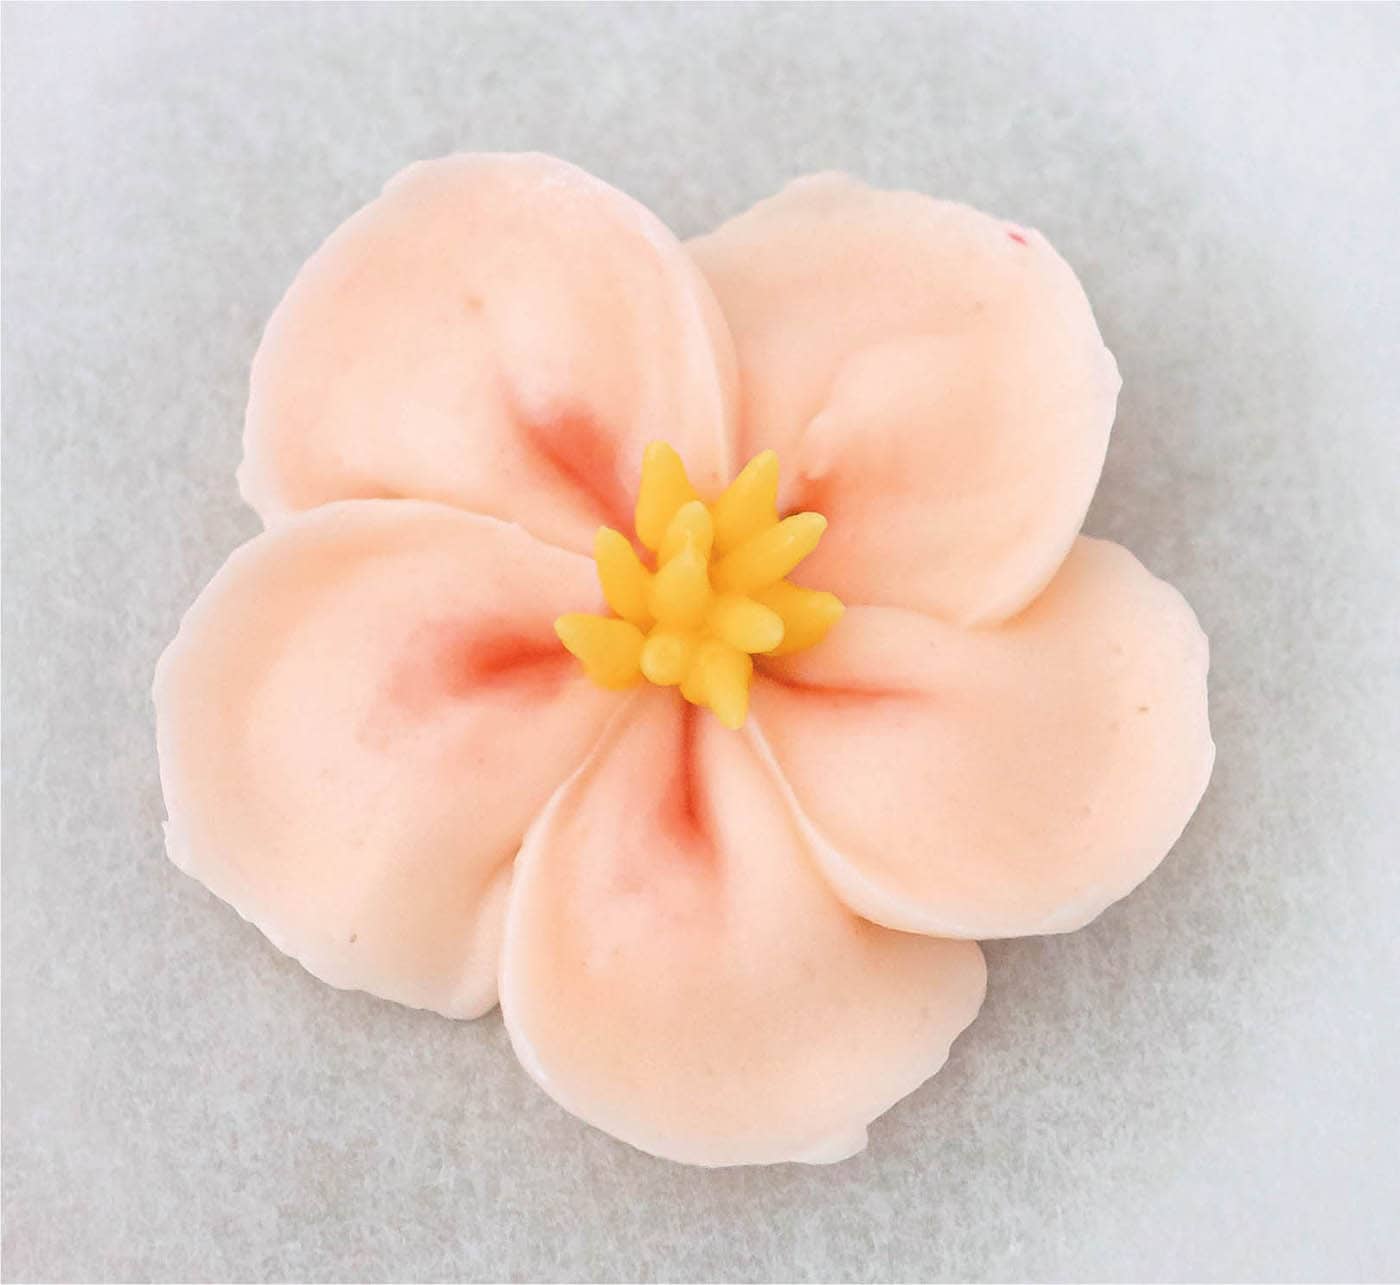
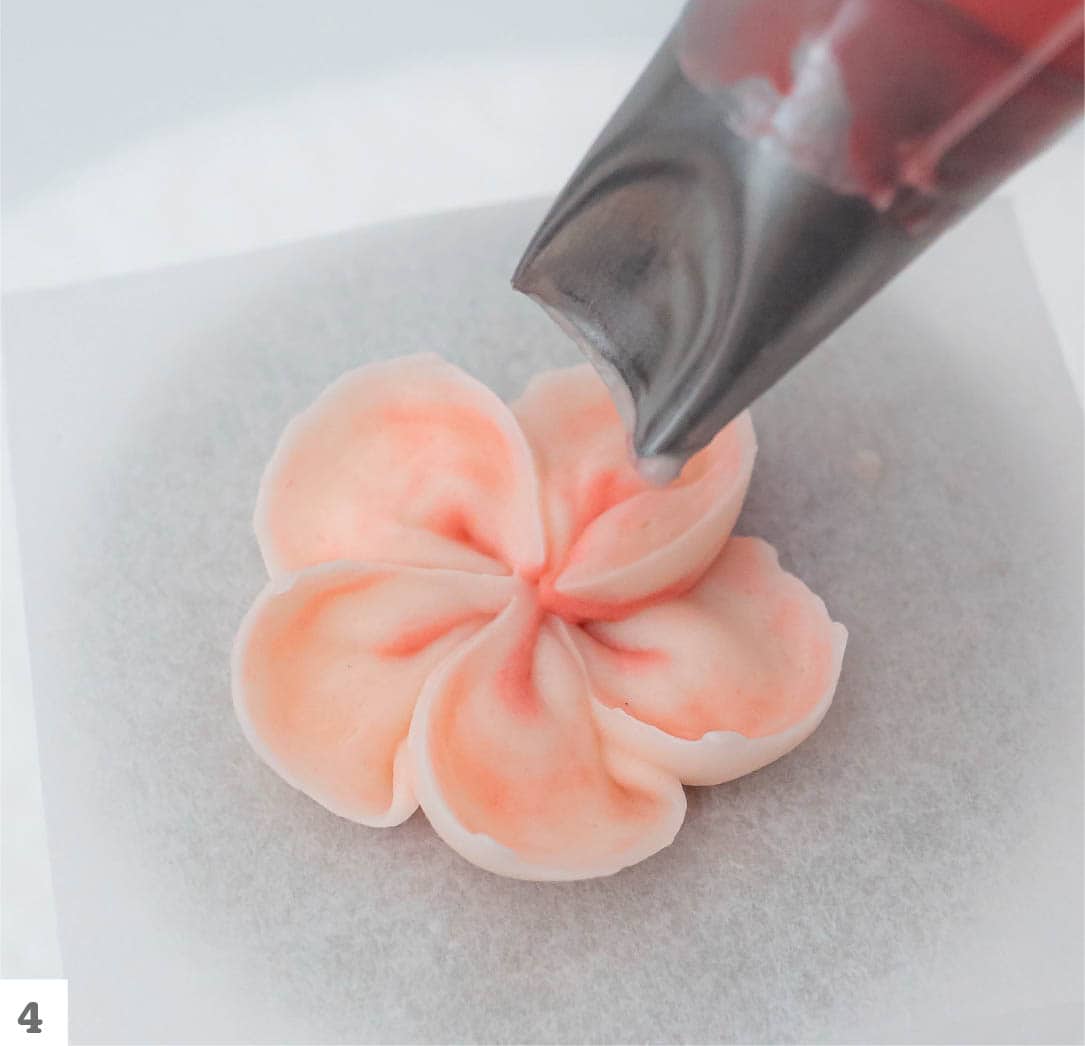
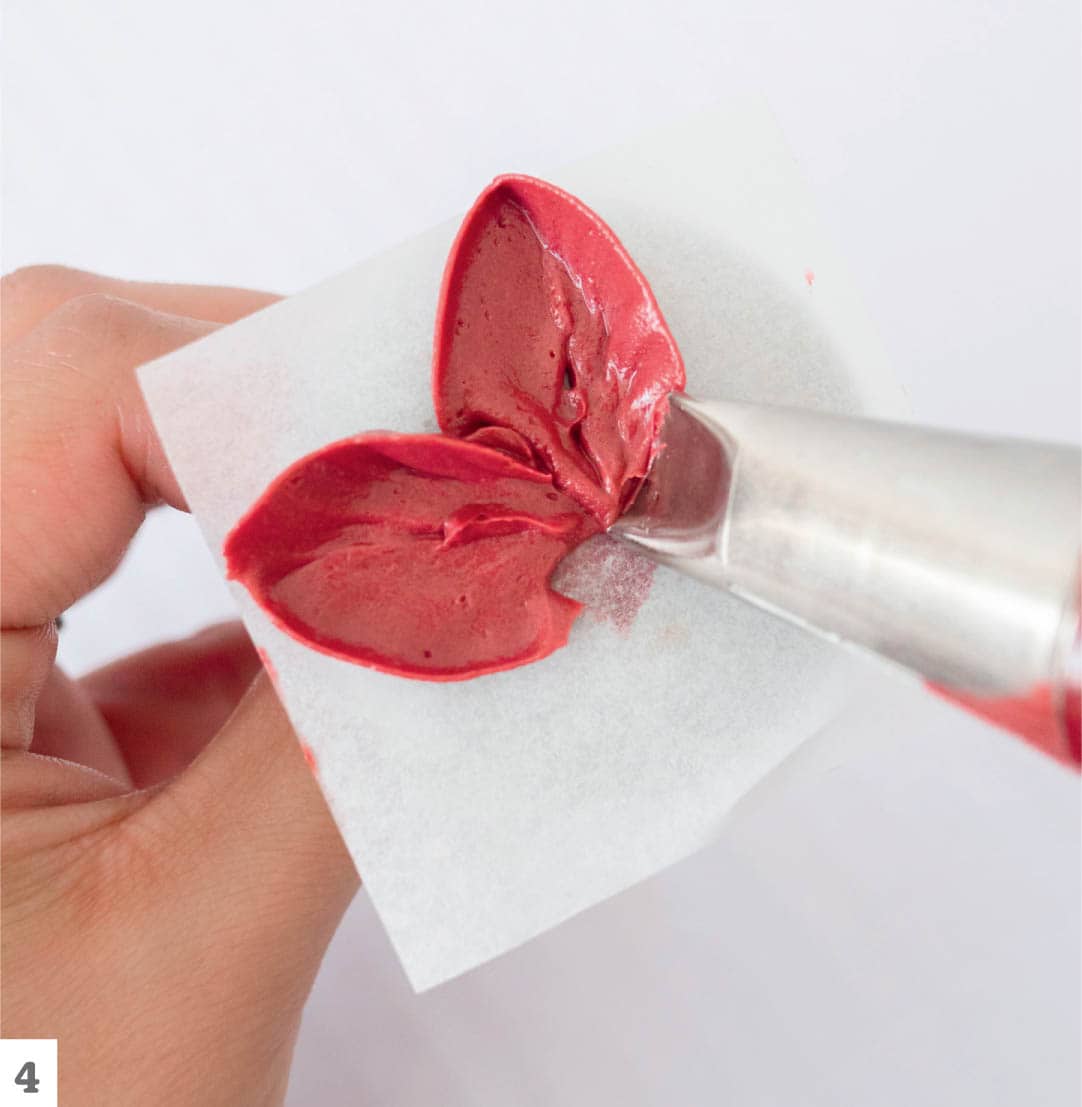
◁ Hellebore
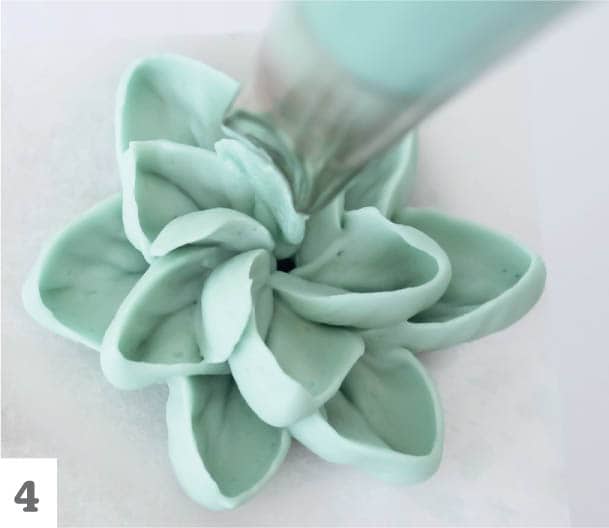
The hellebore, also known as the Christmas rose, is an uncommon flower with five pointed petals and a wispy stamen. Hellebores bloom in a wide variety of colors that include white and cream, plus varying shades of pinks, reds, purples, almost-black, and even green. Because of the association with Christmas, hellebores can be paired with other wintery botanicals, such as pine cones (here). They also work clustered on their own or among other botanicals in any type of arrangement.
- 1Prepare batches of maroon and gold buttercreams. Fit a piping bag with the curved petal tip and fill the bag with the maroon buttercream. Fit another bag with the small round tip and fill it with the gold buttercream.
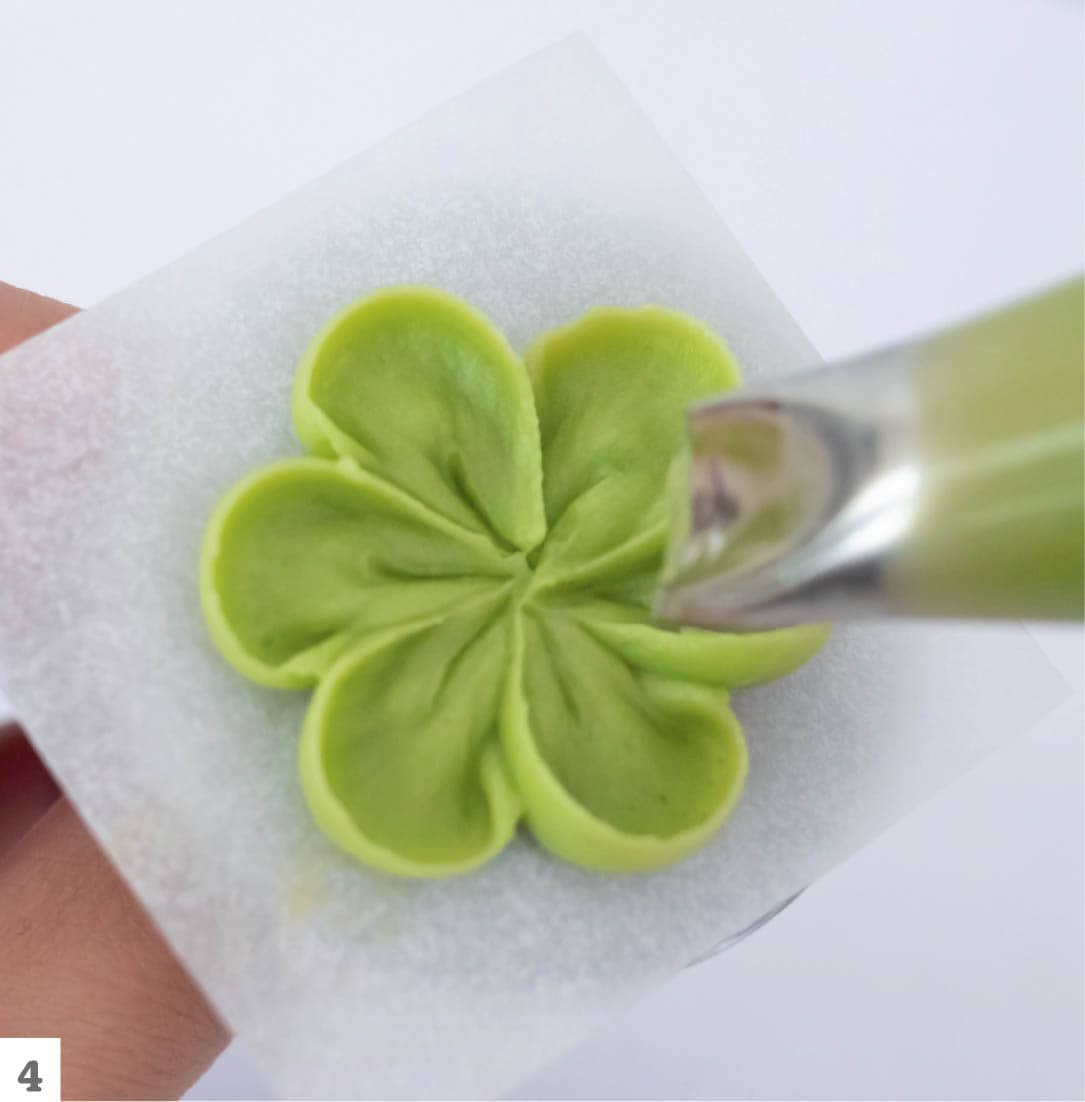
- 2Place the piping bag so the petal tip is lying almost on its side on the flower nail, with the wider end facing the center of the nail. Squeeze the piping bag and drag the tip upward, creating a slight curve. Release pressure on the bag and pull the tip away. This should produce a single, curved ribbon.

- 3Pipe the other half of the petal by starting from the top of the ribbon and following the curve down to the beginning of the petal, touching both the flower nail and the first half of the petal as you go. Release pressure on the bag to complete the petal.

- 4Repeat steps 2 and 3 to pipe a second petal next to the first.
- 5Repeat the process, piping a total of five petals that abut each other, with the last one next to the first.

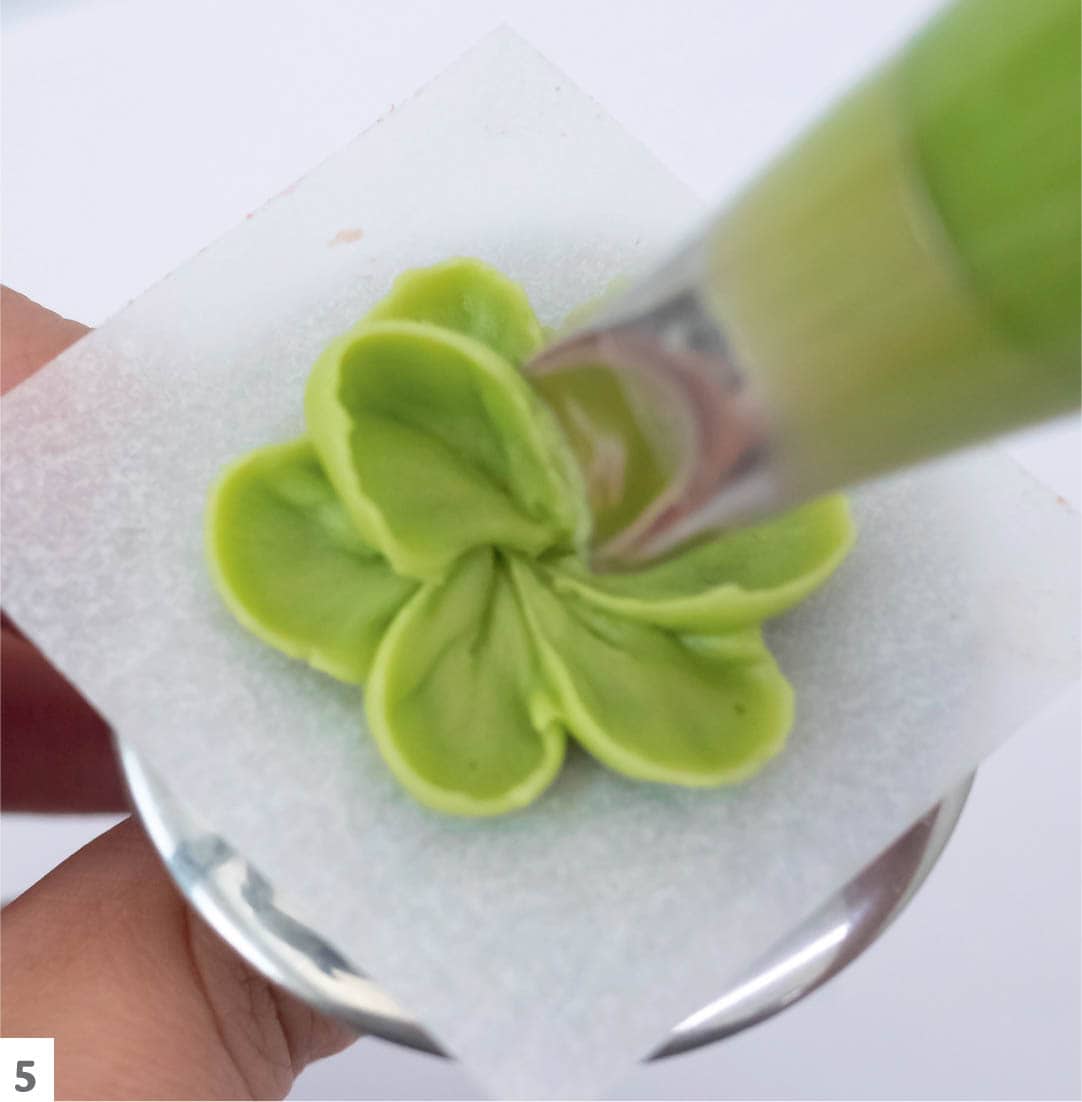
- 6Using the piping bag fitted with the small round tip, pipe the center of the hellebore. Squeeze several strands of buttercream to fill the center of the flower. Allow the buttercream strands to naturally fall in different directions for a realistic look. The strands should not exceed more than about ¼" (6 mm) in length.
