
Many developers have heard about abstract classes, but their implementation is a mystery. How can you as a developer identify an abstract class and decide when to use one? The definition is quite a simple one actually. Once you understand this fundamental definition of an abstract class, when and why to use one becomes obvious.
Imagine for a moment that you are developing an application that manages the animals in a cat sanctuary. The cat sanctuary rehabilitates lions, tigers, jaguars, leopards, cheetahs, pumas, and even domestic cats. The common noun that describes all these animals is the word cat. You can, therefore, safely assume that the abstraction of all these animals is a cat, and thus, this word identifies our abstract class. You would then create an abstract class called Cat.
However, you need to keep in mind that you will never ever create an instance of the abstract class Cat. All the classes that inherit from the abstract class also share some functionality. This means that you will create a Lion class and a Tiger class that inherit from the abstract class Cat. In other words, the inherited classes are a kind of cat. Both classes share functionality in the form of Sleep(), Eat(), Hunt(), and various other methods. In this way, we can ensure that inherited classes all contain this common functionality.
Let's go ahead and create our abstract class for cat. We will then use it to inherit from and create other objects to define different types of cats.
- In the Visual Studio Solution Explorer, right-click on the solution, click on Add, and then click on New Project. Select Class Library option to add a new class library project to your solution and call it
Chapter2: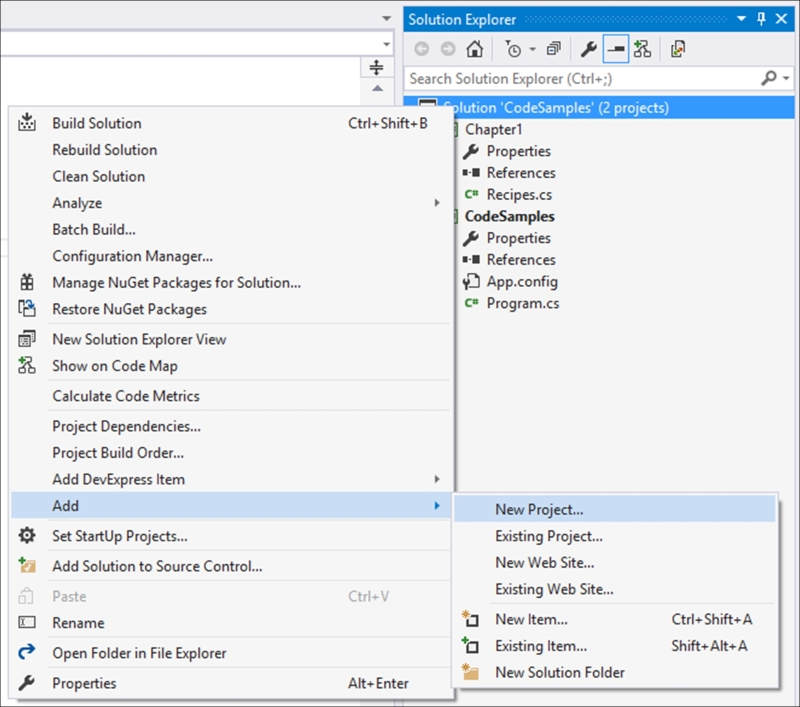
- A class library project called
Chapter2is added to your solution. Go ahead and right-click on the default class calledClass1.csthat was added to yourChapter2project and rename it toRecipes.cs:
- Once you have done this, your code should resemble the following code listing. You can see that the default class has been renamed to
Recipesand that it exists in theChapter2namespace:namespace Chapter2 { public class Recipes { } } - We will now change the default class
Recipesto an abstract class calledCat. To do this, add theabstractkeyword to the class and change the name fromRecipestoCat. We are now ready to describe theCatabstract class:namespace Chapter2 { public abstract class Cat { } }Note
The
abstractkeyword indicates to us that the object it is applied to has no implementation. When used in a class declaration, it basically tells the compiler that the class is to be used as a base class. This means that no instance of the class can be created. The only way in which implementation of the abstract class happens is when it is implemented by derived classes that inherit from the base class. - Add three methods to the abstract class called
Eat(),Hunt(), andSleep(). You will notice that these methods don't contain a body (curly braces). This is because they have been defined as abstract. As with abstract classes, the abstract methods contained within the abstract class contain no implementation. These three methods basically describe functionality that is common to all cats. All cats must eat, hunt, and sleep. Therefore, to ensure that all classes that inherit from theCatabstract class contain this functionality, it is added to the abstract class. These methods are then implemented in the derived classes, which we will see in the upcoming steps:public abstract class Cat { public abstract void Eat(); public abstract void Hunt(); public abstract void Sleep(); } - We want to define two types of cat. The first type of cat we want to define is a lion. For this, we create a
Lionclass:public class Lion { } - At this point in time, the
Lionclass is simply an ordinary class and does not contain any common functionality defined in theCatabstract class. To inherit from theCatabstract class, we need to add: Catafter theLionclass name. The colon indicates that theLionclass inherits from theCatabstract class. TheLionclass is therefore a derived class of theCatabstract class:public class Lion : Cat { }As soon as you specify that the
Lionclass inherits from theCatclass, Visual Studio will show you an error. This is expected, because we have told the compiler that theLionclass needs to inherit all the features of theCatabstract class, but we have not actually added these features to theLionclass. The derived class is said to override the methods in the abstract class, and needs to specifically be written with theoverridekeyword. - If you hover over the red squiggly line underlining the
Lionclass, Visual Studio will offer an explanation for the error via the lightbulb feature. As you can see, Visual Studio is telling you that while you have defined the class to be inheriting from the abstract class, you have not implemented any of the abstract members of theCatclass: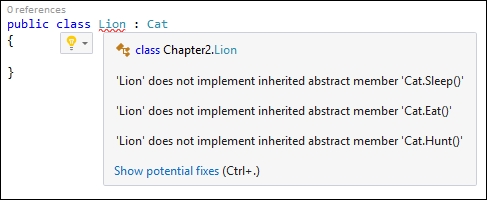
Note
You can, therefore, see that using abstract classes is a fantastic way to enforce specific functionality within your system. If you define abstract members in an abstract class, the derived classes that inherit from that abstract class must implement those members; otherwise, your code will not compile. This can be used to enforce standards and practices adopted by your company, or to simply allow other developers to implement certain best practices as they use your base class for their derived classes. With the advent of the Visual Studio 2015 feature code analyzers, this can ensure a consistent development effort by the team.
- To implement these members that Visual Studio is warning us about, place your mouse cursor on the
Lionclass name and hit Ctrl + . (period). You can also click on the Show potential fixes link in the lightbulb popup. Visual Studio will give you a small heads up, displaying the changes it will make to your code. You can preview these changes by clicking on the Preview changes link, as well as fix all occurrences in the document, project, or solution by clicking on the appropriate link: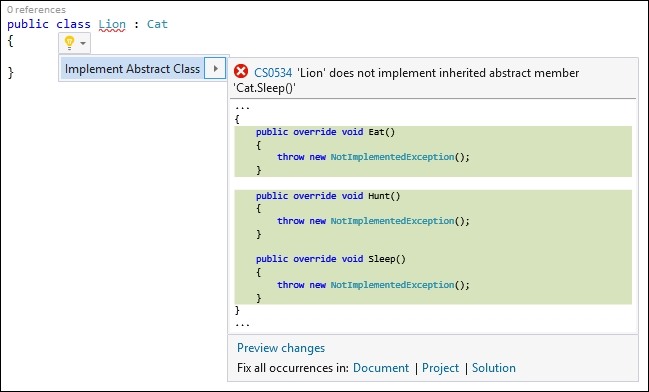
After Visual Studio has added the changes displayed in the suggestions window, your
Lionclass will be correct and will look like the code listed in the following step. - You will notice that Visual Studio automatically adds a
NotImplementedExceptionexception with the following line of code in each overridden method:throw new NotImplementedException();:public class Lion : Cat { public override void Eat() { throw new NotImplementedException(); } public override void Hunt() { throw new NotImplementedException(); } public override void Sleep() { throw new NotImplementedException(); } }Note
This is the default behavior of Visual Studio when overriding methods in the base class. Basically, if you had to instantiate the
Lionclass without writing any implementation in the overridden methods, a runtime exception would be generated. The idea of inheriting from our abstract class was to extend it and implement common functionality. This is where we need to implement that functionality, and this is the reason there is no implementation in the abstract class. The abstract class just tells us that the following methods need to be implemented. The derived class does the actual implementation. - Go ahead and add some implementation to the overridden methods of the
Lionclass. First, add theusing staticstatement for theConsole.WriteLinemethod to the top of your class file:using static System.Console;
- Then, add the implemented code for the methods, as follows:
public override void Eat() { WriteLine($"The {LionColor} lion eats."); } public override void Hunt() { WriteLine($"The {LionColor} lion hunts."); } public override void Sleep() { WriteLine($"The {LionColor} lion sleeps."); } - Next, we will create another class called
Tigerthat also derives from the abstract classCat. Follow step 7 to step 12 to create theTigerclass and inherit theCatabstract class:public class Tiger : Cat { public override void Eat() { throw new NotImplementedException(); } public override void Hunt() { throw new NotImplementedException(); } public override void Sleep() { throw new NotImplementedException(); } } - Add the same implementation for the
Tigerclass, as follows:public override void Eat() { WriteLine($"The {TigerColor} tiger eats."); } public override void Hunt() { WriteLine($"The {TigerColor} tiger hunts."); } public override void Sleep() { WriteLine($"The {TigerColor} tiger sleeps."); } - For our
Lionclass, add an enumerator forColorSpectrumand a property calledLionColor. It is here that the implementations of theLionandTigerclasses will differ. While they both must implement the common functionality specified in the abstract class, namelyEat(),Hunt(), andSleep(), only the lion can have a color of either brown or white in its available range of colors:public enum ColorSpectrum { Brown, White } public string LionColor { get; set; } - Next, add the
Lion()constructor in ourLionclass. This will allow us to specify a color for the lions in the cat sanctuary. The constructor also takes as parameter a variable of theColorSpectrumenumerator type:public Lion(ColorSpectrum color) { LionColor = color.ToString(); } - Slightly similar to this, but quite different in color, the
Tigerclass can only have aColorSpectrumenumeration that defines tigers as being orange, white, gold, blue (yes, you actually get a blue tiger), or black. Add theColorSpectrumenumerator to theTigerclass, as well as a property calledTigerColor:public enum ColorSpectrum { Orange, White, Gold, Blue, Black } public string TigerColor { get; set; } - Finally, we will create a
Tiger()constructor for ourTigerclass to set the colors of tigers in the cat sanctuary to the valid colors that tigers are found in. By doing this, we are separating certain functionality specific only to tigers and lions in their respective classes, while all the common functionality is contained in the abstract classCat:public Tiger(ColorSpectrum color) { TigerColor = color.ToString(); } - To see the class in action, we first need to add a reference to our
Chapter2.csclass file. Right-click on References in the console application project: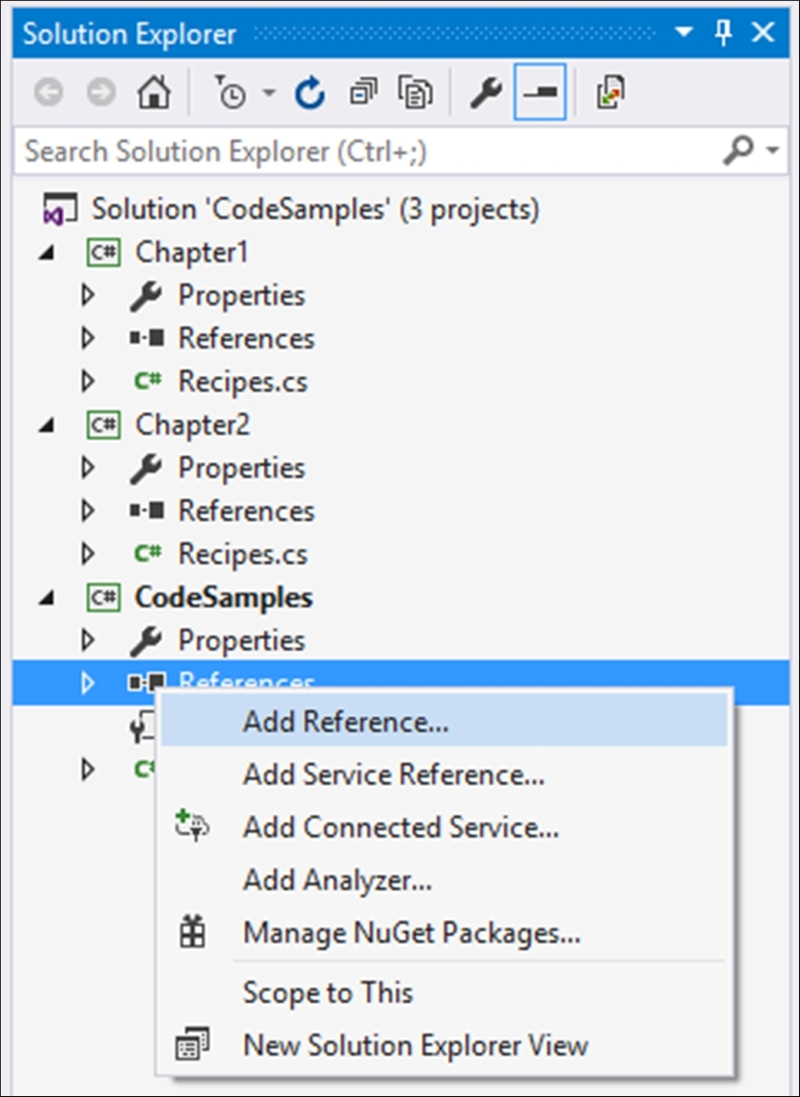
- The Reference Manager window will open for the
CodeSamplesproject. SelectChapter2and click on the OK button. Then, add theusing Chapter2;statement: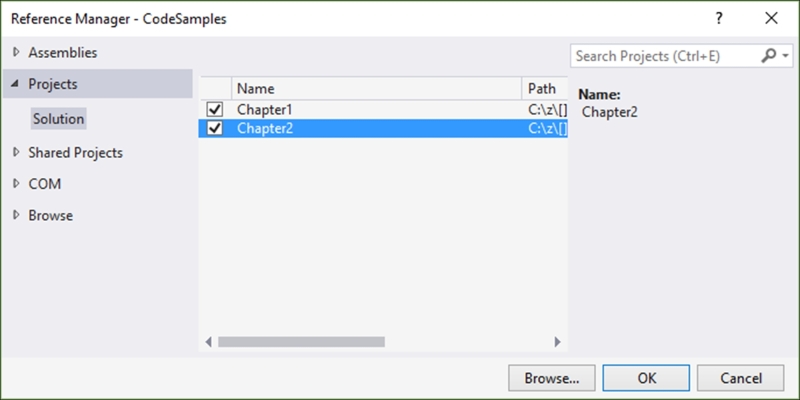
- We now need to instantiate the
LionandTigerclasses. You will see that we set the respective cat's color from the constructor:Lion lion = new Lion(Lion.ColorSpectrum.White); lion.Hunt(); lion.Eat(); lion.Sleep(); Tiger tiger = new Tiger(Tiger.ColorSpectrum.Blue); tiger.Hunt(); tiger.Eat(); tiger.Sleep(); Console.ReadLine();
- When you run your console application, you see that the methods are called in sequence:
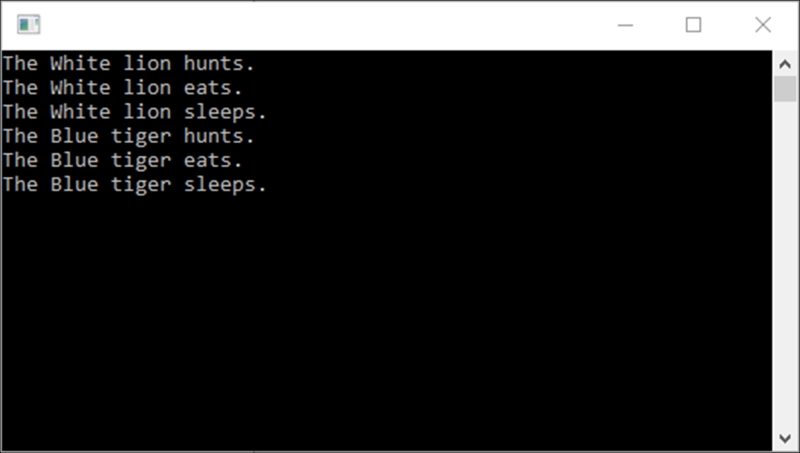
While the example illustrated earlier is a rather simplistic one, the theory is sound. The abstract class takes collective functionality across all cats and groups so that it can be shared inside each derived class. No implementation exists in the abstract class; it only defines what needs to happen. Think of abstract classes as a type of blueprint for classes that inherit from the abstract class.
While the content of the implementation is up to you, the abstract class requires that you add the abstract methods it defines. From here on, you can create a solid foundation for similar classes in your applications that are supposed to share functionality. This is the goal of inheritance. Let's recap the features of an abstract class:
- You can't instantiate an abstract class with the
newkeyword. - You can only add abstract methods and accessors to an abstract class.
- You can never modify an abstract class as
sealed. Thesealedmodifiers prevents inheritance, while abstract requires inheritance. - Any class derived from your abstract class must include the implementations of the abstract methods that were inherited from the abstract class.
- Because abstract methods inside the abstract class have no implementation, they don't contain a body either.