
CHAPTER 18
Chapter Objectives
By the end of the chapter, readers will be able to:
![]() Explain the overall concept of a data structure.
Explain the overall concept of a data structure.
![]() Graphically illustrate and discuss the various components associated with a linked list, including nodes, a head pointer, an optional tail pointer, and a trailing pointer.
Graphically illustrate and discuss the various components associated with a linked list, including nodes, a head pointer, an optional tail pointer, and a trailing pointer.
![]() Develop and implement various functions for manipulating the individual nodes within a linked list, including inserting, appending, deleting, and traversing the list.
Develop and implement various functions for manipulating the individual nodes within a linked list, including inserting, appending, deleting, and traversing the list.
![]() Write the code to insert nodes into an ordered linked list.
Write the code to insert nodes into an ordered linked list.
![]() Distinguish between a singly and a doubly linked list.
Distinguish between a singly and a doubly linked list.
![]() Compare and contrast the concept of a linked list with an array.
Compare and contrast the concept of a linked list with an array.
By now you should be comfortable using arrays to hold information. With all of the practice you have had, you no doubt understand how arrays work as well as their advantages and disadvantages. This chapter introduces another way to store information called linked lists.
18.1 Data Structures
A data structure is a way to store data so that the information can be used in an efficient manner. There are a variety of data structures, each with its own method of storing data. Figure 18.1.1 shows examples of three of the more common data structures.
As you can see from Figure 18.1.1, an array is an example of a data structure. It has specific characteristics that differentiate it from other data structures. Since an array is a contiguous block of memory, it allows for the random access of any element in the array. The linked list pictured in Figure 18.1.1 shows how the individual elements of the list are connected in a sequential manner. Likewise, the binary tree shows the hierarchical nature of tree data structures.
As we continue our introduction, keep in mind that a data structure is nothing more than a container for information. These containers can be various sizes and shapes, but certain data structures and their organization clearly work best in specific situations. The focus of this chapter will be on one of the more commonly used data structures: the linked list.
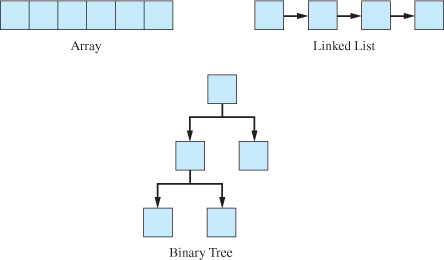
Figure 18.1.1 Simple data structures
Section 18.1 Exercises
1. What is a data structure?
2. True or false: An array, a linked list, and a binary tree are all examples of data structures.
Section 18.1 Learn by Doing Exercise
1. Research on the Internet different types of data structures not listed in this section. List at least five other data structures.
18.2 Linked Lists
To understand how to create a linked list, you must first be able to visualize a representation of the list. In many ways, a linked list is similar to a passenger train. There is a locomotive at the beginning of the train, followed by a number of cars containing passengers. Each car is coupled together, and at the end of the train there is sometimes a caboose. If you are in the first passenger car and you want to visit somebody in the last car, you need to walk through all of the other cars before you reach your desired destination.
Linked lists contain nodes (cars) that contain information (people) and are connected (coupled) to the next node by a pointer. The front of the list is marked by the head pointer (locomotive). The end of the list could optionally be marked by a tail pointer (caboose). The last node's pointer will be set to null to signify that there are no other nodes (no more cars). If we start at the first node and want to get to the last node, we have to go through all of the other nodes. In other words, a linked list is accessed sequentially. Figure 18.2.1 shows a detailed diagram of a linked list.
Each node can be either a class or a structure, but no matter which implementation is used, the node UDT will contain a pointer to the next node in the list. The head and tail are node pointers that always point to the first node and last node, respectively.
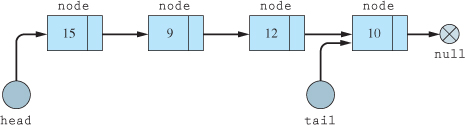
Figure 18.2.1 Linked list
18.2.1 List Implementation Options
There are many implementation possibilities in regard to linked lists. As mentioned previously, a node in the list can be either a structure or a class. Using only structures is more common when developing procedural programs.
A typical OOP methodology would be to have a node class and a linked list class. The node class will contain the data as well as the pointer to the next node. The linked list class will contain the head pointer; the optional tail pointer; as well as all of the functions necessary to manipulate the linked list, such as inserting nodes, deleting nodes, and traversing the list.
Normally the object-oriented implementation option would be the preferred method. However, this option requires the programmer to write all four manager functions. Not doing so could result in shallow copy situations, which would cause your program to crash. Since you have not yet learned how to write copy constructors or overloaded assignment operators, this chapter will focus on the more procedural approach.
Another implementation alternative is to keep a pointer to the previous node as well as to the next node in the list. This is called a doubly linked list. This is the most common version of linked lists because of the value of being able to traverse the list in both directions. However, since the algorithms are basically the same except for the maintenance of the previous pointers, we will only demonstrate a singly linked list.
18.2.2 Node Structure
As stated earlier, the node will contain the data as well as a pointer to the next node. Example 18.2.1 shows a very simple node structure.


In Example 18.2.1, since the pointer must contain an address of another Person, the next pointer is declared as a Person pointer. A pointer embedded in a structure or class that has the same target type as the UDT in which it is enclosed is called a self-referential pointer.
Another approach for the implementation of the node structure involves further separation of the data from the necessary linked list components, such as the next pointer or a previous pointer if we were implementing a doubly linked list. Example 18.2.2 shows the definition of the structures for this implementation option.
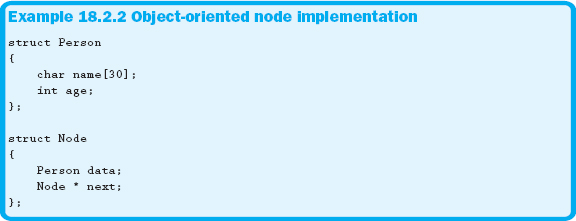
Many programmers feel that the implementation shown in Example 18.2.2 is the preferred option when using structures to create linked lists. The data UDT only contains members to hold pertinent data. Therefore, this is the implementation we will use in all future examples in this chapter.
18.2.3 Head Pointer
The head pointer will hold the address of the first node; its declaration is shown in Example 18.2.3.
It is important, as demonstrated in Example 18.2.3, that head be initialized to null. Not doing so will cause difficulties when trying to determine if the list is empty. Because of the initialization, the list can be determined to be empty whenever head is null.
18.2.4 Creating a New Node
Before a node can be inserted into the list, a new node needs to be dynamically allocated. A simple utility function that takes the node-related data as its parameter(s) and returns a new node is often very useful. Example 18.2.4 shows two different versions of this function. Although not necessary, the CreateNode function has been overloaded to accept the data to be stored in the node in a couple different ways.
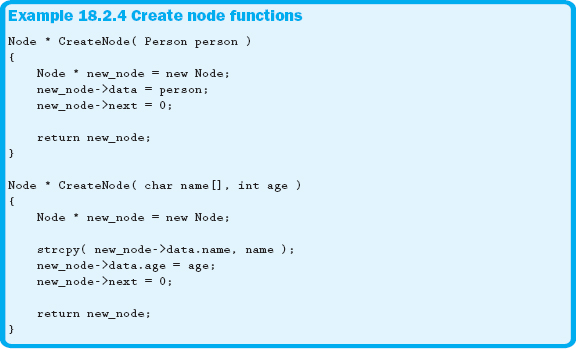
Notice that the CreateNode function has several tasks. The first is to dynamically allocate a new node, as all nodes in the linked list must be dynamically allocated. The next task assigns the data to the newly allocated node. The third task, and probably the most important, is to make sure the next pointer of the node is set to null. This not only places the pointer into a known state but also prepares the node in case it needs to be inserted at the end of the list.
![]()
Remember: The next pointer of the last node always needs to contain a null. This allows the programmer to know when the end of the list has been encountered.
The last task of the CreateNode function is to return the new node. This node is now fully prepared to be inserted into the list.
Section 18.2 Exercises
1. A linked list is made up of:
a. arrays
b. nodes
c. cars
d. units
2. True or false: When working with singly linked lists, it is usually necessary to start at the head of the list.
3. The pointer of the last node will contain a:
a. 1
b. −1
c. null
d. false
e. 0
4. A linked list that has nodes that contain both a previous and a next pointer is called a:
a. singly linked list
b. doubly linked list
c. problem
d. binary tree
5. Which of the following are not contained within a node?
a. data
b. pointer to the next node
c. pointer to the head node
d. pointer to the last node
6. Write the statement to declare a pointer called head_ptr and initialize it to 0.
7. True or false: Linked lists are usually accessed or traversed sequentially.
Section 18.2 Learn by Doing Exercises
1. Based on the node created in Example 18.2.2, draw a singly linked list containing three nodes. Include test data within your diagram, along with the necessary connectors linking each of the respective nodes. Make sure you incorporate and clearly label the different components and pointer(s) required.
2. Create a structure that has the following data members:
int id;
char major[35];
float gpa;
Now create a node structure with the appropriate members. Also write main and include the declaration of head. Next write the appropriate CreateNode function, which was discussed in this section.
18.3 Prepending a Node
Before the new node can be inserted into the list, it must be determined where in the list the node is to be placed. The three options are to insert the new node at the head of the list, at the end of the list, or somewhere in between head and tail.
The easiest place to insert a new node is at the front of the list. Programmers new to linked lists often assume that all that needs to be done is to assign the address of the new node to the head pointer. However, if that is the only thing done, all the existing nodes will no longer have any way of being accessed. Prior to reassigning head, the new node's next pointer must be assigned to point to the beginning of the current list, and then head can be reassigned to the new node's address. This process is demonstrated in Figure 18.3.1.
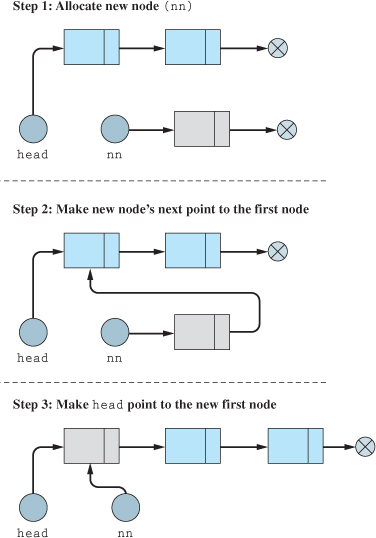
Figure 18.3.1 Prepending a node
Converting the steps illustrated in Figure 18.3.1 into pseudocode is a fairly straightforward process. The resulting pseudocode is shown in Figure 18.3.2.
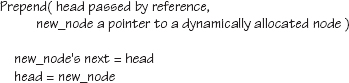 |
Figure 18.3.2 Pseudocode for prepending a node
The Prepend function assumes that the new node has already been created and appropriately initialized, as shown in the CreateNode function in Example 18.2.4. But what would happen if we tried to prepend to an empty list? If the list is empty, head is null, as previously discussed. Therefore, null is assigned to the new node's next pointer, guaranteeing the integrity of our one-node list.
Section 18.3 Exercises
1. Adding a node to the front or head of the list is called:
a. appending a node
b. prepending a node
c. traversing a node
d. attaching a node
2. List the four key elements of a CreateNode function.
3. What is wrong with the following pseudocode, which was written to prepend a node to a linked list? Explain in detail what would happen if the pseudocode was implemented as shown.
![]()
Section 18.3 Learn by Doing Exercise
1. Expand on the program written for Section 18.2 Learn by Doing Exercise 2 to include a function that prepends a node to the list. Write the necessary function, compile, run, and test your program. Obviously there will be memory leaks, but for now, ignore them. Use your debugger to ensure that the linked list is being created correctly.
18.4 Appending a Node
Another option for inserting a new node involves placing it at the end of the list. This would be a very simple task if we were keeping a tail pointer. However, it is important to know how to perform this type of insertion when there is only a head pointer. Also, just like with the Prepend function, a node should be able to be appended to the end of an empty list.
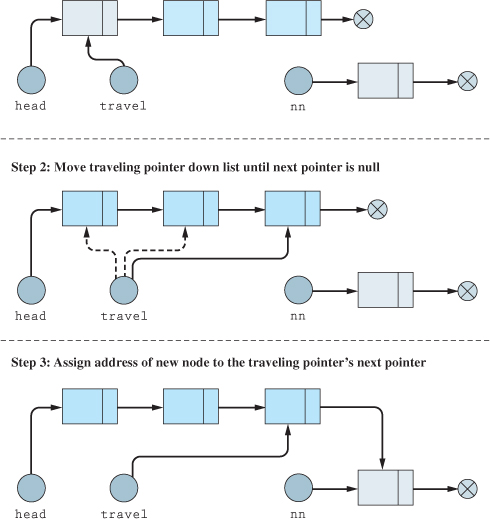
Figure 18.4.1 Appending a node
To find the end of the list, the concept of a traveling pointer is introduced. A traveling pointer is a pointer that will be used to traverse the list. This process is shown in Figure 18.4.1.
The only thing the diagram in Figure 18.4.1 doesn't address is the special case of appending a node to an empty list. This only requires a check to see if head is null and then, if so, assigns the address of the new node to head. The resulting pseudocode is shown in Figure 18.4.2.
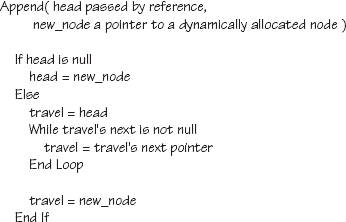 |
Figure 18.4.2 Pseudocode for appending a node
Section 18.4 Exercises
1. A pointer used to traverse a list is called a _________________.
2. What is wrong with the following pseudocode, which was written to append a node to a linked list? Explain in detail what would happen if the pseudocode was implemented as shown.

Section 18.4 Learn by Doing Exercise
1. Expand on the program written for Section 18.3 Learn by Doing Exercise 1 to include a function that appends a node to the list. Write the necessary function, compile, run, and test your program. Obviously there will be memory leaks, but for now, ignore them. Use your debugger to ensure that the linked list is being created correctly.
18.5 Inserting a Node into an Ordered List
The last option for inserting a node involves placing it in the middle of a list. Usually this situation only arises when placing a node in an ordered list. In an ordered list, each node is inserted into the list in a specified order. Therefore, the list is always ordered. This is different than a sorted list, in which nodes are placed at the beginning or end of the list and then a sorting algorithm is applied to the list.
When inserting a node into an ordered list, there are four situations we need to be prepared to handle:
1. The list is empty.
2. The new node is to be placed before the current head.
3. The new node is to be placed at the end of the list.
4. The new node is to be placed between two existing nodes.
Since the first three situations have been addressed in the previous sections, we only need to diagram the last situation. There are many ways to accomplish this algorithm, but we have found the approach shown in Figure 18.5.1 to be an easy way for programmers new to linked lists to visualize the necessary steps. This algorithm introduces the concept of a trailing pointer. The job of the trailing pointer is to trail one node behind the traveling pointer. The reason for this pointer will become clear as we examine the diagram in Figure 18.5.1.
As stated earlier, the situation diagrammed in Figure 18.5.1 can be accomplished without the trailing pointer; it is just a convenient technique to use. Figure 18.5.2 shows the pseudocode that addresses all four situations of inserting nodes into an ordered list.
As you can see from the pseudocode in Figure 18.5.2, with a little careful planning we can take care of multiple situations in each section of the if statement. The if statement itself handles situations 1 and 2, and the else handles situations 3 and 4.
Notice the <= in the if statement. This was included to handle the insertion of duplicate data. Without the check for equality, when inserting a duplicate item, the flow of the program would continue to the else. The while loop's condition would then be evaluated as false, thus never executing the body of the loop and leaving the trailing pointer assigned to null. When an attempt is made to assign the address of the new node to the trailing pointer's next pointer, the program will crash because the trailing pointer is still null.
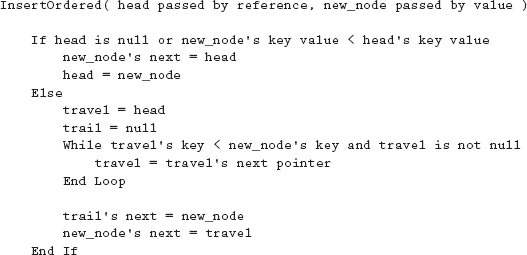
It is also crucial to understand the while loop shown in Figure 18.5.2. Examine the code in Example 18.5.1. Notice that the conditions have been reversed from those given in Figure 18.5.2.
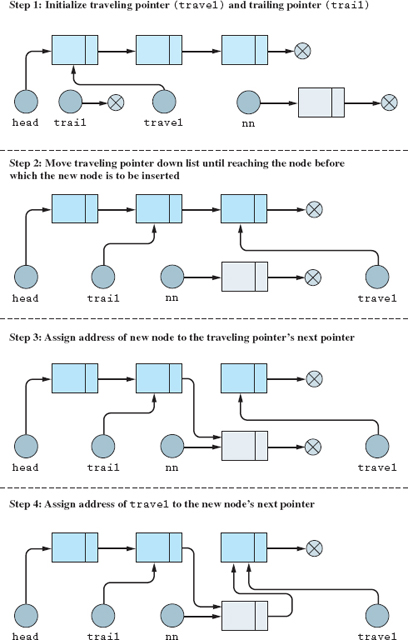
Figure 18.5.1 Inserting a node between two existing nodes
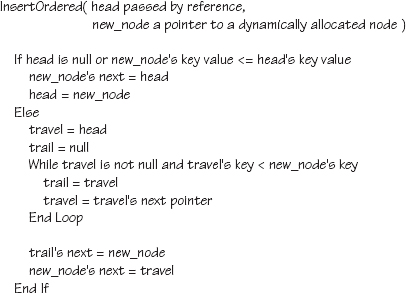 |
Figure 18.5.2 Pseudocode for inserting a node into an ordered list
On the surface, both loops appear to work in the same way. However, the loop shown in Example 18.5.1 will cause your program to crash if inserting a node at the end of the list because when inserting the node at the end, the traveling pointer becomes null. Therefore, trying to access the data members of the traveling pointer will cause your program to crash with a memory access violation.
So how does the loop in Figure 18.5.2 work? As discussed in Chapter 7, C++ performs short-circuit evaluation, which means that as soon as the outcome of a condition can be determined, no additional pieces of the condition need to be examined. Therefore, when the traveling pointer is null, the part of the condition that accesses the data member of the traveling pointer is not evaluated.
Section 18.5 Exercises
1. A pointer used to follow behind a traveling pointer is called a _________________.
2. Explain short-circuit evaluation.
3. What is wrong with the following pseudocode, which was written to insert a node into an ordered linked list? Explain in detail what would happen if the pseudocode was implemented as shown.
Section 18.5 Learn by Doing Exercise
1. Expand on the program written for Section 18.4 Learn by Doing Exercise 1 to include a function that inserts a node into the list ordered by the id member. Write the necessary function, compile, run, and test your program. Obviously there will be memory leaks, but for now, ignore them. Use your debugger to ensure that the linked list is being created correctly.
18.6 Traversing the List
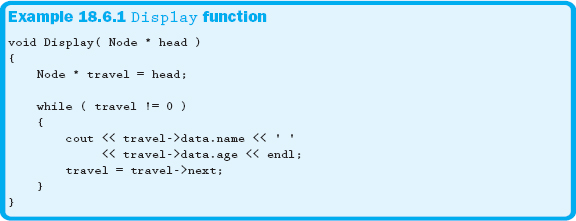
As you have seen from the insertion examples in the previous sections, lists are sequential in nature. No matter what you are trying to do, it is necessary to start at the front of the list. We have also seen how to traverse through a list using a traveling pointer to get to some desired location within the list. It is easy to take this concept and use it to display the contents of a list, as shown in Example 18.6.1.
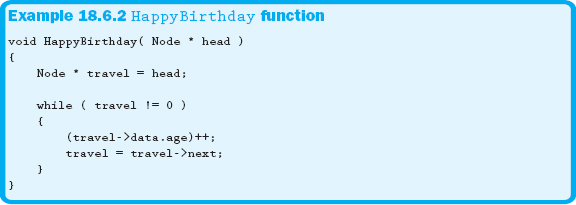
The same basic traversal algorithm is used when performing any action on all nodes of the list. Example 18.6.2 shows the code that increments every-body's age.
As you can see from the previous two examples, there is a lot of overlapping code. Although this is fine, we can make it better by passing a function pointer that will be called to perform the action required of the traversal. Example 18.6.3 shows a traversal that performs the action by calling a function via a function pointer.
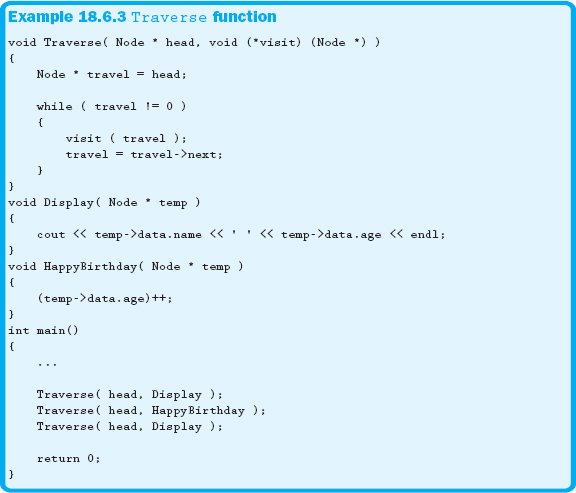
As illustrated in Example 18.6.3, there are many things that can be done by passing a function pointer to the Traverse function. The only requirement is that each function accepts a pointer to a specific node in the list.
Another option for traversing the list uses a recursive function. Remember from Chapter 16 that any algorithm written using loops can also be written using recursion. Therefore, we can modify our Traverse function, rewriting it as a recursive function, as shown in Example 18.6.4.


Although the code doesn't change much, the traversal function is now implemented using a recursive algorithm. So why do this recursively when there is so much more overhead? One useful side effect of this algorithm is that simply swapping the two lines in the if statement will display the list in reverse order.
Section 18.6 Exercises
1. When traversing the list, you will usually need to start at:
a. the node containing the null
b. the front of the list
c. the end of the list
d. the current location of the trailing pointer
2. True or false: It is not possible to use a recursive function when traversing the linked list.
Section 18.6 Learn by Doing Exercises
1. Expand on the program written for Section 18.5 Learn by Doing Exercise 1 to include a function that displays the contents of the linked list. Write the necessary function, compile, run, and test your program. Obviously there will be memory leaks, but for now, ignore them.
2. Change the display function from the previous exercise so that it is implemented using recursion.
3. Add a display function that displays the list backward.
18.7 Deleting Nodes
Another task for which it is necessary to provide functionality is the deletion of nodes. The most important deletion activity is destroying or purging the list. Obviously, if this isn't done, your program will contain a multitude of memory leaks. And while it is necessary to be able to insert information into the list, we need to be able to remove it as well.
As was just stated, it is crucial to purge the list of all nodes when it is time to destroy the list. This function should definitely be called prior to the program exiting. In addition, this function could also be used to remove all of the nodes and return the list back to its original state. Although there are many algorithms that accomplish this task, the one shown here ensures that the head pointer is assigned null when the function is complete. Regardless of the algorithm you choose, always assign null to head when this function is used. Otherwise there won't be any way to determine if the list is empty, and there will be a possibility of making the other list functions work incorrectly.
![]()
Remember: When dynamic memory is deallocated, the pointer doesn't change even though the address in the pointer is no longer valid.
Unlike many of the other list algorithms, the purge algorithm uses head as the traveling pointer. We will still use the trailing pointer, as previously seen. The diagram representing one execution of the loop body is shown in Figure 18.7.1.
The process diagrammed in Figure 18.7.1 continues until there are no more nodes. The pseudocode for the Purge function is shown in Figure 18.7.2.
In the pseudocode in Figure 18.7.2, when the function is done, head will be null, thus resetting the head pointer to an empty list state.
18.7.2 Deleting a Specific Node from an Ordered List
The algorithm for deleting a specific node in an ordered list is fairly complicated. However, the algorithm can be broken down into the following situations, based on the location from which the node is deleted.
1. The list is empty.
2. The node to be deleted is head.
3. The node to be deleted is the last node in the list.
4. The node to be deleted is between two nodes.
5. The information to be deleted doesn't exist in the list.
The first and last situations in the preceding list are considered problematic states that need to be handled according to the specifications of your program. This could be a simple error message stating that the item to be deleted doesn't exist. Since deleting head was addressed in the previous section, we will illustrate only the issue of deleting a node from between two nodes, as shown in Figure 18.7.3, which can also be applied to deleting the last node in the list.
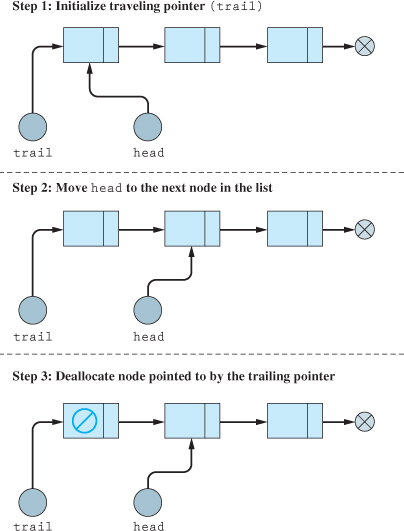
Figure 18.7.1 Purging the list
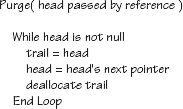 |
Figure 18.7.2 Pseudocode for purging a list
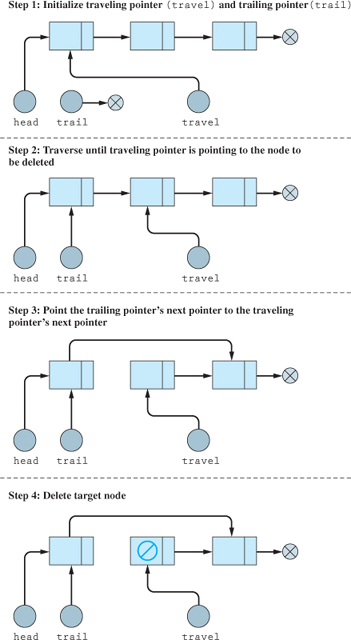
Figure 18.7.3 Deleting a node from between two nodes
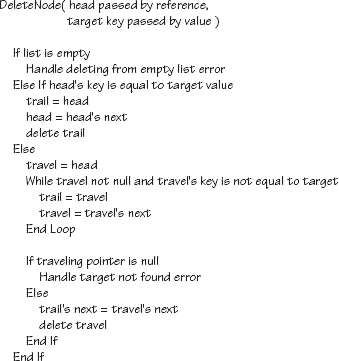 |
Figure 18.7.4 Pseudocode for deleting a specific node
By carefully examining the diagram in Figure 18.7.3, it will become clear that this same algorithm will work even if the node to be deleted is the last one in the list. Combining this algorithm with the other situations presented earlier results in the pseudocode shown in Figure 18.7.4.
Section 18.7 Exercises
1. True or false: Failing to delete one or more of your nodes from a dynamically linked list would result in a memory leak.
2. After the linked list has been deleted, it is important to always set the head pointer to:
a. true
b. false
c. null
d. −1
e. 0
3. True or false: Attempting to delete a node that has already been deleted will cause an error.
Section 18.7 Learn by Doing Exercises
1. Continuing with the expansion of the program developed in the Learn by Doing Exercises for this chapter, write the function that deletes all nodes from the linked list. Be sure to use the memory-leak-detection techniques discussed in Chapter 12. Run and test your program.
2. Add the capability to the previous exercise to delete a specific node from the list. Be sure to test all paths through your function to ensure that all five situations discussed in this section are addressed.
18.8 Arrays Versus Linked Lists
Now that you are more familiar with linked lists, it is time to summarize the pros and cons of arrays and linked lists. Table 18.8.1 lists these characteristics.
As shown in Table 18.8.1, if there are elements frequently added to the data structure, a linked list is the better choice. If the size of the data structure is to remain the same and the number of elements is known at compile time, an array is a good choice. Dynamic arrays are good for those situations in which the number of elements will not change, or will change very little, but the number of elements is unknown until runtime. Also, because a binary search can be easily used with an array, searching is much more efficient. The bottom line is that the data structure to be used should be determined by the situation.
18.9 Problem Solving Applied
Throughout the text we have introduced and applied a number of strategies a programmer or software engineer could use to aid in general problem solving and designing programs. To explore one of these strategies in detail, Chapter 2 presented a seven-step development process. The first step of this process involved defining the problem, and the second step concerned developing the requirement specification. While both of these steps sound simple enough, it is obvious that as problems or applications become more complex, both of these activities can prove to be challenging. Within this section we make one final attempt at illustrating how to complete the first two steps of the development process.
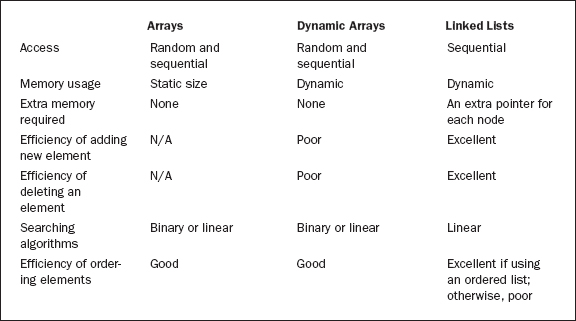
Table 18.8.1 Arrays versus linked lists
In this example, Troy has been assigned yet another project. To help fill you in on the details, Troy meets with you and gives you the following information.
The issues he is trying to address revolve around managing the customers for a local small business. Apparently the owner needs an application for a credit company that simply allows for the addition, editing, and deletion of customers. The owner is not looking for an extensive system, but only wants to be able to generate a couple of reports. The first report would list the first and last names of each customer along with their home and work telephone numbers. The second report would include the same information as the first, along with the person's credit limit and their actual credit balance.
Remember that the first step of our design process involves defining the problem. In addition, recall that an error in this first step is likely to be very costly in terms of both money and time. In Step 1, we have condensed our conversation with Troy into the following problem statement.
Step 1: Define the Problem
To design and develop an application for managing the credit information of the customers for a small business.
Now that we have clearly defined the problem, we will move on to the second step in our process, the requirement specification. In developing the requirement specification, we first remove all the ambiguities in our problem statement. Next we have to determine the inputs and outputs for our application. The culmination of this step results in a list of items that our credit program must meet.
After again reviewing the conversation we had with Troy, we developed the list of requirements shown in Step 2.
Step 2: Requirement Specification
The inputs include:
First name
Last name
Home telephone number
Work telephone number
Credit limit
Credit balance
The outputs include:
Report 1—Customer Contacts
Last name
First name
Home telephone number
Work telephone number
Report 2—Customer Credit Limits and Balances
First name
Last name
Home telephone number
Work telephone number
Credit limit
Credit balance
Users should be able to perform each of the following tasks:
Add new customers
Edit exiting customer information
Delete customers
Generate the two reports requested
Now that the first two steps of the development process have been completed, it would be a good time to talk to Troy to make sure you have understood his requirements. If you have done your job correctly and Troy hasn't changed his mind, you are ready to move on to Step 3 of the development process, the design phase. This example will be continued in the Team Programming section toward the end of this chapter.
18.10 C—The Differences
Since the linked lists in this chapter were created using structures, there really aren't very many differences between C and C++. In fact, the concepts in this chapter are fairly generic and can be implemented with almost any language. Just remember that in C, passing by pointer is the appropriate manner in which to pass a variable so that it can be changed.
18.11 SUMMARY
This final chapter has introduced you to linked lists, one of the more fundamental and powerful data structures associated with programming. The chapter began by briefly reviewing and extending the concept of data structures by graphically illustrating a number of methods for storing data, including an array, a linked list, and a binary tree.
Throughout the remainder of the chapter the emphasis was on visualizing and manipulating a singly linked list. As noted, a linked list is simply a data structure that contains information in nodes that are all connected by a pointer to the next node in the list.
One of the first tasks examined in working with linked lists centered on inserting new nodes. We explored a number of alternatives, including the easiest option, which is simply inserting the node at the front or head of the list.
Another option involved placing the new node at the end of the list. To help support this approach, we introduced the concept of a traveling pointer to help in traversing the list.
The final approach to inserting a new node dealt with putting the node into an ordered list. In this method, the node is actually placed in the list in a specific order, thus ensuring that the list is always ordered.
Next we presented an approach to use when deleting the nodes contained in our list. As discussed a number of times previously in the text, if the programmer allocates any memory dynamically, it is imperative that he or she also delete that memory, including all the nodes within a linked list.
As you can see, the linked list is truly a powerful data structure and another important tool with which the programmer needs to be familiar. It provides some real advantages over arrays—for example, unlike an array whose size is fixed at the time you compile your program, a dynamically allocated linked list is free to grow as needed without any waste-related issues. It is important for you to realize that linked lists are often used as the basis for a number of other, more advanced data structures that you may indeed encounter in the future.
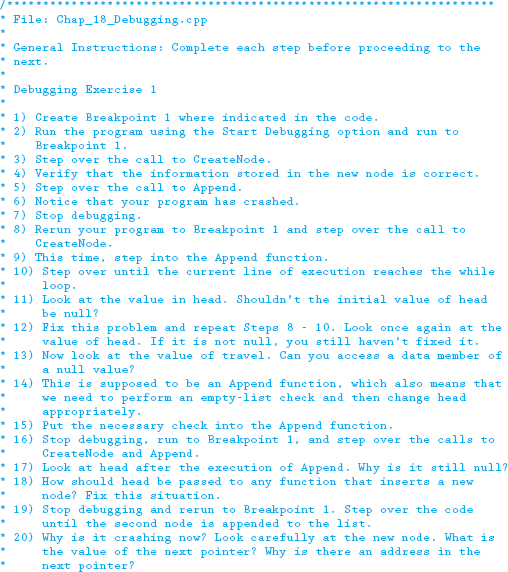
18.12 Debugging Exercise
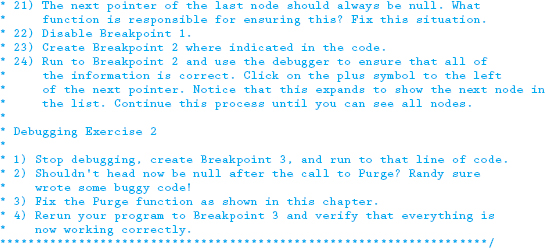
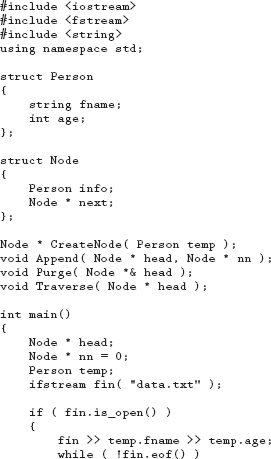
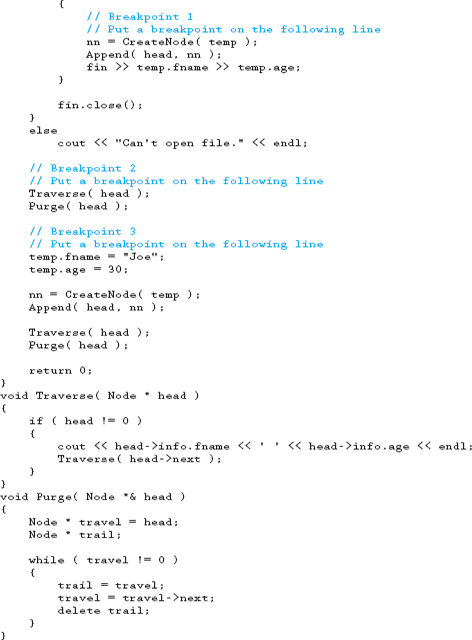
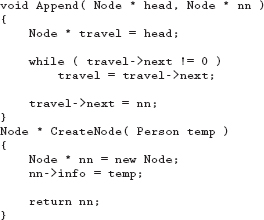
Download the following file from this book's website and run the program following the instructions noted in the code.
18.13 Programming Exercises
1. Create a program that allows a person to keep track of what music is currently on his or her iPod or MP3 player. When the program is executed, it will read a binary file that contains a list of all the music currently loaded on the user's iPod or player. This information will be placed into an ordered linked list. The user will then be able to manipulate the information stored in the list via the following menu.
1. Search by Song—Check to see if a song is currently on the device.
2. Search by Artist—List all songs by a specific artist.
3. Add—Add a song to the linked list.
4. Batch Add—Read a text file and add all music listed in the text file to the list.
5. Remove—Remove a song from the list.
6. Batch Remove—Read a text file and remove all music listed in the file from the list.
7. Save—Save the list to the binary file.
8. Exit—If any changes have been made since the last save, prompt the user to see if he or she wants to save those changes.
The structure for your data should contain members for such pertinent information as song title and artist. The linked list should be ordered by song title.
2. The computer department needs a program to keep track of equipment checked out to students. When a lab assistant checks out the equipment to a student, he or she needs to keep track of the student's name and major, equipment checked out, and date and time of the transaction. The following is an example of a menu that might be displayed when the program is run.
1. Display all equipment checked out
2. Display all equipment checked out to a specific student
3. Display all students that currently have a specific piece of equipment
4. Check out a piece of equipment
5. Check in a piece of equipment
6. Exit
To keep the check-out and check-in procedures running smoothly, use menus to speed up the process. When the program is executed, a text file that has a list of majors and another text file that contains a list of commonly-checked-out equipment will be read. Each one of these files will be stored in its own linked list. During the check-out process, the information from these lists will be displayed in the form of a menu so that the lab assistant can quickly choose the appropriate item from the menu.
There will be times when the item doesn't appear on the list, so the lab assistant will need to be able to choose “Other” from the submenu and then be prompted for the appropriate information. These other entries will then be added to the correct linked list, and upon exiting, the text file will be updated.
The date and time of the transaction—whether checking out or checking in equipment—will be automatically retrieved from the system time. Use the C functions time, localtime, and asctime to determine the date and time.
3. For an added challenge, write Programming Exercise 1 using a doubly linked list.
18.14 Team Programming Exercise
In the Problem Solving Applied section of this chapter, we reviewed and demonstrated the first two steps involved in the development process. Within this section we continue the credit application example and ask you to complete the remaining steps involving the design, implementation, and testing phases of the development process.
Now that Troy has received and approved the requirement specification for this small software program, he needs you to continue developing the application. He has provided some additional information and has asked that you make it a point to clearly document all of the remaining development steps. He is looking forward to seeing your finished application soon.
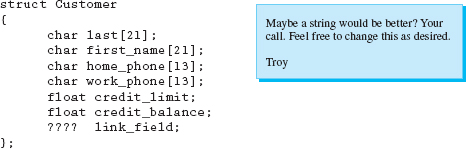
Additional Software Artifacts and Notes Supplied by Troy
Troy's rough idea of a possible layout for the various records:
![]()
First attempt at one of the possible UDTs for the application:
Format for one of the two required reports:

18.15 Answers to Chapter Exercises
Section 18.1
1. A data structure is a method for storing data so that information can be accessed and used efficiently.
2. True
Section 18.2
1. b. nodes
2. True
3. c. null
e. 0
4. b. doubly linked list
5. c. pointer to the head node
d. pointer to the last node
6. Node * head = 0;
7. True
Section 18.3
1. b. prepending a node
2. Allocate a new node
Assign the desired data to the new node
Set the next pointer to null
Return a pointer to the new node
3. Any changes made to the head pointer will not remain after the function is terminated because it was passed by value, not reference. In addition, the next pointer for the new node is never assigned the contents of the head pointer, so we have lost the link or connection to the existing members of our list.
Section 18.4
1. traveling pointer
2. The problem with the pseudocode is that it doesn't handle the case of appending a node to an empty list. If implemented as shown and the list were empty, the head pointer would not be assigned the value of our only node, new_node.
Section 18.5
1. trailing pointer
2. As soon as the outcome of a condition can be determined, the evaluation process ends. For example, if the first part of an && expression were false, there would be no need to continue because the results would be false.
3. In the first if statement, we should have checked for <=, not just <. Remember, we need to include the equality check to be able to deal with the insertion of duplicate data into the list. If we don't check and we have a duplicate item, the flow of the program continues on to the else. The while condition would then be evaluated as false, thus never executing the body of the loop and leaving the trailing pointer assigned to null. When an attempt is made to assign the address of the new node to the trailing pointer's next pointer, the program will fail because the trailing pointer continues to be set to null.
Section 18.6
1. b. the front of the list
2. False
Section 18.7
1. True
2. c. null
e. 0
3. True