
Lesson 9
Creating and Displaying New Forms
Most of this book so far has dealt with building forms. Previous lessons explained how to add, arrange, and handle the events of controls on a form. They explained how to work with specific kinds of controls such as Buttons, MenuStrips, ContextMenuStrips, and ToolStrips. Using these techniques, you can build some pretty nice forms that use simple code to manipulate properties. So far, however, you've only learned how to use a single form.
In this lesson you learn how to display multiple forms in a single program. You see how to add new forms to the project and how to display one or more instances of those forms. Once you've mastered these techniques, you can make programs that display any number of forms for all kinds of different purposes.
Adding New Forms
To add a new form to a project, open the Project menu and select Add Windows Form to see the dialog shown in Figure 9.1.

Leave the Windows Form template selected, enter a good name for the new type of form, and click Add. After you click Add, Visual Studio adds the new form type to the project. Figure 9.2 shows the new form in Solution Explorer.

Now you can add Labels, TextBoxes, Buttons, MenuStrips, and any other controls you like to the new form.
Understanding Classes and Instances
When you add a new form to the project, you're really adding a new type of form, not a new instance of that type. If you add the MakeUserForm type to a project and then run the program, you still only see the original startup form (with the catchy name Form1) and MakeUserForm is nowhere to be seen.
Form types such as Form1 and MakeUserForm are classes. They're like blueprints for making copies of the class, which are called instances. These are important and sometimes confusing topics so I'm going to explain them briefly now and explain them again in greater detail later in the book in the lessons in Section IV.
A class defines the characteristics of any objects from that class. Your code can use the new keyword to create objects of the class. Once you define the class you can make as many copies (instances) as you like, and every copy is identical in structure to all of the others. Different instances may have different property values but their overall features are the same.
For a form example, suppose you define a MakeUserForm that has First Name, Last Name, Street, City, State, and ZIP Labels and TextBoxes. Now suppose your program displays two instances of this form class. Both of the forms will have the same Labels and TextBoxes, so they have basically the same structure. However, the user can type different values into the two forms.
Your code can also change different instances in various ways. For example, menu items, buttons, and other controls could invoke event handlers that modify the form: change its colors, move controls around, resize the form, or whatever. Here's one of the more potentially confusing features of classes: the code in the event handlers modify the form that is currently running the code.
For example, suppose you build a form that has three Buttons that change the form's BackColor property to red, green, and blue, respectively, and then you display three instances of the form. When the user clicks the first form's Red button, the event handler makes the first form red but the other forms are unchanged. The code in the event handler is running in the first form's instance so that's the form it affects.
If you then click the Green button on the second form, the event handler changes that form's background color to green. The first form still has its red background and the third form still has its original background color.
Hopefully by now you think I've beaten this topic into the ground and you understand the difference between the class (MakeUserForm) and the instance (a copy of MakeUserForm visible on the screen). If so, you're ready to learn how to actually display forms.
Displaying Forms
The new keyword creates a new instance of a form. If you want to do anything useful with the form, your code needs a way to refer to the instance it just created. It can do that with a variable. I'm jumping the gun a bit by discussing variables (they're covered in detail in Lesson 11) but, as was the case when I introduced the if statement in Lesson 8, this particular use of the concept is very useful and not too confusing, so I feel only a little guilty about discussing it now.
In short, a variable is a named chunk of memory that can hold a piece of data. To declare a variable to refer to a form instance, you enter the form's type followed by whatever name you want to give the variable. For example, the following code declares a variable named newUserForm of type MakeUserForm:
MakeUserForm newUserForm;At this point, the program has a variable that could refer to a MakeUserForm object but right now it doesn't refer to anything. It's like an empty envelope that could hold a MakeUserForm instance. At this point the variable contains the special value null, which basically means it doesn't refer to anything.
You can use the new keyword to create a new instance of the form class. You can then set the variable equal to the new form instance. For example, the following code creates a new MakeNewUser form and makes the newUserForm variable point to it:
newUserForm = new MakeUserForm();Now the variable refers to the new form. The final step is to display the new form. You can do that by calling the new form's ShowDialog or Show method.
The ShowDialog method displays the form modally. That means the form appears on top of the program's other forms and the user cannot interact with the other forms until this form closes.
This is the way dialogs normally work. For example, when you open the Project menu and select Add Windows Form, the Add New Item dialog displays modally so you cannot interact with other parts of the IDE (such as the Properties window, Solution Explorer, or menus) until you close the dialog by clicking Add or Cancel.
The following code displays the form referred to by the variable newUserForm modally:
newUserForm.ShowDialog();The Show method displays the form non-modally. That means the form appears and the user can interact with it or with the program's other forms.
The following code displays the form referred to by the variable newUserForm non-modally:
newUserForm.Show();The UserForms example program shown in Figure 9.3 displays a main form with a New User button. Each time you click the button, the program displays a new MakeUserForm non-modally. Figure 9.3 shows the main form and two MakeUserForms.

The following code shows how the UserForms program displays a new MakeUserForm when you click its button:
private void newUserButton_Click(object sender, EventArgs e)
{
    MakeUserForm newUserForm;
    newUserForm = new MakeUserForm();
    newUserForm.Show();
}
The code declares a variable to refer to the form, creates the new form instance, and displays the instance non-modally.
Each time you click the button, the event handler executes again. Each time it runs, the event handler creates a new version of the variable named newUserForm, makes a new instance of the MakeUserForm, and displays that instance, so each time you click the button, you get a new form.
Controlling Remote Forms
When you create a new form and make a variable to refer to it, you can later use that variable to manipulate the form. There's just one catch: the techniques described so far don't keep the new form variable around long enough to be useful.
For example, the following code defines the newUserForm variable, makes it point to a new form, and displays the form:
private void newUserButton_Click(object sender, EventArgs e)
{
    MakeUserForm newUserForm;
    newUserForm = new MakeUserForm();
    newUserForm.Show();
}
When the program finishes executing the event handler, the event handler stops running. If the user clicks the button again, the event handler springs back into action.
Unfortunately, when the event handler stops running, it loses its grip on the newUserForm variable. The next time the event handler runs, it creates a new variable named newUserForm and works with that one.
This is bad for a program that wants to manipulate the new form later. Because the variable is gone, it can't refer to it so it can't manipulate the form.
The good news is that this is fairly easy to fix. If you move the variable's declaration out of the event handler, the variable exists throughout the program's lifetime. The event handler can make the variable point to a new form, and it can then use the variable later to manipulate that form.
The RemoteForm example program shown in Figure 9.4 uses the following main form code to manage a secondary ColorForm:
// The remote form we will manipulate.
ColorForm remoteColorForm;
// Create and display the remote form.
private void Form1_Load(object sender,  EventArgs e)
{
    remoteColorForm = new ColorForm();
    remoteColorForm.Show();
}
// Make the color form red.
private void redButton_Click(object sender, EventArgs e)
{
    remoteColorForm.BackColor = Color.Red;
    remoteColorForm.ForeColor = Color.Pink;
}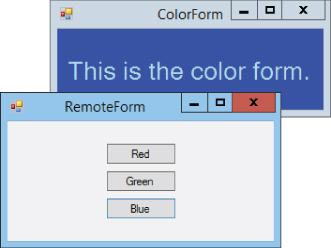
The code starts by declaring the variable remoteColorForm outside of any event handler.
When the program displays the main form, its Load event handler creates and displays a new ColorForm.
When the user clicks the main form's Red button, its event handler changes the remote form's BackColor and ForeColor properties to red and pink, respectively. The startup form also contains green and blue buttons that have similar event handlers.
The remoteColorForm variable is declared outside of the event handlers, so the event handlers have access to it. The form's Load event handler initializes the variable and displays the remote form. The redButton_Click event handler uses it. Because the variable is declared outside of the event handlers, they can all use it. (Lesson 13 has more to say about when and where variables are available to the code.)
In addition to modifying a remote form's properties, you can change the properties of the controls on that form. You refer to a control by using the form variable, followed by a dot, followed by the control's name.
For example, the bold line in the following code accesses the form referred to by the remoteColorForm variable. It locates that form's messageLabel control and changes its Text property to “I'm red!”:
private void btnRed_Click(object sender, EventArgs e)
{
    color_form.BackColor = Color.Red;
    color_form.ForeColor = Color.Pink;
    color_form.lblMessage.Text = "I'm red!";
}
There's one small catch to this technique: by default the controls on a form are private so the code in other forms can't manipulate at them. You can easily fix this by setting a control's Modifiers property to Public, either in the Form Designer or in code. Now other forms can see the control and change its properties.
Try It
In this Try It, you create an application similar to the one shown in Figure 9.5. When the user clicks the main form's buttons, the program displays the other forms non-modally.

Lesson Requirements
In this lesson, you:
- Create the forms shown in Figure 9.5.
- Declare the form variables outside of any event handler.
- In the main form's
Loadevent handler, add code to create the form instances but don't display the forms. - Add code to the main form's
Buttonevent handlers to display the corresponding secondary forms non-modally.
Hints
- Normally every form appears in the taskbar. To avoid cluttering the taskbar with all of the secondary forms, set their
ShowInTaskbarproperties toFalse.
Step-by-Step
- Create the forms shown in Figure 9.5.
- Create the main form.
- Start a new project. In the Properties window, expand the main form's
Fontproperty and set itsSizesubproperty to 12. - Add the
Buttons. Center them as a group and set theirAnchorproperties toNone.
- Start a new project. In the Properties window, expand the main form's
- Create the
GettingThereForm.- Open the Project menu and select Add Windows Form. Enter the form type name
GettingThereFormand click Add. - Set the form's
ShowInTaskbarproperty toFalse. - Add the
Label,ListBox, andButtons. Set theListBox'sAnchorproperty toTop, Bottom, Left. Set theButtons'Anchorproperties toBottom, Right.
- Open the Project menu and select Add Windows Form. Enter the form type name
- Create the
GettingAroundForm.- Repeat step 2 for the
GettingAroundForm.
- Repeat step 2 for the
- Create the
LodgingForm.- Repeat step 2 for the
LodgingForm.
- Repeat step 2 for the
- Create the
FunStuffForm.- Repeat step 2 for the
FunStuffForm. Leave theCheckBoxes'Anchorproperties with their default valuesTop, Left.
- Repeat step 2 for the
- Create the main form.
- Declare the form variables outside of any event handler.
- Add the following to the main form's code module outside of any event handlers:
// The remote forms.
GettingThereForm gettingThereForm;
GettingAroundForm gettingAroundForm;
LodgingForm lodgingForm;
FunStuffForm funStuffForm;
- Add the following to the main form's code module outside of any event handlers:
- In the main form's
Loadevent handler, add code to create the form instances but don't display the forms.- Use code similar to the following:
// Initialize the forms but don't display them.
private void Form1_Load(object sender, EventArgs e)
{
    gettingThereForm = new GettingThereForm();
    gettingAroundForm = new GettingAroundForm();
    lodgingForm = new LodgingForm();
    funStuffForm = new FunStuffForm();
}
- Use code similar to the following:
- Add code to the main form's
Buttonevent handlers to display the corresponding secondary forms non-modally.- Create the
Button Clickevent handlers and make each call the corresponding form variable'sShowmethod:// Display the getting there form. private void gettingThereButton_Click(object sender, EventArgs e) { gettingThereForm.Show(); } // Display the getting around form. private void gettingAroundButton_Click(object sender, EventArgs e) { gettingAroundForm.Show(); } // Display the lodging form. private void lodgingButton_Click(object sender, EventArgs e) { lodgingForm.Show(); } // Display the fun stuff form. private void funStuffButton_Click(object sender, EventArgs e) { funStuffForm.Show(); }
- Create the
Exercises
- Build the UserForms application shown in Figure 9.3.
- [WPF] Repeat Exercise 1 with a WPF application. (Hint: Don't forget to make all of the forms close when you close the main window.)
- Build the RemoteForm application shown in Figure 9.4.
- [WPF] Repeat Exercise 3 with a WPF application. Hints:
- In WPF, set colors equal to brushes as in
Brushes.Red. - To set the remote window's background color, set its
Backgroundproperty. - To set the remote form's text color, set the
Label'sForegroundproperty. - You don't need to set the
Modifiersproperty in WPF. (WPF controls don't have that property.)
- In WPF, set colors equal to brushes as in
- Modify the program you wrote for Exercise 3 so the buttons also change the label on the color form. For example, the Red button should make the label say, “I'm red!” (Hint: Don't forget to set the
Label'sModifiersproperty toPublic.) - [WPF] Repeat Exercise 5 with the WPF application you built for Exercise 4.
- [WPF] Repeat the Try It with a WPF application. (Hint: Don't forget to set the
ShowInTaskbarproperty.) - Unfortunately the Try It has a major problem. If you close one of the secondary forms and then click the main form's button to redisplay that form, the program crashes.
When you close the form, it is destroyed. When you click the button again, the program tries to display the destroyed form and that won't work.
To fix the program, give each of the secondary forms a
FormClosingevent handler similar to the following:private void LodgingForm_FormClosing(object sender, FormClosingEventArgs e) { e.Cancel = true; Hide(); }The first statement cancels the close so the form stays open. The second statement makes the form invisible but keeps it alive.
- [WPF] Repeat Exercise 8 for the WPF program you built in Exercise 7. (Hint: In WPF you need to use the
Closingevent.) - Make a program that displays a
Buttonthat says “New Form.” When the user clicks theButton, display a new non-modal instance of the same kind of form. (What happens when you click the new form's button? What happens if you close the new form? What happens if you make several forms and then close the original one?) - [WPF] Repeat Exercise 10 with a WPF application. After you experiment a bit, set
Application.Current.ShutdownMode = ShutdownMode.OnMainWindowCloseand test the program again. - Copy the program you made for Exercise 10 and add a
TextBoxnamedvalueTextBoxto the form. Before you display the new form, copy the main form'sTextBoxvalue into the new form'sTextBox. (Hint: You don't need to set theTextBox'sModifiersproperty toPublicbecause the new form is the same kind as the old one. You need to do this only if a form of one type wants to peek at the controls on a form of a different type.) - [WPF] Repeat Exercise 12 with the WPF program you made for Exercise 11.
- Make a program that displays a
TextBoxand a “New Form”Button. When the user clicks theButton, display a new form of typeMessageFormmodally.The
MessageFormholds twoLabels. The firstLabelsays “You entered.” The second is blank. When it displays theMessageForm, the main program should copy whatever is in itsTextBoxinto theMessageForm's second label. (Hint: Now you need to set the label'sModifiersproperty toPublic.) - [WPF] Repeat Exercise 14 with a WPF application.
- Build the Pick A Picture program shown in Figure 9.6. When the user clicks one of the thumbnail images on the main form, the program displays a
PictureFormshowing the image at full scale. Use whatever images you like.
Hints:
- Display the thumbnail images in
PictureBoxes withScaleModeset toZoom. - Place a
PictureBoxwithLocation = (0, 0)on thePictureForm. Set itsSizeModeproperty toAutoSize. - Just before you display the
PictureForm, use the following code to make it fit thePictureBoxit contains:newPictureForm.ClientSize = newPictureForm.imagePictureBox.Size
- Display the thumbnail images in
- [WPF] Repeat Exercise 16 with a WPF application. Hints:
- On the
PictureWindow, set the size of theImagecontrol to match the size of the pictures. - To make the
PictureWindowfit theImagecontrol, set the window'sSizeToContentproperty toWidthAndHeight.
- On the
- [Bonus] As I've mentioned before, redundant code is usually a sign that the program's structure can be improved. The Pick A Picture program from Exercise 16 uses four practically identical event handlers. The only difference is the image that they assign to the
PictureForm's background.You can improve this program by making all four
PictureBoxes use the same event handler and making the event handler figure out which image to use.The event handler's
senderparameter is the control that raised the event, in this case, thePictureBoxthat the user clicked. The data type of that parameter isobject, but it actually holds aPictureBox. You can get a variable that refers to thatPictureBoxby using theaskeyword.The
askeyword tells the program to treat some value (in this case thesenderparameter) as if it were some other type (in this case aPictureBox). The following code shows how you can get a variable that treats thesenderparameter as aPictureBox:PictureBox selectedPictureBox; selectedPictureBox = sender as PictureBox;Copy the program you built for Exercise 16. Modify the first event handler so it uses the
askeyword to get a reference to thePictureBoxthat the user clicked and then uses that reference to display the correct picture. Then make all of thePictureBoxes share that event handler. - [Bonus, WPF] Repeat Exercise 18 for the WPF application you build in Exercise 17.