
Lesson 34
Programming Databases, Part 1
Database programming is another truly enormous topic, so there isn't room to cover it all here. However, Visual Studio provides tools that make some simple kinds of database programs so easy to write that your education won't be complete until you've written a few.
In this lesson, you learn how to make a simple database application. You learn how to connect to a database, load data, let the user navigate through records, and save any changes.
Connecting to a Database
The first step in building a database program is giving it a connection to the data. You can easily do this interactively at design time, although it requires quite a few steps:
- First open the Project menu and select Add New Data Source to display the dialog shown in Figure 34.1. As you can see in the figure, you might want the program to get data from several different places. The data source used in this example is a database, so select Database and click Next.
- The dialog's next screen lets you decide whether you want to use a data set or an entity data model for your data. (The entity data model option won't be there if you don't have the entity framework tools installed. You won't be using an entity data model in this lesson, so if that option doesn't appear, don't worry about it.) For this example, pick Dataset and click Next to make the dialog display the screen shown in Figure 34.2.


- If you have previously built data connections, you can pick one from the dropdown list. Otherwise, click the New Connection button to display the dialog shown in Figure 34.3.

For this example, select Microsoft Access Database File and click Continue to see the dialog shown in Figure 34.4.

Enter the name of the database in the textbox or click the Browse button and select it. When you're finished, if you like, you can click Test Connection to see if Visual Studio can connect to the database.
Click OK to create the new connection and return to the dialog shown in Figure 34.2.
- When you click Next, Visual Studio asks whether you want to include the database in the project. Click Yes to copy the database file into the project so it can easily be distributed with the program.
- The dialog's next page asks whether you want to include the database connection string in the program's configuration file so the program can use that string to connect to the database at run time. This is often convenient because it lets you change the connection string without rebuilding the application. Note, however, that you shouldn't store database passwords in the configuration file, so if the database requires a password, you may want to leave the connection string out of the configuration file.
When you click Next again, you see the page shown in Figure 34.5.
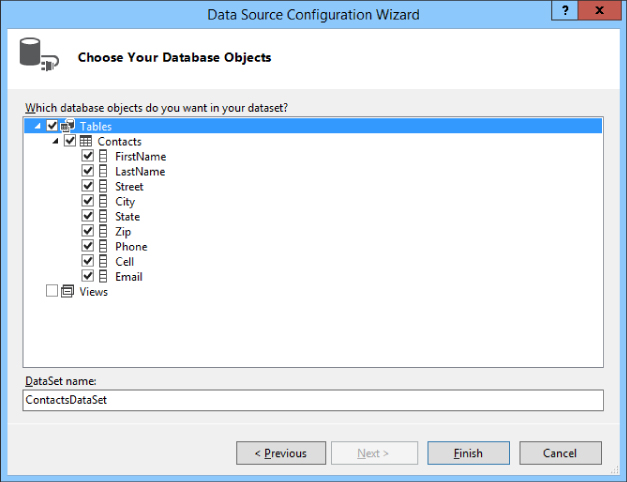
- Expand the database object treeview and select the tables and fields that you want the program to use. In this example, the database contains only one table. In Figure 34.5 I selected the Tables entry and that selected the database's single table and all of its fields.
- When you click Finish, Visual Studio defines a data set that can hold the data in the database. It also adds some code to make working with the data set easier.
Now that you've added a data source to the project, Visual Studio provides easy ways to make two simple kinds of database programs: one that displays data in a grid and one that displays data one record at a time.
Displaying Data in a Grid
To display data in a grid, first open the Data Sources window. If you can't find it, use the View ![]() Other Windows
Other Windows ![]() Data Sources command to find it. Figure 34.6 shows the Data Sources window after I connected to a Microsoft Access database named Contacts.mdb.
Data Sources command to find it. Figure 34.6 shows the Data Sources window after I connected to a Microsoft Access database named Contacts.mdb.

To display data in a grid, click a table in the Data Sources window and drag it onto the form. When you drop the table, Visual Studio adds several objects to the form to help manage the table's data. A few of these objects appear on the form itself, but most of them appear in the Component Tray below the form. When you drop the table on the form, Visual Studio adds:
- A DataGridView—This control displays the data.
- A data set—This data set can hold the table's data at run time.
- A BindingSource—This object encapsulates the data source. It provides a link between the form's controls and the data source.
- A data adapter—This object provides methods to move data between the database and the data set.
- A table adapter manager—This object helps coordinate movement of data by the data adapter.
- Binding navigator—This object provides navigation services for the controls on the form. For example, buttons that move to the next or previous record use these navigation services.
This seems like a confusing assortment of objects. Fortunately you don't need to do much with them for the simple database applications described in this lesson.
Figure 34.7 shows the program created by Visual Studio at run time. The only changes I made were to resize the form and dock the DataGridView control to make it fill the form.
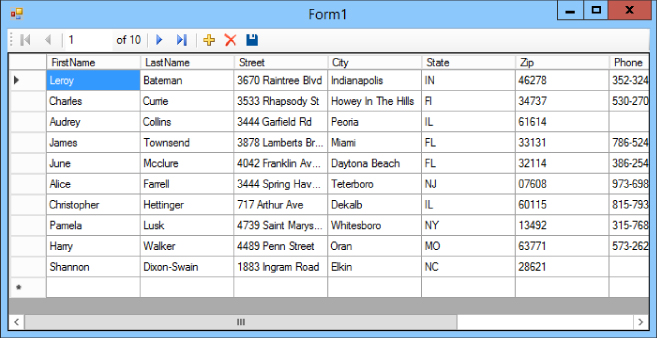
The DataGridView and the BindingNavigator (which provides the buttons at the top) automatically let the user perform a lot of simple database tasks, including:
- Clicking a cell and typing to change its value
- Selecting a row and pressing Delete to delete the corresponding record
- Clicking and dragging on the left of the data to select multiple rows, which the user can then delete all at once
- Using the navigation buttons to move through the records
- Entering values in the last row to create a new record
- Resizing rows and columns
- Clicking the floppy disk button to save changes to the data
- Clicking a column header to sort the records using that column
You should add a few things that this automatically generated program doesn't do to this simple example. The most important of these is to check for unsaved changes before allowing the form to close.
The following FormClosing event handler prevents the user from accidentally closing the form with unsaved changes:
// Check for unsaved changes.
private void Form1_FormClosing(object sender, FormClosingEventArgs e)
{
    // See if there are unsaved changes.
    if (this.contactsDataSet.HasChanges())
    {
        // Make the user confirm.
        DialogResult result = MessageBox.Show(
            "Do you want to save changes before closing?",
            "Save Changes?",
            MessageBoxButtons.YesNoCancel,
            MessageBoxIcon.Question);
        if (result == DialogResult.Cancel)
        {
            // Cancel the close.
            e.Cancel = true;
        }
        else if (result == DialogResult.Yes)
        {
            // Save the changes.
            contactsTableAdapter.Update(contactsDataSet);
            // Make sure the save worked.
            // If we still have unsaved changes, cancel.
            e.Cancel = (this.contactsDataSet.HasChanges());
        }
        // Else the user doesn't want to save
        // the changes so just keep going.
    }
}
If the data set has unsaved changes, the code asks the user whether it should save the changes. If the user clicks Cancel, the code sets e.Cancel to true so the program doesn't close the form.
If the user clicks Yes, the code calls the table adapter's Update method to save the data set's changes back to the database.
If the user clicks No, the code just continues and lets the form close without saving the changes.
Displaying Data One Record at a Time
Instead of displaying a table's records in a grid, you can display the data one record at a time, as shown in Figure 34.8.

With this kind of interface, you can click the navigation buttons on the BindingNavigator to move through the records. You can use the display controls (TextBoxes in Figure 34.8) to change a record's values.
To build this interface, first create a data source as before. Then, instead of dragging a table from the Data Sources window onto the form, drag individual fields onto the form. For each field, Visual Studio adds a Label and an appropriate display control (such as a TextBox) to the form.
This version of the interface does most of the things the grid-based version does but in different ways. For example, to create a new record you can't simply type values into a new row in a grid. Instead you need to click the BindingNavigator's Add New button (which appropriately looks like a plus sign).
As in the grid-style example, the code created by Visual Studio doesn't check for unsaved changes before the form closes. You can solve this problem by adding a FormClosing event handler to check for unsaved changes as before.
This version of the program works a little differently than the previous grid-style version, however. The DataGridView control used by the previous program automatically marks the data as modified when the user starts changing a value. In contrast, the new program marks the data as modified only when the user changes a value and then moves to a new record. That means if the user changes a value and then tries to close the form without moving to a new record, the program doesn't know there is an unsaved change and closes.
To prevent that, you can add the following two lines to the beginning of the FormClosing event handler:
this.Validate();
this.contactsBindingSource.EndEdit();
These lines make the program officially finish editing any fields that the user is modifying so the data set knows that it has a pending change. After that, the FormClosing event handler works exactly as before.
Try It
In this Try It, you have a chance to practice the techniques described in this lesson. You create an application that displays contact information in a grid.
Lesson Requirements
In this lesson, you:
- Start a new project. Download the
Contacts.mdbdatabase from the book's website and place it in the project directory. - Add a new data source for this database.
- Open the Data Sources window and drag the Contacts table onto the form.
- Add code to the
FormClosingevent handler to check for unsaved changes.
Hints
- Dock the
DataGridViewcontrol so it fills the form. - Resize the form so all fields are visible. Add a little extra width for a vertical scrollbar on the right.
- Don't forget to set the database file's
Copy to Output Directoryproperty toCopy if newer.
Step-by-Step
- Start a new project. Download the
Contacts.mdbdatabase from the book's website and place it in the project directory.- This is straightforward.
- Add a new data source for this database.
- Follow the steps described earlier in this lesson.
- Open the Data Sources window and drag the Contacts table onto the form.
- This is straightforward.
- Add code to the
FormClosingevent handler to check for unsaved changes.- Use the code shown earlier in this lesson.
Exercises
- Make a program similar to the one you built for the Try It except make it display one record at a time instead of use a grid. Anchor the
TextBoxes so they widen if the form widens. Don't forget to add theFormClosingevent handler. - Copy the program you built for this lesson's Try It. That program's grid lets the user navigate through the records, add records, and delete records, so you don't really need all of those buttons on the
BindingNavigator. Select theBindingNavigator. In the Properties window, click the Items property and click the ellipsis to the right. Set theVisibleproperty tofalsefor every item except the Position, Count, and Save items. - Copy the program you built for Exercise 1. Add a
MenuStripwith a Data menu that has items First, Previous, Next, Last, Add New, Delete, and Save. Set theVisibleproperty on the correspondingBindingNavigatorbuttons tofalse.To make the menu items work, use the
BindingSource'sCurrencyManager. That object's properties and methods let you manipulate the current record (hence the nameCurrencyManager). For example, the following code sets the current position to the first record:this.contactsBindingSource.CurrencyManager.Position = 0;Add or subtract one from
Positionto move to the next or previous record. SetPositionto theCurrencyManager'sList.Count - 1value to move to the end of the list.Use the
RemoveAtmethod to delete the current record.Finally, enter the necessary code for the Save menu item.
- [WPF] You can use the techniques described in this lesson to make simple database applications in WPF, too. The results are similar, but some differences exist. In particular Visual Studio doesn't place a
BindingNavigatoron the WPFWindow. The program also includes data set and table adapter objects, but they're hidden inside the code.For this exercise, repeat the Try It with a WPF application. After you create the database connection, run the program to let it build some data structures that it needs. Then drag the Contacts table onto the
Windowand arrange it as before.Because Visual Studio doesn't create a
BindingNavigator, add a File menu with a Save item that uses the following code to save changes to the data:private void saveMenuItem_Click(object sender, RoutedEventArgs e) { // Save the changes. ContactsDataSet contactsDataSet = (ContactsDataSet)this.FindResource("contactsDataSet"); ContactsDataSetTableAdapters.ContactsTableAdapter contactsDataSetContactsTableAdapter = new ContactsDataSetTableAdapters.ContactsTableAdapter(); contactsDataSetContactsTableAdapter.Update(contactsDataSet); }Use the following
WindowClosingevent handler to protect the user from losing changes when the program closes:private void Window_Closing(object sender, System.ComponentModel.CancelEventArgs e) { ContactsDataSet contactsDataSet = (ContactsDataSet)this.FindResource("contactsDataSet"); // See if there are unsaved changes. if (contactsDataSet.HasChanges()) { // Make the user confirm. MessageBoxResult result = MessageBox.Show( "Do you want to save changes before closing?", "Save Changes?", MessageBoxButton.YesNoCancel, MessageBoxImage.Question); if (result == MessageBoxResult.Cancel) { // Cancel the close. e.Cancel = true; } else if (result == MessageBoxResult.Yes) { // Save the changes. ContactsDataSetTableAdapters.ContactsTableAdapter contactsDataSetContactsTableAdapter = new ContactsDataSetTableAdapters.ContactsTableAdapter(); contactsDataSetContactsTableAdapter.Update(contactsDataSet); // Make sure the save worked. // If we still have unsaved changes, cancel. e.Cancel = (contactsDataSet.HasChanges()); } // Else the user doesn't want to save // the changes so just keep going. } }This code is similar to the version used by the Windows Forms application except it's more work getting the data set and table adapter.
- [WPF] Repeat Exercise 1 for a WPF application. As in Exercise 4, after you create the database connection, run the program to let it build some data structures that it needs. Then drag the Contacts table fields onto the
Windowand align theLabels andTextBoxes.Add the
Window'sClosingevent handler as in Exercise 4 but don't worry about adding Previous, Next, Save, and other commands. You'll do that in later exercises.Run the program and verify that you can see the first record in the data set and that you can save changes to it. (Hint: Don't forget to set the database's
Copy to Output Directoryproperty.) - [WPF, Hard] In Exercise 5, Visual Studio put the
LabelandTextBoxfor each database field inside a separateGridcontrol. ThoseGrids sit inside the mainGridcontrol. That works, but it makes it hard to rearrange the controls. For example, eachTextBox's width is explicitly set to120.To make the program more flexible, copy the program you built for Exercise 5 and give the main
Gridcontrol nine rows with heightsAutoand two columns with widthsAutoand*. Add the following property to theGrid:DataContext="{StaticResource contactsViewSource}"The
DataContextproperty tells the controls inside theGridwhere they should look for data.Next give the main
Grida resource dictionary containing twoStyles that set the properties forLabels andTextBoxes. Make theStyles set all of the property values shared by the automatically created controls except set theTextBox HorizontalAlignmentproperty toStretchand omit theTextBox Widthproperty.Now when you run the program, the
TextBoxes should resize to use the available width. - [WPF, Hard] Copy the program you wrote for Exercise 6 and add navigation buttons. To do that, make the
Window's main control be aDockPanel. Dock aToolBarto the top and dock the previousGridcontrol below that.Give the
ToolBarthe buttons First, Previous, Next, Last, Add, Delete, and Save.To make managing the data easier, use the following code to make class-level variables to hold the data set, the table adapter, and the view source:
private ContactsDataSet DataSet;
private ContactsDataSetTableAdapters.ContactsTableAdapter TableAdapter;
private CollectionViewSource ViewSource;
Modify the
Window_Loadedevent handler so it initializes and uses the class-level variables. Also modify theWindow_Closingevent handler so it uses the variables.Next give the buttons the following code:
private void firstButton_Click(object sender, RoutedEventArgs e) { ViewSource.View.MoveCurrentToFirst(); } private void previousButton_Click(object sender, RoutedEventArgs e) { ViewSource.View.MoveCurrentToPrevious(); } private void nextButton_Click(object sender, RoutedEventArgs e) { ViewSource.View.MoveCurrentToNext(); } private void lastButton_Click(object sender, RoutedEventArgs e) { ViewSource.View.MoveCurrentToLast(); } private void addButton_Click(object sender, RoutedEventArgs e) { ContactsDataSet.ContactsRow row = DataSet.Contacts.NewContactsRow(); row.FirstName = "<missing>"; row.LastName = "<missing>"; DataSet.Contacts.AddContactsRow(row); ViewSource.View.MoveCurrentToLast(); } private void deleteButton_Click(object sender, RoutedEventArgs e) { int rownum = ViewSource.View.CurrentPosition; DataSet.Contacts.Rows[rownum].Delete(); } private void saveButton_Click(object sender, RoutedEventArgs e) { TableAdapter.Update(DataSet); } - [WPF] Copy the program you wrote for Exercise 7 and add a
Labelat the bottom of the form that displays the current record's number as in “Record 7 of 12.” Update the position when the program starts and when theViewSource.Viewobject receives aCurrentChangedevent. - [WPF] The
MoveCurrentToPreviousandMoveCurrentToNextmethods can move the current record beyond the beginning or end of the data set. In that case, the boundTextBoxes are blank and the user is probably confused. Fortunately those methods returntrueif they successfully move to a new record andfalseif they fall off the data set.Copy the program you wrote for Exercise 8 and modify the code to check the values returned by
MoveCurrentToPreviousandMoveCurrentToNext. If they returnfalse, move to the first or last record. - [WPF] Copy the program you wrote for Exercise 9 and make the
ToolBar Buttons display appropriate images. - [WPF] Copy the program you wrote for Exercise 10 and enable and disable the
ToolBar Buttons when appropriate. Hints:- To enable a
Button, setIsEnabled = trueandOpacity = 1. - To disable a
Button, setIsEnabled = falseandOpacity = 0.5. - Make the existing
CurrentChangedevent handler enable and disable the movementButtons as appropriate. - Catch the
DataSet.Contacts.RowChangedevent and enable the SaveButtonwhen a record is modified by the user.
- To enable a