
Basics
|
This chapter will introduce users to programming macros in CATIA V5 with Visual Basic Script (VBScript). The following topics are covered:

CATScript and CATVBS are both VBScript programming languages. Both macro languages work with objects and methods. An object is a container that stores information. This information could be a CATPart, a line, or a surface. A method is an instruction from which an object is created or modified, or from which information is read.
CATVBS is a type of Microsoft VBScript (MS VBScript) that is extended to objects and methods of CATIA V5. Up to V5R7, CATVBS only ran on Windows machines. From V5R8 on, Dassault Systémes have expanded their programming so that CATVBS also operates on UNIX workstations.
CATScript is a variant of MS VBScript that is designed to run on UNIX and Windows. CATScript was able to run on both platforms prior to V5R8.
CATScript and CATVBS are interpreter languages that serve as the foundation for programming macros in CATIA V5. Macros that are written in CATScript or CATVBS can be used on Windows 7, Vista, XP, NT, 98 and 2000, and UNIX operating systems.
Programming CATIA macros with Visual Basic for Applications (CATVBA) offers more capabilities for CATIA V5. CATVBA has a compiler and provides many tools for designing user interfaces. These two points distinguish it from CATScript and CATVBS. An overview of all three languages is shown in Table 1.1.
TABLE 1.1 Overview of the Macro Languages in CATIA V5

The program syntaxes of CATScript, CATVBS, and CATVBA are very similar. By making slight changes, program components are very easily transferred from one platform to another, as long as other methods and objects in that platform are available. In most cases, the three languages differ only in the way that variables, functions, and procedures are defined. An overview of these differences is illustrated with a small sample program in Table 1.2. The differences are highlighted in bold.
TABLE 1.2 Differences between CATScript, CATVBA, and CATVBS
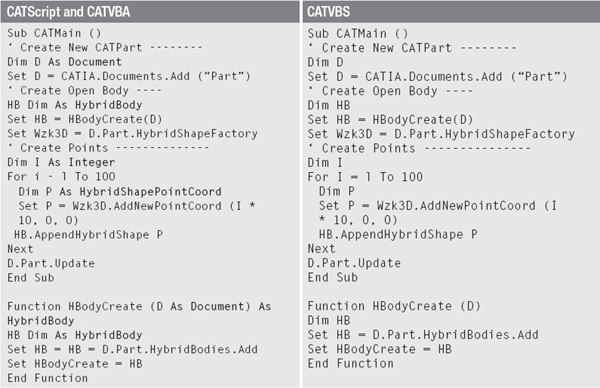
Since CATScript through its history has the closest connection with CATIA V5, all programming examples and source code in this book are based on CATScript. Through the differences shown in Table 1.2, the examples can very easily be transferred into CATVBS.
Nomenclature explains the definition of terms used in the following sections. This book outlines how instructions are used by CATScript. An instruction may be:
Word
A general description provides all the capabilities of the commands in an instruction. One example describes a string that is used in a specific application.
A general description provides all the capabilities of the commands in an instruction. One example describes a string that is used in a specific application.
An instruction is usually composed of several words. A word is the smallest unit of an instruction. Two words are separated, depending on the application, by a period, a comma, or a space. Important words in a general description and in examples are highlighted in bold.
Example 1.1: Highlighting Important Words
Additional information of a general description can be enclosed in square brackets or braces.
[Self-defined word]
A square bracket encloses words that can be defined by a programmer. A self-defined word can be a name or the contents of memory location. If the memory location is defined by a programmer, it is called a Variable. A memory location for an object or a subroutine is called a Parameter. The information following a square bracket with the keyword “As” determines the type of variable or parameter. If several variables or parameters have the same type, they can be listed within the same square bracket.
A square bracket encloses words that can be defined by a programmer. A self-defined word can be a name or the contents of memory location. If the memory location is defined by a programmer, it is called a Variable. A memory location for an object or a subroutine is called a Parameter. The information following a square bracket with the keyword “As” determines the type of variable or parameter. If several variables or parameters have the same type, they can be listed within the same square bracket.
Example 1.2: Description of Variables and Parameters
General Description:
Code in the macro:
{Optional word}
A curly brace encloses optional words that do not need to be written. A programmer can determine the number of words that are shown by a comma and three periods.
A curly brace encloses optional words that do not need to be written. A programmer can determine the number of words that are shown by a comma and three periods.
General Description:
Code in the macro:
CATScript is an object-oriented programming language, so in order to program CATScript it is necessary to understand a few basic principles of an object-oriented language.
1.3.1 Object and Class
An Object is a container that stores information. Each object is assigned a class. A Class is a description of the information structure of objects of the same object type. Within a class’s properties and methods, each object has a class.
A Property is a characteristic of an object. A property is usually being read or changed through the value of its parameter. Some properties can only be read but not changed. In this case the property is referred to as having “read only” access.
A Method is an instruction used to modify an existing object or create a new one. A method can have multiple input parameters and output parameters. An output parameter is the result of applying a method. If a method has an output parameter, then it is called either a function (Func) or a subroutine (Sub).
Example 1.4: Properties and Methods of the “Line” Class
Properties: Start Point, End Point, Length (Read Only)
Methods: Sub Set _Start Point, Sub Set _End Point
Each object of the “Line” class has a start point and an end point that can be assigned. The length of a line can be read but not written. Both methods do not have an output parameter because they are subroutines.
1.3.2 Object Path
The classes of CATScript are hierarchically structured. A hierarchical structure has parent and child classes. A parent class summarizes a group of child classes and provides the basic methods and properties available for these classes. The deeper a class is placed, the more specialized are its objects. An object can access all properties and methods of its class and the parent classes. This dependency describes the object path of an object. An Object Path is the explanation of the dependencies of an object from its class and parent classes. In the case of an object path, classes are separated by periods, and child classes are written to the right:
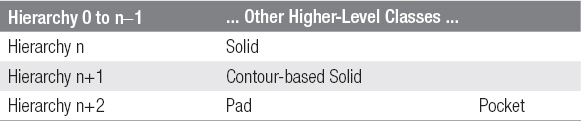
Example 1.5: Object Path of Pads and Pockets
Class hierarchy n: Solid
Class hierarchy n+1: Contour-based Solid
Class hierarchy n+2: Pad, Pocket
Object Paths: ….Solid.Contour-based Solid.Pad
….Solid.Contour-based Solid.Pocket
An object of the “Pad” class can use the properties and methods of the “Solid,” “Contour-based Solid,” and “Pad” classes but not the “Pocket” class. The hierarchy is illustrated in Table 1.3.
TABLE 1.3 Example of a Class Hierarchy
1.3.3 Root Class and Base Classes
A complete object path begins with a root class. A Root Class is the class that stands on the top hierarchy level and from which all other classes and objects are derived.
The root class of all objects in CATScript is the CATBaseDispatch class (Section 8.12). CATBaseDispatch has no properties or methods. From CATBaseDispatch, the two subordinate base classes are derived from AnyObject for individual objects and Collection for list objects (Table 1.4). In the case of an object’s path, the root class CATBaseDispatch is typically not written but started directly with a base class.
TABLE 1.4 Root Class and Base Classes of CATScript
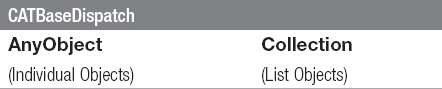
An Individual Object is a container for geometry or other information. Each object path of an individual object begins with the base class AnyObject (Section 8.4). AnyObject provides basic methods for each individual object.
A List Object is a collection of individual objects. Each object path of list objects begins with the base class Collection (Section 8.17). Collection provides basic methods for each list object.
Example 1.6: Object Paths for Individual and List Objects

For a practical understanding of the sections below, the foundational theory of programming is started with a basic example. In the “GreetingMacro.CATScript” macro, a user is greeted with the text “Hello.” In order to prepare the input of the macro, follow these steps:
The “Macros” window (Figure 1.1) shows all the macros that are available for immediate execution. The window is fully explained in Section 1.6. Initially the list is empty.

FIGURE 1.1 Macros window
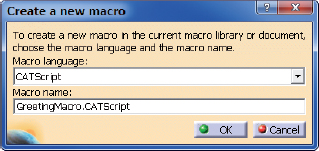
The next step is to create a new macro and name it “GreetingMacro.CATScript” (Figure 1.2):
Now the “GreetingMacro.CATScript” macro has been created and will appear in the “Macros” window (Figure 1.3).

FIGURE 1.3 “Macros” window with the “Greeting-Macro. CATScript” macro
A macro can be edited using the internal V5-Editor. The V5-Editor is a simple text entry tool, comparable to “Notepad” in Windows.
CATIA V5 opens the V5-Editor and the source code of the macro, “GreetingMacro.CATScript,” is shown (Figure 1.4).
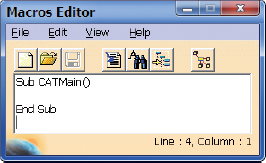
FIGURE 1.4 Internal V5-Editor
The main part of a macro is defined at the beginning and the end of the source code with the following expressions:
All commands between or above these two lines are run each time a macro is called. To complete the macro, the word “Hello” is added to a command, generating a dialog box. The commands for input and output on the screen are explained in detail in Section 2.1.
A macro can be saved by selecting the disk icon of the V5-Editor. The macro “GreetingMacro.CATScript” is stored, in this case, in the current document “Part1.CATPart” (Figure 1.3). The V5-Editor will close, and the macro can be run.
This will start the macro. During the execution, a review of the program logic and syntax will be made. Since it is an interpreted language, the macro is executed line by line. If the interpreter finds an error, the macro is canceled during the run. If the source code of the macro is correct, the greeting “Hello!” will be seen on the screen (Figure 1.5).

FIGURE 1.5 Output of the macro “GreetingMacro.CATScript”
With this basic example, all steps are shown that are necessary for the entry and execution of a macro. The following sections show how to edit, load, save, and run a macro.
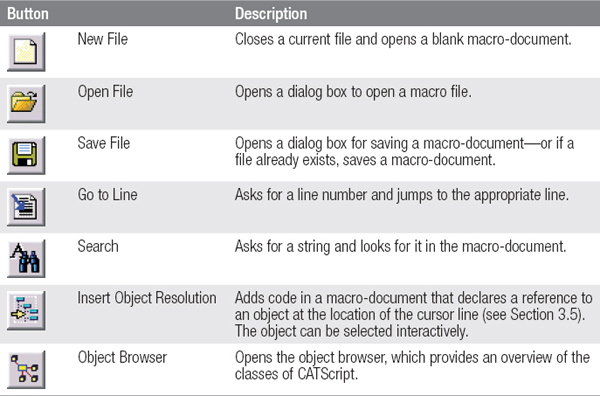
In the previous section, the Internal V5-Editor was used. The internal V5-Editor is a very simple text editor, which is granted as the default editor in CATIA V5. It is utilized automatically when a macro is being processed. An overview of the functionality is provided in Table 1.5.
TABLE 1.5 Functionality of the internal V5-Editor
It is possible to choose a different editor to edit a macro. During the execution of a CATIA V5 macro, the editor will start automatically and is defined by the options in V5. The options window is found under “Tools/Options/General/Macros” (Figure 1.6).

FIGURE 1.6 Options window to select a macro editor
For smaller macros, the internal V5-Editor is quite sufficient. However, for intensive macro work, it can be convenient to have a more powerful editor. Select the “Change editor” button to choose a different editor. The “Default editor” button resets the editor option back to the original state, as shown in Figure 1.6.
A macro can be stored in two ways:
1. storage in a CATIA document (*.CATPart, *.CATProduct, *.CATDrawing)
2. storage in a separate file (*.CATScript)

In the first case, a macro is stored inside of a CATIA document. Thus, a macro and a CATIA document are closely linked. A CATIA document is a part, product, or a drawing. It can contain multiple macros.
In the second case, a macro is stored inside a folder with the file type “*.CATScript” and can be used independently of a CATIA document.
In the “Macros” window and from the “Current macro library or document:” drop-down (Figure 1.7), select a CATIA document. A macro that is created via the “Create…” button is stored in this document. A list of “Available macros” in the “Macros” window shows all the macros that are stored in the selected document. The “Run” button starts the selected macro.

FIGURE 1.7 “Macros” window and available macros in a CATIA document
1.6.2 Storage in a Separate File

If a macro is stored in a separate file, you should define a macro library before you create the macro. A Macro Library is a directory where macros are stored, and CATIA is directed to their location. By using a macro library, a user receives quick access to all of the macros within the selected directory.
A macro library is created in the “Macro libraries” window (Figure 1.8). It appears by clicking the “Macro libraries” button in the “Macros” window. If programmed with CATScript as the library type, it is seen in the “Directories” drop-down. The other types are based on programming with VBA (see Section 1.1). The list in the “Current libraries:” field displays all currently defined macro libraries of one library type. To add a new directory to the list, select the “Create new library…” button.
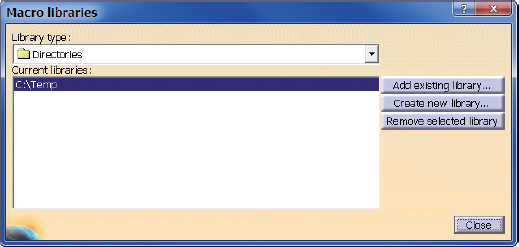
FIGURE 1.8 “Macro libraries” window with a list of current libraries
In the “Macros” window, a macro library can be selected from the “Current macro library or document:” drop-down (Figure 1.9). The list of “Available macros:” shows all macros in a macro library.

FIGURE 1.9 “Macros” window with a macro in the macro library “C:Temp”
To create a new macro and add it to a macro library, select the “Create…” button. This opens the “Create a new macro” window (Figure 1.10), which defines a new macro. Select “OK” to store the macro in the current macro library.

FIGURE 1.10 “Create a new macro” window
To run a macro from a separate file, open the “Macros” window, choose the appropriate macro from the list, and select “Run.”
When using macros extensively, it can be repetitive to always open the “Macros” window and select the appropriate macro library and macro. A shorter way is to run a macro from a button.

A macro that is stored in a separate file (see Section 1.6.2) can be assigned to a button. A button can be added to a toolbar and displayed on the user interface of CATIA. A toolbar is a group of icons that is defined by a user via the command “View/Toolbars.” Toolbars can be shown or hidden.
1. Assign a macro to a button
2. Create a toolbar
3. Assign the button to the toolbar
1.7.1 Assigning a Macro to a Button
A macro can be assigned to a button:
Select “Tools/Customize” from the menu bar and then move over to the “Commands” tab. In the “Categories” column, scroll down and select “Macros.” In the “Commands” column on the right, a list of all macros in the currently selected library will be displayed (Figure 1.11). If no macros are visible, review the selected macro library (see Section 1.6.2). An icon can be assigned to a macro button by highlighting the desired macro in the “Commands” list and selecting the “Show Properties” button. Pick an icon from the “Icon Browser” button, or navigate to an icon through the button folder. Selecting an icon automatically assigns it to the macro button. Selecting “Reset…” returns the macro’s button icon to the original state.

FIGURE 1.11 Customize window with “Commands” current macros list
1.7.2 Creating a Toolbar
A toolbar displays a group of buttons and is always assigned to a work environment.
A work environment is a workbench (e.g. “Part Design,” for the modeling of solids). A workbench is the workspace that is active in the CATIA session. By assigning a toolbar to a workbench, the toolbar is available and can be controlled by users.
The list of all toolbars in the current work environment is located in the “Toolbars” tab of the “Customize” window (Figure 1.12). The window will open with the command “Tools/Customize.”
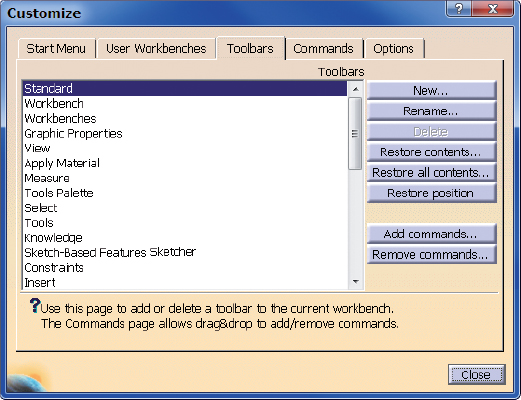
By selecting “New,” a new toolbar is created in the current workbench and the “New Toolbar” window opens (Figure 1.13). This is a toolbar, which can be given a descriptive name. The “OK” button closes the window, and the new toolbar is added to the “Toolbars” tab of the “Customize” window (Figure 1.14).
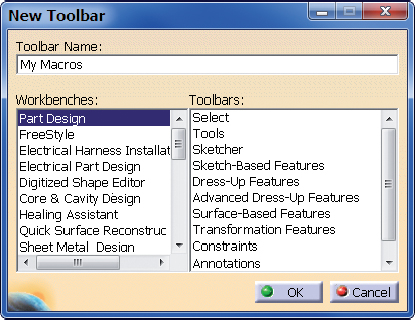
FIGURE 1.13 “New Toolbar” window

FIGURE 1.14 “Customize” window, Toolbars tab with user-defined toolbar “My Macros”
Assigning a button to a toolbar is controlled through the “Customize” window with the “Toolbars” tab. In the “Toolbars” tab, select a toolbar and then add a button by selecting the “Add commands…” button (Figure 1.14).
This will open the “Commands list” window, and then the desired command can be assigned (Figure 1.15). The macros of the current macro library are listed in the “Commands list.” Click “OK” to add the macro button to the toolbar and complete the process.
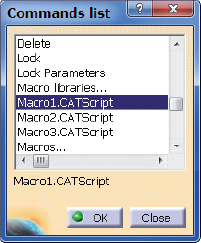
FIGURE 1.15 “Commands list” window
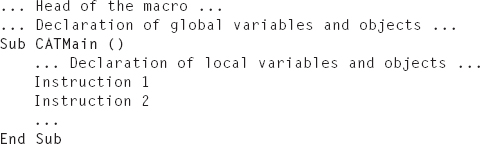
A Block is a group of instructions in the source code of a macro. Together they include organizational or logical commands. The source code of a macro is usually composed of the following blocks:
1. Head of a macro
2. Declaration of global variables and objects
4. Subroutines and functions that are called from “CATMain”
1.8.1 Head of a Macro
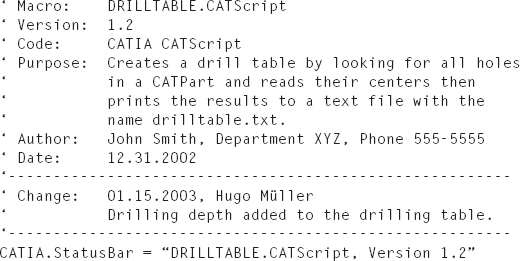
The head of a macro contains descriptive information about the name, author, and function of the macro as well as important information for the maintenance of the code. This information typically includes:
This information is stored in comment lines. A comment line begins with a single quote and is ignored when a macro is executed (see Section 9.58).
You may need to tell a user what version of a macro is currently being used. In order for this information to be understood it is recommended not to open a macro’s source code, but instead complement the head of a macro with one line of code that displays this information. This can be done with the StatusBar property of the Application class (Section 8.5). An object of the Application class directly represents CATIA (Section 1.10.1).
Example 1.7: Head of a Macro
At the beginning of the macro “DRILLTABLE.CATScript,” the name and version of the macro are displayed in the status bar of CATIA (Figure 1.16).

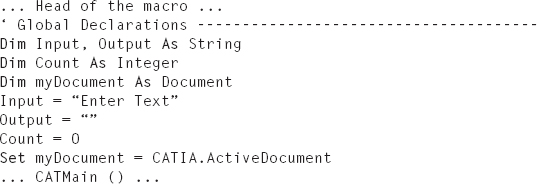
1.8.2 Declaration of Global Variables and Objects
Global variables and objects are declared in the next block. A global variable or object is an element that is available in all functions and subroutines of a macro.
The declaration of a single variable or an object is done via the Dim statement Dim () (Section 9.19). A variable or object can be single- or multi-dimensional.

A list of classes is in Chapter 8. The main variable types are:
| Logical statement (“True” or “False”) | |
| String of CATIA expressions (e.g. “Pad.1”) | |
| Field of CATIA expressions (mostly coordinates) | |
| Index of a list of objects (integer or object) | |
| Floating point with double precision | |
| Integer | |
| Integer with an increased range | |
| String |
It is recommended to assign a start value to a global variable or an object. The assignment of an object to a variable is made by using “=” and the command Set:
Example 1.8: Declaration of Global Variables and Objects
In a macro, the global “input” and “output” variables are declared as a text, and “numbers” are declared as integers. The global object “Document” is declared as the object type “Document.”
1.8.3 CATMain, Subroutines, and Functions
The head of the macro and global declarations are followed by the macro block “CATMain,” which contains subroutines and/or functions. CATMain and the following subroutines and functions can include global and local variables and objects. A local variable or local object is only valid within its respective range and is similar to a function or subroutine that declares a global variable or a global object (Section 1.8.2).
1.8.3.1 CATMain
“CATMain” is the main block of a macro from which instructions are run each time the macro is executed:
Within “CATMain” you should place just a few critical lines of code in a macro and then access additional code by calling subroutines (Sub) and/or functions (Function). This way the source code is easier to read. A subroutine or function can be called multiple times by CATMain. Calls to other subroutines and functions are possible within a subroutine or function.
1.8.3.2 Subroutines
A subroutine is a sequence of instructions that performs an action. A call is made via the name of the subroutine followed by an optional parameter list:
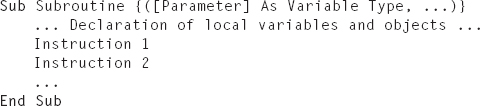
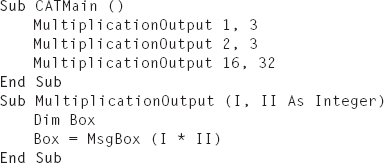
Example 1.9: Subroutine
The subroutine “MultiplicationOutput” is called several times within the “CATMain” block. A dialog box displays the result of multiplying two integers.

1.8.3.3 Functions
A function is a sequence of instructions that returns a single value. A function can be passed to parameters while it is being called. Parameters are written after the function name in brackets:
Declaring a function is performed between the Function and End Function statements:

The return value is assigned to the variable with the function name.
Example 1.10: Function
The function “Multiplication” multiplies two integers and returns the result of the multiplication. The return value is displayed in a dialog box.

A branch is a control that determines the basis of testing a criterion from which instruction blocks are run in a macro. A branch is defined by the statement “If-Then-Else” or “Select-Case-Else.”
A loop is a series of instructions that are executed repeatedly. In CATScript there are three types of loops, which are defined by the statements “For-Next,” “Do While,” and “Do-Until.”
1.9.1 If-Then-Else
“If-Then-Else” describes a branch that separates two instruction blocks. A branch needs a criterion to decide whether the first or the second instruction block is executed. If the criterion of a branch is met, the instruction block is executed after the “Then” statement. If the test criterion is not met, the instruction is executed according to the “Else” statement. The “Else” statement is optional and can be omitted. The general syntax of the statement “If-Then-Else” is:
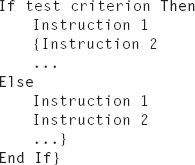
The instruction that follows is the “Then” statement next an “End If” statement, and the “Else” statement is optional. “End If” marks the end of the “If-Then-Else” statement.
Example 1.11: If-Then-Else


Several criteria can be linked by the words “And” and “Or” to other complex criteria. The “And” statement specifies that both test criteria must be met. The “Or” statement specifies that one criterion must be met by either instruction. The word “Not” negates a criterion. Multiple criteria can also be nested in brackets. Examples are given in Table 1.6.
TABLE 1.6 Examples of Criteria

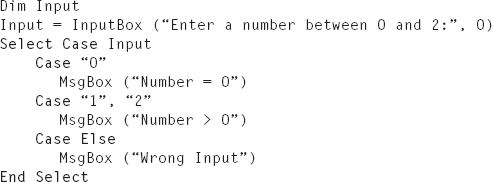
1.9.2 Select-Case-Else
“Select-Case-Else” describes a branch separated by two or more instruction blocks. “Select-Case-Else” is more powerful than an “If-Then-Else” statement. The instruction block begins with the keyword “Case.” The keyword is followed by the test criterion and the instruction block itself. The criterion is a test value or a list of multiple test values. An instruction block is executed only if the test value or one of the test values matches the keyword “Case.” If no matching value is found, the “Case Else” statement is run if it exists; otherwise the macro runs through the instruction block.
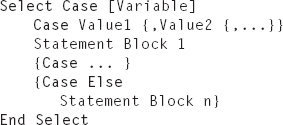
Example 1.12: Select-Case-Else
“For-Next” describes a loop that is controlled by a counter. The counter has an initial and a final value. The counter begins with an initial value, which is incremented by a fixed step size value toward a final value. If no increment is defined, the step size value is equal to 1. “Next” indicates the end of the loop. The general syntax for a “For-Next” loop is:

The “Exit For” statement terminates the loop. With this statement the macro moves to the next statement after the line “Next.” To keep the code organized, this statement should be rarely used.
Example 1.13: For-Next
This example demonstrates a loop that adds up the numbers “1” to “10” and stores the value in the variable “Sum.”
1.9.4 Do-While
“Do-While” describes a loop with an input criterion that runs as long as the test criterion of the loop is met. The test criterion is checked at the beginning of the loop and before each new run. Test criteria that have not fulfilled the instructions of the loop is skipped. The “Loop” statement marks the end of the loop. The general syntax of “Do-While” is:
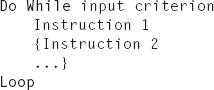
The “Exit Do” statement terminates the loop. With this statement the macro moves to the next statement after the line “Loop.”
Example 1.14: Do-While
This example demonstrates a loop that adds up the numbers “1,” “2,” “3,” …, as long as the sum is less than “100.”
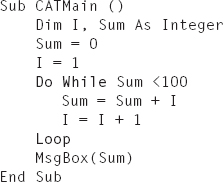
The result is “105”.
1.9.5 Do Until
“Do Until” describes a loop with an initial criterion that runs until the test criterion is met. The criterion is checked after each iteration of the loop and the loop is executed at least once. “Loop” marks the end of the loop. The general syntax of “Do Until” is:

The “Exit Do” statement terminates the loop. With this statement the macro moves to the next statement after the line “Loop.”
Example 1.15: Do Until
This example demonstrates a loop that adds up the numbers “1,” “2,” “3,” …, until the sum is greater than “50” or an addend of “10” is reached.

The result is “55.”
An Anchor Object is an object that is required in every macro to access the elements of CATIA. There are four major anchor objects in CATScript when solid, wireframe, surfaces, and product structures are created:
1.10.1 CATIA-Application
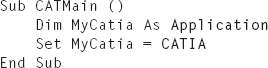
The main anchor object is an object of the Application class (Section 8.5) that represents the application CATIA V5. The CATIA V5 application is described with the CATIA label.
Example 1.16: Creating the Anchor Object CATIA V5
All objects are derived through this anchor object’s properties and methods. A CATIA document and the provided communication services with an operating system are shown in Figure 1.17.

FIGURE 1.17 Content of the anchor object in the “Application” class (Source: Online Documentation of Dassault Systémes)
A list of all CATIA V5 application windows are shown with the Windows property of the anchor object (Figure 1.17, top right). The current window is accessed by the ActiveWindow property.
A list of all open CATIA documents in the CATIA V5 application are shown with the Documents property (Figure 1.17, top left). The current CATIA document is accessed by the ActiveDocument property.
The FileSystem, Printer, and SystemService properties providing communication services between the CATIA V5 application and an operating system are shown (Figure 1.17, bottom right).

The properties of the Application class will be explored in Chapter 2.
1.10.2 CATIA Documents “CATPart” and “CATProduct”
A CATIA document is all of the data stored in one file type, whether it is a “CATPart,” “CATDrawing,” or “CATProduct.” The parent class of all CATIA documents is the Document class (Section 8.25). For each document type of CATIA V5, there is a specialized class whose parent class is the Document class. For a CATPart, this is the PartDocument class (Section 8.16.9) ; for a CATProduct, this is the ProductDocument class (Section 8.17.7).
If the ActiveDocument property of the Application class is declared, which is an object of a current CATIA document (Section 1.10.1), the correct class of the document is automatically determined. For example, if a CATIA document is a CATPart, the ActiveDocument is automatically a PartDocument. Additional information on how to create, load, and store a CATIA document is in Section 2.2.
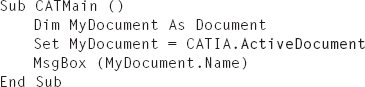
Example 1.17: Creating the Anchor Object of a CATIA Document
A user has opened a CATIA document, and the macro “Document” is an object of this document. The macro assigns and displays the document name in a dialog box.
1.10.3 Geometry Containers in CATParts
The geometry of a CATPart is an object of the Part class (Section 8.168) and is assigned to the third anchor object. The anchor object is derived using the Part property of the PartDocument class.
All other objects are derived from the geometric content of a CATPart through the methods and properties of the third anchor object (Figure 1.18).

FIGURE 1.18 Content of an anchor object in the “PartDocument” and “Part” classes (Source: Online Documentation of Dassault Systémes)
The origin planes and axis systems used in CATParts are accessed by the OriginElements and AxisSystems properties (Figure 1.18, top left).
Bodies can be accessed through the Bodies properties and Geometrical Sets through HybridBodies and OrderedGeometricalSets properties (Figure 1.18, bottom left and top right).
Constraints, relations, and parameters (Figure 1.18 right, center) are accessed through the Constraints, Relations, and Parameters properties.
Toolboxes are used in CATScript to create geometry. A toolbox is a class that provides methods to create geometry. The set of all toolboxes are summarized in the Factory class. The ShapeFactory property represents a toolbox for solid shapes, and the HybridShapeFactory property represents a toolbox for wireframe geometry and surfaces (Figure 1.18, bottom right).
The properties outlined in this section are explained in further detail in Chapters 3 to 7.
1.10.4 Structural Information and Metadata
The structural information of CATProducts is the list of all elements inside of a CATProduct. The metadata of CATParts or CATProducts are general attributes such as the Transformation Matrix, Part Number, or Version. The structural information and metadata of CATProducts or CATParts are stored in an object of the Product class (Section 8.176). An object of the class can be derived via the Product property of the PartDocument class (Section 8.169) and ProductDocument class (Section 8.177).
Through the methods and properties of this fourth anchor object, all other objects that represent the attributes and product structures are defined (Figure 1.19).

FIGURE 1.19 Content of the anchor object in the “Product” class (Source: Online Documentation of Dassault Systémes)
The product structure of CATProducts is stored in a Products list object. This list object stores the Product elements that are used in a CATProduct.
The parameters, formulas, constraints, and publications of CATProducts are stored in the Parameters, Relations, Constraints, FixTogethers, and Publications list objects.
Other Product object properties describe the transformation matrix, which controls the positioning of a CATParts or CATProducts within an assembly.
Metadata (e.g. Part Number, Version) of CATProducts or CATParts can be accessed through the Part Number, Revision, Definition, Nomenclature, Source, and DescriptionRef properties, shown in Figure 1.19.
The properties outlined in this section are explained in further detail in Chapters 3 to 7.
CATIA V5 has a macro recorder that records the individual steps of a user and converts these steps into source code. This recording may not always be complete and typically does not meet the requirements for organized programming. However, it does record valuable insight for objects and methods.
The macro recorder will start from the “Tools/Macro/Start Recording…” menu (Figure 1.20).
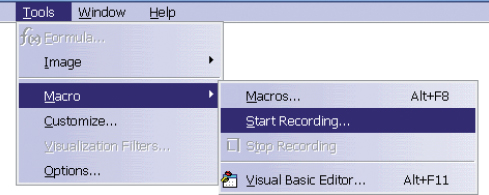
FIGURE 1.20 Starting the macro recorder
The macro recorder opens the “Record Macro” dialog box. Here the macro language, location, and name of the macro are defined. Select the “Start” button to begin recording (Figure 1.21).

FIGURE 1.21 “Record macro” dialog box
CATIA now records and converts the actions that a user performs. A recording ends with the selection of the “Stop” button (Figure 1.22). The button is only shown during a recording and is displayed automatically.

FIGURE 1.22 Stop recording button
With the basics of this book, a user will quickly be able to write their own macros. If the scope of any macro is outside of creating wireframe, surfaces, and solids, the following sources provide additional information:

FIGURE 1.23 Full-text search of the Online Documentation
..................Content has been hidden....................
You can't read the all page of ebook, please click here login for view all page.