Jenkins is used by the different members of a team. A few team members will work as system administrators so they will have all rights and privileges required to manage the whole system, whereas others will have the least possible access to the system and can only view Jenkins jobs and execute them. This chapter explains how to create different users in Jenkins and how to assign them different rights based on their roles.
Creating Users in Jenkins
- 1.
Go to the Manage Jenkins page on the Jenkins dashboard and then click the Manage Users link
- 2.
Click the Create User link shown on the left side of page.
- 3.
Enter the details in the Username, Password, Confirm Password, Full Name, and E-mail Address fields, as shown in Figure 9-1.

A window box of a browser, with a Create User tab, followed by an address bar, then a Jenkins menu bar. On the left side is a navigation pane, where Create user is selected. On the right side details to fill out are username, password, confirm password, full name, and email address, and a button labeled Create User.
The Create User screen with the required fields filled in
- 4.
Click the Create User button.

A window box of a browser, with a Users tab, followed by an address bar, then a Jenkins menu bar. On the left side is a navigation pane of labels Back to Dashboard, Manage Jenkins, and Create User. On the right side is the Users page, listed with 3 users I D, with their respective names.
All users available in Jenkins
Assigning Roles to Users in Jenkins
Before you can assign roles to your users, you have to create roles and then assign different rights (i.e., accesses) to these roles. To create different roles, you need to install the Role-Based Authorization Strategy plugin.
Installing the Role-Based Authorization Strategy Plugin
- 1.
Log into Jenkins: Log in with the credentials of your Jenkins administrator. Once you are logged in, you will see the Jenkins dashboard.
- 2.
Go to the Plugin Installation Manager: Click the Manage Jenkins link on the Jenkins dashboard and then click the Manage Plugins link to go to the Plugin Installation Manager (Figure 9-3).

A window box of a browser, with an Update Center tab from an account under the name of Pranoday Dingare, followed by an address bar, then Jenkins menu bar. On the left side is a navigation pane of labels Back to Dashboard and Manage Jenkins. On the right side is the Update Section, with no history of update, followed by a button of Check now.
The Plugin Installation Manager
- 3.
Install the plugin: Go to the Available tab and type Role-based Authorization Strategy plugin into the Search field. This will filter out other options from the list of plugins and will show the Role-Based Authorization Strategy plugin at the top of the plugins list.
- 4.
Click the checkbox to select the plugin, as shown in Figure 9-4.

A window box of a browser, with an Available Plugins tab from an account under the name of Pranoday Dingare, followed by an address bar, then Jenkins menu bar. On the left side is a navigation pane of labels Back to Dashboard and Manage Jenkins. On the right side is the Available section, with a checkbox for Role-based Authorization Strategy, ticked, and a button labeled Install without restart.
The Role-based Authentication Strategy plugin entry is selected
- 5.
Select the plugin and click the Install without Restart button, which will start the plugin installation.
- 6.
Wait until Jenkins finishes installing the plugin and shows the Success status, as shown in Figure 9-5.

A window box of a browser, with an Update Center tab from an account under the name of Pranoday Dingare, followed by an address bar, then Jenkins menu bar. On the left side is a navigation pane of labels Back to Dashboard, Manage Jenkins, and Manage Plugins. On the right side is the Installing Plugins or Upgrades with preparations and details.
The plugin has been successfully installed
Enabling Role-Based Strategy in Jenkins

A dialog box under the Authorization section, with 3 buttons, where Logged in users can do anything option is selected, followed by a checkbox, ticked. On the bottom part is another set of buttons, where the Role-Based Strategy option is boxed.
The Role-Based Strategy option
Click the Role-Based Strategy option. Then click the Save button.
Creating User Roles in Jenkins
- 1.
Go to the Manage and Assign Roles page.
- 2.
Click the Manage Jenkins link. You will see the new Manage and Assign Roles link under the Security section.
- 3.
Click the Manage and Assign Roles link highlighted in Figure 9-7.

A window box of a browser, with a Manage Jenkins tab, followed by an address bar, and a row labeled Dashboard. Below is the Setting, with generalized options. Under security, the Manage and Assign Roles option under Security is boxed.
The Manage and Assign Roles link on the Jenkins dashboard
- 4.
To create the role, click the Manage Roles link on the Manage and Assign Roles screen, as highlighted in Figure 9-8.

A window box of a browser, with a Jenkins tab on an account under the name of Pranoday Dingare. On the left side is a navigation pane, arranged vertically, and beside it is the Manage and Assign Roles section, which has 3 main functions, which are Manage Roles Assign Roles, and Role Strategy Macros. Manage Roles is boxed.
The Manage and Assign Roles screen

A window box of a browser, with Manage Roles tab on an account under the name of Pranoday Dingare. On the left side is a navigation pane, arranged vertically, and beside it is the Manage Roles section, which has different roles. First is a global role with all checkboxes ticked for the role of an admin. Followed by item roles, with no input.
The Manage Roles screen
- 5.
Enter a name for the role in the Role to Add field and click the Add button.
- 6.
Click the appropriate checkboxes under each section to assign the required rights to the role.

A table that has 7 columns, and 2 rows. Column 1 titled Overall has subheaders, which are administer and read, 2 titled Credentials has create, delete, manage domains, update, and view. 3 titled Agent has build, configure, connect, create, delete, disconnect, and provision. 4 titled Job has build, cancel, configure, create, delete, discover, read, and workspace. 5 titled Run has delete and update. 6 titled View has configure, create, delete, and read. 7 titled S C M has tag. The row labels are admin and view.
All checkboxes are checked under the view section
- 7.
Scroll down the page to find the Save button and click it.
Assigning Roles to Users in Jenkins
- 1.
Go to the Assign Roles page.
- 2.
Click the Assign Roles link on the Manage and Assign Roles page.

A window box of a browser, with the Assign Roles tab of an account under the name of Pranoday Dingare, followed by an address bar, then Jenkins menu bar. On the left side is a navigation pane, arranged vertically. Beside it is the Assign Roles page, with a table where columns 2 and 3 have checkboxes for inputs under column 1, then 2 boxes to fill out are labeled User or group to add.
The Assign Roles screen
- 3.
Enter the user’s ID into the User/Group to Add field and click the Add button.

A window box of a browser, with the Users tab of an account under the name of Pranoday Dingare, followed by an address bar, then Jenkins menu bar. On the left side is a navigation pane, and beside it is the Users page, with 3 User I D, with their respective names.
Three users currently available in my Jenkins system
Out of these three, I want to assign a newly created role to the pd user.
- 4.
To assign a View role, click the checkbox in the View column, from the pd user row.
- 5.
Page down to find to the Save button and click it.
Checking the Assignment of a Role to a User
To see if the role was successfully assigned to the user, you can log in with the credentials of the user to whom the View role was assigned.
I tried to log in with the credentials of the pd user, which shows an Access Denied message.
Creating Project-Based Roles in Jenkins
In Jenkins, you can create different jobs to perform different CI/CD operations in your application. If you want to restrict the access of a particular user to only few jobs, you can create a project-based role and assign it to that user.
- 1.
Go to the Manage Roles page. Click the Manage Jenkins ➤ Manage and Assign Roles ➤Manage Roles link to open the Manage Roles page.
- 2.
Create a new role to access specific jobs. Say you want to create a role that will allow access only to testing jobs that run unit testing and e-e testing.
- 3.
Under the Item Roles section, enter a name for the role in the Role to Add field and .*Testing in the Pattern field (see Figure 9-13). This will allow access to the jobs that have the word testing in them, such as unittesting, e-e testing, etc.

A dialog box, with 2 roles, first is Global roles with a table of 3 columns and 3 rows, where columns 2 and 3 consist of checklists, followed by a box filled out with dingarepranoday. On the bottom part is another table of 2 columns and 2 rows, where column 2 has checkboxes.
The value entered in the Pattern field
- 4.
Click the Add button.
- 5.
Give all rights to the job by checking all the checkboxes in the Job column for newly created role.
- 6.
Scroll down the page to the Save button and click it to save the changes.
Assigning Project-Based Roles to Users
- 1.
Go to Assign Roles page. Click the Manage Jenkins ➤ Manage and Assign Roles ➤ Assign Roles link, which will open the Assign Roles page.
- 2.
Under the Item Roles section, In the User/Group to Add field, enter the user ID of the user. Click the Add button.
- 3.
Let’s assign the TestingOnlyRole to the dingarepranoday user. I have entered dingarepranoday in the User/Group to Add field and clicked the Add button.
- 4.
Click the TestingOnlyRole checkbox in the dingarepranoday user’s row.
- 5.
Under the Global Roles section, in the User/Group to Add field, enter dingarepranoday and click the Add button.
- 6.
Assign the view role to this user, as this role contains an Overall type of access in its definition.
- 7.
The dingarepranoday user now has two roles assigned— the View role from Global roles and the TestingOnlyRole from the Item Roles section (see Figure 9-14). Note that if users do not have overall access, then they will not be able to see anything on the dashboard.

A dialog box, with 2 roles, first is Global roles with a table of 3 columns and 3 rows, where columns 2 and 3 consist of checklists, followed by a box filled out with dingarepranoday. On the bottom part is another table of 2 columns and 2 rows, where column 2 has checkboxes.
The dingarepranoday user is assigned two roles
- 8.
Scroll down the page and click the the Save button.
Verifying the Assignment of the Project-Based Role to the User

A window box of a browser, with a Dashboard tab of an account under the name of Pranoday Dingare, followed by an address bar, then Jenkins menu bar. On the left side is a navigation pane, and beside it is the dashboard, with a table of 7 columns and 3 rows.
Jenkins showing the list of jobs created
There are three jobs—called CreateAPIJar, E-E Testing, and UnitTesting and I am currently logged in as user PranodayDingare. Let’s log in with the credentials of the dingarepranoday user.

A window box of a browser, with 2 tabs, opened is the Dashboard tab of an account under the name of Pranoday Dingare, followed by an address bar, then Jenkins menu bar. On the left side is a navigation pane, and beside it is the dashboard, with a table of 7 columns and 2 rows.
Showing only jobs ending with the word “testing”
Understanding Matrix-Based Security in Jenkins
The previous section discussed how to create different roles and manage access at the job level, node level, etc.
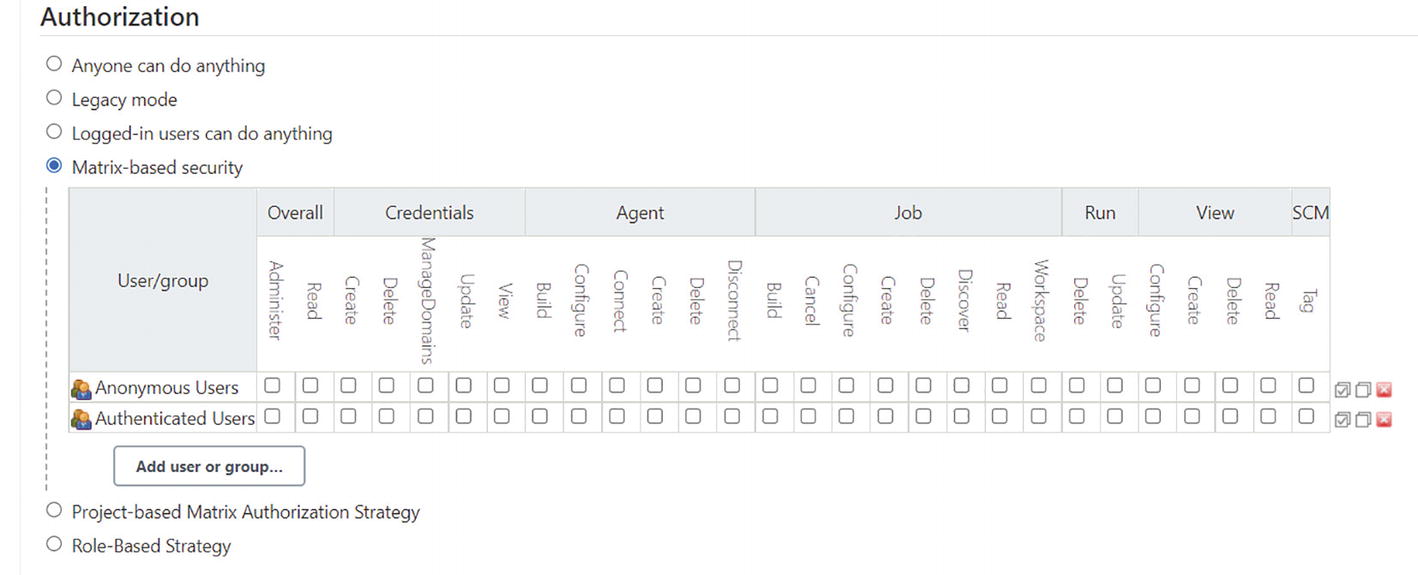
A segment of a dialog box, under matrix-based security, is a table that has 7 columns with subheaders and 2 rows. The row header is user or group. Below is a button labeled Add user or group, and 2 select buttons.
The matrix-based security option in the Authorization section on the Configure Global Security page
Anonymous users: A special type of user who is not authenticated.
Authenticated users: All authenticated users from the Jenkins system.

A window box of a browser, with Configure Global Security tab, followed by the address bar, and a boxed notice at the center top, with a box to put details. Then the configure global security section of the site, starting with a selected button followed by a table of 7 columns and 2 rows, a button labeled Add user or group, 2 select buttons, a box to fill out, 3 select buttons, and buttons Save and Apply.
The browser prompt after clicking the Add User or Group button
Click the OK button from the prompt. Select the checkboxes for the user from the available sections to set the access rights.

A segment of a dialog box, under matrix-based security, is a table that has 7 columns and 3 rows. Column 1 titled Overall have subheaders read and administer, 2 titled Credentials has to create, delete, manage domains, update, and view. 3 titled Agent has to build, configure, connect, create, delete, and disconnect. 4 titled Job has to build, cancel, configure, create, delete, discover, read, and workspace. 5 has update and delete. The view has configure, create, delete, and read. 6 titled S C M has tag. The row header is user or group.
The DingarePranoday user has been assigned all rights from the Job section
Scroll down the page and click the Save button.
Now log in with DingarePranoday’s credentials. Once I log in with this user’s credentials, I can see only a few menu options on the left side.
Other menu options, such as Manage Jenkins, are not available to this user.
Understanding the Project-Based Matrix Authorization Strategy in Jenkins
This mode is an extension to matrix-based security, which allows additional matrixes to be defined for each project.
You can see the Project-based Matrix Authorization Strategy option in the Authorization section of the Configure Global Security page.

A window box of a browser, with Configure Global Security tab, followed by the address bar, and a boxed notice at the center top, with a box to put details. Then the configure global security section of the site, starting with a selected button followed by a table of 7 columns and 2 rows, a button labeled Add user or group, a select button, a box to fill out, and buttons Save and Apply.
The browser prompt opens after clicking the Add User or Group button
Clicking the OK button will add the user entry. You can see that the DingarePranoday user entry was added.
Select the checboxes from the available sections to set the access rights.

A segment of a dialog box has a table that has 7 columns and 3 rows. Column 1 titled Overall has subheaders read and administer, 2 titled Credentials has to create, delete, manage domains, update, and view. 3 titled Agent has to build, configure, connect, create, delete, and disconnect. 4 titled Job has to build, cancel, configure, create, delete, discover, read, and workspace. 5 has update and delete. The view has configure, create, delete, and read. 6 titled S C M has tag. The row header is user or group.
The DingarePranoday user now has Build and Read rights
Click the Save button on the page.

A window box of a browser, with a Dashboard tab of an account under the name of Pranoday Dingare, followed by an address bar, then Jenkins menu bar. On the left side is a navigation pane, and beside it is the dashboard, with a table of 7 columns and 1 row. Below column 3 is a right-click menu, where configure is boxed.
The Configure menu option for a job
We will enable project-based security settings.
This setting is shown to all the jobs only if the Project-based Matrix Authorization Strategy option in the Authorization section of the Configure Global Security page is turned on.
Enable this setting by clicking the checkbox.
To add a user to this setting, click the Add User or Group button. It will open the browser prompt dialog box. Enter the user ID.
I added the DingarePranoday user to this setting by listing this name in the prompt dialog and clicking the OK button.

A window box of a browser, with My Job Config tab, followed by the address bar, and general section of the site, starting with a ticked checkbox, followed by a dropdown, with row 3 selected, then a table of 5 columns and 3 rows, a button labeled Add user or group, 4 unticked checkboxes, and buttons Save and Apply.
The Do Not Inherit Permission Grants from Other ACLs option in the Inheritance Strategy dropdown
I want to give only Build and Read permissions to the DingarePranoday user, so I selected these checkboxes.
Let’s log in with the DingarePranoday user credentials now.

A window box of a browser, with a Dashboard tab of an account under the name of Pranoday Dingare, followed by an address bar, then Jenkins menu bar. On the left side is a navigation pane, and beside it is the dashboard, with a table of 7 columns and 1 row. Below column 3 is a right-click menu, where the changes option is boxed.
The Configure and Delete Project menu options are not available
Summary
This chapter explained how to create multiple users and assign them different rights according to the role they play on a team. You also learned about the project-based matrix authorization and matrix-based strategies, which allow Jenkins to establish good access control over a Jenkins system. The next chapter introduces the Jenkins job. Stay tuned!!