In the previous chapter, you learned how to set up Maven and JDK and integrate them with Jenkins.
This chapter talks about different security-related settings that help you configure the authentication and authorization features in Jenkins.
In simple terms, authentication means valid users can log into the Jenkins system and invalid users cannot. Authorization defines different kinds of accesses granted to the different types of users, such as admin/non-admin.
Configuring Global Security in Jenkins
In this section, you work with the different settings on the Configure Global Security page. Log into Jenkins; you will see the Jenkins dashboard. Then use the following steps to go to the Configure Global Security page.

A user interface image of the Manage Jenkins webpage, System Configuration, Security, and Status Information. The System Configuration menu page has selections that are Configure System, Global Tool Configuration, Manage Plugins, Manage Nodes, and Clouds, and Install as Windows Service. Under Security are Configure Global Security, Manage Users, Manage Credentials, and Configure Credential Provider.
The System Configuration page

A user interface image of the Manage Jenkins webpage, Configure Global Security. The Configure Global Security has headers that are Authentication, Security Realm, Authorization, and Markup Formatter. With Save and Apply option buttons.
The Configure Global Security Page
Disable remember me: This checkbox will be unchecked by default.
When you open the Login screen, it shows the Keep Me Signed In checkbox. If you keep this checked, Jenkins will not ask you to log in again when you exit without logging out.
You can check the Disable Remember Me checkbox. If this checkbox is checked, the Login page will not show the Keep Me Signed In checkbox.
Delegate to servlet container: Jenkins is a automation server that runs inside a Java servlet container like Jetty (which is the default servlet container used to run Jenkins server), tomcat, etc. If you want Jenkins to use users configured in these containers, then select this option.
Jenkins’ own user database: Jenkins allows you to create users and then maintains them in its own database. So if you don’t want to rely on a third-party entity to give the list of users allowed to use Jenkins, you can create users and ask Jenkins to use it.
To create a new user, follow these steps:
- 1.
Go to the Dashboard.
- 2.
Choose Manage Jenkins ➤ Manage Users
- 3.
Click the Create User link.
- 4.
Enter all the details like username, password, confirm password, full name, and email address on the Create User page and click the Create User button. Now this user can be used to log in to Jenkins.
Allow users to sign up: On the Configure Global Security page (see Figure 7-2), this checkbox is available under the Jenkin’s Own User Database option. This checkbox is unchecked by default. If you check this checkbox, then the Create an Account link will be available on the Jenkins welcome page, as shown in Figure 7-3.

A user interface image of the login webpage for Jenkins to create an account. You may click the create an account link for you tp provide your personal information.
Jenkins login screen with the Create an Account link
Click on this link and fill in the required details on the Create an Account page to create an authenticated user.
None: On the Configure Global Security page (see Figure 7-2), if you select the None radio button from the Security Realms section, it will not ask for any authentication and the user will be treated as anonymous.
If you set this option and try to access Jenkins, you will get the following error in the Jenkins server logs:
- 1.
Go to the $Jenkins_Homeconfig.xml file.
- 2.
Change the value of the <denyAnonymousReadAccess> tag from true to false, as shown in Figure 7-4.
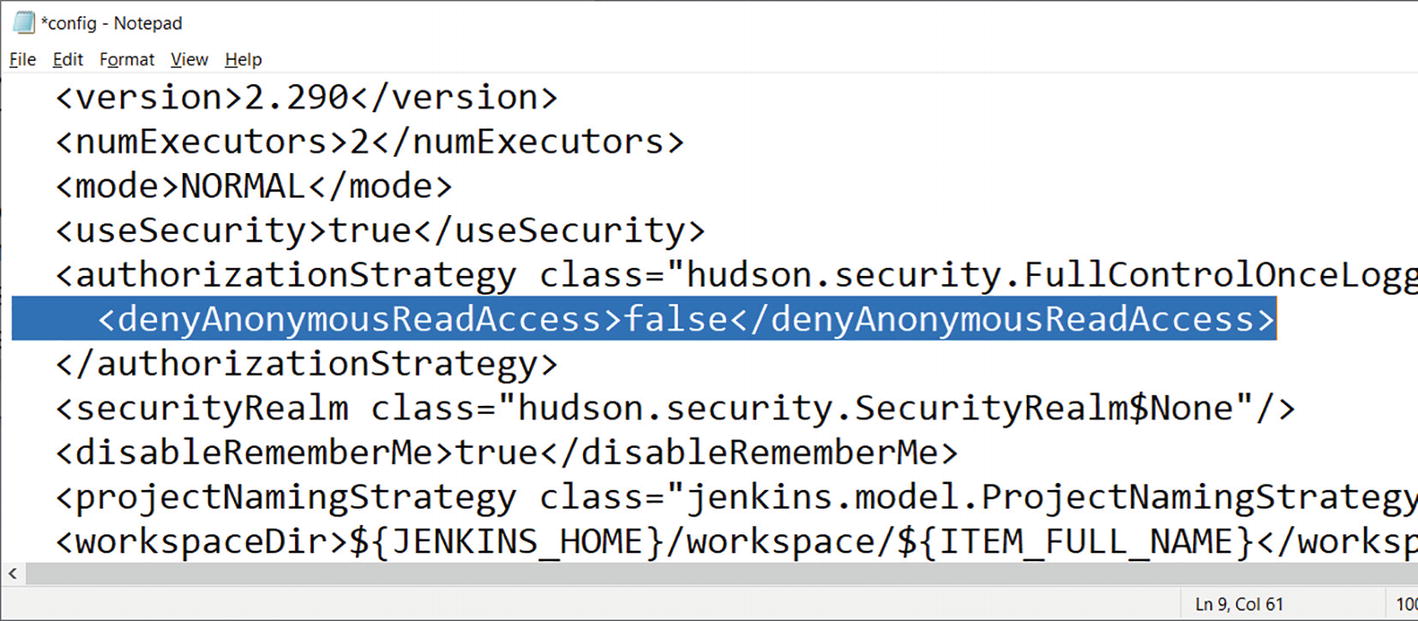
A user interface image of the Notepad for configuring the code for the Anonymous Read Access setting.
The denyAnonymousReadAccess setting in the config file
- 3.
Restart the server and access the Jenkins URL.
Anyone can do anything: On the Configure Global Security page (see Figure 7-2), this option is present in the Authorization section.
If this option is selected, then everyone, including anonymous users who have not signed in, will get full control of Jenkins.
You may use this setting when you are using Jenkins through your company’s intranet, which is a trusted environment. That way, users don’t have to sign into the Jenkins system every time and this will allow for quick changes. Using this setting is generally not recommended.
Legacy mode: In this mode, if the user has an Admin role, they will be granted full control over the system. Other users (not having the admin role), including anonymous users, will have read only access. Jenkins behaves by default before release 1.164. This option is not recommended.
Logged in user can do anything: If this option is selected, every user must log into Jenkins. Logged in users will have full control whereas anonymous users will get read only access
Allow anonymous read access: This checkbox is available under the Logged In Users Can Do Anything option. If this checkbox is checked, users who are not logged in (called anonymous users) will have read only access.

A user interface image of the webpage of Jenkins for a problem that occurred while processing the request where in an unidentified account is trying to access the webpage.
The anonymous user is not able to access Jenkins
TCP port for inbound agents: On the Configure Global Security page (see Figure 7-2), this option is available in the Agents section.
If you select the Random option, a random port number not being used by any other process is chosen dynamically.
If you select the Fixed option, you need to check the available port number on your machine and provide it in the text box.
Usually people prefer the Fixed option over the Random option because a machine’s firewall settings need to include the port number in the Inbound Rules, in order to allow the incoming communication requests through the specific port.
You are going to see the steps for creating inbound rules in the Windows firewall in the Jenkins Distributed Builds chapter (Chapter 17).
It’s easy to create inbound rules if you use a Fixed port. Creating inbound rules for random ports is not possible, as Jenkins keeps on changing the port it will use to communicate with Jenkins agents. If you do not have any firewall restrictions, you can use the Random option, as you will not have to create a firewall rule in that case.
CSRF protection: CSRF (Cross-Site Request Forgery) protection uses a token that Jenkins creates based on user information and sends it to the user. If any form submission or any action results in any kind of modifications like changing build configurations, that token (called a crumb in Jenkins) must be provided. This token contains information identifying a particular user it was created for. So submissions done with another user’s token would be rejected.
Username
Web session ID
IP address of the user’s machine
A salt unique to this Jenkins instance
API Token: This section of the configuration is used to configure the access to Jenkins when access is done through REST APIs exposed by Jenkins, CLI commands of Jenkins, or different applications. (We talk about this in more detail in Chapters 19 and 20.) Jenkins exposes various REST API endpoints as well as provides different CLI commands to perform things like triggering new builds, creating/copying existing jobs, etc.
If you check the Generate a Legacy API Token for Each Newly Created User checkbox, then Jenkins will create an API token for every user, which would be created in Jenkins database or using LDAP. When the Jenkins server is accessed through REST APIs, this token is used to authenticate the user.
If you check the Allow Users to Manually Create a Legacy API Token checkbox, the users can create their own legacy API token manually.
Agent ➤ Controller security: We will discuss this in Chapter 17.
SSH Server: Jenkins has built-in commands that you can use to access Jenkins through shell programs. You can create batch files in the Windows environment and Shell scripts in the Linux environment to perform tasks like creating jobs, triggering builds, etc. using Jenkins CLI commands. We discuss Jenkins CLI in Chapter 20. During this kind of access, Jenkins can act as an SSH server, which will allow CLI access to the program wanting to access Jenkins server using its commands.
If you select the Random option, a random port number not being used by any other process is chosen dynamically. The server will use this port to listen to the incoming connections from the SSH client.
If you select the Fixed option, you need to check the available port number on your machine and provide it in the text box. Jenkins will use that port number to listen to incoming connection requests from SSH clients.
People typically prefer the Fixed option over the Random one, as configuring inbound rules on a Windows firewall for specific fixed port number is easy. Random numbers require you to open all the ports in the firewall, which is quite difficult. You learn the steps for creating inbound rules in a Windows firewall in Chapter 17.
If you are not going to access Jenkins server using Jenkins CLI commands, then it’s better to select the Disable radio button.
Configuring LDAP with Jenkins
LDAP (Lightweight Directory Access Protocol) is a software protocol that allows anyone to locate data about organizations, individuals, and other resources such as files, whether on the Internet or an intranet.
Common uses of LDAP include providing a central place of authentication, i.e., it stores usernames and passwords. LDAP can be used to validate usernames and passwords with Docker, Jenkins, etc.
Why We Need to Configure LDAP with Jenkins
The Jenkins and LDAP integration is explained in this section. Usually in organizations, read/write access to directories/files or access to particular servers is given to a few domain users. Consider one practical scenario here. I am an employee of company named ABC and my company domain username is Pranodayd. The Pranodayd user has access to a server where builds are developed. Now say Jenkins is installed on a machine with a user called adminuser. This user does not have access to that build server. A Jenkins job (a task that you ask Jenkins to do, discussed in Chapter 10) wanting to deploy an application on the build server will not be able to do so.

A user interface image of the window for Access Control for Builds. The Configure Build Authorizations in Project Configuration menu that has selections with a tick box, these are Run as Specific User, Run as User who Triggered Build, and Run as anonymous. With Delete and Add option buttons.
The settings for the Authorize Project plugin
We don’t discuss using this plugin in this book. I just wanted to make a point here that sometimes you may need Jenkins to access users from the Active Directory (LDAP) rather than from Jenkin’s own user database.
How to Configure LDAP with Jenkins
To configure LDAP with Jenkins, you need to install the LDAP plugin in Jenkins first. Choose Dashboard ➤ Manage Jenkins ➤ Manage Plugins. Then go to the Available tab and type LDAP in the Search field.
Select the checkbox for the LDAP plugin and click the Install Without Restart button. The LDAP plugin installation will start. Wait until the installation status shows success. Go back to the Dashboard by clicking the Back to Dashboard link.

A user interface of the Manage Jenkins webpage, Configure Global Security. Under the Security Realm, the selections with tick boxes are Delegate to the servlet container, Jenkin's own user database, and L D A P. L D AP is encircled. A message reads Syntax of server field is SERVER or SERVER colon PORT or ldaps colon slash slash SERVER colon PORT. With Save and Apply option buttons.
The LDAP configuration setting on the Configure Global Security page
Contact your IT department to complete the LDAP setup in Jenkins.
Summary
This chapter explained the different settings found on the Configure Global Security page. You also learned about the need to integrate Jenkins with LDAP. With knowledge of the topics discussed in this chapter, you can configure the required security settings in Jenkins.