
OpenID (http://openid.net) is a great way to allow users to log in without having to have an actual username in your application. It is a solution that is widely adopted, and has proven itself on many popular sites (such as Google, Yahoo, MySpace, and AOL).
This recipe shows how to add support for OpenID logins in a transparent way, while still working with a valid Auth implementation.
We should have a working authentication system, so follow the recipe, Setting up a basic authentication system.
We will also need the PHP OpenID Library. Download the latest release from https://github.com/openid/php-openid/downloads and extract the folder named Auth from the downloaded file into your app/vendors folder. You should now have a directory named Auth inside your vendors folder.
Finally, we need to download the OpenID plugin for CakePHP. Go to http://github.com/mariano/openid/downloads and download the latest release. Uncompress the downloaded file into your app/plugins folder. You should now have a directory named openid inside app/plugins.
- Edit your
AppControllerclass and change the reference for theAuthcomponent fromAuthtoOpenid.OpenAuth. Thecomponentsproperty should now look like this:public $components = array( 'Openid.OpenAuth' => array( 'authorize' => 'controller' ), 'Session' );
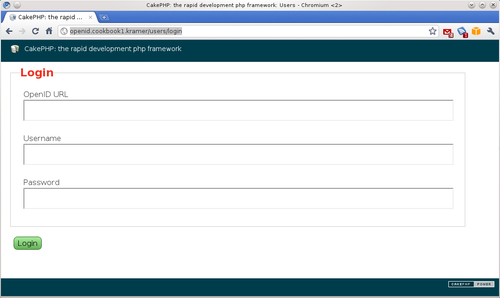
- Next, edit the login view (in
app/views/users/login.ctp) and add a field to allow the user to specify their OpenID URL. The view should now look like this:<?php echo $this->Form->create(array('action'=>'login')); echo $this->Form->inputs(array( 'legend' => 'Login', 'openid' => array('label' => 'OpenID URL'), 'username', 'password' )); echo $this->Form->end('Login'), ?>You should now be able to log in using either a valid username and password combination, or an OpenID URL, as shown in the following screenshot:
As the OpenAuth component (a part of the openid plugin) extends the CakePHP built-in Auth component, it works in a similar fashion. When the component cannot seem to find a way to log in the user with a username and password, it will check whether the OpenID URL is specified.
If this is the case, it will attempt to authenticate the URL against the OpenID server. When it does, the user is taken to the OpenID server so the application can be granted permission to access the OpenID credentials. When permission is given, the user is taken back to the application, at a point on which the OpenAuth component is able to mark the user as logged in, and resume the normal application work flow.
The openid plugin has further options to customize its behavior; including the ability to specify which user information should be given back. Check the documentation in http://github.com/mariano/openid.
Being a standard Auth implementation, this integration can be combined with any of the other recipes we have seen in this chapter, which allows for a flexible open authentication solution. If you do, make sure to note that the user given back by the OpenAuth component does not contain a valid user record, so you should create one upon log in.
Even when you are using the OpenAuth component which clearly has a different name than Auth, you can still use $this->Auth to set properties or call, for example, the allow method. This is possible because the component creates an alias.