In the previous recipe, Building REST services with JSON, we learnt how to enable JSON access to our actions, including the ability to create, modify, or delete posts with a simple JSON request.
Modification of data through REST requests can lead to sensitive data loss if we don't add some sort of authentication. This recipe shows us how to enforce that our data-changing REST services are only utilized by valid users using HTTP Basic Authentication.
To go through this recipe, we need some JSON-based REST services implemented. Follow the entire recipe Building REST services with JSON.
We also need a working authentication for our application. Follow the entire recipe Setting up a basic authentication system in the Authentication chapter.
Edit your app/controller/posts_controller.php file and make the following changes to the beforeFilter callback:
public function beforeFilter() {
parent::beforeFilter();
if ($this->_isJSON()) {
$this->Auth->allow($this->action);
$this->Security->loginOptions = array(
'type' => 'basic',
'realm' => 'My REST services,services
'login' => '_restLogin'
);
$this->Security->requireLogin($this->action);
$this->Security->validatePost = false;
}
if (
$this->_isJSON() &&
!$this->RequestHandler->isGet()
) {
if (empty($this->data) && !empty($_POST)) {
$this->data[$this->modelClass] = $_POST;
}
}
}
While still editing the PostsController class, add the following method below the beforeFilter() method:
public function _restLogin($credentials) {
$login = array();
foreach(array('username', 'password') as $field) {
$value = $credentials[$field];
if ($field == 'password' && !empty($value)) {
$value = $this->Auth->password($value);
}
$login[$this->Auth->fields[$field]] = $value;
}
if (!$this->Auth->login($login)) {
$this->Security->blackhole($this, 'login'),
}
}
If we now browse to http://localhost/posts, we will be presented with a login screen. As there are no users in the system, we need to create one by browsing to http://localhost/users/add, and specifying the desired user name and password.
Let us run the test shell script (remember to change http://localhost to suit your application's base URL).
- If you are on a GNU Linux / Mac / Unix system:
../cake/console/cake consume http://localhost
- If you are on Microsoft Windows:
..cakeconsolecake.bat consume http://localhost
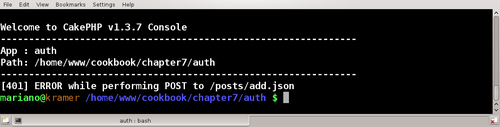
Its output would inform us that the creation of the post fails with a 401 (Unauthorized) status code, as shown in the following screenshot:
If you haven't done so already while following the recipe Setting up a basic authentication system, create a user account by browsing to http://localhost/users/add and specifying the desired username and password.
We need to modify the script to specify the user and password we created.
Edit your app/vendors/shells/consume.php shell script and add the following two properties to the ConsumeShell class:
protected static $user;
protected static $password;
While still editing the script, make the following changes to the main() method:
public function main() {
if (empty($this->args) || count($this->args) != 3) {
$this->err('USAGE: cake consume <baseUrl> <user> <password>'),
$this->_stop();
}
list(self::$baseUrl, self::$user, self::$password) = $this->args;
$this->test();
}
Make the following changes to the request() method:
protected function request($url, $method='GET', $data=null) {
if (!isset(self::$httpSocket)) {
self::$httpSocket = new HttpSocket();
} else {
self::$httpSocket->reset();
}
$body = self::$httpSocket->request(array(
'method' => $method,
'uri' => self::$baseUrl . '/' . $url,
'body' => $data,
'auth' => array(
'user' => self::$user,
'pass' => self::$password
)
));
if ($body === false || self::$httpSocket->response['status']['code'] != 200) {
$error = 'ERROR while performing '.$method.' to '.$url;
if ($body !== false) {
$error = '[' . self::$httpSocket->response['status']['code'] . '] ' . $error;
}
$this->err($error);
$this->_stop();
}
return $body;
}
We can now run the script specifying the username and password we created. Change http://localhost to match your application's URL, user to match the username, and password to match the created password:
- If you are on a GNU Linux / Mac / Unix system:
../cake/console/cake consume http://localhost user password
- If you are on Microsoft Windows:
..cakeconsolecake.bat consume http://localhost user password
Running the script should give the same successful output as shown in the recipe Building REST services with JSON.
We started by adding some special logic to the beforeFilter callback when being requested through JSON. In it, we start by telling the Auth component that the action being requested is public. If we didn't, the Auth component would render the login form to the client, which is obviously not a valid JSON response.
Note
This recipe uses a database-based authentication method. A simplier approach could have been taken by implementing basic HTTP authentication, a concept covered at http://book.cakephp.org/view/1309/Basic-HTTP-Authentication.
Once we have established that the Auth component will not handle authorization for any actions requested through JSON, we need to add support for HTTP Basic Authentication. We do so by first configuring the loginOptions property of the Security component with the following settings:
type: Type of HTTP Authentication to use, which can be eitherbasicordigest. We chosebasic.realm: A descriptive name of the system being accessed.login: An optional function that is called when a client is trying to login through HTTP authentication. As we will use theAuthcomponent to validate a login, we specify our own custom function, named_restLogin, to validate a user.
Once we configured Security, we use its requireLogin() method to mark the current action as one that requires HTTP authentication.
We also need to take into account a special check the Security component performs on certain requests. When data is posted, the component will look for a special token that should be saved in the session, and also posted as part of the request. This is a great feature that prevents the manipulation of hidden fields, because the token contains a hash of all known form values.
Naturally, this is something that should not be applicable for REST requests because as we learnt while describing the REST architecture in the introduction to the recipe Building REST services with JSON, REST requests are stateless. Therefore, we disable this feature by setting the validatePost property of the Security component to false.
The final step is implementing the method that is called by the Security component whenever an HTTP authentication login is attempted. We named this method _restLogin(), prefixing it with an underscore to prevent direct access to it. This method takes only one parameter, an indexed array with two mandatory keys: username, and password.
As the Auth component can be configured to use any field names for the username and password fields, we need to make sure we use the configured field names prior to attempting the login. The fields property of the Auth component contains this configuration in an array, indexed by username, and password.
When we receive a call to _restLogin(), the value for the password field is plain text, as this is the standard way HTTP Basic Authentication works. However, the Auth component only takes hashes as passwords, so we need to hash the given password by utilizing the password() method of the Auth component.
Once the correct field names are utilized, and the password is hashed, we are ready to attempt the login. We call the login() method of the Auth component, which returns true if the login is successful, or false otherwise. If the login fails, we use the blackHole() method of the Security component, specifying the reason for failure (login, which translates to a 401 HTTP status code), which stops the client request.