As our application grows in size and complexity, we will find ourselves in the need to create and automate certain tasks, deferring the processing of non-interactive tasks for later execution. While we can create shells to perform these operations, some of our needs may be met by the Robot plugin.
Note
While this recipe shows a pure CakePHP approach, there are more involved and scalable alternatives. One of the most used tools is Gearman, available at http://gearman.org/.
The Robot plugin allows us to schedule tasks for later execution, and have those tasks run by a shell. The tasks themselves are actually CakePHP controller actions, which are run by the shell at the specified time.
This recipe shows us how to use the Robot plugin to send an e-mail after a user has signed up for our newsletters, and how to have the shell in the Robot plugin periodically check for pending tasks and run them as they become available.
To go through this recipe we need some data to work with. Follow the Getting ready section of the previous recipe.
We need to download the Robot plugin. Go to http://github.com/mariano/robot/downloads and download the latest release. Uncompress the downloaded file into your app/plugins folder. You should now have a directory named robot inside app/plugins.
Run the SQL statements found in the app/plugins/robot/config/sql/robot.sql file to create the tables required by the Robot plugin.
- Create a file named
subscribers_controller.phpand place it in yourapp/controllersfolder, with the following contents:<?php class SubscribersController extends AppController { public function add() { if (!empty($this->data)) { $this->Subscriber->create(); if ($this->Subscriber->save($this->data)) { $this->Session->setFlash('You have been subscribed!'), $this->redirect('/'), } else { $this->Session->setFlash('Please correct the errors'), } } } public function welcome() { } } ?> - Create a folder named
subscribersin yourapp/viewsfolder. Create a file namedadd.ctpand place it in the folderapp/views/subscribers, with the following contents:<?php echo $this->Form->create(); echo $this->Form->inputs(array( 'legend' => 'Subscribe', 'name', 'email' )); echo $this->Form->end('Submit'), ?> - Create a file named
welcome.ctpand place it in theapp/views/subscribersfolder, with the following contents:<h1>Welcome to my site!</h1>
- Add the following property to the beginning of the
SubscribersControllerclass (change the delivery settings of theEmailcomponent to match your needs):public $components = array( 'Email' => array( 'delivery' => 'smtp', 'smtpOptions' => array( 'host' => 'smtp.email.com', 'username' => 'smtpUser', 'password' => 'smtpPassword' ) ) );
- Edit the
add()method of theSubscribersControllerclass and make the following changes:public function add() { if (!empty($this->data)) { $this->Subscriber->create(); if ($this->Subscriber->save($this->data)) { ClassRegistry::init('Robot.RobotTask')->schedule( array('action'=>'welcome'), array( 'name' => $this->data['Subscriber']['email'], 'email' => $this->data['Subscriber']['email'] ) ); $this->Session->setFlash('You have been subscribed!'), $this->redirect('/'), } else { $this->Session->setFlash('Please correct the errors'), } } } - While still editing the
SubscribersControllerclass, replace thewelcome()method with the following contents:public function welcome() { if (isset($this->params['robot'])) { $subscriber = $this->params['robot']; $this->Email->sendAs = 'html'; $this->Email->subject = 'Welcome to my site!'; $this->Email->from = 'My Application <[email protected]>'; $this->Email->to = $subscriber['name'] . ' <'.$subscriber['email'].'>'; return ($this->Email->send('Hi, and <strong>welcome</strong> to my site!') !== false); } }
You can now browse to http://localhost/subscribers/add and enter your name and e-mail address. Now run the robot shell with the following command:
If you are on a GNU Linux / Mac / Unix system:
../cake/console/cake robot.robot run
If you are on Microsoft Windows:
..cakeconsolecake.bat robot.robot run
You should get an output similar to what is shown in the following screenshot:
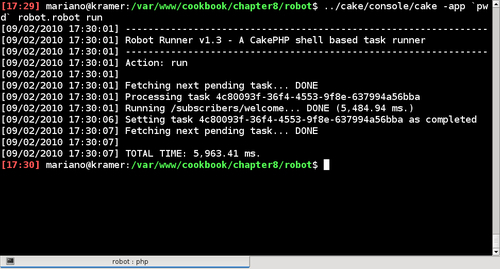
The robot is informing us that a task executed the CakePHP URL /subscribers/welcome successfully, after which we should receive a welcome e-mail.
We started with a basic controller that takes new subscriptions and saves them, redirecting to a welcome screen after the record is created. Then we added the Email component to our controller, as it will be used for sending e-mails.
We continued by modifying the add() method to create the scheduled task. We scheduled a task using the schedule() method of the RobotTask model located in the Robot plugin. This method takes up to three arguments:
|
Argument |
Purpose |
|---|---|
|
|
The URL to a CakePHP action, which can be given as a string or as an array. |
|
|
Optional parameters to send to the controller action specified in |
|
|
The time at which the action should be executed. This can be either a specific time stamp (in seconds since the Unix Epoch, which is January 1, 1970 00:00:00 GMT), or any string that can be used by the PHP function |
In our add() method, we set the action argument to the welcome action of the current controller, and send two parameters: name, and email. These parameters are available to the called action through the $this->params['robot'] array.
In fact, whenever a controller action is called through the robot shell, $this->params['robot'] will be available. If no parameters were specified when scheduling the task, this array will be empty, hence the check with isset() instead of !empty() in the welcome() method.
When called through the robot shell, the welcome() method uses the given parameters to build and send the e-mail. It returns a Boolean value to indicate the success of the executed task. If no value is returned, the task is assumed to have succeeded.
To test the Robot plugin, we ended the recipe by signing up as a subscriber, and then running the robot. Naturally, the application should not have to wait for us to manually run the robot shell in order for e-mails to go out. We need to add the shell to our list of automated tasks, commonly known as CRON tasks on most operative systems.
Assuming your application lives at /var/www/myapp, and that the path to your PHP binary is /usr/bin/php, the following would be the command that should be included as an automated task in your operative system:
/usr/bin/php -q /var/www/myapp/cake/console/cake.php -app /var/www/myapp/app robot.robot run -silent
Notice the silent option. This tells the robot plugin to output no messages unless an error is found. This is particularly important when adding this command to our list of automated tasks, as it may be configured to e-mail the output of any executed command.
When adding this command to our list of automated tasks, we have to decide how often we want the robot to check for tasks. If we are interested in immediate results, we should set the robot to run every minute. However, what happens if at second 0 of a given minute the robot finds no tasks? We will have 59 seconds of idle time.
Fortunately, the plugin offers an interesting solution to this problem. Using the parameter daemon, we tell the Robot plugin to wait for tasks even if there are none available. If we try to manually run it with this option using the following command:
$ cake/console/cake robot.robot run -daemon
we will notice the shell complains, saying that there is no limit specified. This is because the robot should not be set to wait for tasks indefinitely, as any PHP fatal error that may be provoked by a called action could render the robot useless.
Instead, we can use the time parameter to limit the number of seconds to which the robot should wait for tasks. If we wanted to run the robot every minute, this limit should be set to 59 seconds:
$ cake/console/cake robot.robot run -daemon -time 59
This means that we would have a robot waiting up to 59 seconds for tasks, after which the next robot run will be triggered.