
3
Taking Great Pictures, Automatically
In This Chapter
![]() Shooting your first pictures
Shooting your first pictures
![]() Setting focus and exposure automatically
Setting focus and exposure automatically
![]() Getting better results by using the automatic scene modes
Getting better results by using the automatic scene modes
![]() Understanding the Ambience and Lighting/Scene Type features
Understanding the Ambience and Lighting/Scene Type features
![]() Gaining more control with Creative Auto mode
Gaining more control with Creative Auto mode
Are you old enough to remember the Certs television commercials from the 1960s and 1970s? “It’s a candy mint!” declared one actor. “It’s a breath mint!” argued another. Then a narrator declared the debate a tie and spoke the famous catchphrase: “It’s two, two, two mints in one!”
Well, that pretty much describes the 70D. On one hand, it provides a range of powerful controls, offering just about every feature a serious photographer could want. On the other, it also offers fully automated exposure modes that enable people with no experience to capture beautiful images. “It’s a sophisticated photographic tool!” “It’s as simple as ‘point and shoot’!” “It’s two, two, two cameras in one!”
Of course, you probably bought this book for help with your camera’s advanced side, so that’s what other chapters cover. This chapter, however, is devoted to your camera’s point-and-shoot side, explaining how to get the best results from the fully automatic exposure modes.
 Although the fully automated modes work in Live View mode, where you use the monitor to compose your shots, some picture-taking steps (including autofocusing) are different than when you use the viewfinder. This chapter assumes that you’re using the viewfinder; see Chapter 4 for help with Live View photography.
As Easy As It Gets: Auto and Flash Off
For the most automatic of automatic photography, set your camera’s Mode dial to one of the following settings:
![]() Scene Intelligent Auto: The name of this mode, labeled in Figure 3-1, refers to the fact that the camera analyzes the scene and selects the picture-taking options that it thinks will best capture the subject.
Scene Intelligent Auto: The name of this mode, labeled in Figure 3-1, refers to the fact that the camera analyzes the scene and selects the picture-taking options that it thinks will best capture the subject.
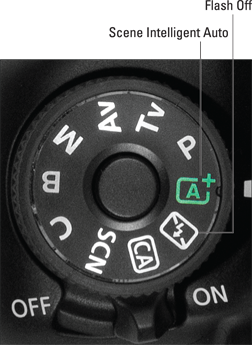
Figure 3-1: These two modes are identical, except that one disables flash.
![]() Flash Off: Also labeled in the figure, this mode does the same thing as Scene Intelligent Auto, except flash is disabled. This mode provides an easy way to ensure that you don’t break the rules when shooting in locations that don’t permit flash.
Flash Off: Also labeled in the figure, this mode does the same thing as Scene Intelligent Auto, except flash is disabled. This mode provides an easy way to ensure that you don’t break the rules when shooting in locations that don’t permit flash.
In either mode, follow these steps to take a picture:
1. Set the focusing switch on the lens to the AF (autofocus) position, as shown in Figure 3-2.
The figure features the 18–135mm kit lens; the switch looks the same on the 18–55mm kit lens. If you own a different lens, the switch may look and operate differently; check your lens manual for details. (Note that these steps assume that your lens offers autofocusing; if not, ignore autofocusing instructions and focus manually.)
2. Unless you’re using a tripod, set the Image Stabilizer switch to the On setting, as shown in Figure 3-2.
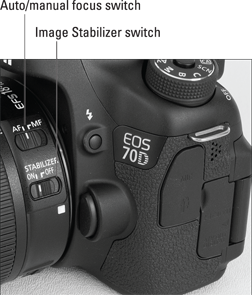
Figure 3-2: Set the lens switch to AF to use autofocusing.
Image stabilization helps produce sharper images by compensating for camera movement that can occur when you handhold the camera. If you’re using a tripod, you can save battery power by turning stabilization off. Again, if you use a lens other than one of the two kit lenses, check your lens manual for details about its stabilization feature, if provided.
3. Set the Drive mode.
By default, the camera sets the Drive mode to Single, which means that you capture one picture with each press of the shutter button. The Single mode is represented by the single rectangle symbol you see in Figure 3-3.
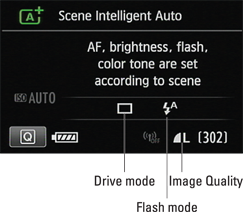
Figure 3-3: In Scene Intelligent Auto and Flash Off modes, you still have control over the Drive mode and Image Quality settings.
To access the other settings, the fastest route is via the Drive button on top of the camera. You also can adjust the setting through the Quick Settings screen.
4. Select the Image Quality setting via Shooting Menu 1.
Chapter 2 spells out the intricacies of this setting. If you’re not up for digesting the topic, keep the setting at the default (Large/Fine). The icon representing that setting looks like the one shown in Figure 3-3.
5. In Scene Intelligent Auto mode, set the Flash mode to Auto.
In this mode, the flash fires if the camera thinks it’s necessary. The symbol for the Auto flash mode appears as shown in Figure 3-3; if you see the Flash Off or Flash On symbol instead, use the Quick Control screen to adjust the option.
 If you’re shooting a portrait in dim lighting, try enabling Red-Eye Reduction flash (found on Shooting Menu 2). Chapter 2 has more about this feature and other flash topics.
6. Looking through the viewfinder, frame the image so that your subject appears within the autofocus brackets.
Those brackets, labeled in Figure 3-4, represent the area of the frame that contains the autofocus points.
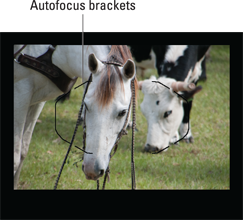
Figure 3-4: Frame your subject so that it falls within the autofocus brackets.
7. Press and hold the shutter button halfway down.
The autofocus and autoexposure systems begin to do their thing. In dim light, the flash pops up when you use the Scene Intelligent Auto exposure mode. Additionally, the flash may emit an AF-assist beam, a few rapid pulses of light designed to help the autofocusing mechanism find its target.
After the camera meters exposure, it displays its chosen aperture (f-stop) and shutter speed settings at the bottom of the viewfinder. In Figure 3-5, for example, the shutter speed is 1/500 second, and the f-stop is f/6.3. You also see the current ISO setting and the maximum burst rate (in this case, 100 and 34, respectively). (Chapter 7 details shutter speed, f-stops, and ISO; see Chapter 1 for information about the maximum burst rate.)
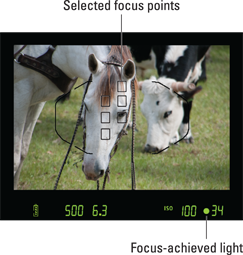
Figure 3-5: When you photograph stationary subjects, the green focus indicator lights when the camera locks focus.
 If the shutter speed value blinks, the camera needs to use a slow shutter speed to expose the picture. Because any movement of the camera or subject can blur the picture at a slow shutter speed, use a tripod and tell your subject to remain as still as possible.
When focus is established, one or more autofocus points appear to indicate which areas are in focus, as shown in Figure 3-5. (The camera typically locks focus on the object closest to the lens.) In most cases, you also hear a beep and see the focus indicator light, labeled in the figure. Focus is now locked as long as you keep the shutter button halfway down.
These focus signals vary if the camera detects a moving subject, however. You may hear a series of small beeps, and the focus lamp may not light. Both signals mean that the camera switched to an autofocusing option that enables it to adjust focus as necessary up to the time you take the picture. As long as you keep the subject within the area covered by the autofocus brackets, focus should be correct.
8. Press the shutter button the rest of the way to take the picture.
When the camera finishes recording image data to the memory card, the picture appears briefly on the monitor. See Chapter 5 to find out more about picture playback.
I need to add two more pointers about these modes:
![]() Exposure: In dim lighting, the camera may need to use a very high ISO setting, which increases the camera’s sensitivity to light, or very slow shutter speed (longer exposure time). Both can create noise, a defect that makes your picture look grainy. See Chapter 7 for tips on dealing with this and other exposure problems.
Exposure: In dim lighting, the camera may need to use a very high ISO setting, which increases the camera’s sensitivity to light, or very slow shutter speed (longer exposure time). Both can create noise, a defect that makes your picture look grainy. See Chapter 7 for tips on dealing with this and other exposure problems.
![]() Color: Color decisions are handled automatically. Normally, the camera’s color brain does a good job of rendering the scene, but if you want to tweak color, you’re out of luck.
Color: Color decisions are handled automatically. Normally, the camera’s color brain does a good job of rendering the scene, but if you want to tweak color, you’re out of luck.
Taking Advantage of Scene (SCN) Modes
In Scene Intelligent Auto and Flash Off modes, the camera tries to figure out what type of picture you want to take. If you don’t want to rely on the camera to make that judgment, you can choose from one of seven automatic scene modes that are designed to capture specific subjects using traditional recipes. For example, most people prefer portraits that have softly focused backgrounds, so Portrait mode selects settings that can blur the background. And action shots typically show the subject frozen in time, so that’s the route the camera takes in Sports mode.
Scene modes also apply color, exposure, contrast, and sharpness adjustments to the picture according to the traditional characteristics of the scene type. Landscape mode produces more vibrant colors (especially in the blue-green range, for example).
 Upcoming sections describe each scene mode, but first, a few basics. To select a scene mode, turn the Mode dial to SCN, as shown in Figure 3-6. Then bring up the Shooting Settings screen, where the current scene mode is indicated by the icon and label at the top of the screen, as shown on the left in Figure 3-7. To select a different mode, use the Quick Control screen, as shown on the right.
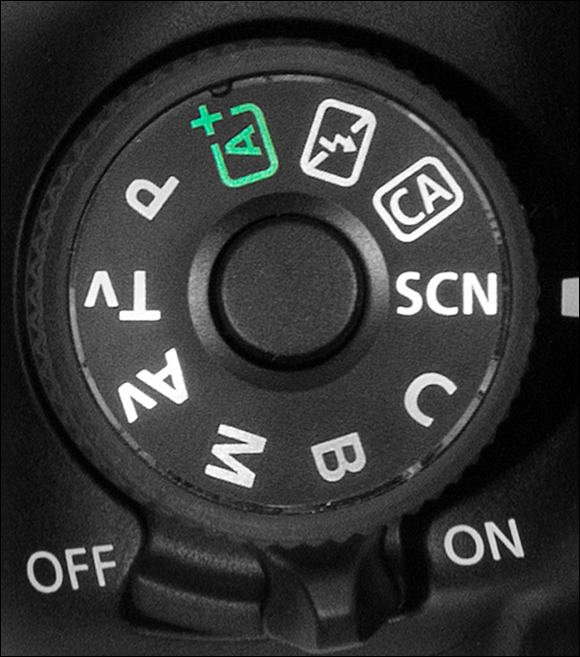
Figure 3-6: Set the Mode dial to SCN to access the scene modes.
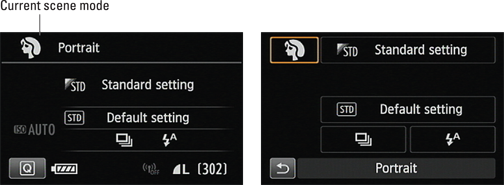
Figure 3-7: Use the Quick Settings screen to choose your scene mode.
You’re pretty limited in access to picture settings in all the scene modes, but depending on the mode, you may be able to adjust the following settings:
![]() Shoot by Ambience: This option, available in all the scene modes except HDR Backlight Control, enables you to play with image colors and request a darker or brighter exposure on your next shot. The section Taking a look at the Shoot by Ambience options, later in this chapter, explains your choices. Look for the setting marked by the little triangle symbol, as labeled in Figure 3-8; adjust the option via the Quick Control screen.
Shoot by Ambience: This option, available in all the scene modes except HDR Backlight Control, enables you to play with image colors and request a darker or brighter exposure on your next shot. The section Taking a look at the Shoot by Ambience options, later in this chapter, explains your choices. Look for the setting marked by the little triangle symbol, as labeled in Figure 3-8; adjust the option via the Quick Control screen.
![]() Shoot by Lighting or Scene Type: This option, also labeled in the figure, is available only in Portrait, Landscape, Close-up, and Sports modes. It manipulates color and is primarily designed to eliminate color casts that can occur in some types of lighting. Check out “Eliminating color casts with Shoot by Lighting or Scene Type,” also later in this chapter, for details. Again, this setting is accessed by the Quick Control screen.
Shoot by Lighting or Scene Type: This option, also labeled in the figure, is available only in Portrait, Landscape, Close-up, and Sports modes. It manipulates color and is primarily designed to eliminate color casts that can occur in some types of lighting. Check out “Eliminating color casts with Shoot by Lighting or Scene Type,” also later in this chapter, for details. Again, this setting is accessed by the Quick Control screen.
![]() Drive mode: The icon representing this setting appears in the area labeled in Figure 3-8. To access this setting, detailed in Chapter 2, press the Drive button or use the Quick Control screen.
Drive mode: The icon representing this setting appears in the area labeled in Figure 3-8. To access this setting, detailed in Chapter 2, press the Drive button or use the Quick Control screen.
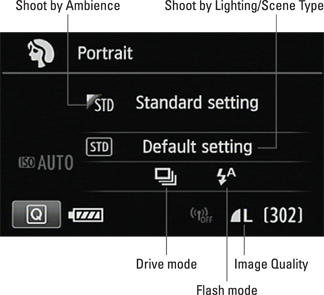
Figure 3-8: Whether you can adjust these settings depends on the scene mode.
![]() Flash: Flash is disabled in Sports and Landscape modes; in Night Portrait scene, on the other hand, the flash is locked at Auto mode, which means the camera decides if flash is needed. For Handheld Night Scene mode, you can enable or disable flash; and for the other modes, you can choose from Auto, On, and Off. Adjust the setting via the Quick Control screen, and again, refer to Chapter 2 for more help with the basics of using your flash. When you do use flash, you can enable Red-Eye Reduction flash via Shooting Menu 2.
Flash: Flash is disabled in Sports and Landscape modes; in Night Portrait scene, on the other hand, the flash is locked at Auto mode, which means the camera decides if flash is needed. For Handheld Night Scene mode, you can enable or disable flash; and for the other modes, you can choose from Auto, On, and Off. Adjust the setting via the Quick Control screen, and again, refer to Chapter 2 for more help with the basics of using your flash. When you do use flash, you can enable Red-Eye Reduction flash via Shooting Menu 2.
![]() Image Quality: You can change this setting, which controls resolution and file type, only via Shooting Menu 1. Chapter 2 explains the impact of that setting; if you’re unsure which option to choose, stick with the default (Large/Normal). The symbol next to the menu item should look like the one shown in Figure 3-8. Note that you can’t use the Raw setting for the HDR Backlight Control and Handheld Night Scene modes.
Image Quality: You can change this setting, which controls resolution and file type, only via Shooting Menu 1. Chapter 2 explains the impact of that setting; if you’re unsure which option to choose, stick with the default (Large/Normal). The symbol next to the menu item should look like the one shown in Figure 3-8. Note that you can’t use the Raw setting for the HDR Backlight Control and Handheld Night Scene modes.
As for the actual picture-taking process, everything works pretty much as outlined in the steps provided earlier in the first section of this chapter. You do need to be aware of a few variations, which I spell out in the upcoming sections.
Portrait mode
 Portrait mode is designed to produce the classic portrait look featured in Figure 3-9: a sharply focused subject against a blurred background. In photography lingo, this picture has a short depth of field.

Figure 3-9: Portrait setting produces a softly focused background.
 One way to control depth of field is to adjust an exposure control called aperture, or f-stop setting, so Portrait mode attempts to use an f-stop setting that produces a short depth of field. But the range of f-stops available to the camera depends on the lens and the lighting conditions, so one picture taken in Portrait mode may look very different from another. Additionally, the amount of background blurring depends on the distance of the subject from the background, the focal length of your lens, and how close you get to your subject. For greater background blurring, move the subject farther from the background, use a telephoto lens (or zoom to the longest focal length your lens offers), and get closer to the subject. See Chapter 8 for an in-depth discussion of this topic.
Along with favoring an f-stop that produces a shorter depth of field, Portrait mode results in a slightly less sharp image, the idea being to keep skin texture soft. Colors are also adjusted to enhance skin tones. A few other facts to note:
![]() Drive mode: The default Drive mode is Low-speed Continuous, which records as many as 3 frames per second (fps) as long as you hold down the shutter button. Press the Drive button or use the Quick Control screen to select a different Drive mode.
Drive mode: The default Drive mode is Low-speed Continuous, which records as many as 3 frames per second (fps) as long as you hold down the shutter button. Press the Drive button or use the Quick Control screen to select a different Drive mode.
![]() Autofocusing: Portrait mode employs the One-Shot AF (autofocus) mode. This is one of three AF modes, all detailed in Chapter 8. In One-Shot mode, the camera locks focus when you press the shutter button halfway. Typically the camera locks focus on the closest object that falls within the autofocus brackets.
Autofocusing: Portrait mode employs the One-Shot AF (autofocus) mode. This is one of three AF modes, all detailed in Chapter 8. In One-Shot mode, the camera locks focus when you press the shutter button halfway. Typically the camera locks focus on the closest object that falls within the autofocus brackets.
Landscape mode
 Landscape mode, designed for capturing scenic vistas, city skylines, and other large-scale subjects, produces a large depth of field. As a result, objects both close to the camera and at a distance appear sharply focused, as in Figure 3-10.
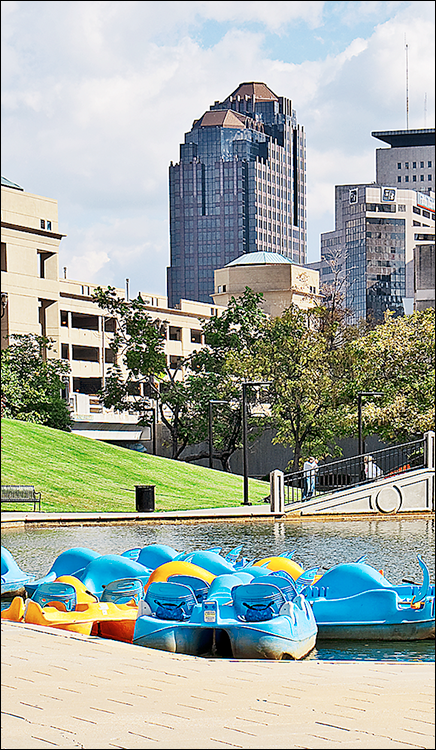
Figure 3-10: Landscape mode produces a large zone of sharp focus.
Like Portrait mode, Landscape mode achieves its depth-of-field goal by manipulating the aperture (f-stop) setting. Consequently, the extent to which the camera succeeds in keeping everything in sharp focus depends on your lens and on the available light. To fully understand this issue and other factors that affect depth of field, see Chapters 7 and 8.
Whereas Portrait mode tweaks the image to produce soft, flattering skin tones, Landscape mode results in sharper, more contrasty, photos. Color saturation is increased as well, and blues and greens appear especially bold. Other critical settings work as follows:
![]() Drive mode: The default setting is Single, which records one image for each press of the shutter button.
Drive mode: The default setting is Single, which records one image for each press of the shutter button.
![]() Autofocusing: Landscape mode uses One-Shot AF mode; focus locks when you press the shutter button halfway. Focus usually is set on the nearest object that falls within the autofocus brackets.
Autofocusing: Landscape mode uses One-Shot AF mode; focus locks when you press the shutter button halfway. Focus usually is set on the nearest object that falls within the autofocus brackets.
In this mode, the built-in flash is disabled, which is typically no big deal. Because of its limited range, the flash is of little use when shooting most landscapes, anyway. But for some still-life shots, such as of a statue at close range, a flash may prove helpful. Try switching to Creative Auto mode, detailed later in this chapter, if you want to use flash.
Close-up mode
 Close-up mode doesn’t enable you to focus closer to your subject than normal as it does on some non-SLR cameras. The close-focusing capabilities of your camera depend entirely on the lens you use. (Your lens manual should specify the minimum focusing distance.)
Choosing Close-up mode does tell the camera to try to select an aperture (f-stop) setting that results in a short depth of field, which blurs background objects so that they don’t compete for attention with your main subject. I took this creative approach to capture the orchid in Figure 3-11. As with Portrait mode, though, how much the background blurs varies depending on a number of factors, all detailed in Chapter 8.

Figure 3-11: Close-up mode also produces short depth of field.
As far as color, sharpness, and contrast, the camera doesn’t play with those characteristics as it does in Portrait and Landscape modes. So in that regard, Close-up mode is the same as Scene Intelligent Auto and Flash Off modes.
Other settings that apply to Close-up mode:
![]() Drive mode: The Drive mode is set to Single by default, so you record one photo each time you fully press the shutter button. However, you can use any of the other options you prefer. Don’t know how those work? Chapter 2 explains.
Drive mode: The Drive mode is set to Single by default, so you record one photo each time you fully press the shutter button. However, you can use any of the other options you prefer. Don’t know how those work? Chapter 2 explains.
![]() Autofocusing: The AF mode is set to One-Shot mode; again, that means that when you press the shutter button halfway, the camera locks focus, usually on the nearest object.
Autofocusing: The AF mode is set to One-Shot mode; again, that means that when you press the shutter button halfway, the camera locks focus, usually on the nearest object.
Sports mode
 Sports mode helps you photograph moving subjects, such as the soccer player in Figure 3-12. In this mode, the camera selects a fast shutter speed, which is needed to “stop motion.” Shutter speed is an exposure control that you can explore in Chapter 7.
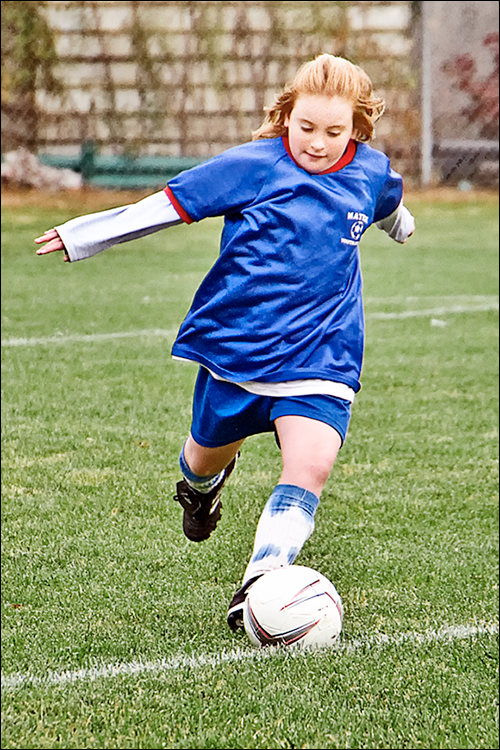
Figure 3-12: To capture moving subjects and minimize blur, try Sports mode.
Colors, sharpness, and contrast are all standard in Sports mode, with none of the adjustments that occur in Portrait and Landscape mode. Other settings to note include the following:
![]() Drive mode: The default Drive mode is High-speed Continuous, which records up to 7fps as long as you hold down the shutter button.
Drive mode: The default Drive mode is High-speed Continuous, which records up to 7fps as long as you hold down the shutter button.
![]() Autofocusing: The AF mode is set to AI Servo, which is designed for moving subjects. When you press the shutter button halfway, the camera establishes focus on whatever is at the center of the frame. But if the subject moves, the camera attempts to refocus up to the moment you take the picture. For this feature to work correctly, you must adjust framing so that your subject remains within the autofocusing brackets.
Autofocusing: The AF mode is set to AI Servo, which is designed for moving subjects. When you press the shutter button halfway, the camera establishes focus on whatever is at the center of the frame. But if the subject moves, the camera attempts to refocus up to the moment you take the picture. For this feature to work correctly, you must adjust framing so that your subject remains within the autofocusing brackets.
As with Landscape mode, the built-in flash is off-limits in Sports mode. The other critical thing to understand is that whether the camera can select a shutter speed fast enough to stop motion depends on the available light and the speed of the subject. In dim lighting, a subject moving at a rapid pace may appear blurry even when photographed in Sports mode. And the camera may need to increase light sensitivity by boosting the ISO setting, which has the unhappy side effect of creating noise, a defect that looks like grains of sand.
Night Portrait mode
 As its name implies, Night Portrait mode is designed to deliver a better-looking portrait at night (or in any dimly lit environment). Night Portrait does so by combining flash with a slow shutter speed. That slow shutter speed produces a longer exposure time, which enables the camera to rely more on ambient light and less on the flash to expose the picture. The result is a brighter background and softer, more even lighting.
Shutter speed is covered in detail in Chapter 7. For now, the important thing to know is that the slower shutter speed used by Night Portrait mode means that you need a tripod. If you handhold the camera, you run the risk of camera shake blurring the image. Your subjects also must stay still during the exposure.
Night Portrait mode also differs from regular Portrait mode in that it renders the scene in the same way as Scene Intelligent Auto in terms of colors, contrast, and sharpness. So shots taken in Night Portrait mode typically display sharper, bolder colors than those taken in Portrait mode.
Other Night Portrait settings to note:
![]() Drive mode: The default setting is Single, but you also can switch to any of the other Drive mode options. Just press that Drive button on top of the camera to access the settings.
Drive mode: The default setting is Single, but you also can switch to any of the other Drive mode options. Just press that Drive button on top of the camera to access the settings.
![]() Autofocusing: The AF mode is set to One-Shot, which locks focus when you press the shutter button halfway down.
Autofocusing: The AF mode is set to One-Shot, which locks focus when you press the shutter button halfway down.
Handheld Night Scene mode
 Any camera movement during an exposure can blur your photo. And when you take a picture in dim lighting, the risk is increased because the camera needs a longer exposure time, meaning you have to hold the camera still longer. That’s the scenario that led to the Handheld Night Scene mode: As its name implies, it’s designed to produce a sharper handheld picture in dim lighting.
When you press the shutter button, the camera records four shots in quick succession, then blends the images in a way that reduces blurring while still producing a good exposure. Don’t worry about the details — just know that this magic formula, whatever it is, works pretty well, although pictures may not be as sharp as when you use a tripod.
You don’t have to reserve this setting for nighttime shots, by the way. For example, I used it to capture the shot in Figure 3-13, taken from the top flight of stairs inside a lighthouse. I knew it would be enough of a struggle to climb up the 200-some steps to get to that vantage point, and I wasn’t about to add a tripod to my load. So I just leaned over the railing, pointed the camera downward, held my breath, and pressed the shutter button. At a shutter speed of 1/40 second — slow by photographic standards — that would normally be a recipe for a blurry image, but with the help of the Handheld Night Scene mode, the shot is acceptably sharp.

Figure 3-13: I used Handheld Night Scene to capture this handheld shot from a vantage point at the top of a lighthouse.
A couple of points about this mode:
![]() Drive mode: The Single Drive mode is set by default, but the camera records the four successive images with one press of the shutter button anyway, as if you were using one of the Continuous Drive modes. Setting the Drive mode to the Continuous modes has no effect — you still get just four shots per shutter press. You can, however, use one of the Self-Timer modes to delay the capture of those four shots. See Chapter 2 for the complete scoop on Drive mode.
Drive mode: The Single Drive mode is set by default, but the camera records the four successive images with one press of the shutter button anyway, as if you were using one of the Continuous Drive modes. Setting the Drive mode to the Continuous modes has no effect — you still get just four shots per shutter press. You can, however, use one of the Self-Timer modes to delay the capture of those four shots. See Chapter 2 for the complete scoop on Drive mode.
![]() Flash: You can set the Flash mode to on or off. For landscapes, disable flash, but for portraits, flash is a good idea. The flash fires on the first frame to guarantee that your subject will be well lit, and then the other three frames are taken without flash. Warn your subjects to remain still even after the flash fires, or they may appear blurry in the photo.
Flash: You can set the Flash mode to on or off. For landscapes, disable flash, but for portraits, flash is a good idea. The flash fires on the first frame to guarantee that your subject will be well lit, and then the other three frames are taken without flash. Warn your subjects to remain still even after the flash fires, or they may appear blurry in the photo.
Using flash can result in a couple other problems, too: If you’re really close to your subject, the image may appear too bright. Back away a little to see if that solves the problem. Additionally, if both subject and background are within the reach of the flash, the camera may have trouble aligning the four frames, resulting in a blurry photo.
![]() Autofocusing: The One-Shot AF mode is in force, so focus is locked when you press the shutter button halfway down.
Autofocusing: The One-Shot AF mode is in force, so focus is locked when you press the shutter button halfway down.
![]() Frame area: The angle of view of the final image is a little smaller than what you see through the viewfinder. This occurs because the camera usually needs to crop the image a little in order to get the four frames to align properly. The actual size of the image remains the same — it just contains a slightly smaller subject area than normal. So compose your image with a little extra margin around the edges to compensate.
Frame area: The angle of view of the final image is a little smaller than what you see through the viewfinder. This occurs because the camera usually needs to crop the image a little in order to get the four frames to align properly. The actual size of the image remains the same — it just contains a slightly smaller subject area than normal. So compose your image with a little extra margin around the edges to compensate.
![]() Moving subjects: Moving subjects may create blur in your picture because they’ll be captured at slightly different areas in each frame. For example, if you look closely at my lighthouse shot (refer to Figure 3-13), you may be able to notice some blurring of the people climbing the stairs.
Moving subjects: Moving subjects may create blur in your picture because they’ll be captured at slightly different areas in each frame. For example, if you look closely at my lighthouse shot (refer to Figure 3-13), you may be able to notice some blurring of the people climbing the stairs.
![]() Image Quality: This mode works only with images recorded in the JPEG format. In fact, you can’t select Raw as the file format when this mode is active. If you select Raw prior to selecting the Handheld Night Scene mode, the camera automatically changes the format to Large/Fine.
Image Quality: This mode works only with images recorded in the JPEG format. In fact, you can’t select Raw as the file format when this mode is active. If you select Raw prior to selecting the Handheld Night Scene mode, the camera automatically changes the format to Large/Fine.
Finally, give the camera all the help you can by holding it as still as possible while the four frames are being captured. If possible, find a ledge or other surface on which you can brace the camera, and try tucking your elbows into your sides for additional stability.
HDR Backlight Control mode
 When a scene contains both very dark and very bright areas, the camera has a difficult time recording the entire range of brightness values — its “eyes” aren’t nearly as adept as ours at seeing the whole picture, as it were. That’s where the HDR Backlight Control feature comes in.
A bit of background about the terminology: HDR stands for high dynamic range. Dynamic range refers to the range of brightness values that a device can record. HDR refers to an image that contains a greater spectrum of brightness values than can normally be captured by a camera. In order to produce this result, the photographer records a series of images at different exposures and then uses HDR software to merge the images in a way that results in more detail in both the darkest and brightest parts of a photo.
About the Backlight Control part of the mode name? Well, a backlit image is one in which the light source is behind the subject, which often produces a photograph background that’s well exposed but a subject that’s too dark. If you tweak exposure settings, you can get your subject to be bright, but not without also brightening the background and, usually, “blowing out the highlights,” or making the lightest areas of the scene too bright. HDR Backlight Control to the rescue: It helps brighten the darkest parts of the image while holding onto more highlight detail than is otherwise possible.
When you press the shutter button in this mode, the camera records three images, adjusting exposure between each frame. One frame is exposed to capture the highlights, another for the midtones (areas of medium brightness), and another for the shadows. Then the three are merged into one final HDR image. You can see an example in Figure 3-14. I took the left picture using the Scene Intelligent Auto mode; for the right image, I used HDR Backlight Control. Both the highlight and the shadow areas in the HDR version contain more detail. Note, too, that the frame area for the two images is slightly different: As with the Handheld Night Scene, the camera needs to crop the image a little in order to properly align the multiple frames into one.
For best results, use a tripod; this ensures that each frame records the same image area, helping the camera to properly align frames when merging them. Also, frame a little loosely so that when the images are merged, you won’t lose important parts of the scene due to the cropping that occurs. Finally, keep in mind that anything that’s moving in the scene usually appears at partial opacity in different parts of the frame in the merged image. (On the other hand, you may be able to claim that you captured a ghost in your picture. . . .)
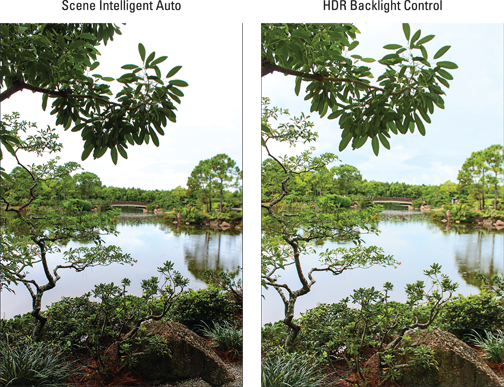
Figure 3-14: Try shooting high-contrast scenes with HDR Backlight Control to retain more detail in both shadows and highlights.
Other final details to note:
![]() Image Quality: Like the Handheld Night Scene mode, HDR Backlight Control is a JPEG-only creature. You can’t shoot in the Raw format in this mode.
Image Quality: Like the Handheld Night Scene mode, HDR Backlight Control is a JPEG-only creature. You can’t shoot in the Raw format in this mode.
![]() Drive mode: The camera fires off three shots in succession with each press of the shutter button, regardless of whether the Drive mode is set to Single or one of the Continuous modes. You can use one of the Self-Timer modes to delay the shutter release if desired.
Drive mode: The camera fires off three shots in succession with each press of the shutter button, regardless of whether the Drive mode is set to Single or one of the Continuous modes. You can use one of the Self-Timer modes to delay the shutter release if desired.
![]() Flash: Flash is disabled.
Flash: Flash is disabled.
![]() Autofocus: One-Shot AF is used, so focus is locked when you press and hold the shutter button halfway.
Autofocus: One-Shot AF is used, so focus is locked when you press and hold the shutter button halfway.
Modifying scene mode results
With the Scene Intelligent Auto and Flash Off modes, what you see on the playback monitor is what you get — you can’t modify the camera settings to get different results on the next shot. But with certain Scene modes, you can play around a little with color, sharpness, contrast, and exposure through the Shoot by Ambience and Shoot by Lighting/Scene Type features.
Key words here: Play around a little. These features don’t give you anywhere near the level of control as the advanced exposure modes or even as much as Creative Auto mode, explained at the end of this chapter. But they do offer an easy way to start exploring your creative possibilities and begin thinking about how you want to record a scene.
My only beef with these features is that they aren’t presented in the most user-friendly fashion. For starters, the feature names don’t give you a lot of information about what you can accomplish by using them. And the displayed names of the default settings — shown on the Shooting Settings screen in Figure 3-15 — are Standard and Default. Well, that’s helpful, huh? Then again, if it weren’t for confusing stuff like this, you might not need my input, so I probably shouldn’t complain.
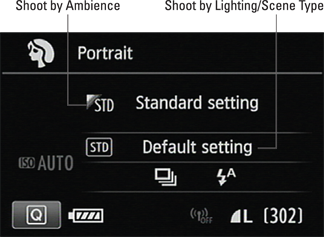
Figure 3-15: These settings enable you to adjust picture color, contrast, sharpness, and exposure when shooting in the scene modes.
At any rate, the next two sections give you a better idea of what you can accomplish with these options.
Taking a look at the Shoot by Ambience options
Chapter 8 introduces the Picture Style feature, which enables you to choose how the camera “processes” your original picture data when you use one of the JPEG Image Quality settings. You can choose the Landscape Picture Style for bold, sharp colors, for example, or select Portrait to give skin a warm, soft look. (Yes, the camera offers Landscape and Portrait exposure modes and Landscape and Portrait Picture Styles. Don’t get me started.)
You can control Picture Styles only in the advanced exposure modes, however — that option is off-limits in the other modes. But as compensation, the scene modes (except HDR Backlight Control) and Creative Auto mode give you Shoot by Ambience, which lets you accomplish results similar to those that you could achieve by using Picture Styles. You also get two Shoot by Ambience settings that enable you to achieve exposure adjustments similar to what you can produce with Exposure Compensation, another feature that’s available only in the advanced exposure modes.
Here’s a description of each Shoot by Ambience setting:
![]() Standard: Consider this the “off” setting. When you select this option, the camera makes no adjustment to the characteristics normally produced by your selected scene mode.
Standard: Consider this the “off” setting. When you select this option, the camera makes no adjustment to the characteristics normally produced by your selected scene mode.
![]() Vivid: Increases contrast, color saturation, and sharpness.
Vivid: Increases contrast, color saturation, and sharpness.
![]() Soft: Creates the appearance of slightly softer focus.
Soft: Creates the appearance of slightly softer focus.
![]() Warm: Warms colors and slightly softens focus.
Warm: Warms colors and slightly softens focus.
![]() Intense: Boosts contrast and color saturation even more than the Vivid setting. Also results in a slightly darker overall exposure.
Intense: Boosts contrast and color saturation even more than the Vivid setting. Also results in a slightly darker overall exposure.
![]() Cool: Adds a cool color cast and slightly darkens the exposure.
Cool: Adds a cool color cast and slightly darkens the exposure.
![]() Brighter: Lightens the photo.
Brighter: Lightens the photo.
![]() Darker: Darkens the photo.
Darker: Darkens the photo.
![]() Monochrome: Creates a black-and-white photo, with an optional color tint.
Monochrome: Creates a black-and-white photo, with an optional color tint.
All adjustments are applied in addition to whatever adjustments occur by virtue of your selected scene mode. For example, Landscape mode already produces slightly sharper, more vivid colors than normal. If you add the Vivid Shoot by Ambience option, you amp things up another notch.
In addition, you can control the amount of the adjustment through a related setting, Effect. You can choose from three Effect levels — Low, Standard, and Strong; or Low, Medium, and High, depending on the Shoot by Ambience setting. For the Monochrome setting, the Effect setting enables you to switch from a black-and-white image to a monochrome image with a warm (sepia) or cool (blue) tint.
As a quick example of the color effects you can create, Figure 3-16 shows the same subject taken at four different Shoot by Ambience settings. I took all pictures in the Landscape scene mode. For the three variations — Vivid, Warm, and Intense — I set the Effect option to the maximum setting.
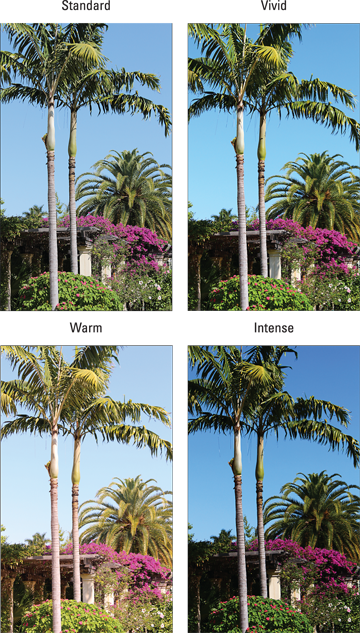
Figure 3-16: To create these Shoot by Ambience variations, I used the maximum amount of adjustment for the Vivid, Warm, and Intense settings.
Although the color effects are entertaining, I think you’ll get more use out of the Brighter and Darker settings, as they give you a way to overrule the camera’s exposure decisions. For example, in the left image in Figure 3-17, the exposure of the background was fine, but the flower was overexposed. So I set the Shoot by Ambience option to Darker, set the Effect option to Medium, and shot the flower again to produce the improved exposure you see on the right.
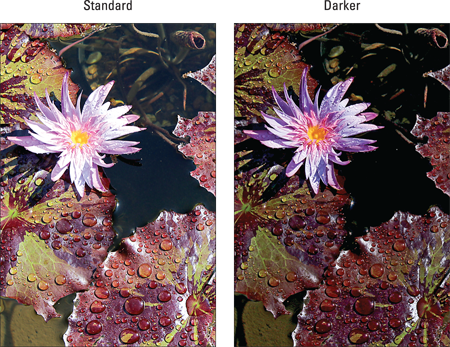
Figure 3-17: If the initial exposure leaves your subject too bright, choose the Darker setting and reshoot.
When you’re ready to try the Shoot by Ambience option, here’s the fastest way to adjust the setting:
1. Display the Quick Settings screen and use the Multi-controller to select the Shoot by Ambience setting, as shown on the left in Figure 3-18.
2. Rotate the Main dial to cycle through the available settings.
As soon as you shift from the Standard setting to one of the other settings, the Effect option appears, as shown on the right in the figure.
3. Use the Multi-controller to select the Effect setting and then rotate the Main dial to set the level of the adjustment.
Or, if you’re using the Monochrome setting, you can choose a regular black-and-white photo, a sepia tone, or a blue-and-white tint.
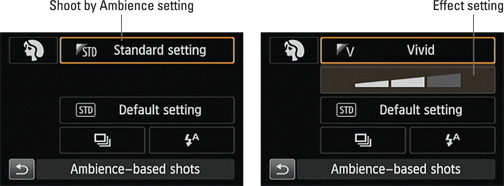
Figure 3-18: Select the setting you want to use via the Quick Settings screen.
You also can go the touchscreen route, but things work a little differently (and in fact take a little longer than just using the steps I just outlined). After you tap the Shoot by Ambience setting, you access a screen showing all the possible options; make your choice and then press the Return arrow to return to the Quick Settings screen. Then tap the Effects option, and tap the vertical bars to adjust the level of the adjustment. Tap the Return arrow again or press the Q button to exit the Quick Settings screen.
Eliminating color casts with Shoot by Lighting or Scene Type
This option might be better named “Eliminate Color Cast” because that’s what it’s designed to do: remove unwanted color casts that can occur when the camera makes a white balance misstep.
Chapter 8 explains white balancing fully, but in short, it has to do with the fact that every light source emits its own color cast — candlelight, a warm hue; flash, a slightly cool hue, and so on. The camera’s White Balance mechanism compensates for the color of the light so that colors are rendered accurately.
Normally, the camera uses automatic white balancing, and things turn out fine. But if a scene is lit by different types of light, each throwing its own color bias into the mix, the camera sometimes gets confused, and colors may be out of whack. The left image in Figure 3-19 has an example — a white-balance error caused the scene to be too yellow. The image on the right shows the correct image colors.
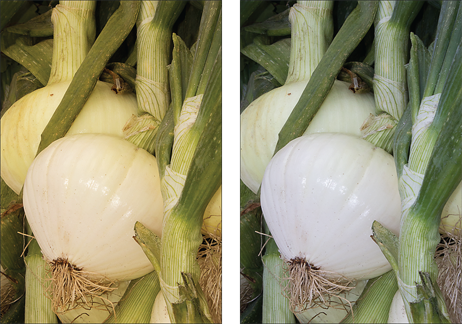
Figure 3-19: If your photo has a color cast (left), you may be able to use the Shoot by Lighting/Scene Type option to eliminate it (right).
In the advanced exposure modes, you deal with color casts by changing the White Balance setting; again, Chapter 8 shows you how. You can’t access the White Balance setting in the scene modes, but in Portrait, Landscape, Close-Up, and Sports modes, you can use the Shoot by Lighting or Scene Type option to tell the camera to balance colors for a specific light source.
You can choose from the following settings:
![]() Default: Colors are balanced for the light source automatically.
Default: Colors are balanced for the light source automatically.
![]() Daylight: For bright sunlight.
Daylight: For bright sunlight.
![]() Shade: For subjects in shade.
Shade: For subjects in shade.
![]() Cloudy: For shooting under overcast skies.
Cloudy: For shooting under overcast skies.
![]() Tungsten Light: For incandescent and tungsten bulbs; not available for Landscape scene mode.
Tungsten Light: For incandescent and tungsten bulbs; not available for Landscape scene mode.
![]() Fluorescent Light: For subjects lit by fluorescents. Note: This may not be suitable for some compact-fluorescent lights. Try Tungsten Light if you get bad results. Also not available for Landscape scene mode.
Fluorescent Light: For subjects lit by fluorescents. Note: This may not be suitable for some compact-fluorescent lights. Try Tungsten Light if you get bad results. Also not available for Landscape scene mode.
![]() Sunset: Helps capture brilliant sunset colors, especially when you’re shooting into the sun.
Sunset: Helps capture brilliant sunset colors, especially when you’re shooting into the sun.
Don’t aim the lens directly at the sun or look through the viewfinder directly into the sun. You can damage the camera and hurt your eyes.
Select the setting via the Quick Control screen, as shown in Figure 3-20. For example in Figure 3-20, the Default (no adjustment) setting is selected.
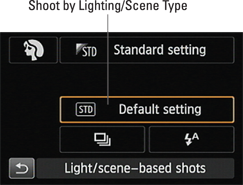
Figure 3-20: Adjust this option via the Quick Control screen.
Gaining More Control with Creative Auto
When you use the scene modes, the camera selects settings that render your subject using the traditional “look” for the scene — blurry backgrounds for Portrait mode, greater depth of field and bold colors for landscapes, and so on. Depending on the scene mode, you may be able to modify colors and exposure somewhat by using the Shoot by Ambience and Shoot by Lighting or Scene Type options, but all in all, you’re fairly limited as to the look of your pictures.
Creative Auto mode enables you to take a bit more control. As its name implies, this mode is still mostly automatic, but if you check the monitor after taking a shot and don’t like the results, you can make the following adjustments for your next shot:
![]() Enable or disable the flash.
Enable or disable the flash.
![]() Adjust color, sharpness, contrast, and exposure through the Shoot by Ambience option, as explained a little earlier in the chapters.
Adjust color, sharpness, contrast, and exposure through the Shoot by Ambience option, as explained a little earlier in the chapters.
![]() Soften or sharpen the apparent focus of the picture background.
Soften or sharpen the apparent focus of the picture background.
What about the Shoot by Lighting or Scene Type option that’s available in the scene modes? Sorry, that dog won’t hunt in Creative Auto mode. But remember that using that option typically isn’t necessary: It’s designed to fix white-balancing issues, and in Creative Auto mode, the camera uses automatic white balancing, which works well for the majority of shooting situations.
Here’s how to use Creative Auto mode:
 1. Set the Mode dial on top of the camera to the CA setting.
The Creative Auto version of the Shooting Settings screen appears, as shown in Figure 3-21.
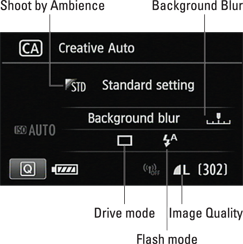
Figure 3-21: In Creative Auto mode, the Shooting Settings screen displays this information.
2. To adjust the Drive mode, Flash, Shoot by Ambience, and Background Blur settings, use the Quick Control screen.
As usual, you can either tap the Q icon on the screen or press the Q button to get to the screen. Either way, one of the settings becomes selected, and a text label appears at the bottom of the screen to remind you what the highlighted setting does. In Figure 3-22, for example, the Background Blur setting is highlighted.
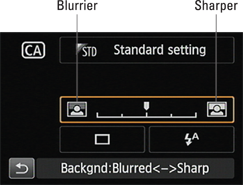
Figure 3-22: Use this control to make the background sharper or more blurry.
See the upcoming list for details about each option.
3. To adjust the Image Quality setting, use Shooting Menu 1.
You can’t change that setting via the Quick Control screen in Creative Auto mode.
4. Frame, focus, and shoot.
From this point on, everything works as outlined for the Scene Intelligent Auto mode, explained near the start of this chapter.
The settings you choose remain in effect from shot to shot. If you turn the camera off or switch to a different exposure mode, though, the settings return to their defaults.
Now for the promised explanations of how the Creative Auto options work:
![]() Shoot by Ambience: This setting enables you to alter how the camera processes the photo, enabling you to tweak color, contrast, and exposure slightly. The earlier section Taking a look at the Shoot by Ambience options explains this feature.
Shoot by Ambience: This setting enables you to alter how the camera processes the photo, enabling you to tweak color, contrast, and exposure slightly. The earlier section Taking a look at the Shoot by Ambience options explains this feature.
![]() Background Blur: This feature gives you some control over depth of field, or the distance over which focus appears acceptably sharp. Consider the images in Figure 3-23, for example. In both shots, I set focus on the flag. The left image features a long depth of field, so both the flag and the tractor in the background are sharp. Comparatively, the right image has a very shallow (short) depth of field, so the tractor is blurry.
Background Blur: This feature gives you some control over depth of field, or the distance over which focus appears acceptably sharp. Consider the images in Figure 3-23, for example. In both shots, I set focus on the flag. The left image features a long depth of field, so both the flag and the tractor in the background are sharp. Comparatively, the right image has a very shallow (short) depth of field, so the tractor is blurry.
Unfortunately, this feature doesn’t play nice with the flash. If the flash mode is set to Auto, as in the figure, the Background Blur setting is available, but if the camera sees the need for flash, the Background Blur feature stomps off in a huff as soon as the flash pops up. If you set the flash mode to On, the Background Blur setting is dimmed in the display.
Assuming that the flash doesn’t get in your way, use the Main dial to move the little indicator on the bar to the left to shorten depth of field, which makes distant objects appear blurrier, and move the indicator to the right to make distant objects appear sharper. (Refer to Figure 3-23.) You can also drag along the blurring scale or tap the icons at either end to adjust the setting.
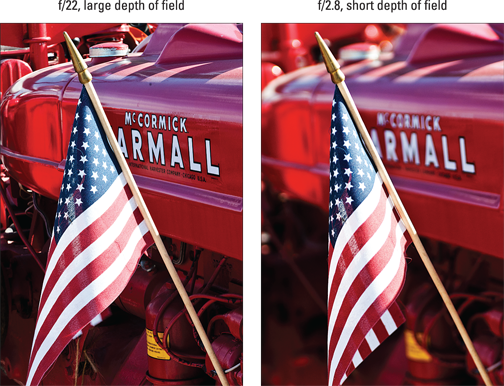
Figure 3-23: You can choose to make background objects appear sharp (left) or blurry (right).
The camera creates this shift in depth of field by adjusting the aperture setting (f-stop), which is an exposure control you can explore in Chapter 7. A lower f-stop number produces a more shallow depth of field, for a blurrier background, as shown on the right in Figure 3-23; a higher f-stop setting produces a greater depth of field, for a sharper background, as shown on the left.
The range of f-stops available depends on your lens. Additionally, because aperture also plays a critical role in exposure, the range of f-stops the camera can choose — and, therefore, the extent of focus shift you can achieve with this setting — depends on the available light. The camera gives priority to getting a good exposure, assuming that you’d prefer a well-exposed photo to one that has the background blur you want but is too dark or too light. Understand, too, that when the aperture changes, the camera also must change the shutter speed, ISO (light sensitivity setting), or both to maintain a good exposure.
At slow shutter speeds, moving objects appear blurry, regardless of your depth of field. But even for still subjects, a slow shutter speed creates the risk that camera shake during the exposure will blur the image. A blinking shutter speed value in the viewfinder alerts you to a potentially risky shutter speed; put your camera on a tripod to avoid camera shake. Look for the shutter speed on the left side of the viewfinder display when you press the shutter button halfway.
To find out more about depth of field, aperture, shutter speed, ISO, and exposure, see Chapters 7 and 8. In the meantime, note these easy ways to tweak depth of field beyond using the Background Blur slider:
• For blurrier backgrounds, move the subject farther from the background, get closer to the subject, and zoom in to a tighter angle of view, if you use a zoom lens.
• For sharper backgrounds, do the opposite of the preceding.
![]() Drive mode: The Single mode is selected by default, but you can choose any Drive mode option, all explained in Chapter 2. Remember that you can access the settings by pressing the Drive mode button or by using the Quick Control screen.
Drive mode: The Single mode is selected by default, but you can choose any Drive mode option, all explained in Chapter 2. Remember that you can access the settings by pressing the Drive mode button or by using the Quick Control screen.
![]() Flash: You can set the flash mode to Auto, On, or Off. For the Auto and On settings, you can use the Red-Eye Reduction flash feature, found on Shooting Menu 2. See Chapter 2 for more information about flash photography.
Flash: You can set the flash mode to Auto, On, or Off. For the Auto and On settings, you can use the Red-Eye Reduction flash feature, found on Shooting Menu 2. See Chapter 2 for more information about flash photography.