

5
Picture Playback
In This Chapter
![]() Exploring playback functions
Exploring playback functions
![]() Deciphering the playback displays
Deciphering the playback displays
![]() Deleting, protecting, and rating photos and movies
Deleting, protecting, and rating photos and movies
![]() Connecting your camera to a TV for big-screen playback
Connecting your camera to a TV for big-screen playback
Without question, one of the best things about digital photography is being able to view pictures right after you shoot them. No more guessing whether you got the shot you want or need to try again; no more wasting money on developing and printing pictures that stink. But seeing your pictures is just the start of the things you can do when you switch your camera to playback mode. You also can review the settings you used to take the picture, display graphics that alert you to exposure problems, and add file markers that protect the picture from accidental erasure. This chapter tells you how to use all these playback features and more.
 Many features discussed in this chapter apply to still photos, movies, and video snapshots. For some playback functions that apply only to movies, see Chapter 4. Chapter 10 covers video snapshots.
Disabling and Adjusting Image Review
After you take a picture, it automatically appears briefly on the camera monitor. By default, the instant-review period lasts 2 seconds. You can customize this behavior via the Image Review option on Shooting Menu 1, shown in Figure 5-1.

Figure 5-1: Use this option to control the timing of instant picture review.
You can select from the following options:
![]() Select a specific review period: Pick 2, 4, or 8 seconds.
Select a specific review period: Pick 2, 4, or 8 seconds.
![]() Off: Disables automatic instant review. Turning off the monitor saves battery power, so keep this option in mind if the battery is running low. You can still view pictures by pressing the Playback button.
Off: Disables automatic instant review. Turning off the monitor saves battery power, so keep this option in mind if the battery is running low. You can still view pictures by pressing the Playback button.
![]() Hold: Displays the current image until the camera automatically shuts off to save power. See the Chapter 1 section about Setup Menu 2 to find out about the Auto Power Off feature.
Hold: Displays the current image until the camera automatically shuts off to save power. See the Chapter 1 section about Setup Menu 2 to find out about the Auto Power Off feature.
You can quickly return to shooting, no matter the setting, by pressing the shutter button halfway. Note that the Image Review feature doesn’t work for movies or video snapshots; you must put the camera in Playback mode to view those masterpieces.
Exploring Playback Mode
 To switch your camera to Playback mode, just press the Playback button, labeled in Figure 5-2.
Here are the absolute basics of Playback mode:
![]() Scrolling through pictures: Rotate the Quick Control dial, press the Multi-controller right or left, or swipe your fingertip horizontally across the touchscreen.
Scrolling through pictures: Rotate the Quick Control dial, press the Multi-controller right or left, or swipe your fingertip horizontally across the touchscreen.
![]() Return to shooting: Press the Playback button or give the shutter button a quick half-press and release it.
Return to shooting: Press the Playback button or give the shutter button a quick half-press and release it.
For still photos, you may see your image only, as in Figure 5-2, or see a little or a lot of shooting data along with the image. For a movie or video snapshot, you always see at minimum a big playback arrow that you can tap to start playback. For any type of file, you can press the Info button to change how much data appears; see “Viewing Picture Data,” later in this chapter, for help deciphering what you see. You can also display multiple images at a time; the next section tells all.
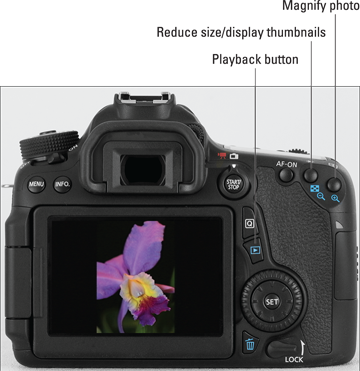
Figure 5-2: The default Playback mode displays one picture at a time.
Switching to Index (thumbnails) view
Instead of viewing one image at a time, you can display four or nine thumbnails on the screen, as shown in Figure 5-3. To switch from full-frame view to thumbnails view — called Index view in Canon parlance — you have two options. The simplest is to use the touchscreen: Pinch inward to shift from full-frame to four-thumbnail view; pinch inward again to display nine thumbnails.
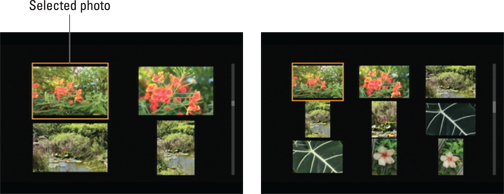
Figure 5-3: You can view four or nine thumbnails at a time.
 The other method is to press the AE Lock button — labeled Reduce size/display thumbnails in Figure 5-2. Your first press displays four thumbnails; press again to display nine thumbnails.
 Note the little blue checkerboard and magnifying glass icons under the button. Blue labels are reminders that the button serves a function in Playback mode. In this case, the checkerboard indicates the Index function, and the minus sign in the magnifying glass tells you that pressing the button reduces the size of the thumbnail.
Remember these other factoids about Index display mode:
![]() Select a thumbnail. For some playback operations, you start by selecting a thumbnail. A highlight box surrounds the currently selected thumbnail; for example, in Figure 5-3, the upper-left photo is selected.
Select a thumbnail. For some playback operations, you start by selecting a thumbnail. A highlight box surrounds the currently selected thumbnail; for example, in Figure 5-3, the upper-left photo is selected.
To select a different file, tap its thumbnail, rotate the Quick Control dial, or press the Multi-controller up, down, right, or left.
![]() Scroll from one screen of thumbnails to another. Swipe your finger up or down the screen or rotate the Main dial.
Scroll from one screen of thumbnails to another. Swipe your finger up or down the screen or rotate the Main dial.
![]() Reduce the number of thumbnails. For touchscreen operation, pinch outward to reduce the number of thumbnails and return to full-frame view.
Reduce the number of thumbnails. For touchscreen operation, pinch outward to reduce the number of thumbnails and return to full-frame view.
 If you’re in a button-pressing mood, press the AF Point Selection button, labeled Magnify photo in Figure 5-2. This button also has a blue magnifying glass icon, this time with a plus sign in the center to indicate that pressing it enlarges the thumbnail. Press once to switch from nine thumbnails to four; press again to switch from four thumbnails to single-image view.
For a quicker way to shift from Index view to full-frame view, select a photo and then press Set or tap the thumbnail.
Using the Quick Control screen during playback
During playback, you can access a handful of functions via the Quick Control screen. Here’s how it works:
 1. Press the Quick Control button.
If you were viewing pictures in Index mode, the camera shifts temporarily to full-frame playback. Then various icons appear on the left and right sides of the screen, as shown in Figure 5-4.
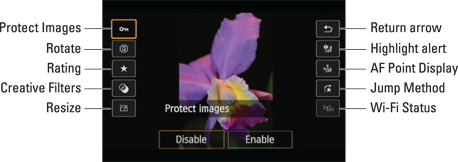
Figure 5-4: During playback, you can control these features via the Quick Control screen.
2. Select one of the playback function icons.
Either tap the icon or press the Multi-controller up or down to select it. The selected icon is surrounded by the orange box; for example, in the figure, the Protect Images feature is active.
The name of the selected feature appears at the bottom of the screen, along with symbols that represent the available settings for that option. For example, in Figure 5-4, you see the two options available for the Protect Images feature (Disable and Enable).
You can read more about rotating, rating, protecting, and jumping through images in other sections of this chapter. And the section Enabling a few display extras details the Highlight Alert and AF Point Display features. See Chapter 10 for a look at the Creative Filters, and visit Chapter 6 for information about the Resize and Wi-Fi features.
3. Select the setting you want to use.
Either tap the option or rotate the Main dial or Quick Control dial to select it. You also can press the Multi-controller left or right.
4. To exit the Quick Control screen, tap the return arrow (labeled in Figure 5-4) or press the Quick Control button again.
Jumping through images
If your memory card contains scads of files, here’s a trick you’ll love: By using the Jump feature, you can rotate the Main dial to leapfrog through them rather than scrolling through them one by one to get to the file you want to see. You also can search for the first photo, movie, or video snapshot taken on a specific date, tell the camera to display only movies and video snapshots or only stills, or display images with a specific rating or stored in a certain folder.
You can choose from the following jumping options:
![]() 1 Image: This option, in effect, disables jumping, restricting you to browsing pictures one at a time. So what’s the point? You can use this setting to scroll pictures using the Main dial in addition to using the touchscreen, Multi-controller, or Quick Control dial.
1 Image: This option, in effect, disables jumping, restricting you to browsing pictures one at a time. So what’s the point? You can use this setting to scroll pictures using the Main dial in addition to using the touchscreen, Multi-controller, or Quick Control dial.
![]() 10 Images: Select this option to advance 10 images at a time.
10 Images: Select this option to advance 10 images at a time.
![]() 100 Images: Select this option to advance 100 images at a time.
100 Images: Select this option to advance 100 images at a time.
![]() Date: If your card contains files shot on different dates, you can jump between dates with this option. For example, if you’re looking at the first of 30 pictures taken on June 1, you can jump past all others from that day to the first file created on, say, June 5.
Date: If your card contains files shot on different dates, you can jump between dates with this option. For example, if you’re looking at the first of 30 pictures taken on June 1, you can jump past all others from that day to the first file created on, say, June 5.
![]() Folder: If your memory card contains multiple folders — as it might if you create custom folders as outlined in Chapter 11 — this option jumps you from the current folder to the first photo in a different folder.
Folder: If your memory card contains multiple folders — as it might if you create custom folders as outlined in Chapter 11 — this option jumps you from the current folder to the first photo in a different folder.
![]() Movies: Does your memory card contain both still photos and movies? If you want to view only the movie files, select this option. Then you can rotate the Main dial to jump from one movie to the next without seeing any still photos. (Video snapshots are considered movies, so they’re included in the playback lineup as well.)
Movies: Does your memory card contain both still photos and movies? If you want to view only the movie files, select this option. Then you can rotate the Main dial to jump from one movie to the next without seeing any still photos. (Video snapshots are considered movies, so they’re included in the playback lineup as well.)
![]() Stills: This one is the opposite of the Movies option: Your movies and video snapshots are hidden when you jump through files.
Stills: This one is the opposite of the Movies option: Your movies and video snapshots are hidden when you jump through files.
![]() Image Rating: This Jump mode relates to the Rating feature covered later in this chapter. You can choose to view all rated photos, movies, or video snapshots; only those with a specific rating; or those without any rating at all.
Image Rating: This Jump mode relates to the Rating feature covered later in this chapter. You can choose to view all rated photos, movies, or video snapshots; only those with a specific rating; or those without any rating at all.
Use these methods to specify which type of jumping you want to do:
![]() Quick Control screen: After displaying the Quick Control screen, select the Jump mode option, as shown on the left in Figure 5-5. You see a row of icons across the bottom of the screen, each one representing a different jump method. (I labeled the more cryptic icons in the figure.) Tap the method you want to use or use the Main dial, Quick Control dial, or Multi-controller to highlight its icon.
Quick Control screen: After displaying the Quick Control screen, select the Jump mode option, as shown on the left in Figure 5-5. You see a row of icons across the bottom of the screen, each one representing a different jump method. (I labeled the more cryptic icons in the figure.) Tap the method you want to use or use the Main dial, Quick Control dial, or Multi-controller to highlight its icon.
If you select the Rating mode, as I did in Figure 5-5, tap the Info icon or press the Info button to display the second screen in the figure. Then select the rating option that applies to the files you want to view when jumping. You can choose files that have no rating; files that have any rating; or select a certain rating (one star, five stars, and so on). Tap the return arrow or press the Menu button to exit the rating selection screen and return to the screen on the left in the figure.
To exit the Quick Control screen, tap the return arrow or press the Quick Control button again.
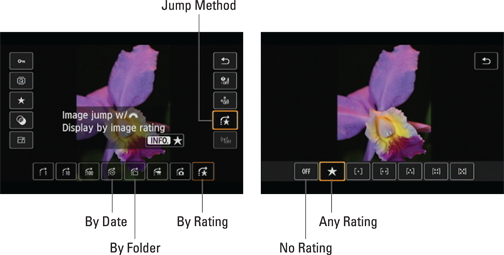
Figure 5-5: You can specify a Jump mode by using the Quick Control screen.
![]() Playback Menu 2: Choose the Image Jump option, highlighted on the left in Figure 5-6, to display the right screen in the figure, which presents the Jump settings. Tap your choice or highlight it by using the Quick Control dial or Multi-controller. If you choose the Rating option, as in the figure, rotate the Main dial to select the rating of the files you want to see. You also can tap the little arrows next to the selected rating symbol in the lower-left corner of the screen. After making your choice, tap Set or press the Set button.
Playback Menu 2: Choose the Image Jump option, highlighted on the left in Figure 5-6, to display the right screen in the figure, which presents the Jump settings. Tap your choice or highlight it by using the Quick Control dial or Multi-controller. If you choose the Rating option, as in the figure, rotate the Main dial to select the rating of the files you want to see. You also can tap the little arrows next to the selected rating symbol in the lower-left corner of the screen. After making your choice, tap Set or press the Set button.
Press the Playback button to exit the menu and return to playback mode.
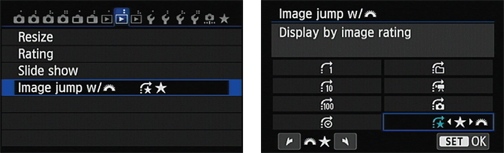
Figure 5-6: Or select the Jump method from Playback Menu 2.
After selecting a Jump mode, take the following steps to jump through your photos during playback:
1. Set the camera to display a single photo.
You can use jumping only when viewing a single photo at a time. To leave Index mode, just press the Set button or tap the selected thumbnail.
2. Rotate the Main dial or swipe two fingers across the screen.
The camera jumps to the next image, movie, or video snapshot according to the jump method you selected.
If you select any Jump setting except 1 Image, a jump bar appears for a few seconds at the bottom of the monitor, as shown in Figure 5-7, indicating the current Jump setting.
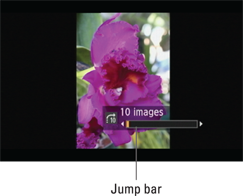
Figure 5-7: Rotate the Main dial to start jumping through pictures.
3. To exit Jump mode, just start scrolling through pictures using the Quick Control dial, Multi-controller, or touchscreen.
Now you’re back to regular Playback mode.
Rotating pictures
When you take a picture, the camera can record the image orientation: that is, whether you held the camera horizontally or on its side to shoot vertically. This bit of data is added into the picture file. Then when you view the picture, the camera reads the data and rotates the image so that it appears upright in the monitor, as shown on the left in Figure 5-8, instead of on its side, as shown on the right. The image is also rotated automatically when you view it in the Canon photo software that shipped with your camera (as well as in other programs that can read the rotation data).

Figure 5-8: Display a vertically oriented picture upright (left) or sideways (right).
 Official photo lingo uses the term portrait orientation to refer to vertically oriented pictures and landscape orientation to refer to horizontally oriented pictures. The terms stem from the traditional way that people and places are captured in painting and photographs — portraits, vertically; landscapes, horizontally.
By default, the camera tags the photo with the orientation data and rotates the image automatically both on the camera and on your computer screen. But you have other choices, as follows:
![]() Disable or adjust automatic rotation: Select Auto Rotate on Setup Menu 1, as shown in Figure 5-9. Then choose from these options, listed in the order they appear on the menu:
Disable or adjust automatic rotation: Select Auto Rotate on Setup Menu 1, as shown in Figure 5-9. Then choose from these options, listed in the order they appear on the menu:
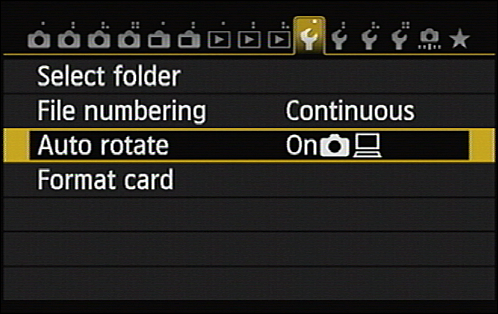
Figure 5-9: Go to Setup Menu 1 to disable or adjust automatic image rotation.
• On, camera and computer: This option is the default.
• On, computer only: Pictures are tagged with orientation data but rotated only on your computer monitor.
• Off: New pictures aren’t tagged with the orientation data, and existing photos aren’t rotated during playback on the camera, even if they are tagged.
![]() Rotate pictures during playback: If you stick with the default Auto Rotate setting, you can rotate pictures during playback via the Quick Control screen. Tap the Rotate icon (labeled in Figure 5-10), and then tap one of the three orientation icons at the bottom of the screen. You also can press the Multi-controller up/down to select the Rotate icon and press right/left or rotate the Main dial or Quick Control dial to select the orientation icons. Either way, the display updates as you select an orientation icon. Tap the return arrow (upper right of the screen) or press the Quick Control button a second time to exit the Quick Control screen.
Rotate pictures during playback: If you stick with the default Auto Rotate setting, you can rotate pictures during playback via the Quick Control screen. Tap the Rotate icon (labeled in Figure 5-10), and then tap one of the three orientation icons at the bottom of the screen. You also can press the Multi-controller up/down to select the Rotate icon and press right/left or rotate the Main dial or Quick Control dial to select the orientation icons. Either way, the display updates as you select an orientation icon. Tap the return arrow (upper right of the screen) or press the Quick Control button a second time to exit the Quick Control screen.
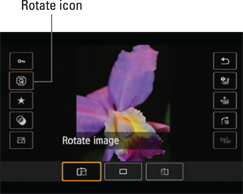
Figure 5-10: The fastest way to rotate individual images is to use the Quick Control screen.
If the Auto Rotate menu option is set to Off or computer-rotation only, the Quick Control technique only adds the rotation data to the image file — your picture doesn’t rotate on the camera monitor. However, you can still rotate pictures for on-camera display via the Rotate option on Playback Menu 1.
Choose the menu option to display your photos. In Index display mode, select the image that needs rotating. In full-frame display, just scroll to the photo. Either way, press Set or tap the Set icon once to rotate the image 90 degrees; press or tap again to rotate 180 degrees from the first press (270 total degrees); press or tap once more to return to 0 degrees, or back where you started. Press the Playback button to return to viewing pictures. The photo remains in its rotated orientation only if the Auto Rotate option is set to the default.
These steps apply only to still photos; you can’t rotate movies or video snapshots.
Zooming in for a closer view
During playback, you can magnify a photo to inspect small details, as shown in Figure 5-11. As with image rotating, zooming works only for still photos and only when you’re displaying photos one at a time, though. So if you’re viewing pictures in Index display mode, press Set or tap the thumbnail to return to full-frame view.
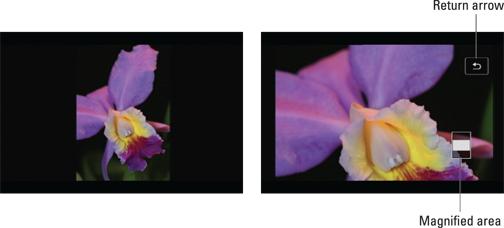
Figure 5-11: After displaying your photo in full-frame view (left), you can magnify the image for a closer view (right).
When the image is magnified, a little thumbnail representing the entire image appears in the lower right of the monitor, as shown in the right image in Figure 5-11. The white box indicates the area of the image that’s visible.
To take advantage of this feature, use either of these approaches:
![]() Touchscreen zooming: Using your thumb and forefinger, pinch outward from the center of the screen to magnify the display; pinch inward to zoom out. To scroll the magnified display, just drag your finger in the direction you want to scroll. To exit to full-image view, tap the Return arrow (labeled on the right in Figure 5-11).
Touchscreen zooming: Using your thumb and forefinger, pinch outward from the center of the screen to magnify the display; pinch inward to zoom out. To scroll the magnified display, just drag your finger in the direction you want to scroll. To exit to full-image view, tap the Return arrow (labeled on the right in Figure 5-11).
![]() Button zooming: Use these navigation techniques to operate the display via buttons instead of the touchscreen:
Button zooming: Use these navigation techniques to operate the display via buttons instead of the touchscreen:
• Zoom in. Press and hold the AF Point Selection button (refer to Figure 5-2) until you reach the magnification you want. (Again, note the blue magnifying glass label under the button — the plus sign reminds you that you use the button to magnify the view.)
• View another part of the picture. Use the Multi-controller to scroll the display to see another portion of the image.
• Zoom out. To zoom out to a reduced magnification, press the AE Lock button. (Note that the magnifying glass label contains a minus sign, for zoom out.) Continue holding down the button until you reach the magnification you want.
• Return to full-frame view when zoomed in. When you’re ready to exit the magnified view, you don’t need to keep pressing the AE Lock button until you zoom out all the way. Instead, press the Playback button, which quickly returns you to full-frame view.
Here’s an especially neat trick you can use no matter which zoom approach you prefer: While the display is zoomed, you can rotate the Quick Control dial to display the same area of the next photo at the same magnification. For example, if you shot a group portrait several times, you can easily check each one for shut-eye problems.
Viewing Picture Data
When you review still photos, you can press the Info button to change the type of shooting data that appears with the photo. Choose from the following display styles, shown in Figure 5-12:
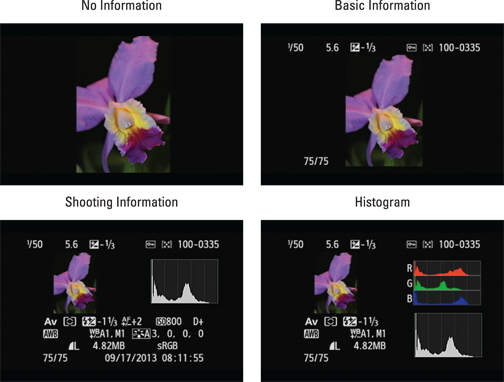
Figure 5-12: Press the Info button to change the amount of picture data displayed with your photo.
![]() No Information: True to its name, this display option shows just your picture, with no shooting or file data. The exception to the rule: If you visit Playback Menu 3 and enable the Highlight Alert, AF Point Display, or Playback Grid options, the data associated with those features appears even in No Information mode. See Enabling a few display extras, found a ways down the road from here, for details.
No Information: True to its name, this display option shows just your picture, with no shooting or file data. The exception to the rule: If you visit Playback Menu 3 and enable the Highlight Alert, AF Point Display, or Playback Grid options, the data associated with those features appears even in No Information mode. See Enabling a few display extras, found a ways down the road from here, for details.
![]() Basic Information: What’s this? Two settings with clear-cut names? Holy cannoli, pretty soon you won’t need me at all. Well, at least check out the next section, which explains the basic data that appears in this display mode.
Basic Information: What’s this? Two settings with clear-cut names? Holy cannoli, pretty soon you won’t need me at all. Well, at least check out the next section, which explains the basic data that appears in this display mode.
![]() Shooting Information: This mode gives you a slew of tiny symbols and numbers, all representing various shooting settings, plus a histogram (the graph in the upper right of the screen). If you need help deciphering all the data, it’s presented two sections from here.
Shooting Information: This mode gives you a slew of tiny symbols and numbers, all representing various shooting settings, plus a histogram (the graph in the upper right of the screen). If you need help deciphering all the data, it’s presented two sections from here.
![]() Histogram: This mode gives you a Brightness histogram plus an RGB histogram. Head to “Understanding Histogram display mode,” later in this chapter, to find out what wisdom you can glean from these little graphs.
Histogram: This mode gives you a Brightness histogram plus an RGB histogram. Head to “Understanding Histogram display mode,” later in this chapter, to find out what wisdom you can glean from these little graphs.
A couple of notes before you start exploring each display mode:
![]() When you view horizontally oriented images on your camera monitor, some data is actually overlaid on the image instead of appearing above or to the side the photo, as it does in the figures in this book. The difference is due to the process used to capture the camera screens for publication. Don’t worry about it — the data itself is the same; only the positioning varies.
When you view horizontally oriented images on your camera monitor, some data is actually overlaid on the image instead of appearing above or to the side the photo, as it does in the figures in this book. The difference is due to the process used to capture the camera screens for publication. Don’t worry about it — the data itself is the same; only the positioning varies.
![]() If you shot your picture using Scene Intelligent Auto, Flash Off, Creative Auto, or a Scene mode, you see less data in Shooting Information and Histogram display modes than appears in Figure 5-12. You get the full complement of data only if you took the picture in the advanced exposure modes.
If you shot your picture using Scene Intelligent Auto, Flash Off, Creative Auto, or a Scene mode, you see less data in Shooting Information and Histogram display modes than appears in Figure 5-12. You get the full complement of data only if you took the picture in the advanced exposure modes.
![]() You can access the various display modes for movies and video snapshots, but the data displayed will relate to the movie or snapshot. Also, the histograms relate to the first frame of the movie or snapshot and go blank as soon as you start movie playback. You can’t change the display mode while the movie or snapshot is playing.
You can access the various display modes for movies and video snapshots, but the data displayed will relate to the movie or snapshot. Also, the histograms relate to the first frame of the movie or snapshot and go blank as soon as you start movie playback. You can’t change the display mode while the movie or snapshot is playing.
Basic Information display data
In Basic Information mode, you see the following bits of information (labeled in Figure 5-13):
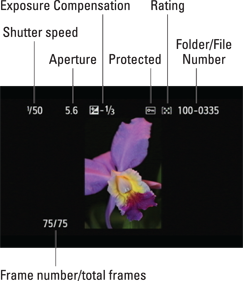
Figure 5-13: You can view basic exposure and file data in this display mode.
![]() Shutter speed, f-stop (aperture), and Exposure Compensation setting: Chapter 7 explains these exposure settings, the last of which appears in the display only if you enabled it when you took the shot.
Shutter speed, f-stop (aperture), and Exposure Compensation setting: Chapter 7 explains these exposure settings, the last of which appears in the display only if you enabled it when you took the shot.
For movies and video snapshots, the movie length takes the place of the shutter speed and f-stop values.
![]() Protected status: A key icon appears if you used the Protect Images feature to prevent the file from being erased when you use the normal file-deleting feature. You can find out how to protect files later in this chapter.
Protected status: A key icon appears if you used the Protect Images feature to prevent the file from being erased when you use the normal file-deleting feature. You can find out how to protect files later in this chapter.
![]() Rating: If you rated the file, you can see how many stars you assigned it. See the section Rating Photos, for details.
Rating: If you rated the file, you can see how many stars you assigned it. See the section Rating Photos, for details.
![]() Folder number and last four digits of file number: See Chapter 1 for information about how the camera assigns folder and file numbers. And visit Chapter 11 for details on how you can create custom folders if you’re into that sort of organizational control.
Folder number and last four digits of file number: See Chapter 1 for information about how the camera assigns folder and file numbers. And visit Chapter 11 for details on how you can create custom folders if you’re into that sort of organizational control.
![]() Frame number/total frames: Displayed in the bottom-left corner of the screen, this pair of values shows you the current frame number and the total number of frames on the memory card. For example, in Figure 5-13, you see frame 75 of 75.
Frame number/total frames: Displayed in the bottom-left corner of the screen, this pair of values shows you the current frame number and the total number of frames on the memory card. For example, in Figure 5-13, you see frame 75 of 75.
Shooting Information display mode
Shooting Information display mode presents a thumbnail of your image along with scads of shooting data. You also see a Brightness histogram — the chart-like thingy on the top right of the screen. You can get schooled in the art of reading histograms in the next section. (Remember, just press the Info button to cycle through the other display modes to this one.)
How much data you see, though, depends on the exposure mode you used to take the picture, as illustrated in Figure 5-14. The screen on the left shows the data dump that occurs when you shoot in the advanced exposure modes, where you can control all the settings indicated on the playback screen. When you shoot in the other exposure modes, you get a far-less detailed playback screen. For example, the screen on the right in Figure 5-14 shows the data that appears for a picture taken in Close-up mode. Here, you can view the Shoot by Ambience and Shoot by Lighting and Scene Type settings you used, but not all the individual exposure and color settings that appear for pictures shot in the advanced exposure modes.
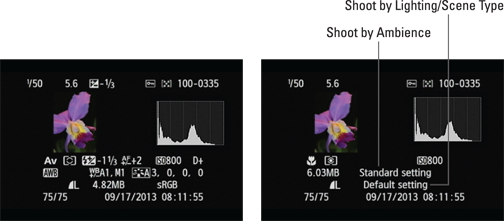
Figure 5-14: How much data appears depends on which exposure mode you used to shoot the picture.
I’m going to go out on a limb here and assume that if you’re interested in the Shooting Information display mode, you’re shooting in the advanced exposure modes, so the rest of this section concentrates on that level of playback data. To that end, it helps to break the display into five rows of information: the row along the top of the screen and the four rows that appear under the image thumbnail and histogram. The following list tells you what you see in each row. (Note that in Figures 5-15 through 5-17, I show all possible shooting data for the purpose of illustration. If a data item doesn’t appear on your monitor, it simply means that the feature wasn’t enabled when you captured the photo.)
![]() Row 1 data: You see the same data that appears in the Basic Information display mode, explained in the preceding section.
Row 1 data: You see the same data that appears in the Basic Information display mode, explained in the preceding section.
![]() Row 2 data: For photos, this row contains the exposure settings labeled in Figure 5-15, along with the status of a Custom Function feature called AF (autofocus) Microadjustment. You can find details about exposure in Chapter 7 and dig into the autofocus option in Chapter 8.
Row 2 data: For photos, this row contains the exposure settings labeled in Figure 5-15, along with the status of a Custom Function feature called AF (autofocus) Microadjustment. You can find details about exposure in Chapter 7 and dig into the autofocus option in Chapter 8.
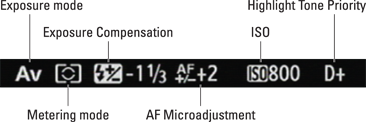
Figure 5-15: This row contains additional exposure information.
A few other points about this row of data:
• The Exposure mode symbol is replaced by a double-rectangle symbol if you took the picture using the Multiple Exposure option (covered in Chapter 7). For still photos taken during movie recording, a little movie camera icon takes the place of the Exposure mode symbol.
• If you turned on Multi Shot Noise Reduction when taking the photo, you see an NR symbol in place of the Flash Exposure Compensation symbol. And if you used flash but without any Flash Exposure Compensation, you see just the lightning bolt symbol.
• For movies, you see a little movie camera symbol plus the letter A (for movies taken in the fully automatic modes) or M (for movies shot in Manual exposure mode). Seeing no letter means that you used the P, Tv, or Av exposure mode. In Manual mode, you also see the f-stop and shutter speed used to record the movie.
![]() Row 3 data: Figure 5-16 labels the data found in this row, which features color settings you can explore in Chapter 8. Again, the display differs for movies: You see only the movie file size on this row.
Row 3 data: Figure 5-16 labels the data found in this row, which features color settings you can explore in Chapter 8. Again, the display differs for movies: You see only the movie file size on this row.

Figure 5-16: This data relates to color settings.
![]() Row 4 data: Here (the top row of Figure 5-17) you see the Image Quality setting, file size, and Color Space (another color option covered in Chapter 8). Note that for pictures taken in both the Raw and JPEG formats, the file size reflects the heft of the Raw file only. For movies, the Image Quality symbol is swapped out for data showing the Movie Recording Size option.
Row 4 data: Here (the top row of Figure 5-17) you see the Image Quality setting, file size, and Color Space (another color option covered in Chapter 8). Note that for pictures taken in both the Raw and JPEG formats, the file size reflects the heft of the Raw file only. For movies, the Image Quality symbol is swapped out for data showing the Movie Recording Size option.
If you shot with or applied a Creative Filter to the file, resized the file, or processed it using the built-in Raw processing function, you see a symbol that looks like a paint brush over a photo next to the Image Quality symbol.
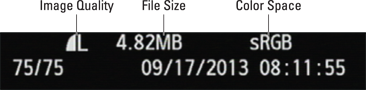
Figure 5-17: The bottom two rows of the display offer this data.
![]() Row 5 data: Wrapping up the smorgasbord of shooting data, the bottom row of the playback screen (also shown in Figure 5-17) shows the frame number and total number of frames as well as the date and time of the shot. If you use Eye-Fi memory cards, you also see a small icon depicting the card’s wireless connection status.
Row 5 data: Wrapping up the smorgasbord of shooting data, the bottom row of the playback screen (also shown in Figure 5-17) shows the frame number and total number of frames as well as the date and time of the shot. If you use Eye-Fi memory cards, you also see a small icon depicting the card’s wireless connection status.
Understanding Histogram display mode
A variation of the Shooting Information display, the Histogram display offers the data you see in Figure 5-18. Again, you see an image thumbnail, but some of the detailed color and exposure information that you see in the Shooting Information display is left out, making room for an additional histogram: the RGB histogram. Again, remember that this figure shows you the playback screen for pictures taken in the advanced exposure modes; in the other exposure modes, you see slightly different data, but you still get two histograms. For movies and video snapshots, the histograms relate to the first frame of the movie and go blank after playback begins.
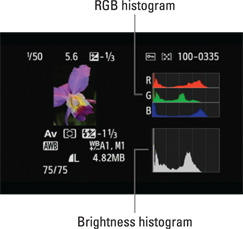
Figure 5-18: Histogram display mode replaces some shooting data with an RGB histogram.
The next two sections explain what information you can gain from both types of histograms.
Interpreting a Brightness histogram
One of the most difficult photo problems to correct in a photo-editing program is known as “blown” or “clipped” highlights. In plain English, both terms mean that highlights — the brightest areas of the image — are so overexposed that areas that should include a variety of light shades are instead totally white. For example, in a cloud image, pixels that should be light to very light gray become white because of overexposure, resulting in a loss of detail in those clouds.
You can of course get an idea of exposure by viewing the photo on the monitor, but because the image brightness may vary depending on the ambient light and the monitor brightness, you’re provided with a more accurate analysis of exposure. The Brightness histogram shown in Figure 5-19 is simply a graph that indicates the distribution of shadows, highlights, and midtones (areas of medium brightness) in an image. Photographers use the term “tonal range” to describe this aspect of their pictures.
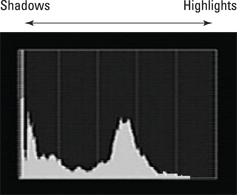
Figure 5-19: The Brightness histogram indicates the tonal range of an image.
The horizontal axis of the graph represents the possible picture brightness values from black (a value of 0) to white (a value of 255). And the vertical axis shows you how many pixels fall at a particular brightness value. A spike indicates a heavy concentration of pixels. For example, in Figure 5-19, which shows the histogram for the orchid image in Figure 5-18, the histogram indicates a broad range of brightness values but with very few at the brightest end of the spectrum.
Keep in mind that there is no “perfect” histogram that you should try to duplicate. Instead, interpret the histogram with respect to the amount of shadows, highlights, and midtones that make up your subject. For example, don’t expect to see lots of shadow pixels in a photo of a white polar bear standing amid a snowy landscape. Pay attention, however, if you see a very high concentration of pixels at the far right or left end of the histogram, which can indicate a seriously overexposed or underexposed image, respectively.
In Figure 5-19, the lack of white pixels may seem odd for the orchid photo — after all, the center of the flower does contain some white areas. (Refer to the close-up view shown in Figure 5-11.) When I shot this photo, I purposely underexposed the image just a hair to avoid the possibility of blowing out those highlights. So, the histogram offered reassurance that I didn’t overshoot the exposure, which can be difficult to determine from just looking at the image itself.
Your camera offers a second overexposure warning system, called Highlight Alert, which is disabled by default. You can read more about it two sections from here.
Reading an RGB histogram
In Histogram display mode, you see two histograms: the Brightness histogram (refer to Figure 5-19) and an RGB histogram, shown in Figure 5-20.
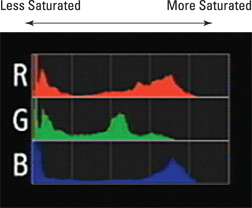
Figure 5-20: The RGB histogram can indicate problems with color saturation.
To make sense of an RGB histogram, you need to know that digital images are known as RGB images because they’re created from three primary colors of light: red, green, and blue. The brightness values of each of the three colors are stored in separate data vats called channels. Whereas the Brightness histogram reflects the brightness of all three color channels rolled into one, RGB histograms let you view the values for each channel.
When you look at the brightness data for a single channel, though, you glean information about color saturation rather than image brightness. I don’t have space in this book to provide a full lesson in RGB color theory, but the short story is that when you mix red, green, and blue light, and each component is at maximum brightness, you create white. Zero brightness in all three channels creates black. If you have maximum red and no blue or green, though, you have fully saturated red. If you mix two channels at maximum brightness, you also create full saturation. For example, maximum red and blue produce fully saturated magenta.
Where colors are fully saturated, you can lose picture detail. For example, a rose petal that should have a range of tones from medium to dark red may instead be a flat blob of dark red. So the upshot is that if all the pixels for one or two channels are slammed to the right end of the histogram, you may be losing picture detail because of overly saturated colors. If all three channels show a heavy pixel population at the right end of the histogram, you may have blown highlights — again, because the maximum levels of red, green, and blue create white. Either way, you may want to adjust the exposure settings and try again.
A savvy RGB histogram reader can also spot color balance issues by looking at the pixel values. But frankly, color balance problems are fairly easy to notice just by looking at the image on the camera monitor.
If you’re a fan of RGB histograms, however, you may be interested in another possibility: You can swap the standard Brightness histogram that appears in Shooting Information display mode with the RGB histogram. Just set the Histogram Disp option on Playback Menu 3 to RGB instead of Brightness.
Enabling a few display extras
Playback Menu 3, shown in Figure 5-21, enables you to add the following features to picture playback in any display mode, including the No Information mode:
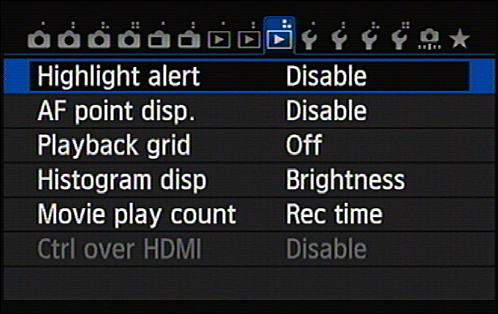
Figure 5-21: You can enable a few additional playback display options via Playback Menu 3.
![]() Highlight Alert: If you enable this option, areas of the photo that are completely white blink on and off to alert you of possible blown highlights. Depending on the number and location of the “blinkies,” you may or may not want to adjust exposure settings and retake the photo. For example, if someone’s face contains the blinking spots, you should take steps to correct the problem. But if the blinking occurs in, say, a bright window behind the subject, and the subject looks fine, you may choose to simply ignore it.
Highlight Alert: If you enable this option, areas of the photo that are completely white blink on and off to alert you of possible blown highlights. Depending on the number and location of the “blinkies,” you may or may not want to adjust exposure settings and retake the photo. For example, if someone’s face contains the blinking spots, you should take steps to correct the problem. But if the blinking occurs in, say, a bright window behind the subject, and the subject looks fine, you may choose to simply ignore it.
![]() AF Point Display: Turn this option on to view the focus point or points that the camera used when setting the focusing distance, as shown in Figure 5-22. Focus points appear as red rectangles on the screen.
AF Point Display: Turn this option on to view the focus point or points that the camera used when setting the focusing distance, as shown in Figure 5-22. Focus points appear as red rectangles on the screen.
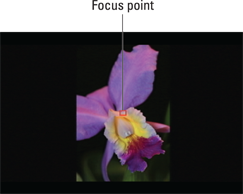
Figure 5-22: Enable AF Point Display to see the focus point the autofocusing system used to establish focus.
![]() Playback Grid: Through this option, you can display one of three different grids over your photo. The grids are useful for checking the alignment of vertical and horizontal structures in the photo.
Playback Grid: Through this option, you can display one of three different grids over your photo. The grids are useful for checking the alignment of vertical and horizontal structures in the photo.
You also can toggle the Highlight Alert and AF Point Display on and off via the Quick Control screen, as shown in Figure 5-23. Just tap the icons labeled in the figure.
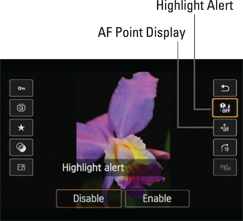
Figure 5-23: You can quickly toggle these two options on and off via the Quick Control screen.
Deleting Photos
When you spot a clunker during your picture review, you can erase it in a few ways, as outlined in the next three sections.
Erasing single images
 To delete photos one at a time, display the photo (in single image view) or select it (in Index view). Then press the Erase button. The words Cancel and Erase appear at the bottom of the screen, as shown in Figure 5-24. To zap that photo into digital oblivion, either tap Erase or use the Multi-controller or Quick Control dial to highlight it and then press the Set button.
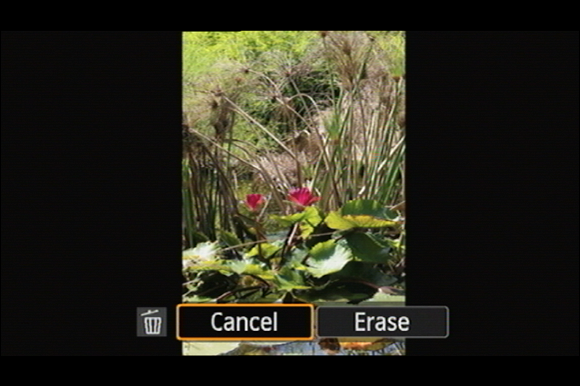
Figure 5-24: Press the Erase button and then tap Erase to delete the current image.
Erasing all images on the memory card
To erase all images on the memory card — with the exception of those you locked by using the Protect Images feature discussed later in this chapter — take the following steps:
1. Display Playback Menu 1, shown on the left in Figure 5-25.
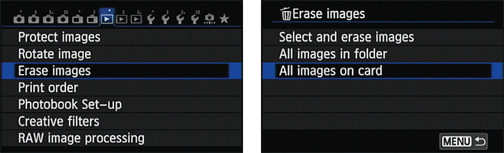
Figure 5-25: Use the Erase option on Playback Menu 1 to delete multiple images quickly.
2. Choose Erase Images to display the screen shown on the right in Figure 5-25.
3. Choose All Images on Card.
You then see a confirmation screen.
4. Choose OK to go ahead and dump the photos.
If your card contains multiple folders, you can limit the cardwide image dump to just the images in a specific folder. Take these same steps but choose All Images in Folder in Step 3. You then display a list of folders; choose the folder you want to empty and then tap Set or press the Set button. (See Chapter 11 to find out how to create folders in addition to the ones the camera creates by default.)
Erasing selected images
To erase more than a few but not all images on your memory card, save time and trouble by using this alternative to deleting photos one by one:
1. On Playback Menu 1, choose Erase Images.
You see the main Erase Images screen.
2. Choose Select and Erase Images, as shown in Figure 5-26.
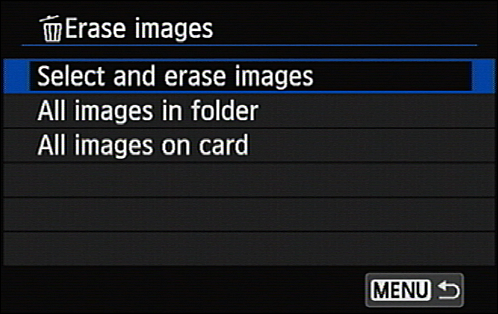
Figure 5-26: You can delete multiple selected images at once.
You see the current image in the monitor. At the top of the screen, a little check box appears, as shown on the left in Figure 5-27. (The box is empty until you take the next step.)
3. Tag the image for deletion.
Tap the check box, press the Set button, or tap the Set icon to put a check mark in the box, thereby declaring it ready for the trash. If you change your mind, tap the box or the icon or press the Set button again to remove the check mark.

Figure 5-27: Tap the check box or press the Set button to tag images you want to delete.
4. Scroll to the next image.
5. Keep repeating Steps 3 and 4 until you mark all images you want to trash.
If you don’t need to inspect each image closely, you can display up to three thumbnails per screen. (Refer to the image on the right in Figure 5-27.) Just press the AE Lock button (or pinch the image) to shift into this display. Use the same methods to tag images for erasure and to scroll through photos as you do when viewing them one at a time.
To return to full-frame view, press the AF Point Selection button or pinch outward on the thumbnail.
6. After tagging all the photos you want to delete, press the Erase button or tap the OK icon.
You see a confirmation screen asking whether you really want to get rid of the selected images.
7. Tap OK or highlight it and press Set.
The selected images are deleted, and you return to the Erase Images menu.
8. Tap the Menu icon or press the Menu button to return to Playback Menu 1.
Or, to continue shooting, press the shutter button halfway and release it.
Protecting Photos
You can protect pictures from accidental erasure by giving them protected status. After you take this step, the camera doesn’t allow you to delete the picture from your memory card, regardless of whether you press the Erase button or use the Erase Images option on Playback Menu 1.
I also use the protection feature when I want to keep a handful of pictures on the card but delete the rest. Instead of using the Select and Erase Images option, which requires that you tag each photo you want to delete, I protect the handful I want to preserve. Then I use the Erase All Images option to dump the rest — the protected photos are left intact.
 Although the Erase functions don’t touch protected pictures, formatting your memory card does erase them. For more about formatting, see the Chapter 1 section related to Setup Menu 1, which contains the Format Card tool.
Also note that when you download protected files to your computer, they show up as read-only files, meaning that the photo can’t be altered. So if you want to be able to edit your photos, be sure to remove the protected status before downloading.
Anyway, protecting a picture on the camera is easy. You can use either of the techniques outlined in the next two sections.
Protecting (or unprotecting) a single photo
To apply protection to just one or two photos, the Quick Control screen offers the fastest option. Display the photo you want to protect in full-frame view. Or in Index view, select the photo by moving the highlight box over it. Then press the Quick Control button and tap or highlight the Protect Images symbol, labeled in Figure 5-28. Choose Enable at the bottom of the screen, and a little key symbol appears at the top of the frame, as shown in the figure. Tap the return arrow (upper right of the screen) or press the Quick Control button again to exit the Quick Control display.
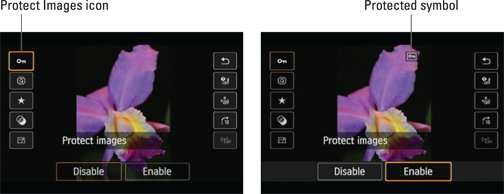
Figure 5-28: You can use the Quick Control screen to protect the current photo.
If you later want to remove the protected status, follow the same steps but choose Disable on the Quick Control screen.
Protecting multiple photos
When you want to apply protected status to — or remove it from — more than a couple photos, going through Playback Menu 1 is faster than using the Quick Control screen. Take these steps:
1. Display Playback Menu 1 and choose Protect Images, as shown on the left in Figure 5-29.

Figure 5-29: This option prevents you from erasing pictures using the normal picture-deletion techniques.
You then see the options shown on the right in the figure:
• Select Images: Choose the photos you want to protect.
• All Images in Folder: Protects all the photos in a folder. Unless your memory card contains multiple folders, this option protects all your pictures. If you do have multiple folders, you can select a folder in the next step.
• Unprotect All Images in Folder: This does the opposite, in case you protected those images and no longer need them locked down.
• All Images on Card: A handy option to protect all photos on the card.
• Unprotect All Images on Card: Removes protected status from all pictures on the card.
2. Choose an option from the list.
What happens now depends on which option you chose:
• Select Images: An image appears on the monitor, along with a little key icon in the upper left of the screen, as shown on the left in Figure 5-30. Scroll to the first picture you want to protect and then tap the Set icon or press the Set button. Now a key icon appears with the data at the top of the screen, as shown in the image on the right side of the figure. After you finish protecting photos, press the Menu button or tap the Menu icon to exit the protection screens.
You can also pinch the display to show more (4 or 9) photos, then touch the photo to protect it. Don’t forget to tap Set or press the Set button to lock your choices in.
• All Images in Folder or Unprotect All Images in Folder: You see a screen where you can select a specific folder. Select that folder, tap Set or press the Set button, and then tap OK or press the Set button again.
• All Images on Card or Unprotect All Images on Card: Choose OK on the confirmation screen.
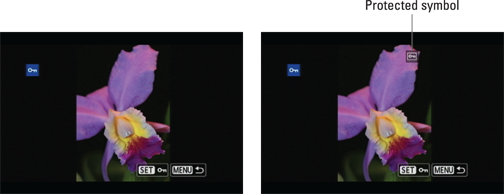
Figure 5-30: The key icon indicates that the picture is protected.
To remove protection from individual pictures, follow these same steps, choosing Select Images in Step 2. When you display the locked picture, just press or tap Set to turn off the protection. The little key icon disappears from the top of the screen to let you know that the picture is no longer protected.
Rating Photos
Many image browsers provide a tool that you can use to assign a rating to a picture: five stars for your best shots, one star for those you wish you could reshoot, and so on. But you don’t have to wait until you make it to your computer, because your camera offers the same feature. If you later view your pictures in the Canon image software, as detailed in the next chapter, you can see the ratings you assigned and even sort pictures according to rating.
You assign a rating to a photo either via the Quick Control screen or Playback Menu 2. For rating just a photo or two, either works fine, but for rating a batch of photos, using the menu is fastest. Here’s how the two options work:
![]() Quick Control screen: Display your photo in full-screen view and then press the Quick Control button and choose the Rating icon, as shown on the left in Figure 5-31. Along the bottom of the screen (right side of the figure), tap or highlight the icon representing the number of stars you want to give the photo and then tap the return arrow or press the Quick Control button to return to the normal playback screen. You must exit the Quick Control screen before rating a second photo — there’s no way to advance to another image while the Quick Control screen is active. To remove a rating, choose the Off option.
Quick Control screen: Display your photo in full-screen view and then press the Quick Control button and choose the Rating icon, as shown on the left in Figure 5-31. Along the bottom of the screen (right side of the figure), tap or highlight the icon representing the number of stars you want to give the photo and then tap the return arrow or press the Quick Control button to return to the normal playback screen. You must exit the Quick Control screen before rating a second photo — there’s no way to advance to another image while the Quick Control screen is active. To remove a rating, choose the Off option.
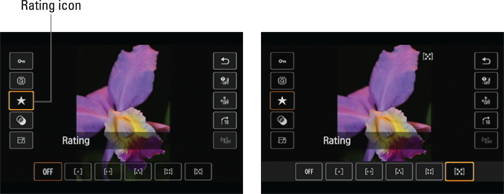
Figure 5-31: You can rate photos via the Quick Control screen.
![]() Playback Menu 2: Choose the Rating option, as shown in Figure 5-32, to access the screen shown on the left in Figure 5-33. Above the image, you get a control box for setting the rating of the current picture — just press the Multi-controller up or down to give the photo anything from one to five stars. You also can tap the up/down arrows at the bottom of the thumbnail to set the rating level.
Playback Menu 2: Choose the Rating option, as shown in Figure 5-32, to access the screen shown on the left in Figure 5-33. Above the image, you get a control box for setting the rating of the current picture — just press the Multi-controller up or down to give the photo anything from one to five stars. You also can tap the up/down arrows at the bottom of the thumbnail to set the rating level.
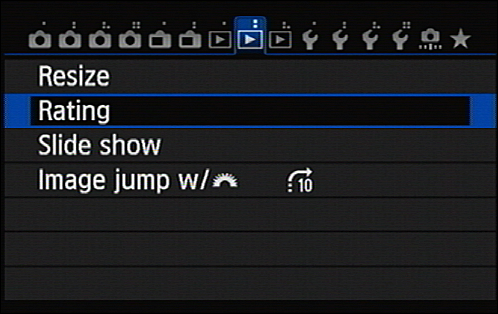
Figure 5-32: Rating photos is a great organizational tool.
The values next to the control box indicate how many other photos on the card have been assigned each of the ratings. For example, in the figure, the numbers tell me that my card contains one 2-star photo, one 4-star photo, and two 5-star photos.
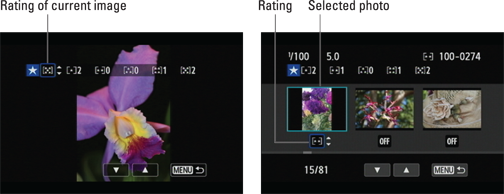
Figure 5-33: Tap the up or down arrows to adjust the photo rating.
You can press the AE Lock button or pinch the thumbnail inward to display three thumbnails at a time, as shown on the right in Figure 5-33. Use the Quick Control dial or Multi-controller to highlight a thumbnail — or just give the thumbnail a tap to select it. Its rating appears in the box right below the thumbnail. A value of Off means you haven’t rated the photo yet. You can raise or lower the rating by pressing the Multi-controller up or down or by tapping the arrows at the bottom of the screen.
To go back to the one-image display, press the AF Point Selection button or pinch a thumbnail outward.
After rating your photos, press the Menu button or tap the Menu icon to return to the Playback Menu 2.
Viewing Your Photos on a Television
Your camera is equipped with a feature that allows you to play your pictures and movies on a television screen. In fact, you have three playback options:
![]() Regular video playback: Haven’t made the leap yet to HDTV? No worries: You can set the camera to send a regular standard-definition audio and video signal to the TV. You’ll need to purchase the Canon AVC-DC400ST cable to do so.
Regular video playback: Haven’t made the leap yet to HDTV? No worries: You can set the camera to send a regular standard-definition audio and video signal to the TV. You’ll need to purchase the Canon AVC-DC400ST cable to do so.
![]() HDTV playback: If you have a high-definition television, you can set the camera to high-def playback. However, you need to purchase an HDMI cable to connect the camera and television; the Canon part number you need is HDMI cable HTC-100. Do not use the HDMI port with anything other than the HDMI HTC-100 cable or a quality equivalent.
HDTV playback: If you have a high-definition television, you can set the camera to high-def playback. However, you need to purchase an HDMI cable to connect the camera and television; the Canon part number you need is HDMI cable HTC-100. Do not use the HDMI port with anything other than the HDMI HTC-100 cable or a quality equivalent.
![]() For HDMI CEC TV sets: If your television is compatible with HDMI CEC, your camera enables you to use the TV’s remote control to rule your playback operations. You can put the camera on the coffee table and sit back with your normal remote in hand to entertain family and friends with your genius. To make this operation work, you must enable the Ctrl Over HDMI option on Playback Menu 3. (The option is dimmed if you’re not connected to a compatible TV.)
For HDMI CEC TV sets: If your television is compatible with HDMI CEC, your camera enables you to use the TV’s remote control to rule your playback operations. You can put the camera on the coffee table and sit back with your normal remote in hand to entertain family and friends with your genius. To make this operation work, you must enable the Ctrl Over HDMI option on Playback Menu 3. (The option is dimmed if you’re not connected to a compatible TV.)
Before you begin connecting your camera to your TV, you may need to adjust one camera setting — Video System — which you find on Setup Menu 3. You have just two options: NTSC and PAL. Select the video mode used by your part of the world. (In the United States, Canada, and Mexico, NTSC is the standard.) The camera should have shipped from the factory with the right setting selected, but it never hurts to double-check.
With the right cable in hand and the camera turned off, open the little rubber door that covers the video-out ports — it’s the door closest to the back of the camera — as shown in Figure 5-34. The camera has two ports (connection slots): one for a standard audio/video (A/V) signal and one for the HDMI signal. The A/V port is the same one you use to connect the camera via USB for picture download.
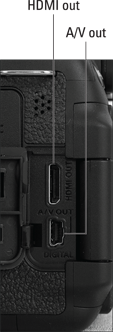
Figure 5-34: You can connect your camera to a television via the A/V port or HDMI port.
The smaller plug on the A/V cable attaches to the camera. For A/V playback, your cable has three plugs at the other end: Put the yellow one into your TV’s video jack and the red and white ones into your TV’s stereo audio jacks. For HDMI playback, a single plug goes to the TV.
At this point, I need to point you to your TV manual to find out exactly which of its jacks to use to connect your camera. You also need to consult your manual to find out which channel to select for playback of signals from auxiliary input devices.
After you sort out that issue, turn on your camera to send the signal to the TV set. If you don’t have the latest and greatest HDMI CEC capability (or lost your remote), you can control playback using the same camera controls as you normally do to view pictures on your camera monitor.
Understand that as soon as you plug your camera into a TV, the camera monitor goes dark — which means touchscreen operations are no longer possible. So you must use the camera buttons (or remote control) to operate any playback functions.