
This chapter covers 10% of the Certified OpenStack Administrator exam requirements.
Architecture and Components of Cinder
Instances use an ephemeral volume by default. This kind of volume does not save the changes made on it and reverts to its original state when the current user relinquishes control. One of the methods for storing data permanently in OpenStack cloud is the use of a block storage service named Cinder. This service is similar to the Amazon EBS service by its functions.
Figure 9-1 shows the main components of Cinder.

Figure 9-1. Architecture of Cinder
OpenStack block storage service consists of four services implemented as GNU/Linux daemons:
cinder-api: API service provides an HTTP endpoint for API requests. At the time of this writing, two versions of API are supported and required for the cloud. So Cinder provides six endpoints. The cinder-api verifies the identity requirements for an incoming request and after that routes them to the cinder-volume for action through the message broker.
cinder-scheduler: Scheduler service reads requests from the message queue and selects the optimal storage provider node to create or manage the volume.
cinder-volume: The service works with a storage back end through the drivers. The cinder-volume gets requests from the scheduler and responds to read and write requests sent to the block storage service to maintain state. You can use several back ends at the same time. For each back end you need one or more dedicated cinder-volume service.
cinder-backup: The backup service works with the backup back end through the driver architecture.
As you can see in Figure 9-1, Cinder uses block storage providers for particular storage. You can find a list of supported drivers at https://wiki.openstack.org/wiki/CinderSupportMatrix . There are a lot of storage providers for Cinder, such as LVM/iSCSI, Ceph, Swift, EMC VNX, ScaleIO, IBM Storwize, and others.
Let’s look at these services in the OpenStack node:
# systemctl | grep cinderopenstack-cinder-api.serviceloaded active running OpenStack Cinder API Serveropenstack-cinder-backup.serviceloaded active running OpenStack Cinder Backup Serveropenstack-cinder-scheduler.serviceloaded active running OpenStack Cinder Scheduler Serveropenstack-cinder-volume.service
You can use the cinder service-list command to query the status of Cinder services:
$ source keystonerc_admin$ cinder service-list+------------------+------------------------+------+---------+-------+---------------------+| Binary | Host | Zone | Status | State | Updated_at |+------------------+------------------------+------+---------+-------+---------------------+| cinder-backup | centos7.test.local | nova | enabled | up | 2016-04-24T16:34:08 || cinder-scheduler | centos7.test.local | nova | enabled | up | 2016-04-24T16:34:06 || cinder-volume | centos7.test.local@lvm | nova | enabled | up | 2016-04-24T16:34:07 |+------------------+------------------------+------+---------+-------+---------------------+
After testing the environment, you can see that all services are running on one host. In the production environment, it is more common to have cinder-volume service running on separate storage nodes. By default in test environments Cinder uses the Linux Logical Volume Manager (LVM) back end and the iSCSI target provided by Targetcli ( http://linux-iscsi.org/wiki/Targetcli ):
# systemctl | grep lvmetad.servicelvm2-lvmetad.serviceloaded active running LVM2 metadata daemon# systemctl | grep target.servicetarget.serviceloaded active exited Restore LIO kernel target configuration
Now let’s look through the Keystone main configuration file /etc/cinder/cinder.conf. Table 9-1 shows the main configuration options available from the config file.
Table 9-1. Main Configuration Options from /etc/cinder/cinder.conf
Example of Config Options | Description |
|---|---|
[DEFAULT] glance_host = 10.0.2.15 | Default Glance host name or IP. |
[DEFAULT] backup_driver = cinder.backup.drivers.swift | Driver to use for backups. |
[DEFAULT] auth_strategy = keystone [keystone_authtoken] auth_uri = http:// 10.0.2.15:5000 auth_url = http:// 10.0.2.15:35357 auth_type = password project_domain_name = default user_domain_name = default project_name = service username = cinder password = openstack | Authentication parameters: auth_uri, which is the public Identity API endpoint, and auth_url, which is the admin Identity API endpoint. Other parameters set a default project name, domain name, project name for services, and account information for the Cinder user. |
[DEFAULT] backup_swift_url = http://10.0.2.15:8080/v1/AUTH_ backup_swift_container = volumes_backup backup_swift_object_size = 52428800 backup_swift_retry_attempts = 3 backup_swift_retry_backoff = 2 | The URL of the Swift endpoint and other Swift parameters such as: name of Swift container to use, maximum object size, the number of retries to make for Swift operations, and the back-off time in seconds between Swift retries. |
[DEFAULT] enabled_backends = lvm | A list of back-end names to use. |
[database] connection = mysql:// cinder:[email protected]/cinder | The SQLAlchemy connection string is used to connect to the database. |
[DEFAULT} rpc_backend = rabbit [oslo_messaging_rabbit] rabbit_host = localhost rabbit_port = 5672 rabbit_userid = guest rabbit_password = guest | The RabbitMQ broker address, port, user name, and password. |
[lvm] iscsi_helper=lioadm | iSCSI target user-land tool to use. The old one tgtadm is default. Use lioadm for modern LIO iSCSI support. |
[lvm] volume_group=cinder-volumes iscsi_ip_address=10.0.2.15 volume_driver=cinder.volume.drivers.lvm.LVMVolumeDriver volumes_dir=/var/lib/cinder/volumes iscsi_protocol=iscsi volume_backend_name=lvm | LVM back-end options: name of LVM volume group, iSCSI target IP address, volume driver, volume configuration file storage directory, and the back-end name for a given driver implementation. |
Manage Volume and Mount It to a Nova Instance
Let’s start our example from volume creation. There are two CLI commands that can be used: openstack or cinder. Also you can use the Horizon web client. Here is an example using the cinder command:
$ source keystonerc_demo$ cinder create --display-name apresstest1 1+---------------------------------------+--------------------------------------+| Property | Value |+---------------------------------------+--------------------------------------+| attachments | [] || availability_zone | nova || bootable | false || consistencygroup_id | None || created_at | 2016-04-21T05:22:11.000000 || description | None || encrypted | False || id | 08c41630-4da9-42c5-99bb-f9aa389ce2dc || metadata | {} || multiattach | False || name | apresstest1 || os-vol-tenant-attr:tenant_id | 1542af2b20d349d29710d8c4019ba202 || os-volume-replication:driver_data | None || os-volume-replication:extended_status | None || replication_status | disabled || size | 1 || snapshot_id | None || source_volid | None || status | creating || user_id | ec92590f7ff84887ab9c0329f5ce850c || volume_type | None |+---------------------------------------+--------------------------------------+
The next example shows use of the universal openstack command:
$ openstack volume create --size 1 apresstest2+---------------------+--------------------------------------+| Field | Value |+---------------------+--------------------------------------+| attachments | [] || availability_zone | nova || bootable | false || created_at | 2016-04-21T05:23:43.504895 || display_description | None || display_name | apresstest2 || encrypted | False || id | e42d8fe1-7475-46b6-a769-20a2ce462d3c || multiattach | false || properties | || size | 1 || snapshot_id | None || source_volid | None || status | creating || type | None |+---------------------+--------------------------------------+
Now you can check to make sure that both volumes were created and are now available:
$ openstack volume list+--------------------------------------+--------------+-----------+------+-------------+| ID | Display Name | Status | Size | Attached to |+--------------------------------------+--------------+-----------+------+-------------+| e42d8fe1-7475-46b6-a769-20a2ce462d3c | apresstest2 | available | 1 | || 08c41630-4da9-42c5-99bb-f9aa389ce2dc | apresstest1 | available | 1 | |+--------------------------------------+--------------+-----------+------+-------------+$ cinder list+--------------------+---------+-----------+----+---------------+-----------+-----------+| ID |Status |Name |Size|Volume|Bootable|Multiattach|Attached to|Type+--------------------+---------+-----------+----+---------------+-----------+-----------+| 08c41630-4da9-42c5-|available|apresstest1| 1 |- |false |False | |99bb-f9aa389ce2dc| e42d8fe1-7475-46b6-|available|apresstest2| 1 |- |false |False | |a769-20a2ce462d3c+--------------------+---------+-----------+----+---------------+-----------+-----------+
As mentioned earlier, Cinder uses Linux Logical Volume Manager in test environments by default. You can easily check this fact by using the lvs command. As you see below, there are two LVM volumes in the cinder-volumes group with the names that contain the OpenStack’s volumes’ IDs:
# lvsLV VG Attr LSizehome centos -wi-ao---- 55.64groot centos -wi-ao---- 50.00gswap centos -wi-ao---- 3.88gvolume-08c41630-4da9-42c5-99bb-f9aa389ce2dc cinder-volumes -wi-a----- 1.00gvolume-e42d8fe1-7475-46b6-a769-20a2ce462d3c cinder-volumes -wi-a----- 1.00g
Note
The command lvs is used to report information about logical volumes. Using the Logical Volume Manager (LVM) is a common way to create the abstraction level of block devices for modern GNU/Linux distributions. LVM is able to create, delete, resize, mirror, or snapshot logical volumes. Logical volumes are created from volume groups and volume groups are usually created from physical devices. If you are not familiar with LVM you can start from a manual page for LVM (man lvm in linux prompt).
You can also manage existing and create new volumes from within the Horizon web interface. Go to Compute ➤ Volumes if you are working as a user or System ➤ Volumes if you want to see all of the volumes as an administrator. In each case, different subsets of options are available. Examples of the different web interface screenshots are shown in Figures 9-2 and 9-3.

Figure 9-2. Volumes in regular users Horizon web interface view

Figure 9-3. Volumes for admin users in the Horizon web interface view
Deleting a volume is as easy as creating one. To delete a volume, for example, using the cinder CLI command, use the following code:
$ cinder delete apresstest2Request to delete volume apresstest2 has been accepted.
In Figure 9-4 you can see the volume creation dialog used in the Horizon user interface. In the drop-down menu you can see additional options for creating the image. You can create a volume from another volume or from the image instead by creating a volume from scratch. For these actions the --image and --source options of the openstack CLI command are used. Here is an example of creating a volume from Glance’s image:
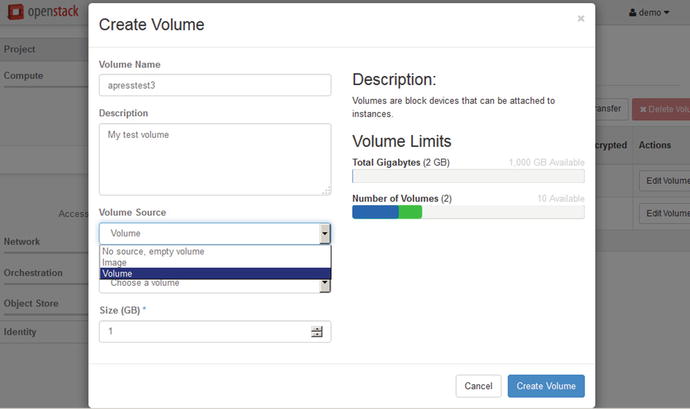
Figure 9-4. Creation of a volume from the Horizon web interface view
$ openstack volume create --size 1 --image cirros-0.3.4-x86_64 apresstest3+---------------------+--------------------------------------+| Field | Value |+---------------------+--------------------------------------+| attachments | [] || availability_zone | nova || bootable | false || created_at | 2016-04-24T12:22:47.445562 || display_description | None || display_name | apresstest3 || encrypted | False || id | e5ac6599-d1a9-4d27-a338-6989e2abc0fc || image_id | e5791edb-30dd-475a-9bc4-5938341db655 || multiattach | false || properties | || size | 1 || snapshot_id | None || source_volid | None || status | creating || type | None |+---------------------+--------------------------------------+
You can use the openstack volume show command with the image name or ID if you need to look at the particular volume properties.
Volumes are useless by themselves. So let’s try to start a new instance of VM and to access a volume from within this VM:
$ nova boot --flavor m1.tiny --image cirros-0.3.4-x86_64 apresstestinstance1...$ nova list+--------------+---------------------+--------+------------+-------------+-----------------+| ID | Name | Status | Task State | Power State | Networks |+--------------+---------------------+--------+------------+-------------+-----------------+| a2deaa34-... | apresstestinstance1 | ACTIVE | - | Running | private=10.0.0.3 |+--------------+---------------------+--------+------------+-------------+-----------------+
Now you can attach the volume apresstest1 to the instance apresstestinstance1:
$ openstack server add volume apresstestinstance1 apresstest1$ openstack volume list+--------------+--------------+--------+------+--------------------------------------------+| ID | Display Name | Status | Size | Attached to |+--------------+--------------+--------+------+--------------------------------------------+| 78680241-... | apresstest1 | in-use | 1 | Attached to apresstestinstance1 on /dev/vdb |+--------------+--------------+--------+------+--------------------------------------------+
As an alternative, you can use the nova volume-attach command in conjunction with the volume ID:
nova volume-attach apresstestinstance1 78680241-7928-41d5-b9bc-f2f82dad7bba /dev/vdb+----------+--------------------------------------+| Property | Value |+----------+--------------------------------------+| device | /dev/vdb || id | 78680241-7928-41d5-b9bc-f2f82dad7bba || serverId | a2deaa34-2ca0-406f-9ef7-cf2a92cb6751 || volumeId | 78680241-7928-41d5-b9bc-f2f82dad7bba |+----------+--------------------------------------+
For detaching a volume you can use one of these commands:
$ openstack server remove volume apresstestinstance1 apresstest1$ nova volume-detach apresstestinstance1 78680241-7928-41d5-b9bc-f2f82dad7bba
Create Volume Group for Block Storage
One of the Certified OpenStack Administrator exam objectives is to create the LVM volume group for block storage. It is very easy but you need to be aware of the hard disks partitions and the LVM hierarchy.
Let’s assume that you do not have free space in your current storage. First, you will need to add a new block device (virtual hard drive in this case) to the controller VM. Usually you will need to reboot the VM after that.
Then you need to find a new device name. A device name refers to the entire disk. Device names can be /dev/sda, /dev/sdb, and so on when you are using the virtualization-aware disk driver. For example, if you use the native KVM-based virtualization in GNU/Linux, this code would show the devise name:
# fdisk -l | grep [vs]dDisk /dev/sda: 118.2 GB, 118182313984 bytes, 230824832 sectors/dev/sda1 * 2048 1026047 512000 83 Linux/dev/sda2 1026048 230823935 114898944 8e Linux LVMDisk /dev/sdb: 103.8 GB, 103834320896 bytes, 202801408 sectors
You can see the new disk /dev/sdb has no partitions on it. Let’s create one partition for the whole disk:
# fdisk /dev/sdbWelcome to fdisk (util-linux 2.23.2).Changes will remain in memory only, until you decide to write them.Be careful before using the write command.Device does not contain a recognized partition tableBuilding a new DOS disklabel with disk identifier 0xc2ccdc51.Command (m for help): nPartition type:p primary (0 primary, 0 extended, 4 free)e extendedSelect (default p): pPartition number (1-4, default 1):First sector (2048-202801407, default 2048):Using default value 2048Last sector, +sectors or +size{K,M,G} (2048-202801407, default 202801407):Using default value 202801407Partition 1 of type Linux and of size 96.7 GiB is set
Before saving changes to the partition table, you also need to change the partition type number from 83 (Linux) to 8e (Linux LVM):
Command (m for help): tSelected partition 1Hex code (type L to list all codes): 8eChanged type of partition 'Linux' to 'Linux LVM'Command (m for help): wThe partition table has been altered!Calling ioctl() to re-read partition table.Syncing disks.# partprobe
Now you can create the new volume group for the LVM back end:
# vgcreate cinder-volumes-2 /dev/sdb1Physical volume "/dev/sdb1" successfully createdVolume group "cinder-volumes-2" successfully created
Manage Quotas
It is possible to add quotas for Cinder volumes. Default quotas for new projects are in the Cinder configuration file. Some of them are shown in Table 9-2.
Table 9-2. Quota Configuration Options from /etc/cinder/cinder.conf
Example of Config Options | Description |
|---|---|
quota_volumes = 10 | Number of volumes allowed per project. |
quota_snapshots = 10 | Number of volume snapshots allowed per project. |
quota_gigabytes = 1000 | Total amount of storage, in gigabytes, allowed for volumes and snapshots per project. |
quota_backups = 10 | Number of volume backups allowed per project. |
quota_backup_gigabytes = 1000 | Total amount of storage, in gigabytes, allowed for backups per project. |
You can show or modify Cinder quotes by using the cinder CLI command or through the Horizon web interface. In Horizon, all quotas for projects that exist can be found by going to Identity ➤ Projects. Then you would need to choose “Modify Quotas” from the drop-down menu to the right of the project name. You need to know the project ID if you work from the command line:
$ openstack project list+----------------------------------+---------+| ID | Name |+----------------------------------+---------+| 007cad0f17df4b6f9ece6e5f630cec83 | admin || 7cd5f81dc5d849bbb76295e317128373 | service || 90829e88e94a4a39b9860ac61183e98d | demo |+----------------------------------+---------+
Then you can show the quotas for project demo:
$ cinder quota-show 90829e88e94a4a39b9860ac61183e98d+----------------------+-------+| Property | Value |+----------------------+-------+| backup_gigabytes | 1000 || backups | 10 || gigabytes | 1000 || gigabytes_LUKS | -1 || per_volume_gigabytes | -1 || snapshots | 10 || snapshots_LUKS | -1 || volumes | 10 || volumes_LUKS | -1 |+----------------------+-------+
The results show the current usage of the demo project’s quota:
$ cinder quota-usage 90829e88e94a4a39b9860ac61183e98d+----------------------+--------+----------+-------+| Type | In_use | Reserved | Limit |+----------------------+--------+----------+-------+| backup_gigabytes | 0 | 0 | 1000 || backups | 0 | 0 | 10 || gigabytes | 0 | 0 | 1000 || gigabytes_LUKS | 0 | 0 | -1 || per_volume_gigabytes | 0 | 0 | -1 || snapshots | 0 | 0 | 10 || snapshots_LUKS | 0 | 0 | -1 || volumes | 0 | 0 | 10 || volumes_LUKS | 0 | 0 | -1 |+----------------------+--------+----------+-------+
To update Cinder service quotas for an existing project, you need a quota name and the suggested number:
$ cinder quota-update --snapshots 17 90829e88e94a4a39b9860ac61183e98d+----------------------+-------+| Property | Value |+----------------------+-------+| backup_gigabytes | 1000 || backups | 10 || gigabytes | 1000 || gigabytes_LUKS | -1 || per_volume_gigabytes | -1 || snapshots | 17 || snapshots_LUKS | -1 || volumes | 10 || volumes_LUKS | -1 |+----------------------+-------+
For removing all quotas for the project use the quota-delete command:
$ cinder quota-delete 90829e88e94a4a39b9860ac61183e98dBack Up and Restore Volumes and Snapshots
The cinder command can create a whole volume backup or incremental backup (starting from the Liberty release). You can restore a volume from a backup if the backup’s associated metadata exist in the Cinder database. You can also export metadata if you are concerned about a database crush.
First, you need to know the volume ID. You can use the cinder list command to find this. Next, you can enter the command:
$ cinder backup-create 78680241-7928-41d5-b9bc-f2f82dad7bba+-----------+--------------------------------------+| Property | Value |+-----------+--------------------------------------+| id | 4dc8c496-85f1-438f-9eb7-56fb2aa04503 || name | None || volume_id | 78680241-7928-41d5-b9bc-f2f82dad7bba |+-----------+--------------------------------------+
It is possible to check the status of existing backups using the command:
$ cinder backup-list+-------------+-------------+-----------+------+------+--------------+----------------+| ID | Volume ID | Status | Name | Size | Object Count | Container |+-------------+-------------+-----------+------+------+--------------+----------------+| 4dc8c496-.. | 78680241-.. | available | - | 1 | 22 | volumes_backup |+-------------+-------------+-----------+------+------+--------------+----------------+
All backups go to the Swift Object Storage by default. You can check the volumes_backup container and objects inside this container:
$ swift listvolumes_backup$ swift list volumes_backupvolume_78680241-7928-41d5-b9bc-f2f82dad7bba/20160424152627/az_nova_backup_4dc8c496-..-00001...volume_78680241-7928-41d5-b9bc-f2f82dad7bba/20160424152627/az_nova_backup_4dc8c496-..-00021volume_78680241-7928-41d5-b9bc-f2f82dad7bba/20160424152627/az_nova_backup_4dc8c496-.._metadatavolume_78680241-7928-41d5-b9bc-f2f82dad7bba/20160424152627/az_nova_backup_4dc8c496-.._sha256file
Restoration of an existing backup is similar to the backup procedure:
$ cinder backup-restore 4dc8c496-85f1-438f-9eb7-56fb2aa04503+-------------+-----------------------------------------------------+| Property | Value |+-------------+-----------------------------------------------------+| backup_id | 4dc8c496-85f1-438f-9eb7-56fb2aa04503 || volume_id | 7cf64dd4-4e35-455e-9b15-f2ad75b6e78b || volume_name | restore_backup_4dc8c496-85f1-438f-9eb7-56fb2aa04503 |+-------------+-----------------------------------------------------+
With the option --volume you can choose the name or ID of the volume to which you wish to restore your backup to. By default, a new volume will be created:
$ cinder list+------------+---------+----------------+----+-----------+--------+-----------+------------+| ID |Status |Name |Size|Volume Type|Bootable|Multiattach|Attached to |+------------+---------+----------------+----+-----------+--------+-----------+------------+| 78680241-..|available| apresstest1 |1 |- |false | False | || 7cf64dd4-..|available| restore_backup |1 |- |false | False | |_4dc8c496..+------------+---------+----------------+----+-----------+--------+-----------+------------+
As mentioned earlier, you can export the metadata of a volume backup. To do so, you will need to run this command as an admin user:
$ source keystonerc_admin$ cinder backup-export 4dc8c496-85f1-438f-9eb7-56fb2aa04503+----------------+------------------------------------------------------------------------+| Property | Value |+----------------+------------------------------------------------------------------------+| backup_service | cinder.backup.drivers.swift || backup_url | eyJzdGF0dXMiOiAihaWxhYmxlIiwgImRpc3BsYXlfbmFtZSI6IG51bGwsICJhdmGFiaWxp || | ... |+----------------+------------------------------------------------------------------------+
To import backup metadata, run the following command:
$ cinder backup-import eyJzdGF0dXMiOiAihaWxhYmxlIiwgI.....Manage Volume Snapshots
Using volume snapshots is another way to create a back up of an existing volume. Volume snapshots provide a way to obtain a nondisruptive copy of the volume. Snapshot will be stored in Cinder’s back-end storage system, as opposed to Swift Object Storage in cases of backups. In the default installation LVM will take care of creating snapshots. Do not confuse Cinder snapshots with Nova snapshots. You can use snapshot when the volume is in use by a VM, but from a consistency point of view, it is best if the volume is not connected to an instance when the snapshot is taken. It is possible to create new volumes from snapshots.
Let’s look at some examples of how to work with Cinder snapshots. First, you need to know the volume ID that will be used:
$ cinder list+--------------------+----------+----------+---+------+-------+---------+---------------+|ID |Status |Name |Size|Volume|Bootable|Multiattach| Attached to |Type+--------------------+----------+----------+---+------+-------+---------+---------------+| 78680241-7928-41d5-|available |apresstest1|1 |- |false |False | |b9bc-f2f82dad7bba+--------------------+----------+----------+---+------+-------+---------+---------------+
Next, you can enter a command to create a snapshot:
$ cinder snapshot-create --display-name apresstest1_snap1 78680241-7928-41d5-b9bc-f2f82dad7bba+-------------+--------------------------------------+| Property | Value |+-------------+--------------------------------------+| created_at | 2016-04-25T16:06:04.676842 || description | None || id | 393a436d-3112-425f-8faf-ca14e3db3092 || metadata | {} || name | apresstest1_snap1 || size | 1 || status | creating || volume_id | 78680241-7928-41d5-b9bc-f2f82dad7bba |+-------------+--------------------------------------+
Then you should make sure that a snapshot was created:
$ cinder snapshot-list+--------------------+------------------------+-----------+-------------------+------+|ID |Volume ID | Status | Name | Size |+--------------------+------------------------+-----------+-------------------+------+| 393a436d-3112-425f-| 78680241-7928-41d5- | available | apresstest1_snap1 | 1 |8faf-ca14e3db3092 b9bc-f2f82dad7bba+--------------------+------------------------+-----------+-------------------+------+
And now knowing the snapshot ID, you can show the details of the snapshot:
$ cinder snapshot-show 393a436d-3112-425f-8faf-ca14e3db3092+--------------------------------------------+--------------------------------------+| Property | Value |+--------------------------------------------+--------------------------------------+| created_at | 2016-04-25T16:06:04.000000 || description | None || id | 393a436d-3112-425f-8faf-ca14e3db3092 || metadata | {} || name | apresstest1_snap1 || os-extended-snapshot-attributes:progress | 100% || os-extended-snapshot-attributes:project_id | 1542af2b20d349d29710d8c4019ba202 || size | 1 || status | available || volume_id | 78680241-7928-41d5-b9bc-f2f82dad7bba |+--------------------------------------------+--------------------------------------+
At the end, you can create a new volume from the snapshot. As a part of the creation process, you can specify a new volume size in gigabytes:
# cinder create --display-name apresstest2_from_snap1 --snapshot-id 393a436d-3112-425f-8faf-ca14e3db3092 1+---------------------------------------+--------------------------------------+| Property | Value |+---------------------------------------+--------------------------------------+| attachments | [] || availability_zone | nova || bootable | false || consistencygroup_id | None || created_at | 2016-04-25T19:10:40.000000 || description | None || encrypted | False || id | 027c2640-8f96-4024-8a42-5265b263e32c || metadata | {} || multiattach | False || name | apresstest2_from_snap1 || os-vol-tenant-attr:tenant_id | 1542af2b20d349d29710d8c4019ba202 || os-volume-replication:driver_data | None || os-volume-replication:extended_status | None || replication_status | disabled || size | 1 || snapshot_id | 393a436d-3112-425f-8faf-ca14e3db3092 || source_volid | None || status | creating || user_id | ec92590f7ff84887ab9c0329f5ce850c || volume_type | None |+---------------------------------------+--------------------------------------+
You can also delete the snapshot if needed:
$ cinder snapshot-delete 393a436d-3112-425f-8faf-ca14e3db3092Figure 9-5 shows the Volume Snapshots tab in the Horizon web user interface.

Figure 9-5. Working with snapshots in Horizon web interface view
Manage Volumes Encryption
OpenStack supports two options for volume encryption. One of them is called the static shared secret, and the other is with support of the new Barbican OpenStack Key Manager Service. The easiest way to set up volume encryption is to use the static secret. The disadvantage of this method is that if shared secret is compromised, then all volumes will be compromised. To use the static shared secret-based encryption you need to add one common section to all configuration files: /etc/nova/nova.conf and /etc/cinder/cinder.conf:
[keymgr]fixed_key = my_fixed_key_value
After that you need to restart the correspondent services. Everything is ready now so you can create the new Cinder LUKS (Linux Unified Key Setup) volume type. LUKS specifies a platform-independent disk format for use in encryption tools. The reference implementation is based on the cryptsetup GNU/Linux tool with the dm-crypt back end.
$ source keystonerc_admin$ cinder type-create LUKS+--------------------------------------+------+-------------+-----------+| ID | Name | Description | Is_Public |+--------------------------------------+------+-------------+-----------+| 6e565bfa-a16a-4bc5-9bfe-1ec54969ec81 | LUKS | - | True |+--------------------------------------+------+-------------+-----------+
Now you can mark the LUKS volume type as encrypted and provide the necessary details such as cipher and key size:
$ cinder encryption-type-create --cipher aes-xts-plain64 --key_size 512 --control_location front-end LUKS nova.encryptors.luks.LuksEncryptor+-------------------------+---------------------+----------+----------+-------------------+|Volume Type ID |Provider |Cipher | Key Size | Control Location |+-------------------------+---------------------+----------+----------+-------------------+| 6e565bfa-a16a-4bc5- |nova.encryptors.luks |aes-xts- |512 |front-end |9bfe-1ec54969ec81 LuksEncryptor plain64+-------------------------+---------------------+---------+-----------+-------------------+
The corresponding screenshot of the admin web UI is shown in Figure 9-6.
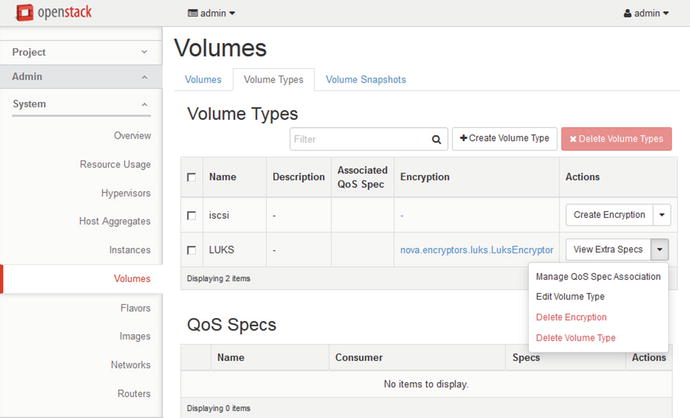
Figure 9-6. Volume Types tab in the Horizon web interface view
Now you can create the encrypted volume:
$ cinder create --display-name volEncr --volume-type LUKS 1+---------------------------------------+--------------------------------------+| Property | Value |+---------------------------------------+--------------------------------------+| attachments | [] || availability_zone | nova || bootable | false || consistencygroup_id | None || created_at | 2016-04-25T19:36:51.000000 || description | None || encrypted | True || id | d681fc68-8034-416d-9f46-b521c9c40b8e || metadata | {} || migration_status | None || multiattach | False || name | volEncr || os-vol-host-attr:host | None || os-vol-mig-status-attr:migstat | None || os-vol-mig-status-attr:name_id | None || os-vol-tenant-attr:tenant_id | 560a3e76bdc64ea2bee9316038b12793 || os-volume-replication:driver_data | None || os-volume-replication:extended_status | None || replication_status | disabled || size | 1 || snapshot_id | None || source_volid | None || status | creating || user_id | 15b05be5765b49698bd2c890399bb8ae || volume_type | LUKS |+---------------------------------------+--------------------------------------+
Set Up Storage Pools
Cinder allows you to use multiple storage pools and storage drivers at the same time. You can find the list, which contains more than 50 storage drivers, at the Support Matrix web page for Cinder ( https://wiki.openstack.org/wiki/CinderSupportMatrix ).
You need to enumerate all of the back ends when you want to use two or many back ends with different or the same type of drivers in the [DEFAULT] section of the cinder.conf configuration file:
[DEFAULT]enabled_backends = lvmA, lvmB, nfsA
Now you need to add sections with back-end specific information for each back end. Here is an example for two LVM back ends and one NFS back end:
[lvmA]volume_group=cinder-volumes-1volume_driver=cinder.volume.drivers.lvm.LVMISCSIDrivervolume_backend_name=LVM[lvmB]volume_group=cinder-volumes-2volume_driver=cinder.volume.drivers.lvm.LVMISCSIDrivervolume_backend_name=LVM[nfsA]nfs_shares_config=/etc/cinder/shares.txtvolume_driver=cinder.volume.drivers.nfs.NfsDrivervolume_backend_name=NFS
If you want to give the user the right to choose on which back end their volumes are created, then a volume type must be defined by the admin:
$ source ∼/keystonerc_admin$ cinder type-create lvm1$ cinder type-create lvm2$ cinder type-create nfs1$ cinder type-key lvm1 set volume_backend_name=lvmA$ cinder type-key lvm2 set volume_backend_name=lvmB$ cinder type-key nfs1 set volume_backend_name=nfsA
Review Questions
How many cinder-volume services exist in a typical installation?
One.
At least three.
One per storage back end.
One per database instance.
What parameter in the configuration file defines the public Identity API endpoint?
auth_uri
auth_ure
auth_url
auth_url_public
How can you create a volume with a name test and the size 1GB?
openstack volume create test 1
cinder create --name test
openstack volumes create --size 1 test
cinder create --display-name test 1
What is the Linux LVM partition number?
82
8e
83
1F
How does Cinder back up differ from snapshot (choose two)?
Back up is stored in Glance.
Back up is stored in Swift.
Back up can’t be incremental.
Back up can be incremental.
Answers to Review Questions
C
A
D
B
B and D