
This chapter covers 15% of the Certified OpenStack Administrator exam requirements.
Architecture and Components of Nova
OpenStack Compute (Nova) service is the heart of the OpenStack cloud. Its main goal is to manage basic virtual machines functions like creating, starting, stopping, and so on. Let’s look at the architecture and general parts of Nova. As with other services, Nova uses a message broker and database. As usual, by default the database is MariaDB and the message broker is RabbitMQ. The main services that support Nova are:
nova-api: This service receives REST API calls from other services and clients and responds to them.
nova-scheduler: This is Nova’s scheduling service. It takes requests for starting instances from the queue and selects a compute node for running a virtual machine on it. The selection of Hypervisor is based on its weight and filters. Filters can include an amount of memory, a requested availability zone, a set of group hosts, among others. The rules apply each time the instance is started or when migrating to another Hypervisor.
nova-conductor: This is the proxy service between the database and the nova-compute services. It helps with horizontal scalability.
nova-compute: This is the main part of an IaaS system. This daemon usually runs only on compute nodes. Its role is to rule Hypervisor through the Hypervisor’s specific API. It is designed to manage pools of computer resources and can work with widely available virtualization technologies.
nova-nonvncproxy and nova-consoleauth: These are two services for providing access to the instances console through remote access VNC protocol. The former acts as the VNC-proxy and the latter is responsible for authorization.
Figures 6-1 and 6-2 illustrate the process of starting an instance.

Figure 6-1. Instance provision workflow—Part I
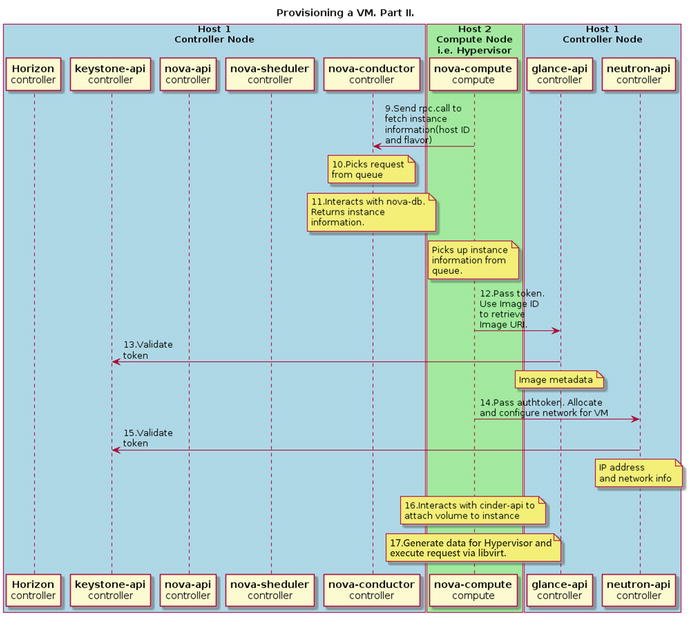
Figure 6-2. Instance provision workflow—Part II
In this example two hosts are used: compute host, which acts as the Hypervisor when nova-compute service is running, and controller node, with all its management services. The workflow of the starting instance is:
The client (in this particular example the client is Horizon web client, but it can be nova CLI command) asks keystone-api for authentication and generates the access token.
If authentication succeeds, the client sends a request for a running instance to nova-api. It is similar to the nova boot command.
Nova service validates the token and receives headers with roles and permissions from keystone-api.
Nova checks the database for conflicts with existing names of objects and creates a new entry for this instance in its database.
Nova-api sends the RPC for a scheduling instance to nova-scheduler service.
Nova-scheduler service picks up the request from the message queue.
Nova-scheduler service finds an appropriate compute host through the database via filters and weights. Then scheduler sends the RPC call to nova-compute service to launch the virtual machine.
Nova-compute service picks up the request from the message queue.
Nova-compute service asks nova-conductor to fetch information about the instance, for example: host ID, flavor, etc.
Nova-conductor service picks up the request from the message queue.
Nova-conductor service gets information about an instance from the database.
Nova-compute takes the instance information from the queue. At this moment the compute host knows what image will be used to start the instance. Nova-compute asks the glance-api service for a particular image URL.
Glance-api validates the token and returns the metadata of the image including the URL.
Nova-compute service passes a token to neutron-api and asks it to configure the network for the instance.
Neutron validates the token and configures the network.
Nova-compute interacts with cinder-api to attach the volume to the instance.
Nova-compute generates data for Hypervisor and executes the request via libvirt.
Now let’s have a look at the main configuration file of Nova: /etc/nova/nova.conf. Table 6-1 shows the main configuration options available from config.
Table 6-1. Main Configuration Options from /etc/cinder/cinder.conf
Examples of Config Options | Description |
|---|---|
[DEFAULT] my_ip = 10.0.2.15 | Management interface IP address of the controller node |
[DEFAULT] use_neutron = True firewall_driver = nova.virt.firewall.NoopFirewallDriver | Enables support for the networking service |
[DEFAULT] auth_strategy = keystone [keystone_authtoken] auth_uri = http:// 10.0.2.15:5000 auth_url = http:// 10.0.2.15:35357 auth_type = password project_domain_name = default user_domain_name = default project_name = service username = nova password = openstack | Authentication parameters: auth_uri-public Identity API endpoint and auth_url-admin Identity API endpoint Other parameters set a default project name, domain name, project name for services, and account information for Cinder user |
[api_database] connection=mysql+pymysql://nova_api:[email protected]/nova_api [database] connection=mysql+pymysql://nova:[email protected]/nova | Connection strings are used to connect to Nova’s databases |
[DEFAULT] rpc_backend = rabbit [oslo_messaging_rabbit] rabbit_host = localhost rabbit_port = 5672 rabbit_userid = guest rabbit_password = guest | RabbitMQ broker address, port, user name, and password |
[vnc] vncserver_listen = $my_ip vncserver_proxyclient_address = $my_ip | Management interface IP address of the VNC proxy |
[glance] api_servers=10.0.2.15:9292 | Location of the Image Service API |
Managing Flavors
Instance flavor is a template of a virtual machine that describes the main parameters. It is also known as an instance type. Immediately after installation of OpenStack cloud, you will have several predefined flavors. You can also add new flavors and delete existing ones. To list the flavors use the following command:
$ openstack flavor list+----+-----------+-------+------+-----------+-------+-----------+| ID | Name | RAM | Disk | Ephemeral | VCPUs | Is Public |+----+-----------+-------+------+-----------+-------+-----------+| 1 | m1.tiny | 512 | 1 | 0 | 1 | True || 2 | m1.small | 2048 | 20 | 0 | 1 | True || 3 | m1.medium | 4096 | 40 | 0 | 2 | True || 4 | m1.large | 8192 | 80 | 0 | 4 | True || 5 | m1.xlarge | 16384 | 160 | 0 | 8 | True |+----+-----------+-------+------+-----------+-------+-----------+
You can also use the Nova flavor-list command with the same result. To list the details of the flavor use:
$ openstack flavor show m1.tiny+----------------------------+---------+| Field | Value |+----------------------------+---------+| OS-FLV-DISABLED:disabled | False || OS-FLV-EXT-DATA:ephemeral | 0 || disk | 1 || id | 1 || name | m1.tiny || os-flavor-access:is_public | True || properties | || ram | 512 || rxtx_factor | 1.0 || swap | || vcpus | 1 |+----------------------------+---------+
By default only admin can list all the flavors and create new ones. Here is an example of creation of a new publicly available flavor:
$ source keystonerc_admin$ nova flavor-create --is-public true m10.tiny auto 400 3 1+-------+----------+-----------+------+-----------+------+-------+-------------+-----------+| ID | Name | Memory_MB | Disk | Ephemeral | Swap | VCPUs | RXTX_Factor | Is_Public |+-------+----------+-----------+------+-----------+------+-------+-------------+-----------+| 33e.. | m10.tiny | 400 | 3 | 0 | | 1 | 1.0 | True |+-------+----------+-----------+------+-----------+------+-------+-------------+-----------+
In this example a new flavor was created with the name m10.tiny that has a 3GB disk, 400Mb RAM, and 1 vCPU. You can delete the flavor with the command:
$ nova flavor-delete m10.tinyFor managing flavors in Horizon go to System ➤ Flavors.
Managing and Accessing an Instance Using a Keypair
Before launching instances, you should know how to work with OpenSSH keypairs. Getting access to virtual machines with OpenSSH key-based authentication is essential for using GNU/Linux in the cloud computing environment.
SSH (Secure Shell) allows you to authenticate users by using the private-public keypair. You should generate two linked cryptographic keys: public and private. The public key can be given to anyone. Your private key should be kept in a secure place—it is only yours. An instance with running the OpenSSH server that has your public key can issue a challenge that can only be answered by the system holding your private key. As a result, it can be authenticated through the presence of your key. This allows you to access a virtual machine in a way that does not require passwords.
OpenStack can store public keys and put them inside the instance at the moment it is started. It is your responsibility to keep the private key secured. If you lose the key, you can’t recover it. In that case you should remove the public key from your cloud and generate a new keypair. If somebody stole a private key, they can get access to your instances.
Tip
In a GNU/Linux system, public keys are stored in the ∼/.ssh/authorized_keys file.
Let’s start by creating a keypair. The corresponding command is:
$ nova keypair-add apresskey1 > ∼/apresskey1With this command you create a keypair. The private key is stored in the file ∼/apresskey1 at your workstation:
$ cat ∼/apresskey1-----BEGIN RSA PRIVATE KEY-----FliElAoNnAoKvQaELyeHnPaLwb8KlpnIC65PunAsRz5FsoBZ8VbnYhD76DON/BDVT...gdYjBM1CqqmUw54HkMJp8DLcYmBP+CRTwia9iSyY42Zw7eAi/QTIbQ574d8=-----END RSA PRIVATE KEY-----
A public key is stored in your OpenStack cloud and ready to use. You can check the list of public keys accessible to you with the command:
$ nova keypair-list+------------+-------------------------------------------------+| Name | Fingerprint |+------------+-------------------------------------------------+| apresskey1 | f4:64:d2:51:91:04:13:f7:4a:76:e7:36:a6:17:05:77 |+------------+-------------------------------------------------+
Before an SSH client can use a private key, you should make sure that the file has the correct GNU/Linux permissions:
$ chmod 600 apresskey1$ ls -l apresskey1-rw------- 1 andrey andrey 1684 Aug 24 18:05 apresskey1
If you want to create and delete keypairs in Horizon, go to Project ➤ Compute ➤ Access & Security ➤ Key Pairs.
When your instance is running and has a floating IP, you can connect to it with a similar command:
$ ssh -i ∼/apresskey1 [email protected]Option -i points to your private key. You will learn in the next section how to run an instance and how to insert a public key to it.
Launching, Shutting Down, and Terminating the Instance
In general, you need at least three parameters to start an instance: the name of an instance, the flavor, and the source of an instance. The instance source can be an image, snapshot, or block storage volume. At boot time you can also specify optional parameters like keypair, security group, user data files, and volume for persistent storage. Here is the general command line for instance launching:
$ nova boot --flavor FLAVOR_ID --image IMAGE_ID --key-name KEY_NAME--user-data USER_DATA_FILE --security-groups SEC_GROUP_NAME --meta KEY=VALUEINSTANCE_NAME
To be more specific, you can try this example:
$ nova boot --flavor m1.tiny --image cirros-raw --security-groups apress-sgroup --key-name apresskey1 apressinstance1+--------------------------------------+---------------------------------------------------+| Property | Value |+--------------------------------------+---------------------------------------------------+| OS-DCF:diskConfig | MANUAL || OS-EXT-AZ:availability_zone | || OS-EXT-STS:power_state | 0 || OS-EXT-STS:task_state | scheduling || OS-EXT-STS:vm_state | building || OS-SRV-USG:launched_at | - || OS-SRV-USG:terminated_at | - || accessIPv4 | || accessIPv6 | || adminPass | et4XhfLmwL7e || config_drive | || created | 2016-08-24T16:41:16Z || flavor | m1.tiny (1) || hostId | || id | a526612a-75ce-4856-930e-6bc4e7a54d77 || image | cirros-raw (039daa2e-6b3e-4e31-b1da-ab3e6feb8b30) || key_name | apresskey1 || metadata | {} || name | apressinstance1 || os-extended-volumes:volumes_attached | [] || progress | 0 || security_groups | apress-sgroup || status | BUILD || tenant_id | 16f44d2a075a4139a2a5425a42f1b447 || updated | 2016-08-24T16:41:16Z || user_id | 8e28b302669042e58e7ceb642d4f9708 |+--------------------------------------+---------------------------------------------------+
In this example you tried to run the instance with the name apressinstance1 by the flavor m1.tiny from an image named cirros-raw. You also specified the security group named apress-sgroup and the keypair apresskey1. To check the current state of the instances available to you, use the command:
$ nova list+-------------+-----------------+--------+------------+-------------+---------------------+| ID | Name | Status | Task State | Power State | Networks |+-------------+-----------------+--------+------------+-------------+---------------------+| a526612a-.. | apressinstance1 | ACTIVE | - | Running | demo-net=172.16.0.5 |+-------------+-----------------+--------+------------+-------------+---------------------+
You may want to connect to the instance console in your browser by the noVNC client, which is the VNC client using HTML5 with encryption support. To get the URL, use the command:
$ nova get-vnc-console apressinstance1 novnc+-------+--------------------------------------------------------------------------------+| Type | Url |+-------+--------------------------------------------------------------------------------+| novnc | http://10.0.2.15:6080/vnc_auto.html?token=9e2a16e9-904e-4764-b0fa-cebf396f55c6 |+-------+--------------------------------------------------------------------------------+
If you put the URL in the address bar of your browser, you can connect to the machine. The example is shown in Figure 6-3.
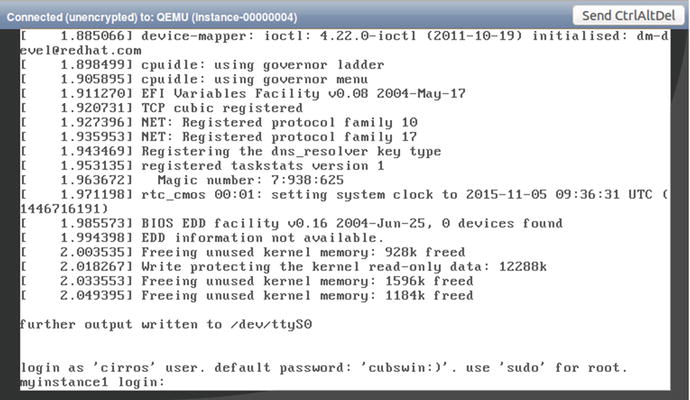
Figure 6-3. Example of console of running instance in browser
If you prefer to work with instances in GUI, you can use the Horizon web interface. For that go to Project ➤ Compute ➤ Instances. The example of the launch dialog is shown in Figure 6-4.
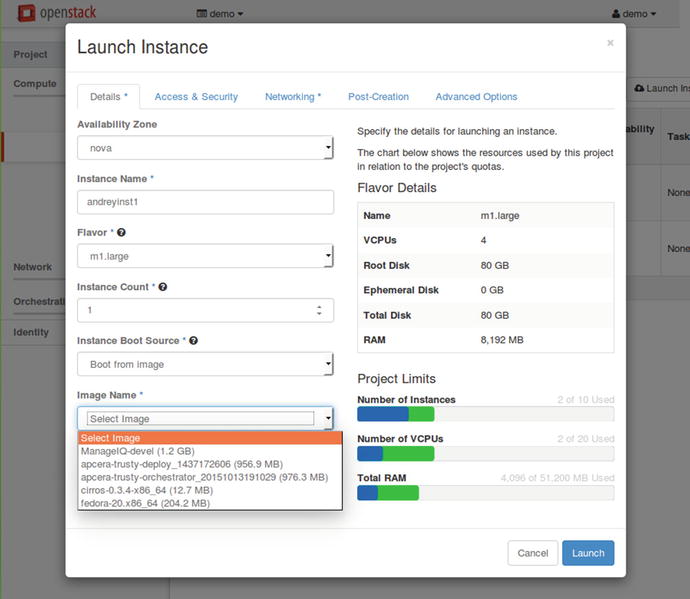
Figure 6-4. Example of a launch instance dialog window
In case of an error, you may see something like this:
$ nova list+-------------+-----------------+--------+------------+-------------+---------------------+| ID | Name | Status | Task State | Power State | Networks |+-------------+-----------------+--------+------------+-------------+---------------------+| a526612a-.. | apressinstance1 | ACTIVE | - | Running | demo-net=172.16.0.5 || 7ee3f1e8-.. | apressinstance2 | ERROR | - | NOSTATE | |+-------------+-----------------+--------+------------+-------------+---------------------+
To get the detailed information about the instance, you can run the command:
$ nova show apressinstance2+--------------------------------------+-------------------------------------------------+| Property | Value |+--------------------------------------+-------------------------------------------------+| OS-DCF:diskConfig | MANUAL || OS-EXT-AZ:availability_zone | || OS-EXT-STS:power_state | 0 || OS-EXT-STS:task_state | - || OS-EXT-STS:vm_state | error || OS-SRV-USG:launched_at | - || OS-SRV-USG:terminated_at | - || accessIPv4 | || accessIPv6 | || config_drive | || created | 2016-08-24T17:39:45Z || fault | {"message": "No valid host was found. || | There are not enough hosts available.", || | "code": 500, "created": "2016-08-24T17:39:46Z"} || flavor | m1.xlarge (5) || hostId | || id | 7ee3f1e8-278f-4212-9318-c35eb35fbd37 || image | cirros-raw (039daa2e-6b3e-4e31-b1da-ab3e6feb..) || key_name | apresskey1 || metadata | {} || name | apressinstance2 || os-extended-volumes:volumes_attached | [] || status | ERROR || tenant_id | 16f44d2a075a4139a2a5425a42f1b447 || updated | 2016-08-24T17:39:46Z || user_id | 8e28b302669042e58e7ceb642d4f9708 |+--------------------------------------+-------------------------------------------------+
The command for starting this instance was:
$ nova boot --flavor m1.xlarge --image cirros-raw --security-groups apress-sgroup --key-name apresskey1 apressinstance2From the output above, it is easy to see that there is no room to put such a big instance within flavor m1.xlarge. Flavor m1.xlarge requires 16GB of RAM.
The next command will completely delete this instance:
$ nova delete apressinstance2Request to delete server apressinstance2 has been accepted.
If you need to reboot your virtual machine, then use the command:
$ nova reboot apressinstance1Request to reboot server <Server: apressinstance1> has been accepted.
For a hard reset of the server you can add the --hard option. You may stop and start an instance if needed:
$ nova stop apressinstance1Request to stop server apressinstance1 has been accepted.$ nova list+-------------+-----------------+---------+------------+-------------+---------------------+| ID | Name | Status | Task State | Power State | Networks |+-------------+-----------------+---------+------------+-------------+---------------------+| 27a86b68-.. | apressinstance1 | SHUTOFF | - | Shutdown | demo-net=172.16.0.6 |+-------------+-----------------+---------+------------+-------------+---------------------+$ nova start apressinstance1Request to start server apressinstance1 has been accepted.$ nova list+-------------+-----------------+--------+------------+-------------+---------------------+| ID | Name | Status | Task State | Power State | Networks |+-------------+-----------------+--------+------------+-------------+---------------------+| 27a86b68-.. | apressinstance1 | ACTIVE | - | Running | demo-net=172.16.0.6 |+-------------+-----------------+--------+------------+-------------+---------------------+
Managing Instance Snapshots
OpenStack can create snapshots of instances, even if a virtual machine is running. In this case it is the user’s obligation to keep the data consistent. It is important to know that snapshot is not an instance recovery point. Snapshot is the same as a regular Glance image. You can start a new virtual machine from the snapshot of another virtual machine.
Let’s check whether there is at least one image in Glance and one instance:
$ nova image-list+--------------------------------------+----------------------+--------+--------+| ID | Name | Status | Server |+--------------------------------------+----------------------+--------+--------+| 039daa2e-6b3e-4e31-b1da-ab3e6feb8b30 | cirros-raw | ACTIVE | |+--------------------------------------+----------------------+--------+--------+$ nova list+-------------+-----------------+--------+------------+-------------+---------------------+| ID | Name | Status | Task State | Power State | Networks |+-------------+-----------------+--------+------------+-------------+---------------------+| 27a86b68-.. | apressinstance1 | ACTIVE | - | Running | demo-net=172.16.0.6 |+-------------+-----------------+--------+------------+-------------+---------------------+
Now you can create a snapshot from a running instance:
$ nova image-create apressinstance1 apressinstance1_snapAnd after that you can list the available images:
$ nova image-list+-------------+----------------------+--------+--------------------------------------+| ID | Name | Status | Server |+-------------+----------------------+--------+--------------------------------------+| 5b385bc6-.. | apressinstance1_snap | ACTIVE | 27a86b68-80ce-4e4b-925a-9d0f558bd49a || 039daa2e-.. | cirros-raw | ACTIVE | |+-------------+----------------------+--------+--------------------------------------+
As you can see, snapshot was added to the list. You are free to create a new instance from this snapshot:
$ nova boot --flavor m1.tiny --image apressinstance1_snap apressinstance_from_sn+--------------------------------------+---------------------------------------+| Property | Value |+--------------------------------------+---------------------------------------+| OS-DCF:diskConfig | MANUAL || OS-EXT-AZ:availability_zone | || OS-EXT-STS:power_state | 0 || OS-EXT-STS:task_state | scheduling || OS-EXT-STS:vm_state | building || OS-SRV-USG:launched_at | - || OS-SRV-USG:terminated_at | - || accessIPv4 | || accessIPv6 | || adminPass | Ciuh4iXBBzcX || config_drive | || created | 2016-08-26T14:19:54Z || flavor | m1.tiny (1) || hostId | || id | 46c28143-ab85-425e-a5a7-46014a43ec32 || image | apressinstance1_snap (5b385bc6-8d1..) || key_name | - || metadata | {} || name | apressinstance_from_sn || os-extended-volumes:volumes_attached | [] || progress | 0 || security_groups | default || status | BUILD || tenant_id | 16f44d2a075a4139a2a5425a42f1b447 || updated | 2016-08-26T14:19:54Z || user_id | 8e28b302669042e58e7ceb642d4f9708 |+--------------------------------------+---------------------------------------+
Managing Quotas
A quota limits the number of available resources. The default number of resources allowed per tenant is defined in the main configuration file: /etc/nova/nova.conf. Here is an example:
# Number of instances allowed per project (integer value)quota_instances=10# Number of instance cores allowed per project (integer value)quota_cores=20# Megabytes of instance RAM allowed per project (integer value)quota_ram=51200# Number of floating IPs allowed per project (integer value)quota_floating_ips=10# Number of fixed IPs allowed per project (this should be at least the number# of instances allowed) (integer value)quota_fixed_ips=-1# Number of metadata items allowed per instance (integer value)quota_metadata_items=128# Number of injected files allowed (integer value)quota_injected_files=5# Number of bytes allowed per injected file (integer value)quota_injected_file_content_bytes=10240# Length of injected file path (integer value)quota_injected_file_path_length=255# Number of security groups per project (integer value)quota_security_groups=10# Number of security rules per security group (integer value)quota_security_group_rules=20# Number of key pairs per user (integer value)quota_key_pairs=100
Regular users can get their quotas by using the nova quota-show command:
$ nova quota-show+-----------------------------+-------+| Quota | Limit |+-----------------------------+-------+| instances | 10 || cores | 20 || ram | 51200 || floating_ips | 10 || fixed_ips | -1 || metadata_items | 128 || injected_files | 5 || injected_file_content_bytes | 10240 || injected_file_path_bytes | 255 || key_pairs | 100 || security_groups | 10 || security_group_rules | 20 || server_groups | 10 || server_group_members | 10 |+-----------------------------+-------+
With the command nova quota-defaults, users can see the default quotas for comparison with their own quotas. Users can see a part of the current quotas in a graphical view on the Overview page of the project. An example is shown in Figure 6-5.
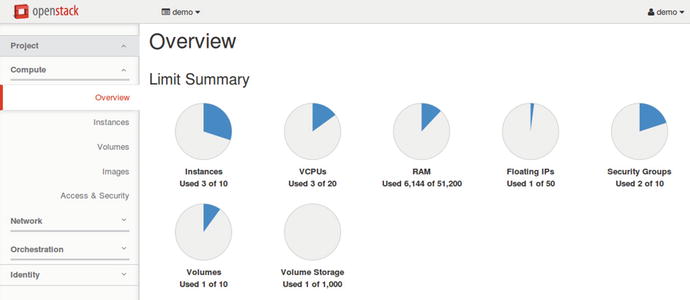
Figure 6-5. User’s overview of the current quota status
Admins can do the same but for any project with the --tenant_id option. If an admin needs to change the quotas for a particular project, this command would be used:
$ source keystonerc_admin$ nova quota-update 16f44d2a075a4139a2a5425a42f1b447 --instances 4$ source keystonerc_demo$ nova quota-show | grep instances| instances | 4 |
Admins can manage quotas on a per-project basis in Horizon by going to Identity ➤ Projects ➤ Modify Quotas and accessing the drop-down menu to the right of the project’s name.
Getting Nova Stats
First let’s grab the list of all Hypervisors:
$ nova hypervisor-list+----+---------------------+-------+---------+| ID | Hypervisor hostname | State | Status |+----+---------------------+-------+---------+| 1 | centos7.test.local | up | enabled |+----+---------------------+-------+---------+
In this example only one compute node is presented and it is up and running. You can check which instances are running at this particular host:
$ nova hypervisor-servers centos7.test.local+----------------------------+-------------------+---------------+---------------------+| ID | Name | Hypervisor ID | Hypervisor Hostname |+----------------------------+-------------------+---------------+---------------------+| 27a86b68-80ce-4e4b-925a-.. | instance-0000000b | 1 | centos7.test.local || ca0b7a1e-8aca-41e4-ac2d-.. | instance-0000000c | 1 | centos7.test.local |+----------------------------+-------------------+---------------+---------------------+
To get a summary of resource usage of all of the instances running on the host, use the command:
$ nova host-describe centos7.test.local+--------------------+----------------------------------+-----+-----------+---------+| HOST | PROJECT | cpu | memory_mb | disk_gb |+--------------------+----------------------------------+-----+-----------+---------+| centos7.test.local | (total) | 1 | 3952 | 49 || centos7.test.local | (used_now) | 3 | 2048 | 3 || centos7.test.local | (used_max) | 3 | 1536 | 3 || centos7.test.local | 16f44d2a075a4139a2a5425a42f1b447 | 3 | 1536 | 3 |+--------------------+----------------------------------+-----+-----------+---------+
To search for all running virtual machines, you can use the Nova database:
# nova-manage vm list | grep activeapressinstance2 centos7.test.local m1.tiny active 2016-08-24 18:55:30+00:00 039daa2e-6b3e-4e31-b1da-ab3e6feb8b30 16f44d2a075a4139a2a5425a42f1b447 8e28b302669042e58e7ceb642d4f9708 None 0apressinstance1 centos7.test.local m1.tiny active 2016-08-24 18:14:01+00:00 039daa2e-6b3e-4e31-b1da-ab3e6feb8b30 16f44d2a075a4139a2a5425a42f1b447 8e28b302669042e58e7ceb642d4f9708 None 0
And as admin you can see an overall picture of all Hypervisors in Horizon. An example is shown in Figure 6-6.
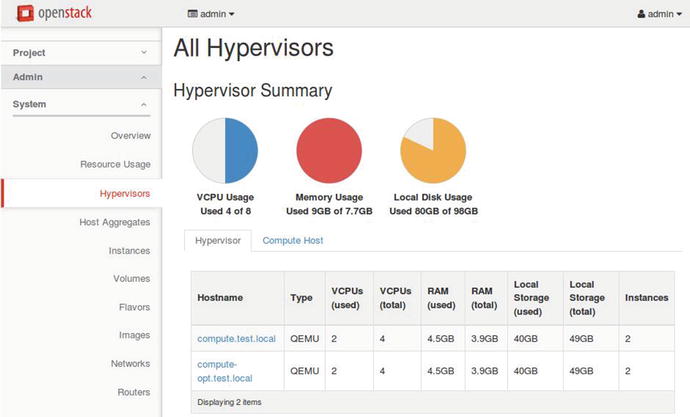
Figure 6-6. Example of the Hypervisors’ summary picture
If needed you can easily get diagnostic information about any instance:
$ nova diagnostics 27a86b68-80ce-4e4b-925a-9d0f558bd49a+---------------------------+----------+| Property | Value |+---------------------------+----------+| memory | 524288 || memory-actual | 524288 || memory-rss | 46568 || tap550ae562-c0_rx | 8710 || tap550ae562-c0_rx_drop | 0 || tap550ae562-c0_rx_errors | 0 || tap550ae562-c0_rx_packets | 80 || tap550ae562-c0_tx | 10614 || tap550ae562-c0_tx_drop | 0 || tap550ae562-c0_tx_errors | 0 || tap550ae562-c0_tx_packets | 106 || vda_errors | -1 || vda_read | 20419584 || vda_read_req | 1151 || vda_write | 434176 || vda_write_req | 125 |+---------------------------+----------+
And at the end, you can get a summary of the statistics for each tenant:
$ nova usage-listUsage from 2016-07-30 to 2016-08-28:+----------------------------------+---------+--------------+-----------+---------------+| Tenant ID | Servers | RAM MB-Hours | CPU Hours | Disk GB-Hours |+----------------------------------+---------+--------------+-----------+---------------+| 16f44d2a075a4139a2a5425a42f1b447 | 6 | 399400.59 | 780.08 | 780.08 || 3e52946ffa538409b34cc3849201aa78 | 2 | 124000.30 | 58.02 | 120.06 |+----------------------------------+---------+--------------+-----------+---------------+
Verifying Operation and Managing Nova Compute Servers
You can check whether all Nova servers are started and active by using the systemctl command:
# systemctl status *nova* -n 0● openstack-nova-compute.service - OpenStack Nova Compute ServerLoaded: loaded (/usr/lib/systemd/system/openstack-nova-compute.service; enabled; vendor preset: disabled)Active: active (running) since Sat 2016-08-27 15:20:00 MSK; 2h 40min agoMain PID: 1728 (nova-compute)CGroup: /system.slice/openstack-nova-compute.service└─1728 /usr/bin/python2 /usr/bin/nova-compute● openstack-nova-conductor.service - OpenStack Nova Conductor ServerLoaded: loaded (/usr/lib/systemd/system/openstack-nova-conductor.service; enabled; vendor preset: disabled)Active: active (running) since Sat 2016-08-27 15:19:54 MSK; 2h 40min agoMain PID: 982 (nova-conductor)CGroup: /system.slice/openstack-nova-conductor.service└─982 /usr/bin/python2 /usr/bin/nova-conductor● openstack-nova-novncproxy.service - OpenStack Nova NoVNC Proxy ServerLoaded: loaded (/usr/lib/systemd/system/openstack-nova-novncproxy.service; enabled; vendor preset: disabled)Active: active (running) since Sat 2016-08-27 15:19:08 MSK; 2h 40min agoMain PID: 1014 (nova-novncproxy)CGroup: /system.slice/openstack-nova-novncproxy.service└─1014 /usr/bin/python2 /usr/bin/nova-novncproxy --web /usr/share/novnc/● openstack-nova-consoleauth.service - OpenStack Nova VNC console auth ServerLoaded: loaded (/usr/lib/systemd/system/openstack-nova-consoleauth.service; enabled; vendor preset: disabled)Active: active (running) since Sat 2016-08-27 15:19:54 MSK; 2h 40min agoMain PID: 989 (nova-consoleaut)CGroup: /system.slice/openstack-nova-consoleauth.service└─989 /usr/bin/python2 /usr/bin/nova-consoleauth● openstack-nova-api.service - OpenStack Nova API ServerLoaded: loaded (/usr/lib/systemd/system/openstack-nova-api.service; enabled; vendor preset: disabled)Active: active (running) since Sat 2016-08-27 15:20:00 MSK; 2h 40min agoMain PID: 1010 (nova-api)CGroup: /system.slice/openstack-nova-api.service├─1010 /usr/bin/python2 /usr/bin/nova-api├─1879 /usr/bin/python2 /usr/bin/nova-api├─1896 /usr/bin/python2 /usr/bin/nova-api● openstack-nova-scheduler.service - OpenStack Nova Scheduler ServerLoaded: loaded (/usr/lib/systemd/system/openstack-nova-scheduler.service; enabled; vendor preset: disabled)Active: active (running) since Sat 2016-08-27 15:20:19 MSK; 2h 39min agoMain PID: 1017 (nova-scheduler)CGroup: /system.slice/openstack-nova-scheduler.service└─1017 /usr/bin/python2 /usr/bin/nova-scheduler
As you can see in this example, all services are running on the same host. In the production environment, all are running on the control nodes except nova-compute and nova-compute, which are running on the compute nodes. You can also use nova host-list for listing the hosts and the Nova-related services that run on them:
$ nova host-list+--------------------+-------------+----------+| host_name | service | zone |+--------------------+-------------+----------+| centos7.test.local | consoleauth | internal || centos7.test.local | scheduler | internal || centos7.test.local | conductor | internal || centos7.test.local | compute | nova |+--------------------+-------------+----------+
Let’s check for the presence of Nova service in the Keystone services catalog:
$ source keystonerc_admin$ openstack service show nova+-------------+----------------------------------+| Field | Value |+-------------+----------------------------------+| description | Openstack Compute Service || enabled | True || id | fae23070b15b428f9cb8b59e5cb2323f || name | nova || type | compute |+-------------+----------------------------------+
For troubleshooting, you may also need to know where the glance-api endpoint is:
$ openstack endpoint show nova+--------------+----------------------------------------+| Field | Value |+--------------+----------------------------------------+| adminurl | http://10.0.2.15:8774/v2/%(tenant_id)s || enabled | True || id | a1472fcf100140c3a0d1cbf42c35502b || internalurl | http://10.0.2.15:8774/v2/%(tenant_id)s || publicurl | http://10.0.2.15:8774/v2/%(tenant_id)s || region | RegionOne || service_id | fae23070b15b428f9cb8b59e5cb2323f || service_name | nova || service_type | compute |+--------------+----------------------------------------+
The Nova service is listening for incoming connections at the IP address 10.0.2.15 and port number 8774.
You may also want to check Nova’s log files. With the help of the lsof command, you can enumerate the log files and services that are using it:
# lsof /var/log/nova/*COMMAND PID USER FD TYPE DEVICE SIZE/OFF NODE NAMEnova-cond 982 nova 3w REG 253,0 100016 136665685 /var/log/nova/nova-conductor.lognova-cons 989 nova 3w REG 253,0 414239 136665681 /var/log/nova/nova-consoleauth.lognova-cert 990 nova 3w REG 253,0 192460 136665677 /var/log/nova/nova-cert.lognova-api 1010 nova 3w REG 253,0 6150041 136538093 /var/log/nova/nova-api.lognova-novn 1014 nova 3w REG 253,0 28222 136665680 /var/log/nova/nova-novncproxy.lognova-sche 1017 nova 3w REG 253,0 696714 136665683 /var/log/nova/nova-scheduler.lognova-comp 1728 nova 3w REG 253,0 7423359 136665687 /var/log/nova/nova-compute.lognova-api 1879 nova 3w REG 253,0 6150041 136538093 /var/log/nova/nova-api.lognova-api 1896 nova 3w REG 253,0 6150041 136538093 /var/log/nova/nova-api.log
Review Questions
Which service acts as a proxy service between the database and nova-compute services?
nova-conductor
nova-nonvncproxy
nova-api
nova-scheduler
How can you add a new flavor with name m5.tiny that has 5GB disk, 2 vCPU, and 500Mb RAM?
nova flavor-create --is-public true m5.tiny auto 500 2 5
nova flavor-create --is-public true m5.tiny auto 5 2 500
nova flavor-create --is-public true m5.tiny auto 500 5 2
nova flavor-create --is-public true m5.tiny auto 5 500 2
Which GNU/Linux permissions should be applied to the private SSH key?
640
660
600
620
How can the regular user get Nova quotes for the project?
nova quota-list
nova quota-show
nova show-quota
nova list-quota
How can you get summary statistics for all tenants?
nova show-stat
nova usage-list all
nova statistics
nova usage-list
Answers to Review Questions
A
C
C
B
D