
This chapter covers 16% of the Certified OpenStack Administrator exam requirements.
Architecture and Components of Neutron
OpenStack Networking is one of the most complicated OpenStack services. Let’s start by looking at the architecture and general concepts of Neutron. Figure 5-1 shown the objects in the OpenStack Networking.
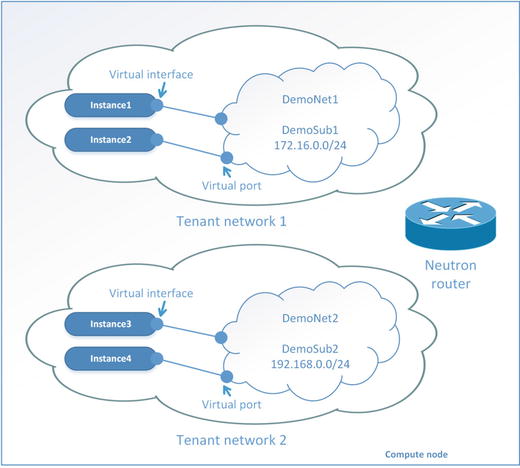
Figure 5-1. Logical objects in the OpenStack Networking service
There are several components of most importance in OpenStack Networking:
Tenant network: A virtual network that provides connectivity between entities. The network consists of subnets, and each subnet is a logical subdivision of an IP network. A subnet can be private or public. Virtual machines can get access to an external world through the public subnet. If a virtual machine is connected only to the private subnet, then only other virtual machines from this particular network can access it. Only a user with an admin role can create a public network.
Router: A virtual network device that passes network traffic between different networks. A router can have one gateway and many connected subnets.
Security Group: The set of ingress and egress firewall rules that can be applied to one or many virtual machines. It is possible to change a Security Group at runtime.
Floating IP address: An IP address that can be associated with a virtual machine so that the instance has the same IP from the public network each time it boots.
Port: A virtual network port within OpenStack Networking. It is a connection between the subnet and vNIC or virtual router.
vNIC (virtual Network Interface Card) or VIF (Virtual Network Interface): An interface that is plugged into a port in a network.
Let’s continue this discussion by learning more about Neutron architecture (see Figure 5-2).
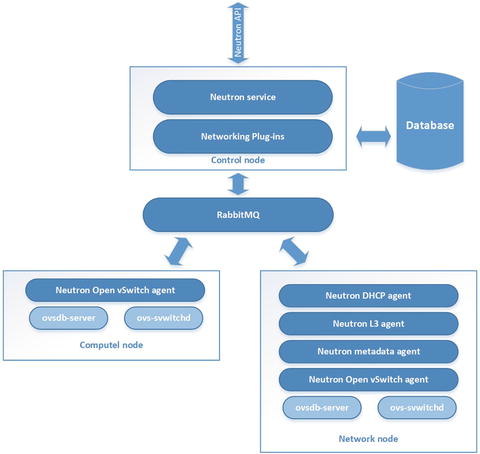
Figure 5-2. Architecture of OpenStack Networking sevice
Upstream documentation from docs.openstack.org defines several types of OpenStack nodes. Neutron is usually spread across three of them. API service usually exists at the control node. Open vSwitch and client-side Neutron agents are usually started at the Hypervisor or Compute node. And all server-side components of the OpenStack Networking service work on Networks nodes, which can be gateways to an external network.
Neutron consists of several services that are implemented as standard GNU/Linux daemons:
neutron-server: The main service of Neutron. Accepts and routes API requests through message bus to the OpenStack Networking plug-ins for action.
neutron-openvswitch-agent: Receives commands from neutron-server and sends them to Open vSwitch (OVS) for execution. The neutron-openvswitch-agent uses the local GNU/Linux commands for OVS management.
neutron-l3-agent: Provides routing and Network Address Translation (NAT) using standard GNU/Linux technologies like Linux Routing and Network Namespaces.
neutron-dhcp-agent: Manages dnsmasq services. Dnsmasq is a lightweight Dynamic Host Configuration Protocol (DHCP) and caching DNS server. Also neutron-dhcp-agent starts proxies for the metadata server.
neutron-metadata-agent: Provides the ability for instances to get information such as hostname, SSH keys, etc. Virtual machines can request HTTP protocol information such as an URL http://169.254.169.254 at boot time. Usually this happens with scripts like cloud-init ( https://launchpad.net/cloud-init ). Agent acts as a proxy to nova-api for retrieving metadata.
Neutron also uses Open vSwitch. Its configuration will be discussed in the next section of this chapter. Table 5-1 lists what type of node (Compute, Network, or Control) services are started and the location of their configs.
Table 5-1. OpenStack Neutron Services and Their Placement
Service | Node Type | Configuration Files |
|---|---|---|
neutron-service | Control | /etc/neutron/neutron.conf |
neutron-openvswitch-agent | Network and Compute | /etc/neutron/plugins/ml2/openvswitch_agent.ini |
neutron-l3-agent | Network | /etc/neutron/l3_agent.ini |
neutron-dhcp-agent | Network | /etc/neutron/dhcp_agent.ini |
neutron-metadata-agent | Network | /etc/neutron/metadata_agent.ini |
Modular Layer 2 agent (it is not run as a daemon) | Network | /etc/neutron/plugins/ml2/ml2_conf.ini and /etc/neutron/plugin.ini (symbolic link to ml2_conf.ini) |
Architecture of Open vSwitch
The important part of networking in the OpenStack cloud is OVS. The web site for OVS with documentation and source code is http://openvswitch.org/ . Open vSwitch is not a part of OpenStack project. However, OVS is used in most implementations of OpenStack clouds. It has also been integrated into many other virtual management systems including OpenQRM, OpenNebula, and oVirt. Open vSwitch can provide support for protocols such as OpenFlow, GRE, VLAN, VXLAN, NetFlow, sFlow, SPAN, RSPAN, and LACP. It can operate in distributed configurations with a central controller.
Open vSwitch by itself consists of several components:
GNU/Linux kernel module openswitch_mod.ko: The module plays the role of ASIC (application-specific integrated circuit) in hardware switches. This module is an engine of traffic processing.
Daemon ovs-vswitchd: The daemon is in charge of management and logic for data transmitting.
Daemon ovsdb-server: The daemon is used for the internal database. It also provides RPC (remote procedure call) interfaces to one or more Open vSwitch databases (OVSDBs).
Most likely you will not need to manage Open vSwitch at the exam time, but commands can be useful. Let’s see some examples of using the management utility ovs-vsctl for interacting with OVS. First, let’s check for the version of Open vSwitch:
# ovs-vsctl -Vovs-vsctl (Open vSwitch) 2.4.0Compiled Oct 7 2015 18:01:06DB Schema 7.12.1
You can create a new bridge and delete it with the help of the commands:
# ovs-vsctl add-br br-new# ovs-vsctl del-br br-new
The same with adding or removing a physical interface to or from the bridge:
# ovs-vsctl add-port br-ex enp0s3# ovs-vsctl del-port br-ex enp0s3
The most interesting command is ovs-vsctl show. The output of this command is printed from the lab environment with three nodes:
# ovs-vsctl show22a0e0a2-7ac2-493a-9398-65e5683835e9Bridge br-intfail_mode: securePort br-intInterface br-inttype: internalPort "tap7fd27c60-32"tag: 1Interface "tap7fd27c60-32"type: internalPort patch-tunInterface patch-tuntype: patchoptions: {peer=patch-int}Port int-br-exInterface int-br-extype: patchoptions: {peer=phy-br-ex}Port "qr-8d2a382b-01"tag: 1Interface "qr-8d2a382b-01"type: internalBridge br-exPort "eth1"Interface "eth1"Port br-exInterface br-extype: internalPort "qg-dbd535f0-05"Interface "qg-dbd535f0-05"type: internalPort phy-br-exInterface phy-br-extype: patchoptions: {peer=int-br-ex}Bridge br-tunfail_mode: securePort "gre-c0a87ad2"Interface "gre-c0a87ad2"type: greoptions: {df_default="true", in_key=flow, local_ip="10.0.2.15", out_key=flow, remote_ip="10.0.2.20"}Port br-tunInterface br-tuntype: internalPort patch-intInterface patch-inttype: patchoptions: {peer=patch-tun}Port "gre-c0a87ad7"Interface "gre-c0a87ad7"type: greoptions: {df_default="true", in_key=flow, local_ip="10.0.2.15", out_key=flow, remote_ip="10.0.2.30"}ovs_version: "2.4.0"
As you can see, three bridges exist:
Integration bridge (br-int): There is a single integration bridge on each node. This bridge acts as a virtual switch where all virtual network cards from all virtual machines are connected. OVS Neutron agent automatically creates the integration bridge.
External bridge (br-ex): This bridge is for interconnection with external networks. In our example, physical interface eth1 is connected to this bridge.
Tunnel bridge (br-tun): This bridge is a virtual switch like br-int. It connects the GRE and VXLAN tunnel endpoints. As you can see in our particular example, it connects the node with the IP address 10.0.2.15 and two others with IP 10.0.2.20 and 10.0.2.30. In our example, a GRE tunnel was used.
Here is an example of the code from a config file for neutron-openvswitch-agent:
# grep -o '^[^#]*' /etc/neutron/plugins/ml2/openvswitch_agent.ini[DEFAULT][agent]tunnel_types =vxlan,grevxlan_udp_port = 4789l2_population = Falsedrop_flows_on_start = False[ovs]integration_bridge = br-inttunnel_bridge = br-tunlocal_ip = 10.0.2.15enable_tunneling=True[securitygroup]firewall_driver = neutron.agent.linux.iptables_firewall.OVSHybridIptablesFirewallDriver
See the Tip in Chapter 4 for an explanation of how RegEx can be used in the grep command.
Manage Network Resources
Now let’s go through the process of creating all the necessary network resources for connecting an instance to the external world. For that you can use the neutron command and sometimes nova. Both commands have built-in help. Use nova help <sub-command> or neutron help sub-command for getting help for a particular sub-command. First, let’s create a flat external network. You should have admin role before doing that:
$ source keystonerc_demo$ neutron net-create ext-net --router:external True --provider:physical_network external --provider:network_type flatCreated a new network:+---------------------------+--------------------------------------+| Field | Value |+---------------------------+--------------------------------------+| admin_state_up | True || availability_zone_hints | || availability_zones | || created_at | 2016-07-17T16:39:51 || description | || id | 4716a0c7-70c9-44f1-a276-6e159400ba78 || ipv4_address_scope | || ipv6_address_scope | || is_default | False || mtu | 1500 || name | ext-net || provider:network_type | flat || provider:physical_network | external || provider:segmentation_id | || router:external | True || shared | False || status | ACTIVE || subnets | || tags | || tenant_id | ae8d3e3f5cff4a959f1ae1cfe9e80d6d || updated_at | 2016-07-17T16:39:51 |+---------------------------+--------------------------------------+
Tip
If you can’t create a network with type flat, then add flat to the type_drivers option in the /etc/neutron/plugins/ml2/ml2_conf.ini config file. After changes, you will need to restart Neutron service.
The next step is to create a subnet for this network. It will be an external existing network and you will need to disable DHCP for this network:
$ neutron subnet-create ext-net --name ext-subnet --allocation-pool start=10.0.2.100,end=10.0.2.200 --disable-dhcp --gateway 10.0.2.2 10.0.2.0/24Created a new subnet:+-------------------+----------------------------------------------+| Field | Value |+-------------------+----------------------------------------------+| allocation_pools | {"start": "10.0.2.100", "end": "10.0.2.200"} || cidr | 10.0.2.0/24 || created_at | 2016-07-17T16:43:48 || description | || dns_nameservers | || enable_dhcp | False || gateway_ip | 10.0.2.2 || host_routes | || id | 40d6da8b-b7eb-437e-8e84-ef018b773e4a || ip_version | 4 || ipv6_address_mode | || ipv6_ra_mode | || name | ext-subnet || network_id | 4716a0c7-70c9-44f1-a276-6e159400ba78 || subnetpool_id | || tenant_id | ae8d3e3f5cff4a959f1ae1cfe9e80d6d || updated_at | 2016-07-17T16:43:48 |+-------------------+----------------------------------------------+
If you use Horizon for net and subnet creation, go to Project ➤ Network ➤ Networks and click the “Create Network” button. You will then see an opened window as shown in Figure 5-3. By clicking Next, you will then go to the Subnet tab.

Figure 5-3. Net creating dialog in Horizon
Now it is possible to check the work that has already been done. First, let’s check the list of all networks:
$ neutron net-list+----------------------------------+---------+-----------------------------------------------+| id | name | subnets |+---------------------------------+----------+------------------------------------------------+| 4716a0c7-70c9-44f1-a276-6e15.. | ext-net | 40d6da8b-b7eb-437e-8e84-ef018b773e4a 10.0.2.0/24 |+---------------------------------+----------+------------------------------------------------+
Then you may want to check the details of ext-net:
$ neutron net-show ext-net+---------------------------+--------------------------------------+| Field | Value |+---------------------------+--------------------------------------+| admin_state_up | True || availability_zone_hints | || availability_zones | nova || created_at | 2016-07-17T16:39:51 || description | || id | 4716a0c7-70c9-44f1-a276-6e159400ba78 || ipv4_address_scope | || ipv6_address_scope | || is_default | False || mtu | 1500 || name | ext-net || provider:network_type | flat || provider:physical_network | external || provider:segmentation_id | || router:external | True || shared | False || status | ACTIVE || subnets | 40d6da8b-b7eb-437e-8e84-ef018b773e4a || tags | || tenant_id | ae8d3e3f5cff4a959f1ae1cfe9e80d6d || updated_at | 2016-07-17T16:39:51 |+---------------------------+--------------------------------------+
The corresponding Networks screen from Horizon is shown in Figure 5-4.

Figure 5-4. Properties of the chosen network in Horizon
The rest of the work you can do as a demo user from the demo project. Actually the only action where you need an admin role is when you name the network as external. Now let’s create the tenant network:
$ source keystonerc_demo$ neutron net-create demo-netCreated a new network:+-------------------------+--------------------------------------+| Field | Value |+-------------------------+--------------------------------------+| admin_state_up | True || availability_zone_hints | || availability_zones | || created_at | 2016-07-17T16:45:52 || description | || id | da07837c-74a5-471b-a79a-810dd3c2a91f || ipv4_address_scope | || ipv6_address_scope | || mtu | 1450 || name | demo-net || router:external | False || shared | False || status | ACTIVE || subnets | || tags | || tenant_id | 16f44d2a075a4139a2a5425a42f1b447 || updated_at | 2016-07-17T16:45:53 |+-------------------------+--------------------------------------+
You will also need a subnet for your network:
$ neutron subnet-create demo-net --name demo-subnet --gateway 172.16.0.1 172.16.0.0/24Created a new subnet:+-------------------+------------------------------------------------+| Field | Value |+-------------------+------------------------------------------------+| allocation_pools | {"start": "172.16.0.2", "end": "172.16.0.254"} || cidr | 172.16.0.0/24 || created_at | 2016-07-17T16:46:53 || description | || dns_nameservers | || enable_dhcp | True || gateway_ip | 172.16.0.1 || host_routes | || id | 51a7950a-c132-462e-8b49-72b82ac7a0d2 || ip_version | 4 || ipv6_address_mode | || ipv6_ra_mode | || name | demo-subnet || network_id | da07837c-74a5-471b-a79a-810dd3c2a91f || subnetpool_id | || tenant_id | 16f44d2a075a4139a2a5425a42f1b447 || updated_at | 2016-07-17T16:46:53 |+-------------------+------------------------------------------------+
You will then need to create a virtual router for routing traffic:
$ neutron router-create demo-routerCreated a new router:+-------------------------+--------------------------------------+| Field | Value |+-------------------------+--------------------------------------+| admin_state_up | True || availability_zone_hints | || availability_zones | || description | || external_gateway_info | || id | c61bbed9-ee0e-4b9f-b385-1e778b915a1b || name | demo-router || routes | || status | ACTIVE || tenant_id | 16f44d2a075a4139a2a5425a42f1b447 |+-------------------------+--------------------------------------+
Now connect the router with the tenant subnet from one side:
$ neutron router-interface-add demo-router demo-subnetAdded interface 875a80bc-adb4-4cff-b029-91af84f6fc86 to router demo-router.
And from the other side you will need to set ext-net as a gateway for the router:
$ neutron router-gateway-set demo-router ext-netSet gateway for router demo-router
You can now create a virtual router in Horizon by going to Project ➤ Network ➤ Router tab. An example of the router properties is shown in Figure 5-5.

Figure 5-5. Properties of virtual router in Horizon
Now you can check all of the ports. Remember, it is the connection between a subnet and vNIC or a virtual router:
$ source keystonerc_admin$ neutron port-list+---------+------+-------------------+---------------------------------------------------+| id | name | mac_address | fixed_ips |+---------+------+-------------------+---------------------------------------------------+| 5c4aa.. | | fa:16:3e:58:a8:71 | {"subnet_id": "51..", "ip_address": "172.16.0.2"} || 875a8.. | | fa:16:3e:9f:f4:bb | {"subnet_id": "51..", "ip_address": "172.16.0.1"} || 95db6.. | | fa:16:3e:64:e2:6d | {"subnet_id": "40..", "ip_address": "10.0.2.100"} |+---------+------+-------------------+---------------------------------------------------+
Then you can get information about any chosen port:
$ neutron port-show 875a80bc-adb4-4cff-b029-91af84f6fc86+-----------------------+--------------------------------------------------------+| Field | Value |+-----------------------+--------------------------------------------------------+| admin_state_up | True || allowed_address_pairs | || binding:host_id | centos7.test.local || binding:profile | {} || binding:vif_details | {"port_filter": true, "ovs_hybrid_plug": true} || binding:vif_type | ovs || binding:vnic_type | normal || created_at | 2016-07-17T16:48:31 || description | || device_id | c61bbed9-ee0e-4b9f-b385-1e778b915a1b || device_owner | network:router_interface || dns_name | || extra_dhcp_opts | || fixed_ips | {"subnet_id": "51a7950a-c132-462e-8b49-72b82ac7a0d2", || | "ip_address": "172.16.0.1"} || id | 875a80bc-adb4-4cff-b029-91af84f6fc86 || mac_address | fa:16:3e:9f:f4:bb || name | || network_id | da07837c-74a5-471b-a79a-810dd3c2a91f || security_groups | || status | ACTIVE || tenant_id | 16f44d2a075a4139a2a5425a42f1b447 || updated_at | 2016-07-17T16:48:35 |+-----------------------+--------------------------------------------------------+
At this stage, you can start the instance and get an overall picture of configured network by going to Project ➤ Network ➤ Network Topology. It is shown in Figure 5-6.
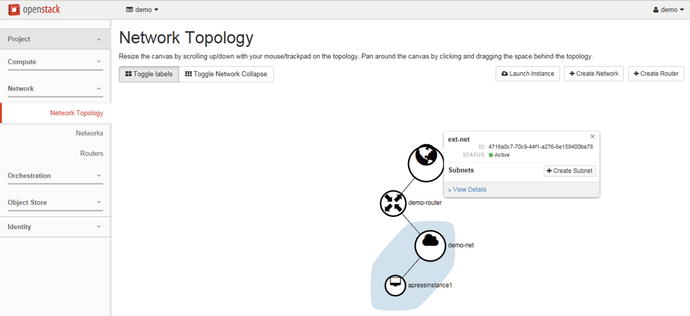
Figure 5-6. Network Topology tab in Horizon
At this point you have only one missing part. Your instances within the one tenant network can connect to each other. But none of the instances can reach out to an external network. You need to add a floating IP from ext-net to the virtual machine.
First, let’s create the floating IP. The default quota for the number of floating IPs is 10, and this can be adjusted by anyone who has admin capacity:
$ neutron floatingip-create ext-netCreated a new floatingip:+---------------------+--------------------------------------+| Field | Value |+---------------------+--------------------------------------+| description | || dns_domain | || dns_name | || fixed_ip_address | || floating_ip_address | 10.0.2.101 || floating_network_id | 4716a0c7-70c9-44f1-a276-6e159400ba78 || id | 2c60a8b3-591d-475e-bb81-2d7c9bd4f18d || port_id | || router_id | || status | DOWN || tenant_id | 16f44d2a075a4139a2a5425a42f1b447 |+---------------------+--------------------------------------+
Take a moment to locate the ID of the floating IP from the output. You will need this ID soon. Next, you should determine which port you will associate the IP with. You can get an internal IP of your instance:
$ nova list+--------------------------------------+-----------------+--------+-------------+----------+| ID | Name | Status | Power State | Networks |+--------------------------------------+-----------------+--------+-------------+----------+| 4b80e2f5-c331-49f3-b653-33aa4ae77233 | apressinstance1 | ACTIVE | Running | demo-net=|| | | | | 172.16.0.3 |+--------------------------------------+-----------------+--------+-------------+----------+
After locating the IP, you can then determine the port ID from the list:
$ neutron port-list+--------------------------------------+- .. ---------------+| id | .. fixed_ips |+--------------------------------------+- .. ---------------+| 5c4aa20c-6f85-4f1c-a807-f39db46e7ce5 | .. "172.16.0.2"} || 875a80bc-adb4-4cff-b029-91af84f6fc86 | .. "172.16.0.1"} || e30e079a-985a-4ff2-ab3a-ba79f1841b3b | .. "172.16.0.3"} |+--------------------------------------+- .. ---------------+
Now you can associate the floating IP with the port. In the example, the ID of the IP is 2c60a8b3-591d-475e-bb81-2d7c9bd4f18d and the ID of the port is e30e079a-985a-4ff2-ab3a-ba79f1841b3b:
$ neutron floatingip-associate 2c60a8b3-591d-475e-bb81-2d7c9bd4f18d e30e079a-985a-4ff2-ab3a-ba79f1841b3bAssociated floating IP 2c60a8b3-591d-475e-bb81-2d7c9bd4f18d
If you check the nova list again, you will find the second external IP and the virtual machine properties:
$ nova list+--------------------------------------+-----------------+--------+-------------+----------+| ID | Name | Status | Power State | Networks |+--------------------------------------+-----------------+--------+-------------+----------+| 4b80e2f5-c331-49f3-b653-33aa4ae77233 | apressinstance1 | ACTIVE | Running | demo-net=|| | | | | 172.16.0.3,|| | | | | 10.0.2.101 |+--------------------------------------+-----------------+--------+-------------+----------+
You can find information related to the floating IPs in Horizon by going to Project ➤ Compute ➤ Access & Security ➤ Floating IPs. An example of information provided at this tab is shown in Figure 5-7.

Figure 5-7. Floating IPs tab in Horizon
Manage Project Security Group Rules
Security Groups are firewall rules that can filter ingress and egress traffic for virtual machines. They are implemented with iptables rules in the reference configuration. To create the Security Group use the command:
$ nova secgroup-create apress-sgroup "Apress secgroup"+--------------------------------------+---------------+-----------------+| Id | Name | Description |+--------------------------------------+---------------+-----------------+| 2ad4b67a-f943-451b-bcd2-14853704bcee | apress-sgroup | Apress secgroup |+--------------------------------------+---------------+-----------------+
Then you can add a rule:
$ nova secgroup-add-rule apress-sgroup tcp 22 22 0.0.0.0/0+-------------+-----------+---------+-----------+--------------+| IP Protocol | From Port | To Port | IP Range | Source Group |+-------------+-----------+---------+-----------+--------------+| tcp | 22 | 22 | 0.0.0.0/0 | |+-------------+-----------+---------+-----------+--------------+
And you can also apply Security Groups to instances at boot time:
$ nova boot --flavor m1.tiny --image cirros-raw --security-groups apress-sgroup apressinstance1+--------------------------------------+---------------------------------------------------+| Property | Value |+--------------------------------------+---------------------------------------------------+| OS-DCF:diskConfig | MANUAL || OS-EXT-AZ:availability_zone | || OS-EXT-STS:power_state | 0 || OS-EXT-STS:task_state | scheduling || OS-EXT-STS:vm_state | building || OS-SRV-USG:launched_at | - || OS-SRV-USG:terminated_at | - || accessIPv4 | || accessIPv6 | || adminPass | EDZh9ctFcfHz || config_drive | || created | 2016-07-17T17:17:31Z || flavor | m1.tiny (1) || hostId | || id | 4b80e2f5-c331-49f3-b653-33aa4ae77233 || image | cirros-raw (039daa2e-6b3e-4e31-b1da-ab3e6feb8b30) || key_name | - || metadata | {} || name | apressinstance1 || os-extended-volumes:volumes_attached | [] || progress | 0 || security_groups | apress-sgroup || status | BUILD || tenant_id | 16f44d2a075a4139a2a5425a42f1b447 || updated | 2016-07-17T17:17:34Z || user_id | 8e28b302669042e58e7ceb642d4f9708 |+--------------------------------------+---------------------------------------------------+
Also it is possible to add or remove a Security Group on the fly:
$ nova add-secgroup apressinstance11 apress-sgroup$ nova remove-secgroup apressinstance1 default
To list the rules, you would use the command:
nova secgroup-list-rules apress-sgroup+-------------+-----------+---------+-----------+--------------+| IP Protocol | From Port | To Port | IP Range | Source Group |+-------------+-----------+---------+-----------+--------------+| tcp | 22 | 22 | 0.0.0.0/0 | |+-------------+-----------+---------+-----------+--------------+
You can find information related to Security Groups in Horizon by going to Project ➤ Compute ➤ Access & Security ➤ Security Groups tab. An example of the information provided on this tab is shown in Figure 5-8.
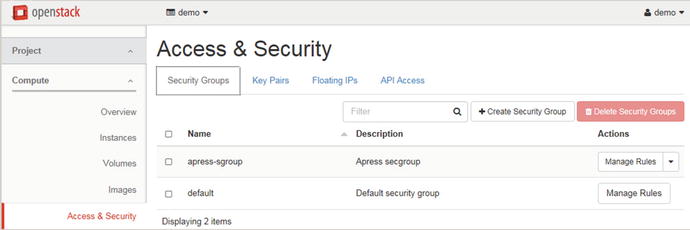
Figure 5-8. Security Groups tab in Horizon
Manage Quotas
A quota limits the number of available resources. The default number of resources allowed per tenant is defined in the main configuration file /etc/neutron/neutron.conf in the [quota] section. Here is an example:
[quota]# Number of networks allowed per tenant. A negative value means unlimited.# (integer value)quota_network = 10# Number of subnets allowed per tenant, A negative value means unlimited.# (integer value)quota_subnet = 10# Number of ports allowed per tenant. A negative value means unlimited.# (integer value)quota_port = 50# Default driver to use for quota checks (string value)quota_driver = neutron.db.quota.driver.DbQuotaDriver# Keep in track in the database of current resourcequota usage. Plugins which# do not leverage the neutron database should set this flag to False (boolean# value)track_quota_usage = true# Number of routers allowed per tenant. A negative value means unlimited.# (integer value)quota_router = 10# Number of floating IPs allowed per tenant. A negative value means unlimited.# (integer value)quota_floatingip = 50# Number of security groups allowed per tenant. A negative value means# unlimited. (integer value)quota_security_group = 10# Number of security rules allowed per tenant. A negative value means# unlimited. (integer value)quota_security_group_rule = 100
Regular users can get their quotas with the neutron quota-show command:
$ neutron quota-show+---------------------+-------+| Field | Value |+---------------------+-------+| floatingip | 50 || network | 10 || port | 50 || rbac_policy | 10 || router | 10 || security_group | 10 || security_group_rule | 100 || subnet | 10 || subnetpool | -1 |+---------------------+-------+
Admins can do the same, but only for any project with the --tenant_id option. If an admin needs to change the quotas for a particular project, the following command would be used:
$ neutron quota-update --tenant_id 16f44d2a075a4139a2a5425a42f1b447 --floatingip 7+---------------------+-------+| Field | Value |+---------------------+-------+| floatingip | 7 || network | 10 || port | 50 || rbac_policy | 10 || router | 10 || security_group | 10 || security_group_rule | 100 || subnet | 10 || subnetpool | -1 |+---------------------+-------+
The neutron quota-list command lists tenants for which the per-tenant quota is enabled. The command does not list tenants with default quotas:
$ neutron quota-list+------------+---------+------+--------+-----------+----------------+--------+-----------+| floatingip | network | port | router | sec_group | sec_group_rule | subnet | tenant_id |+------------+---------+------+--------+-----------+----------------+--------+-----------+| 7 | 10 | 50 | 10 | 10 | 100 | 10 | 16f44d2.. |+------------+---------+------+--------+-----------+----------------+--------+-----------+
Admins can manage quotas on a per-project basis in Horizon by going to Identity ➤ Projects ➤ Modify Quotas through the drop-down menu to the right of the project’s name. Part of the networks quotas edit page is shown in Figure 5-9. A user can check the overall limits, including Neutron quotas, in Horizon by going to Project ➤ Compute ➤ Overview tab.

Figure 5-9. Checking quotas in Horizon
Verify Operation of Network Service
As mentioned earlier, Neutron consists of several components. Its configuration files were shown at the beginning of this chapter. Neutron API service is bound to port 9696. The log file for the Neutron server is available at /var/log/neutron/server.log.
You can check the supported extension for Neutron with the command:
$ neutron ext-list+---------------------------+-----------------------------------------------+| alias | name |+---------------------------+-----------------------------------------------+| default-subnetpools | Default Subnetpools || network-ip-availability | Network IP Availability || network_availability_zone | Network Availability Zone || auto-allocated-topology | Auto Allocated Topology Services || ext-gw-mode | Neutron L3 Configurable external gateway mode || binding | Port Binding || metering | Neutron Metering || agent | agent || subnet_allocation | Subnet Allocation || l3_agent_scheduler | L3 Agent Scheduler || tag | Tag support || external-net | Neutron external network || net-mtu | Network MTU || availability_zone | Availability Zone || quotas | Quota management support || l3-ha | HA Router extension || provider | Provider Network || multi-provider | Multi Provider Network || address-scope | Address scope || extraroute | Neutron Extra Route || timestamp_core | Time Stamp Fields addition for core resources || extra_dhcp_opt | Neutron Extra DHCP opts || dns-integration | DNS Integration || security-group | security-group || dhcp_agent_scheduler | DHCP Agent Scheduler || router_availability_zone | Router Availability Zone || rbac-policies | RBAC Policies || standard-attr-description | standard-attr-description || router | Neutron L3 Router || allowed-address-pairs | Allowed Address Pairs || dvr | Distributed Virtual Router |+---------------------------+-----------------------------------------------+
And you can check the state of the running agents with the command:
$ neutron agent-list+------+--------------------+---------+-------------------+-------+----------------+-------+| id | agent_type | host | availability_zone | alive | admin_state_up | binary|+------+--------------------+---------+-------------------+-------+----------------+-------+| 38.. | Open vSwitch agent | centos7 | | :-) | True | neutron-openvswitch-agent || 66.. | L3 agent | centos7 | nova | :-) | True | neutron-l3-agent || 7c.. | Metering agent | centos7 | | :-) | True | neutron-metering-agent || 82.. | DHCP agent | centos7 | nova | :-) | True | neutron-dhcp-agent || 9b.. | Metadata agent | centos7 | | :-) | True | neutron-metadata-agent |+------+--------------------+---------+-------------------+-------+----------------+-------+
Review Questions
What service provides routing and Network Address Translation?
neutron-server
neutron-openvswitch-agent
neutron-l3-agent
neutron-metadata-agent
How can you check the status of running Neutron agents?
neutron agents-list-state
neutron agent-list
neutron list-agent
neutron agents-list
Name the Neutron API service config.
/etc/neutron/neutron.conf
/etc/neutron.conf
/etc/neutron/plugin.ini
/etc/neutron/api-server.conf
How can you correctly add a new rule to an existing Security Group?
nova secgroup-add-rule apress-sgroup tcp 22 22 0.0.0.0/0
nova secgroup-add-rule apress-sgroup tcp 22 0.0.0.0/0
nova secgroup-add-new-rule apress-sgroup tcp 22 22 0.0.0.0/0
nova secgroup-add-new-rule apress-sgroup tcp 22 0.0.0.0/0
Where is the Neutron API log file situated?
/var/log/neutron/neutron.log
/var/log/neutron/server.log
/var/log/neutron/api.log
/var/log/neutron/api-server.log
Answers to Review Questions
B
C
A
A
B