
5
Exploring Identity Patterns
In this chapter, we will finally put into practice the knowledge that we acquired throughout the book before now. We now know how the OpenID Connect (OIDC) and OAuth 2.0 protocols work and, most importantly, what authentication flows they enable.
Understanding the right scenario for an authentication flow is a key aspect for an enterprise architect during the design of an application: the patterns described in this chapter can be used as a quick reference to guide the decision-making process around the authentication and authorization of an application.
To make a parallel with the programming world, these patterns can be applied to authentication in the same way that today, we, as programmers, design and write the code of a modern cloud application architecture by leveraging software design patterns (e.g. Ambassador, retry, sidecar, etc.).
This chapter will give you the tools (or patterns) to choose the best authentication design for an application, which can be harnessed side by side with software design patterns to engineer all the aspects of an application before it is effectively deployed into a production environment.
We will cover the following topics in this chapter:
- Understanding the basic terminology
- Web applications
- Native applications
- SPAs
Understanding the basic terminology
Before diving into each pattern, we will present you with some terminology that will be used throughout the following presentation of different patterns. Then, we’re going to review the patterns recommended for different application styles:
- Application identity
As we’ll see later, there are different kinds of applications that exist. It’s important to grasp the concept of application identity though before expanding to examine the different types of applications that can be encountered.
Application identity is a concept that is tightly coupled with the OIDC and OAuth 2.0 authentication protocols. When interacting with an identity provider, an application must have and use an identity that the identity provider knows, an identity that an administrator has previously registered as part of the application configuration. Typically, an OIDC or OAuth 2.0 flow requires two application identities to be registered: a client and a server application identity.
The client application may require an ID token to authenticate the user or an access token to be authorized to call a particular server application. In this scenario, the server applications are also named resources or resource servers and, typically, they are in the form of web (REST) APIs when related to complex enterprise applications.
- Single-page applications (SPAs)
SPAs do not typically involve a web server in the backend to host static content (a web server may be used to host the API on which the SPA will rely). Static files such as JavaScript, CSS, and HTML are retrieved from a publicly available location and all the application logic is typically handled by JavaScript running in the browser, which interacts with the API on the server side to tune the page accordingly. A SPA, as a matter of fact, even if it is very complex, interacts with APIs to send and retrieve data and most of the time, this interaction requires some kind of authorization artifact (obtained once the SPA is authenticated) that in OIDC/OAuth 2.0, we know takes the shape of an access token.
- Native application
A native application is very similar to a SPA if we just look at the core functionality: it is an application that needs to interact with (typically REST) APIs to accomplish a task or business feature. The main difference with SPAs is that a native application is not browser-based and therefore, it does not run within the context of a browser, rather running directly as an application of the operating system where it is installed. A native application can be a Win32 or Store app in Windows, or an app retrieved from an app store and then installed on a mobile operating system, such as iOS or Android.
- Web (REST) API
By web API, we mean a RESTful API that understands HTTP and is published on a network to provide some sort of functionality to consumer applications. A web API usually needs a form of authentication in order to be successfully used by a caller application – there are different methods used by enterprises for web API authentication, including the client and server certificates used in a mutual authentication scenario, but the focus of this book will be on OAuth 2.0 protected APIs.
- Service
By service, we mean an application that can operate without any user intervention. A service could be a background task, a job that can act according to an external trigger (an event or an HTTP request trigger), or a schedule (for example, a job that runs each day at 2:00 a.m.). During task execution, a service may need to interact with external components that may be another service or a web API. Within these two scenarios, it is common to have an authentication flow happening in the background that cannot depend on a user providing authorization for the service to perform a specific task because it would make the automation of that task impossible. As per the web APIs, different authentication methods can be used here (including certificates), but we will focus on the ones leveraging the OAuth 2.0 protocol.
- User agent
A user agent is a commodity software that acts on behalf of the user by translating the user’s intentions (or user inputs) into actions in the context of an application. For multi-page applications and SPAs, the user agent is typically a web browser. The web browser handles the application code and translates it into a human-readable format, ready to accept any user input. Why is the concept of a user agent important to us? This is easy to explain – the user agent acts as the bearer of the client application’s identity. As already said, for multi-page applications and SPAs, the user agent is the web browser, whereas, in the case of native applications, it corresponds to the native application itself (because it carries out user actions on behalf of the user).
We will now use this terminology to present the different design patterns throughout this chapter. We will go through the different application types that are typically encountered in an enterprise (using the aforementioned terminology) and understand which patterns are best applied to design their authentication flows, along with examining their relationships with the application identities registered with the identity provider.
We will assume that a single identity provider exists in the following sections unless explicitly stated otherwise.
Web applications
In this section, we refer to a web application as a multi-page application to distinguish it from the SPA discussed later in this chapter.
When we use the term multi-page application, we refer to the traditional web application backed by a web server. A user accesses a multi-page application through a web browser (see the previous definition of user agent), which interacts with the web server by exchanging and requesting data – the web server typically responds to browser requests (HTTP requests) by computing a new page and sending it back to the browser for user visualization and further interaction.
We can think of a typical web application as a set of layers. The set of layers is defined according to the framework used – for example, Model-View-Controller (MVC), Model-View-Adapter (MVA), or Presentation-Abstraction-Control (PAC). Regardless of the framework used, we can increase the level of abstraction (without going into detail) and think of a web application as something built on top of two main components: business logic, which represents the core implementation of the web application itself, and the interceptor, which is the layer triggered in every request to “intercept” the request up front, before it hits any business logic:
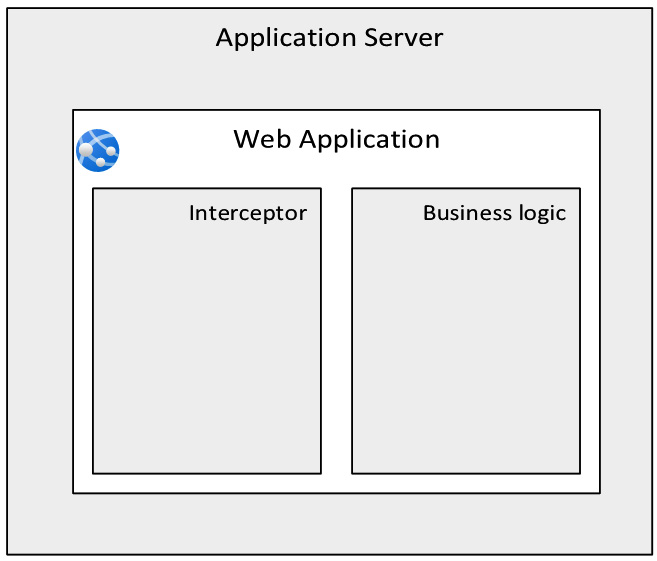
Figure 5.1 – Web application layers
The business logic is usually implemented using frameworks such as MVC, which is the most common framework adopted by most technologies (such as .NET, Java frameworks, Ruby on Rails, etc.). Regardless of the technology, the interceptor layer is the first piece of logic to be executed and validates whether the request can be directly served (and as such, triggers the implemented business logic), whether it should be refused, or whether it requires authentication. In certain technologies, the interceptor layer logic is implemented in the middleware, but the concept is still the same – no business logic can run if the request is not evaluated by the interceptor layer first. We can surmise here that one of the most important duties of this kind of layer is to validate whether the user is already authenticated and as such, the request can be moved on to the business logic or sent to the identity provider for authentication.
Traditional web applications (written using common web development frameworks such as .NET, Spring, or Laravel) hosted on a web server usually provide a consistent user experience without relying on external services (that is, external web APIs).
When external dependencies are not present, then it is likely that an access token is not needed, but for the application to completely achieve its business logic, it is sufficient to extract the information (claims) that comes with the ID token.
An example of an application without external dependencies could be the typical “monolith” application hosted on a server and usually replicated on a wider set of servers for availability and load-handling purposes.
The multi-page application presented in this section differs from a SPA because, in the multi-page application, the business logic is responsible for returning the view (HTML and CSS) to the browser according to the request and the business logic. The view is served according to server-side operations, unlike a SPA, where the view is typically performed on the client side according to the API response, which is typically JSON.
User authentication only pattern
In the case of multi-page applications, we recommend using a pattern named user authentication only, described in greater detail later in this section.
Before going into the authentication logic, it is important to recap how the logic of the application is supposed to be implemented to run the authentication flow:
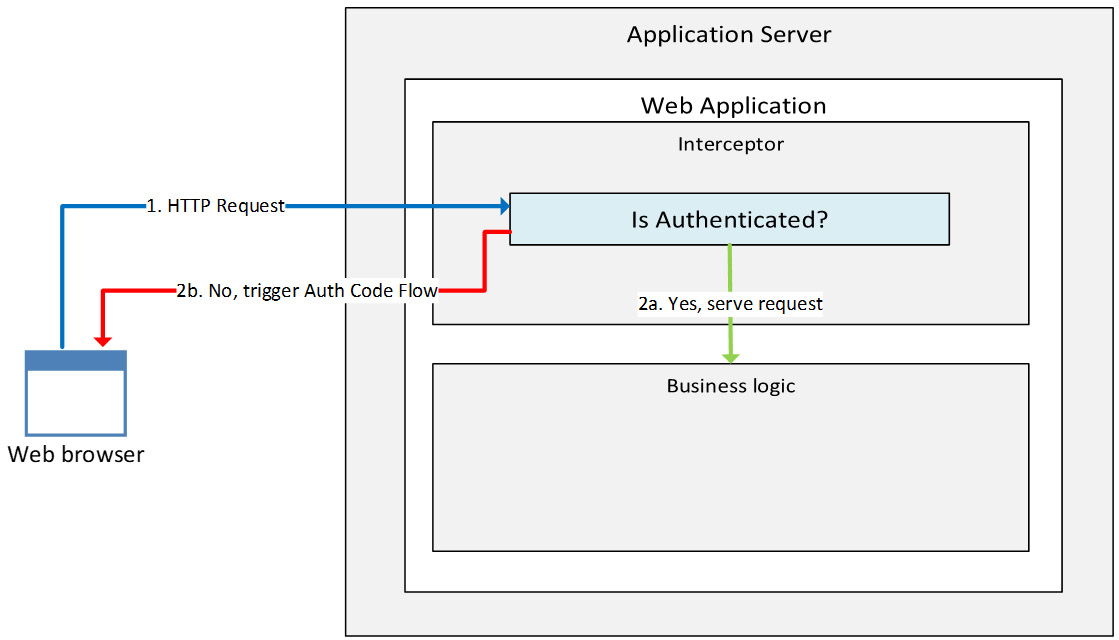
Figure 5.2 – Sample application logic for an AuthZ code grant flow
The interceptor layer of the application determines whether or not the user is already authenticated and thus whether authentication needs to be triggered.
How the application determines this depends on the implementation of the interceptor layer itself. The most typical approach is to take advantage of cookies – whenever the user is authenticated the first time, the application will release a cookie that will then be used for any subsequent HTTP request as proof of authentication already having been performed.
Let’s now get familiar with some of the important concepts related to the user authentication-only pattern:
- Scenario:
- Application type: Multi-page web application hosted on a single web server. By web server, we mean a generic hosting platform that is auto-consistent and does not need to communicate with other external services, which could be other web servers or a hosting platform that publishes a service through a REST API.
- External dependencies: None.
- User agent: In this scenario, the user agent is a web browser that renders HTML pages and interacts with the web server by translating the user’s actions into HTTP requests. The web server typically responds to the web browser by either sending back data or new HTML pages to render.
- Recommended pattern: User authentication only.
- Protocol/flow: Open ID Connect (OIDC) with the Authorization Code Grant flow (with PKCE if possible).
- Description: In this scenario, we have just a single application. This application requires user authentication before the user can access and interact with it. Once a user shows their proof of authentication, the application does not need anything else to function properly – we say that the application is auto-consistent because it does not rely on external services to implement its business logic. A typical example in an enterprise could be an informative web portal such as an intranet portal. A common interaction between a user and an intranet portal is the user navigating through the different pages of the portal to find relevant information about, for instance, internal corporate policies, the latest news, or upcoming events. To accomplish all these tasks, the intranet portal usually just needs to know who the principal (user) is and some pieces of information regarding their business area, country, and so on, to provide a user experience tailored to the specific user. In other words, the application needs the user to authenticate and provide some information about themselves to enhance the overall experience for the end users – we can agree that what the application needs here is an ID token.
- Technical details: We already know we are focusing on a single multi-page application with no external dependencies, whose user agent is a web browser. Now, the question is what the steps required to configure the application with the suggested authentication protocol and flow are. In this chapter, we won’t focus on a specific identity provider but will provide generally applicable configuration steps that are common to most publicly available identity providers that implement the OIDC and OAuth 2.0 protocols.
The Authorization Code Grant flow (see Chapter 4, Authentication Flows) typically requires registering two application identities in the identity provider – one for the application requesting authorization and one for the resource that the requesting application seeks to access.
In our scenario, however, there are no external dependencies, which means there is no resource our application needs to access. In other words, we could say that, in this case, the client application and the server application (resource) are the same entity.
With that in mind, it is easy to work out the number of application identities we need to register in the identity provider – just one, representing our multi-page web application. When we have just one application and the only requirement is to authenticate the user, then the OIDC protocol should be used.
Now that we have explained in greater detail why we need certain artifacts, we can show them more clearly with an example. Our example is comprised of the following:
- An end user named User1 who accesses the application
- A multi-page web application named WebApp1
- The WebApp1 reply URL is https://webapp1.example.com/auth
- A web server named WebServer1 that hosts WebApp1
- An identity provider named Idp1, in charge of authenticating the end user
- The Idp1 URL is https://idp1.example.com
- An identifier for WebApp1, registered by an administrator in Idp1, as WebApp1-Id
- A client secret configured for WebApp1-Id in Idp1, called WebApp1-Secret
The Authorization Code Grant flow implementation then follows the standard process as presented in the previous chapter’s Authorization Code Grant flow section. It is important to note the following two points:
- The WebApp1 application is considered a confidential client because it runs on a web server (WebServer1, which is typically deployed within a protected corporate network) and not directly in the User1 web browser like a SPA – the browser, as a matter of fact, interacts with the server to implement the business logic of the application and therefore, the ID token never flows through the browser, which only sees the authorization code. This code is sent to WebServer1, which retrieves the ID token by contacting Idp1 directly and providing WebApp1-Secret.
- Since there is only one application identity (WebApp1-Id) registered in Idp1, the scope parameter of the authorization request that WebApp1 sends to Idp1 (through the web browser) cannot include any specific resource identifier, but can use common OIDC-only scopes such as OpenID, profile, and so on.
The flow with the details of the requests is explained as follows (for the sake of simplicity, we are not considering the PKCE variation of the AuthZ Code Grant flow, which would indeed be the preferred choice):
- WebApp1 (through the web browser of User1) requests an authorization code to the /authorize endpoint of Idp1. This is what the request looks like:
GET /authorize?
response_type=code
&client_id=WebApp1-Id
&redirect_uri=https%3A%2F%2Fwebapp1.example.com%2Fauth
&scope=openid%20profile
&nonce=n-0S6_WzA2Mj
&state=af0ifjsldkj HTTP/1.1
Host: idp1.example.com
- User1 grants authorization to WebApp1 by inserting its credentials in the Idp1 login page. Idp1 returns an authorization code to the WebApp1 reply URL.
- WebApp1 (in the background) requests an access token from the /token endpoint by sending the authorization code received in the previous step. This is what the request looks like:
POST /token HTTP/1.1
Host: idp1.example.com
Content-Type: application/x-www-form-urlencoded
Authorization: Basic WebApp1-Secret
grant_type=authorization_code&code=SplxlOBeZQQYbYS6WxSbIA
&redirect_uri=https%3A%2F%2Fwebapp1.example.org%2Fauth
- Idp1 validates the authorization code and issues an ID token, an access token, and a refresh token (if requested) to WebApp1.
As you may also have noticed, an access token is issued by Idp1 to WebApp1 even if it is not needed. This happens because the OIDC official specification says to do so.
Once the ID token is received and validated by WebApp1, the user is considered authenticated. At this point, several techniques can be put in place to store the User1 information for later requests to avoid User1 being prompted for authentication a second time within the token validity timeframe. These techniques are out of the scope of this book, but to name just one, a web application usually stores session information (including information retrieved from the ID token) within an application cookie.
What is important though is how the authentication and single sign-on are handled by WebApp1 and Idp1. Typically, what happens is the following:
- An application cookie of the same validity period as the ID token, which has a short duration (usually 1 hour), is issued to the web browser by WebApp1. Within the cookie validity period, the user is not prompted for authentication.
- Once the ID token (and therefore the cookie) expires, WebApp1 may use its refresh token to obtain a new ID token from Idp1.
- If WebApp1 has no refresh token or the refresh token has expired, then the user is redirected back to the identity provider to get a new ID token (in the Authorization Code Grant flow). If Idp1 issued a cookie during the first successful authentication attempt with the web browser, then it can be used to avoid prompting the user for authentication a second time, providing the cookie hasn’t expired.
In the next two sections, we will see why other OIDC flows are generally discouraged for this scenario.
Additional considerations
OIDC and OAuth 2.0 provide different flows that could be used in the multi-page application scenario we described previously: we are talking about the implicit flow and the resource owner password credentials grant flow.
Although they may be used for very specific use cases, their usage is generally discouraged because of the security concerns (for more info on this, refer to the Security considerations section in the next chapter) that have been raised by the authentication community since the protocols were officially released. If you’re interested, more details can be found on the Internet Engineering Task Force (IETF) website.
Here follows a list of exploits that can be further reviewed online, highlighting why OAuth flows should be avoided:
- Insufficient redirect Uniform Resource Identifier (URI) validation
If the authorization server does not enforce strict validation of the redirect URIs that can be registered for each application, an attacker can redirect the user agent to a bad URI under the attacker’s control.
- Credential leakage via a web browser plugin
When the access token is received by a web browser, a malevolent plugin (or browser extension) can steal it and use it within a legitimate application, impersonating the user who initially requested it.
- Credential leakage via browser history
A web browser may save code and access token information within the browser’s history, exposing it to other applications running on the user’s client.
- Access token injection
Once an access token has been obtained by a malicious user, it can be injected into a legitimate application to impersonate a different user or authorize the application to do something that it is not supposed to be able to do.
Moreover, there is no mechanism in place in the implicit flow that can bind an access token to the specific client that requested it because clients using the implicit flow are public clients. This means they cannot use any form of secrets because these secrets would be available directly in the web browser or native application using them.
Adoption of both the implicit flow and the resource owner password credentials grant is discouraged. The resource owner password credentials grant insecurely exposes the credentials of the resource owner to the client. Even if the user is using a trusted client, this increases the attack surface (credentials can leak from more places than just the authorization server) and users are trained to enter their credentials in places other than the authorization server, which usually makes them more prone to a phishing attack.
These additional considerations are important factors that require consideration from architects at design time. In this section, we explored how OAuth can be used in different ways and how some of these ways are discouraged from a security perspective. When an interactive login is required from a web application using OAuth, it is important to adopt the concept highlighted by the user authentication only pattern and avoid, wherever possible, the implicit flow and the resource owner password credentials grant flow, for the reasons reported previously.
In the next section, we will describe other use cases that differ from the standard user interactive login path.
Native applications
A native application, as already explained, is a non-web application (by non-web application, we mean something that is not supposed to be browser-based, but still uses the REST or SOAP protocols for client-server interaction) written for a specific operating system that runs side by side with other applications on that operating system. Nowadays, native applications run mostly on mobile platforms such as iOS and Android, but it is very common to encounter native applications running on Windows as Win32 and Store applications, among other things.
It’s rare to find a native application that does not interact with external APIs to implement its business logic and therefore, it’s also common that these applications require an access token to securely communicate with such external services.
As we will appreciate in the rest of this chapter, native applications have many similarities to SPAs. This is because both of them interact with APIs located on the server side and dynamically evolve the UX according to the API responses, which, in turn, are affected by the user behavior.
From a design point of view, native applications do not usually differ so much from SPAs, and as such, the authentication and authorization flows are often similar.
Application authorization pattern
The recommended authorization pattern for native applications is the authorization code grant flow discussed in the previous chapter.
From a high level, the flow to authorize a native application against the API it needs to consume looks like the following:
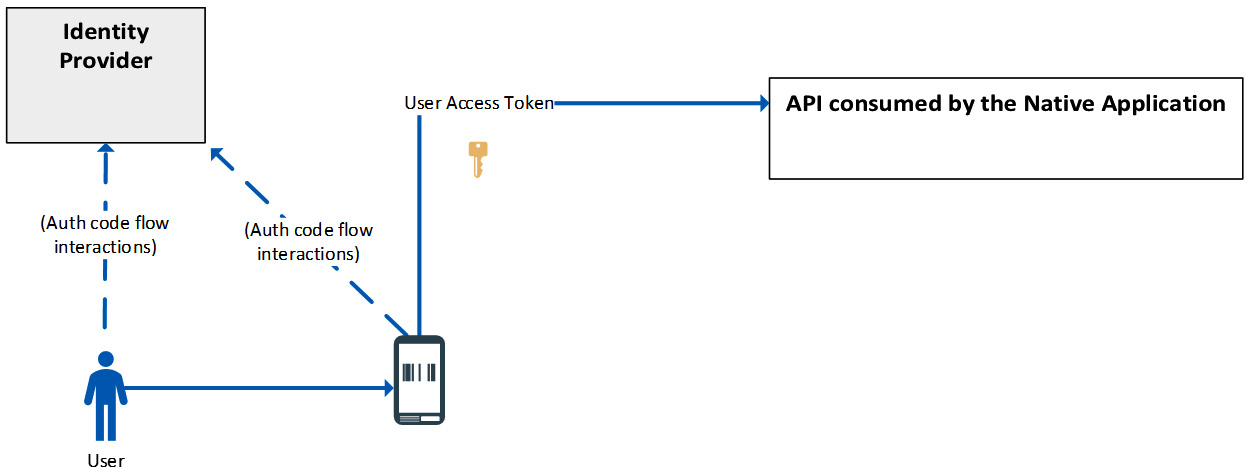
Figure 5.3 – Native app – application authorization pattern
In this scenario, both the OIDC and OAuth 2.0 protocols are needed, and the recommended pattern in this case is named application authorization.
As in the previous section, we’ll review the scenario details in bullet fashion to see which OAuth flow is suggested for adoption in this scenario, what the user agent is, and a description of the technical details required to fully understand how it is recommended to implement authentication in a native application:
- Scenario:
- Application type: A native application directly runs in the context of an operating system. Mobile applications are the most common example of native applications (e.g., the Facebook app or your banking app) – they usually do not store any data locally, except for caching purposes, and instead, are highly reliant on authenticated external APIs in order to retrieve the relevant information needed by the end user.
- External dependencies: One or more external APIs registered on the same identity provider as the client application.
- User agent: In this scenario, the user agent is the native application itself, which both implements the user interface and manages the interactions with the external REST APIs in the background to exchange the data needed to fulfill the application logic. Modern applications using this approach commonly leverage the JSON format for data exchange – an external REST API receives an HTTP request containing data in its body in JSON format and the API responds with the requested information by embedding it into a JSON document in the HTTP response body.
- Recommended pattern: Application authorization.
- Protocol/flow: OIDC and OAuth 2.0 with the Authorization Code Grant flow (with PKCE if possible).
- Description: A native application requires both an authenticated user and authorization to access the external APIs it depends on. In other words, a native application needs both an ID token and an access token.
The ID token, once obtained, is usually stored locally in the application and is used to tailor the user experience according to the operations the authenticated user can and cannot do. The access token is also stored locally and it is used as a bearer token in the HTTP requests against the external APIs as proof of authorization for performing a specific task. As part of the Authorization Code Grant flow, a refresh token can also be issued and stored in the application to renew the access token when it expires.
Since the Authorization Code Grant flow requires that the user inserts their credentials in the authentication form provided by the identity provider, the native application (not being a web browser) will likely leverage an external application provided by the operating system to render the web page containing the aforementioned web login form. This application is usually opened by the native application in an external or pop-up window and it is usually referred to as a web view. This user experience is not optimal because the authentication flow does not happen as a whole within the native application, but it is safer than using alternative approaches that make use of the resource owner password credentials flow, which requires handling user credentials directly in the native application logic.
- Technical details: What are the steps required to configure a native application with the suggested authentication protocol or flow? In this chapter, we won’t focus on a specific identity provider but will provide generally applicable configuration steps that are common to most publicly available identity providers that implement the OIDC or OAuth 2.0 protocols.
The Authorization Code Grant flow (see Chapter 4, Authentication Flows) typically requires defining two application identities in the identity provider – one for the application requesting authorization and one for the resource that the application seeks to access.
Since, in this scenario, we know one or more external dependencies exist, it means that there could be several resources our application needs to access. In other words, we could also say that in this case, the client application and the server applications (resources) are separate entities.
For simplicity, we assume that the external API needed by our native application is just one, and therefore the number of application identities we need to register in the identity provider is two – one representing the native application (the client application) and one representing the external API (the server or resource). When we have multiple APIs, it is easy to see that we need to register an application identity for each of them.
Let’s now see how this pattern can be put into practice with an example. Our example is comprised of the following:
- An end user named User1 that accesses the application.
- A native application named NativeApp1 that represents the client application.
- An external web API named WebAPI1 that represents the server application (resource).
- An identity provider named Idp1 in charge of authenticating the end user.
- The Idp1 URL is https://idp1.example.com.
- An identifier for NativeApp1 that has been registered by an administrator in Idp1 as NativeApp1-Id.
- An identifier for WebAPI1 that has been registered by an administrator in Idp1 as WebAPI1-Id.
- One or more scopes (for example, read or write) can be defined for WebAPI1. These scopes define what operations can be done when calling the API and are interpreted by WebAPI1 itself. The scopes must be registered in the configuration of the WebApp1-Id application registered in Idp1 and a client application (in our example, NativeApp1-Id) must be explicitly allowed to request such scopes.
- The NativeApp1 reply URL depends on the schema supported by the specific authentication library used – for instance, when using Microsoft Authentication Library (MSAL), it could be something like msalc38ukiaghksg73ldsg://auth. This URL must be registered in the configuration of the NativeApp1-Id application registered in Idp1.
The Authorization Code Grant flow implementation then follows the standard process presented in the previous chapter’s Authorization Code Grant flow section. It is important to note that the scope parameter of the authorization request sent by NativeApp1 to Idp1 typically includes the resource identifier of the web API, WebApp1-Id, together with the scopes WebAPI1 offers (read and write, in our example).
The flow with the details of the requests is explained as follows (for the sake of simplicity, we are not considering the PKCE variation of the AuthZ Code Grant flow, which would be the preferred choice here):
- When a user opens NativeApp1 on their device, the application requests an authorization code from the /authorize endpoint of Idp1. This is how the request looks:
GET /authorize?
response_type=code
&client_id=NativeApp1-Id
&redirect_uri=msalc38ukiaghksg73ldsg%3A%2F%2Fauth
&scope=NativeApp1-Id%3Aread%20NativeApp1-Id%3Awrite
&nonce=n-0S6_WzA2Mj
&state=af0ifjsldkj HTTP/1.1
Host: idp1.example.com
- NativeApp1 opens a web view showing the Idp1 login page.
- User1 grants the authorization to NativeApp1 by inserting their credentials into the Idp1 login page – Idp1 returns an authorization code to the NativeApp1 reply URL.
- NativeApp1 (in the background) requests an access token from the /token endpoint by sending the authorization code received in the previous step. This is how the request looks:
POST /token HTTP/1.1
Host: idp1.example.com
Content-Type: application/x-www-form-urlencoded
grant_type=authorization_code&code=SplxlOBeZQQYbYS6WxSbIA
&redirect_uri=msalc38ukiaghksg73ldsg%3A%2F%2Fauth
Notice that, in this case, a secret is not sent because native applications are not considered confidential clients since they run fully on the user device, which is considered untrustworthy.
- Idp1 validates the authorization code and issues an ID token, an access token, and a refresh token (if requested) to NativeApp1.
Once the ID token is received and validated by NativeApp1, then the user is considered authenticated. At this point, several techniques can be used to store User1 information for further requests so that User1 is not prompted for authentication a second time within the token validity timeframe; these techniques are out of the scope of this book. On the other hand, the access token can be used to invoke the operations exposed by WebAPI1 by sending it as a bearer token within each HTTP request sent to the API.
SPAs
In this section, we are going to look at SPAs. First, we will learn about how they differ from web applications (aka multi-page applications) described in the Web applications section of this chapter, allowing us to appreciate the implications of the authentication and authorization mechanisms in question.
A typical SPA is served as static content to the browser. Since the initial static content consisting of HTML, CSS, and JavaScript files is still the same for all users, it is not uncommon to serve this content directly from a cloud storage service, rather than a web server, as covered in the Web applications section in this chapter. Determining whether to choose a multi-page application or SPA in line with the application requirements is beyond the scope of this book. For more information, it is recommended to refer to the following link: https://docs.microsoft.com/en-us/dotnet/architecture/modern-web-apps-azure/choose-between-traditional-web-and-single-page-apps.
The reason why many implementations of SPAs take advantage of cloud storage capabilities and do not use an application server to store their content is that, for static content, there is no server-side logic involved, storage is cheaper, and this is typically the most convenient solution. Moreover, offloading the web server from serving static content can enhance performance; more specifically, the API that needs to run server-side logic can focus on computation only and doesn’t need to waste compute time on serving static content.
The following is a logical diagram outlining the composition of a typical SPA:

Figure 5.4 – SPA – logical diagram
As shown in the preceding figure, the browser will get the static content without any server-side logic involved. Then, the page will evolve according to the browser’s interpretations of the HTTP responses coming from the API as a result of the user’s behavior.
Single-page authentication pattern
To better understand this pattern, we need to think of the browser and the user as two different entities.
In this case, in fact, we are going to see an important concept of OAuth that was described in Chapter 3, OAuth 2.0 and OIDC – an entity that spends its access token to access the API. This is something we weren’t able to appreciate in the Web applications section, as it used a pure OIDC flow. In this section, the access token and OAuth concepts are really important for this pattern to work.
The following is a representation of the actors and steps involved:
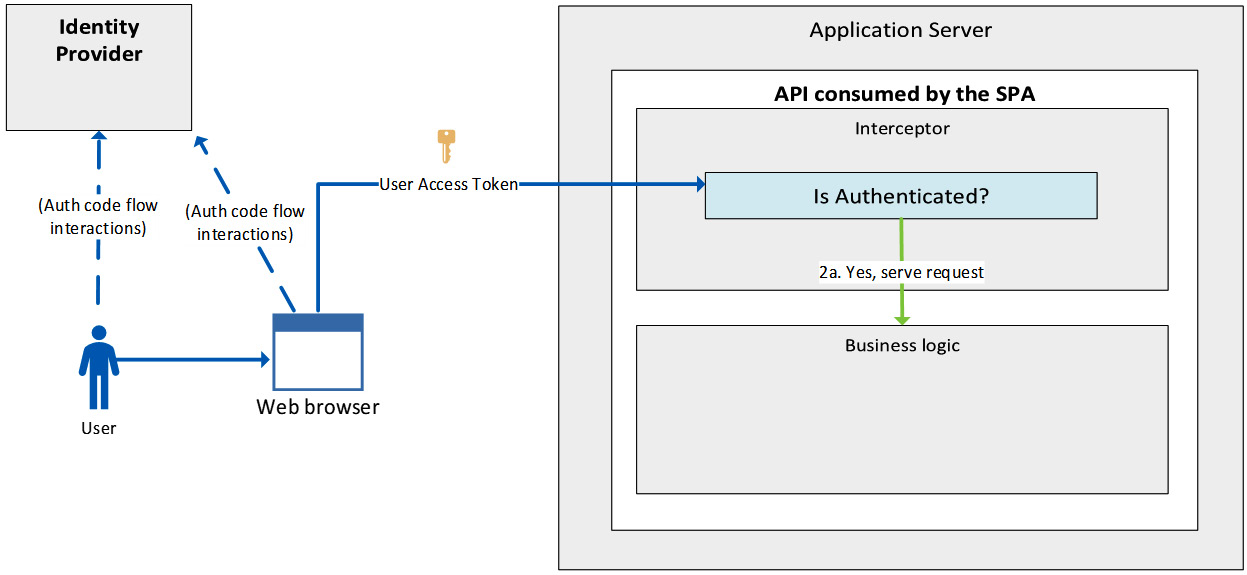
Figure 5.5 – Single-page application pattern – a monolith design
The preceding figure represents a monolith where both the interceptor layer and the business logic layer share the same application server and are developed within the same solution.
Figure 5.5 shows that we have a web browser that accesses the API on behalf of the user. This is possible thanks to an access token provided by the identity provider upon user login. The final result of the operations is a user access token dispatched to the browser and spendable by it until its expiration, which is commonly around an hour (this depends on the default time set in the identity provider).
It’s important to note that the user access token is provided upon first accessing the API. Ensuring the user is still authenticated during future interactions between the web browser and the API itself depends on how the API is implemented, and there are multiple ways to achieve this.
Let’s start by reviewing the implementations from an application point of view. From this perspective, the typical logic implemented within the interceptor belongs to one of the following categories:
- Access token-based
- Checks the presence of a valid (unexpired) access token upon every request.
- If the token is not present or has expired, the API will refuse the request by returning an HTTP status 401 (access token not present) or 403 (access token expired). This can be then interpreted by the client-side logic, which triggers the proper action to get the user to request or renew the access token.
- Cookie-based
The access token is evaluated and validated during the first interaction between the user and the application. After that moment, the interceptor releases an application cookie that represents proof of an already verified access token, and at the same time, potential extra information about the session that will be retransmitted by the web browser in the next interaction. Whenever a cookie is created, its lifetime should match the access token expiration time to increase the overall application’s security posture: cookies are very often also used to keep a user’s session for a much longer time (even days) – it’s always a trade-off between security and usability.
The choice between cookie-based or access token-based logic also depends upon the software and infrastructure design. There are circumstances where the access token is more convenient than the traditional cookie approach. Access tokens are usually preferred when the interceptor logic is not developed within the application, as demonstrated in Figure 5.4, but rather when it is external to the application, as shown in Figure 5.5. Access tokens are generally used by an application when calling a web API that does not require user interaction but does require the caller to be authenticated.
If the application is implemented on microservices or serverless technology, it is common to use an external service to implement the interceptor and not do it in the middleware of the application itself. In other words, the interceptor and the application logic may not be part of the same monolith – the business logic and the interceptor in this design do not share the same application server. They are hosted on two different application servers. This kind of design pattern is gaining momentum in the cloud because cloud-native architectures tend to privilege a decoupled design with independent services to enhance the scalability and reliability of the overall application.
When the interceptor logic is not present in the application code, the business logic lives in independent memory and stack. In these architectures, information between services is exchanged via HTTP; using a shared context variable set by the interceptor and reading by the business logic (as happens in a monolith design) is not an option. The advantage of this design is that developers can focus on the business logic, as the interceptor layer is usually developed in an external component by a different team. The design of this kind of architecture is therefore different from the monolith design presented in Figure 5.4. In the picture here, the business logic coexists with the interceptor layer; in a decoupled component design, the architecture will look like the following diagram:
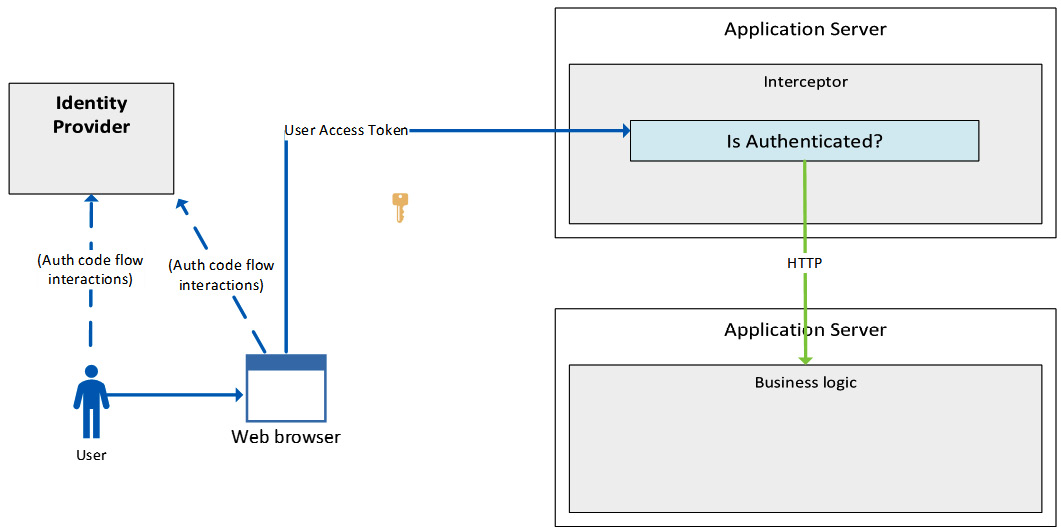
Figure 5.6 – Decoupled architecture
The authentication and authorization concepts are the same in any case if we see the application as a unique entity, regardless of the final design. In both designs, the business logic of the application receives the request from the client only if the request was approved by the interceptor layer. It is important to keep in mind that in this latter design, the information about the user needs to be propagated to the business logic via HTTP. This can be done in multiple ways, including adding custom headers to inject the information required by the business logic, or propagating or sending the access token itself again to the business logic, which doesn’t need to validate it anymore but can still check the information contained in the token’s claims. However, again, the business logic cannot read a context variable set by the interceptor because they are different processes in different servers.
The interceptor role in a decoupled design is tricky: we have a set of different services that need to identify the users once, ideally, like a central brain in a decentralized architecture. In this context, the client needs to deal with multiple APIs and it is recommended to prevent the user from performing multiple authentications. In this kind of design, the role of the interceptor layer can be covered by an infrastructure appliance with the duty of validating the access token before sending the request to the application business logic. The most important cloud providers, such as Amazon Web Services and Microsoft Azure, provide Layer 7 network appliances that can implement this logic.
In other circumstances, especially in Kubernetes-based architecture, the interceptor can be a sidecar (more information about the sidecar pattern can be found here: https://docs.microsoft.com/en-us/azure/architecture/patterns/sidecar) that lives in a dedicated container hosted alongside the application’s container. Here, the logical architecture does not change – containers hosted in the same Pod need to exchange information in HTTP, as they were logically hosted in different application servers.
It’s time to focus on the authentication logic and inspect the technical details, which as mentioned earlier, do not differ from the monolith or decoupled architectures discussed previously.
Let’s review the scenario details in bullet fashion as in the previous sections of this chapter:
- Scenario:
- Application type: A SPA that runs in the browser. In this type of application, HTML and JavaScript are only served once, and then the page will dynamically evolve according to the user’s input and the API responses.
- External dependencies: One or more external APIs registered on the same identity provider as the client application.
- User agent: In this scenario, the user agent is the browser itself, which both implements the user interface and manages the interactions with the external REST APIs in the background to exchange the data needed to let the client react to the user’s input. Modern applications using this approach commonly leverage JSON (content-type: application/json) for data exchange. The external REST API receives an HTTP request containing data in its body in JSON format, and the API responds with the requested information by embedding it in a JSON document in the HTTP response body.
- Recommended pattern: Single-page authentication pattern.
- Protocol/flow: OAuth 2.0 with the Authorization Code Grant flow (PKCE is recommended to enhance security, but for the sake of simplicity, the following flow will be discussed without using PKCE).
- Description: As depicted in Figure 5.4 and Figure 5.5, the interactions between the client-side logic and API require an access token to be sent to the API (then, according to the application implementation, a cookie may be released, but this aspect is not relevant, as the first step will not change – as explained previously).
It is important to note that, optionally, an ID token can be served to the client side as well in case the client-side logic requires the user’s information without requiring any interaction with the API. If this is the case, the protocol or flow here needs to also use OIDC, which needs to work together with OAuth in such a way that both the ID token and access token will be released.
The rest of this description assumes that only the access token is required.
- Technical details: As mentioned at the beginning of the chapter, the user agent and the API that the user agent needs to consume are the two distinguished entities. The entity we need to register on the identity provider, then, is the entity that needs to perform the end-to-end authentication process, which is the application that is running within the user agent context and the API, as in the native app.
As outlined in previous sections, the web browser cannot be considered a trusted entity. This means that application registration will use the client ID only and not the secret (the application is considered a public client here).
Not using a secret in the client makes the adoption of the state parameter even more important in contexts where SPAs are used.
The macro steps needed to finalize the operations are the following:
- The web browser initiates the authorization request.
- The user approves the request or logs in.
- The web browser exchanges the authorization code for an access token.
- The access token is available on the browser and can be used to authenticate the request against the API.
The following table will better outline the four preceding steps with further details and sample HTTP request expected:
|
Step |
Description |
Sample code/Sample HTTP request |
|
1. |
The static content served to the web browser will propose the option to the user to authorize the application to call the API on their behalf. |
<a href="https://authorization-server.com/authorize?response_type=code &client_id=sampleClient&state= sampleState">Connect Your Account</a> |
|
2. |
The user is taken to the auth server and can log in or approve the OAuth request if already logged in. Once the operation completes, the authorization server will redirect the user to the redirect URI specified in the app registration, along with a code that will be used later by the browser to grab the access token. | |
|
3. |
The app makes a POST request to the service’s token endpoint in order to exchange the authorization code for an access token. |
POST /oauth/token HTTP/1.1 Host: authorization-server.com grant_type=code &code=sampleCode123 &redirect_uri=https://contoso.com/cb &client_id=sampleClient |
|
4. |
At this point in time, the SPA has the access token that will be included in the host headers of the calls to be authorized by the API. |
Authorization: Bearer <access_token> |
Table 5.1 – OAuth steps for a SPA (example)
The end-to-end flow just described can be summarized by the following sequence diagram:
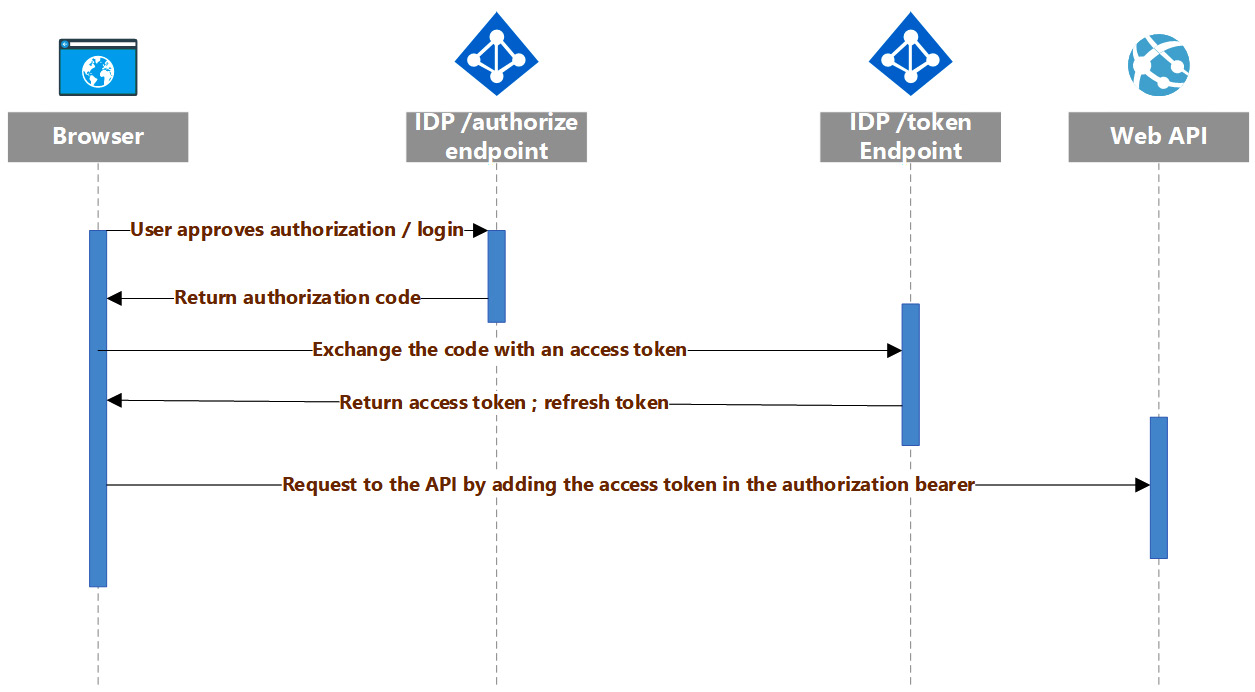
Figure 5.7 – SPA authorization sequence (the Authorization Code Grant flow)
It’s important to note, as shown in the preceding diagram, that upon successful validation of the code, the token endpoint returns both the access token and the refresh token.
This is important because as soon as the access token expires, the browser may require a new one without having to repeat all the interactions shown in Figure 5.5. In fact, the browser can require a new access token by just submitting the refresh token and the client ID, as detailed in the Authorization Code Grant flow section in Chapter 4, Authentication Flows.
Another important aspect is that a SPA has to be able to send a POST request to the authorization server in order to leverage the Authorization Code Grant flow. This means that the server must support the relevant CORS headers if the authorization server is on a different domain. If it is not possible to implement CORS headers, the service may choose to use a different flow instead.
Additional considerations
This flow for a SPA should only be followed if, for any reason, the Auth Code Grant flow outlined in the previous chapter is not an option.
Most of the information about the SPA and the interceptor layer and how they are composed has already been covered in previous sections. This section will focus only on the implicit flow, which is discouraged as a primary option for the SPA, but it needs to be evaluated as a secondary option.
The main reasons why the implicit flow should not be adopted are the following:
- The Auth code grant flow is more secure, as there is an extra step for code validation
- The renewal of the token is done by taking advantage of third-party cookies, which will eventually be disabled by the browser and can even break the application experience
- The access token will be provided back in the URL, which exposes sensitive token data further (it will even be present in the address bar and as such, will be part of the history of navigation within the browser)
The implicit flow is simpler than the one proposed in the Single-page authentication pattern section previously:
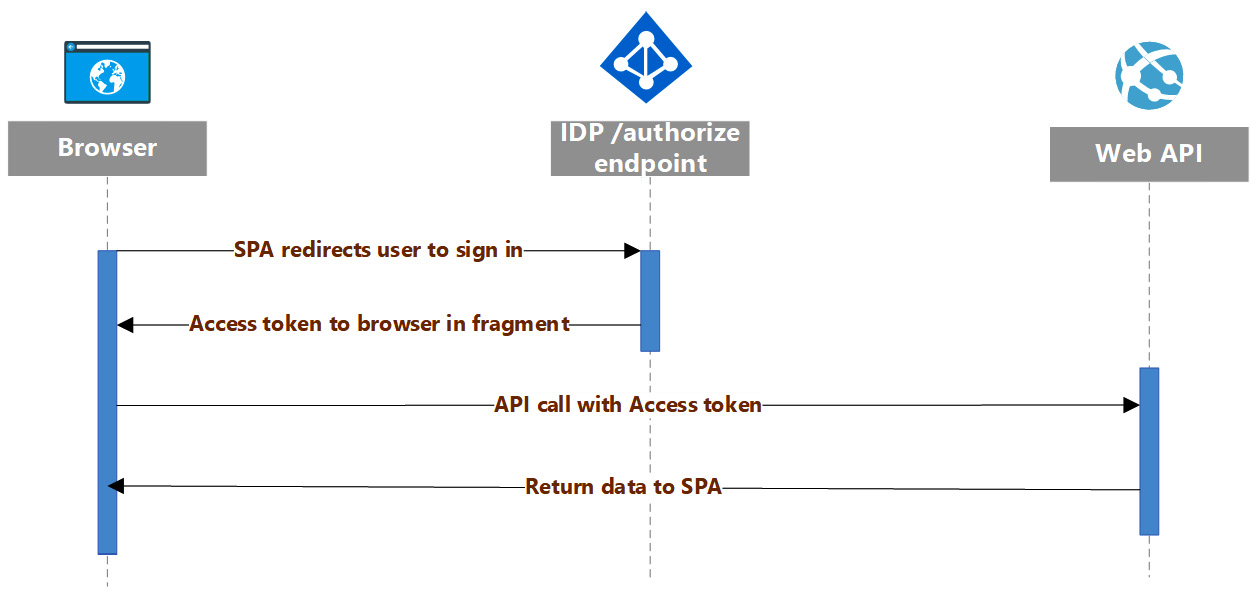
Figure 5.8 – SPA authorization sequence (the implicit flow)
The representation of the flow in Figure 5.5 highlights that the interaction in the implicit flow scenario is done only on the Authorize component of the identity provider and the access token is directly delivered to the browser in fragments. This flow has many security implications, which we will look at in closer detail in the following section.
Security considerations
As reported in the User authentication only pattern section, the auth grant code flow is preferable for security reasons.
It’s important nonetheless to state that, in general, all the authentication and authorization flows outlined for SPAs are less secure than those for web applications, as described in the Web applications section at the beginning of this chapter.
This is because the entity that validates and requests the access token is a client-side component (browser) that needs access to the client ID of the application. This information will, of course, be available to any attacker that downloads the static content and as such, they can attempt to attack the identity provider by using all the information available to them. This is not the case when the token is validated in the backend in a trusted environment where the secrets and client ID can be protected and are not available to an attacker.
Utilizing the state parameter and limiting the redirect URL to trustworthy clients is the approach adopted to ensure the security of the Authorization Code Grant without a client secret (as mentioned in the Web applications section earlier in this chapter). Since the secret isn’t being utilized, the only method to confirm the client’s identity is by utilizing a registered redirect URL. The redirect URL must be pre-registered with the OAuth 2.0 service for this reason.
Summary
In this chapter, we had the opportunity to review the recommended ways to implement authentication in different contexts. We covered user authentication in a web application scenario in a dedicated section and then reviewed the differences between user authentication from a native application standpoint and from a SPA standpoint as well. Throughout the chapter, we covered the advantages and disadvantages and the specific OAuth 2.0 flow to adopt according to the given circumstances. As we outlined in the chapter, whenever applicable, the Authorization Code Grant flow with PKCE is the recommended OAuth flow to adopt.
In the next chapter, we’re going to describe how these authentication patterns and OAuth flows relate to current IT trends, API proliferation, and service meshes, and, in general, how to match new trends to the concepts of authentication.