Chapter 11. Security and Backups
If you think technology can solve your security problems, then you don’t understand the problems and you don’t understand the technology.
Bruce Schneier, Applied Cryptography
In this chapter we’ll explore the security and access control machinery in Kubernetes, including Role-Based Access Control (RBAC), outline some vulnerability scanning tools and services, and explain how to back up your Kubernetes data and state (and even more importantly, how to restore it). We’ll also look at some useful ways to get information about what’s happening in your cluster.
Access Control and Permissions
Small tech companies tend to start out with just a few employees, and everyone has administrator access on every system.
As the organization grows, though, eventually it becomes clear that it is no longer a good idea for everyone to have administrator rights: it’s too easy for someone to make a mistake and change something they shouldn’t. The same applies to Kubernetes.
Managing Access by Cluster
One of the easiest and most effective things you can do to secure your Kubernetes cluster is limit who has access to it. There are generally two groups of people who need to access Kubernetes clusters: cluster operators and application developers, and they often need different permissions and privileges as part of their job function.
Also, you may well have multiple deployment environments, such as production and staging. These separate environments will need different policies, depending on your organization. Production may be restricted to only some individuals, whereas staging may be open to a broader group of engineers.
As we saw in “Do I need multiple clusters?”, it’s often a good idea to have separate clusters for production and staging or testing. If someone accidentally deploys something in staging that brings down the cluster nodes, it will not impact production.
If one team should not have have access to another team’s software and deployment process, each team could have their own dedicated cluster and not even have credentials on the other team’s clusters.
This is certainly the most secure approach, but additional clusters come with tradeoffs. Each needs to be patched and monitored, and many small clusters tend to run less efficiently than larger clusters.
Introducing Role-Based Access Control (RBAC)
Another way you can manage access is by controlling who can perform certain operations inside the cluster, using Kubernetes’s Role-Based Access Control (RBAC) system.
RBAC is designed to grant specific permissions to specific users (or service accounts, which are user accounts associated with automated systems). For example, you can grant the ability to list all Pods in the cluster to a particular user if they need it.
The first and most important thing to know about RBAC is that it should be turned on. RBAC was introduced in Kubernetes 1.6 as an option when setting up clusters. However, whether this option is actually enabled in your cluster depends on your cloud provider or Kubernetes installer.
If you’re running a self-hosted cluster, try this command to see whether or not RBAC is enabled on your cluster:
kubectl describe pod -n kube-system -l component=kube-apiserverName: kube-apiserver-docker-for-desktopNamespace: kube-system...Containers:kube-apiserver:...Command:kube-apiserver...--authorization-mode=Node,RBAC
If --authorization-mode doesn’t contain RBAC, then RBAC is not enabled for your cluster. Check the documentation for your service provider or installer to see how to rebuild the cluster with RBAC enabled.
Without RBAC, anyone with access to the cluster has the power to do anything, including running arbitrary code or deleting workloads. This probably isn’t what you want.
Understanding Roles
So, assuming you have RBAC enabled, how does it work? The most important concepts to understand are users, roles, and role bindings.
Every time you connect to a Kubernetes cluster, you do so as a specific user. Exactly how you authenticate to the cluster depends on your provider; for example, in Google Kubernetes Engine, you use the gcloud tool to get an access token to a particular cluster.
There are other users configured in the cluster; for example, there is a default service account for each namespace. All these users can potentially have different sets of permissions.
These are governed by Kubernetes roles. A role describes a specific set of permissions. Kubernetes includes some predefined roles to get you started. For example, the cluster-admin role, intended for superusers, has access to read and change any resource in the cluster. By contrast, the view role can list and examine most objects in a given namespace, but not modify them.
You can define roles on the namespace level (using the Role object) or across the whole cluster (using the ClusterRole object). Here’s an example of a ClusterRole manifest that grants read access to secrets in any namespace:
kind:ClusterRoleapiVersion:rbac.authorization.k8s.io/v1metadata:name:secret-readerrules:-apiGroups:[""]resources:["secrets"]verbs:["get","watch","list"]
Binding Roles to Users
How do you associate a user with a role? You can do that using a role binding. Just like with roles, you can create a RoleBinding object that applies to a specific namespace, or a ClusterRoleBinding that applies at the cluster level.
Here’s the RoleBinding manifest that gives the daisy user the edit role in the demo namespace only:
kind:RoleBindingapiVersion:rbac.authorization.k8s.io/v1metadata:name:daisy-editnamespace:demosubjects:-kind:Username:daisyapiGroup:rbac.authorization.k8s.ioroleRef:kind:ClusterRolename:editapiGroup:rbac.authorization.k8s.io
In Kubernetes, permissions are additive; users start with no permissions, and you can add them using Roles and RoleBindings. You can’t subtract permissions from someone who already has them.
Tip
You can read more about the details of RBAC, and the available roles and permissions, in the Kubernetes documentation.
What Roles Do I Need?
So what roles and bindings should you set up in your cluster? The predefined roles cluster-admin, edit, and view will probably cover most requirements. To see what permissions a given role has, use the kubectl describe command:
kubectldescribeclusterrole/editName:editLabels:kubernetes.io/bootstrapping=rbac-defaultsAnnotations:rbac.authorization.kubernetes.io/autoupdate=truePolicyRule:Resources...Verbs---------...-----bindings...[getlistwatch]configmaps...[createdeletedeletecollectiongetlistpatchupdatewatch]endpoints...[createdeletedeletecollectiongetlistpatchupdatewatch]...
You could create roles for specific people or jobs within your organization (for example, a developer role), or individual teams (for example, QA or security).
Guard Access to Cluster-Admin
Be very careful about who has access to the cluster-admin role. This is the cluster superuser, equivalent to the root user on Unix systems. It can do anything to anything. Never give this role to users who are not cluster operators, and especially not to service accounts for apps which might be exposed to the internet, such as the Kubernetes Dashboard (see “Kubernetes Dashboard”).
Warning
Don’t fix problems by granting cluster-admin unnecessarily. You’ll find some bad advice about this on sites like Stack Overflow. When faced with a Kubernetes permissions error, a common response is to grant the cluster-admin role to the application. Don’t do this. Yes, it makes the errors go away, but at the expense of bypassing all security checks and potentially opening up your cluster to an attacker. Instead, grant the application a role with the fewest privileges it needs to do its job.
Applications and Deployment
Apps running in Kubernetes usually don’t need any RBAC permissions. Unless you specify otherwise, all Pods will run as the default service account in their namespace, which has no roles associated with it.
If your app needs access to the Kubernetes API for some reason (for example, a monitoring tool that needs to list Pods), create a dedicated service account for the app, use a RoleBinding to associate it with the necessary role (for example, view), and limit it to specific namespaces.
What about the permissions required to deploy applications to the cluster? The most secure way is to allow only a continuous deployment tool to deploy apps (see Chapter 14). It can use a dedicated service account, with permission to create and delete Pods in a particular namespace.
The edit role is ideal for this. Users with the edit role can create and destroy resources in the namespace, but can’t create new roles or grant permissions to other users.
If you don’t have an automated deployment tool, and developers have to deploy directly to the cluster, they will need edit rights to the appropriate namespaces too. Grant these on an application-by-application basis; don’t give anyone edit rights across the whole cluster. People who don’t need to deploy apps should have only the view role by default.
Best Practice
Make sure RBAC is enabled in all your clusters. Give cluster-admin rights only to users who actually need the power to destroy everything in the cluster. If your app needs access to cluster resources, create a service account for it and bind it to a role with only the permissions it needs, in only the namespaces where it needs them.
RBAC Troubleshooting
If you’re running an older third-party application that isn’t RBAC-aware, or if you’re still working out the required permissions for your own application, you may run into RBAC permission errors. What do these look like?
If an application makes an API request for something it doesn’t have permission to do (for example, list nodes) it will see a Forbidden error response (HTTP status 403) from the API server:
Error from server (Forbidden): nodes.metrics.k8s.io is forbidden: User"demo" cannot list nodes.metrics.k8s.io at the cluster scope.
If the application doesn’t log this information, or you’re not sure which application is failing, you can check the API server’s log (see “Viewing a Container’s Logs” for more about this). It will record messages like this, containing the string RBAC DENY with a description of the error:
kubectl logs -n kube-system -l component=kube-apiserver | grep "RBAC DENY"RBAC DENY: user "demo" cannot "list" resource "nodes" cluster-wide
(You won’t be able to do this on a GKE cluster, or any other managed Kubernetes service that doesn’t give you access to the control plane: see the documentation for your Kubernetes provider to find out how to access API server logs.)
RBAC has a reputation for being complicated, but it’s really not. Just grant users the minimum privileges they need, keep cluster-admin safe, and you’ll be fine.
Security Scanning
If you’re running third-party software in your cluster, it’s wise to check it for security problems and malware. But even your own containers may have software in them that you’re not aware of, and that needs to be checked too.
Clair
Clair is an open source container scanner produced by the CoreOS project. It statically analyzes container images, before they are actually run, to see if they contain any software or versions that are known to be insecure.
You can run Clair manually to check specific images for problems, or integrate it into your CD pipeline to test all images before they are deployed (see Chapter 14).
Alternatively, Clair can hook into your container registry to scan any images that are pushed to it and report problems.
It’s worth mentioning that you shouldn’t automatically trust base images, such as alpine. Clair is preloaded with security checks for many popular base images, and will tell you immediately if you’re using one that has a known vulnerability.
Aqua
Aqua’s Container Security Platform is a full-service commercial container security offering, allowing organizations to scan containers for vulnerabilities, malware, and suspicious activity, as well as providing policy enforcement and regulatory compliance.
As you’d expect, Aqua’s platform integrates with your container registry, CI/CD pipeline, and multiple orchestration systems, including Kubernetes.
Aqua also offers a free-to-use tool called MicroScanner, that you can add to your container images to scan installed packages for known vulnerabilities from the same database that the Aqua Security Platform uses.
MicroScanner is installed by adding it to a Dockerfile, like this:
ADDhttps://get.aquasec.com/microscanner /RUNchmod +x /microscannerRUN/microscanner <TOKEN>[--continue-on-failure]
MicroScanner outputs a list of detected vulnerabilities in JSON format, which you can consume and report on using other tools.
Another handy open source tool from Aqua is kube-hunter, designed to find security issues in your Kubernetes cluster itself. If you run it as a container on a machine outside your cluster, as an attacker might, it will check for various kinds of problems: exposed email addresses in certificates, unsecured dashboards, open ports and endpoints, and so on.
Anchore Engine
The Anchore Engine is an open source tool for scanning container images, not only for known vulnerabilities, but to identify the bill of materials of everything present in the container, including libraries, configuration files, and file permissions. You can use this to verify containers against user-defined policies: for example, you can block any images that contain security credentials, or application source code.
Backups
You might be wondering whether you still need backups in cloud native architectures. After all, Kubernetes is inherently reliable and can handle the loss of several nodes at once, without losing state or even degrading application performance too much.
Also, Kubernetes is a declarative infrastructure as code system. All Kubernetes resources are described by data stored in a reliable database (etcd). In the event of some Pods being accidentally deleted, their supervising Deployment will re-create them from the spec held in the database.
Do I Need to Back Up Kubernetes?
So do you still need backups? Well, yes. The data stored on persistent volumes, for example, is vulnerable to failure (see “Persistent Volumes”). While your cloud vendor may provide nominally high-availability volumes (replicating the data across two different availability zones, for example), that’s not the same as backup.
Let’s repeat that point, because it’s not obvious:
Warning
Replication is not backup. While replication may protect you from the failure of the underlying storage volume, it won’t protect you from accidentally deleting the volume by mis-clicking in a web console, for example.
Nor will replication prevent a misconfigured application from overwriting its data, or an operator from running a command with the wrong environment variables and accidentally dropping the production database instead of the development one. (This has happened, probably more often than anyone’s willing to admit.)
Backing Up etcd
As we saw in “High Availability”, Kubernetes stores all its state in the etcd database, so any failure or data loss here could be catastrophic. That’s one very good reason why we recommend that you use managed services that guarantee the availability of etcd and the control plane generally (see “Use Managed Kubernetes if You Can”).
If you run your own master nodes, you are responsible for managing etcd clustering, replication, and backup. Even with regular data snapshots, it still takes a certain amount of time to retrieve and verify the snapshot, rebuild the cluster, and restore the data. During this time your cluster will likely be unavailable or seriously degraded.
Best Practice
Use a managed or turnkey service provider to run your master nodes with etcd clustering and backups. If you run them yourself, be very sure you know what you’re doing. Resilient etcd management is a specialist job, and the consequences of getting it wrong can be serious.
Backing Up Resource State
Apart from etcd failures, there is also the question of saving the state of your individual resources. If you delete the wrong Deployment, for example, how would you re-create it?
Throughout this book we emphasize the value of the infrastructure as code paradigm, and recommend that you always manage your Kubernetes resources declaratively, by applying YAML manifests or Helm charts stored in version control.
In theory, then, to re-create the total state of your cluster workloads, you should be able to check out the relevant version control repos, and apply all the resources in them. In theory.
Backing Up Cluster State
In practice, not everything you have in version control is running in your cluster right now. Some apps may have been taken out of service, or replaced by newer versions. Some may not be ready to deploy.
We’ve recommended throughout this book that you should avoid making direct changes to resources, and instead apply changes from the updated manifest files (see “When Not to Use Imperative Commands”). However, people don’t always follow good advice (the consultant’s lament throughout the ages).
In any case, it’s likely that during initial deployment and testing of apps, engineers may be adjusting settings like replica count and node affinities on the fly, and only storing them in version control once they’ve arrived at the right values.
Supposing your cluster were to be shut down completely, or have all its resources deleted (hopefully an unlikely scenario, but a useful thought experiment). How would you re-create it?
Even if you have an admirably well-designed and up-to-date cluster automation system that can redeploy everything to a fresh cluster, how do you know that the state of this cluster matches the one that was lost?
One way to help ensure this is to make a snapshot of the running cluster, which you can refer to later in case of problems.
Large and Small Disasters
It’s not very likely that you’d lose the whole cluster: thousands of Kubernetes contributors have worked hard to make sure that doesn’t happen.
What’s more likely is that you (or your newest team member) might delete a namespace by accident, shut down a Deployment without meaning to, or specify the wrong set of labels to a kubectl delete command, removing more than you intended.
Whatever the cause, disasters do happen, so let’s look at a backup tool that can help you avoid them.
Velero
Velero (formerly known as Ark) is a free and open source tool that can back up and restore your cluster state and persistent data.
Velero runs in your cluster and connects to a cloud storage service of your choice (for example, Amazon S3, or Azure Storage).
Follow the instructions to set up Velero for your platform.
Configuring Velero
Before you use Velero, you need to create a BackupStorageLocation object in your Kubernetes cluster, telling it where to store backups (for example, an AWS S3 cloud storage bucket). Here’s an example that configures Velero to back up to the demo-backup bucket:
apiVersion:velero.io/v1kind:BackupStorageLocationmetadata:name:defaultnamespace:velerospec:provider:awsobjectStorage:bucket:demo-backupconfig:region:us-east-1
You must have at least a storage location called default, though you can add others with any names you like.
Velero can also back up the contents of your persistent volumes. To tell it where to store them, you need to create a VolumeSnapshotLocation object:
apiVersion:velero.io/v1kind:VolumeSnapshotLocationmetadata:name:aws-defaultnamespace:velerospec:provider:awsconfig:region:us-east-1
Creating a Velero backup
When you create a backup using the velero backup command, the Velero server queries the Kubernetes API to retrieve the resources matching the selector you provided (by default, it backs up all resources). You can back up a set of namespaces, or the whole cluster:
velero backup create demo-backup --include-namespaces demoIt will then export all these resources to a named file in your cloud storage bucket, according to your configured BackupStorageLocation. The metadata and contents of your persistent volumes will also be backed up to your configured VolumeSnapshotLocation.
Alternatively, you can back up everything in your cluster except specified namespaces (for example, kube-system). You can also schedule automatic backups: for example, you can have Velero back up your cluster nightly, or even hourly.
Each Velero backup is complete in itself, not an incremental backup. So, to restore a backup, you only need the most recent backup file.
Restoring data
You can list your available backups using the velero backup get command:
velero backup getNAME STATUS CREATED EXPIRES SELECTORdemo-backup Completed 2018-07-14 10:54:20 +0100 BST 29d <none>
To see what’s in a particular backup, use velero backup download:
velero backup download demo-backupBackup demo-backup has been successfully downloaded to$PWD/demo-backup-data.tar.gz
The downloaded file is a tar.gz archive that you can unpack and inspect using standard tools. If you only want the manifest for a specific resource, for example, you can extract it from the backup file and restore it individually with kubectl apply -f.
To restore the whole backup, the velero restore command will start the process, and Velero will re-create all the resources and volumes described in the specified snapshot, skipping anything that already exists.
If the resource does exist, but is different from the one in the backup, Velero will warn you, but not overwrite the existing resource. So, for example, if you want to reset the state of a running Deployment to the way it was in the most recent snapshot, delete the running Deployment first, then restore it with Velero.
Alternatively, if you’re restoring a backup of a namespace, you can delete the namespace first, and then restore the backup.
Restore procedures and tests
You should write a detailed, step-by-step procedure describing how to restore data from backups, and make sure all staff know where to find this document. When a disaster happens, it’s usually at an inconvenient time, the key people aren’t available, everyone’s in a panic, and your procedure should be so clear and precise that it can be carried out by someone who isn’t familiar with Velero or even Kubernetes.
Each month, run a restore test by having a different team member execute the restore procedure against a temporary cluster. This verifies both that your backups are good and that the restore procedure is correct, and makes sure everyone is familiar with how to do it.
Scheduling Velero backups
All backups should be automated, and Velero is no exception. You can schedule a regular backup using the velero schedule create command:
velero schedule create demo-schedule --schedule="0 1 * * *" --include-namespacesdemoSchedule "demo-schedule" created successfully.
The schedule argument specifies when to run the backup, in Unix cron format (see “Cronjobs”). In the example, 0 1 * * * runs the backup at 01:00 every day.
To see what backups you have scheduled, use velero schedule get:
velero schedule getNAME STATUS CREATED SCHEDULE BACKUP TTL LAST BACKUP SELECTORdemo-schedule Enabled 2018-07-14 * 10 * * * 720h0m0s 10h ago <none>
The BACKUP TTL field shows how long the backup will be kept around before being automatically deleted (by default, 720 hours, equivalent to one month).
Other uses for Velero
While Velero is extremely useful for disaster recovery, you can also use it to migrate resources and data from one cluster to another—a process sometimes called lift and shift.
Making regular Velero backups can also help you understand how your Kubernetes usage is changing over time; comparing the current state to the state a month ago, six months ago, and a year ago, for example.
The snapshots can also be a useful source of audit information: for example, finding out what was running in your cluster at a given date or time, and how and when the cluster state changed.
Monitoring Cluster Status
Monitoring cloud native applications is a big topic, which, as we’ll see in Chapter 15, includes things like observability, metrics, logging, tracing, and traditional black-box monitoring.
However, in this chapter we’ll be concerned only with monitoring the Kubernetes cluster itself: the health of the cluster, the status of individual nodes, and the utilization of the cluster and the progress of its workloads.
kubectl
We introduced the invaluable kubectl command in Chapter 2, but we haven’t yet exhausted its possibilities. As well as being a general administration tool for Kubernetes resources, kubectl can also report useful information about the state of the cluster components.
Control plane status
The kubectl get componentstatuses command (or kubectl get cs for short) gives health information for the control plane components—the scheduler, the controller manager, and etcd:
kubectl get componentstatusesNAME STATUS MESSAGE ERRORcontroller-manager Healthy okscheduler Healthy oketcd-0 Healthy {"health": "true"}
If there were a serious problem with any of the control plane components, it would soon become apparent anyway, but it’s still handy to be able to check and report on them, as a sort of top-level health indicator for the cluster.
If any of your control plane components is not in a Healthy state, it will need to be fixed. This should never be the case with a managed Kubernetes service, but for self-hosted clusters, you will have to take care of this yourself.
Node status
Another useful command is kubectl get nodes, which will list all the nodes in your cluster, and report their status and Kubernetes version:
kubectl get nodesNAME STATUS ROLES AGE VERSIONdocker-for-desktop Ready master 5d v1.10.0
Since Docker Desktop clusters only have one node, this output isn’t particularly informative; let’s look at the output from a small Google Kubernetes Engine cluster for something more realistic:
kubectl get nodesNAME STATUS ROLES AGE VERSIONgke-k8s-cluster-1-n1-standard-2-pool--8l6n Ready <none> 9d v1.10.2-gke.1gke-k8s-cluster-1-n1-standard-2-pool--dwtv Ready <none> 19d v1.10.2-gke.1gke-k8s-cluster-1-n1-standard-2-pool--67ch Ready <none> 20d v1.10.2-gke.1...
Note that in the Docker Desktop get nodes output, the node role was shown as master. Naturally enough, since there’s only one node, that must be the master—and the sole worker node, too.
In Google Kubernetes Engine, and some other managed Kubernetes services, you don’t have direct access to the master nodes. Accordingly, kubectl get nodes lists the worker nodes only (a role of <none> indicates a worker node).
If any of the nodes shows a status of NotReady, there is a problem. A reboot of the node may fix it, but if not, it may need further debugging—or you could just delete it and create a new node instead.
For detailed troubleshooting of bad nodes, you can use the kubectl describe node command to get more information:
kubectl describe nodes/gke-k8s-cluster-1-n1-standard-2-pool--8l6nThis will show you, for example, the memory and CPU capacity of the node, and the resources currently in use by Pods.
Workloads
You may recall from “Querying the Cluster with kubectl” that you can also use kubectl to list all Pods (or any resources) in your cluster. In that example, you listed only the Pods in the default namespace, but the --all-namespaces flag will allow you to see all Pods in the entire cluster:
kubectl get pods --all-namespacesNAMESPACE NAME READY STATUS RESTARTS AGEcert-manager cert-manager-cert-manager-55 1/1 Running 1 10dpa-test permissions-auditor-15281892 0/1 CrashLoopBackOff 1720 6dfreshtracks freshtracks-agent-779758f445 3/3 Running 5 20d...
This can give you a helpful overview of what’s running in your cluster, and any Pod-level problems. If any Pods are not in Running status, like the permissions-auditor Pod in the example, it may need further investigation.
The READY column shows how many containers in the Pod are actually running, compared to the number configured. For example, the freshtracks-agent Pod shows 3/3: 3 out of 3 containers are running, so all is well.
On the other hand, permissions-auditor shows 0/1 containers ready: 0 containers running, but 1 required. The reason is shown in the STATUS column: CrashLoopBackOff. The container is failing to start properly.
When a container crashes, Kubernetes will keep trying to restart it at increasing intervals, starting at 10 seconds and doubling each time, up to 5 minutes. This strategy is called exponential backoff, hence the CrashLoopBackOff status message.
CPU and Memory Utilization
Another useful view on your cluster is provided by the kubectl top command. For nodes, it will show you the CPU and memory capacity of each node, and how much of each is currently in use:
kubectl top nodesNAME CPU(cores) CPU% MEMORY(bytes) MEMORY%gke-k8s-cluster-1-n1-...8l6n 151m 7% 2783Mi 49%gke-k8s-cluster-1-n1-...dwtv 155m 8% 3449Mi 61%gke-k8s-cluster-1-n1-...67ch 580m 30% 3172Mi 56%...
For Pods, it will show how much CPU and memory each specified Pod is using:
kubectl top pods -n kube-systemNAME CPU(cores) MEMORY(bytes)event-exporter-v0.1.9-85bb4fd64d-2zjng 0m 27Mifluentd-gcp-scaler-7c5db745fc-h7ntr 10m 27Mifluentd-gcp-v3.0.0-5m627 11m 171Mi...
Cloud Provider Console
If you’re using a managed Kubernetes service that is offered by your cloud provider, then you will have access to a web-based console that can show you useful information about your cluster, its nodes, and workloads.
For example, the Google Kubernetes Engine (GKE) console lists all your clusters, details for each cluster, node pools, and so on (See Figure 11-1).
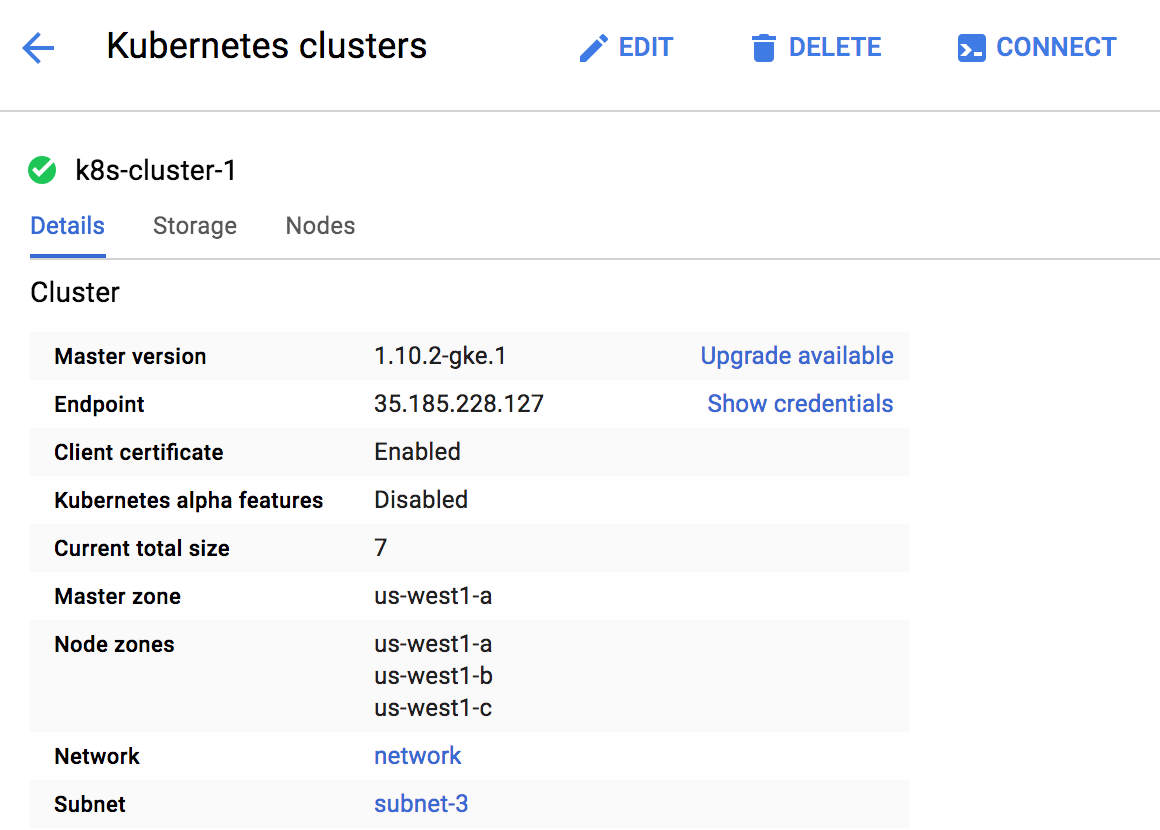
Figure 11-1. The Google Kubernetes Engine console
You can also list workloads, services, and configuration details for the cluster. This is much the same information as you can get from using the kubectl tool, but the GKE console also allows you to perform administration tasks: create clusters, upgrade nodes, and everything you’ll need to manage your cluster on a day-to-day basis.
The Azure Kubernetes Service, AWS Elastic Container Service for Kubernetes, and other managed Kubernetes providers have similar facilities. It’s a good idea to make yourself familiar with the management console for your particular Kubernetes service, as you’ll be using it a lot.
Kubernetes Dashboard
The Kubernetes Dashboard is a web-based user interface for Kubernetes clusters (Figure 11-2). If you’re running your own Kubernetes cluster, rather than using a managed service, you can run the Kubernetes Dashboard to get more or less the same information as a managed service console would provide.
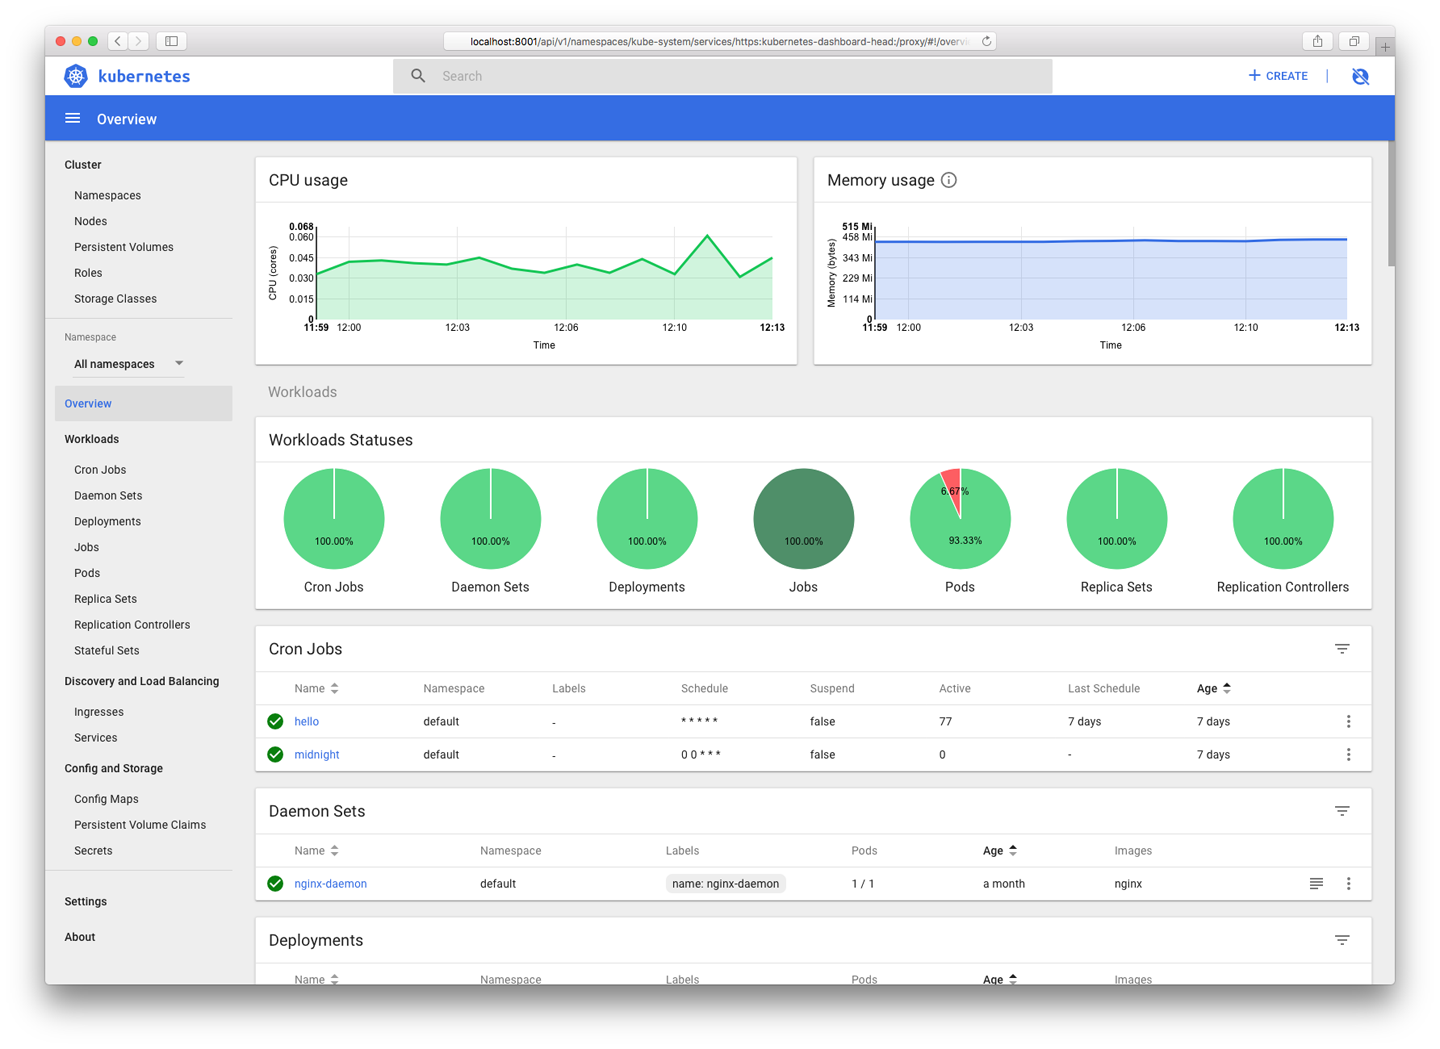
Figure 11-2. The Kubernetes Dashboard displays useful information about your cluster
As you’d expect, the Dashboard lets you see the status of your clusters, nodes, and workloads, in much the same way as the kubectl tool, but with a graphical interface. You can also create and destroy resources using the Dashboard.
Because the Dashboard exposes a great deal of information about your cluster and workloads, it’s very important to secure it properly, and never expose it to the public internet. The Dashboard lets you view the contents of ConfigMaps and Secrets, which could contain credentials and crypto keys, so you need to control access to the Dashboard as tightly as you would to those secrets themselves.
In 2018, security firm RedLock found hundreds of Kubernetes Dashboard consoles accessible over the internet without any password protection, including one owned by Tesla, Inc. From these they were able to extract cloud security credentials and use them to access further sensitive information.
Best Practice
If you don’t have to run the Kubernetes Dashboard (for example, if you already have a Kubernetes console provided by a managed service such as GKE), don’t run it. If you do run it, make sure it has minimum privileges, and never expose it to the internet. Instead, access it via kubectl proxy.
Weave Scope
Weave Scope is a great visualization and monitoring tool for your cluster, showing you a real-time map of your nodes, containers, and processes. You can also see metrics and metadata, and even start or stop containers using Scope.
kube-ops-view
Unlike the Kubernetes Dashboard, kube-ops-view doesn’t aim to be a general-purpose cluster management tool. Instead, it gives you a visualization of what’s happening in your cluster: what nodes there are, the CPU and memory utilization on each, how many Pods each one is running, and the status of those Pods (Figure 11-3).
node-problem-detector
node-problem-detector is a Kubernetes add-on that can detect and report several kinds of node-level issues: hardware problems, such as CPU or memory errors, filesystem corruption, and wedged container runtimes.
Currently, node-problem-detector reports problems by sending events to the Kubernetes API, and comes with a Go client library that you can use to integrate with your own tools.
Although Kubernetes currently does not take any action in response to events from the node-problem-detector, there may be further integration in the future that will allow the scheduler to avoid running Pods on problem nodes, for example.
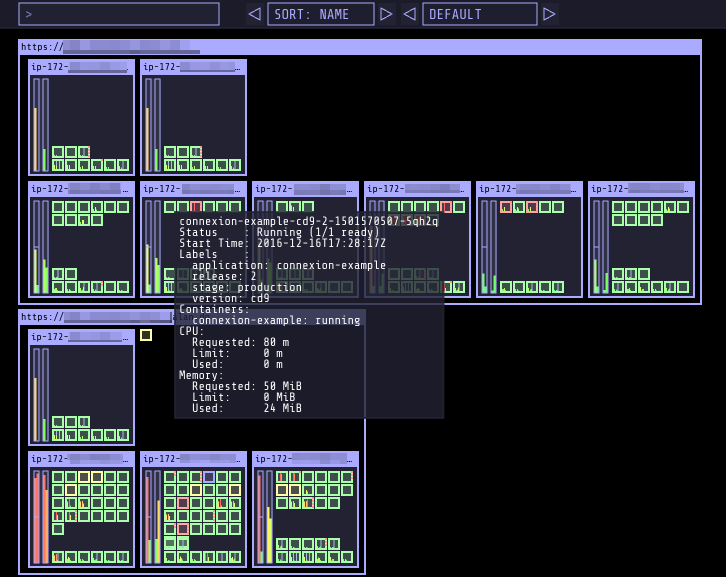
Figure 11-3. kube-ops-view gives an operational picture of your Kubernetes cluster
This is a great way to get a general overview of your cluster and what it’s doing. While it’s not a replacement for the Dashboard or for specialist monitoring tools, it’s a good complement to them.
Further Reading
Kubernetes security is a complex and specialized topic, and we’ve only scratched the surface of it here. It really deserves a book of its own… and now there is one. Security experts Liz Rice and Michael Hausenblas have written the excellent Kubernetes Security (O’Reilly), covering secure cluster setup, container security, secrets management, and more. We recommend it highly.
Summary
Security is not a product or an end goal, but an ongoing process that requires knowledge, thought, and attention. Container security is no different, and the machinery to help ensure it is there for you to use. If you’ve read and understood the information in this chapter, you know everything you need to know to configure your containers securely in Kubernetes—but we’re sure you get the point that this should be the start, not the end, of your security process.
The main things to keep in mind:
-
Role-Based Access Control (RBAC) gives you fine-grained management of permissions in Kubernetes. Make sure it’s enabled, and use RBAC roles to grant specific users and apps only the minimum privileges they need to do their jobs.
-
Containers aren’t magically exempt from security and malware problems. Use a scanning tool to check any containers you run in production.
-
Kubernetes is great and all, but you still need backups. Use Velero to back up your data and the state of the cluster. It’s handy for moving things between clusters, too.
-
kubectlis a powerful tool for inspecting and reporting on all aspects of your cluster and its workloads. Get friendly withkubectl. You’ll be spending a lot of time together. -
Use your Kubernetes provider’s web console and kube-ops-view for a graphical overview of what’s going on. If you use the Kubernetes Dashboard, secure it as tightly as you would your cloud credentials and crypto keys.