
11
BUILT-IN SOFTWARE AND PLUG-IN CAPABILITIES
As the popularity and importance of color correction grows, more and more vendors are getting color correction products into the market or beefing up the capabilities of the products that are already there. Despite the rapidly changing and expanding marketplace, this chapter will provide an explanation of color correction capabilities for some of the most popular desktop products and platforms. We’ll leave the “big iron” products out of the discussion for now and focus just on products under $10,000.
We’ll start with the built-in capabilities of some of the most popular editing applications and then cover some of the plug-ins that also have specialized color correction tools. We’ll primarily focus on the specific tools that help you utilize the information in the first couple of chapters. We’ll stay away from filters that provide preset looks because that pushes the boundary between color correction and effects work.
Adobe Premiere and After Effects
Adobe Premiere offers a nice array of color correction tools built in to the basic software. Premiere and After Effects both ship with versions of Synthetic Aperture’s Color Finesse, which is a very powerful, dedicated color correction plug-in and probably the Adobe user’s best choice for serious color correction. (See the Color Finesse heading later in this chapter for more on Color Finesse’s capabilities.)
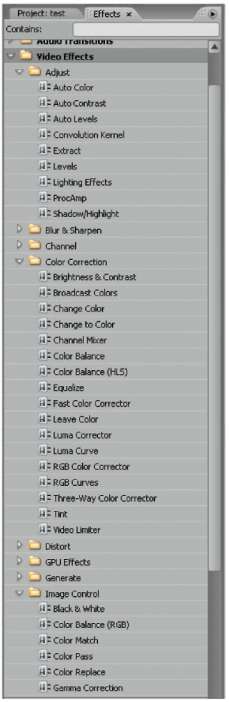
In addition to using Color Finesse, Premiere and After Effects both have other color correction effects. In Premiere these are in Effects > Video Effects. There are three folders with subcategories of effects that are applicable to color correction: Adjust, Color Correction, and Image Control (Figure 11-1).
Most of the effects in the Adjust folder are automatic effects. Though there are times when using these may be appropriate or helpful under tight deadlines, I won’t discuss them in more depth here because they’re basically “drag and drop” solutions.
- Extract is basically for creating black and white images, with nice control over contrast and exposure.
- ProcAmp is basically just the kind of control you’d get from a time base corrector (TBC), so I wouldn’t advise using it.
- Shadow/Highlight allows you to even out an image that has a strong backlight, pulling up the shadows and reducing the highlights.
The Color Correction folder has most of the effects you’ll want to access.
- Brightness and Contrast don’t give you enough control, which this book is all about, so stay away from that.
- Broadcast Colors is basically a broadcast limiter that helps keep your video legal.
- Change Color, Change to Color, and Leave Color are all variations of one another. Essentially they all do secondary color correction. They allow you to choose a color or color range in your image and either change it to another color or change everything else to black and white.
- Channel Mixer is a powerful tool but is not very intuitive or easy to use for beginners. It allows you to change the percentages of various channels or to swap them with other channels that are within—or even outside of—their own color spaces (for example, swapping the red channel for the Pb channel or the green channel for the luminance channel). This is useful when you have a severely damaged color channel because you can swap it for another less damaged channel. This obviously will change the color of the image quite radically, but you can fix the color differences with another effect.
- Color Balance is similar to the RGB Color Corrector effect, but I think that the RGB Color Corrector effect is superior to this in terms of functionality, so I’d use that instead of Color Balance.
- Color Balance (HLS) is basically like the ProcAmp effect and only provides very rudimentary control.
- Equalize is a gimmicky automatic effect to even out your pictures.
- Color Corrector is good for a quickie correction. It’s similar to FCP’s Color Corrector effect. It’s a single color wheel with sliders for blacks, mids, highlights, and saturation.
- Luma Corrector is a powerful tool. It includes the ability to do secondary color correction qualification and to set your tonal ranges.
- Luma Curve is limited in its functionality compared to what you can do with RGB Curves, so I’d use that instead.
- RGB Color Corrector is basically like the Advanced Tab in the Primary room of Apple Color. It allows you to address specific tonal ranges of each color channel. This is an important effect. Like a few other Premiere color correction effects, it includes the ability to do secondary color correction qualification and to set your tonal ranges.
- RGB Curves is similar to the Curves controls available in Color’s Primary In room and in Avid. Some people love to do their corrections with this tool. This is good to use while watching RGB Parade waveforms.
- Three-Way Color Corrector is similar to the Color Balance wheels in Final Cut Pro and Color and to Avid’s Hue Offset wheels. This is an important set of controls for color correction (Figure 11-2).
- Video Limiter is another broadcast-safe limiter to ensure legal levels on output.
The Image Control folder has a few additional effects, but these are mainly poor versions of effects that are in the Adjust and Color Correction folders. I have the feeling that this folder is a “legacy” folder that was left in place so that longtime Premiere users will know where certain effects are. In any case, the effects in this folder are:
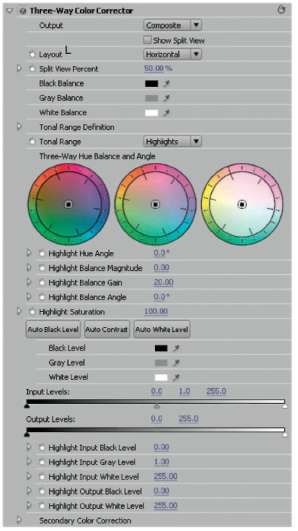
Figure 11.2 Three-way Color Corrector in adobe Premiere.
- Black and White: This effect has no controls. Use Extract instead.
- Color Balance (RGB): This is limited to overall levels for each color channel instead of allowing control over each tonal range. Use RGB Color Corrector instead.
- Color Match: This allows you to match colors. You can use this to tryto match shots or colors, but hopefully you’ve learned enough at this point that you can do a better job than this effect by a little hands-on effort.
- Color Pass and Color Replace: These are variations of Change Color, Change to Color, and Leave Color. Essentially they all do secondary color correction. They allow you to choose a color or color range in your image and either change it to another color or change everything else to black and white.
- Gamma Correction: This provides a single slider to adjust gamma. Try another tool instead, like the Luma Corrector.
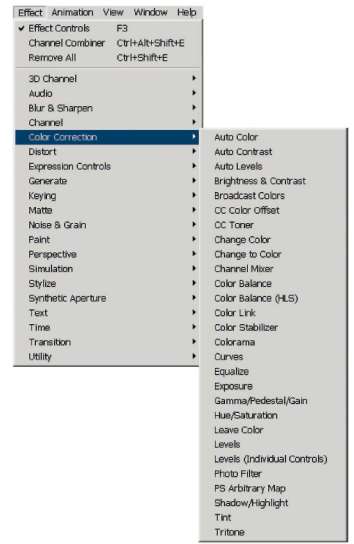
Figure 11-3 Adobe after effects Color Correction menu.
The effects for color correction in Adobe After Effects are a little more centrally located (see Figure 11-3). These are all the same as the effects just described for Premiere. Adobe tries—whenever possible—to have similar user interfaces and effects between all of its products to make it easier to transition between them. Some of the differences in effects are due to the nature of After Effects as an animation and motion design tool, so even though the effects are in the color correction menu, they’re really more design tools, like Color Link, which allows you to colorize a layer based on the average color of the pixels from another layer. That’s not really applicable in color correction. There are a few effects that are different between the two applications though:
- Color Stabilizer helps to reduce flicker and luminance changes between frames.
- Exposure is not really designed for video images, though it does give excellent controls over tonal range and color.
- Gamma/Pedestal/Gain is similar to Premiere’s RGB Color Corrector effect.
- Levels (Individual Controls) has histogram controls for each color channel and the master level.
- Photo Filter allows you to add a filter—similar to a glass filter placed over a lens when taking a picture—to add an overall color to the image.
- Tint is similar to Photo Filter without all of the preset colors.
- Tritone provides controls to break the image down into three distinct color palettes. This is a cool, graphic-looking effect.
Additionally, as of CS3, Adobe Photoshop has the ability to deal with video, and all of its powerful image processing tools can be used to do color correction. Video can be imported, turned into Smart Objects, and manipulated just like a still image.
Avid
Since the introduction of Avid Xpress Pro 3.5, Avid has ported a good deal of the power of their excellent color correction mode from Avid Symphony down into the rest of the Avid line, including Adrenaline and Media Composer. These are accessed from the Toolset menu. By clicking on Color Correction, the entire UI reconfigures to a new set of tools specifically designed to put all of the color correction tools you need in one place. The two main tabs are HSL and Curves. In the HSL tab are two more tabs. One is called Controls, and one is called Hue Offsets.
Controls offers the basic TBC controls, Hue, Saturation, Brightness, Contrast, and Clipping controls. There are also color matching controls that allow you to sample colors from reference frames to match colors from scene to scene. I never use the controls in this tab except for Saturation. Instead, use the controls in the Hue Offset tab.
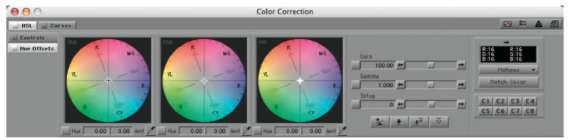
Figure 11-4 Avid Color Correction mode HSl Hue offset wheels tab.
The Hue Offsets tab (Figure 11-4) includes three Hue Offset wheels, one for each luminance range, but none for overall Hue Offset. Additionally, it includes controls for gain, gamma, and setup. Also on this tab is another set of color matching controls. For quick fixes, this is the tab where you can get the most done with the least work.
In the Curves tab, there are four different curves, one for each primary color plus a master curve. There is also another set of color matching controls. The color matching controls on each tab offer a slightly different capability, especially the one in the Curves tab, which provides a function called Natural Match. All of these tabs have buttons called Color Buckets that allow the user to save various setups for quick recall and reuse from shot to shot.
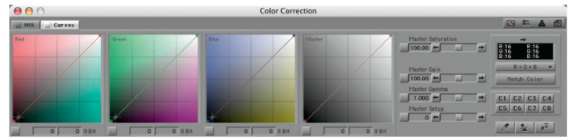
Figure 11-5 Avid Color Correction mode Curves tab.
In addition to the easily accessible Buckets, an unlimited number of corrections can be saved in a bin. These corrections can then be named and used from the bin, like any Avid effect, by dragging and dropping. The naming convention for color corrections is usually to name it after the clip that it corrected, but it can also be a simple description of what the correction does, such as “crushed blacks, cool gamma” or “Kurtis blue fix.”
Color
Apple Color has been discussed in pretty thorough depth throughout this book. This application—for Mac only—is a very deep application that has a very thorough toolset organized into rooms, which would be referred to as Tabs in just about any other application. The rooms include:
- Setup Room: This room is tor general settings and project management including the ability to save entire grades including all of the settings in all of the rooms.
- Primary In Room: This room is where the main Primary color correction is done using numerous sliders, color wheels, numerical entries, and Curves.
- Secondary Room: This room allows for qualification of eight different secondaries plus the ability to correct inside and outside of each of those qualifications. Vignettes and custom-user shape masks can be applied.
- Color FX Room: This room lets colorists apply numerous effects and plug-ins to the image and connect them in unique and complex ways in a user interface known as a process or effects tree. If you want to do selective defocus effects—a common color correction task—this is the room for the chore.
- Primary Out Room: This room is identical to the Primary In room except that it allows you to add additional corrections to a shot without altering the initial correction. And, because the rooms feed into one another, the Primary Out room is “downstream” of the Secondary and Color FX rooms, so it allows you to add corrections after the image has gone through those rooms. It also has additional limiting or “ceiling” functions for keeping your video legal.
- Geometry Room: This room allows you to rescale, recom-pose, and change the tilt of shots. As has been pointed out in a few tutorials, this can be useful to zoom all the way in on a certain portion of the picture so that it is the only thing fed to the scopes.
- Still Store Room: This room allows you to save and compare corrections on the same shot or to match colors between shots. Parameters allow for various wipes or to cut back and forth between shots.
- Render Queue Room: The final stop in Color is the Render Queue. This is the room that controls the output of Color and the return of the corrected material to Final Cut Pro or some other output.
Color Finesse
Synthetic Aperture is everywhere. It is a powerful standalone application for color correction, similar to Apple Color, but it is also a plug-in for Final Cut, After Effects, and Premiere, among others (Figure 11-6). It has many useful features that make it an excellent tool, even when used as a plug-in to applications that already have substantial color correction horsepower. One reason for using Color Finesse within these apps is that you can execute all your corrections with a single filter.
Color Finesse has a very complete range of tools with which to inspect and analyze the footage. There are software waveform and vectorscopes built into Color Finesse. Sampling colors with an eye-dropper is an excellent way to analyze your footage. Color Finesse provides this common feature and adds the ability to choose a single pixel or an averaged sample from a 3 × 3 pixel area, a 5 × 5 pixel area, or a 9 × 9 pixel area. Another nice feature is the Reference Gallery, which allows you to have access to a list of images that can be used as references for matching colors from one shot to the next. They are available across all projects, which is very convenient. You can use this feature for clients who have approved a certain color for their products or a certain skin tone for talent. (This stuff happens, believe me!) When it has been approved for one project, you can then match that color for any other projects. Matching skin tones from one scene to the next is as easy as clicking with an eyedropper using Color Finesse’s Color Matching feature. This is a great thing for people looking for more automated corrections. You can also use the eyedropper in the Curves tab to set white balance, black balance, and gray balance. This is a quick and intuitive way to get rid of color casts and to set basic levels.
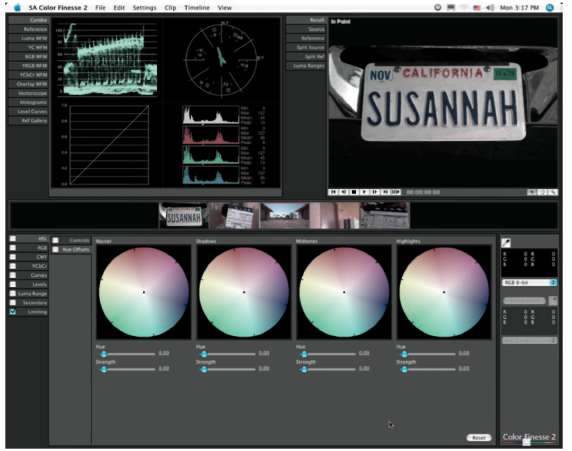
Figure 11-6 Color finesse’s basic ui. more tools are accessible through numerous tabs.
For more hands-on specific, manual control of your image, there are a wide range of choices that closely match the capability of Avid Symphony. There are Hue Offset wheels, Levels, and Curves, in addition to the standard HSL controls. All of these controls can be applied to specific luminance ranges of the picture, providing excellent control.
Final Cut Pro
Internally, Final Cut Pro provides most of its color correction effects through the Effects Menu > Video Filters > Color Correction path. The main tools that you’ll access from here are the Color Corrector and 3-Way Color Corrector (Figure 11-7). FCP also offers a set of scopes, including a histogram and parade waveform, which are accessed through the Windows > VidScopes. These scopes can be arranged in various configurations and, best of all, can be expanded to full-screen size. There are also color correction options in the Effects Menu > Video Filters > Image Control path, which was the main path for color correction before FCP version 3.
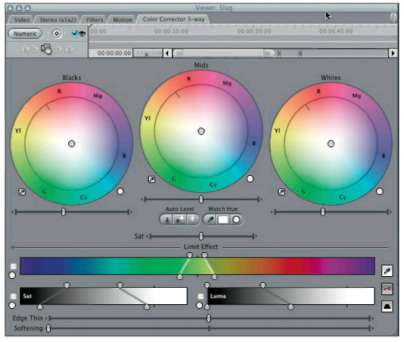
Figure 11-7 Final Cut Pro 3-way Color Correction effect. the limit effect controls at the bottom are revealed by spinning down the small triangle at the bottom left side of the effect window.
Under Image Control, Brightness and Contrast there are simple sliders for general control across the entire image. Color Balance provides sliders for R, G, and B levels for highlights, midtones, and shadows. Gamma/Pedestal/Gain provides sliders for gamma, pedestal, and gain in each of the color channels. Also, Levels provides sliders for master RGB and individual R, G, and B color channels with control similar to that of an editable histogram. Finally, the Proc Amp controls give the basic TBC-like controls that many editors are used to: Setup, Video, Chroma, and Phase.
Plug-Ins
In the first edition of this book, plug-ins were much more important because editing software was just beginning to provide the capabilities that the plug-ins allowed. Plug-ins still allow some functionality not provided by the color correction tools built in to the software. Plug-ins can also help make a more effortless transition between editing or compositing applications by using a color correction application that works as a plug-in in both applications.
Boris
Boris offers a number of color correction options in addition to the 3D effects for which Boris is best known. It allows brightness and contrast control and master RGB color controls. It also offers basic TBC control through the Color Correction filter and Gamma Control filters. Boris also has a set of plug-ins called Boris Continuum Complete, which includes a color correction plug-in that provides brightness, contrast, hue, saturation, output black, and output white controls. Also, the Pixelchooser gives many options for applying secondary-like qualifications to very specific portions of the picture based on a list of matte-generating features, as well as the ability to selectively mix the correction back with the original image.
Digital Film Tools
Digital Film Tools’ Composite Suite offers basic HSL (hue/saturation/luminance) control plus sliders for gamma and overall RGB sliders. Additionally, there are RGB sliders for shadows, midtones, and highlights as well as a feature called Flash Amount. This is terminology borrowed from cinematography and describes the optical process of brightening and lowering the contrast of an image by flashing it with light. Basically, Flash Amount just adds a simple tint to the image and is done by choosing a color with an eyedropper or RGB sliders. Digital Film Tools’ full Composite Suite package provides these color correction capabilities. They also have a color correction only package called Composite Suite Color Correct.
GenArts
GenArts’ Sapphire package also has some color correction capabilities. Sapphire does not put all of its color-related controls together in one effect, so you must stack several individual effects to have full control. For creating interesting looks, Sapphire does have a lot of options for blending effects in unique ways.
Bleach Bypass
 Sometimes called Skip Bleach, Bleach Bypass is a film developing process where the bleaching process is skipped. Without the bleaching process, film acquires a contrasty, low saturation look because the silver (black) is left on the film along with the film dyes. The look is similar to laying a black and white image on top of a full-color image.
Noise Industries Color Correction Effects
Noise Industries has several color correction effects as part of an extensive collection of effects (Figure 11-8). These include Vignettes, Bleach Bypass, Color Temperature, Day for Night, Filmic, and others.
The Advanced Vignette allows similar functionality to the Vignette tool in Apple Color without having to leave Final Cut Pro. Bleach Bypass lets you create the classic film process look in post-production with parameters that control the contrast and gamma and provide a couple of preset looks.
Red Giant Magic Bullet Colorista
The basic Colorista effect is so similar to the color correction controls in Final Cut, Avid, and Premiere that there’s not much I can say to recommend it because it seems to work slower than the built-in effects of those applications, but if you want to experiment with some of the techniques in this book that use the individual sliders for each tonal range of each color channel and your application (FCP or Avid) doesn’t have them, then the Colorista (sliders) effect is just what you need. It’s similar to the Advanced Tab of the Primary In room of Apple Color.
3Prong
3Prong’s color correction offering for Avid AVX, ColorFiX provides lots of control for isolating colors and luminance ranges. It also allows the image to be re-white balanced and re-black balanced using eyedroppers. ColorFiX has two sets of controls that it calls paths. The Main path provides overall color correction and the Select path is more closely related to secondary color correction, allowing for the replacement of specific colors with different colors without affecting the rest of the image. The controls in this plug-in are very advanced and provide very detailed control,allowing corrections to one part of a picture, such as shadow, to be done without affecting other areas. Also, the Color Difference controls allow for unusual color vector movement that is not available in any other plug-in.
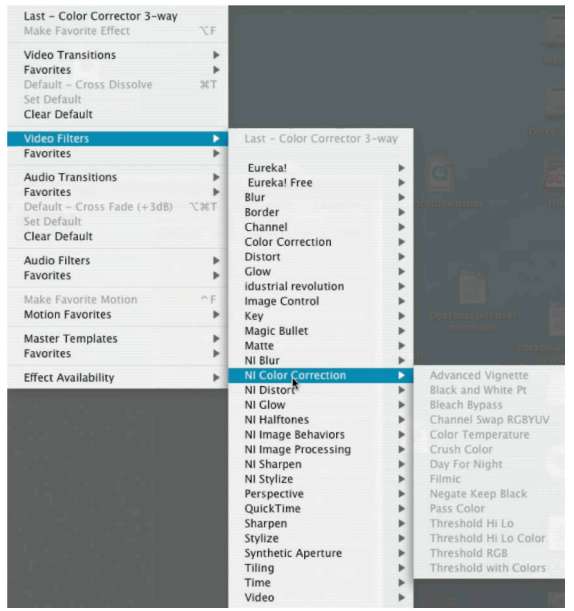
Figure 11-8 Noise industries’ color correction plug-ins.