Chapter 13. Account Security
This chapter covers the following topics:
TCP wrappers
This chapter covers the following objective:
Objective 3.2: Given a scenario, configure and implement appropriate access and authentication methods.
One of the most important tasks that all Linux administrators face is securing each of the systems in a network. Security breaches can occur both locally and remotely, so you need to know how to protect systems from multiple threats.
In this chapter you learn the basic concepts of securing network services, securing data using encryption techniques, and securing local user accounts.
“Do I Know This Already?” Quiz
The “Do I Know This Already?” quiz enables you to assess whether you should read this entire chapter or simply jump to the “Exam Preparation Tasks” section for review. If you are in doubt, read the entire chapter. Table 13-1 outlines the major headings in this chapter and the corresponding “Do I Know This Already?” quiz questions. You can find the answers in Appendix A, “Answers to the ‘Do I Know This Already?’ Quizzes and Review Questions.”
Table 13-1 “Do I Know This Already?” Foundation Topics Section-to-Question Mapping
Foundation Topics Section |
Questions Covered in This Section |
|---|---|
1 |
|
2 |
|
3 |
|
4 |
|
5 |
Caution
The goal of self-assessment is to gauge your mastery of the topics in this chapter. If you do not know the answer to a question or are only partially sure of the answer, you should mark that question as wrong for purposes of the self-assessment. Giving yourself credit for an answer you correctly guess skews your self-assessment results and might provide you with a false sense of security.
1. You have enabled a service definition rule as a file in the PAM configuration directory and suddenly notice that other authentication service rules are not working or are clearly missing. What is the issue?
a. You need to restart the PAM daemon.
b. You have obviated the /etc/pam.conf file.
c. You need to rename the service file so that it ends in .conf.
d. None of these answers are correct.
2. Which files contain lists of SSH host public keys? (Choose two.)
a. /etc/ssh/ssh_known_hosts
b. /etc/ssh_known_hosts
c. /etc/known_hosts
d. ~/.ssh/known_hosts
3. You execute the tty command and see the following output:
/dev/pts/4
What does this mean? (Choose all that apply.)
a. You are attached to a physical terminal.
b. You are running a terminal app in the GUI.
c. You have pressed Ctrl+Alt+F4 to get this terminal.
d. You are signed in via SSH.
4. You run a whistleblower’s website for those reporting fraud and abuse in a particular industry and are unable to get a central authority to issue you a certificate. Which of the following best describes your certificate authority status?
a. Rogue
b. Self-signed
c. Protected
d. Resigned
5. You are working behind a difficult firewall while on a project in a country that discourages many locations on the Web. What feature of virtual private networks could you take advantage of to get your traffic out to the public Internet?
a. SSL
b. Tunneling
c. Spoofing
d. TTY
e. IPSec
Foundation Topics
Pluggable Authentication Modules (PAMs)
Linux has come far from the days of just using the local /etc/passwd or user database file, and a key reason for this is the concept of pluggable authentication modules, otherwise known as PAMs.
PAMs, which are used by a large superset of Unix/Linux systems for authentication, ensure that an overall common scheme or method is used by any number of applications, services, and so on. The alternative would be for every application or service to have its own method of authenticating.
PAMs are pluggable, meaning that the sysadmin or even the developer of a distribution can decide which methods are used and when, and that person can add mechanisms without necessarily replacing all authentication backend services for existing services and applications.
PAM doesn’t work alone; it takes PAM-aware applications and services to work properly, and thanks to the very well-designed and implemented application programming interface (API), application programmers can insert minimal code into their applications to take advantage of the services of PAMs on a system.
Password Policies
By default, Linux requires a minimum password length of six characters, which is laughably simple in today’s world of high computing power and compute clusters. It could take many years to brute force crack a six-character password manually, but with a reasonable bot group or a supercomputer, it would take about four or five hours.
The password and other authentication-specific files that affect (and, well, effect!) authentication policy are the /etc/pam.conf file and the /etc/pam.d directory. This section focuses on DPKG/Debian system examples, which can be easily translated to RPM systems with a quick Google search.
PAM uses the /etc/pam.conf configuration file by default, and the configuration of services is being laid out in lines or rules that follow this format:
service type control module-path module-arguments
The PAM configuration rules fields are as follows:
service: The name of the application or service being affected, such as su or login.
type: Made up of account, auth, password, and session options, the types separate and control the different types of requirements for the user to access a service. For example, the auth type establishes that the user is who she appears to be with a password prompt and handles group and other privileges being granted.
control: This item governs what happens if a module can’t successfully establish authentication. Configuration happens in key:value sets in brackets. Options include required, which denies access if authentication fails; requisite, which defers access back to the overall application; sufficient, which can fail while allowing authentication to still occur; and optional, which doesn’t negatively affect authentication if it fails.
PAMs can additionally use service configuration files located in the /etc/pam.d directory, with each file being the configuration for a given service. In this case, the service name is the (all-lowercase) name of the file.
Password Length
An example of a PAM rule would be a rule that governs password length. Setting a 10-character password length requirement on a Linux system is as easy as editing the /etc/pam.d/common-password file and editing the following line:
password [success=2 default=ignore] pam_unix.so obscure sha512
so that it reads:
password [success=2 default=ignore] pam_unix.so obscure sha512
  minlen=10
Pay special attention to the spacing and make sure to duplicate this line exactly, or it may error out.
LDAP Integration
In order to set up LDAP integration with PAM, there must be an LDAP server configured and available, and the pam_user_map module must be installed and available in the authentication server’s PAM configuration.
The upshot of the integration is that you will be configuring LDAP authentication and then making a choice of whether to allow authentication for users on this system to occur solely via LDAP sources or to allow either local or LDAP authentication.
This is a complex subject, and while it’s a worthwhile field of endeavor to pursue, it is beyond the scope of this book and the Linux+ exam.
User Lockouts
Another important feature of PAM is the ability to configure user or password lockout policy, essentially being able to stop brute-force password guessing by making the system stop allowing subsequent password tries until a timeout period has been met.
An example of setting a 10-minute timeout would entail editing the /etc/pam.d/system-auth file by adding the following text to the auth line:
auth required pam_tally2.so deny=3 unlock_time=600
This requires a 10-minute timeout to occur after three unsuccessful password attempts by the same user. Such a measure will significantly slow down any brute force system cracking attempts.
The /etc/pam.d Directory
For simpler systems, the /etc/pam.conf file should be sufficient for the configuration of PAM, but on more complex systems with many different services and more complex configurations, the /etc/pam.d directory is another choice.
Use of the /etc/pam.d directory or the presence of service files in that directory will cause a PAM to skip the use of the /etc/pam.conf file, so be very aware that even a single service file in /etc/pam.d will obviate any configuration in the pam.conf file.
The /etc/pam.d directory contains files that follow the general format of the lines in the /etc/pam.conf file, also called rules. The main difference is that whereas the /etc/pam.conf file has a line that begins with service, in the /etc/pam.d directory the name of the service rule file is the name of the service, and each of the files configures just that service.
Another great feature of a PAM is that it allows for the stacking or layering of configuration rules, and the failure of any of the stacked rules causes the authentication to fail, which safeguards the system.
pam_tally2 and faillock
One of the workhorses of a PAM system is the pam_tally2 module, which comes as a separate module or a shared object (.so) and is designed to ensure that brute force attacks fail so the system remains secure. This module is designed to count the number of attempts to gain access, refer to any timeouts configured, ensure that those timeouts are followed, and upon successful access, reset any failed attempt counters.
An important note about lockouts is that the root user is typically not configured to access the system through remote means, such as SSH, so in the default lockout configuration, the root user is not affected, as this would mean a root user who fumbles the login too many times would effectively be locked out of the system from the console—not a good thing!
The companion utility to this process is the faillock command, which allows the system operator to query, display, and make needed changes to the failed attempts that the pam_faillock.so module keeps in per-user listings in the tally directory structure.
For example, you might query a user named snuffyg’s record of failed logging attempts with this command:
faillock snuffyg
If the user has too many failed login attempts and is currently in timeout, you can reset the user’s failed login attempts back to zero and give the user a new start with the following:
faillock snuffyg --reset
Secure Shell
By this time, you are probably aware that the Telnet protocol sends passwords and data in clear text and shouldn’t be trusted for important sessions and tasks. The Secure Shell (SSH) suite includes a protocol, a daemon, and client utilities that make your host-to-host shell sessions much more secure—about as secure as being at the physical console.
One of the features that makes SSH desirable as a remote protocol is its end-to-end encryption, which encrypts not only the username and password but also all communications.
The SSH suite replaces telnet, as well as rsh, rexec, rcp, and other unsecure utilities. You can use SSH to connect for a shell session, or you can use the scp command to remotely transfer files through the secure pipe that SSH builds between the hosts.
SSH Components
SSH includes a number of programs and files:
ssh: Used for remote shell sessions on another host, it replaces the telnet, rsh, and rexec commands.
scp: Used for remote copying operations, it replaces the rcp command.
sshd: The SSH daemon.
ssh-agent: Runs as a wrapper to the user’s session and provides authentication when requested.
ssh-add: Loads the user’s key(s) into the agent.
The SSH package configuration files are somewhat scattered. SSH daemon and global configuration files are kept in the /etc/ssh directory, and local or user-specific configuration files are kept in the ~/.ssh directory for each user.
The global configuration files include
/etc/ssh/sshd_config: This is the main configuration for the sshd daemon.
/etc/ssh/ssh_host_[dr]sa_key: These files, the ssh_host_dsa_key file and the ssh_host_rsa_key file, are in the same directory and are the private parts of the host’s key structure and should be protected from public view. The permissions for these files are 600 or rw for the root user and no permissions for anyone else.
/etc/ssh/ssh_host_[dr]sa_key.pub: These files, the ssh_host_dsa_key.pub file and the ssh_host_rsa_key.pub file, are in the same directory and are the public parts of the host’s key structure. These must be world-readable and write-only by the root user or set to 644.
/etc/nologin: This isn’t a part of SSH. However, if it’s present, no one can log in via SSH except the root user. Non-root users see the contents of the /etc/nologin file and then are denied access to the system.
A couple of special file pairs affect how SSH works, particularly the /etc/ssh /ssh_known_hosts and ~/.ssh/known_hosts files. The global file (/etc/ssh /ssh_known_hosts) is used to check the public key of a host attempting to attach via SSH. The local file (~/.ssh/known_hosts) is the file from which the client gets the public key of the remote server. If a new connection is begun to a previously unknown host, the user sees a message saying that the host is unknown and asking whether the user wants to store the host’s key in his known hosts file. If the user answers in the affirmative, the host’s public key is added to the ~/.ssh /known_hosts file.
The /etc/ssh/ssh_known_hosts file should be world-readable and root-writable. The ~/.ssh/known_hosts file must be owned by and writable for the user.
A file of interest, the ~/.ssh /authorized_keys file, affects only a particular user’s environment. This file is used to store the public keys that can be used for logging in as this user. These keys are matched with the keys presented by an ssh or scp client upon login request.
Using SSH Client Utilities
The SSH client utilities are versatile, with a number of options available to customize the experience. You just need to know the basics for the Linux+ exam, but this section includes a few fun options.
The SSH client command is used to replace the RSH and Telnet programs specifically. Its syntax is as follows:
# ssh -l username remotehost
If you don’t specify a username with the -l option, the ssh command assumes that you want to use the name of the account with which you are locally logged in. For example, if you are logged in as the user ross and you execute the ssh command without the -l option, the command attempts to log you in as ross on the remote system.
For example, I could attach to the host mp3server as the user snuffy with this command:
# ssh -l snuffy mp3server
If I have not connected to this server before, I get a message similar to what’s shown here:
The authenticity of host 'mp3server (192.168.33.44)' can't be
  established.
RSA key fingerprint is 73:4f:fa:b0:42:a4:3a:a8:64:2c:ad:26:1d:b1:
  21:e0.
Are you sure you want to continue connecting (yes/no)?
If I answer yes, the host’s public key is added to my ~/.ssh/known_hosts file and looks something like this:
192.168.3.44 ssh-rsa AAAAB3NzaC1yc2EAAAABIwAAAIEA1gFIB9VQpFKWAZUzNM+
  ac/U81Tk9R8OCFfUkegVJXwj6nqCISPyV2iJwaukcVVaVAQ+JR3EhvOvh4PhoSg4
  yzBSUkJ8aUBYoRSGj7PCD+vyWyi1922HGxWbWooMBAO/Was8I7N0zQ6jxDO9
  qNOHcrIFeU7qbOCrKjQDM08HQjk0=
Rather than work with RCP or FTP for file transfer work, I tend to use SCP. The scp command uses the SSH protocol and encrypts the files sent from one host to another host. For example, if I wanted to transfer file1 from my root user’s home directory on my machine to the same location on a host named remotehost, I could use the following command:
# scp /root/file1 root@remotehost:/root/file1
The system would prompt me with the RSA key question (as shown in the previous ssh example) if I have not connected to this system previously from this account.
I would be prompted for the password, and then the system would transfer the files. The output from a file transfer looks like this:
# [email protected]'s password:
mypubkey.txt 100% |**********************| 1379 00:00
You can copy files from your host to another host, as shown previously, or copy files from a remote host to your system by reversing the source and target specifications.
You can even copy files from one remote system to another remote system. For example, the following command recursively copies the /data directory and all its contents from the remote1 host to the remote2 host after prompting you for the password for both hosts:
# scp -r root@remote1:/data root@remote2:/data
Another use of the SSH protocol is to log in to a host and use SSH to forward the output from an X client back to your display. This feature, which can be specifically invoked with the -x option, is referred to as an X11 tunnel.
SSH allows for skipping the password prompt when signing on between computers, which can be convenient if you use the ssh or scp command frequently and don’t mind the possibility that someone could sit down at your accidentally unlocked station and have her way with your network!
Note
There has been a lot of talk about why it’s important to delete .rhosts files from user directories. Basically, if you have a user who has a hostname in her .rhosts file and that host also has the user’s hostname in its /etc/hosts_equiv file, that user can log in without a password by using the rlogin command. This would be a security risk, so my advice is to delete these files with the following command:
# find /home -iname .rhost -exec rm -f {} ;
Note
This deletes all .rhosts files it finds in users’ home directories and does not prompt you for each deletion.
Note
The system-wide configuration for the SSH client is kept in the /etc/ssh/ssh_config file, while each user’s individual configuration file for the SSH client is kept in the user’s ~/.ssh/config file.
The following example shows the steps required to enable SSH use without a password. In this example I have two machines, fattyre and murphy, both of which are Linux workstations with the necessary SSH software loaded, as per the defaults.
This demonstration assumes that fattyre and murphy are both in each other’s /etc/hosts files or resolvable via DNS.
Here’s how you can enable SSH use without passwords:
Step 1. Log in to fattyre as the root user.
Step 2. For this example, create a new user named user1:
useradd -m user1
Step 3. Set user1’s password with the passwd command to whatever you want:
passwd user1
Step 4. Switch to the user1 user account:
su - user1
Step 5. Create and set the permissions for the .ssh directory:
mkdir .ssh ; chmod 700 .ssh
Step 6. Generate an RSA key:
ssh-keygen -b 1024 -t rsa
Step 7. When prompted for the location for the file, press Enter to accept the default.
Step 8. When prompted for a passphrase, enter
seatec astronomy
Step 9. Reenter the passphrase when prompted.
Step 10. Change to the .ssh directory and set the permissions on the id_rsa.pub file:
cd .ssh ; chmod 644 id_rsa.pub
Step 11. Copy the id_rsa.pub file to a new file called authorized_keys:
cp id_rsa.pub authorized_keys
Note
The next steps take place on the host murphy.
Step 12. From the host murphy, ensure that you can contact the host fattyre with a ping:
ping fattyre
Step 13. Sign on to the host murphy as the root user.
Step 14. Add a user named user2:
useradd -m user2
Step 15. Set the password for user2:
passwd user2
Step 16. Enter the password twice to confirm it.
Step 17. Switch to the user2 account:
su - user2
Step 18. Make a directory and set its permissions with the following command:
mkdir .ssh ; chmod 700 .ssh
Note
The next steps take place on the host fattyre.
Step 19. From the host fattyre, connect to the murphy host as user2:
ssh -l user2 murphy
Step 20. When prompted about the RSA key, answer yes and then enter user2’s password.
Step 21. While logged in as user2 on the host murphy via SSH, copy the authorized_keys file from the fattyre host with the following command:
scp user1@fattyre:~/.ssh/authorized_keys ~/.ssh
The output of the scp program should look similar to this:
authorized_keys 100% |************************| 236 00:00
Step 22. Exit user2 on the host murphy and return to being user1 on fattyre.
Step 23. On fattyre as user1, invoke the ssh-agent as a wrapper to your shell:
ssh-agent $SHELL
Step 24. Add your key to the agent:
ssh-add
Step 25. When prompted for the passphrase, enter the following:
no more tears
You then see output similar to this:
Identity added: /home/ssha/.ssh/id_rsa (/home/ssha/.ssh/
  id_rsa)
Step 26. Try to log in as user2 on murphy and watch what happens:
ssh -l user Murphy
You shouldn’t see any password prompt; you should see only the confirmation of where you last logged in from:
Last login: Wed May 26 13:46:55 from fattyre
Step 27. If you do see a prompt for the passphrase, enter no more tears as you did before.
This is all it takes to get two accounts and machines set up to use SSH utilities without having to enter anything but the ssh-agent command along with the passphrase. Remember that ssh-agent resides in memory and wraps a security blanket around your shell session, answering any SSH-related security requests for you. The ssh-add utility is for adding key information into the agent and doesn’t have to be run again as long as your key information remains the same.
Note
The ssh-copy-id command is also a possible choice for sending a user’s authorized key to another server. For example, to have the user ZakkW’s authorized key exist on the Eternal server, you could use the command
# ssh-copy -id -i ~/zakkw/.ssh/keyfile zakkw@eternal
This will copy the user zakkw’s file to the remote server and install it into the authorized_keys file, prompting for a password to authenticate the process.
Ideally, this would be performed by the root user for both systems and assumes that you are on a remote system from the Eternal server.
Terminals PTY/TTY
TTY is a term that has its roots in antiquity (which I define as before I was born, or before the advent of publicly accessible and user-purchasable computers). Teletypes (hence the name TTY) were a system of hardware interfaces to a U.S. nationwide network called the telex network that was used for communication. Operators used the telex network to send telegrams, which were precursors to the SMS and text messages we enjoy and depend on so much today.
On a Unix/Linux system, tty refers to the subsystem that underlies all terminal (command line) access to a system. Used somewhat interchangeably, the terms console, terminal, and command line are all references to the tty—accessed physically or virtually.
A TTY is based on a type of device file and effectively exists in two types. The first type is what most would call a “real tty”—that is, one that is hardware implemented, or provides direct access from a keyboard and screen to the shell running physically on the system, also known as a console.
The second type is a PTY, or pseudo-tty, which is a terminal or tty that is accessed by a terminal application, either one like gnome-terminal running in the GUI and using a pty to behave like a real tty or from a remote system via the SSH protocol.
When running a text-based (no GUI loaded) Linux system, the user signs in and interacts via the tty subsystem, with the default text-mode terminal being on /dev/tty1, and when running, the default GUI tty access point is the /dev/tty7 terminal.
On a physical console, the typical number of ttys available is typically mapped to the number of F-keys (function keys) the device has. Some distributions only map /dev/tty1-6 to function keys F1 through F6 and leave F7 to be reserved for or mapped to any running GUI subsystem. Others give the user a full complement of /dev/tty1- /dev/ttyX, where X is the last F-key present.
Moving Between Terminals
At a physical console, a user can use Alt+F1 through Alt+F12/F13 to jump between physically configured tty sessions. Moving from one tty to another does not close out or stop the tty that is not currently focused on; the user is just moving from one viewport on the system to another. Finally, when using a GUI subsystem, prepending Ctrl to any of the Alt+F-key combinations allows the user to escape out of the /dev/tty7 GUI location and reach any of the other physical ttys by using the corresponding Ctrl+Alt+F-key combination.
securetty
The /dev/securetty device has several reasons for existing. The main one is that it controls what terminals the root user or configured authentication tokens can access. Or, if it’s used in the PAM system, it governs any terminals you would use to authenticate via an empty password. This is truly an edge case.
Public Key Infrastructure
Public key infrastructure (PKI) is a complex range of roles, procedures, and methods to provide public key encryption/decryption services, ranging from an email sent between two parties to bank-to-bank transactions to the entirety of all e-commerce activity on the Web.
The main purpose of a PKI setup is to ensure that a given certificate (used to sign and identify an entity) belongs to and identifies who it says it does.
To understand PKI, let’s use the open web as an example. If you are going to be doing commerce, accepting payments and handling people’s personal and (hopefully) private information, you can try to convince everyone how trustworthy you are purely through marketing, or you can take the time and trouble necessary to get a certificate from a managing authority and then use that to identify your services as being properly managed and secured. A central certificate management scheme requires you to interact with and trust the centralized authority—something that not every organization will do.
One of the other methods of using PKI is to be self-signing and develop a web of trust among and with other self-signers and to slowly build a reputation for being trustworthy. This is effectively the PKI version of word-of-mouth marketing or compliance. There are advantages to both scenarios—and downsides as well.
A distinct upside to a central certificate authority is that once it is verified as trustworthy by a certificate authority, a site or service or company can very quickly be verified by even individual users as being trustable.
A distinct downside of a central authority is that if you provide a good or service or have customers that the central authority does not approve of, it might be impossible to secure a certificate and participate in being approved as trustworthy. Then the entity will have to go unsigned or work to create a circle of trust with other like entities.
Private keys are always paired with public keys in the PKI process. Everyone has a pair of public and private keys, generated by their favorite tool, and while everyone can and should make their public key accessible to all they wish to communicate with, a private key should remain utterly inaccessible to anyone but the owner.
The role of public keys in this whole experience is that when someone wants to send you a message that is verifiably from her only, she will use your public key and her private key to sign or encrypt that message; then she will deliver it to you.
You can then use the other user’s public key and your private key to decrypt the message, and if you have verified that the other user’s public key is truly her (such as by looking at a certificate authority or finding it publicly posted on her website), then you can be certain the message is from her and not from a third party.
It kind of goes like this:
Say that Rebecca has her public and private keys and wants to encrypt a file to send to Robert. She uses her private key and Robert’s public key to encrypt the file and then sends it to Robert.
Robert either has verified Rebecca’s public key or does so and then uses his private key and her public key to decrypt the message.
It’s the combination of the encrypter’s private and the decrypter’s public key that creates the encrypted file, and only the decrypter’s private key can decrypt the file that was encrypted with the public key.
This is somewhat simplistic, but it is more than is needed for the scope of this book and the Linux+ exam.
The concept and practice of encryption just described is a two-way process. There is another method of encrypting something, involving hashing or using message digests, which enables you to effectively run math functions on an object to derive a hash sum. Then, anyone else who runs that same math or hash calculation on the object gets the same number.
Vendors use this method in practice when they post publicly available RPM and DPKG package files that they want users to download and use to patch their systems. If there were no method of verifying that these packages are authentic and have not been altered, applying them would be unwise. The vendor hash sums the packages and posts the sums, and when the user downloads the package, he runs the same hash calculation, and if he gets the same sum as the vendor, he knows the file is unaltered. If he gets a different sum, he should not trust the package and should report the issue to the vendor and re-obtain the package file from the vendor’s source and do the calculation again.
Another example of the PKI concept is for digital signatures. PKI can be used to authoritatively sign a document, such as an employment contract or contract for services, while never having the document exist as paper or be physically signed.
A prime example of a digital signatures service is DocuSign, which allows you to upload a document and then invite someone to review and sign that document, entirely electronically, and have complete trust that the signed document will stand up in a court of law as the equivalent of a physically signed document.
Using TCP Wrappers for Securing Services
If you want to protect a system’s services, you can use TCP wrappers as one of the layers of protection for seldom-used services.
A common misconception about using TCP wrappers is that only services in the /etc/inetd.conf file can be wrapped or protected, but that’s untrue. The TCP wrappers package includes a library called libwrap.a that an increasing number of Linux services reference for security.
inetd and TCP Wrappers
Using TCP wrappers involves placing a controlling daemon with instructions about who’s allowed and denied in front of each service that runs on a machine. Most services in the era of widespread inetd usage didn’t have built-in protection, so they were configured to be run as parameters of the tcpd daemon.
The tcpd daemon is set up to refer to the /etc/hosts.allow and /etc/hosts.deny files for the hosts that are allowed and denied access to services protected by tcpd.
xinetd and TCP Wrappers
For current distributions of Linux, many of the services are developed to use the libwrap.a library, which finally divorces TCP wrappers from the /etc/inetd.conf file.
In the case of current distributions and xinetd, any service capable of referencing libwrap.a has the potential to benefit from the protection that the /etc/hosts.allow and /etc/hosts.deny files provide.
In addition, if you want to run a set of services that are both secure and fast, you could use TCP wrappers and a standalone daemon instead of putting the service under inetd or xinetd control. Any time you put services behind inetd or xinetd, they must be initially started to function, and that means a small but noticeable delay—often enough that a client request times out.
The hosts.allow and hosts.deny Files
Two tables affect which clients can connect to various services (provided that the services use libwrap.a or are controlled by inetd/xinetd): /etc/hosts.allow and /etc/hosts.deny.
The format of a typical hosts.allow or hosts.deny file is as follows:
daemons: hosts : option : option
Daemons or services can be specified several ways:
ALL: This specifies all services.
service: Specifying a single service name means only that service is affected.
daemon,daemon: Multiple daemons affected by an entry should be separated by spaces or commas.
Hosts can be specified by many methods:
hostname: This affects a single unqualified hostname, typically from the local domain.
hostname.example.com: This affects a resolvable, fully qualified hostname, typically from a remote domain.
@group: This is used by NIS to denote a Net group and is unlikely to appear on the Linux+ exam.
10.1.1.0/255.255.255.0: This notation affects the hosts 10.1.1.1–10.1.1.255. The /XX notation for bits can be used, too, such as /24 to denote a default Class C subnet mask.
/path/filename: This causes the listed file (full path and filename) to be referred to as the list of hosts that will be affected.
Wrapper Read Order
The following order is important to understand when using TCP wrappers to protect services:
The /etc/hosts.allow file is read and parsed first. Any matches in it cause access to be allowed, skipping the /etc/hosts.deny file entirely.
The TCP wrapper files are read each time a service is requested. Therefore, any changes to the hosts.deny and hosts.allow files are immediately used.
The files are read sequentially. This means that two conflicting entries in the same file cause the first one to be matched, and the second and subsequent entries are ignored.
The files are read only if they exist. If they don’t exist, no rules can be applied, which means complete access is possible for services as far as TCP wrappers are concerned.
The most important point about how these files are processed is the order in which rules are matched from the files.
Format of hosts.allow and hosts.deny
It’s important to choose what you want to deny or allow with the following guidelines:
Deny by default: You deny all host access to all services by inserting an entry that reads ALL: ALL in the /etc/hosts.deny file; then you can allow any specific hosts with entries in the /etc/hosts.allow file.
Allow by default: If you trust everyone more than not, don’t have an allow file and just put the bad hosts or domains in the deny file.
Mix and match: This is the most complex style, and you should use it when you don’t have a clear delineation of good and bad. You should carefully inspect the allow files for lines that invalidate your deny rules.
Sample Configurations
This section shows a number of sample configurations that can serve as inspiration for your own allow and deny file entries.
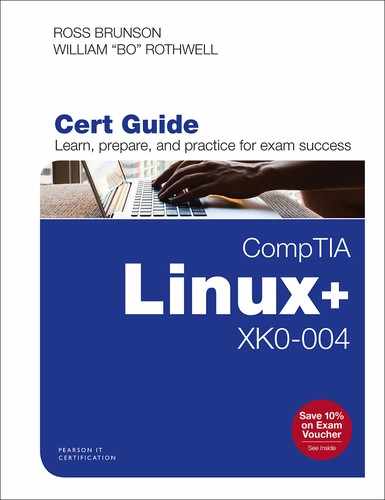
Figure 13-1 shows a scenario that denies all access.
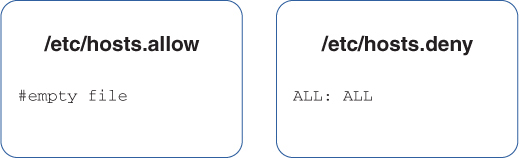
FIGURE 13-1 Denying all access
In this scenario, all access is denied. The presence of an /etc/hosts.allow file in this example is unnecessary because this scenario denies everyone, which means no allow rules are needed.
Another option is to deny all access from a specific domain, with the exception of one machine within the domain, as shown in Figure 13-2.
FIGURE 13-2 The order in which the allow and deny rules are read
The rule in the /etc/hosts.allow file is read before any rules from the /etc/hosts.deny file are read. As a result, the somehost.example.com machine is permitted access to the local system. All other machines from this domain are denied access based on the rule in the /etc/hosts.deny file. If a machine from any other domain attempts to connect to the local system, that machine is granted access since no rule would apply to that situation.
Another way to accomplish the preceding is to not have the /etc/hosts.allow file and in the /etc/hosts.deny file have the following line:
ALL: EXCEPT somehost.example.com
Another option is to allow all systems to connect to the named and sendmail servers and to deny access to all other servers, as shown in Figure 13-3.

FIGURE 13-3 Using service names to allow access
To have more granular control of who can access services, you can use service names to deny and allow access to particular services. For example, the following /etc/hosts.deny file entry allows access to all services except named:
named: ALL
Using Rule Options
Remember that the /etc/hosts.allow and /etc/hosts.deny files have the possibility of four configuration fields:
daemons: hosts : option : option
The real strength of using TCP wrappers comes out when you use the option fields to add characteristics to the entries that control access to services. An option can be a single keyword or a keyword value for a program or utility that needs arguments.
For example, if you wanted to log the fact that a host had attempted to access one of your services configured to be denied, you might use the following line in the /etc/hosts.deny file:
service: badhost : severity auth.info
This entry not only denies the host access to the service but also logs to the auth facility any messages that are severity level info or higher when the denial occurs.
Two useful keywords in the option fields are twist and spawn. You use the twist keyword when you want to booby-trap what would appear to be a service with another program or action. For example, if you wanted to cause a message to be sent back to an offending host that tries to use your finger daemon, you might use the following entry in the /etc/hosts.deny file:
in.fingerd: ALL : twist /bin/echo "421 Buzz off!"
This sends a standardized message to the host’s console, telling it access is denied.
The last keyword we cover is spawn. Often you want to allow some host to connect to a service, but at the same time you also want to be notified of the access. For example, to be notified via email every time someone accesses Telnet so you can email him with an SSH FAQ and scolding note to stop using Telnet, you would use the following entry in the access file:
in.telnetd: ALL : spawn /bin/echo 'date' from %h | mail root
This works for just about any service, as long as it can use the TCP wrappers or can be configured to work from inetd or xinetd.
If you spawn a command, you run the command as a child of the current shell, but if you use twist to run the command, you replace the current process with the command you run.
Watch carefully for denial file modifications, such as twist and spawn statements. Being able to verify which entries are valid or invalid is essential.
Virtual Private Network (VPN) Clients
One of the many offshoots of PKI use in the real world is for a virtual private network client to govern how the client safely authenticates and communicates with the server that grants internal network access.
IPsec
IPsec is an extension of the Internet Protocol (IP) that helps secure communications across networks via encryption. Key among the features it provides are authentication of the endpoints in an encrypted transfer and safety and confidentiality of the data being transmitted.
The role of IPsec and the topics that follow is to ensure that communications are secure between several different sets of hosts.
A VPN connection is typically between a remote user or network and the main network, such as a remote worker in an office, who might be writing a book about Linux+, or even a small satellite office that is connected through a persistent VPN to the main office.
SSL and TLS
Secure Sockets Layer (SSL) used to be alone in the field of securing web transactions, but Transport Layer Security (TLS) now encompasses SSL. Originally developed as a security protocol to allow browsers and servers to securely pass information to and from each other, this security layer is now considered essential for proper network citizens on the public Internet. One of the hallmarks of SSL encryption in a browser session is the telltale padlock icon to the left of the URL in the address, which appears when a session is properly established.
DTLS
Not to be confused with TLS, Datagram Transport Layer Security (DTLS) is based on TLS, but instead of using Transmission Control Protocol (TCP), it uses User Datagram Protocol (UDP) to structure its communications and avoid some of the issues that can arise when using TCP to send encrypted data across wide areas.
One of the very unfortunate issues that tunneling TCP traffic causes is a sort of double jeopardy where you can end up having fast TCP connections negatively interact with slower ones and cause what is known as “TCP meltdown.”
Note
It’s probably a misuse of anthropomorphism to describe TCP and UDP as TCP being slow and sure and UDP as fast and loose, but that’s the nature of the protocols. TCP has a very rigorous set of mechanisms for attempting to guarantee delivery of all data, and UDP doesn’t feature nearly as much in that regard.
Imagine that you are running through a crowded airport, and whenever you encounter a moving walkway, it simply enhances your ability to move faster and be more efficient. This best-case scenario is like fast TCP traffic being encrypted and sent in a time-efficient manner over TCP-based IPsec tunnels to other destinations.
Now imagine that every once in a while, in your running through the airport, you encounter a very slow or almost stopped moving walkway, and people are piled up behind each other, so that you often have to either stop or slow down so precipitously that you end up losing items in your haste. You might even encounter a superfast walkway right in front of a very slow walkway, where another big pileup of people and belongings happens. This illustrates the problem of sending TCP over TCP, and it is why the DTLS protocol exists. It turns out that sending TCP packets over a DTLS/UDP encrypted connection is overall more efficient and reliable than doubling up the TCP protocol. The DTLS protocol leaves the reordering or reassembly of packets to the operating system and application reliability handling mechanism on either side and concentrates on trying to get the data from one location to the other as quickly and reliably as possible.
Transport and Tunnel Modes
There are two modes of transporting information via IP: transport mode and tunnel mode.
Transport mode is typically used between two endpoints, such as a host and a server, and the packet is encapsulated with the proper security header, which is then stripped off at the destination, preserving the original packet’s information. The packets in transport mode are encrypted with the proper header before being sent across the public Internet, and they are decrypted on the other side when received.
Tunnel mode involves building or rebuilding the header to reflect the ingress and egress security points of a tunnel, or an encrypted channel that is built between two security devices. All traffic is sent down that encrypted tunnel rather than being set loose to make its way across the public Internet at will.
Summary
In this chapter you learned about pluggable authentication modules (PAMs), password policies, and other PAM features and tools. You also looked at the SSH protocol and learned how to generate the various keys and use them on local and remote systems to affect authentication. You learned about TTY and PTY use on systems, how public key infrastructure works in some detail, how VPNs are based on IPsec, and how VPNs connect and use various mechanisms to attempt reliable delivery.
Exam Preparation Tasks
As mentioned in the section “How to Use This Book” in the Introduction, you have a couple of choices for exam preparation: the exercises here, Chapter 30, “Final Preparation,” and the exam simulation questions in the Pearson Test Prep Software Online.
Review All Key Topics
Review the most important topics in this chapter, noted with the Key Topic icon in the outer margin of the page. Table 13-2 lists a reference of these key topics and the page numbers on which each is found.
Table 13-2 Key Topics for Chapter 13
Key Topic Element |
Description |
Page Number |
|---|---|---|
Paragraph |
PAMs |
|
Section |
Password Policies |
|
Section |
Password Length |
|
Section |
LDAP Integration |
|
Section |
User Lockouts |
|
Section |
The /etc/pam.d Directory |
|
Section |
pam_tally2 and faillock |
|
Section |
Secure Shell |
|
Section |
SSH Components |
|
List |
Global configuration files |
|
Paragraph |
Set of files that affect SSH operations |
|
Paragraph |
The SSH client command |
|
List |
Enabling SSH usage |
|
Note |
The ssh-copy-id command |
|
Section |
Terminals PTY/TTY |
|
Paragraph |
Two types of TTY |
|
Section |
Moving Between Terminals |
|
Section |
securetty |
|
Section |
Public Key Infrastructure |
|
Paragraph |
PKI self-signing as a way of developing trust |
|
Paragraph |
Private keys |
|
Paragraph |
Encryption |
|
Paragraph |
Private keys and public keys in the PKI process |
|
Paragraph |
Format of hosts.allow and hosts.deny |
|
Section |
Wrapper Read Order |
|
Section |
Using Rule Options |
|
Section |
Virtual Private Network (VPN) Clients |
|
Section |
IPsec |
|
Section |
SSL and TLS |
|
Section |
DTLS |
|
Section |
Transport and Tunnel Modes |
Define Key Terms
Define the following key terms from this chapter and check your answers in the glossary:
SetUID (SUID)
SetGID (SGID)
Gnu Privacy Guard (GnuPG)
Review Questions
1. When a user on host1 uses the SSH client to successfully connect to host2 for the first time, which file is updated with SSH-related information?
a. ~/.ssh/known_hosts on host1
b. /etc/ssh/known_hosts on host2
c. ~/.ssh/authorized_keys on host2
d. /etc/ssh/authorized_keys on host1
2. You are ordered to deny access to the Telnet service on your server for the host snuffypc and to use the TCP wrappers files and utilities to accomplish this. In the blank, write the full path and filename of the file that should contain this entry:
__________________________________________________________________
3. You are the root user on your managed systems. You need to send the /root/file6 file from host1 to host3 in the same location, but you’re on host2. Which of the following commands accomplishes the task?
a. scp root@host1:~/file6 root@host3
b. scp root@host1:/root/file6 root@host3
c. scp root@host1:/root/file6 root@host3:~
d. scp root@host1:file6 root@host3
4. You just downloaded a new public key and imported it into your GPG key ring. Fill in the blank with the command and any necessary options you need to enter to see the contents of your key ring:
__________________________________________________________________
5. One of the systems you manage is acting funny, and you suspect that some files might have special bits set that allow standard users to run important utilities as root. Which of the following search commands shows you all files that have any combination of special bits set?
a. find / -perm -7000
b. find / -perm +7000
c. find / -perms 7000
d. locate --permissions=rws
6. You need to be able to attach, via a shell session, to other hosts over a secure and encrypted connection and to log on to the remote system without entering a password every time. Which of the following is a program or utility that directly makes this possible?
a. ssh-add
b. ssh-keygen
c. ssh-agent
d. .ssh/authorized_keys
7. A security situation requires you to create a 1K RSA public/private key combination for your currently logged-in account. Fill in the blank with the correct command, with any necessary options and arguments, to accomplish this:
__________________________________________________________________