
Chapter 3
Information Gathering and Vulnerability Scanning
This chapter covers the following topics related to Domain 2.0 (Information Gathering and Vulnerability Scanning) of the CompTIA PenTest+ PT0-002 certification exam:
2.1 Given a scenario, perform passive reconnaissance.
2.2 Given a scenario, perform active reconnaissance.
2.3 Given a scenario, analyze the results of a reconnaissance exercise.
2.4 Given a scenario, perform vulnerability scanning.
The first step a threat actor takes when planning an attack is to gather information about the target. This act of information gathering is known as reconnaissance. Attackers use scanning and enumeration tools along with public information available on the Internet to build a dossier about a target. As you can imagine, as a penetration tester, you must also replicate these methods to determine the exposure of the networks and systems you are trying to defend. This chapter begins with a discussion of what reconnaissance is in general and the difference between passive and active methods. You will briefly learn about some of the common tools and techniques used. From there, the chapter digs deeper into the process of vulnerability scanning and how scanning tools work, including how to analyze vulnerability scanner results to provide useful deliverables and explore the process of leveraging the gathered information in the exploitation phase. The chapter concludes with coverage of some of the common challenges to consider when performing vulnerability scans.
“Do I Know This Already?” Quiz
The “Do I Know This Already?” quiz allows you to assess whether you should read this entire chapter thoroughly or jump to the “Exam Preparation Tasks” section. If you are in doubt about your answers to these questions or your own assessment of your knowledge of the topics, read the entire chapter. Table 3-1 lists the major headings in this chapter and their corresponding “Do I Know This Already?” quiz questions. You can find the answers in Appendix A, “Answers to the ‘Do I Know This Already?’ Quizzes and Q&A Sections.”
Table 3-1 “Do I Know This Already?” Section-to-Question Mapping
Foundation Topics Section | Questions |
Performing Passive Reconnaissance | 1–5 |
Performing Active Reconnaissance | 6–8 |
Understanding the Art of Performing Vulnerability Scans | 9 |
Understanding How to Analyze Vulnerability Scan Results | 10 |
1. What tools can be used for performing passive reconnaissance using DNS information? (Choose all that apply.)
DNSRecon
Recon-ng
Dig
All of these answers are correct.
2. You are hired to perform a penetration test and evaluate the security of Pearson.com. While you are performing passive reconnaissance, what is a Linux command that can be used to identify the technical and administrative contacts of a given domain?
netstat
dig
whois
None of these answers are correct.
3. Which of the following are examples of cryptographic flaws that can be identified while performing passive reconnaissance of a given application? (Choose all that apply.)
Incorrect or missing CRLs
Weak crypto algorithms
Legacy TLS and SSL versions
All of these answers are correct.
4. ____________ allows certificate authorities (CAs) to provide details about all related certificates that have been issued for a given domain and organization.
Certificate transparency
A certificate revocation list (CRL)
Online Certificate Status Protocol (OCSP)
None of these answers are correct.
5. During a penetration testing engagement, you are performing passive reconnaissance and would like to get file metadata information about different online files (including images). What specification defines the formats for images, sound, and supplementary tags that can be used to perform this reconnaissance?
Exchangeable Image File Format (Exif)
Extensible Image File Format (Exif)
Exchangeable File Format (EFF)
None of these answers are correct.
6. When running an Nmap SYN scan, what will be the Nmap result if ports on the target device do not respond?
Open
Closed
Filtered
Listening
7. Which of the following Nmap options would you use to perform a TCP connect scan?
-sS
-sF
-sU
-sT
8. Which of the following Nmap options would you want to try if your SYN scans were being identified by network filters?
-sF
-sU
-sT
-sS
9. What type of scan may provide a reduced rate of false positives?
Authenticated scans
Unauthenticated scans
Metasploit scans
None of these answers are correct.
10. Which of the following is a standard developed by MITRE to assign identifiers to vulnerabilities?
CWE
CVE
CVSS
SCAP
Foundation Topics
Performing Passive Reconnaissance
Reconnaissance is always the initial step in a cyber attack. An attacker must first gather information about the target in order to be successful. In fact, the term reconnaissance is widely used in the military world to describe the gathering of information about the enemy, such as information about the enemy’s location, capabilities, and movements. This type of information is needed to successfully perform an attack. Reconnaissance in a penetration testing engagement typically consists of scanning and enumeration. But what does reconnaissance look like from an attacker’s perspective?
Active Reconnaissance vs. Passive Reconnaissance
Active reconnaissance is a method of information gathering in which the tools used actually send out probes to the target network or systems in order to elicit responses that are then used to determine the posture of the network or system. These probes can use various protocols and multiple levels of aggressiveness, typically based on what is being scanned and when. For example, you might be scanning a device such as a printer that does not have a very robust TCP/IP stack or network hardware. By sending active probes, you might crash such a device. Most modern devices do not have this problem; however, it is possible, so when doing active scanning, you should be conscious of this and adjust your scanner settings accordingly.

Passive reconnaissance is a method of information gathering in which the tools do not interact directly with the target device or network. There are multiple methods of passive reconnaissance. Some involve using third-party databases to gather information. Others also use tools in such a way that they will not be detected by the target. These tools, in particular, work by simply listening to the traffic on the network and using intelligence to deduce information about the device communication on the network. This approach is much less invasive on a network, and it is highly unlikely for this type of reconnaissance to crash a system such as a printer. Because it does not produce any traffic, it is also unlikely to be detected and does not raise any flags on the network that it is surveying. Another scenario in which a passive scanner would come in handy would be for a penetration tester who needs to perform analysis on a production network that cannot be disrupted. The passive reconnaissance technique that you use depends on the type of information that you wish to obtain. One of the most important aspects of learning about penetration testing is developing a good methodology that will help you select the appropriate tools and technologies to use during the engagement.
Common active reconnaissance methods include the following:
Host enumeration
Network enumeration
User enumeration
Group enumeration
Network share enumeration
Web page enumeration
Application enumeration
Service enumeration
Packet crafting
Common passive reconnaissance methods include the following:
Domain enumeration
Packet inspection
Open-source intelligence (OSINT)
Recon-ng
Eavesdropping
DNS Lookups
Suppose, for example, that an attacker has a target, h4cker.org, in its sights. h4cker.org has an Internet presence, as most companies do. This presence is a website hosted at www.h4cker.org. Just as a home burglar would need to determine which entry and exit points exist in a home before he could commit a robbery, a cyber attacker needs to determine which of the target’s ports and protocols are exposed to the Internet. A burglar might take a walk around the outside of the house, looking for doors and windows, and then possibly take a look at the locks on the doors to determine their weaknesses. Similarly, a cyber attacker would perform tasks like scanning and enumeration.
Typically, an attacker would start with a small amount of information and gather more information while scanning, eventually moving on to performing different types of scans and gathering additional information. For instance, the attacker targeting h4cker.org might start by using DNS lookups to determine the IP address or addresses used by h4cker.org and any other subdomains that might be in use. Let’s say that those queries reveal that h4cker.org is using the IP addresses 185.199.108.153 for www.h4cker.org, 185.199.110.153 for mail.h4cker.org, and 185.199.110.153 for portal.h4cker.org. Example 3-1 shows an example of the DNSRecon tool in Kali Linux being used to query the DNS records for h4cker.org.
Example 3-1 DNSRecon Example
|--[omar@websploit]--[~]
|--- $dnsrecon -d h4cker.org
[*] Performing General Enumeration of Domain: h4cker.org
/usr/share/dnsrecon/./dnsrecon.py:816: DeprecationWarning: please use
dns.resolver.Resolver.resolve() instead
  answer = res._res.query(domain, 'DNSKEY')
[*] DNSSEC is configured for h4cker.org
[*] DNSKEYs:
[*]   NSEC3 ZSK RSASHA256 030100019ed0af43a7dc09d07e1646d2
b4036075e9187c4c563519155f888b60 8fdffe9c6d8a0a01522f78d25d257772
0a8e97d1350e694b272ec63af9708609 b3721e6b53a2d7aa8839585714800319
dd98f97b39d8768f7e975a449c001ce9 55189ea83f30a4fe6b4dff7b3dd15f89
1cef3a8d84968a980bde65c0b1309d5b 825a0f23
[*]   NSEC3 KSk RSASHA256 030100018403e0971df0dc1770f3b96a
ca57eb68d03a84b4a712cadda60567fe a264f0e5d7ec4c8e0187300f0933f419
d22a17548c3a046636666300c06711f0 761200245149a220b79918b3f38a9a6e
8228425cb39b6466adba9f6f7fe28d76 c1bcf44e19f035f658eef65cb630638f
7aa15d7706cc572c863d65619bd48f77 425ea0844716709b9923117ade41d414
c94f8e581db9274cf1c8bb41fbbd7838 24978c0f9b7125b9ce3e8abe442a6bc7
4bf519790a18a27916c946f503c02b08 0a8550bc5b9b147d581a3f5f763df377
9e1d655c51c2e06aa2062d1f08f34abc 37947ac48403dc0da9af846c7a4caeae
7567bb8fdf625b1a179e6fd6faf35be9 09488cb9
[*]   SOA ns-cloud-c1.googledomains.com 216.239.32.108
[*]   NS ns-cloud-c1.googledomains.com 216.239.32.108
[*]   NS ns-cloud-c1.googledomains.com 2001:4860:4802:32::6c
[*]   NS ns-cloud-c2.googledomains.com 216.239.34.108
[*]   NS ns-cloud-c2.googledomains.com 2001:4860:4802:34::6c
[*]   NS ns-cloud-c3.googledomains.com 216.239.36.108
[*]   NS ns-cloud-c3.googledomains.com 2001:4860:4802:36::6c
[*]   NS ns-cloud-c4.googledomains.com 216.239.38.108
[*]   NS ns-cloud-c4.googledomains.com 2001:4860:4802:38::6c
[*]   MX aspmx.l.google.com 173.194.206.27
[*]   MX alt1.aspmx.l.google.com 64.233.186.27
[*]   MX alt2.aspmx.l.google.com 209.85.202.27
[*]   MX alt3.aspmx.l.google.com 64.233.184.27
[*]   MX alt4.aspmx.l.google.com 74.125.128.27
[*]   MX aspmx.l.google.com 2607:f8b0:400d:c0f::1a
[*]   MX alt1.aspmx.l.google.com 2800:3f0:4003:c00::1b
[*]   MX alt2.aspmx.l.google.com 2a00:1450:400b:c00::1b
[*]   MX alt3.aspmx.l.google.com 2a00:1450:400c:c0b::1b
[*]   MX alt4.aspmx.l.google.com 2a00:1450:4013:c02::1b
[*]   A h4cker.org 185.199.109.153
[*]   SPF v=spf1 include:_spf.google.com ~all
[*]   TXT h4cker.org v=spf1 include:_spf.google.com ~all
[*] Enumerating SRV Records
[+] 0 Records Found
|--[omar@websploit]--[~]
|--- $
From there, an attacker can begin to dig deeper by scanning the identified hosts. Once the attacker knows which hosts are alive on the target site, he or she then needs to determine what kind of services the hosts are running. To do this, the attacker might use the tried-and-true Nmap tool. Before we discuss this tool and others in depth, we need to look at the types of scans and enumerations you should perform and why. Nmap was once considered a simple port scanner; however, it has evolved into a much more robust tool that can provide additional functionality, thanks to the Nmap Scripting Engine (NSE).
You can use other basic DNS tools, such as the nslookup, host, and dig Linux commands, to perform name resolution and obtain additional information about a domain. Example 3-2 shows how the Dig tool is used to show the DNS resolution details for h4cker.org.
Example 3-2 Using Dig to Obtain Information About a Given Domain
|--[omar@websploit]--[~]
|--- $dig h4cker.org
; <<>> DiG 9.16.6-Debian <<>> h4cker.org
;; global options: +cmd
;; Got answer:
;; ->>HEADER<<- opcode: QUERY, status: NOERROR, id: 6517
;; flags: qr rd ra ad; QUERY: 1, ANSWER: 4, AUTHORITY: 0, ADDITIONAL: 1
;; OPT PSEUDOSECTION:
; EDNS: version: 0, flags:; udp: 4096
;; QUESTION SECTION:
;h4cker.org.                IN     A
;; ANSWER SECTION:
h4cker.org.               172     IN       A       185.199.110.153
h4cker.org.               172     IN       A       185.199.111.153
h4cker.org.               172     IN       A       185.199.108.153
h4cker.org.               172     IN       A       185.199.109.153
;; Query time: 72 msec
;; SERVER: 208.67.222.222#53(208.67.222.222)
;; WHEN: Fri Apr 30 20:45:42 EDT 2021
;; MSG SIZE  rcvd: 103

|--[omar@websploit]--[~]
|--- $
The highlighted lines show the IP addresses associated with h4cker.org. Similarly, you can use the dig <domain> mx command to obtain the email servers used by h4cker.org (mail exchanger [MX] record), as demonstrated in Example 3-3.
Example 3-3 Obtaining the MX Record of h4cker.org
|--[omar@websploit]--[~]
|--- $dig h4cker.org mx

; <<>> DiG 9.16.6-Debian <<>> h4cker.org mx
;; global options: +cmd
;; Got answer:
;; ->>HEADER<<- opcode: QUERY, status: NOERROR, id: 62903
;; flags: qr rd ra ad; QUERY: 1, ANSWER: 5, AUTHORITY: 0, ADDITIONAL: 1

;; OPT PSEUDOSECTION:
; EDNS: version: 0, flags:; udp: 4096
;; QUESTION SECTION:
;h4cker.org.                IN     MX

;; ANSWER SECTION:
h4cker.org.   77      IN      MX       1  aspmx.l.google.com.
h4cker.org.   77      IN      MX       5  alt1.aspmx.l.google.com.
h4cker.org.   77      IN      MX       5  alt2.aspmx.l.google.com.
h4cker.org.   77      IN      MX       10 alt3.aspmx.l.google.com.
h4cker.org.   77      IN      MX       10 alt4.aspmx.l.google.com.

;; Query time: 48 msec
;; SERVER: 208.67.222.222#53(208.67.222.222)
;; WHEN: Fri Apr 30 20:47:01 EDT 2021
;; MSG SIZE  rcvd: 157
Identification of Technical and Administrative Contacts
You can easily identify domain technical and administrative contacts by using the Whois tool. Many organizations keep their registration details private and instead use the domain registrar organization contacts. For instance, let’s look at the technical and administrative contacts of h4cker.org (shown in Example 3-4). I own the h4cker.org domain; however, the technical and administrative details are private. Only the abuse contact email and phone number from Google (the domain registrar) are displayed.
Example 3-4 Whois Information for the Domain h4cker.org
|--[omar@websploit]--[~]
|--- $whois h4cker.org
Domain Name: H4CKER.ORG
Registry Domain ID: D402200000006011258-LROR
Registrar WHOIS Server: whois.google.com
Registrar URL: https://domains.google.com
Updated Date: 2018-07-03T03:48:35Z
Creation Date: 2018-05-04T03:43:52Z
Registry Expiry Date: 2028-05-04T03:43:52Z
Registrar Registration Expiration Date:
Registrar: Google LLC
Registrar IANA ID: 895
Registrar Abuse Contact Email: [email protected]
Registrar Abuse Contact Phone: +1.8772376466
Reseller:
Domain Status: ok https://icann.org/epp#ok
Registrant Organization: Contact Privacy Inc. Customer 1242605855
Registrant State/Province: ON
Registrant Country: CA
Name Server: NS-CLOUD-C1.GOOGLEDOMAINS.COM
Name Server: NS-CLOUD-C2.GOOGLEDOMAINS.COM
Name Server: NS-CLOUD-C4.GOOGLEDOMAINS.COM
Name Server: NS-CLOUD-C3.GOOGLEDOMAINS.COM
DNSSEC: signedDelegation
URL of the ICANN Whois Inaccuracy Complaint Form https://
www.icann.org/wicf/)
Now let’s look at the Whois details for tesla.com, shown in Example 3-5.
Example 3-5 Whois Information for the Domain tesla.com
|--[omar@websploit]--[~]
|--- $whois tesla.com
   Domain Name: TESLA.COM
   Registry Domain ID: 187902_DOMAIN_COM-VRSN
   Registrar WHOIS Server: whois.markmonitor.com
   Registrar URL: http://www.markmonitor.com
   Registrar: MarkMonitor Inc.
   Registrar IANA ID: 292
   Registrar Abuse Contact Email: [email protected]
   Registrar Abuse Contact Phone: +1.2083895740
   Domain Status: serverUpdateProhibited
https://icann.org/epp#serverUpdateProhibited
   Name Server: A1-12.AKAM.NET
   Name Server: A10-67.AKAM.NET
   Name Server: A12-64.AKAM.NET
   Name Server: A28-65.AKAM.NET
   Name Server: A7-66.AKAM.NET
   Name Server: A9-67.AKAM.NET
   Name Server: EDNS69.ULTRADNS.BIZ
   Name Server: EDNS69.ULTRADNS.COM
   Name Server: EDNS69.ULTRADNS.NET
   Name Server: EDNS69.ULTRADNS.ORG
   DNSSEC: unsigned
   URL of the ICANN Whois Inaccuracy Complaint Form:
https://www.icann.org/wicf/
<output omitted for brevity>
The Registry database contains ONLY .COM, .NET, .EDU domains and
Registrars.
Domain Name: tesla.com
Registry Domain ID: 187902_DOMAIN_COM-VRSN
Registrar WHOIS Server: whois.markmonitor.com
Registrar URL: http://www.markmonitor.com
Updated Date: 2020-10-02T02:07:57-0700
Creation Date: 1992-11-03T21:00:00-0800
Registrar Registration Expiration Date: 2022-11-02T00:00:00-0700
Registrar: MarkMonitor, Inc.
Registrar IANA ID: 292
Registrar Abuse Contact Email: [email protected]
Registrar Abuse Contact Phone: +1.2083895770
Domain Status: clientUpdateProhibited (https://www.icann.org/
epp#clientUpdateProhibited)
Domain Status: clientTransferProhibited (https://www.icann.org/
epp#clientTransferProhibited)
Domain Status: clientDeleteProhibited (https://www.icann.org/
epp#clientDeleteProhibited)
Domain Status: serverUpdateProhibited (https://www.icann.org/
epp#serverUpdateProhibited)
Domain Status: serverTransferProhibited (https://www.icann.org/
epp#serverTransferProhibited)
Domain Status: serverDeleteProhibited (https://www.icann.org/
epp#serverDeleteProhibited)
Registry Registrant ID:
Registrant Name: Domain Administrator
Registrant Organization: DNStination Inc.
Registrant Street: 3450 Sacramento Street, Suite 405
Registrant City: San Francisco
Registrant State/Province: CA
Registrant Postal Code: 94118
Registrant Country: US
Registrant Phone: +1.4155319335
Registrant Phone Ext:
Registrant Fax: +1.4155319336
Registrant Fax Ext:
Registrant Email: [email protected]
Registry Admin ID:
Admin Name: Domain Administrator
Admin Organization: DNStination Inc.
Admin Street: 3450 Sacramento Street, Suite 405
Admin City: San Francisco
Admin State/Province: CA
Admin Postal Code: 94118
Admin Country: US
Admin Phone: +1.4155319335
Admin Phone Ext:
Admin Fax: +1.4155319336
Admin Fax Ext:
Admin Email: [email protected]
Registry Tech ID:
Tech Name: Domain Administrator
Tech Organization: DNStination Inc.
Tech Street: 3450 Sacramento Street, Suite 405
Tech City: San Francisco
Tech State/Province: CA
Tech Postal Code: 94118
Tech Country: US
Tech Phone: +1.4155319335
Tech Phone Ext:
Tech Fax: +1.4155319336
Tech Fax Ext:
Tech Email: [email protected]
Name Server: edns69.ultradns.org
Name Server: edns69.ultradns.net
Name Server: a10-67.akam.net
Name Server: a12-64.akam.net
Name Server: edns69.ultradns.biz
Name Server: a1-12.akam.net
Name Server: a9-67.akam.net
Name Server: a28-65.akam.net
Name Server: a7-66.akam.net
Name Server: edns69.ultradns.com
<output omitted for brevity>
MarkMonitor reserves the right to modify these terms at any time.
By submitting this query, you agree to abide by this policy.
MarkMonitor Domain Management(TM)
Protecting companies and consumers in a digital world.
Visit MarkMonitor at https://www.markmonitor.com
Contact us at +1.8007459229
In Europe, at +44.02032062220
The highlighted lines in Example 3-5 show the technical and administrative contacts for the domain (which are also the ones for the domain registrar [MarkMonitor]). Example 3-6 shows another example; this example shows the technical and administrative email contacts for the domain cisco.com.
Example 3-6 Showing Technical and Administrative Email Contacts
|--[omar@websploit]--[~]
|--- $whois cisco.com | grep '@cisco.com'
Registrant Email: [email protected]
Admin Email: [email protected]
Tech Email: [email protected]
In Example 3-6, the technical and administrative contacts are pointing to the InfoSec team at Cisco ([email protected]) instead of to the registrant.
Cloud vs. Self-Hosted Applications and Related Subdomains
A company can own a domain and related subdomain, but its applications might be hosted in the cloud. For example, Netflix (at the time of writing) owns the domain netflix.com, which resolves to IPv4 addresses 3.230.129.93, 52.3.144.142, and 54.237.226.164 (as demonstrated in Example 3-7 with the Linux host command).
Example 3-7 DNS Name Resolution for netflix.com
|--[omar@websploit]--[~]
|--- $host netflix.com
netflix.com has address 3.230.129.93
netflix.com has address 52.3.144.142
netflix.com has address 54.237.226.164
netflix.com has IPv6 address 2600:1f18:631e:2f80:77e5:13a7:6533:7584
netflix.com has IPv6 address 2600:1f18:631e:2f82:c8cd:27b2:ac:8dbf
netflix.com has IPv6 address 2600:1f18:631e:2f84:ceae:e049:1e:6a96
netflix.com mail is handled by 1 aspmx.l.google.com.
netflix.com mail is handled by 5 alt1.aspmx.l.google.com.
netflix.com mail is handled by 5 alt2.aspmx.l.google.com.
netflix.com mail is handled by 10 aspmx2.googlemail.com.
netflix.com mail is handled by 10 aspmx3.googlemail.com.
However, the IPv4 addresses 3.230.129.93, 52.3.144.142, and 54.237.226.164 are owned by Amazon Web Services (AWS), which hosts Netflix.com, as demonstrated in Example 3-8.
Example 3-8 Example of the Ownership of IP Addresses and Applications Hosted in the Cloud
|--[omar@websploit]--[~]
|--- $whois 3.230.129.93 | grep OrgName
OrgName:        Amazon Technologies Inc.
OrgName:        Amazon Data Services NoVa
|--[omar@websploit]--[~]
|--- $whois 52.3.144.142 | grep OrgName
OrgName:        Amazon Technologies Inc.
|--[omar@websploit]--[~]
|--- $whois 54.237.226.164 | grep OrgName
OrgName:        Amazon Technologies Inc.
OrgName:        Amazon.com, Inc.
In Example 3-8, the whois command is used to retrieve the organization name (OrgName) of the owner for each of the IP addresses 3.230.129.93, 52.3.144.142, and 54.237.226.164.
Social Media Scraping
Attackers can easily gather valuable information about victims by scraping social media sites such as Twitter, LinkedIn, Facebook, and Instagram. People post too many things online. They publicly talk about their hobbies, the restaurants they visit, what they do for work, work promotions, where they travel for business and pleasure, and much more.
Often attackers use other information such as key contacts (company stakeholders) and their job responsibilities. Attackers can use all that information to perform different types of social engineering attacks (including spear phishing and whaling). You will learn details about social engineering attacks in Chapter 4, “Social Engineering Attacks.”
Attackers often leverage job listings in websites like Indeed, LinkedIn, CareerBuilder, and individual company websites to obtain information about the technologies these companies use (for example, the technology stack of an organization). Let’s say a the company is looking for a Cisco firewall administrator, an Ansible expert, and a Mongo database architect in Raleigh, North Carolina. The attacker didn’t have to launch any tools to learn that the company is using Cisco firewalls, Mongo databases, and Ansible for automation in its Raleigh office.
Similarly, attackers have also created job posts to attract people to apply for those positions. Then they interview their victims to try to get them to talk about what they do at work and the technologies used by their employer. Think about it: When people are trying to get a job, they want to “show off” and often reveal too much information about the technologies, architectures, and applications that they use in their current roles.
Cryptographic Flaws
During the reconnaissance phase, attackers often can inspect Secure Sockets Layer (SSL) certificates to obtain information about the organization, potential cryptographic flaws, and weak implementations. You can find a lot inside digital certificates: the certificate serial number, the subject common name, the uniform resource identifier (URI) of the server it was assigned to, the organization name, Online Certificate Status Protocol (OCSP) information, the certificate revocation list (CRL) URI, and so on.
Figure 3-1 shows the digital certificate assigned to h4cker.org. The certificate shows the organization that issued the certificate—in this case, Let’s Encrypt (letsencrypt.org)—the serial number, validity period, and public key information, including the algorithm, key size, and so on. Attackers can use this information to reveal any weak cryptographic configuration or implementation.

FIGURE 3-1 The Digital Certificate Assigned to h4cker.org
Attackers can also leverage certificate transparency to reveal additional information and enumerate subdomains. What is certificate transparency? More than a decade ago, there was a major attack against DigiNotar (an organization that creates, maintains, and authorizes digital certificates for many companies and government institutions). This attack (along with other similar attacks) raised concerns around organizations that generate and manage digital certificates. Subsequently, certificate transparency was created to better detect the issuing of malicious certificates. The goal of certificate transparency is for any organization or individual to be able to “transparently” verify the issuance of a digital certificate. Certificate transparency allows certificate authorities (CAs) to provide details about all certificates that have been issued for a given domain and organization. Attackers can also use this information to reveal what other subdomains and systems an organization may own.
Tools such as crt.sh enable you to obtain detailed certificate transparency information about any given domain. Figure 3-2 shows the result of the query https://crt.sh/?q=h4cker.org in crt.sh for the domain h4cker.org. You can see in the search results multiple subdomains that were not known to the attacker before.
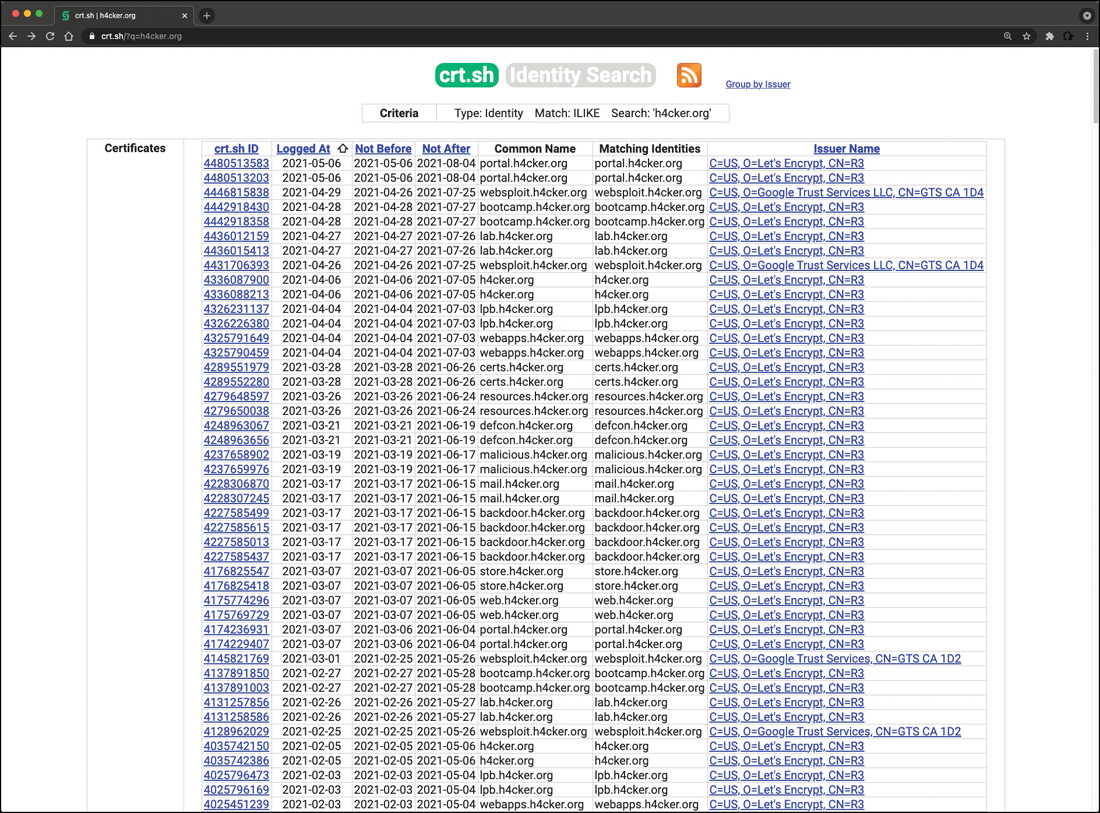
FIGURE 3-2 Revealing Additional Subdomains Using Digital Certificate Information in crt.sh
Company Reputation and Security Posture
Security breaches can have a direct impact on a company’s reputation. Attackers can leverage information from past security breaches that an organization might have experienced. They may, for example, leverage the following data while trying to gather information about their victims:
Password dumps
File metadata
Strategic search engine analysis/enumeration
Website archiving/caching
Public source code repositories
Password Dumps
Attackers can leverage password dumps from previous breaches. There are a number of ways that an attacker can get access to such password dumps, such as by using Pastebin, dark web websites, and even GitHub in some cases. Several different tools and websites make this task very easy. An example of a tool that allows you to find email addresses and passwords exposed in previous breaches is h8mail. You can install h8mail by using the pip3 install h8mail command, as demonstrated in Example 3-9. Example 3-9 also shows the h8mail command-line usage.
Example 3-9 Installing and Using h8mail
root@websploit# pip3 install h8mail
Collecting h8mail
  Downloading h8mail-2.5.5-py3-none-any.whl (33 kB)
Requirement already satisfied: requests in /usr/lib/python3/
dist-packages (from h8mail) (2.23.0)
Installing collected packages: h8mail
Successfully installed h8mail-2.5.5
root@websploit# h8mail -h
usage: h8mail [-h] [-t USER_TARGETS [USER_TARGETS ...]]
               [-u USER_URLS [USER_URLS ...]] [-q USER_QUERY] [--loose]
                [-c CONFIG_FILE [CONFIG_FILE ...]] [-o OUTPUT_FILE]
                [-j OUTPUT_JSON] [-bc BC_PATH] [-sk]
                [-k CLI_APIKEYS [CLI_APIKEYS ...]]
                [-lb LOCAL_BREACH_SRC [LOCAL_BREACH_SRC ...]]
                [-gz LOCAL_GZIP_SRC [LOCAL_GZIP_SRC ...]] [-sf]
                [-ch [CHASE_LIMIT]] [--power-chase] [--hide] [--debug]
                [--gen-config]

Email information and password lookup tool
optional arguments:
  -h, --help             show this help message and exit

  -t USER_TARGETS [USER_TARGETS ...], --targets USER_TARGETS [USER_
TARGETS ...]
                          Either string inputs or files. Supports
email pattern
                          matching from input or file, filepath
globing and
                          multiple arguments
  -u USER_URLS [USER_URLS ...], --url USER_URLS [USER_URLS ...]
                          Either string inputs or files. Supports URL
pattern
                          matching from input or file, filepath
globing and
                          multiple arguments. Parse URLs page for
emails.
                          Requires http:// or https:// in URL.
  -q USER_QUERY, --custom-query USER_QUERY
                          Perform a custom query. Supports username,
password,
                          ip, hash, domain. Performs an implicit
"loose" search
                          when searching locally
  --loose                  Allow loose search by disabling email
pattern
                          recognition. Use spaces as pattern
separators
  -c CONFIG_FILE [CONFIG_FILE ...], --config CONFIG_FILE [CONFIG_FILE
...]
                          Configuration file for API keys. Accepts
keys from
                          Snusbase, WeLeakInfo, Leak-Lookup,
HaveIBeenPwned,
                          Emailrep, Dehashed and hunterio
  -o OUTPUT_FILE, --output OUTPUT_FILE
                          File to write CSV output
  -j OUTPUT_JSON, --json OUTPUT_JSON
                          File to write JSON output
  -bc BC_PATH, --breachcomp BC_PATH
                          Path to the breachcompilation torrent
folder. Uses the
                          query.sh script included in the torrent
 -sk, --skip-defaults  Skips Scylla and HunterIO check. Ideal for
local scans
  -k CLI_APIKEYS [CLI_APIKEYS ...], --apikey CLI_APIKEYS [CLI_APIKEYS
...]
                          Pass config options. Supported format:
"K=V,K=V"
  -lb LOCAL_BREACH_SRC [LOCAL_BREACH_SRC ...], --local-breach LOCAL_
BREACH_SRC [LOCAL_BREACH_SRC ...]
                          Local cleartext breaches to scan for
targets. Uses
                          multiprocesses, one separate process per
file, on
                          separate worker pool by arguments. Supports
file or
                          folder as input, and filepath globing
  -gz LOCAL_GZIP_SRC [LOCAL_GZIP_SRC ...], --gzip LOCAL_GZIP_SRC
[LOCAL_GZIP_SRC ...]
                          Local tar.gz (gzip) compressed breaches to
scans for
                          targets. Uses multiprocesses, one separate
process per
                          file. Supports file or folder as input, and
filepath
                          globing. Looks for 'gz' in filename
  -sf, --single-file    If breach contains big cleartext or tar.gz
files, set
                          this flag to view the progress bar. Disables
                          concurrent file searching for stability
  -ch [CHASE_LIMIT], --chase [CHASE_LIMIT]
                          Add related emails from hunter.io to ongoing
target
                          list. Define number of emails per target to
chase.
                          Requires hunter.io private API key if used
without
                          power-chase
  --power-chase          Add related emails from ALL API services to
ongoing
                          target list. Use with --chase
  --hide                 Only shows the first 4 characters of found
passwords
                          to output. Ideal for demonstrations
  --debug                Print request debug information
  --gen-config, -g      Generates a configuration file template in
the current
                          working directory & exits. Will overwrite
existing
                          h8mail_config.ini file
The following are additional tools that allow you to search for breach data dumps:
WhatBreach: https://github.com/Ekultek/WhatBreach
LeakLooker: https://github.com/woj-ciech/LeakLooker
Scavenger: https://github.com/rndinfosecguy/Scavenger
Tools like h8mail and WhatBreach take advantage of breached data repositories of websites such as haveibeenpwned.com and snusbase.com. Historically, websites such as weleakinfo.com (seized by the FBI) have been used by criminals to dump information from past security breaches.
File Metadata
You can obtain a lot of information from metadata in files such as images, Microsoft Word documents, Excel files, PowerPoint files, and more. For instance, Exchangeable Image File Format (Exif) is a specification that defines the formats for images, sound, and supplementary tags used by digital cameras, mobile phones, scanners, and other systems that process image and sound files. Figure 3-3 shows the Exif data of a digital image (picture) captured by an iPhone.
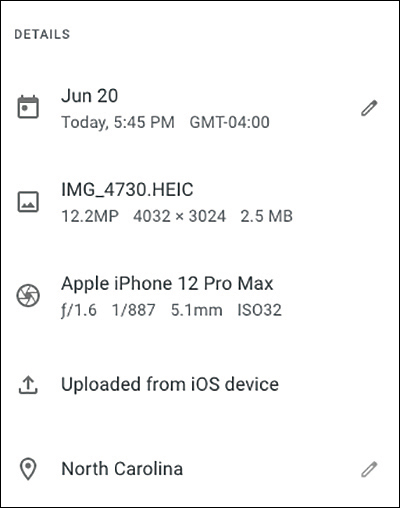
FIGURE 3-3 Exif Metadata of an Image Captured by an iPhone
Several tools can show Exif details. One of the most popular of them, ExifTool, is demonstrated in Example 3-10. This example shows the Exif metadata details of the same image whose details are shown in Figure 3-3.
Example 3-10 Using ExifTool
|--[omar@websploit]--[~]
|--- $exiftool IMG_4730.jpg
ExifTool Version Number            : 12.06
File Name                          : IMG_4730.jpg
Directory                          : .
File Size                          : 2.4 MB
File Modification Date/Time        : 2021:06:20 21:33:36-04:00
File Access Date/Time              : 2021:06:20 21:33:36-04:00
File Inode Change Date/Time        : 2021:06:20 21:33:36-04:00
File Permissions                   : rw-r--r--
File Type                          : JPEG
File Type Extension                : jpg
MIME Type                          : image/jpeg
JFIF Version                       : 1.01
Exif Byte Order                    : Big-endian (Motorola, MM)
Make                               : Apple
Camera Model Name                  : iPhone 12 Pro Max
Orientation                        : Horizontal (normal)
X Resolution                       : 72
Y Resolution                       : 72
Resolution Unit                    : inches
Software                           : 14.6
Modify Date                        : 2021:06:20 17:45:44
Host Computer                      : iPhone 12 Pro Max
Tile Width                         : 512
Tile Length                        : 512
Exposure Time                      : 1/887
F Number                           : 1.6
Exposure Program                   : Program AE
ISO                                : 32
Exif Version                       : 0232
Date/Time Original                 : 2021:06:20 17:45:44
Create Date                        : 2021:06:20 17:45:44
Offset Time                        : -04:00
Offset Time Original               : -04:00
Offset Time Digitized              : -04:00
Components Configuration           : Y, Cb, Cr, -
Shutter Speed Value                : 1/887
Aperture Value                     : 1.6
Brightness Value                   : 7.700648484
Exposure Compensation              : 0
Metering Mode                      : Multi-segment
Flash                              : Auto, Did not fire
Focal Length                       : 5.1 mm
Subject Area                       : 2002 1503 2213 1327
Run Time Flags                     : Valid
Run Time Value                     : 892872412170041
Run Time Scale                     : 1000000000
Run Time Epoch                     : 0
Acceleration Vector                : -0.9863093504 0.003411300248
                                     0.1393117606
Sub Sec Time Original              : 458
Sub Sec Time Digitized             : 458
Flashpix Version                   : 0100
Color Space                        : Uncalibrated
Exif Image Width                   : 4032
Exif Image Height                  : 3024
Sensing Method                     : One-chip color area
Scene Type                         : Directly photographed
Exposure Mode                      : Auto
White Balance                      : Auto
Focal Length In 35mm Format        : 26 mm
Scene Capture Type                 : Standard
Image Unique ID                    : ebf42e8d3764ccc90000000000000000
Lens Info                          : 1.539999962-7.5mm f/1.6-2.4
Lens Make                          : Apple
Lens Model                         : iPhone 12 Pro Max back triple
                                     camera 5.1mm f/1.6
Composite Image                    : General Composite Image
GPS Version ID                     : 2.2.0.0
GPS Latitude Ref                   : North
GPS Longitude Ref                  : West
GPS Altitude Ref                   : Above Sea Level
GPS Speed Ref                      : km/h
GPS Speed                          : 0.2300000042
GPS Img Direction Ref              : True North
GPS Img Direction                  : 74.98474114
GPS Dest Bearing Ref               : True North
GPS Dest Bearing                   : 74.98474114
GPS Horizontal Positioning Error   : 15.67681275 m
Compression                        : JPEG (old-style)
Thumbnail Offset                   : 2650
Thumbnail Length                   : 6523
XMP Toolkit                        : XMP Core 5.5.0
Creator Tool                       : 14.6
Date Created                       : 2021:06:20 17:45:44
Profile CMM Type                   : Apple Computer Inc.
Profile Version                    : 4.0.0
Profile Class                      : Display Device Profile
Color Space Data                   : RGB
Profile Connection Space           : XYZ
Profile Date Time                  : 2017:07:07 13:22:32
Profile File Signature             : acsp
Primary Platform                   : Apple Computer Inc.
CMM Flags                          : Not Embedded, Independent
Device Manufacturer                : Apple Computer Inc.
Device Model                       :
Device Attributes                  : Reflective, Glossy, Positive, Color
Rendering Intent                   : Perceptual
Connection Space Illuminant        : 0.9642 1 0.82491
Profile Creator                    : Apple Computer Inc.
Profile ID                         : ca1a9582257f104d389913d5d1ea1582
Profile Description                : Display P3
Profile Copyright                  : Copyright Apple Inc., 2017
Media White Point                  : 0.95045 1 1.08905
Red Matrix Column                  : 0.51512 0.2412 -0.00105
Green Matrix Column                : 0.29198 0.69225 0.04189
Blue Matrix Column                 : 0.1571 0.06657 0.78407
Red Tone Reproduction Curve        : (Binary data 32 bytes, use -b
                                     option to extract)
Chromatic Adaptation               : 1.04788 0.02292 -0.0502 0.02959
                                     0.99048 -0.01706 -0.00923 0.01508
                                     0.75168
Blue Tone Reproduction Curve       : (Binary data 32 bytes, use -b
                                     option to extract)
Green Tone Reproduction Curve      : (Binary data 32 bytes, use -b
                                     option to extract)
Image Width                        : 4032
Image Height                       : 3024
Encoding Process                   : Baseline DCT, Huffman coding
Bits Per Sample                    : 8
Color Components                   : 3
Y Cb Cr Sub Sampling               : YCbCr4:2:0 (2 2)
Run Time Since Power Up            : 10 days 8:01:12
Aperture                           : 1.6
Image Size                         : 4032x3024
Lens ID                            : iPhone 12 Pro Max back triple
                                     camera 5.1mm f/1.6
Megapixels                         : 12.2
Scale Factor To 35 mm Equivalent   : 5.1
Shutter Speed                      : 1/887
Create Date                        : 2022:06:20 17:45:44.458-04:00
Date/Time Original                 : 2022:06:20 17:45:44.458-04:00
Modify Date                        : 2022:06:20 17:45:44-04:00
Thumbnail Image                    : (Binary data 6523 bytes, use -b
                                     option to extract)
GPS Altitude                       : 112.7 m Above Sea Level
GPS Latitude                       : 35 deg 46' 78.6382" N
GPS Longitude                      : 78 deg 38' 30.4793" W
Circle Of Confusion                : 0.006 mm
Field Of View                      : 69.4 deg
Focal Length                       : 5.1 mm (35 mm equivalent: 26.0 mm)
GPS Position                       : 35 deg 46' 49.69" N, 78 deg 38'
                                     30.4793" W
Hyperfocal Distance                : 2.76 m
Light Value                        : 12.8
|--[omar@websploit]--[~]
|--- $
Strategic Search Engine Analysis/Enumeration
Most of us use search engines such as DuckDuckGo, Bing, and Google to locate information. What you might not know is that search engines, such as Google, can perform much more powerful searches than most people ever dream of. Google can translate documents, perform news searches, and do image searches. In addition, hackers and attackers can use it to do something that has been termed Google hacking.
By using basic search techniques combined with advanced operators, both you and attackers can use Google as a powerful vulnerability search tool. The following are some advanced operators:
Filetype: Directs Google to search only within the text of a particular type of file (for example, filetype:xls)
Inurl: Directs Google to search only within the specified URL of a document (for example, inurl:search-text)
Link: Directs Google to search within hyperlinks for a specific term (for example, link:www.domain.com)
Intitle: Directs Google to search for a term within the title of a document (for example, intitle: “Index of.etc”)
By using these advanced operators in combination with key terms, both you and attackers can get Google to uncover many pieces of sensitive information that shouldn’t be revealed. These search strings are often called Google dorks.
To see how Google dorking works, enter the following phrase into Google:
intext:JSESSIONID OR intext:PHPSESSID inurl:access.log ext:log
This query searches in a URL for the session IDs that could be used to potentially impersonate users. When I ran this search, it found more than 100 sites that store sensitive session IDs in logs that were publicly accessible. If these IDs have not timed out, they could be used to gain access to restricted resources.
You can use advanced operators to search for many types of data. The following is another example of a Google search string (or Google dork) that can reveal passwords of web applications:
“public $user =” | “public $password = “ | “public $secret =” | “public $db =” ext:txt | ext:log -git
Now that we have discussed some basic Google search techniques, let’s look at advanced Google hacking. If you have never visited the Google Hacking Database (GHDB) repositories, at https://www.exploit-db.com/google-hacking-database/, I suggest that you do. GHDB has the following search categories:
Footholds
Files containing usernames
Sensitive directories
Web server detection
Vulnerable files
Vulnerable servers
Error messages
Files containing juicy info
Files containing passwords
Sensitive online shopping info
Network or vulnerability data
Pages containing login portals
Various online devices
Advisories and vulnerabilities
GHDB is a community effort. Anyone can upload a new Google dork to perform these types of searches. Once you start playing with the dorks in GHDB, you will be surprised by the unbelievable things found through Google hacking. GHDB has made using Google dorks very easy, and there are other options as well. Later in this chapter, you will learn about additional tools that can be used to perform similar searches (such as Recon-ng).
Website Archiving/Caching
Several organizations archive and cache website data on the Internet. One of the most popular repositories is the “Wayback Machine” of Internet Archive (https://archive.org/web).
The Wayback Machine allows you to go back in time on the Internet. For example, Figure 3-4 shows what Cisco’s website looked like on November 3, 1999. You can access the archive of the site shown in Figure 3-4 by navigating to https://web.archive.org/web/19991103121048/ http://www.cisco.com.
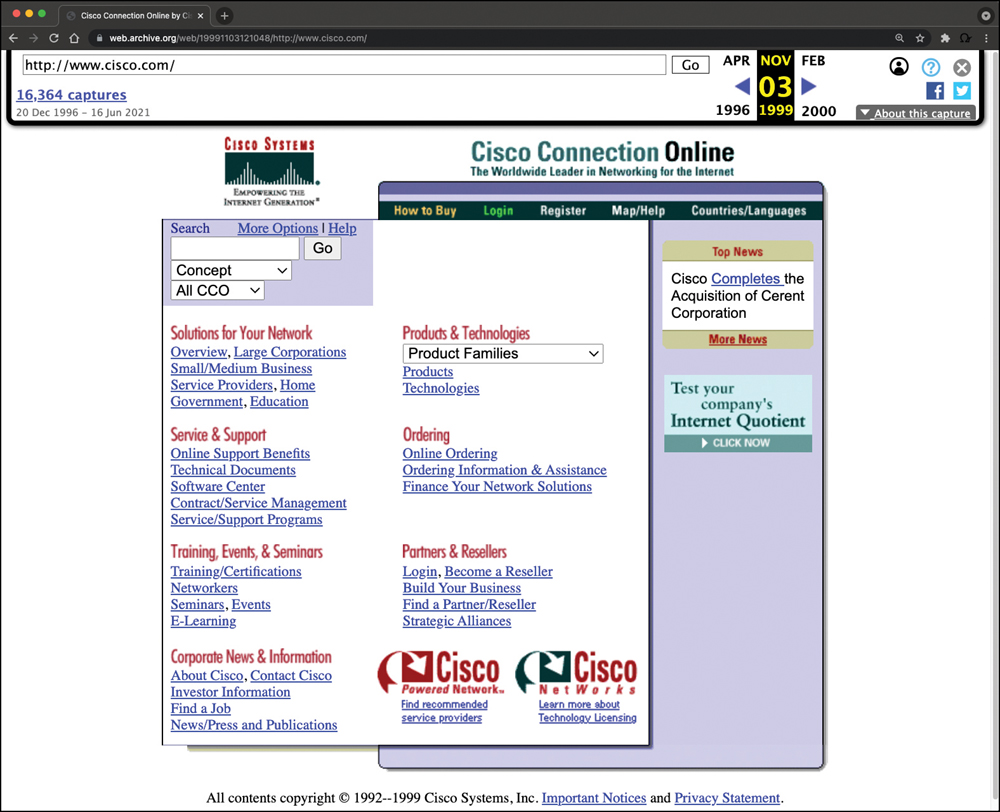
FIGURE 3-4 The Internet Archive Wayback Machine
Public Source Code Repositories
An attacker can obtain extremely valuable information from public source code repositories such as GitHub and GitLab. Most of the applications and products we consume today use open-source software that is freely available in these public repositories. Attackers can find vulnerabilities in those software packages and use them to their advantage. Similarly, as a penetration tester, you can obtain valuable information from these public repositories. Even if you do not immediately find security vulnerabilities in the code, these repositories can give you insights into the architecture and underlying code used in the organization’s applications and infrastructure.
Open-Source Intelligence (OSINT) Gathering
Open-source intelligence (OSINT) gathering is a method of gathering publicly available intelligence sources to collect and analyze information about a target. OSINT is “open source” because collecting the information does not require any type of covert methods. Typically, the information can be found on the Internet. The larger the online presence of the target, the more information that will be available. This type of collection can often start with a simple Google search, which can reveal a significant amount of information about a target. It will at least give you enough information to know what direction to go with your information-gathering process. The following sections look at some of the sources that can be used for OSINT gathering.
Reconnaissance with Recon-ng
This chapter covers a number of individual sources and tools used for information gathering. These tools are all very effective for their specific uses; however, wouldn’t it be great if there were a tool that could pull together all these different functions? This is where Recon-ng comes in. It is a framework developed by Tim Tomes of Black Hills Information Security. This tool was developed in Python with Metasploit msfconsole in mind. If you have used the Metasploit console before, Recon-ng should be familiar and easy to understand.
Recon-ng is a modular framework, which makes it easy to develop and integrate new functionality. It is highly effective in social networking site enumeration because of its use of application programming interfaces (APIs) to gather information. It also includes a reporting feature that allows you to export data in different report formats. Because you will always need to provide some kind of deliverable in any testing you do, Recon-ng is especially valuable.
The examples in this section show how to run Recon-ng from a Kali Linux system because Recon-ng is installed there by default.
To start using Recon-ng, you simply run recon-ng from a new terminal window. Example 3-11 shows the command and the initial menu that Recon-ng starts with.
Example 3-11 Starting Recon-ng
|--[omar@websploit]--[~]
|--- $recon-ng
[*] Version check disabled.


                                          /
                                         / \ /
    Sponsored by...               /  //  \V  /
                                 / \/ // \\ \ /
                                // // BLACK HILLS / \
                               www.blackhillsinfosec.com

              ____   ____   ____   ____ _____ _  ____   ____  ____
             |____] | ___/ |____| |       |   | |____  |____ |
             |      |   \_ |    | |____   |   |  ____| |____ |____
                                   www.practisec.com

                      [recon-ng v5.1.1, Tim Tomes (@lanmaster53)]

[4] Recon modules
[1] Discovery modules

[recon-ng][default] >
To get an idea of what commands are available in the Recon-ng command-line tool, you can simply type help and press Enter. Example 3-12 shows the output of the help command.
Example 3-12 Recon-ng help Command
[recon-ng][default] > help
Commands (type [help|?] <topic>):
---------------------------------
back           Exits the current context
dashboard      Displays a summary of activity
db             Interfaces with the workspace's database
exit           Exits the framework
help           Displays this menu
index          Creates a module index (dev only)
keys           Manages third party resource credentials
marketplace    Interfaces with the module marketplace
modules        Interfaces with installed modules
options        Manages the current context options
pdb            Starts a Python Debugger session (dev only)
script         Records and executes command scripts
shell          Executes shell commands
show           Shows various framework items
snapshots      Manages workspace snapshots
spool          Spools output to a file
workspaces     Manages workspaces
[recon-ng][default] >
Before you can start gathering information using the Recon-ng tool, you need to understand what modules are available. (You can see from the initial screen in Example 3-11 the current number of modules that are installed in Recon-ng.) Recon-ng comes with a “marketplace,” where you can search for available modules to be installed. You can use the marketplace search command to search for all the available modules in Recon-ng, as demonstrated in Figure 3-5.

FIGURE 3-5 The Recon-ng Marketplace Search
Figure 3-5 shows only the first few modules available in Recon-ng. The letter D in the table header in Figure 3-5 indicates that the module has dependencies. The letter K indicates that an API key is needed in order to use the resources used in a particular module. For example, the module with the path recon/companies-contacts/censys_email_address has dependencies and needs an API key in order to query the Censys database. (Censys is a very popular resource for querying OSINT data.)
You can refresh the data about the available modules by using the marketplace refresh command, as shown in Example 3-13.
Example 3-13 Refreshing the Recon-ng Marketplace Data
[recon-ng][default] > marketplace refresh
[*] Marketplace index refreshed.
Let’s perform a quick search to find different subdomains of one of my domains (h4cker.org). We can use the module bing_domain_web to try to find any subdomains leveraging the Bing search engine. You can perform a keyword search for any modules by using the command marketplace search <keyword>, as demonstrated in Example 3-14.
Example 3-14 Marketplace Keyword Search
[recon-ng][default] > marketplace search bing
[*] Searching module index for 'bing'...
+---------------------------------------------------------------------+
|           Path             | Version |     Status    |    Updated   |
D | K |
+---------------------------------------------------------------------+
| recon/companies-contacts/bing_linkedin_cache   | 1.0     | not
installed | 2019-06-24 |   | * |
| recon/domains-hosts/bing_domain_api             | 1.0     | not
installed | 2019-06-24 |   | * |
| recon/domains-hosts/bing_domain_web             | 1.1     | not
installed     | 2019-07-04 |   |   |
| recon/hosts-hosts/bing_ip                        | 1.0     | not
installed | 2019-06-24 |   | * |
| recon/profiles-contacts/bing_linkedin_contacts | 1.1     | not
installed | 2019-10-08 |   | * |
+---------------------------------------------------------------------+

  D = Has dependencies. See info for details.
  K = Requires keys. See info for details.
Several results matched the bing keyword. However, the one that we are interested in is recon/domains-hosts/bing_domain_web. You can install the module by using the marketplace install command, as shown in Example 3-15.
Example 3-15 Installing a Recon-ng Module
[recon-ng][default] > marketplace install recon/domains-hosts/
bing_domain_web
[*] Module installed: recon/domains-hosts/bing_domain_web
[*] Reloading modules...
[recon-ng][default] >
You can use the modules search command (as shown in Example 3-16) to show all the modules that have been installed in Recon-ng.
Example 3-16 Recon-ng Installed Modules
[recon-ng][default] > modules search
  Discovery
  ---------
    discovery/info_disclosure/interesting_files
  Recon
  -----
    recon/domains-hosts/bing_domain_web
    recon/domains-hosts/brute_hosts
    recon/domains-hosts/certificate_transparency
    recon/domains-hosts/netcraft
[recon-ng][default] >
To load the module that you would like to use, use the modules load command, as shown in Example 3-17. In Example 3-17, the bing_domain_web module is loaded. Notice that the prompt changed to include the name of the loaded module. After the module is loaded, you can display the module options by using the info command (also demonstrated in Example 3-17).
Example 3-17 Loading an Installed Module in Recon-ng
[recon-ng][default] > modules load recon/domains-hosts/bing_domain_web
[recon-ng][default][bing_domain_web] > info
    Name: Bing Hostname Enumerator

    Author: Tim Tomes (@lanmaster53)
   Version: 1.1
Description:
  Harvests hosts from Bing.com by using the 'site' search operator.
Updates the 'hosts' table with the results.

Options:
  Name    Current Value  Required  Description
  ------  -------------  --------  -----------
  SOURCE  example.com    yes       source of input (see 'info' for
details)

Source Options:
  default         SELECT DISTINCT domain FROM domains WHERE domain IS
NOT NULL
  <string>        string representing a single input
  <path>          path to a file containing a list of inputs
  query <sql>     database query returning one column of inputs
[recon-ng][default][bing_domain_web] >
For example, you can change the source (the domain to be used to find its subdomains) by using the command options set SOURCE, as demonstrated in Example 3-18. After the source domain is set, you can type run to run the query (also shown in Example 3-18).
Example 3-18 Setting the Source Domain and Running the Query
[[recon-ng][default][bing_domain_web] > options set SOURCE h4cker.org
SOURCE => h4cker.org
[recon-ng][default][bing_domain_web] > run
----------
H4CKER.ORG
----------
[*] URL: https://www.bing.com/search?first=0&q=domain%3Ah4cker.org
[*] Country: None
[*] Host: bootcamp.h4cker.org
[*] Ip_Address: None
[*] Latitude: None
[*] Longitude: None
[*] Notes: None
[*] Region: None
[*] --------------------------------------------------
[*] Country: None
[*] Host: webapps.h4cker.org
[*] Ip_Address: None
[*] Latitude: None
[*] Longitude: None
[*] Notes: None
[*] Region: None
[*] --------------------------------------------------
[*] Country: None
[*] Host: lpb.h4cker.org
[*] Ip_Address: None
[*] Latitude: None
[*] Longitude: None
[*] Notes: None
[*] Region: None
[*] --------------------------------------------------
[*] Country: None
[*] Host: malicious.h4cker.org
[*] Ip_Address: None
[*] Latitude: None
[*] Longitude: None
[*] Notes: None
[*] Region: None
[*] --------------------------------------------------
[*] Sleeping to avoid lockout...
[*] URL: https://www.bing.com/search?first=0&q=domain%3Ah4cker.
org+-domain%3Abootcamp.h4cker.org+-domain%3Awebapps.h4cker.org+-
domain%3Alpb.h4cker.org+-domain%3Amalicious.h4cker.org
-------
SUMMARY
-------
[*] 4 total (0 new) hosts found.
[recon-ng][default][bing_domain_web] >
The highlighted lines in Example 3-18 show that four subdomains were found using the bing_domain_web module.
Recon-ng is incredibly powerful because it uses the APIs of various OSINT resources to gather information. Its modules can query sites such as Facebook, Indeed, Flickr, Instagram, Shodan, LinkedIn, and YouTube.
Shodan
Shodan is an organization that scans the Internet 24 hours a day, 365 days a year. The results of those scans are stored in a database that can be queried at shodan.io or by using an API. You can use Shodan to query for vulnerable hosts, Internet of Things (IoT) devices, and many other systems that should not be exposed or connected to the public Internet. Figure 3-6 shows different categories of systems found by Shodan scans, including industrial control systems (ICS), databases, network infrastructure devices, and video games.

FIGURE 3-6 Exploring the Shodan Database
Figure 3-7 shows a query performed to find network infrastructure devices that are running a broken protocol called Cisco Smart Install. Attackers have leveraged this protocol for years to compromise different infrastructures. Cisco removed this protocol from its systems many years ago. However, many people are still using it in devices connected to the public Internet.
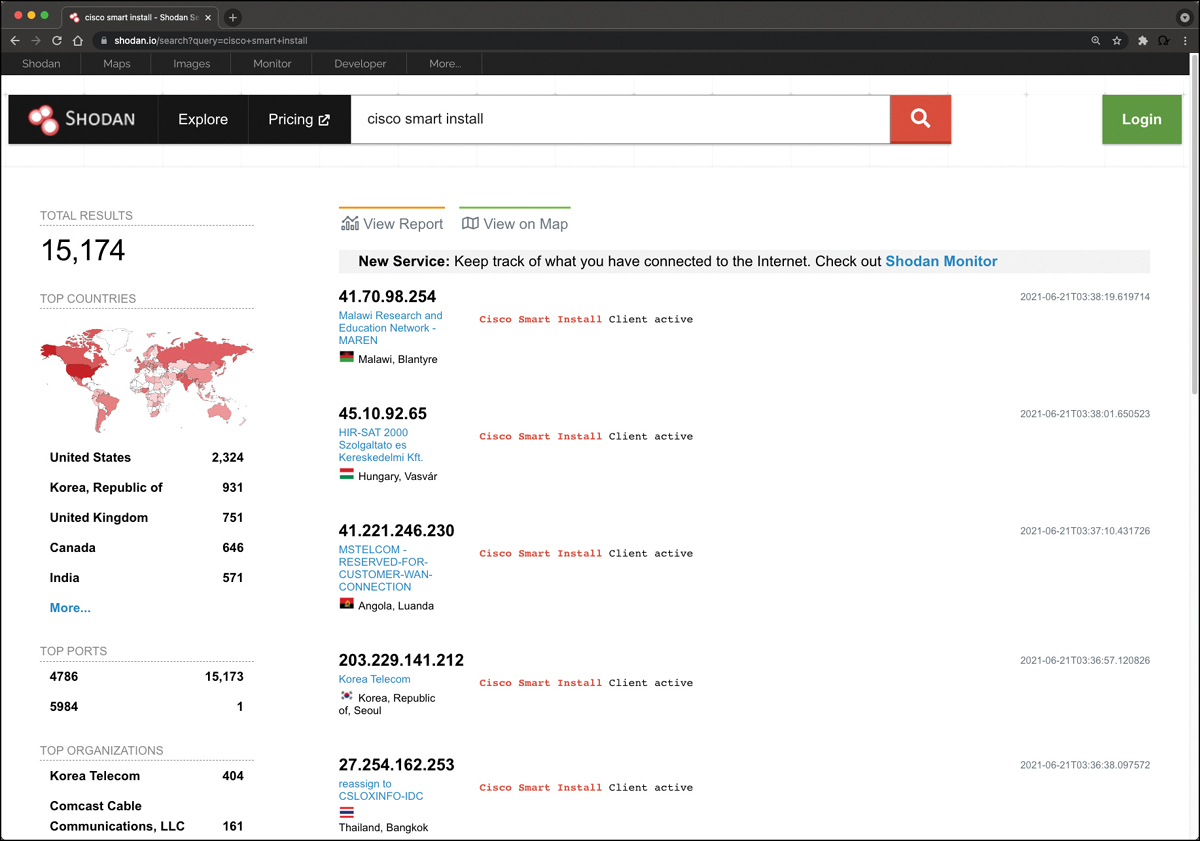
FIGURE 3-7 Revealing Vulnerable Systems Using Shodan
Performing Active Reconnaissance
As mentioned earlier in this chapter, with each step of the information gathering phase, the goal is to gather additional information about the target. The process of gathering this information is called enumeration. So, let’s talk about what kind of enumeration you would typically be doing in a penetration test. In an earlier example, we looked at the enumeration of hosts exposed to the Internet by h4cker.org. External enumeration of hosts is usually one of the first things you do in a penetration test. Determining the Internet-facing hosts of a target network can help you identify the systems that are most exposed. Obviously, a device that is publicly accessible over the Internet is open to attack from malicious actors all over the world. After you identify those systems, you then need to identify which services are accessible. A server should be behind a firewall, allowing minimal exposure to the services it is running. Sometimes, however, services that are not expected are exposed. To determine if a network is running any such services, you can run a port scan to enumerate the services that are running on the exposed hosts.
A port scan is an active scan in which the scanning tool sends various types of probes to the target IP address and then examines the responses to determine whether the service is actually listening. For instance, with an Nmap SYN scan, the tool sends a TCP SYN packet to the TCP port it is probing. This process is also referred to as half-open scanning because it does not open a full TCP connection. If the response is a SYN/ACK, this would indicate that the port is actually in a listening state. If the response to the SYN packet is an RST (reset), this would indicate that the port is closed or is not in a listening state. If the SYN probe does not receive any response, Nmap marks it as filtered because it cannot determine if the port is open or closed. Table 3-2 defines the SYN scan responses when using Nmap.
Table 3-2 SYN Scan Responses
Nmap Port Status Reported | Response from Target | Nmap Analysis |
Open | TCP SYN-ACK | The service is listening on the port. |
Closed | TCP RST | The service is not listening on the port. |
Filtered | No response from target or ICMP destination unreachable | The port is firewalled. |
Figure 3-8 illustrates how a SYN scan works, and Example 3-19 shows the output of a SYN scan.

FIGURE 3-8 Nmap SYN Scan Illustration
Example 3-19 Nmap SYN Scan Sample Output
|--[root@websploit]--[~]
└---- #nmap -sS 192.168.88.251
Starting Nmap 7.80 ( https://nmap.org )
Nmap scan report for 192.168.88.251
Host is up (0.00011s latency).
Not shown: 992 closed ports
PORT     STATE SERVICE
22/tcp   open  ssh
80/tcp   open  http
139/tcp  open  netbios-ssn
445/tcp  open  microsoft-ds
3306/tcp open  mysql
8888/tcp open  sun-answerbook
9000/tcp open  cslistener
9090/tcp open  zeus-admin
MAC Address: 1E:BD:4F:AA:C6:BA (Unknown)
Nmap done: 1 IP address (1 host up) scanned in 0.23 seconds
Example 3-19 shows how to run a TCP SYN scan using Nmap by specifying the -sS option against a host with the IP address 192.168.88.251. As you can see, this system has several ports open. In some situations, you will want to use the many different Nmap options in your scans to get the results you are looking for. The sections that follow look at some of the most common options and types of scans available in Nmap.
Nmap Scan Types
The following sections cover some of the most common Nmap scanning options. These scanning techniques would be used for specific scenarios, as discussed in the following sections.
TCP Connect Scan (-sT)
A TCP connect scan actually makes use of the underlying operating system’s networking mechanism to establish a full TCP connection with the target device being scanned. Because it creates a full connection, it creates more traffic (and thus takes more time to run). This is the default scan type that is used if no scan type is specified with the nmap command. However, it should typically be used only when a SYN scan is not an option, such as when a user who is running the nmap command does not have raw packet privileges on the operating system because many of the Nmap scan types rely on writing raw packets. This section illustrates how a TCP connect scan works and provides an example of a scan from a Kali Linux system. Table 3-3 defines the TCP connect scan responses.
Table 3-3 TCP Connect Scan Responses
Nmap Port Status Reported | Response from Target | Nmap Analysis |
Open | TCP SYN-ACK | The service is listening on the port. |
Closed | TCP RST | The service is not listening on the port. |
Filtered | No response from target | The port is firewalled. |
Figure 3-9 illustrates how a TCP connect scan works. Example 3-20 shows the output of a full TCP connection scan.
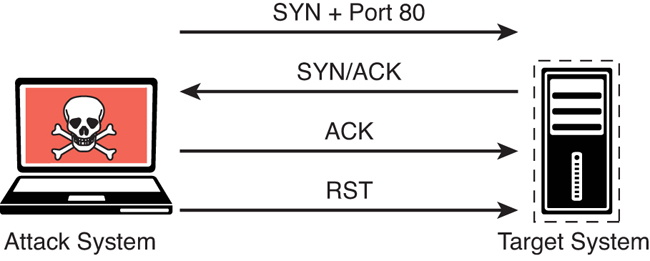
FIGURE 3-9 TCP Connect Scan Illustration
Example 3-20 Nmap TCP Connect Scan Sample Output
|--[root@websploit]--[~]
|--- #nmap -sT 192.168.88.251
Starting Nmap 7.80 ( https://nmap.org ) at 2021-06-21 12:48 EDT
Nmap scan report for 192.168.88.251
Host is up (0.00024s latency).
Not shown: 992 closed ports
PORT     STATE SERVICE
22/tcp   open  ssh
80/tcp   open  http
139/tcp  open  netbios-ssn
445/tcp  open  microsoft-ds
3306/tcp open  mysql
8888/tcp open  sun-answerbook
9000/tcp open  cslistener
9090/tcp open  zeus-admin
MAC Address: 1E:BD:4F:AA:C6:BA (Unknown)

Nmap done: 1 IP address (1 host up) scanned in 0.16 seconds
The output in Example 3-20 shows the results of an Nmap TCP connect scan. As you can see, the results indicate that a number of TCP ports are listening on the target device, and these results are very similar to the result shown in Example 3-19.
A full TCP connect scan requires the scanner to send an additional packet per scan, which increases the amount of noise on the network and may trigger alarms that a half-open scan wouldn’t trigger. Security tools and the underlying targeted system are more likely to log a full TCP connection, and intrusion detection systems (IDSs) are similarly more likely to trigger alarms on several TCP connections from the same host.
UDP Scan (-sU)
The majority of the time, you will be scanning for TCP ports, as this is how you connect to most services running on target systems. However, you might encounter some instances in which you need to scan for UDP ports—for example, if you are trying to enumerate a DNS, SNMP, or DHCP server. These services all use UDP for communication between client and server. To scan UDP ports, Nmap sends a UDP packet to all ports specified in the command-line configuration. It waits to hear back from the target. If it receives an ICMP port unreachable message back from a target, that port is marked as closed. If it receives no response from the target UDP port, Nmap marks the port as open/filtered. Table 3-4 shows the UDP scan responses.
Table 3-4 UDP Scan Responses
Nmap Port Status Reported | Response from Target | Nmap Analysis |
Open | Data returned from port | The service is listening on the port. |
Closed | ICMP error message received | The service is not listening on the port. |
Open/filtered | No ICMP response from target | The port is firewalled or timed out. |
Figure 3-10 illustrates how a UDP scan works, and Example 3-21 shows the output of a UDP scan specifying only port 53 on the target system.
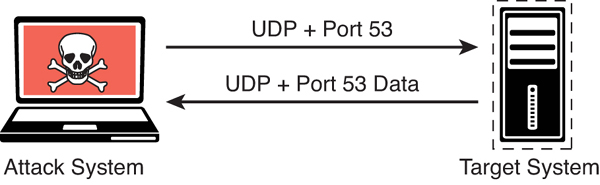
FIGURE 3-10 UDP Scan Illustration
Example 3-21 Nmap UDP Scan Sample Output
|--[root@websploit]--[~]
|--- #nmap -sU -p 53 192.168.88.251
Starting Nmap 7.80 ( https://nmap.org ) at 2021-06-21 13:12 EDT
Nmap scan report for 192.168.88.251
Host is up (0.00057s latency).
PORT   STATE  SERVICE
53/udp open domain
MAC Address: 1E:BD:4F:AA:C6:BA (Unknown)
Nmap done: 1 IP address (1 host up) scanned in 0.19 seconds
The output in Example 3-21 shows the results of an Nmap UDP scan on port 53 of the target 192.168.88.251. As you can see, the results indicate that this port is open.
TCP FIN Scan (-sF)
There are times when a SYN scan might be picked up by a network filter or firewall. In such a case, you need to employ a different type of packet in a port scan. With the TCP FIN scan, a FIN packet is sent to a target port. If the port is actually closed, the target system sends back an RST packet. If nothing is received from the target port, you can consider the port open because the normal behavior would be to ignore the FIN packet. Table 3-5 shows the TCP FIN scan responses.
Table 3-5 TCP FIN Scan Responses
Nmap Port Status Reported | Response from Target | Nmap Analysis |
Filtered | ICMP unreachable error received | Closed port should respond with RST. |
Closed | RST packet received | Closed port should respond with RST. |
Open/Filtered | No response received | Open port should drop FIN. |
Figure 3-11 illustrates how a TCP FIN scan works. Example 3-22 shows the output of a TCP FIN scan against port 80 of the target.

FIGURE 3-11 TCP FIN Scan Illustration
Example 3-22 Nmap TCP FIN Scan Sample Output
|--[root@websploit]--[~]
|--- #nmap -sF -p 80 192.168.88.251
Starting Nmap 7.80 ( https://nmap.org ) at 2021-06-21 13:15 EDT
Nmap scan report for 192.168.88.251
Host is up (0.00045s latency).
PORT   STATE          SERVICE
80/tcp open|filtered http
MAC Address: 1E:BD:4F:AA:C6:BA (Unknown)
Nmap done: 1 IP address (1 host up) scanned in 0.38 seconds
|--[root@websploit]--[~]
|--- #
The output in Example 3-22 shows the results of an Nmap TCP FIN scan, specifying port 80 on the target. The response from the target indicates that the port is open/filtered.
Host Discovery Scan (-sn)
A host discovery scan is one of the most common types of scans used to enumerate hosts on a network because it can use different types of ICMP messages to determine whether a host is online and responding on a network.
Example 3-23 shows an example of a ping scan of the 192.168.88.0/24 subnet. This is a very basic host discovery scan that can be performed to determine what devices on a network are live. Such a scan for host discovery of an entire subnet is sometimes referred to as a ping sweep.
Example 3-23 Nmap Host Discovery Scan
|--[root@websploit]--[~]
└---- #nmap -sn 192.168.88.0/24
Starting Nmap 7.80 ( https://nmap.org ) at 2021-06-21 14:32 EDT
Nmap scan report for 192.168.88.1
Host is up (0.00045s latency).
MAC Address: E0:55:3D:E9:61:74 (Cisco Meraki)
Nmap scan report for 192.168.88.12
Host is up (0.00094s latency).
MAC Address: 0E:64:AF:27:9C:44 (Unknown)
Nmap scan report for 192.168.88.14
Host is up (0.0092s latency).
MAC Address: 00:B8:B3:FD:BF:C2 (Cisco Systems)
Nmap scan report for 192.168.88.24
Host is up (0.0033s latency).
MAC Address: 00:E1:6D:E5:43:C2 (Cisco Systems)
Nmap scan report for 192.168.88.32
Host is up (0.00046s latency).
MAC Address: BE:38:F5:2D:6C:C0 (Unknown)
Nmap scan report for 192.168.88.231
Host is up (0.00061s latency).
MAC Address: FE:82:8C:A3:D2:3C (Unknown)
Nmap scan report for 192.168.88.251
Host is up (0.00040s latency).
MAC Address: 1E:BD:4F:AA:C6:BA (Unknown)
Nmap scan report for 192.168.88.71
Host is up.
Nmap scan report for 192.168.88.225
Host is up.
Nmap done: 256 IP addresses (11 hosts up) scanned in 2.45 seconds
|--[root@websploit]--[~]
|--- #
Timing Options (-T 0-5)
The Nmap scanner provides six timing templates that can be specified with the -T option and the template number (0 through 5) or name. Nmap timing templates enable you to dictate how aggressive a scan will be, while leaving Nmap to pick the exact timing values. These are the timing options:
-T0 (Paranoid): Very slow, used for IDS evasion
-T1 (Sneaky): Quite slow, used for IDS evasion
-T2 (Polite): Slows down to consume less bandwidth, runs about 10 times slower than the default
-T3 (Normal): Default, a dynamic timing model based on target responsiveness
-T4 (Aggressive): Assumes a fast and reliable network and may overwhelm targets
-T5 (Insane): Very aggressive; will likely overwhelm targets or miss open ports
Types of Enumeration
This section covers enumeration techniques that should be performed in the information-gathering phase of a penetration test. You will learn how and when these enumeration techniques should be used. This section also includes examples of performing these types of enumeration by using Nmap.
Host Enumeration
The enumeration of hosts is one of the first tasks you need to perform in the information-gathering phase of a penetration test. Host enumeration is performed internally and externally. When performed externally, you typically want to limit the IP addresses you are scanning to just the ones that are part of the scope of the test. This reduces the chance of inadvertently scanning an IP address that you are not authorized to test. When performing an internal host enumeration, you typically scan the full subnet or subnets of IP addresses being used by the target. Host enumeration is usually performed using a tool such as Nmap or Masscan; however, vulnerability scanners also perform this task as part of their automated testing. Example 3-23, earlier in this chapter, shows a sample Nmap ping scan being used for host enumeration on the network 192.168.88.0/24. In earlier versions of Nmap, the Nmap ping scan option was -sP (not -sn).
User Enumeration
Gathering a valid list of users is the first step in cracking a set of credentials. When you have the username, you can then begin brute-force attempts to get the account password. You perform user enumeration when you have gained access to the internal network. On a Windows network, you can do this by manipulating the Server Message Block (SMB) protocol, which uses TCP port 445. Figure 3-12 illustrates how a typical SMB implementation works.

FIGURE 3-12 SMB Message Illustration
The information contained in the responses to these messages enables you to reveal information about the server:
SMB_COM_NEGOTIATE: This message allows the client to tell the server what protocols, flags, and options it would like to use. The response from the server is also an SMB_COM_NEGOTIATE message. This response is relayed to the client about which protocols, flags, and options it prefers. This information can be configured on the server itself. A misconfiguration sometimes reveals information that you can use in penetration testing. For instance, the server might be configured to allow messages without signatures. You can determine if the server is using share- or user-level authentication mechanisms and whether the server allows plaintext passwords. The response from the server also provides additional information, such as the time and time zone the server is using. This is necessary information for many penetration testing tasks.
SMB_COM_SESSION_SETUP_ANDX: After the client and server have negotiated the protocols, flags, and options they will use for communication, the authentication process begins. Authentication is the primary function of the SMB_COM_SESSION_SETUP_ANDX message. The information sent in this message includes the client username, password, and domain. If this information is not encrypted, it is easy to sniff it right off the network. Even if it is encrypted, if the mechanism being used is not sufficient, the information can be revealed using tools such as Lanman and NTLM in the case of Microsoft Windows implementations. The following example shows this message being used with the smb-enum-users.nse script:
nmap --script smb-enum-users.nse <host>
Example 3-24 shows the results of the Nmap smb-enum-users script run against the target 192.168.88.251. As you can see, the results indicate that the script was able to enumerate the users who are configured on this Windows target.
Example 3-24 Enumerating SMB Users
|--[root@websploit]--[~]
|--- #nmap  --script smb-enum-users.nse 192.168.88.251
Starting Nmap 7.91 ( https://nmap.org ) at 2021-06-22 11:14 EDT
Nmap scan report for 192.168.88.251
Host is up (0.012s latency).
Not shown: 992 closed ports
PORT     STATE SERVICE
22/tcp   open  ssh
80/tcp   open  http
139/tcp  open  netbios-ssn
445/tcp  open  microsoft-ds
3306/tcp open  mysql
8888/tcp open  sun-answerbook
9000/tcp open  cslistener
9090/tcp open  zeus-admin
Host script results:
| smb-enum-users:
|   VULNHOST-1derek (RID: 1000)
|     Full name:
|     Description:
|_    Flags:       Normal user account
Nmap done: 1 IP address (1 host up) scanned in 0.81 seconds
The highlighted line in Example 3-24 reveals the user who was enumerated by Nmap (derek).
Group Enumeration
For a penetration tester, group enumeration is helpful in determining the authorization roles that are being used in the target environment. The Nmap NSE script for enumerating SMB groups is smb-enum-groups. This script attempts to pull a list of groups from a remote Windows machine. You can also reveal the list of users who are members of those groups. The syntax of the command is as follows:
nmap --script smb-enum-groups.nse -p445 <host>
Example 3-25 shows sample output of this command run against the Windows server at 192.168.56.3. This example uses known credentials to gather information.
Example 3-25 Enumerating SMB Groups
|--[root@websploit]--[~]
|--- #nmap --script smb-enum-groups.nse --script-args smbusername=vagr
ant,smbpass=vagrant 192.168.56.3
Starting Nmap 7.91 ( https://nmap.org )
Nmap scan report for 192.168.56.3
Host is up (0.0062s latency).
Not shown: 979 closed ports
PORT      STATE SERVICE
22/tcp    open  ssh
135/tcp   open  msrpc
139/tcp   open  netbios-ssn
445/tcp   open  microsoft-ds
3306/tcp  open  mysql
3389/tcp  open  ms-wbt-server
MAC Address: 08:00:27:1B:A4:60 (Oracle VirtualBox virtual NIC)
Host script results:
| smb-enum-groups:
|   BuiltinAdministrators (RID: 544): Administrator, vagrant,
sshd_server
|   BuiltinUsers (RID: 545): vagrant, sshd, sshd_server, leia_organa,
luke_skywalker, han_solo, artoo_detoo, c_three_pio, ben_kenobi, darth_
vader, anakin_skywalker, jarjar_binks, lando_calrissian, boba_fett,
jabba_hutt, greedo, chewbacca, kylo_ren
|   BuiltinGuests (RID: 546): Guest, ben_kenobi
|   BuiltinPower Users (RID: 547): boba_fett
|   BuiltinPrint Operators (RID: 550): jabba_hutt
|   BuiltinBackup Operators (RID: 551): leia_organa
|   BuiltinReplicator (RID: 552): chewbacca
|   BuiltinRemote Desktop Users (RID: 555): greedo
|   BuiltinNetwork Configuration Operators (RID: 556):
anakin_skywalker
|   BuiltinPerformance Monitor Users (RID: 558): lando_calrissian
|   BuiltinPerformance Log Users (RID: 559): jarjar_binks
|   BuiltinDistributed COM Users (RID: 562): artoo_detoo
|   BuiltinIIS_IUSRS (RID: 568): darth_vader
|   BuiltinCryptographic Operators (RID: 569): han_solo
|   BuiltinEvent Log Readers (RID: 573): c_three_pio
|   BuiltinCertificate Service DCOM Access (RID: 574): luke_skywalker
|_  VAGRANT-2008R2WinRMRemoteWMIUsers__ (RID: 1003): <empty>
Nmap done: 1 IP address (1 host up) scanned in 0.81 seconds
|--[root@websploit]--[~]
|--- #
The highlighted output in Example 3-25 shows the enumerated groups and users in the target host. In Windows, the relative identifier (RID) is a variable-length number assigned to objects and becomes part of the object’s security identifier (SID) that uniquely identifies an account or a group within a domain. To learn more about the different RID numbers, see https://docs.microsoft.com/en-us/troubleshoot/windows-server/identity/security-identifiers-in-windows.
Network Share Enumeration
Identifying systems on a network that are sharing files, folders, and printers is helpful in building out an attack surface of an internal network. The Nmap smb-enum-shares NSE script uses Microsoft Remote Procedure Call (MSRPC) for network share enumeration. The syntax of the Nmap smb-enum-shares.nse script is as follows:
nmap --script smb-enum-shares.nse -p 445 <host>
Example 3-26 demonstrates the enumeration of SMB shares.
Example 3-26 Enumerating SMB Shares
|--[root@websploit]--[~]
|--- #nmap --script smb-enum-shares.nse -p 445 192.168.88.251
Starting Nmap 7.91 ( https://nmap.org ) at 2021-06-22 11:27 EDT
Nmap scan report for 192.168.88.251
Host is up (0.0011s latency).

PORT    STATE SERVICE
445/tcp open  microsoft-ds

Host script results:
| smb-enum-shares:
|   account_used: guest
|   \192.168.88.251IPC$:
|     Type: STYPE_IPC_HIDDEN
|     Comment: IPC Service (Samba 4.9.5-Debian)
|     Users: 1
|     Max Users: <unlimited>
|     Path: C:	mp
|     Anonymous access: READ/WRITE
|     Current user access: READ/WRITE
|   \192.168.88.251print$:
|     Type: STYPE_DISKTREE
|     Comment: Printer Drivers
|     Users: 0
|     Max Users: <unlimited>
|     Path: C:varlibsambaprinters
|     Anonymous access: <none>
|     Current user access: <none>
|   \192.168.88.251secret_folder:
|     Type: STYPE_DISKTREE
|     Comment: Extremely sensitive information
|     Users: 0
|     Max Users: <unlimited>
|     Path: C:secret_folder
|     Anonymous access: <none>
|_    Current user access: <none>

Nmap done: 1 IP address (1 host up) scanned in 0.39 seconds
|--[root@websploit]--[~]
|--- #
Additional SMB Enumeration Examples
The system used in earlier examples (with the IP address 192.168.88.251) is running Linux and Samba. However, it is not easy to determine that it is a Linux system from the results of previous scans. An easy way to perform additional enumeration and fingerprinting of the applications and operating system running on a host is by using the nmap -sC command. The -sC option runs the most common NSE scripts based on the ports found to be open on the target system.
Example 3-27 shows the output of the nmap -sC command launched against the Linux system at 192.168.88.251, which is running Samba.
Example 3-27 Running the Nmap NSE Default Scripts
|--[root@websploit]--[~]
|--- #nmap -sC 192.168.88.251
Starting Nmap 7.80 ( https://nmap.org ) at 2021-06-21 17:38 EDT
Nmap scan report for 192.168.88.251
Host is up (0.00011s latency).
Not shown: 992 closed ports
PORT     STATE SERVICE
22/tcp   open  ssh
| ssh-hostkey:
|   2048 d0:0c:83:4d:7f:84:2c:60:96:9f:df:26:da:d2:11:9a (RSA)
|   256 e2:aa:69:ab:a3:e6:0f:13:c5:5a:65:f2:d5:16:8c:3e (ECDSA)
|_  256 21:4b:27:7b:6e:a6:d4:33:86:60:cb:39:3b:48:9c:0b (ED25519)
80/tcp   open  http
|_http-title: WebSploit Mayhem
139/tcp  open  netbios-ssn
445/tcp  open  microsoft-ds
3306/tcp open  mysql
| mysql-info:
|   Protocol: 10
|   Version: 5.5.47-0ubuntu0.14.04.1
|   Thread ID: 3
|   Capabilities flags: 63487
|   Some Capabilities: InteractiveClient,
DontAllowDatabaseTableColumn, FoundRows, IgnoreSigpipes,
Support41Auth, ODBCClient, ConnectWithDatabase, LongPassword,
SupportsTransactions, IgnoreSpaceBeforeParenthesis,
Speaks41ProtocolOld, Speaks41ProtocolNew, SupportsCompression,
SupportsLoadDataLocal, LongColumnFlag, SupportsMultipleResults,
SupportsMultipleStatments, SupportsAuthPlugins
|   Status: Autocommit
|   Salt: b_60.4ZH=52:l5ajmhBP
|_  Auth Plugin Name: mysql_native_password
8888/tcp open  sun-answerbook
9000/tcp open  cslistener
9090/tcp open  zeus-admin
MAC Address: 1E:BD:4F:AA:C6:BA (Unknown)
Host script results:
|_clock-skew: mean: 17s, deviation: 0s, median: 17s
|_nbstat: NetBIOS name: VULNHOST-1, NetBIOS user: <unknown>, NetBIOS
MAC: <unknown> (unknown)
| smb-os-discovery:
|   OS: Windows 6.1 (Samba 4.9.5-Debian)
|   Computer name: vulnhost-1
|   NetBIOS computer name: VULNHOST-1x00
|   Domain name: ohmr.org
|   FQDN: vulnhost-1.ohmr.org
|_  System time: 2022-06-21T21:38:40+00:00
| smb-security-mode:
|   account_used: guest
|   authentication_level: user
|   challenge_response: supported
|_  message_signing: disabled (dangerous, but default)
| smb2-security-mode:
|   2.02:
|_    Message signing enabled but not required
| smb2-time:
|   date: 2021-06-21T21:38:40
|_  start_date: N/A
Nmap done: 1 IP address (1 host up) scanned in 28.77 seconds
|--[root@websploit]--[~]
|--- #
The highlighted lines in Example 3-27 show details about the Samba version that is running on the system (Samba Version 4.9.5). You can also see that even though the OS is marked as Windows 6.1, the correct operating system is Debian. Example 3-28 shows the output of the samba -V command at the target system (vulnhost-1), which confirms that the scanner was able to determine the correct Samba version.
Example 3-28 Confirming Scan Results in the Target System
omar@vulnhost-1:~$ sudo samba -V
Version 4.9.5-Debian
omar@vulnhost-1:~$
You can also use tools such as enum4linux to enumerate Samba shares, including user accounts, shares, and other configurations. Example 3-29 shows the output of the enum4linux tool after it is launched against the target system (192.168.88.251).
Example 3-29 Enumerating Additional Information Using enum4linux
|-- [root@websploit]--[~]
|--- #enum4linux 192.168.88.251
Starting enum4linux v0.8.9 ( http://labs.portcullis.co.uk/application/
enum4linux/ )
 ==========================
|    Target Information    |
 ==========================
Target ........... 192.168.88.251
RID Range ........ 500-550,1000-1050

Username ......... ''
Password ......... ''
Known Usernames .. administrator, guest, krbtgt, domain admins, root,
bin, none
 ======================================================
|    Enumerating Workgroup/Domain on 192.168.88.251    |
 ======================================================
[+] Got domain/workgroup name: WORKGROUP
 ==============================================
|    Nbtstat Information for 192.168.88.251    |
 ==============================================
Looking up status of 192.168.88.251
  VULNHOST-1       <00> -         B <ACTIVE>  Workstation Service
  VULNHOST-1       <03> -         B <ACTIVE>  Messenger Service
  VULNHOST-1       <20> -         B <ACTIVE>  File Server Service
..__MSBROWSE__. <01> - <GROUP> B <ACTIVE>  Master Browser
  WORKGROUP        <00> - <GROUP> B <ACTIVE>  Domain/Workgroup Name
  WORKGROUP        <1d> -         B <ACTIVE>  Master Browser
  WORKGROUP        <1e> - <GROUP> B <ACTIVE>  Browser Service
Elections
  MAC Address = 00-00-00-00-00-00
 =======================================
|    Session Check on 192.168.88.251    |
 =======================================
[+] Server 192.168.88.251 allows sessions using username '', password ''
 =============================================
|    Getting domain SID for 192.168.88.251    |
 =============================================
Domain Name: WORKGROUP
Domain Sid: (NULL SID)
[+] Can't determine if host is part of domain or part of a workgroup
 ========================================
|    OS information on 192.168.88.251    |
 ========================================
Use of uninitialized value $os_info in concatenation (.) or string at
./enum4linux.pl line 464.
[+] Got OS info for 192.168.88.251 from smbclient:
[+] Got OS info for 192.168.88.251 from srvinfo:
    VULNHOST-1     Wk Sv PrQ Unx NT SNT Samba 4.9.5-Debian
    platform_id     : 500
    os version      : 6.1
    server type     : 0x809a03
 ===============================
|    Users on 192.168.88.251    |
 ===============================
index: 0x1 RID: 0x3e8 acb: 0x00000010 Account: derek Name:  Desc:
user:[derek] rid:[0x3e8]
 ===========================================
|    Share Enumeration on 192.168.88.251    |
 ===========================================
    Sharename       Type      Comment
    ---------       ----      -------
    print$          Disk      Printer Drivers
secret_folder   Disk      Extremely sensitive information
    IPC$            IPC       IPC Service (Samba 4.9.5-Debian)
SMB1 disabled -- no workgroup available
[+] Attempting to map shares on 192.168.88.251
//192.168.88.251/print$ Mapping: DENIED, Listing: N/A
//192.168.88.251/secret_folder Mapping: DENIED, Listing: N/A
======================================================
|    Password Policy Information for 192.168.88.251    |
 ======================================================
[+] Attaching to 192.168.88.251 using a NULL share
[+] Trying protocol 139/SMB...
[+] Found domain(s):
    [+] VULNHOST-1
    [+] Builtin
[+] Password Info for Domain: VULNHOST-1
    [+] Minimum password length: 5
    [+] Password history length: None
    [+] Maximum password age: 37 days 6 hours 21 minutes
    [+] Password Complexity Flags: 000000
        [+] Domain Refuse Password Change: 0
        [+] Domain Password Store Cleartext: 0
        [+] Domain Password Lockout Admins: 0
        [+] Domain Password No Clear Change: 0
        [+] Domain Password No Anon Change: 0
        [+] Domain Password Complex: 0
    [+] Minimum password age: None
    [+] Reset Account Lockout Counter: 30 minutes
    [+] Locked Account Duration: 30 minutes
    [+] Account Lockout Threshold: None
    [+] Forced Log off Time: 37 days 6 hours 21 minutes
[+] Retrieved partial password policy with rpcclient:
Password Complexity: Disabled
Minimum Password Length: 5
 ================================
|    Groups on 192.168.88.251    |
 ================================
[+] Getting builtin groups:
[+] Getting builtin group memberships:
[+] Getting local groups:
[+] Getting local group memberships:
[+] Getting domain groups:
[+] Getting domain group memberships:
=======================================================
|    Users on 192.168.88.251 via RID cycling (RIDS: 500-550,
1000-1050)    |
=======================================================
[I] Found new SID: S-1-22-1
[I] Found new SID: S-1-5-21-2226316658-154127331-1048156596
[I] Found new SID: S-1-5-32
[+] Enumerating users using SID S-1-5-21-2226316658-154127331-
1048156596 and logon username '', password ''
<output omitted for brevity>
S-1-5-21-2226316658-154127331-1048156596-501 VULNHOST-1
obody (Local
User)
S-1-5-21-2226316658-154127331-1048156596-513 VULNHOST-1None (Domain
Group)
S-1-5-21-2226316658-154127331-1048156596-1000 VULNHOST-1derek (Local
User)
<output omitted for brevity>
[+] Enumerating users using SID S-1-22-1 and logon username '',
password ''
S-1-22-1-1000 Unix Useromar (Local User)
S-1-22-1-1001 Unix Userderek (Local User)
[+] Enumerating users using SID S-1-5-32 and logon username '',
password ''
<output omitted for brevity>
=================================================
|    Getting printer info for 192.168.88.251    |
=================================================
No printers returned.
|--[root@websploit]--[~]
|--- #
There is a Python-based enum4linux implementation called enum4linux-ng that can be downloaded from https://github.com/cddmp/enum4linux-ng.
Example 3-30 shows an example of SMB enumeration using enum4linux-ng.
Example 3-30 Enumeration Using enum4linux-ng
|--[root@websploit]--[~/enum4linux-ng]
|--- #./enum4linux-ng.py -As 192.168.88.251
ENUM4LINUX - next generation

 ==========================
|    Target Information    |
 ==========================
[*] Target ........... 192.168.88.251
[*] Username ......... ''
[*] Random Username .. 'opaftohf'
[*] Password ......... ''
[*] Timeout .......... 5 second(s)

 ======================================
|    Service Scan on 192.168.88.251    |
 ======================================
[*] Checking LDAP
[-] Could not connect to LDAP on 389/tcp: connection refused
[*] Checking LDAPS
[-] Could not connect to LDAPS on 636/tcp: connection refused
[*] Checking SMB
[+] SMB is accessible on 445/tcp
[*] Checking SMB over NetBIOS
[+] SMB over NetBIOS is accessible on 139/tcp
 ===========================================
|    SMB Dialect Check on 192.168.88.251    |
 ===========================================
[*] Check for legacy SMBv1 on 445/tcp
[+] Server supports dialects higher SMBv1
 ===========================================
|    RPC Session Check on 192.168.88.251    |
 ===========================================
[*] Check for null session
[+] Server allows session using username '', password ''
[*] Check for random user session
[+] Server allows session using username 'opaftohf', password ''
[H] Rerunning enumeration with user 'opaftohf' might give more results
 =====================================================
|    Domain Information via RPC for 192.168.88.251    |
 =====================================================
[+] Domain: WORKGROUP
[+] SID: NULL SID
[+] Host is part of a workgroup (not a domain)
 ================================================
|    OS Information via RPC on 192.168.88.251    |
 ================================================
[+] The following OS information were found:
server_type_string = Wk Sv PrQ Unx NT SNT Samba 4.9.5-Debian
platform_id        = 500
os_version         = 6.1
server_type        = 0x809a03
os                 = Linux/Unix (Samba 4.9.5-Debian)
 =======================================
|    Users via RPC on 192.168.88.251    |
 =======================================
[*] Enumerating users via 'querydispinfo'
[+] Found 2 users via 'querydispinfo'
[*] Enumerating users via 'enumdomusers'
[+] Found 2 users via 'enumdomusers'
[+] After merging user results we have 2 users total:
'1000':
  username: derek
  name: ''
  acb: '0x00000010'
  description: ''
'1001':
  username: omar
  name: ''
  acb: '0x00000010'
  description: ''
 ========================================
|    Groups via RPC on 192.168.88.251    |
 ========================================
[*] Enumerating local groups
[+] Found 0 group(s) via 'enumalsgroups domain'
[*] Enumerating builtin groups
[+] Found 0 group(s) via 'enumalsgroups builtin'
[*] Enumerating domain groups
[+] Found 0 group(s) via 'enumdomgroups'
 ========================================
|    Shares via RPC on 192.168.88.251    |
 ========================================
[*] Enumerating shares
[+] Found 3 share(s):
IPC$:
  comment: IPC Service (Samba 4.9.5-Debian)
  type: IPC
print$:
  comment: Printer Drivers
  type: Disk
secret_folder:
comment: Extremely sensitive information
  type: Disk
[*] Testing share IPC$
[-] Could not check share: STATUS_OBJECT_NAME_NOT_FOUND
[*] Testing share print$
[+] Mapping: DENIED, Listing: N/A
[*] Testing share secret_folder
[+] Mapping: DENIED, Listing: N/A
 ===========================================
|    Policies via RPC for 192.168.88.251    |
 ===========================================
[*] Trying port 445/tcp
[+] Found policy:
domain_password_information:
  pw_history_length: None
  min_pw_length: 5
  min_pw_age: none
  max_pw_age: 49710 days 6 hours 21 minutes
  pw_properties:
  - DOMAIN_PASSWORD_COMPLEX: false
  - DOMAIN_PASSWORD_NO_ANON_CHANGE: false
  - DOMAIN_PASSWORD_NO_CLEAR_CHANGE: false
  - DOMAIN_PASSWORD_LOCKOUT_ADMINS: false
  - DOMAIN_PASSWORD_PASSWORD_STORE_CLEARTEXT: false
  - DOMAIN_PASSWORD_REFUSE_PASSWORD_CHANGE: false
domain_lockout_information:
  lockout_observation_window: 30 minutes
  lockout_duration: 30 minutes
  lockout_threshold: None
domain_logoff_information:
  force_logoff_time: 49710 days 6 hours 21 minutes
 ===========================================
|    Printers via RPC for 192.168.88.251    |
 ===========================================
[+] No printers returned (this is not an error)
Completed after 0.70 seconds
|--[root@websploit]--[~/enum4linux-ng]
|--- #
The highlighted lines in Example 3-30 show the enumerated users, Samba version, and shared folders. You can also use simple tools such as smbclient to enumerate shares and other information from a system running SMB, as demonstrated in Example 3-31.
Example 3-31 Enumeration Using smbclient
|--[root@websploit]
|--- #smbclient -L \\192.168.88.251
       Sharename       Type       Comment
       ---------       ----       -------
       print$          Disk       Printer Drivers
      secret_folder             Disk      Extremely sensitive information
       IPC$            IPC        IPC Service (Samba 4.9.5-Debian)
SMB1 disabled -- no workgroup available
|--[root@websploit]--[~/enum4linux-ng]
|--- #
Web Page Enumeration/Web Application Enumeration
Once you have identified that a web server is running on a target host, the next step is to take a look at the web application and begin to map out the attack surface performing web page enumeration or often referred to as web application enumeration. You can map out the attack surface of a web application in a few different ways. The handy Nmap tool actually has an NSE script available for brute forcing the directory and file paths of web applications. Armed with a list of known files and directories used by common web applications, it probes the server for each of the items on the list. Based on the response from the server, it can determine whether those paths exist. This is handy for identifying things like the Apache or Tomcat default manager page that are commonly left on web servers and can be potential paths for exploitation. The syntax of the http-enum NSE script is as follows:
nmap -sV --script=http-enum <target>
Example 3-32 displays the results of running this script against the host with the IP address 192.168.88.251.
Example 3-32 Sample Nmap http-enum Script Output
|--[root@websploit]--[~]
|--- #nmap -sV --script=http-enum -p 80 192.168.88.251
Starting Nmap 7.91 ( https://nmap.org ) at 2021-06-22 11:53 EDT
Nmap scan report for 192.168.88.251
Host is up (0.0011s latency).

PORT   STATE SERVICE VERSION
80/tcp open  http    nginx 1.17.2
| http-enum:
|   /admin/: Possible admin folder
|   /admin/index.html: Possible admin folder
|_  /s/: Potentially interesting folder
|_http-server-header: nginx/1.17.2
Service detection performed. Please report any incorrect results at
https://nmap.org/submit/ .
Nmap done: 1 IP address (1 host up) scanned in 8.54 seconds
|--[root@websploit]--[~]
|--- #
The highlighted output in Example 3-32 shows several enumerated directories/folders and the version of the web server being used (Nginx 1.17.2). This is a good place to start in attacking a web application.
Another web server enumeration tool we should talk about is Nikto. Nikto is an open-source web vulnerability scanner that has been around for many years. It’s not as robust as the commercial web vulnerability scanners; however, it is very handy for running a quick script to enumerate information about a web server and the applications it is hosting. Because of the speed at which Nikto works to scan a web server, it is very noisy. It provides a number of options for scanning, including the capability to authenticate to a web application that requires a username and password. Example 3-33 shows the output of a Nikto scan being run against the same host as in Example 3-32 (192.168.88.251). The output in Example 3-33 shows similar results to the Nmap script used in Example 3-32.
Example 3-33 Sample Nikto Scan
|--[root@websploit]--[~]
|--- #nikto -h 192.168.88.251
- Nikto v2.1.6
-----------------------------------------------------------------------
+ Target IP:           192.168.88.251
+ Target Hostname:    192.168.88.251
+ Target Port:         80
-----------------------------------------------------------------------
+ Server: nginx/1.17.2
+ The anti-clickjacking X-Frame-Options header is not present.
+ The anti-clickjacking X-Frame-Options header is not present.
+ The X-XSS-Protection header is not defined. This header can hint to
the user agent to protect against some forms of XSS
+ The X-Content-Type-Options header is not set. This could allow the
user agent to render the content of the site in a different fashion
to the MIME type
+ No CGI Directories found (use '-C all' to force check all possible
dirs)
+ OSVDB-3092: /admin/: This might be interesting...
+ /admin/index.html: Admin login page/section found.
+ /wp-admin/: Admin login page/section found.
+ /wp-login/: Admin login page/section found.
+ 7916 requests: 0 error(s) and 7 item(s) reported on remote host
+ End Time:            2021-06-22 11:57:59 (GMT-4) (15 seconds)
---------------------------------------------------------------------------
+ 1 host(s) tested
|--[root@websploit]--[~]
|--- #
Service Enumeration
Service enumeration is the process of identifying the services running on a remote system, a and it is a primary focus of what Nmap does as a port scanner. Earlier discussion in this chapter highlights the various scan types and how they can be used to bypass filters. When you are connected to a system that is on a directly connected network segment, you can run some additional scripts to enumerate further. A port scan takes the perspective of a credentialed remote user. The Nmap smb-enum-processes NSE script enumerates services on a Windows system, and it does so by using credentials of a user who has access to read the status of services that are running. This is a handy tool for remotely querying a Windows system to determine the exact list of services running. The syntax of the command is as follows:
nmap --script smb-enum-processes.nse --script-args
smbusername=<username>,smbpass=<password> -p445 <host>
Exploring Enumeration via Packet Crafting
When it comes to enumeration via packet crafting and generation, Scapy is one of my favorite tools and frameworks. Scapy is a very comprehensive Python-based framework or ecosystem for packet generation. This section looks at some of the simple ways you can use this tool to perform basic network reconnaissance.
Launching the Scapy interactive shell is as easy as typing sudo scapy from a terminal window, as illustrated in Figure 3-13.
Example 3-34 shows how easy it is to begin crafting packets. In this example, a simple ICMP packet is crafted with malicious_payload as the payload being sent to the destination host 192.168.88.251.
Example 3-34 Crafting a Simple ICMP Packet Using Scapy
>>> send(IP(dst="192.168.88.251")/ICMP()/"malicious_payload")
.
Sent 1 packets.

FIGURE 3-13 Starting scapy from the Command Line
Example 3-35 shows the ICMP packet received by the target system (192.168.88.225/vulnhost-1). The tshark packet capture tool is used to capture the crafted ICMP packet.
Example 3-35 Collecting a Crafted Packet by Using tshark
omar@vulnhost-1 ~ % sudo tshark host 192.168.78.142
Capturing on 'eth0'
    1 0.000000000 192.168.78.142 ? 192.168.88.251 ICMP 60 Echo (ping)
request  id=0x0000, seq=0/0, ttl=63
    2 0.000026929 192.168.88.251 ? 192.168.78.142 ICMP 59 Echo (ping)
reply    id=0x0000, seq=0/0, ttl=64 (request in 1)
Scapy supports a large number of protocols. You can use the ls() function to list all available formats and protocols, as demonstrated in Example 3-36.
Example 3-36 The Scapy ls() Function
>>> ls()
AH          : AH
AKMSuite   : AKM suite
ARP         : ARP
ASN1P_INTEGER : None
ASN1P_OID  : None
ASN1P_PRIVSEQ : None
ASN1_Packet : None
ATT_Error_Response : Error Response
ATT_Exchange_MTU_Request : Exchange MTU Request
ATT_Exchange_MTU_Response : Exchange MTU Response
ATT_Execute_Write_Request : Execute Write Request
ATT_Execute_Write_Response : Execute Write Response
ATT_Find_By_Type_Value_Request : Find By Type Value Request
ATT_Find_By_Type_Value_Response : Find By Type Value Response
ATT_Find_Information_Request : Find Information Request
ATT_Find_Information_Response : Find Information Response
ATT_Handle : ATT Short Handle
ATT_Handle_UUID128 : ATT Handle (UUID 128)
ATT_Handle_Value_Indication : Handle Value Indication
ATT_Handle_Value_Notification : Handle Value Notification
ATT_Handle_Variable : None
ATT_Hdr    : ATT header
ATT_Prepare_Write_Request : Prepare Write Request
<output omitted for brevity>
You can use the ls() function to display all the options and fields of a specific protocol or packet format supported by Scapy, as shown in Example 3-37. This example shows the available fields for the TCP protocol.
Example 3-37 Listing the TCP Layer 4 Fields in Scapy
>>> ls(TCP)
sport         : ShortEnumField                     = (20)
dport         : ShortEnumField                     = (80)
seq           : IntField                           = (0)
ack           : IntField                           = (0)
dataofs       : BitField  (4 bits)                 = (None)
reserved      : BitField  (3 bits)                 = (0)
flags         : FlagsField  (9 bits)               = (<Flag 2 (S)>)
window        : ShortField                         = (8192)
chksum        : XShortField                        = (None)
urgptr        : ShortField                         = (0)
options       : TCPOptionsField                    = (b'')
Example 3-38 shows the DNS packet fields that can be modified by Scapy.
Example 3-38 Listing the Available DNS Packet Fields in Scapy
>>> ls(DNS)
length      : ShortField (Cond)                 = (None)
id          : ShortField                        = (0)
qr          : BitField  (1 bit)                 = (0)
opcode      : BitEnumField  (4 bits)            = (0)
aa          : BitField  (1 bit)                 = (0)
tc          : BitField  (1 bit)                 = (0)
rd          : BitField  (1 bit)                 = (1)
ra          : BitField  (1 bit)                 = (0)
z           : BitField  (1 bit)                 = (0)
ad          : BitField  (1 bit)                 = (0)
cd          : BitField  (1 bit)                 = (0)
rcode       : BitEnumField  (4 bits)            = (0)
qdcount     : DNSRRCountField                   = (None)
ancount     : DNSRRCountField                   = (None)
nscount     : DNSRRCountField                   = (None)
arcount     : DNSRRCountField                   = (None)
qd          : DNSQRField                        = (None)
an          : DNSRRField                        = (None)
ns          : DNSRRField                        = (None)
ar          : DNSRRField                        = (None)
You can use the explore() function to navigate the Scapy layers and protocols. After you execute the explore() function, the screen in Figure 3-14 is displayed.
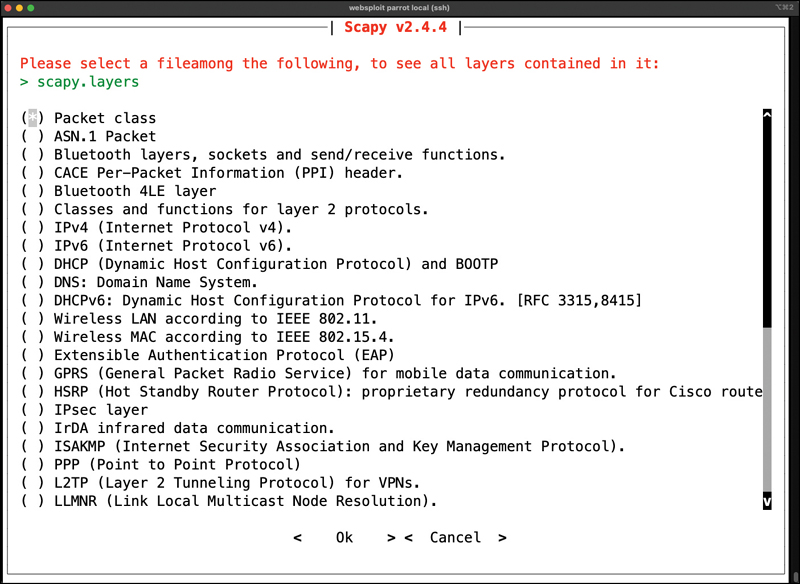
FIGURE 3-14 Using the explore() Function in Scapy
You can use the explore() function with any packet format or protocol. Example 3-39 shows the packets contained in scapy.layers.dns using the explore(“dns”) function.
Example 3-39 Using the explore(“dns”) Function to Display the Packet Types in scapy.layers.dns
>>> explore("dns")
Packets contained in scapy.layers.dns:
Class                      |Name
---------------------------|------------------------------
DNS                        |DNS
DNSQR                      |DNS Question Record
DNSRR                      |DNS Resource Record
DNSRRDLV                   |DNS DLV Resource Record
DNSRRDNSKEY                |DNS DNSKEY Resource Record
DNSRRDS                    |DNS DS Resource Record
DNSRRMX                    |DNS MX Resource Record
DNSRRNSEC                  |DNS NSEC Resource Record
DNSRRNSEC3                 |DNS NSEC3 Resource Record
DNSRRNSEC3PARAM            |DNS NSEC3PARAM Resource Record
DNSRROPT                   |DNS OPT Resource Record
DNSRRRSIG                  |DNS RRSIG Resource Record
DNSRRSOA                   |DNS SOA Resource Record
DNSRRSRV                   |DNS SRV Resource Record
DNSRRTSIG                  |DNS TSIG Resource Record
EDNS0TLV                   |DNS EDNS0 TLV
InheritOriginDNSStrPacket|
You can use Scapy as a scanner in many different ways. I have several examples of Python scripts to perform network and system scanning using Scapy at my GitHub repository; see https://github.com/The-Art-of-Hacking/h4cker/blob/master/python_ruby_and_bash. However, you can do a simple TCP SYN scan to any given port, as demonstrated in Example 3-40. In this example, a TCP port 445 SYN packet is sent to the host with the IP address 192.168.88.251. The output indicates that it received one answer, but it doesn’t specify what the actual answer (response) was. Example 3-41 shows the packet capture on the target host (192.168.88.251).
Example 3-40 Sending a TCP SYN Packet Using Scapy
>>> ans, unans = sr(IP(dst='192.168.88.251')/TCP(dport=445,
flags='S'))
Begin emission:
Finished sending 1 packets.
....*
Received 5 packets, got 1 answers, remaining 0 packets
>>>
Example 3-41 The Packet Capture of the TCP Packets on the Target Host
omar@vulnhost-1 ~ % sudo tshark host 192.168.78.142
Running as user "root" and group "root". This could be dangerous.
Capturing on 'eth0'
    1 0.000000000 192.168.78.142 ? 192.168.88.251 TCP 60 20 ? 445
[SYN] Seq=0 Win=8192 Len=0
    2 0.000033735 192.168.88.251 ? 192.168.78.142 TCP 58 445 ? 20
[SYN, ACK] Seq=0 Ack=1 Win=64240 Len=0 MSS=1460
    3 0.001065273 192.168.78.142 ? 192.168.88.251 TCP 60 20 ? 445
[RST] Seq=1 Win=0 Len=0
Packet Inspection and Eavesdropping
As a penetration tester, you can use tools like Wireshark, tshark (refer to Example 3-41), and tcpdump to collect packet captures for packet inspection and eavesdropping. Anyone who has been involved with networking or security has at some point used these tools to capture and analyze traffic on a network. For a penetration tester, such tools can be convenient for performing passive reconnaissance. Of course, this type of reconnaissance requires either a physical or a wireless connection to the target. If you are concerned about being detected, you are probably better off attempting a wireless connection because it would not require you to be inside the building. Many times, a company’s wireless footprint bleeds outside its physical walls. This gives a penetration tester an opportunity to potentially collect information about the target and possibly gain access to the network to sniff traffic. Chapter 5, “Exploiting Wired and Wireless Networks,” covers this topic in depth.
Understanding the Art of Performing Vulnerability Scans
Once you have identified the target hosts that are available and the services that are listening on those hosts, you can begin to probe those services to determine if there are any weaknesses; this is what vulnerability scanners do. Vulnerability scanners use a number of different methods to determine whether a service is vulnerable. The primary method is to identify the version of the software that is running on the open service and try to match it with an already known vulnerability. For instance, if a vulnerability scanner determines that a Linux server is running an outdated version of the Apache web server that is vulnerable to remote exploitation, it reports that vulnerability as a finding.
Of course, the main concern with automated vulnerability scanners is false positives; the output from a vulnerability scan may be useless if no validation is done on the findings. Turning over a report full of false positives to a developer or an administrator who is then responsible for fixing the issues can really cause conflicts. You don’t want someone chasing down findings in your report just to find out that they are false positives.
How a Typical Automated Vulnerability Scanner Works
Now let’s take a look at how typical vulnerability scanners work (see Figure 3-15). They are all different in some ways, but most of them follow a similar process:
Step 1. In the discovery phase, the scanner uses a tool such as Nmap to perform host and port enumeration. Using the results of the host and port enumeration, the scanner begins to probe open ports for more information.
Step 2. When the scanner has enough information about the open port to determine what software and version are running on that port, it records that information in a database for further analysis. The scanner can use various methods to make this determination, including using banner information.
Step 3. The scanner tries to determine if the software that is listening on the target system is susceptible to any known vulnerabilities. It does this by correlating a database of known vulnerabilities against the information recorded in the database about the target services.
Step 4. The scanner produces a report on what it suspects could be vulnerable. Keep in mind that these results are often false positives and need to be validated.
At the very least, this type of tool gives you an idea of where to look for vulnerabilities that might be exploitable.

FIGURE 3-15 Vulnerability Scanner Illustration
Types of Vulnerability Scans
The type of vulnerability scan to use is usually driven by scan policy that is created in the automated vulnerability scanning tool. Each tool has many options available for scanning. You can often just choose to do a full scan that will operate all scanning options, although you might not be able to use every option (for instance, if you are scanning a production environment or a device that is prone to crashing when scanning occurs). In such situations, you must be careful to select only the scan options that are less likely to cause issues. The sections that follow take a closer look at the typical scan types.
Unauthenticated Scans
By default, vulnerability scanners do not use credentials to scan a target. If you provide only the IP address of the target and click Scan, the tool will begin enumerating the host from the perspective of an unauthenticated remote attacker. An unauthenticated scan shows only the network services that are exposed to the network. The scanner attempts to enumerate the ports open on the target host. If the service is not listening on the network segment that the scanner is connected to, or if it is firewalled, the scanner will report the port as closed and move on. However, this does not mean that there is not a vulnerability. Sometimes it is possible to access ports that are not exposed to the network via SSH port forwarding and other tricks. It is still important to run a credentialed (or authenticated) scan when possible.
Authenticated Scans
In some cases, it is best to run an authenticated scan against a target to get a full picture of the attack surface. An authenticated scan requires you to provide the scanner with a set of credentials that have root-level access to the system. The scanner actually logs in to the target via SSH or some other mechanism. It then runs commands like netstat to gather information from inside the host. Many of the commands that the scanner runs require root-level access to be able to gather the correct information from the system.
Example 3-42 shows the netstat command run by a non-privileged user (omar); Example 3-43 shows the netstat command run by a root user. You can see that the output is different for the different user-level permissions. Specifically, notice that when running as the user omar, the PID/program name is not available, and when running as the user root, that information is displayed.
Example 3-42 Netstat Example Without Root-Level Access
omar@vulnhost-1 ~ % netstat -tunap
(Not all processes could be identified, non-owned process info
 will not be shown, you would have to be root to see it all.)
Active Internet connections (servers and established)
Proto Recv-Q Send-Q Local Address         Foreign Address
State       PID/Program name
tcp        0       0 0.0.0.0:9000         0.0.0.0:*     LISTEN     -
tcp        0       0 0.0.0.0:9001         0.0.0.0:*     LISTEN     -
tcp        0       0 0.0.0.0:9002         0.0.0.0:*     LISTEN     -
tcp        0       0 0.0.0.0:3306         0.0.0.0:*     LISTEN     -
tcp        0       0 0.0.0.0:139          0.0.0.0:*     LISTEN     -
tcp        0       0 0.0.0.0:80           0.0.0.0:*     LISTEN     -
tcp        0       0 0.0.0.0:8881         0.0.0.0:*     LISTEN     -
tcp        0       0 0.0.0.0:8882         0.0.0.0:*     LISTEN     -
tcp        0       0 0.0.0.0:8883         0.0.0.0:*     LISTEN     -
tcp        0       0 0.0.0.0:8884         0.0.0.0:*     LISTEN
<output omitted for brevity>
Example 3-43 shows the details about the process and program name associated with the opened port.
Example 3-43 Netstat Example with Root-Level Access
omar@vulnhost-1 ~ % sudo netstat -tunap
Active Internet connections (servers and established)
Proto Recv-Q Send-Q Local Address       Foreign Address  State
PID/Program name
tcp         0      0 0.0.0.0:9000       0.0.0.0:*       LISTEN
1076/docker-proxy
tcp         0      0 0.0.0.0:9001       0.0.0.0:*       LISTEN
762/docker-proxy
tcp         0      0 0.0.0.0:9002       0.0.0.0:*       LISTEN
1287/docker-proxy
tcp         0      0 0.0.0.0:3306       0.0.0.0:*       LISTEN
1095/docker-proxy
tcp         0      0 0.0.0.0:139        0.0.0.0:*       LISTEN
247/smbd
tcp         0      0 0.0.0.0:80         0.0.0.0:*       LISTEN
506/docker-proxy
tcp         0      0 0.0.0.0:8881       0.0.0.0:*       LISTEN
831/docker-proxy
tcp         0      0 0.0.0.0:8882       0.0.0.0:*       LISTEN
530/docker-proxy
tcp         0      0 0.0.0.0:8883       0.0.0.0:*       LISTEN
702/docker-proxy
tcp         0      0 0.0.0.0:8884       0.0.0.0:*       LISTEN
1133/docker-proxy
tcp         0      0 0.0.0.0:8885       0.0.0.0:*       LISTEN
989/docker-proxy
tcp         0      0 0.0.0.0:8886       0.0.0.0:*       LISTEN
604/docker-proxy
tcp         0      0 0.0.0.0:22         0.0.0.0:*       LISTEN
161/sshd
tcp         0      0 0.0.0.0:8887       0.0.0.0:*       LISTEN
1163/docker-proxy
tcp         0      0 0.0.0.0:8888       0.0.0.0:*       LISTEN
494/docker-proxy
tcp         0      0 0.0.0.0:88         0.0.0.0:*       LISTEN
482/docker-proxy
tcp         0      0 0.0.0.0:8889       0.0.0.0:*       LISTEN
470/docker-proxy
tcp         0      0 127.0.0.1:25       0.0.0.0:*       LISTEN
338/master
tcp         0      0 0.0.0.0:445        0.0.0.0:*       LISTEN
247/smbd
tcp         0      0 0.0.0.0:9090       0.0.0.0:*       LISTEN
819/docker-proxy
<output omitted for brevity>
Discovery Scans
A discovery scan is primarily meant to identify the attack surface of a target. A port scan is a major part of what a discovery scan performs. A scanner may actually use a tool like Nmap to perform the port scan process. It then pulls the results of the port scan into its database to use that information for further discovery. For instance, the result of the port scan might come back showing that ports 80, 22, and 443 are open and listening. From there, the scanning tool probes those ports to identify exactly what service is running on each port. For example, say that it identifies that an Apache Tomcat 8.5.22 web server is running on ports 80 and 443. Knowing that a web server is running on the ports, the scanner can then perform further discovery tasks that are specific to web servers and applications. Now say that, at the same time, the scanner identifies that OpenSSH is listening on port 22. From there, the scanner can probe the SSH service to identify information about its configuration and capabilities, such as preferred and supported cryptographic algorithms. This type of information is useful for identifying vulnerabilities in later phases of testing.
Full Scans
As mentioned previously, a full scan typically involves enabling every scanning option in the scan policy. The options vary based on the scanner, but most vulnerability scanners have their categories of options defined similarly. For instance, they are typically organized by operating system, device manufacturer, device type, protocol, compliance, and type of attack, and the rest of the options might fall into a miscellaneous category. Example 3-44 shows a sample list of the plugin categories from the Nessus vulnerability scanner. As you can see from this list, there are a lot of plugins available for the scanner to run. It should also be obvious, based on the names of the plugin categories, that there will never be a single device that all of these plugins apply to. For instance, plugins for a macOS device would not be applicable to a Windows device. That is why you normally need to customize your plugin selection to reflect the environment that you are scanning. Doing so will reduce unnecessary traffic and speed up your scanning process.
Example 3-44 Examples of Plugin Categories from Nessus
Family                                        Count
AIX Local Security Checks                     11416
Amazon Linux Local Security Checks             1048
Backdoors                                       114
Brute force attack                               26
CGI abuses                                     3841
CGI abuses : XS                                 666

CISCO                                           918
CentOS Local Security Checks                   2585
DNS                                             172
Databases                                       577
Debian Local Security Checks                   5532
Default Unix Accounts                           168
Denial of Service                               109
F5 Networks Local Security Checks               607
FTP                                             255
Fedora Local Security Checks                  12634
Firewalls                                       240
FreeBSD Local Security Checks                  3957
Gain a shell remotely                           280
General                                         255
Gentoo Local Security Checks                   2650
HP-UX Local Security Checks                    1984
Huawei Local Security Checks                    563
Junos Local Security Checks                     212
macOS Local Security Checks                    1191
Mandriva Local Security Checks                 3139
Misc.                                          1661
Mobile Devices                                   76
Netware                                          14
Oracle Linux Local Security Checks             2806
OracleVM Local Security Checks                  459
Palo Alto Local Security Checks                  49
Peer-To-Peer File Sharing                        90
Policy Compliance                                49
Port scanners                                     7
RPC                                              38
Red Hat Local Security Checks                  4864
SCADA                                           300
SMTP problems                                   139
SNMP                                             33
Scientific Linux Local Security Checks         2493
Service detection                               431
Settings                                         85
Slackware Local Security Checks                1067
Solaris Local Security Checks                  4937

SuSE Local Security Checks                    11377
Ubuntu Local Security Checks                   4130
VMware ESX Local Security Checks                118
Virtuozzo Local Security Checks                 191
Web Servers                                    1092
Windows                                        4053
Windows : Microsoft Bulletins                  1509
Windows : User management                        28
Stealth Scans
There are sometimes situations in which you must scan an environment that is in a production state. In such situations, there is typically a requirement for running a scan without alerting the defensive position of the environment; such a scan is called a stealth scan. In this case, you will want to implement a vulnerability scanner in a manner that makes the target less likely to detect the activity. Vulnerability scanners are pretty noisy; however, there are some options you can configure to make a scan quieter. For example, as discussed earlier in this chapter, there are different types of Nmap scans, and they can be detected by network intrusion prevention systems (IPSs) or host firewalls. You have learned that a SYN scan is a fairly stealthy type of scan to run. This same concept applies to vulnerability scanners because they all use some kind of port scanner to enumerate the target. These same options are available in the vulnerability scanner’s configuration. You can also disable any plugins/attacks that might be especially likely to generate noisy traffic, such as any that perform denial-of-service attacks, which would definitely arouse some concerns on the target network.
Aside from the modifications to a traditional vulnerability scanner just described, there is also the concept of a passive vulnerability scanner. A passive vulnerability scanner monitors and analyzes the network traffic. Based on the traffic it sees, it can determine what the topology of the network consists of and what service the hosts on the network are listening on. From the detailed information about the traffic at the packet layer, a passive vulnerability scanner can determine if any of those services or even clients have vulnerabilities. For instance, if a Windows client with an outdated version of Internet Explorer is connecting to an Apache web server that is also outdated, the scanner will identify the versions of the client and server from the monitored traffic. It can then compare those versions to its database of known vulnerabilities and report the findings based on only the passive monitoring it performed. Figure 3-16 illustrates how this type of scanner typically works.
Compliance Scans
Compliance scans are network and application tests (scans) typically driven by the market or governance that the environment serves and regulatory compliance. An example of this would be the information security environment for a healthcare entity, which must adhere to the requirements sent forth by the Health Insurance Portability and Accountability Act (HIPAA). This is where a vulnerability scanner comes into play. It is possible to use a vulnerability scanner to address the specific requirements that a policy requires. Vulnerability scanners often have the capability to import a compliance policy file. This policy file can typically map to specific plugins/attacks that the scanner is able to perform. Once the policy is imported, the specific set of compliance checks can be run against a target system.

FIGURE 3-16 Passive Vulnerability Scanner Diagram
The challenge with compliance requirements is that there are many different types for different industries and government agencies, and they can all be interpreted in various ways. Some of the checks might be straightforward. If a requirement check is looking for a specific command to be run and that the output be a 1 instead of a 0, that is very simple for a vulnerability scanner to determine; however, many requirements leave more to be interpreted. This makes it very difficult for a tool like a vulnerability scanner to make a determination. Most vulnerability scanners also have the capability to create custom compliance policies. This is a valuable option for penetration testers, who typically want to fine-tune the scanner policy for each engagement.
Challenges to Consider When Running a Vulnerability Scan
The previous sections have touched on a number of different things that should factor into how you perform your scanning. The sections that follow go into further detail about some of the specific things you should consider when building a scanning policy and actually performing scans.
Considering the Best Time to Run a Scan
The timing of when to run a scan is typically of most concern when you are scanning a production network. If you are scanning a device in a lab environment, there is normally not much concern because a lab environment is not being used by critical applications. There are a few reasons running a scan on a production network should be done carefully. First, the network traffic that is being generated by a vulnerability scan can and will cause a lot of noise on the network. It can also cause significant congestion, especially when your scans are traversing multiple network hops. (We talk about this further shortly.)
Another consideration in choosing a time to run a scan is the fact that many of the options or plugins that are performed in a vulnerability scan can and will crash the target device as well as the network infrastructure. For this reason, you should be sure that when scanning on a production network, you are scanning at times that will have the least possible impact on end users and servers. Most of the time, scanning in the early hours of the day, when no one is using a network for critical purposes, is best.
Determining What Protocols Are in Use
One of the first things you need to know about a network or target device before you begin running vulnerability scans is what protocols are being used. If a target device is using both TCP and UDP protocols for services that are running, and you only run a vulnerability scan against TCP ports, then you are going to miss any vulnerabilities that might be found on the UDP services.
Network Topology
As mentioned previously, the network topology should always be considered when it comes to vulnerability scanning. Of course, scanning across a WAN connection is never recommended because it would significantly impact any of the devices along the path. The rule of thumb when determining where in the network topology to run a vulnerability scan is that it should always be performed as close to the target as possible. For example, if you are scanning a Windows server that is sitting inside your screened subnet (formerly known as the demilitarized zone, or DMZ), the best location for your vulnerability scanner is adjacent to the server on the screened subnet. By placing it there, you can eliminate any concerns about impacting devices that your scanner traffic is traversing.
Aside from the impact on the network infrastructure, another concern is that any device that you traverse could also affect the results of your scanner. This is mostly a concern when traversing a firewall device; in addition, other network infrastructure devices could possibly impact the results as well.
Bandwidth Limitations
Let’s take a moment to consider the effects of bandwidth limitations on vulnerability scanning. Obviously, any time you flood a network with a bunch of traffic, it is going to cause an issue with the amount of bandwidth that is available. As a penetration testing professional, you need to be cognizant of how you are affecting the bandwidth of the networks or systems you are scanning. Specifically, depending on the amount of bandwidth you have between the scanner and the target, you might need to adjust your scanner settings to accommodate lower-bandwidth situations. If you are scanning across a VPN or WAN link that most likely has limited bandwidth, you will want to adjust your scanning options so that you are not causing bandwidth consumption issues. The settings that need to be adjusted are typically those related to flooding and denial-of-service (DoS) type attacks.
Query Throttling
To work around the issue of bandwidth limitations and vulnerability scanning, slowing down the traffic created by your scanner can often help. This is often referred to as query throttling, and it can typically be achieved by modifying the options of the scanning policy. One way to do this is to reduce the number of attack threads that are being sent to the target at the same time. There isn’t a specific rule of thumb for the number of threads. It really depends on the robustness of the target. Some targets are more fragile than others. Another way to accomplish this is to reduce the scope of the plugins/attacks that the scanner is checking for. If you know that the target device is a Linux server, you can disable the attacks for other operating systems, such as Windows. Even though the attacks won’t work against the Linux server, it still needs to receive and respond to the traffic. This additional traffic can cause a bottleneck in processing and network traffic consumption. Limiting the number of requests that the target would need to respond to would reduce the risk of causing issues such as crashing on the target and result in a more successful scan.
Fragile Systems/Nontraditional Assets
When using a vulnerability scanner against your internal network, you must take into consideration the devices on the network that might not be able to stand up to the traffic that is hurled at them by a vulnerability scanner. For these systems, you might need to either adjust the scanning options to reduce the risk of crashing the devices or completely exempt the specific devices from being scanned. Unfortunately, by exempting the specific devices, you reduce the overall security of the environment.
Printers are often considered “fragile systems.” Historically, they have been devices that have not been able to withstand vulnerability scanning attempts. With the surge in IoT devices, today there are many more devices that may be considered fragile, and you need to consider them when planning for vulnerability scanning. The typical way to address fragile devices is to exempt them from a scan; however, these devices can pose a risk to the environment and do need to be scanned. To address this issue, you can “throttle” the scan frequency as well as the options used in the scan policy to reduce the likelihood of crashing the device.
Understanding How to Analyze Vulnerability Scan Results
As you might already know, running a vulnerability scan is really the easy part of the information gathering and vulnerability identification process. The majority of the work goes into analyzing the results you obtain from the tools you use for vulnerability scanning. These tools are not foolproof; they can provide false positives, and the false positives need to be sorted out to determine what the actual vulnerabilities are.
For example, say that you are part of an information security team doing internal vulnerability scans on your network. You run your vulnerability scanning tool of choice and then export a report of the findings from the scan. Next, you turn over the report to the endpoint team to address all the issues noted in the report. The endpoint team begins to address the issues one by one. Its process would likely include an investigation of an endpoint to determine how to best mitigate a finding about it. If the report that you provide includes false positives, the endpoint team will end up wasting a lot of time chasing down issues that don’t actually exist. This can obviously cause some problems between the security team and the endpoint team. This scenario can also be applied to other situations.
When you are providing a report as a deliverable of a paid penetration testing assignment, it is especially important that the report be accurate. Say that you have been hired to identify vulnerabilities on a customer’s network. Your deliverable is to provide a full report of security issues that need to be addressed to protect the customer’s environment. Turning over a report that includes false positives will waste your customer’s time and will likely result in your losing the customer’s repeat business. As you can see from this discussion, reducing the false positives in vulnerability scans is very important.
So how do you go about eliminating false positives? The process involves a detailed and thorough look into the results that your vulnerability scanning tool has provided. Suppose that the results of a scan reveal that there is a possible remote code execution vulnerability in the Apache web server that is running on the target server. This type of finding is likely to be flagged as a high-severity vulnerability, and it should therefore be prioritized. To determine if this is a valid finding, you would first want to take a look at what the vulnerability scanner did to come to this conclusion. Did it pull the version information directly from the system by using a credentialed scan, or was it determined by remotely connecting to the port? As you know, the results of a credentialed scan are more likely than remote analysis to be valid.
Because the method of harvesting version information varies based on the scanner and the service, you should be able to take a look at the details of the findings in a report to determine how the information was gathered. From there, if possible, you would want to connect directly to the target that is reporting a particular vulnerability and try to manually determine the version information of that service. Once you validate that the version reported by the scanner does actually match what is on the system, you also need to dig deeper into the details of the vulnerability. Each vulnerability will typically map to one or many items in the Common Vulnerabilities and Exposures (CVE) list. You need to take a look at the particulars of those CVE items to understand the criteria because a vulnerability may be flagged based on only one piece of information (such as the version number of the Apache server pulled from the banner). When you dig into the CVE details, you might find that for the vulnerability to be exploitable, this version of Apache must be running on a specific version or distribution of Linux. Most vulnerability scanners are able to correlate multiple pieces of information to make the determination. However, some Linux operating systems, such as Red Hat, report an older version of a service that has actually been patched for the specific vulnerability. This is called backporting. So, as you can see, there is more to it than just running a scan. Of course, the number-one method of validating a finding from a vulnerability scan is to exploit the vulnerability, as discussed in many of the upcoming chapters.
Sources for Further Investigation of Vulnerabilities
The following sections describe some helpful sources for further investigation of vulnerabilities that you might find during your scans.
US-CERT
The U.S. Computer Emergency Readiness Team (US-CERT) was established to protect the Internet infrastructure of the United States. The main goal of US-CERT is to work with public- and private-sector agencies to increase the efficiency of vulnerability data sharing. The work done by US-CERT is meant to improve the nation’s cybersecurity posture. US-CERT operates as an entity under the Department of Homeland Security as part of the National Cybersecurity and Communications Integration Center (NCCIC). You can access US-CERT resources by visiting https://www.us-cert.gov.
The CERT Division of Carnegie Mellon University
The CERT Division of the Software Engineering Institute of Carnegie Mellon University is a cybersecurity center whose experts help coordinate vulnerability disclosures across the industry. CERT researches security vulnerabilities and contributes to many different cybersecurity efforts in the industry. CERT also develops and delivers training to many organizations to help them improve their cybersecurity practices and programs. You can obtain additional information about CERT at https://cert.org.
NIST
The National Institute of Standards and Technology (NIST) is an agency of the U.S. Department of Commerce. Its core focus is to promote innovation and industrial competitiveness. NIST is responsible for the creation of the NIST Cybersecurity Framework (NIST CSF; see https://www.nist.gov/cyberframework). This framework includes a policy on computer security guidance. Version 1 of the NIST framework was published in 2014 for the purpose of guiding the security of critical infrastructure; however, it is commonly used by private industry for guidance in risk management. In 2018, NIST released version 1.1, which is designed to assist organizations in assessing the risks they encounter. In general, the framework outlines the standards and industry best practices that can be used to improve organizations’ cybersecurity posture. Anyone who is responsible for making decisions related to cybersecurity in an organization should consult this framework for guidance on standards and best practices.
JPCERT
Similar to the US-CERT, the Japan Computer Emergency Response Team (JPCERT) is an organization that works with service providers, security vendors, and private-sector and government agencies to provide incident response capabilities, increase cybersecurity awareness, conduct research and analysis of security incidents, and work with other international CERT teams. The JPCERT is responsible for Computer Security Incident Response Team (CSIRT) activities in the Japanese and Asia Pacific region.
You can access JP-CERT resources by visiting https://www.jpcert.or.jp/english/.
CAPEC
The Common Attack Pattern Enumeration and Classification (CAPEC) is a community-driven effort to catalog the attack patterns seen in the wild so that they can be used to more efficiently identify active threats. CAPEC, which is maintained by MITRE, acts as a dictionary of known attacks that have been seen in the real world.
CVE
Common Vulnerabilities and Exposures (CVE) is an effort that reaches across international cybersecurity communities. It was created in 1999 with the idea of consolidating cybersecurity tools and databases. A CVE ID is composed of the letters CVE followed by the year of publication and four or more digits in the sequence number portion of the ID (for example, CVE-YYYY-NNNN with four digits in the sequence number, CVE-YYYY-NNNNN with five digits in the sequence number, CVE-YYYY-NNNNNNN with seven digits in the sequence number, and so on). You can obtain additional information about CVE at https://cve.mitre.org.
CWE
Common Weakness Enumeration (CWE), at a high level, is a list of software weaknesses. The purpose of CWE is to create a common language to describe software security weaknesses that are the root causes of given vulnerabilities. CWE provides a common baseline for weakness identification to aid the mitigation process. You can obtain additional information about CWE at MITRE’s site: https://cwe.mitre.org.
The Common Vulnerability Scoring System (CVSS)
Each vulnerability represents a potential risk that threat actors can use to compromise your systems and your network. Each vulnerability carries an associated amount of risk. One of the most widely adopted standards for calculating the severity of a given vulnerability is the Common Vulnerability Scoring System (CVSS), which has three components: base, temporal, and environmental scores. Each component is presented as a score on a scale from 0 to 10.
CVSS is an industry standard maintained by the Forum of Incident Response and Security Teams (FIRST) that is used by many Product Security Incident Response Teams (PSIRTs) to convey information about the severity of vulnerabilities they disclose to their customers. In CVSS, a vulnerability is evaluated according to three aspects, with a score assigned to each of them:
The base group represents the intrinsic characteristics of a vulnerability that are constant over time and do not depend on a user-specific environment. This is the most important information and the only aspect that’s mandatory to obtain a vulnerability score.
The temporal group assesses the vulnerability as it changes over time.
The environmental group represents the characteristics of a vulnerability, taking into account the organizational environment.
The score for the base group is between 0 and 10, where 0 is the least severe and 10 is assigned to highly critical vulnerabilities. For example, a highly critical vulnerability could allow an attacker to remotely compromise a system and get full control. In addition, the score comes in the form of a vector string that identifies each of the components used to make up the score. The formula used to obtain the score takes into account various characteristics of the vulnerability and how the attacker is able to leverage these characteristics.
CVSS defines several characteristics for the base, temporal, and environmental groups. The base group defines Exploitability metrics that measure how the vulnerability can be exploited, as well as Impact metrics that measure the impact on confidentiality, integrity, and availability. In addition to these two metrics, a metric called Scope Change (S) is used to convey the impact on other systems that may be impacted by the vulnerability but do not contain the vulnerable code. For instance, if a router is susceptible to a DoS vulnerability and experiences a crash after receiving a crafted packet from the attacker, the scope is changed, since the devices behind the router will also experience the denial-of-service condition. FIRST provides additional examples at https://www.first.org/cvss/.
How to Deal with a Vulnerability
As a penetration tester, your goal is to identify weaknesses that can be exploited. As previously discussed, vulnerability scanning is a method of identifying potential exploits. After you identify a vulnerability, you need to verify it. There are many ways to determine if a vulnerability scanner’s findings are valid. The ultimate validation is exploitation.
To determine if a vulnerability is exploitable, you need to first identify an exploit for a vulnerability. Suppose your vulnerability scanner reports that there is an outdated version of Apache Struts that is vulnerable to a remotely exploitable unauthenticated defect. One of the first things you would want to do is to determine if there is a readily available exploit. Many times, this can be found with an exploitation framework such as Metasploit. As a general rule, if a vulnerability has a matching module in Metasploit, it should almost always be considered high severity. That being said, there are also other methods for finding exploits, and you can always write your own exploits.
How do you prioritize your findings for the next phase of your penetration test? To determine the priority, you need to answer a few questions:
What is the severity of the vulnerability?
How many systems does the vulnerability apply to?
How was the vulnerability detected?
Was the vulnerability found with an automated scanner or manually?
What is the value of the device on which the vulnerability was found?
Is this device critical to your business or infrastructure?
What is the attack vector, and does it apply to your environment?
Is there a possible workaround or mitigation available?
Answering these questions can help you determine the priority you should assign to the vulnerabilities found. Standard protocol would have you start with the highest-severity vulnerabilities that have the greatest likelihood of being exploited. If these vulnerabilities are actually valid, they might already be compromised. (If at any time during a penetration test, you find that a system is being actively exploited, you should report it right away to the system owner.) Next, you should address any vulnerabilities that are on critical systems, regardless of the severity level. It is possible that there might be an exploit chain available to an attacker that would allow a lower-severity vulnerability to become critical. You need to protect critical systems first. Next, you might want to prioritize based on how many systems are affected by the finding. If a large number of systems are affected, then this would raise the priority because many exploits on this vulnerability would have a higher impact on your environment. These are suggested guidelines, but when it comes to prioritization of vulnerability management and mitigation, it really depends on the specific environment.
Exam Preparation Tasks
As mentioned in the section “How to Use This Book” in the Introduction, you have a couple choices for exam preparation: the exercises here, Chapter 11, “Final Preparation,” and the exam simulation questions in the Pearson Test Prep software online.
Review All Key Topics
Review the most important topics in this chapter, noted with the Key Topics icon in the outer margin of the page. Table 3-6 lists these key topics and the page number on which each is found.
Table 3-6 Key Topics for Chapter 3
Key Topic Element | Description | Page Number |
Paragraph | Information gathering and reconnaissance | 59 |
Paragraph | Using DNS lookups to gather IP address information | 60 |
Paragraph | Using Whois to identify domain technical and administrative contacts | 64 |
Paragraph | Cloud vs. self-hosted domains | 68 |
Paragraph | Social media scraping | 69 |
Paragraph | Certificate revocation | 70 |
Paragraph | Obtaining file metadata | 76 |
Paragraph | Displaying archived/cached website data | 82 |
Paragraph | Using public source code repositories to find software vulnerabilities | 83 |
Paragraph | How to leverage information from Shodan scans | 91 |
Paragraph | Exploring enumeration via packet crafting | 119 |
Paragraph | The types of vulnerability scans | 126 |
Paragraph | Challenges to consider when running a vulnerability scan | 133 |
Define Key Terms
Define the following key terms from this chapter and check your answers in the glossary:
open-source intelligence (OSINT) gathering
Q&A
The answers to these questions appear in Appendix A. For more practice with exam format questions, use the Pearson Test Prep software online.
1. An Nmap _________ scan is also known as a “half-open” scan because it doesn’t open a full TCP connection.
2. An Nmap _______ scan uses the underlying operating systems networking mechanisms and is typically very noisy.
3. The Nmap __________ script uses MSRPC to enumerate valid account information about the target.
4. The Python-based _______ tool can be used to enumerate information about targets by using packet-crafting commands.
5. Google _______ are search strings that can be used for passive reconnaissance.
6. ___________ reconnaissance is a method of information gathering in which the attacker uses techniques that are not likely to be detected by the target.
7. What Scapy function can be used to list all the available packet formats?
8. What is the Nmap option that can be used to perform a quick host discovery or a ping sweep?
9. You are running an Nmap TCP FIN scan against a target device. The result of the scan indicates that port 80 is filtered. What response was likely received from the target that led to Nmap making this determination?
10. A(n) _______ vulnerability scan is typically focused on a specific set of regulatory requirements.