
CHAPTER 6
Building the Project Plan
This chapter covers the following topics:
• Creating the project management plan
• Building the project schedule
• Designing a project network diagram
• Planning for project costs
• Writing the staffing management plan
• Assuring and controlling project quality
• Communicating with project stakeholders
• Analyzing project risks
• Implementing the procurement management plan
Remember the story of Noah and the ark? When did he build that ship? Aha! He built it before the rain started. That’s the same idea with all of this planning you’re doing for each of your projects. By effectively planning, analyzing, and examining your plan from different perspectives, you increase your chances of completing your project on time and on budget.
At this point of your project, you’ve already done a great deal of work. Look back at all you’ve accomplished: you’ve created a vision, researched the technology, partnered with management, created a budget, made a WBS, and assembled your team. Phew! That’s a ton of progress, and the actual implementation of the project work hasn’t started yet. Don’t get discouraged—these activities that you’ve been doing are the building blocks of a strong foundation for the success of your project. Without all of those activities, your project would be doomed.
This chapter focuses on bringing your plan together. If you’ve done all of the preliminary work described in the earlier chapters, your plan is already coming together—which is grand. However, there are still a few more things that require your attention before you set your plan into motion. Particularly, you need to give some thought to the project schedule, the risk, and the procurement activities defined in your plan and determine if everything is reasonable. This is crucial for any project. What looks good on paper doesn’t always work well in execution.
Building the Project Plans
Depending on the size of your project, your project plans will vary. The project plan is not one big plan, but rather a collection of subsidiary plans that detail how different conditions, scenarios, and actions will be managed. It is a formal document that is reviewed and, hopefully, approved by management. The project plan is not a novel that tells the story of how the project will move along, but rather a guide that allows for changes to the project plan as more details become available.
In a predictive project, rather than adaptive projects, the project plan may evolve, but there are some elements within the project that generally do not change—or are protected from change. Of course, the foundation of the project is the project scope. Recall that the project scope is all of the required work—and only the required work—to complete the project objectives. The project scope statement defines what the project will and won’t accomplish. Once the project scope statement has been agreed upon, your change control system protects it.
Other elements of the project plan that should be immune from change are the project charter and the performance baselines. The project charter authorizes the project. It is a formal document that allows the project manager to manage the project work, resources, and schedule to deliver on the project scope. Performance baselines are time, cost, and scope objectives that the project manager must meet within the project delivery. These baselines rarely change unless an approved change happens in the project, and then these baselines are updated to reflect the approved change. In other words, you’re supposed to have enough time and budget to meet the requirements of the project scope.
Addressing Project Factors
As you begin to plan out the project in both predictive and agile approaches, you need to address the project factors that will affect how the project operates. These factors are the environmental, social, and governance conditions and can have great influence over the project approach. You may need to work with your project sponsor or product owner to address these concerns. You don’t want to ignore these factors; if you don’t have a clear plan of attack and strategy on how these factors should be managed, they’ll haunt your project throughout.
Environmental factors describe where the project work will take place. Consider how a project can affect the water, soil, air quality, and community and consider the ethical and regulatory requirements. For example, there are regulations on disposing computer equipment. You don’t want a project to disrupt or spoil the environment for ethical reasons, but also consider the goodwill of the organization, and legal requirements you’ll need to adhere to. Environmental conditions can also mean the organizational environment—such as how your project may disrupt the business, the day-to-day operations of the people working in the organization, and their attitude to the project and the change it ultimately brings to the organization. This is where politics can creep into a project, something that is inevitable in almost all projects, so you’ll need a strategy to manage perceptions of your project and how it helps, or hinders, the people in the organization.
Social factors are directly related to the politics of the organization as well. It’s no secret that there will be forces for and against your project. There will be power plays, pet requirements, and attitudes you’ll have to contend with as your project marches towards its vision. Social factors also include how society, your organization’s customers, and community view your project and what it aims to accomplish. Some projects target social good, such as setting up free Wi-Fi access in a park or an improvement in wastewater management, for example. It’s always important to ask how the project is viewed by the positive and negative stakeholders and how you can improve upon their perception of the project.
Governance is about following the rules of the organization and regulations specific to your organization’s industry. All organizations have their own way of conducting business, of getting things done. Consider how you request IT resources, how you hire contractors, or how your team schedules vacation time. There are rules or best practices within your organization to do these and other tasks that will be entirely different from how other organizations accomplish these same common activities. You want to know the rules, the governance, and work within those boundaries. Your project may also need to follow government regulations that are specific to your industry or the type of project work you’re doing. These regulations are requirements, and you must stay in compliance or there will likely be fines, penalties, and even a pause in your project execution.
Planning for Security and Privacy
Project planning, especially in IT projects, also entails addressing the security and privacy requirements of the project. The project manager, product owner or project sponsor, key stakeholders, and the project team must consider the need for privacy and security of the data they’ll be working with in the project. IT projects often encompass data that should remain private and secure, so you’ll need a policy and strategy for all team members for accessing and working with such data in the project. Many organizations require operational security, such as background screening and security clearance requirements.
Your IT project plan will likely need to address the following privacy and security considerations:
• Data confidentiality and security
• Remote access
• Authentication protocols
• Regulatory requirements
• Physical security of equipment and technology
• Intellectual property and trade secrets
Security and safeguarding data and information is always an early consideration in project planning. You’ll need to know your organization’s security policies and restrictions in order to plan effectively. You may have to work not only with your IT department but also human resources and maybe even lawyers or a legal department to understand the security requirements and approaches you’re allowed to take to remain in compliance. Throughout the project you’ll need to examine the security approaches to ensure that the team remains in compliance.
Creating Project Plan Documents
When you and your project team create the elements of the project plan for a predictive project, you can start from scratch and build your plan, or you can rely on historical information to lend a hand. Many times project managers will find that their projects are similar to past projects they’ve completed. Rather than reinventing the project management wheel, they’ll rely on past project plans to serve as templates for their current projects. There’s nothing wrong with this approach at all—it’s just working smart, not hard. Of course, when you use older plans as templates, you’ll update the older plans to reflect your current project.
Regardless of which approach you take to building your project plan, there are some common project management documents you should include in your comprehensive plan:
• Project charter This document comes from someone in a supervisory position that is higher in the organizational chart than the immediate management of the project team. This document authorizes the project. All projects need a project charter.
• Scope baseline The project scope baseline is actually a combination of three documents: the project scope statement, the work breakdown structure (WBS), and the WBS dictionary. The scope baseline is used throughout the project when there are questions about the project requirements, execution concerns, risk management, cost estimating, issues, and other project management activities. You’ll use the scope baseline as a guideline for all future project decisions.
• Time and cost estimates for each work package Recall that time and cost estimates reflect the labor and materials needed to deliver the project. This portion of the project plan will also detail how the estimate was derived, the degree of confidence in the estimate, and any assumptions associated with the estimates.
• Performance measurement baselines These baselines are boundaries or targets the project manager and the project team are expected to perform within. For example, the cost baseline may predict the amount of budget that should be spent by a given milestone, with an allowable variance. Time and cost are the most common baselines that you’ll measure your project performance against.
• Milestones and target dates for the milestones Within your project, there should be easily identified milestones that signal you are moving toward project completion. Associated with these major milestones are some target dates that you and management agree on. This allows you and management to plan on resource use, consider adjunct processes within your business, and keep all stakeholders informed of where the project should be heading—and when.
• Resource requirements Resources are people, materials, tools, equipment, facilities, and services that you’ll need to get your project done. There may be portions of your project plan that require procured resources or temporary specialized resources to complete. The required personnel, materials, and services should be identified, their availability determined, and their associated costs documented.
• Issue log Issues are risks that have occurred in the project. This doesn’t mean that the risk was identified; an issue can happen because a risk was overlooked during planning. For example, if a team member quits the project, that’s an issue; it was always a risk that people on the team could leave during the project execution. There will often be open issues and pending decisions as the plan is first created. This section of the plan identifies and documents the issues to be determined and allows the project to continue. Of course, the decisions and issues in this section of the project plan should be addressed accordingly, which may cause other areas of the project plan to be updated. In an adaptive project, issues are known as impediments or blockers and the project manager, coach, or scrum master is responsible for resolving those issues.
• Assumptions log An assumption is anything that you believe to be true but haven’t yet proved to be true. In IT, you often have to make assumptions in your planning: the software and hardware will work together, the new hardware drivers will work with the existing operating system, the learning curve of the software isn’t too drastic, and more. When you complete risk management planning, you’ll test these assumptions to prove your theories true or false. Assumptions that prove false can become risks in the project.
• Quality requirements Quality is an esoteric concept—what’s fast, good, and super to you may not be fast, good, or super to me. To have quality in an IT project, you must define the quality metrics, provide quantitative measurements that will equate to quality, and explain to the project stakeholders what the measurements mean and how they’ll map to the requirements for quality acceptance within the project. Your organization may also subscribe to quality programs, such as Six Sigma or ISO programs. You’ll need to include the project requirements for quality in these management-driven programs.
• Calendars Your project management plan needs two calendars: a resource calendar and a project calendar. The resource calendar defines when the project resources are needed, when the resources are available, and when the resources will be used in your project. Remember that resources are more than people—materials, facilities, and services are resources, too. The project calendar defines when the project work will take place. You’ll define the working hours of the project, company holidays, and busy seasons when the project work may, or may not, take place.
• Risk register The risk register, sometimes called the risk log, is a document that defines each risk, its probability, impact, and overall risk score, and an issue owner. The risk register should also reference or document the defined risk response for each risk event. Some projects may also include a risk owner that owns the risk and is empowered to enact the planned risk response should a risk event come into fruition. All risks are updated, tracked, and documented if their status or outcome changes.
• Stakeholder management strategy Your project will likely have negative, neutral, and positive stakeholders. The stakeholder management strategy defines how you’ll bolster support for your project, fend off the negative stakeholders, alleviate fears and concerns, and promote the support for your project. You’ll use the stakeholder management strategy along with the project’s communications management plan.
• Supporting details The supporting details are any relevant documentation that influenced your project decisions, any technical documentation, and any relevant standards the project will operate under.
These project documents will be unique for each project, and you might need to adjust some of the documents as the project moves forward. Changes to the project scope, for example, will cause changes to the cost and schedule baselines, but not to the project charter. You’ll use these documents to help you refine your project plans, but also to help you in the project execution. The documents, plans, reports, and other communications that come out of project planning and project management are called artifacts. Project artifacts should be archived as part of the project. Typically, a project team member is responsible for these artifacts and their organization, location, and access.
Creating the Project Scope Management Plan
The project scope management plan defines how the project scope in a predictive project will be defined by the project management team in terms of the project requirements, how the scope will be monitored and controlled throughout the project, and how the scope will be verified by the project customers. The project scope is all of the required work for the project to be considered complete, and it’s based on the requirements of the project stakeholders. This project plan focuses on the requirements and benefits of the project—things that are in scope. It also defines, in the project scope statement, the things that are considered out of scope.
This plan directs your creation of the project scope statement, the WBS, the WBS dictionary or the product backlog in an agile environment. Recall that these three elements comprise the project scope baseline. Once you’ve created the project scope statement and your stakeholders have approved the scope, you’ll decompose the scope into the work packages. Each work package, as I’m sure you remember, can be estimated for time and cost within your project. Along with the WBS, you’ll create a companion document—the WBS dictionary. This document defines what the work packages are, what resources are needed for the work packages, and the time and cost estimates for each work package.
The project scope management plan also defines how the scope might be allowed to change. If you’ve ever managed a project before, you know that stakeholders change their minds—often. The scope’s change control system is defined in the project scope management plan—you don’t want (or need) change requests fluttering into your inbox on a daily basis. In theory, if you’ve accurately collected the project requirements, there should be few to no change requests. In practice, however, stakeholders aren’t as thorough as you are in collecting and offering requirements. Generally, change requests are needed for the project scope for four reasons:
• Errors and omissions Oops! The stakeholders or the project manager goofed and didn’t accurately include all of the requirements in the project scope. When there are errors or omissions in the project scope, the scope must be revised to reflect the newly added requirements.
• Value-added changes Sometimes there is a great reason to add elements to the project scope. The additions can be profitable for the organization, make the deliverable better, or create benefits that are low in cost and high in value. Value-added changes are documented and folded into the project scope.
• External events There’s a world outside of your project that doesn’t care about your project. New releases from vendors, new laws and regulations, and competitors can all change your project scope. External events are a common element that can change the direction of your project scope.
• Risk events A risk is an uncertain event or condition that can have a positive or negative effect on your project. Some of your project work may be too risky, so it might be carved out of the project scope. Other events, such as a discount from a vendor if you add a few elements, is a good deal, so you might add the new elements to the project scope.
When a change request is introduced, the change must pass through the project’s integrated change control system, which is part of the project’s project management information system. Change requests must be documented and explained as to why the change is warranted. Undocumented change requests are not implemented in the project—get the change request in writing, define who started the change request, and explain why the change might be needed. Once the scope change request has been documented, it enters the scope change control system. Technically, as you can see in Figure 6-1, there are four change control systems: scope, schedule, costs, and contract.

Figure 6-1 An approved change request has an effect on the entire project.
In an adaptive project the product owner acts as the change control board. The product owner evaluates each change for its business value to the product and determines if it should be added to the product backlog. If the change is added to the product backlog, it is also prioritized in the backlog—it doesn’t automatically go to the bottom or top of the list.
A scope change request passes through the configuration management system, which examines the scope change request’s effect on the features and functions of the project’s product. For example, a scope change request could be to add reporting features to a piece of software. The reporting features would affect the features and functions of the project’s product, so the change would be evaluated, weighed for value, and then documented as part of the product scope, if approved.

EXAM TIP Adaptive projects welcome change and don’t follow a change control process like waterfall projects do. Adaptive projects welcome and expect change, while predictive projects are averse to change.
All change requests, scope or otherwise, pass through integrated change control to assess the effect of the change on the entire project. A scope change request could affect the project costs, schedule, quality, human resources, communications, risk, and even procurement. Integrated change control is the requirement that a proposed change request be examined for its true impact on the project. Once the change request is determined to be accepted or rejected, the result is communicated to the appropriate stakeholders and documented in the change log. Yes, even changes that aren’t approved go into the change log as a record of what happened to the change and why it was rejected.
A change to the project scope can affect the product scope statement, the project scope, the WBS, and the WBS dictionary; it can even have ripples into the project plan. All of these documents and affected plans need to be updated to reflect the approved change. When a change enters the project scope and it’s approved, then you’ll also need the time and monies to reflect the approved change. Approved changes to the project’s scope and budget will cause the corresponding baselines to be updated, too.
Changes that happen early in the project usually don’t cost as much as changes that are requested later in the project. It’s easier to change the project plan and its documents than to change the physical work that has already been completed in the project. The physical work of the project and the results of project execution are also affected by this scope management plan. The work results must be examined by the project stakeholders to verify that the results are acceptable to them. This examination is called scope verification, and the project’s scope management plan defines when and how the verification will happen.
Scope verification usually happens at the end of project phases and always at the end of the project. The goal of scope verification is for the project customer to accept the deliverables that the project team has created. Scope verification is an inspection-driven process that the customers, key stakeholders, or project champions do with the project team and project manager. If there are mistakes or errors in the inspection, the project manager can create a “punch list” of things that must be corrected before the project deliverables are accepted by the project customer.
Defining the Project Schedule Management Plan
Your predictive project must have a definite set of deliverables that mark its end. Projects also require a finish date. Some projects’ finish dates are a touch firmer than others—for example, building a football stadium before the season begins. Or consider a project that management says must be completed before a peak business period. Other projects, such as the release of a new e-mail program within an organization, can tend to go on forever and evolve into runaway projects.
Runaway projects stem from a loosely guarded project scope, poor planning, and lack of research. Of course, the longer a project takes to produce its deliverables, the more the project will cost. In addition, to make it personal, a missed deadline can impact bonuses, incentives, and raises for project managers and team members. The best way to reach a target date for completion is to plan, plan, plan. And then analyze the plan. And then adjust and readjust the plan until it is acceptable and the team is ready to implement the technology. The project schedule management plan defines several things for the project manager and the project team:
• What project activities need to be completed
• An estimate of how long the project activities will take to complete
• When the project activities will need to happen and in what order
• What resources are needed for the project activities and when the resources will be needed
• How the project schedule can be adjusted, compressed, analyzed, or manipulated for the best possible outcome for the project
• How the schedule will be monitored and controlled
• A cadence to the project communications, regularly scheduled events, and communications
A project schedule should be a reflection of the WBS, the accumulation of all of the work packages within the project, and the assignment of resources for each task. Most new project managers work around specific target dates for milestones, phases, and a completed project. This makes the most sense, right? IT professionals are used to working off a specific calendar for so much of their lives that this next concept can be a little confusing at first: if possible, do not schedule project tasks to happen on a specific date.
Project managers should not work around specific dates when creating the project plan, but instead should initially work around units of time—for example, one day, two weeks, three months, and so on. Rather than saying a specific work unit will take place next Thursday and Friday, it’s better to say that a specific task will take two days to complete. Why? Isn’t next Thursday and Friday the same as two days? Yes, and no. Assigning two days to complete a task rather than two specific days allows you to move the task around within your project plan. Figure 6-2 demonstrates the concept of working in units of time rather than specific dates. This little trick allows for a process you’ll learn more about later in this chapter: project compression.
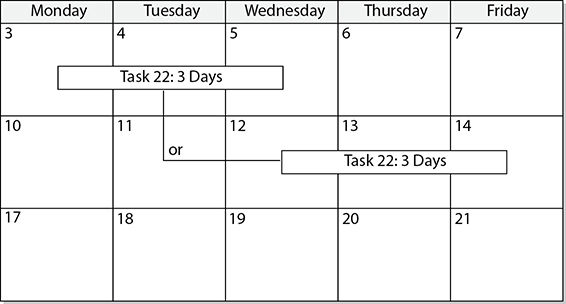
Figure 6-2 Assign tasks to be completed in units of time rather than by specific dates.
Working with units of time rather than specific dates for each of the tasks within your project plan allows you to tally your plan to a specific amount of time—regardless of when the actual project is implemented. For example, if tasks within your project are all assigned a deadline based on the project start date of July 9 and end date of November 2, each task is very time constrained and date specific. However, this same project takes 90 workdays (depending on the year and allowing for weekends). When you assign tasks units of time within the span of 90 workdays, regardless of when the actual start date commences, the project can shift 90 days into the future from the start date.
Often, however, project schedules and deadlines are determined before the project even begins. We’ve all been there, right? We’re handed a project to create an application that must be delivered by an unrealistic date. There hasn’t been real reflection on the needed time to create a quality application by the given date. In these instances, the project manager still needs to address the project, the work decomposition, and the assignment of resources to complete the work, just as with a project where the end date is not known.
EXAM TIP Predictive projects utilize a work breakdown structure to show the components of the project scope. Adaptive projects utilize a product backlog to show all of the project requirements and features.
During project planning, you’ll create the WBS based on the project scope. Once you’ve created the WBS, you can enter the activity list into Microsoft Project or your favorite project management information system (PMIS) software. Once you enter the activities into Microsoft Project, you can create a Gantt chart like the example shown in Figure 6-3. It shows a mapping of each of the units of work required to complete each phase of the project.

Figure 6-3 A Gantt chart maps activities to a project calendar.
The Gantt chart is ideal for simple, short-term projects. It is a timeline of the events with consideration given to tasks that can be completed concurrently within a project’s life span. Traditional Gantt charts have some drawbacks:
• Gantt charts do not display detailed information on each work unit. (Microsoft Project does allow project managers to add task information and notes within a Gantt chart on each task.)
• Gantt charts display only the order of tasks.
• Gantt charts do not clearly reflect the order of tasks in multiple phases.
• Gantt charts do not reflect the shortest path to completion.
• Gantt charts do not reflect the best usage of resources.
To address these issues, project managers can use a project network diagram (PND). PNDs are fluid mappings of the work to be completed. (Figure 6-4 shows a sample of a portion of a network diagram.) Incidentally, the terms “PND,” “project network diagram,” and “network diagram” all refer to the same workflow structure—don’t let the different names confuse you. Such diagrams enable the project manager and the project team to tinker with the relationships between tasks and create alternative solutions to increase productivity, profitability, and the control of a project.
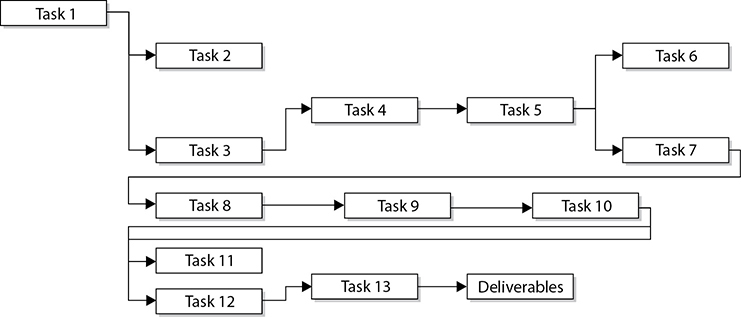
Figure 6-4 Network diagrams demonstrate the relationships between tasks.
A PND visualizes the flow of work from conception to completion. Network diagrams provide detailed information on work units and enable project managers to analyze tasks, resources, and the allotted time for each task. You can use a PND to determine the flow of work to predict the earliest completion date. Network diagrams are ideal for these situations:
• Detailed project planning In large projects that may span several months, or even years, a network diagram is essential, as it can correlate each task in relation to the project scope. Through a network diagram, the project manager, management, and the project team can see the entire project plan from a high-level view and then zoom in on a specific portion of the project plan.
• Implementation tracking As tasks are completed on time, or over time, the number of time units used can accurately display the impact on dependent tasks within the project. If you use software to track the project implementation, the reflection of the impact is automated for you. Imagine a task that has four dependencies and is two weeks late in completion. The failure of the task to be completed on time now pushes the dependent tasks back by two weeks. A network diagram can illustrate this impact and allow the project manager to react to the changes by adjusting resources or other dependent tasks.
• Contingency plans Network diagrams enable a project manager to play out “what if?” scenarios with any work unit within the project plan. A project manager can adjust units of time to see the impact of the work units on the entire project. For example, it may be obvious to see an impact on dependent tasks when a work unit is two weeks late, but what about units that are completed early? Imagine that pay incentives are based on project completion dates—a series of work units that each have one day shaved off of their target completion times may have positive impacts on all future tasks.
• Resource control A network diagram shows the flow of work and the impact of the finished tasks on the rest of the project. By using the Gantt chart’s assigned resources to a unit of work, a project manager can add or remove resources to a task to complete it faster or delay the completion. Resources can be both workers and physical objects such as routers, faster computers, and leased equipment.
Using the Precedence Diagramming Method
The most common method of creating a network diagram is the precedence diagramming method (PDM). PDM requires the project manager to evaluate each project activity and determine the order in which the activities should be completed. You’ll determine which activities are successors and which are predecessors. In other words, each activity in your project has some activities that must come before it in a particular order and activities that will come after the current activity, also in a particular order. Once this information is obtained, you can begin to snap the pieces of the PDM puzzle together. You must give careful consideration to the placement of each activity, as all activities are connected even if they are scheduled to run concurrently.
Each unit of work in a network diagram using PDM is represented by a rectangle called an activity node. Predecessors are linked to successors by lines and the flow of the work is always left to right, as Figure 6-5 demonstrates. One work unit can be both a successor and a predecessor. For example, the task to install and configure a web server may first require the installation of an operating system; only after the web server task is completed can the web pages the web server will host be added.
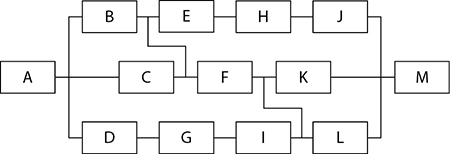
Figure 6-5 Network diagrams flow from left to right and connect predecessor and successor tasks.
To begin creating the network diagram using PDM, a project manager and project team have to determine the order of tasks to be completed. Basically, a project manager asks, “What tasks must be completed before the next tasks can begin?” The activity list, which you derived from your WBS work packages, is what you are sequencing. You do not want to include activities that are too short in length to be useful. Based on your project, you may have work units that last days or weeks—generally not hours.
As you add tasks to the network diagram, draw a line between tasks to connect them in the successor/predecessor relationship. As expected, the network diagram is read left to right, top to bottom. Most tasks within the diagram will have a successor and predecessor—except for the first and last tasks in the project. Once the diagram has been completed with successor and predecessor tasks, it is considered a connected network. A project manager, or anyone involved in the project, can trace any activity through the network.
The relationship between activities is what allows a project to move forward or to wait for other tasks to complete. An accurate description between tasks is required for the project manager to analyze and adjust each task in the network diagram. Figure 6-6 shows the dependency types you may have between tasks.

Figure 6-6 Dependencies describe the relationship between tasks.
There are four types of dependencies:
• Finish-to-start (FS) This relationship is the most common. It simply requires the predecessor task to complete before the successor task can begin. An example is installing the network cards before connecting PCs to the Internet.
• Start-to-start (SS) These tasks are usually closely related in nature and should be started, but not necessarily completed, at the same time. An example is planning for the physical implementation of a network and determining each network’s IP addressing configurations. All tasks are closely related and can be done in tandem.
• Finish-to-finish (FF) These tasks require that the predecessor task and the successor task be completed at nearly the same time. In this relationship the successor tasks cannot be completed before the predecessor task is completed. An example is rolling out a new software package and finishing the user training sessions. While users are in the new training session, the new software should be installed and configured on their workstations by the time the training session ends.
• Start-to-finish (SF) These rare tasks require that the predecessor not begin until the successor finishes. You won’t find yourself using this activity all that often. It’s often used with just-in-time scheduling for inventory and manufacturing instances. For example, if you’re opening a coffee shop, you’ll want your inventory of coffee to be on hand as close as possible to when the construction of your shop is done. The coffee has to be ordered to officially open the shop, and the construction has to be done before you can open the doors. You’ll need to time the order of coffee with the completion of the construction in order to open your doors on time without your merchandise spoiling—or tying up your cash flow in inventory that’s not being sold.

NOTE Understanding the concept of the network diagrams helps with scheduling, but few project managers manually draw their network diagrams. Project management information systems, such as Microsoft Project, Basecamp, and other solutions, help sequence the flow of the work and can quickly expose bottlenecks, constraints, float, and other characteristics of your schedule.
Managing Logical Constraints
A constraint is a boundary or limit based on the project. You’ve dealt with constraints before: a preset budget for your project, an inflexible deadline, limited availability of computer hardware, or locating a resource with a specific skill. Constraints are any factors that can limit your options. The project manager and team must document constraints and their risks examined, and then the project manager must plan on how to meet the project objectives within the identified constraints.
When it comes to scheduling activities, you can also create constraints on the relationships you assign between your activities. For example, an FS relationship is constrained by the completion of the predecessor before the successor can begin. This is a natural constraint. This relationship between activities is sometimes called hard logic. Hard logic (aka mandatory logic) describes the matter-of-fact order of activities. For example, you must install the operating system before you install the application. On the other hand, soft logic is when the project manager decides to do tasks in a particular order based on experience, conditions in the project, time, or other reasons. This logic is also called discretionary logic. For example, it is a good “old school” practice to have completed all the coding before beginning the testing phase. It is not mandatory—you can unit-test certain modules that are complete before all the coding is done—but it is preferred to have all the coding complete before any testing begins.
In some conditions, you might want to schedule a task to wait before starting, and that’s called lag time. Lag time means that you’re adding time to the activity’s start date. The opposite of this is called lead time, when you’re moving the activity’s start date backward to allow it to overlap with other activities. Lag time is always positive time or waiting time. Lead time is always negative time and often overlaps with other activities.
Often in project management, projects have preset deadlines that require project managers to work backward from the assigned completion date. The problem is that the person establishing the deadline may not realize the work required to complete a project by that given date. Unfortunately, this is often the way project management works: you’re assigned a deadline and then you have to figure out how to complete the tasks by that date.
Whenever possible, avoid using specific dates for tasks unless it is absolutely required. With date constraints, you are signifying that a certain task must happen on a specific date, regardless of the completion of tasks before or after it. The best method of assigning tasks is to use a unit of time and then predict when the task may happen based on the best- and worst-case scenarios for the predecessor tasks’ completion.
There are three types of date constraints:
• No earlier than This constraint specifies that a task may happen any time after a specific date, but not earlier than the given date.
• No later than This constraint is deadline oriented. The task must be completed by this date—or else.
• On this date This constraint is the most time oriented. There is no margin for adjustment, as the task must be completed on this date, no sooner or later.
You can set these constraints on a task by using your project management software.
Management constraints are dependency relationships imposed because of a decision by management—this includes the project manager. For example, suppose a project manager is overseeing the development of a web-based learning management system. The website will allow students to register for classes, check grades, and pay for their tuition, all online. The e-commerce portion of the project and the database development portion of the project are scheduled to happen concurrently. Because of the unique relationship between the two tasks, the project manager decides to rearrange the work schedule so that the database portion of the project must finish first and then the e-commerce portion of the project may begin. The project manager accomplishes this by changing the relationship between the tasks from start-to-start to finish-to-start. Now the database task must be completed before the development of the e-commerce portion. This is another example of soft logic.
EXAM TIP Constraints limit your options. Constraints are things like time, cost, and scope, but can also include quality expectations, security rules, and resource availability.
There are actually eight types of constraints that you may use in your project schedule management plan:
• As soon as possible (ASAP) When you specify a task constraint of ASAP, you schedule the associated task to occur as soon as it can. This is the default for all new tasks when assigning tasks from the start date. This constraint is flexible.
• As late as possible (ALAP) When you have a task with this flexible constraint, you schedule the task to occur as late as possible without delaying dependent tasks. This is the default for all new tasks when scheduling tasks from the end date.
• Start no earlier than (SNET) A task assigned the SNET constraint starts on or after a specific date. This constraint is semiflexible.
• Start no later than (SNLT) This semiflexible constraint requires that a task begin by a specific date at the latest.
• Finish no earlier than (FNET) This constraint requires that a task be completed on or after a specified date. This constraint is semiflexible.
• Finish no later than (FNLT) This semiflexible constraint requires that a task be completed on or before this date.
• Must start on (MSO) A task with this constraint must begin on a specific date. This constraint is inflexible.
• Must finish on (MFO) This inflexible constraint indicates a deadline-oriented task. The task must be completed by a specific date.
Managing Technical Constraints
Technical constraints stem from FS relationships. Most often within an IT project, tasks will be logically sequential to get from the start to the end. These constraints are the simplest and most likely ones you’ll find in a project. The technical constraints you may encounter when building your network diagram fall into two major categories:
• Discretionary constraints These constraints allow the project manager to change the relationship between activities based on educated guesses. Imagine two tasks that are scheduled to run concurrently. Task A, the design on the web interface, must finish, however, before Task B, the development of the web application, is well under development. Because of the cost associated with the programmer, the project manager changes the relationship between the tasks from SS to FS. Now the first task must finish before the second task begins.
• Resource constraints A project manager may elect to schedule two tasks as FS rather than SS because of a limitation of a particular resource. For example, if you are managing a project that requires a C++ programmer for each task and you have only one programmer, then you will not be able to use SS relationships. The sequential tasks that require the programmer’s talents dictate that the relationship between tasks be FS.
Managing Organizational Constraints
Within your organization, multiple projects may be loosely related. The completion of another project may be a key milestone for your own project to continue. Should another project within your organization be lagging, it can impact your own project’s success. For example, suppose that you work for a manufacturing company that is upgrading its software to track the warehouse inventory. Your project is to develop a web application that allows clients to query for specific parts your company manufactures. The success of your project requires the warehouse inventory project to be completed before your project can end. You enter these relationships into your network diagram as FF, with the origin activity representing the foreign project.
Scheduling with Gates
We all know that gates are things that swing open and allow you to pass through. In project management, there are also gates that are part of the project governance. A governance gate governs how the project is allowed to move from one phase of the project into the next phase of the project. A governance gate defines the conditions that must exist for the project to move forward—for example, forms completed, budget reconciled, and stakeholder approval of the work completed so far.
Another common gate is tied to quality: you can’t move on—that is, you can’t pass through the quality gate—until certain conditions are met. A quality gate requires an inspection of the work your team has completed to confirm that it meets the quality requirements of your organization, PMO, customer, or even laws and regulations. If the quality is sufficient, then the quality gate will swing open and your project can move forward.
Consider, for example, a project that includes a phase to replace old network cabling with new cable in the plenum (the area above the drop ceilings). There are regulations, industry practices, and standards that all affect this project. The quality gates would require an inspection of the installed cable for accuracy, standard adherence, and compliance. If the cables pass the inspection, the project can continue onto its next gate; if not, the project is stalled until the problem is fixed. Once the problem is corrected, the gate swings open and the project can move forward.
Another gate, for projects in the public domain, is legislative approval. A government-sponsored project has different accountability than a project using private funds. Legislative approval would review the work and either cancel the project or continue to invest in the project based on its merit and success.
Building the Project Network Diagram
Because the project network diagram can be a long and detailed map of the project, you probably don’t want to enter it into a computer on the first draft. One of the best methods of building and implementing the PND is on a whiteboard using sticky notes. A project manager, along with the project team, should begin by defining the origin work unit on a sticky note and then defining the project deliverables on another sticky note. On the left of the whiteboard, place the origin task, and on the right, place the deliverables. Now the project manager and the project team can use the activity list to identify the relationships between the units of work.
You and the team will continue to create the PND by adding activities in the order they should happen given upstream and downstream activities. This can be a long process, but it’s necessary in order to complete the PND. Chances are, you’ll be moving activities around and changing their relationships—that’s why the whiteboard and sticky notes are so nice.
Once you have roughed out the network diagram, you’ll refer to your time estimates for each activity. You can use the WBS, PERT, and supporting details to reiterate the amount of time allotted for each task. Once you’ve recorded the units of time, you may then begin to assign the resources to the tasks. Use sticky notes to move and strategize the relationships between the tasks, connecting each task with an arrow and identifying the relationship between the tasks to be implemented. You will have to consider the availability of the resources to determine if tasks can truly run concurrently within a network diagram. In other words, you can’t assign a programmer to two activities that are supposed to happen at the same time.
After you have constructed the initial diagram, examine the activity lists and the WBS to determine if any tasks or project deliverables have been omitted. If you find omissions, update the WBS and task list to reflect the work and deliverables you’ve found. Examine the relationships directly between tasks but also the relationships of tasks upstream and downstream. Review these relationships to see if you can edit any of the tasks to save time or resources. If so, rearrange the necessary tasks to update the diagram. A balance of acceptable risk and predictable outcome is required to discern the type of relationships involving each task.
A project manager must also consider business cycles, holidays, and reasonable times for completing each task. For example, a company has sent new cellular modem cards to all of its employees working out of the office on laptops. Part of the deployment is a request that the users in the field connect to the corporate LAN as soon as they receive their cellular cards. There must be a reasonable amount of time allotted between the cards being shipped to the users in the field and the confirmation that the cards have been received.
Finally, once you’ve created the network diagram, break for a day or two to allow the team to ponder any additional tasks or other considerations in the workflow prior to implementing the plan. When you reconvene to finalize the network diagram, consider the amount of risk you’ve allowed into the project by asking these questions:
• Are there adequate resources to complete the project?
• Are the time estimations accurate?
• Are there too many concurrent tasks?
• Are resources spread too thin?
• Is this a proven plan?
• Is the plan realistic?
There are two other project network diagrams that you should be topically familiar with. The first is the critical chain method (CCM). CCM is similar to the critical path method (CPM), but it accounts for the availability of project resources, whereas CPM assumes the project resources are available all the time for the project work.
Another diagramming technique is GERT, the Graphical Evaluation and Review Technique. This diagramming approach has questions, branches, and loopbacks that allow you to move forward, backward, or sideways in the project according to the outcomes of the project work. For example, GERT may ask, “Are the results of network testing greater than 90 percent or less than 90 percent? If greater than 90 percent, go on to Activity D; if the results are less than 90 percent, return to Activity C.”
EXAM TIP Adaptive projects don’t have a project network diagram or GERT chart, but they do use a product roadmap to show when releases of the product will go into production. The product roadmap helps the product owner, the development team, the project manager role, and stakeholder define and analyze the project schedule.
Analyzing the Project Network Diagram
One of the most satisfying accomplishments in IT project management is to step back and, looking at the PND, follow the project conception through each task to the final deliverable of the project. Don’t get too infatuated—this network diagram will likely change.
Now that the PND has been constructed, you can find the critical path. The critical path is the sequence of events that determines the project completion date. The critical path is the path with the longest duration from project start to project completion. For example, imagine that you have created and analyzed your network diagram. Most likely it depicts multiple paths from project start to completion. Usually, just one of the project paths will take longer than any of the other paths. This is the critical path. (I say “usually” it’s just one because you could have two or more paths that tie for the longest paths in the project network diagram.) It’s called the critical path because if any activities on it are delayed, the project completion date is also going to be late.
Calculating Project Float
Given you know that activities on the critical path cannot be delayed, what about activities that are not on the critical path? Can these activities be delayed? Yes, usually they can—but there is a limit to the amount of time an activity not on the critical path can be delayed. This limit is called float. (Sometimes this is called “slack,” but it’s the same business.) There are three different flavors of float:
• Free float The length of time a single activity can be delayed without delaying the early start of any successor activities
• Total float The length of time an activity can be delayed without delaying project completion
• Project float The length of time the project can be delayed without passing the customer’s expected completion date
Most project managers allow their project management software to calculate the available float on each activity, but it’s really not that hard to do manually. To find the float for each activity, first find the earliest possible start date and the earliest possible finish date for each activity by completing what’s called the “forward pass.” Once you’ve got this info, you do just the reverse through the “backward pass”—find the latest possible start and latest possible finish date for each activity. There are a few different methods for calculating project float. Here’s one of the most common approaches.
Calculating float is one of the toughest topics in this book for most people to grasp. It’s weird, it’s confusing, and most project managers never do this stuff manually—they’ll let Microsoft Project do it for them. I’ll walk you through a scenario, but the process of calculating float is also a great example of how watching someone do this may be easier than reading about it. And for that reason, I’ve also created a video that demonstrates this entire process.

VIDEO For a more detailed explanation on calculating float, watch the Finding Float video now.
For this example, we’ll be using the simple project network diagram shown in Figure 6-7. (You can print Figure 6-7 from the online resources that accompany this book if you’d like; it’s in Adobe Acrobat PDF format. See Appendix C for accessing the online resources.) As you can see, there are two simple paths to completion: ABDF and ACEF. The number over each node represents the duration of the activity. If you add up the duration of each path, you’ll find the critical path—the longest path to completion. In this example, it’s ACEF because it takes 17 days, while ABDF takes only 15 days.

Figure 6-7 The longest path to completion is the critical path.
Now let’s try the forward pass. (Again, there are different methods of finding float, so don’t be concerned if you’ve been exposed to a different one.) Follow these steps:
1. Make the Early Start (ES) for Activity A one, because you’ll start on Day one. Add the duration of the activity to the ES and you’ll have three. Now this part trips up some folks: subtract one day from the value of the ES and the task duration to arrive at the Early Finish (EF) of the activity. The reason is that the duration of Activity A is only two days, not three, right? In other words, if you start on Day one, you should have two days of work to get to Day two. The EF for Activity A is two.
2. The next activities are Activity B and Activity C. The ES for both of these will be three. Why? Because Day three is the next day in the schedule, the earliest possible day to begin either activity.
3. Let’s finish the ES for activities B, D, and F first. The EF for Activity B is the ES, plus the duration, minus one, for an ES of five. The ES for Activity D is six and the EF for Activity D is eight. The ES for Activity F is 9, and the EF for Activity F is 15.
4. Now let’s do activities C, E, and F. The ES for Activity C is three, and the EF is seven. The ES for Activity E is eight, and the EF is ten. Activity F is the last activity in the project, so you can bet it will be on the critical path—with no float. The ES for Activity F is actually 11, because Activity F cannot begin until your project team completes Activity E. So, the EF for Activity F is actually 17. Figure 6-8 shows the project updated with all of the ES and EF dates.
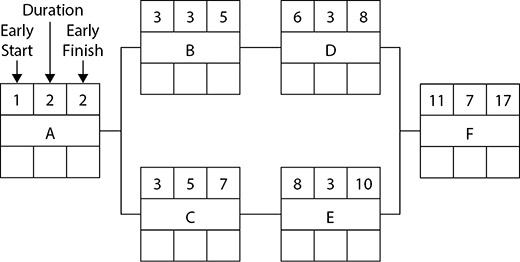
Figure 6-8 The ES and EF dates are found by completing the forward pass.
Now that the forward pass has been completed, it’s time to do the backward pass. It’s a cinch; just follow these steps:
1. Begin with the last activity in the network diagram, Activity F, which has an EF of 17. Make the Late Finish (LF) the same as the EF value: 17. The reason is that Day 17 is the latest day the project can finish without being late.
2. The Late Start (LS) for Activity F is the LF value, minus the duration of the activity, plus one. Yes, plus one. Because you’re going backward in the network, you’ll add one rather than subtract one. This accounts for the full day of work you have completed on the first activity and the last activity. So, Activity F has an LF value of 17, less the duration of 7, plus 1, which equals an LS of 11. It’s no coincidence that the EF and the LF have the same value of 17. It’s also no coincidence that the ES and LS have the same value of 11. This is because this activity is on the critical path.
3. Next let’s do activities D, B, and A. The LF for Activity D is ten—one day prior to the ES of Activity F’s LS. You get the LS for Activity D by subtracting the duration of the activity, plus one, which equals eight. The LF for Activity B is seven and the LS is five. The LS for Activity A is, well, it’s the first activity in the project. Do you think it will have any float? Hey! You’re right—it’s on the critical path, so we can skip it for now.
4. Let’s go back and complete the backward pass for E, C, and A. The LF for Activity E is ten, and the LS for Activity E is eight. The LF for Activity C is seven, while its LS is three. The LF for Activity A is two, and its LS is one. Figure 6-9 shows the completed backward pass.
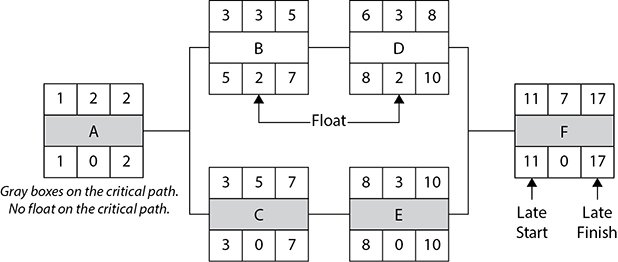
Figure 6-9 The backward pass reveals the LF and the LS.
To finalize the process of finding float, you’ll subtract the LF from the EF and the ES from the LS on each activity. Wherever there’s a zero, you have a task on the critical path; wherever there’s a number, the activity has float. In this example, activities B and D have two days of float. Okay, technically they both don’t have two days of float; there are two days of float on the whole project. Or you could say that Activity B and Activity D can each have one day of float, or either activity can have two days of float. However you slice it, if either activity goes two days beyond its expected completion time, this project is late.
Forecasting Adaptive Project Completion
Adaptive projects don’t move through the same schedule approach that predictive projects do. Recall that adaptive projects work in iterations of two- to four-week time periods. The team selects the most important items from the top of the product backlog based on how much work they think they can complete in the iteration. The requirements from the product backlog are called user stories and are assigned story points. A user story is just a way of writing a requirement so everyone can understand it. User stories follow this formula:
As a role
I want this feature
So I get this value
For example, “As a salesperson, I want to place orders through my phone app, so my customers can get their product delivered quickly.” Based on how difficult the user story is to create, it’s assigned a point value that is relative to the user stories. For example, an easy user story might have three points, but a difficult user story might have 13 points. The point value isn’t hours of work, it’s just relative sizing, like T-shirts get sized small, medium, large, and x-large.
Over time and with experience, the team will learn how many points they can actually complete in an iteration. For example, they may predict they can complete 36 stories points worth of work in four weeks. The number of points the team can complete may vary wildly at the beginning of the project as the team’s efficiency settles, but when the number of story points accomplished settles, it’s called the team’s velocity. Velocity is how many points the team can reliably complete in an iteration. In this example, the velocity is 36 user story points. To predict how long the project will last, you’ll examine how many user story points are in the product backlog and divide that number by the team’s velocity.
For example, the product backlog has 128 user story points remaining and the team’s velocity is 36. 128 divided by 36 is 3.55, which indicates four more iterations are needed to complete all of the user stories in the product backlog. If each iteration lasted four weeks, you could safely predict the project will take 16 weeks to complete based on the current velocity.
Creating the Project Cost Management Plan
The project cost management plan defines how the project will be estimated and budgeted and how the costs will be controlled. In Chapter 5, I detailed the costs of project management. This is a great example of how projects and project management planning are integrated—what you do in one area affects another. You need to plan specifically for project costs, but you need other project management plans in order to plan effectively for project costs. As more and more information becomes available in your project, you can plan in more and more detail.
The first portion of the project cost management plan should define how you’ll complete project cost estimating. In your organization, you may have some specific rules about cost estimating, metrics you’re required to use, and even a chart of accounts that defines standardized costs for certain types of project work. These organizational requirements that control how and what you plan are called enterprise environmental factors. Always follow the rules and policies of your organization when it comes to planning and estimating for costs.
As a reminder, to create accurate cost estimates, you’ll need six things:
• Project scope baseline
• Project schedule
• Human resource plan
• Risk register
• Enterprise environmental factors
• Organizational process assets
You’ve seen all of these inputs to cost estimating before—except for the risk register and the human resource plan. Each of these inputs has some cost factor associated with it, which is why you’ll need all of them to predict how much the project is going to cost the organization. I’ll address the human resource plan and the risk register later in this chapter.
Cost budgeting, the second process that the cost management plan defines, is the aggregation of the costs of each work package in your project’s WBS. It is the sum of all the costs the project will incur and is put into an authorized budget so that the project can execute the fully composed project management plan. The project’s cost budget does not include any reserves for time or risks—these are special budgets for your project, not part of the project execution. The performance of your project is measured, often enough, against the approved project budget.
Your project’s cost budget is largely built on the cost estimates of your project. That’s why it’s so important for you to document the basis of your cost estimates—how did you determine it would cost your project $24,987 for a particular server configuration? My point is that the project cost estimates are only as good as the supporting detail. If the supporting detail is fiction, then you can bet dollars to donuts the project’s budget is going to be skewed as well.
One of the most important parts of the project cost management plan is how the project costs will be controlled and monitored. The project manager has the responsibility of tracking project costs for all areas of the project scope that have a cost factor. There must be cost reconciliation between what the project manager says the project will cost and what the project actually costs in execution. Monitoring and controlling of the project costs uses several approaches:
• Leading the team to do the work properly the first time to avoid cost overruns
• Thoroughly investigating the true costs of change requests
• Tracking costs to project deliverables against the total costs of the project by phase and overall project costs
• Measuring project performance against the costs of the project to reach said performance
• Stopping unapproved changes of all sorts from entering the project
• Making corrective actions to bring cost overruns back into alignment with the project cost baseline as much as possible
Basically, you’ve got to work with the project team and stakeholders to prevent waste by accurately planning the project work and then accurately doing the project work. When there are mistakes in the project, go to the problem immediately to try to find a solution for the problem. As a project manager, you’re responsible for wastes, cost overruns, and deficits. The actions you take should always be linked to project performance.
Planning for Project Quality
Ask ten people what they think quality is, and you’ll probably get ten different answers. Quality, when it comes to project management, is the entire project and how the project satisfies the stated and implied requirements of the project scope. Quality is creating for the project customer exactly what was promised in a way that’s cost and time effective. Quality is more than just balancing the scope, time, and cost of a project, however—it’s a fitness for use and a conformance to project requirements. In project management, you achieve quality by planning quality into the project—not inspecting the results of the sloppy work and then fixing problems later. It’s always more cost effective to do the work properly the first time.
The quality management plan defines what quality is for your project, how you’ll plan for quality, and then how you’ll inspect the project work to ensure that quality exists within the project deliverables. The first step in planning for quality is to understand what the project customers want—this means you’ll refer back to the scope baseline. By understanding what is expected of the project in exact terms, you can plan to achieve the expectations in exact deliverables. This is one of the reasons it’s so important to get the customer stakeholder to approve the project scope statement and the WBS. You don’t want to be planning to achieve quality for the wrong requirements.
When you begin to plan for project quality, you’ll start with the requirements of the project, and then you’ll need to address quality assurance. Quality assurance (QA) is an organization-wide quality policy or program that your organization subscribes to. Quality assurance examines the quality requirements of the project, inspects the results of quality control, and ensures that the project is using the correct quality standards and terminology in the project. Your organization may use a home-grown quality policy that staff has written, or it may participate in a program such as Six Sigma or Total Quality Management. These quality programs usually have the same theme that W. Edwards Deming, the grandfather of quality, created in his Quality Circle: Plan, Do, Check, Act. My point is, your organization may already have a standardized approach to quality assurance that your project will need to follow. That’s great!
EXAM TIP Quality assurance is planning to do the work correctly the first time. Quality control is inspecting the work to confirm that it conforms to the quality requirements. Remember, it’s always more cost effective to do the work correctly the first time.
Your quality management plan also defines the quality control technique you’ll use in your project. Quality control is the inspection of the work results that your project creates. By inspecting the work results, you’ll know if the work has been done to plan, if the work adheres to the QA metrics, and whether the work needs to be corrected before the project moves forward or it’s acceptable to you. Consider a project to install a network in a new office building. In this construction project, you might have 1,500 network connections to create throughout the building. For each network drop, you’d have a specific requirement of where the jack is to be positioned, how the network cable is punched down, and how the cables are secured between the network drop and the patch panel. The specifications of the work are the requirements, the planning of how you’ll achieve the requirements is the quality assurance, and the inspection of the network is the quality control.
Along with your quality management plan, you may also create or adapt a process improvement plan. The process improvement plan is a project management plan that defines how the processes within the project can be analyzed for potential improvement. The process improvement plan is ideal for projects where there’s a repeatable process, such as installing 1,500 network cables, or for project types that your organization may do over and over as part of your business. It’s really a good idea to use a process improvement plan because it helps you, the project manager, really think about and understand the workflow of a project and how you might shave off some wasted time by getting rid of non–value-added activities.
You can use the process improvement plan to define and analyze several things about your project:
• Process boundaries You’ll identify where a process begins and where a process stops. By understanding the process boundaries, you can document what conditions are needed for a particular process to begin and what conditions must be true for a process to stop.
• Process configuration identification This fancy-schmancy term just means that you identify all of the components within the process. You’ll document how a process is completed, what the process interfaces are, and what each process in your workflow accomplishes.
• Process metrics If you don’t measure, you can’t improve, but in order to measure, you need to know what the metrics are for measurement. You can measure a process on speed, cost, efficiency, throughput, or whatever metric is most appropriate for the type of work the process is participating in.
• Targets for improvement Once you’ve completed process analysis, then you can begin to re-engineer the processes, set goals for process improvement, and try small changes to the process to measure what results the changes may bring.
I’ll talk more about the execution of quality and the inspection of project deliverables in Chapter 11. It’s perfectly acceptable for a project manager to use a previous project’s quality management plan to help achieve quality in the current project. The application of quality control, however, will likely change for each project, as each project has different variables than the last.
Preparing for Managing a Project Team
I think you and I would agree that every organization in the world is unique when it comes to managing employees, the culture of the organization, and how much authority the project manager has over managing their project team. The enterprise environmental factors, the structure of the organization, the policies and guidelines of the organization, and the experience of the project manager all affect how much authority and decision-making ability the project manager has over the project team. As a project manager, you need to understand how you’ll manage the team and still be within your “rights” as a project manager in your organization. You don’t want to overstep your boundaries, but you’ll need to manage your team effectively so that you can get them to complete their assignments as required.
Considering the conditions within your organization, you’ll create two plans to address how you’ll lead and manage your project team: the human resource plan and the staffing management plan. And, yes, as with other project management plans, you can adapt your current plan by drawing on plans from previous, similar projects. The first plan to discuss is the human resource plan. This plan defines the needed roles and responsibilities of the project team. A role is a definition of a type of team member who does a specific kind of actions—for example, network engineer, application developer, database administrator. Roles are generic descriptions of the project team members, not employees named specifically. Attached to the roles are the responsibilities or actions the roles are to fulfill on the project team.
NOTE Understand how much authority you have over the project team in your organization before assuming power you may not have.
One approach that’s worked for me is that when I plan for the project work, I don’t worry about who will be doing what. I focus on the role that will take care of the specific work. For example, you might assign the entire network cabling activities to the network engineer; later, once the initial planning is done, you’ll determine how many specific people can fill the role of the network engineer and slice the activities across the people who can satisfy the one specific role in the project. This way, during planning the project team, you’re not worried about getting a specific person, you’re just identifying the skills the roles will need in order to accomplish the specific responsibilities.
The human resource plan also addresses the type of structure the project is operating in. Recall our conversation on functional, matrix, and projectized structures from Chapter 3? The type of structure you’re in will help you as the project manager to determine who has to report to whom. In a functional structure, where the functional manager is in charge, the reporting structure is easy and shallow. Similarly, in a projectized structure, the team works on just one project at a time, and the project manager is in charge. In a matrix structure, however, your project team members have to report to you, their functional managers, and any other project managers that they work for. Communications, reporting, and resource management get messy in a matrix structure, so ample planning is needed.
The second plan, the staffing management plan, addresses how project team members will be brought on to and released from a project team. It’s this plan that is so important in a matrix structure, as you’ll need to coordinate timetables with other project managers and the project team members. This plan addresses the project calendar—when the project work is expected to take place. It also addresses the needed resource calendars—when the project resources are available for project work.
The staffing management plan also includes an assessment of what is needed for team development. This can include training, team activities, and expectations of team leadership roles for senior project team members. You can’t expect the project team to complete the project without the appropriate skills to complete the project work. Training is an essential part of the team development, and it’s also considered a cost of quality.
The staffing management plan can, and I believe should, include a definition of how a rewards and recognition system works. If your project can reward the project team for a job well done, then the project team should know the rules, the rewards, and how they can achieve those rewards. Rewards can be financial, time off, contributions to their employee review, or other incentives for each employee. What motivates one employee may not motivate someone else. As a general rule, you should shy away from “zero-sum rewards,” which are rewards only one person can win, such as a reward for being employee of the month. As a side note, you will want to reward the project team with genuine praise when it’s appropriate. This isn’t something that’s in your project plan, but when a project team member does a great job, you should acknowledge it. I’ll talk more about team development in Chapter 7.
Writing the Project Communications Management Plan
Without a doubt, the best method to communicate with others is face-to-face communication. However, in most organizations, that’s not always a possibility. So, as a project manager, you’ll need to create a communications management plan to address other approaches for communicating and define what is and is not allowed, preferred, and required.
In order to create solid management alliances, you’ll need to communicate. In order to communicate effectively, you’ll need a communications management plan. Considering stakeholder analysis, the project manager and the project team can determine what communications are needed. There’s no advantage to supplying stakeholders with information that is not needed or desired. Time spent creating and delivering unneeded information is a waste of resources.
The communications management plan helps to determine which person needs what information, when that person needs the information, the modality in which the information is expected, and which stakeholder will supply the information. The communications management plan identifies the appropriate communication technologies, types of forms, and types of meetings, and it creates a schedule of when communication is expected to occur.
A communications management plan organizes and documents the process, types, and expectations of communications. It provides the following:
• A system to gather, organize, store, and disseminate appropriate information to the appropriate people. The system includes procedures for correcting and updating incorrect information that may have been distributed.
• Specifics on how confidentially constraints of sensitive information within the project or organization will be addressed and documented, and the role of the individual(s) who may manage the confidential information. Project managers often have access to sensitive information, such as financial, human resources, and even classified government information. The plan must establish safeguards within the organization (or project) to ensure that confidential information is protected.
• Details on how needed information flows through the project to the correct individuals. The communication structure documents where the information will originate, to whom the information will be sent, and in what modality the information is acceptable.
• Information on how the information to be distributed should be organized, the level of expected detail for the types of communication, and the terminology expected within the communications.
• Schedules of when the various types of communication should occur. Some communications, such as status meetings, should happen on a regular schedule; other communications may be prompted by conditions within the project.
• Methods to retrieve information as needed.
• Instructions on how the communications management plan can be updated as the project progresses.
It’s been said that 90 percent of a project manager’s time is spent communicating. You’ll be communicating with the project team, the project sponsor, business analysts, customers, vendors, and other stakeholders all the time. People will want information from you, and you’ll want information from other people. One tool that you can add to the communications management plan is a communications matrix, shown in Figure 6-10. This matrix lists all of the stakeholders and maps out who needs to speak to whom. You can get fancy and create a legend beyond what I’ve done here, but basically it’s a tool that can help you facilitate communication between certain stakeholders and the project.

Figure 6-10 A communications matrix identifies which stakeholders must communicate.
Beyond the communications management plan, you’ll also want to be aware of how you communicate. Fifty-five percent of all communication, for example, is nonverbal. When you consider how much IT project teams rely on e-mails, text messages, and web collaboration software, it’s easy to see how communication can break down. Have you ever put a joke in an e-mail message, but the recipient didn’t understand that you were joking? Your body language, facial expressions, and gestures all affect your message beyond the words you’re communicating. That’s why e-mails and even phone calls aren’t always an effective mode of communication. In your communications management plan, you should plan for face-to-face meetings with your project team and other key stakeholders as often as possible. Face-to-face meetings are one of the best methods for accurate communication.
Your communications management plan should address how remote workers, sometimes called a virtual team, will communicate. What communication methods are allowed or required for these non–co-located members of the project team? Will you use collaborative software, instant messaging, web conferencing software, voice conferencing, video conferencing, or some other technical solution? You’ll need to consider the pros and cons of communicating through any technology because it will likely affect the communications model and effectiveness of the communication. While static communications, such as e-mails, faxes, and printed materials, can be effective, they lack the interactive attribute of face-to-face communication.
Video conferencing, such as Zoom, allows stakeholders to see one another face-to-face through computer software. Voice conferencing is easy to do with nearly any phone system today, but you lose the effectiveness of the face-to-face communication video conferencing provides. Another possibility for your project might be to use social media for communication. Consider groups within Facebook, lists on Twitter, LinkedIn, and other social media. Project teams have leveraged these social media sites to communicate with one another.
You might also consider creating a Wiki page for stakeholders to access and review project information. Wiki pages are a repository that can give project background, project purpose, project sponsor information, the timeline, and other valuable information. Wiki pages, and even websites, can help you quickly share information on the public Internet or on your organization’s private intranet.
Planning for Project Risk Management
Risks come in all shapes, forms, and sizes. Risks are uncertain conditions that can have a positive or negative effect on your project’s ability to reach its goals and objectives. Risks are prevalent in IT projects; even the project itself is a risk, as any day a new technology may come along and outdate the technology your project centers on. Most risks, as luck would have it, are foreseeable events that you and the project team can identify and plan for. The risk management plan is a component of your overall project management plan that details how project risks will be identified, analyzed, responded to, and controlled. Risk management happens throughout the project, and you and the project team should always be on the lookout for new risk events.
You’ll rely on several project components to help you plan for risk management:
• Project scope baseline The project scope, WBS, and WBS dictionary can help you identify risk events, plan for critical project deliverables, and keep an eye on where risks may be in the technical details of the project.
• Cost management plan There is a financial impact to most risk events, and you’ll need to create a special reserve that’s outside of the project budget just for the management of risk events. More on the risk reserve in a moment.
• Schedule management plan You’ll also find that risks can affect the project schedule and not just the cost of the project. And some of your projects are extra sensitive to the project schedule, so you’ll have reasons to query the schedule and look for events that can hinder the project progression.
• Communications management plan When risks are discovered, analyzed, or squashed, you’ll need to communicate risk status and events to the appropriate people. Risk communication is an important part of the project manager’s role.
• Enterprise environmental factors The rules and policies of your organization may require you to deal with a risk management department, follow particular risk analysis rules, or complete risk assessment forms. Always follow the rules of the organization.
• Stakeholder register This document will help you identify the stakeholders who need to be part of the risk management planning, the stakeholders affected by the identified risk events, and the stakeholders you’ll need to communicate with about the risks in the project.
• Organizational process assets If you or someone in your organization has done a project like the one you’re working on now, chances are you’ll use historical project management plans and lessons learned documentation to help you manage the risks within your current project.
Planning for risk management relies heavily on these inputs, and you’ll work with the project team, key stakeholders, subject matter experts, and management to help you plan how the risks in the project should be handled. You’ll discover that some risk events are of little consequence and you can ignore them. Other risks are project-killers and you’ll have to attack them any way you can to prevent them from coming to fruition. The key to risk management is to identify the risks as soon as possible in the project, analyze the risks, and then create a reasonable plan of attack.
Identifying the Project Risks
Risk identification is an iterative part of project planning. You and the project team are always on the lookout for project risks that can sneak into the project or that may have been overlooked. Risk identification must happen throughout the project, especially in an IT project, because as the project develops, new risks may develop. It would be nice if you could identify all the risks within a project before the execution begins, but the reality is, you’ll probably find risks lurking in the project throughout the project life cycle. There are several tools you and the project team can use to identify risks within the project:
• Review the project documents A great place to start looking for project risks is to sit down with a mug of coffee and read all of your project documents. You can identify many risks just from what’s in the project scope statement, the WBS, the resource requirements, supporting details of your project, your project management plans, contracts, and any other document that affects the decisions made in your project.
• Brainstorming You and your project team can rattle off as many risks as possible in a brainstorming session. In a brainstorming session, there’s no set number of risks for a goal to identify; you’re just encouraging the team to identify anything at all that might be a risk regardless of how silly or small the risk may seem. One technique that works for me is to examine the WBS as a group and create a similar structure, the risk breakdown structure, to group relative risks together.
• Delphi Technique This approach uses rounds of anonymous surveys to build consensus on risk events. Imagine that Frederico works for Bill, and both men were invited to a brainstorming session for Janelle’s project. Frederico knows of a risk that could affect Janelle’s project, but he doesn’t want to say what it is because the risk event may make his boss, Bill, look bad. Frederico says nothing and Janelle’s project crashes and burns. The Delphi Technique takes out the fear of repercussion, which Frederico was experiencing, by using anonymous surveys to identify risks. With this approach, Frederico can anonymously tell Janelle about the risk. Janelle then would compile all of the risk events and send them back to the survey participants for feedback. Now Bill can respond to the identified risk, if he needs to, and no one knows that Frederico was the identifier of the risk event. Depending on the response to the original survey results, Janelle can fire off another survey, or multiple surveys, until there’s a consensus within the group on what risks are genuine and what risks are superficial.
• Assumptions analysis An assumptions log should be included as part of the project documents. All assumptions should be tested as much as possible to determine if the assumptions are valid or not. Assumptions can be risks if they’re not tested and researched to determine how they’ll affect the project. An assumption that your software will work with the latest and greatest operating system can really wreck your project if the assumption proves false later in the project delivery.
• Root cause analysis This analysis approach examines an effect the project is experiencing and tries to determine why the effect is happening. You might plot out the result of the risks in a cause-and-effect diagram, sometimes called an Ishikawa diagram or a Fishbone diagram, as shown in Figure 6-11.

Figure 6-11 Cause-and-effect diagrams help identify causes and contributing causes.
• SWOT analysis This approach examines the project in terms of its strengths, weaknesses, opportunities, and threats to test where the project could fail and where the project could improve. SWOT is a great technique to use on resources you’ve not used before or on requirements that you and your project team haven’t tried before. If you’re stumped in a brainstorming session, fire up SWOT to jump-start the meeting.
All of your identified risks, as your risk management plan will tell you, should go into a risk register. A risk register, also called a risk log, is a database of the identified risk events, what impact each event may have on the project objectives, and what effect each event will have on the project. The project manager and team will update the risk register throughout the project as new risk events are identified. You’ll also record the outcome of the identified risk events in your project. A risk report is utilized to document the risk event, the response selected, and the outcome of the risk event.
You might encounter a risk/issues log in your organization. A risk is an uncertain event, while an issue is a certain event. Issues are generally risk events that have happened and now need to be managed. A risk/issues log documents the risks and issues within the project; tracks their status, potential responses, and costs to the project budget and schedule; outlines plans for managing the risk or issue; and records the final outcome of the risk or issue. Note that keeping risks and issues separate in two logs, a risk log and an issues log, is not uncommon.
Analyzing Identified Risks
The risk management plan should detail how the identified risks will be analyzed. You should analyze the risks to determine how probable the risks are to occur and, if the risks do occur, what the impact of the risk events will be. The usual approach to risk analysis is first to perform qualitative risk analysis and then, for risks that qualify, to perform quantitative risk analysis. Your organization, as part of its enterprise environmental factors, may have risk policies already established on how you should analyze project risks. The risk management processes will also help you to rank and prioritize risk events based on when the risks may happen, their severity, costs, or other factors your organization deems important.
Qualitative risk analysis is a high-level, fast approach to risk analysis. It’s somewhat subjective and doesn’t offer much in-depth review and analysis of the risk events. When you perform qualitative risk analysis, you can base the predicted probability and impact on past experience, gut instinct, and other subjective inputs. You don’t have much to go on as far as research during qualitative risk analysis—it’s a fast approach to qualifying the identified risks for further analysis.
With qualitative risk analysis, you can use a risk matrix, sometimes called a probability-impact matrix, to score the risk events on an ordinal scale. Figure 6-12 shows a heuristic for how risks are ranked and responded to through qualitative risks. Because this is a subjective approach to risk analysis, the project manager should periodically review the low-level risks just to confirm they’re not becoming more serious during the project execution.

Figure 6-12 Qualitative risk analysis uses an ordinal scale to rank risks.
Quantitative risk analysis takes the more serious risks from qualitative analysis and really researches the risk events to find their true probability and impact. Quantitative risk analysis takes time and often a budget, as you’ll want to test the risk events in a controlled environment whenever possible. You want to determine which risk events are most likely to happen and what their related impact on the project will be. This approach allows you to create a risk ranking by impact and probability and by which risks are most imminent in the project.
During the quantitative risk analysis process, you and the project team are trying to quantify the risk event value. The impact, in quantitative analysis, is usually a dollar amount that shows the true impact on the project should the risk event happen. The last column in the risk-impact matrix is the risk event value, which you calculate by multiplying the probability of the risk by the impact for the risk event value score. The sum of the risk event value scores is the project’s risk exposure.
Be aware that both positive and negative risk events are possible. Negative risk events are the risks that can hinder the project’s success, and they’re really the events most project managers focus on. Positive risk events are things that can happen to save your project time and money, and even create opportunities for your project.
Creating Risk Responses
Once you’ve identified the risks within your project, you can use any of seven risk responses for each risk. You should document the chosen response along with the risk event in your risk register. It’s also a good idea to identify a trigger for when the risk response is appropriate. A trigger is a warning sign or condition that the risk event is coming true so it’s time to fire the risk response to counteract the risk event. There are three risk responses for negative risk events:
• Avoidance This risk response seeks to avoid the risk event by creating workarounds, changing the project schedule, adjusting the project objectives, or taking other action to avoid the identified risk event.
• Transference This risk response transfers the risk to a third party, usually for a fee. Imagine a dangerous activity, such as working with electricity. Rather than owning the risk in-house, you could hire an electrician to own and manage the risk for you.
• Mitigation This risk response looks to spend extra time or monies to reduce the probability and/or impact of a risk event. You might spend more on a server with a fault-tolerant RAID system that’s integrated rather than using a software RAID application among multiple hard drives. You’ve spent more for a faster, more reliable solution and reduced the probability of data loss.
There are also three risk responses for positive risk events you may find in your projects:
• Exploitation This positive risk response aims to take advantage of a positive risk. Imagine that your IT project creates a byproduct that could be sold to help offset the project costs. Or perhaps you and the project team could take advantage of a holiday weekend to work on the project uninterrupted.
• Enhancement This positive risk response tries to make the conditions just right for a positive risk to happen. You could save a tremendous amount of time and project costs if you were able to finish a particular milestone by a given date. To reach the milestone, you add extra resources to help the effort-driven work so that the team can complete the milestone by the specific date.
• Sharing This positive risk response allows your project team to partner or team with another entity to realize an opportunity that you may not have been able to realize on your own. Sharing examples are teaming agreements, joint ventures, partnerships, and special-purpose companies.
The seventh risk response is appropriate for both positive and negative risk events: acceptance. Smaller risks that have little probability and little impact are often accepted. It’s also possible that low-probability risks with huge impacts could also be accepted: consider meteorites. Assumptions that may prove false, such as the weather, travel delays, and hardware interoperability, are accepted.
Creating the Stakeholder Management Plan
The stakeholder management plan addresses how you identify, engage, and maintain the engagement of your project stakeholders. This is a special plan that is closely related to the project’s communications management plan. Recall that the communications management plan defines who needs what information, when the information is needed, and the expected modality of the communication. The stakeholder management plan describes the recipients of the communication and the expectations of how they’ll communicate with the project manager and other stakeholders.
The stakeholder management plan is more than just communication for stakeholders; it also defines stakeholder identification and engagement. The stakeholder management plan defines four things for your project:
• How you will identify and documented stakeholders
• How you will manage stakeholders, based on their needs, expectations, and effects on the project success
• How you will manage stakeholder engagement throughout the project
• How you will monitor, maintain, and influence stakeholder engagement
EXAM TIP Stakeholder identification is an initiation process. You should complete stakeholder identification as early as possible in the project so you don’t overlook key stakeholders. It’s always challenging to gain stakeholder support if you didn’t identify and involve them early in the project decisions.
Performing a Stakeholder Analysis
While all stakeholders are important, some stakeholders are more important than others. I know that sounds harsh, but you don’t want to spend all your time communicating with and managing a stakeholder that has very little influence or power over your project. Stakeholder analysis is a method to discover, prioritize, and group stakeholders based on their power, interest, influence, and impact on the project success. There are three general steps to performing stakeholder analysis:
• Broad stakeholder identification Identify and document all of the stakeholders, identify their roles and responsibilities, and determine which stakeholders are decision makers who can affect the project outcomes, objectives, and approach.
• Stakeholder analysis Analyze the list of stakeholders for how they can affect the project by their decisions, power, and support of the project goals. You can then begin creating groups of stakeholders by their attitude toward the project.
• Stakeholder engagement Begin to plan how to address, engage, and influence these stakeholders to support the project goals, objectives, and approach to achieving the project goals.
Creating Stakeholder Classification Models
Once you have identified the groups, or classifications, of stakeholders, you can take your analysis and planning a bit deeper by creating a model to map out the stakeholders in your project. There are four common classification models you can use:
• Power/interest grid Maps stakeholders based on their power (authority) and their interest in the project, as shown in Figure 6-13
Figure 6-13 A power/interest grid maps out stakeholders’ power in relation to the interest in a project.
• Power/influence grid Maps stakeholders based on their authority and influence or involvement with the project
• Influence/impact grid Maps stakeholders based on their influence and the possibility that they could affect the project approach, goals, and objectives
• Salience model Classifies stakeholders based on their power, urgency for information, and legitimacy in the project
These four models, and the entire stakeholder management plan, are usually not shared with everyone in the project, because they may include sensitive information. In other words, you don’t want word getting back to Allen the CFO that he’s a pain in the project with little legitimacy in the project planning. These models and classifications will help you better engage, and maintain engagement, of the most appropriate stakeholders.
Building the Project Procurement Management Plan
The final plan you’ll need to create as part of your project management plan is the procurement management plan. This plan defines the process you’ll need to complete in order to create contractual relationships with your vendors. As with most of these plans, your organization may have specific rules on how you, your procurement office, and the vendors all interact. As always, I’ll define the generally accepted practices this plan defines, but out there in the real world, you should always follow the rules of your organization.
The procurement management plan defines four things for your project:
• The decision to procure for your project
• How the procurements are to take place according to your organization
• The administration of the procurement and the contracts the process will create
• The closing of contracts once both parties have fulfilled their obligation
Preparing to Purchase
The first step in creating this plan is to make certain you actually have a need to purchase something. Some things in your project will be easy to see you need to purchase them: materials, resources, facilities, equipment, software, hardware, and services. Other things, however, won’t be so easy. You and the project team need to complete a build-or-buy analysis and weigh the benefits of purchasing products and services versus building them in-house. Not all decisions to procure are financially based, as sometimes there are other reasons, such as experience gained, available staffing, control of the intellectual rights, and other ancillary benefits beyond the cost of the product you’re purchasing.
Once you’ve made a decision to procure, you should create a statement of work (SOW) document. The SOW defines what the vendor is to provide for the project, provides ample information so that the vendor may create an effective response for you, and includes enough information to understand what the expected results of the contractual relationship may be. The SOW is a document from you, the buyer, to the vendor. Along with the SOW, you’ll need to create one of four exploratory documents, depending on what you want back from the vendor:
• Request for information (RFI) This document asks the vendor for more information about their products or services. It means that your organization may be interested in purchasing from the vendor in the future.
• Request for quote (RFQ) This document asks the vendor to provide just a price for the work described in the statement of work.
• Invitation for bid (IFB) This document is nearly the same as the RFQ; you want the vendor to provide a price only for the work described in the SOW. You might see this also called a request for bid (RFB).
• Request for proposal (RFP) This document asks the vendor to create a proposal for the work defined in the SOW. A proposal is not a quick thing to create; the vendor must examine the work, create ideas and solutions for you, and show you the details of the solution they’d create for you based on your SOW. An RFP is asking the vendor to share with you their approach for the work and a price to complete the work.
In some instances, depending on the size of the work to be contracted, you may invite all of the vendors to a bidders’ conference. The bidders’ conference is a meeting where all of the vendors that are interested in performing the work on your project can ask you questions about the SOW you’ve created. Often this meeting will lead to updates and revisions of the SOW that will be redistributed to the vendors. The bidders’ conference is simply a meeting of all the vendors so that all participating vendors can receive the same information to create their bids, quotes, or proposals.
Once you’ve narrowed your search to two or three vendors, it’s time to interview each one to determine who will be awarded the project. In the interview process, which the vendor will probably consider a sales call, remind yourself that this is a “first date”—it’s a chance to find out more information about the vendor.
Document all parts of the meeting: How difficult was it to arrange a meeting time? How polite was the salesperson? Did the salesperson bring a technical consultant to the meeting? All of these little details will help you make an informed decision. In such meetings, pay attention to the following regarding vendors’ representatives:
• Do they pay attention to details? Are they on time? Dressed professionally and appropriately for your business? Are their shoes shined and professional? How vendors pay attention to the details in their appearance and presentation to win your business will be an indicator of how they will treat you once they’ve won your business.
• How organized are their materials? When a salesperson opens their briefcase, can they quickly locate sales materials? Are the brochures and materials well prepared and neat, and not wrinkled or dog-eared? Again, this shows attention to detail, something every project requires from the start.
• What is their body language saying? Pay attention to how they are seated, where their hands are, and how animated their answers become. A salesperson should show genuine interest in your project and be excited to chat with you. If they seem bored now, they will likely be bored when you call to discuss concerns down the road.
• What does your gut say? Gut instinct is not used enough. The meeting with the salesperson should leave you with a confident, informed feeling. If your gut tells you something is wrong, then chances are something is. If you’re not 100 percent certain, and you probably shouldn’t be after one meeting, do more research or ask for another meeting with the project integrators.
Once you receive the quote, bids, or proposals, considering what you’ve asked for, you can select which vendor to purchase your products and services from. You can create screening systems, such as that the vendor must have a 120-day warranty on their product, to screen out vendors who don’t qualify. You can also use a scoring model to choose the most desirable vendor. A scoring model identifies several categories of qualification, such as experience, cost, and certification. Each category is assigned a value of points, and then you’ll measure each vendor and their proposals and award them points in each category. The vendor with the most points is awarded the contract.
Clinching the Deal
When you’ve just about made your decision, it’s time to follow up with a phone call to a few of the references the vendor has provided. Most of these references will no doubt be excellent and prepped. Not that anything’s wrong with that; everyone wants to put their best foot forward. Ask the vendor what type of work was performed for the client and when the work was done.
If the work the vendor completed for the client is not directly similar to your project, ask the vendor to provide you with another reference for whom the vendor has done similar work. In addition, the date of the work should be fairly recent—hopefully within the past six months.
Once you have made your decision to award the project to a particular vendor, ask that vendor to provide the scope of the project in writing, including the price, in the form of a contract. The vendor may, and should, have their own contract that they use whenever implementing technology. Review the vendor’s contract and, if necessary, have your organization’s legal department look it over and make any amendments or changes. Your organization may have, and prefer to use, its own contract for the agreement.
As painful as contracts are, they protect you and the vendor. The contract should require that the vendor guarantee their work for a specified amount of time. The technology to be implemented will determine the amount of time expressed in the warranty and the type of guarantee provided. Your organization may use a letter of intent and/or a memorandum of understanding. The letter of intent means that your organization intends to do business with the vendor; it’s usually not binding, but it lets the vendor know they’ve won the contract. A memorandum of understanding precedes the actual contract written by the attorneys. This document spells out the agreement for both parties before the attorneys (and their fees) get involved and finalize the terms.
Many different types of contracts are available. The project work, the expected duration of the project, and the relationship between the buyer and seller will determine the contract type. Here’s a quick overview of the common contract types and their attributes:

Before any implementation begins, and once the contract details have been worked out, do some prep work. For example, if the project is an operating system upgrade on your servers, create a full backup or system image of your servers. If the technology is a new application to be developed with hooks into your database, assign the appropriate levels of access security to the database for the developers, but don’t give the developers greater permission than what they need to accomplish their work. In other words, prepare for the worst-case scenario, but hope that you never have to use it.
Another part of the contract is keeping the deal. Both parties have responsibilities to live up to in the contract. The procurement management plan defines how the contract will be monitored and controlled. This means you’ll plan for audits and inspections, and you’ll expect feedback from people on the project who deal directly with the vendor’s inputs and actions. You will also need to define in the procurement management plan how changes to the contract may happen. There is a contract change control system, and the terms of the contract should also define the process for adding changes to the contract. Usually, changes can be added directly to the contract for a fee, though some vendors may prefer a new contract or an addendum to an existing contract. It’s not unusual to expect to pay a change request fee in addition to the fees to complete the actual change request.
Planning to Close the Contract
Your procurement management plan must also include details about how the contract will be officially closed. When the vendor reports that they’ve completed their procured work, the details of the contract may direct you on what to do next. In most instances, you’ll inspect the results of the procured work to ensure that you’ve received all that was expected for the project and promised by the vendor. You should examine the financial details of the contract, confirm any invoices, and then finalize the payment for the vendor. Much of this work may be outside of the domain of the project manager, but you should work with your procurement office or project sponsor to ensure that the vendor is paid according to the terms of the contract.
In some instances, the vendor is no longer needed on the project. This situation could come about for a number of reasons: from poor performance to a change in project scope. When the vendor is no longer needed, a contract termination request is generated by the project manager or the contract authority in your organization. This request is subject to the terms of the contract. Your organization may be liable for early termination if the contract is to be terminated for any reason other than poor performance. It’s never a pleasant experience to terminate a contract early, so it’s important to follow the terms of the contract and document the experience.
It’s possible that a contract termination, faulty work, or other disagreement between the vendor and the client can lead to a claim by one party or the other. The buyer in the contract sends the seller a cease-and-desist letter communicating their demand for the work to end. This letter defines why the contract is being terminated and how no additional work from the seller will be approved for payment.
The procurement management plan and the contract should detail how claims will be managed. Ideally, the vendor and the buyer settle the claim themselves without having to escalate the claim to litigation. Litigation, lawsuits, and attorneys can be one of the worst experiences for resolving a claim within a project. It’s best to find a solution for the project without having to go to court to find a solution.
When a contract is closed, the vendor should receive a certificate of completion. This document verifies that the vendor has completed the contracted work and is free from the project with the exception of any warranty clause of the contract. All contracts should become part of the project’s supporting detail, its archives, and then the organizational process assets. Your organization may also use a seller rating system that requires you to document your experience with the vendor once you’ve closed out the contract. The seller rating system allows other project managers and managers in your organization to query the system to check on vendors before they create contracts for new work and services.
CompTIA Project+ Exam Highlight: Planning Processes
As you might have expected, there are loads of CompTIA Project+ exam objectives covered in this chapter. The common theme you can use for your exam is that there are knowledge areas, and each knowledge area gets its own project management subsidiary plan in predictive projects: scope management plan, schedule management plan, cost management plan, quality management plan, human resource plan, communications management plan, risk management plan, stakeholder management plan, process improvement plan, and the procurement management plan—the final plan is the complete project management plan, and that’s from project integration management. Adaptive projects plan, but not to the same depth as a predictive project. Let’s look at the exam specifics covered in this chapter.
1.3 Given a scenario, apply the change control process throughout the project life cycle Changes are likely to happen within a project regardless of the project manager’s best efforts to create an accurate project scope statement. Changes can result from errors and omissions, value-added objectives, external events, and changes from risk events. In a predictive project, when changes are proposed, they move through the project’s change control system as a documented change request to be reviewed, evaluated, and approved or declined. Every change to project scope should also move through configuration management to determine the change’s effect on the features and functions. You’ll also need to use project integrated change control to determine the change’s effect on the entire project. Adaptive projects welcome change, and the product owner approves and prioritizes the changes in the product backlog.
1.4 Given a scenario, perform risk management activities Risk is an uncertain event that can have a positive or negative effect on the project’s ability to reach its objectives. The risk management plan defines how risks will be identified, how qualitative and quantitative analysis will happen, and how the risks will be monitored and controlled. The risk management plan also defines the scales of probability and impact and instructs the project manager and team on how the risk contingency reserve and risk responses should be created. The risk register records the status of both positive and negative risk events.
1.5 Given a scenario, perform issue management activities Issues are risk events that have happened. Issues are communicated, discussed, and recorded in the project’s issue log for resolution. All issues are assigned an issue owner to manage the issue, and there is usually a deadline to resolve the issue in the project. Some issues are of greater importance than others based on the severity, project impact, and urgency for resolution. During project planning, the issue log and its rules are created and communicated for the project team. In an adaptive project, issues are known as impediments or blockers and the project manager, or scrum master, is responsible for resolving those issues.
1.6 Given a scenario, apply schedule development and management activities and techniques The project schedule is based on the WBS and the activity list it creates. The activities that you map out in a project network diagram will create the benefits and deliverables the project scope promises. The resource requirements are the people, materials, tools, and facilities that you’ll need to complete the project scope. The project schedule uses constraints, hard and soft logic, and duration compression techniques to map the project work to the project calendar or milestone chart.
The exam objective includes PERT, the Program Evaluation and Review Technique, which is useful in time and cost estimating. It also includes use of a Gantt chart. A Gantt chart maps the project objectives to a network diagram, and then that network diagram is applied to a project calendar. The Gantt chart helps the project team visualize when the project work will take place with the consideration of holidays, weekends, and other pauses in the project execution. Finally, this objective includes the critical path method, float, and the examination of what project activities can be delayed given their predecessors and successor activities. You also learned about GERT, for projects that require branching and loopbacks, and the critical chain method, for considering the availability of project resources as indicated by the project network diagram.
1.7 Compare and contrast quality management concepts and performance management concepts Quality is achieved by defining the quality metrics, planning quality into the project, and then inspecting the project deliverables to ensure the existence of quality. Quality assurance is the plan to do the work properly the first time, while quality control is the inspection of the work to prove the results of quality. Quality expectations should be established as part of the project requirements so that the project manager and the project team know what they are supposed to be aiming toward. The quality management plan defines quality assurance and quality control for the project.
1.8 Compare and contrast communication management concepts Much of the project manager’s time is spent communicating with project stakeholders—internal and external to the project. The project communications management plan defines who needs what information, when the information is needed, and the modality by which the information should be delivered to the stakeholder. The CompTIA Project+ exam will also test you on how best to communicate with the project team and other stakeholders. This includes the idea of ad hoc meetings versus planned meetings, face-to-face communications, communicating with virtual teams in your project, and even communication approaches such as social media.
1.11 Explain important project procurement and vendor selection concepts Procurement is a pretty common activity in most projects, and the procurement management plan directs these processes. In this chapter, we discussed the procurement planning process and the creation of exploratory documents such as the RFI, RFQ, IFB, and the RFP. You remember those documents, right? We also talked about the vendor response, the types of contracts that your project may use, and how an organization could use a memorandum of understanding prior to the actual contract being written. The contract that is signed by both parties may include a nondisclosure agreement, a statement of work for the contracted portion of the project, warranty information, and certainly payment terms, such as a purchase order.
2.3 Given a scenario, perform activities during the project planning phase This entire chapter is all about planning how the project should operate, the factors, regulations, and conditions that may affect the project, and how the project manager and team will perform. During project planning you’ll address the project scope, schedule, cost, quality, human and physical resources, communication, risk, procurement, and stakeholder management. Planning is not a one-time event but happens throughout the project as the project conditions warrant. You’ll shift from project execution, project monitoring and controlling, and project planning, as needed, throughout the project. There is no set rule or magic potion as to what you should do next, but each condition, organization, and project event should guide you through planning, execution, and control.
3.1 Given a scenario, use the appropriate tools throughout the project life cycle We discussed several tools that you can use during project planning to better plan and manage the project work. In this chapter, you learned about the Gantt chart, project network diagram, and milestone charts and how they can help you and stakeholders visualize the flow of the project work. This chapter also introduced the issue log, change log, risk register, and risk report to record and communicate risk and issues throughout the project.
4.2 Explain relevant information security concepts impacting project management concepts All projects must consider the security requirements of the project and the organization. Depending on the type of project work, the project management plan should address the physical security, operational security, digital security, data security, and the organizational security policy and restrictions. IT projects often interact with systems and data that not everyone should have access to view. You must plan for (and remain) in compliance with organizational security practices and requirements.
Chapter Review
The project management plan is really a collection of project management documents and subsidiary project plans. You’ll need loads of documentation to help your project move from initiation to closing, and you can expect the plan to evolve as the project rolls along. Each plan in the project follows the project management life cycle: plan, execute, monitor and control, and then close that knowledge area. While each plan is separate, the project integration management ensures that all of the plans work together for the betterment of the project.
You could argue, and I think correctly, that much of the project plan begins with the project scope. You have to know what the project aims to accomplish before you can plan how to achieve your project objectives. One of the most important parts of project planning is to create the project’s scope management plan and scope baseline. Recall that the scope baseline is really three separate documents: the project scope statement, the WBS, and the WBS dictionary. These three documents serve as a guideline for all future project decisions.
Once you’ve created the WBS or product backlog, you can define the activity list, and once you put the project activities in the correct sequence, they should happen in that order. By using the precedence diagramming method, you and your project team can map out the entire project from the start to the end. Once you’ve created the project network diagram, you can implement schedule compression, if needed, by designating tasks that may run concurrently or be completed faster with additional resources. This is also the fun process of finding the project’s critical path, float, and opportunities to improve the project performance on schedule.
You’ll also need to consider the cost of the resources your project needs. The cost management plan defines how costs will be estimated, budgeted, and controlled. Your organization may have an approach that you have to follow with cost management—though there are some common principles you’ll use as a project manager. Associated with project costs is project risk. Risks can affect both project costs and the project schedule, so a risk management plan is needed to identify, analyze, and respond to risk events.
As a project manager, you will focus primarily on getting things done, but you’ll need two important skills: managing the project team and communications. Your project team will look to you to provide the resources, training, and leadership so that they can complete their assignments. You’ll need project communications planning to ensure that you’re communicating the right information, to the right people, at the right time, and in the right manner. Your human resource plan and the project communications management plan are needed for these skills.
The final plan you’ll create as part of your project management plan is the procurement management plan. This plan defines how the project may purchase the goods and services it needs to complete the project objectives. The procurement management plan directs the decision to purchase, the vendor selection, the contract types that you’re allowed to use, and the administration of the contract once you’ve reached a deal with the vendor.
Creating the project plan is a type of alchemy. Adequate research, technical skills, and the ability to use logic and reason are required to create a solid, consistent plan for the project team, management, and the project manager to follow. Patience and vision are two attributes of a successful project manager. Just ask Noah.
Exercises
These exercises allow you to apply the knowledge you have learned in this chapter and are followed by possible solutions.
Exercise 6-1: Create a Project Network Diagram
In this exercise, you will create a project network diagram for a fictional company named Donaldson Investments and Holdings. You will be given the core information on the project and then create the diagram based on the information supplied. This is based on the WBS you examined in Chapter 5.
As you have learned, the creation of a PND can be a long and tedious process. If during this exercise you need some prompts to create the PND, you can refer to the Network Diagram Worksheet file in the accompanying online resources. (If you need assistance accessing this file, please refer to Appendix C.) The worksheet has key tasks completed to help you develop the PND.
The worksheet has key assignments completed to coach you through the creation of the diagram. If you would prefer not to use the worksheet to receive any coaching, you can create your own network diagram.
Scenario: Jennifer is the project manager for Donaldson Investment and Holdings. The project is an implementation of a new mail server and the mail clients on all of the workstations. Here is the project’s task list. To organize your PND, begin by mapping out the network diagram by identifying the sequence of tasks and the relationship between tasks.

Exercise 6-2: Create a Risk Contingency Reserve
Another part of project planning is to evaluate the project risks and determine the risk contingency reserve. The following is a simple risk matrix where a few risks have been identified, their probability has been predicted, and their impact on the project has been assigned. Your job is to calculate the risk event value for each risk event and then to predict this project’s risk contingency reserve. Remember that both positive and negative risks must be accounted for.
To complete this exercise, multiply the value of the probability by the impact of the risk for the risk event value. The sum of the risk event values will represent the project’s risk exposure, and the inverse amount of the risk exposure is the needed contingency reserve.

1. What is the project’s risk exposure?
2. What is the needed contingency reserve?
3. What risks have a greater impact than the total contingency reserve?
4. What should you do with these risk events that have a higher impact than the contingency reserve?
Exercise Solutions
The following offer possible solutions for the chapter exercises.
Exercise 6-2: Create a Risk Contingency Reserve
The following table is the completed risk contingency reserve. You can find this by multiplying the probability and the impact for the risk event value. The sum of the risk event value is inverted to reveal the risk contingency reserve needed for the project.
1. The project’s risk exposure is −$27,800.
2. The needed contingency reserve is $27,800.
3. Risks associated with delays from the vendor and data loss have a greater impact than the total contingency reserve. Delays from the vendor will cost the project $28,000, and data loss could cost the project $35,000.
4. The risks of vendor delays and data loss can be combated with mitigation to reduce the probability and/or impact of the events. If these events happen, they’ll have a strong adverse effect on the project’s ability to maintain costs. It’s often more cost effective and time effective to spend more to alleviate these types of risks through mitigation than to allow the risks to exist within the project.
Questions
1. You are the project manager for your organization and are creating the project schedule. You know that a project schedule is composed of all the following components except for which one?
A. The network of all of the tasks within the project
B. The assignment of resources
C. The budget for the project
D. The reflection of the WBS
2. Juan is the project manager for his organization, and he’s creating the project management plan. He is reviewing the project scope baseline with his project team so that they’ll understand the requirements and direction of the project. Which of the following is the correct definition of the project scope baseline?
A. It is all the work, and only the required work, to meet the project objectives.
B. It is the combination of the project scope statement, the WBS, and the WBS dictionary.
C. It is the combination of the project requirements, the project scope, and the WBS.
D. It is the consideration of the project requirements, assumptions, and constraints that affect the project planning.
3. You are the project manager for your organization, and you’re creating with your project team the project management plan. Which project management plan defines how the project deliverables will be inspected by the project team?
A. Process improvement plan
B. Scope management plan
C. Risk management plan
D. Quality management plan
4. Which project management plan defines integrated change control?
A. Quality management plan
B. Scope management plan
C. Change control plan
D. Risk management plan
5. You are the project manager for your organization. Management has approved the project scope, and they’ve asked you and your project team to begin creating a project network diagram. What is a project network diagram?
A. An expansion of the WBS
B. An expansion of the Gantt chart
C. A sequential mapping of the project work
D. A topology of a project phase
6. You are the project manager for your organization, and you’re working with your project team to create the WBS. You and the project team are examining each deliverable of the project and are subdividing the deliverables into smaller elements. Once you’ve created the WBS, what document can you create next in your project planning?
A. Activity list
B. Project network diagram
C. Risk management plan
D. Schedule management plan
7. You and the project team have identified the critical path and are now reviewing the available float in your project network diagram. All of the following statements about float are incorrect except for which one?
A. Every project will have float.
B. Only complex projects will have float.
C. Float is the amount of time an activity can be delayed without increasing the project costs.
D. Float is the amount of time an activity can be delayed without causing the project to be late.
8. You are the project manager for your organization and have been assigned a new project team. Many of the project team members haven’t worked with each other before, so you elect to do some team-building exercises to help the team learn to trust one another. What project management plan defines this process of team development?
A. Project management plan
B. Quality management plan
C. Team leadership plan
D. Project human resource plan
9. What law states that work will expand to fill the amount of time allotted to it?
A. Law of Diminishing Returns
B. Moore’s Law
C. Parkinson’s Law
D. Murphy’s Law
10. You are the project manager of a web server and website upgrade. You have assigned one employee the task of creating the web pages and another employee the task of developing the web pages. The two can begin work on their assigned tasks at the same time. What type of relationship do these tasks have?
A. FS
B. SS
C. FF
D. SF
11. Philippe is the project manager of a network upgrade. All of the client workstations are to be replaced, and this task has been assigned to Steve, Haroun, and Beth. Once the physical workstations are in place, Matteo will release an automated script to deploy an operating system to each of the new workstations. What type of relationship best describes these two tasks?
A. FS
B. SS
C. FF
D. SF
12. You are the project manager of the NHQ Project and are working with your team to create risk responses. One risk, managing an electrical component in your project work, is deemed too dangerous to handle internally, so you and the project team elect to hire a vendor to manage this portion of your project. What type of risk response is this?
A. Sharing
B. Mitigation
C. Avoidance
D. Transference
13. Why should a project manager avoid assigning specific dates to tasks when at all possible during the creation of the network diagram?
A. Dates cannot change; tasks can.
B. Dates require the activity to happen at a specific time.
C. Tasks assigned to dates do not consider successor tasks.
D. Tasks assigned to dates do not consider both successor and predecessor tasks.
14. You are the project manager for your organization and are about to begin the procurement process. You have decided that you want the vendors to provide a fixed price for the materials your project will need. You create the SOW for the work. What other document should you send to the vendors?
A. RFP
B. RFI
C. IFB
D. PO
15. Why must lag times be scheduled between tasks in a project network diagram?
A. Lag times allow the team to take a break.
B. Lag times reflect instances when task overruns are anticipated.
C. Lag times reflect weekends and holidays.
D. Lag times allow other events to be completed before successor tasks can begin.
Answers
1. C. While the project budget is important, it is not part of the project schedule. A project schedule is the compilation of all of the tasks to be completed within a project and the assignment of resources, and it should reflect the entries of the WBS. If you are using Microsoft Project, then you can streamline your efforts, as Microsoft Project will allow you to create the network diagram and work toward the WBS.
2. B. The project scope baseline is composed of three documents: the project scope statement, the WBS, and the WBS dictionary. These three documents serve as the guideline for all future project decisions.
3. D. Quality control is the process that requires the project team to inspect the project work for the existence of quality. The quality management plan defines how quality control should be used, how errors are managed, and what techniques will be implemented.
4. B. The scope management plan defines how changes to the project scope may be allowed to enter the project. When a change is proposed, the project manager, the change control board, and even the project team will examine the change to see its effect on the entire project.
5. C. A project network diagram is a fluid mapping of the entire project, not just one phase.
6. A. Once you and your project team have created the WBS, you can then create the activity list. The activity list is based on the work packages; recall that work packages are the smallest item in the WBS.
7. D. Float is the amount of time an activity’s completion can be delayed without delaying the project end date. Not every project will have float, though most projects do—including simple or complex projects.
8. D. Team development is part of the project human resource plan. It’s essential for project team members to learn to trust one another, work well together, and become a cohesive team unit for the execution of the project.
9. C. When project team members and project managers add time to their time estimates, they’ll likely succumb to Parkinson’s Law: work expands to fill the time allotted to it.
10. B. These tasks have SS dependency, which means “start to start.”
11. A. The tasks involving the replacement of workstations must be completed before the script can run; the dependency is FS, or “finish to start.”
12. D. The best answer to this question is the transference risk response. You have transferred the risk of the dangerous electrical work to a vendor to manage for you. When you do transference, you’re usually hiring someone and there’s a fee associated with the risk response.
13. D. Tasks assigned to dates do not consider successor and predecessor tasks. This becomes a huge problem when upstream tasks are delayed by several days; the task assigned to a specific date does not change to reflect the changes of the tasks upstream. Whenever possible, do not assign tasks to a specific date. Examples of assigning tasks to specific dates can include when a particular resource is available or a consultant is scheduled to be present.
14. C. When you want the vendors to provide a fixed fee for their services or materials, you ask for a bid or quote. In this example, you’d send an IFB—an invitation for bid document—also called a request for bid (RFB).
15. D. Lag time is waiting time and can be used to allow other events to be completed before successor tasks can begin. For example, a dependent task is to mail a survey to all of the network users. Before the successor task, analyzing the user surveys, can happen, there must be time allotted for the users to respond to the survey. It’s not an actual task, but it still requires times within the diagram.