
CHAPTER 17
VC-1
VC-1 (Video Codec 1) is the SMPTE designation for its standard 421M based on the Windows Media Video 9 codec. As an international standard, a full description of the bitstream is available, as well as conformance test files, and source code for reference encoders and decoders.
VC-1 is one of the Big Three codecs offered as an international specification and available for license from the MPEG Licensing Authority (MPEG-LA). While different codecs dominate in different industries, in general modern ASIC decoding hardware supports all of MPEG-2, H.264, and VC-1.
Why VC-1?
Windows Media Compatibility
The biggest reason VC-1 is used is that it’s the best codec in Windows Media, and hence the best way to deliver video to out-of-the-box Windows PCs.
Quality@Perf
VC-1 was designed to offer excellent efficiency along with good decoder performance, particularly on the x86 processors that run Windows. Thus, assuming equally good decoders, maximum complexity VC-1 has about only half the CPU requirements of H.264 High Profile.
VC-1 performance is a lot more predictable; knowing the profile@level, frame size, and bitrate, it is possible to make a pretty accurate estimate of playback for a particular decoder. Of course, H.264 has a lot of latitude for tuning between compression efficiency and decode complexity.
For devices, VC-1 Main Profile can often retain better detail than H.264 baseline for mobile device encodes.
Smooth Streaming
The Smooth Streaming Encoder SDK is a VC-1 implementation highly and specifically tuned for Smooth Streaming that provides better encoding time, visual quality, and decoder performance. The techniques it uses (described later) could certainly be applied to H.264, but until a similar H.264 implementation is created, SSE SDK’s VC-1 output will generally outperform H.264 for Smooth Streaming.
CineVision PSE
CineVision PSE is Sonic Solutions’ high-end Blu-ray encoding product, developed with Microsoft. Beyond including a great VC-1 implementation, it also offers industry-leading dithering quality and a compressionist-tuned workflow for segment re-encoding. Many Bluray compression facilities prefer CineVision PSE and so encode VC-1.
Why Not VC-1?
Compression Efficiency Paramount
When both H.264 High Profile and VC-1 Advanced Profile decoding is available and decode complexity isn’t a concern, the best H.264 encoders can outperform the best VC-1 encoders.
Licensing Costs
VC-1 is licensed by MPEG-LA, and has very similar terms—see H.264 page 227 for details. So, any concerns with H.264 fees would apply to VC-1 as well. The only significant difference is the current agreement is in force until 2012 instead of 2010.
What’s Unique About VC-1?
VC-1 can be thought of as a continuation of the H.261, H.263, MPEG-1, MPEG-2, and the MPEG-4 part 2 codec philosophies, with the goal of adding the maximum improvements in coding efficiency without unduly increasing decoder complexity. To that end, the new techniques it adds not in older codecs are focused on improving compression efficiency in ways minimizing increases in decoder complexity. In general, VC-1 requires about twice as much CPU power per pixel per second as MPEG-2, while requiring half or fewer the bits to achieve the same quality level in many typical uses. The spec runs to hundreds of pages, so I’m just going to focus on a few of the more unique or user adjustable aspects of VC-1.
Adaptive block size
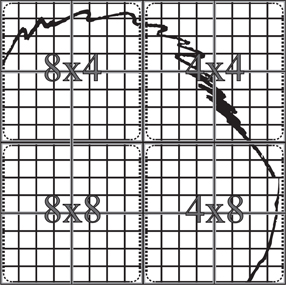
VC-1 was the first codec to introduce variable block size, and still has the deepest implementation of it. VC-1 uses the standard 8 × 8 DCT for intra-coded macroblocks, and adds 4 × 4, 4 × 8, and 8 × 4 blocks for motion vectors. By using smaller blocks on areas of rapid change, less ringing and blocking is produced than when only 8 × 8 blocks are used, and by using bigger blocks on smoother areas, more efficient encoding is delivered.
Figure 17.1 The variable motion vector block structure of VC – 1. A single macroblock can mix sections of four different block types.
16-bit integer iDCT
One big problem with MPEG-1/2 and MPEG-4 part 2 is their use of floating-point math in its DCT. Because different floating-point implementations can have slightly different results, different decoders could reconstruct a particular frame with slight differences. But that slight difference would get exaggerated each time a slightly off result was used as the reference for further frames resulting in noticeable image drift. Also, floating-point calculations are more expensive in silicon, and thus are ill-suited to implementation on very low-power devices, particularly in software.
Instead, VC-1 uses a 16-bit integer variant of DCT. While it serves the same function, there is a single correct result for each calculation, so no decoders have drift. It’s also much easier to implement on processors without floating-point support.
Quarter-pixel motion estimation
Like MPEG-4 ASP, VC-1 added quarter-pixel motion estimation, to more accurately code subtle and slow motion between frames. The MPEG-4 implementation wasn’t particularly efficient and is often not used, but the VC-1 implementation is improved, and is almost always used.
Overlap transform
The Overlap transform reduces blocking artifacts by smoothing the borders between adjoining intra coded blocks with high quantization. This offers some of the value of in-loop deblocking at very little computational cost (it’s even available in Simple Profile). Overlap isn’t used for motion-predicted blocks, and is automatically turned off at low QP where it’s not needed. VC-1 is the only major interframe codec that supports Overlap transform; the other place it’s seen is the experimental Dirac wavelet-based codec.
Overlap can soften the image slightly, and so isn’t used in very high bits-per-pixel encodes like for Blu-ray.
In-Loop Deblocking Filter
VC-1’s in-loop deblocking filter softens the border between two motion-estimated blocks proportional to their quantization. So it has little effect on lightly compressed content, but can help reduce blocking quite a bit for more compressed frames. It is called “in-loop” deblocking because future frames are predicted from the deblocked version, reducing the propagation of compression artifacts forward. It’s more complex than Overlap, and is therefore off in Simple Profile. Overlap and In-Loop are complementary, and are used together in most Main and Advanced encodes.
One of the biggest differences between H.264 and VC-1 is in the strength of the in-loop deblocking filter. H.264’s is stronger, and so it does a better job of reducing blocking, but is more expensive to process and can also smooth out detail more at moderate bitrates, particularly in Baseline profiles.
The same highly-compressed frame encoded with (A) In-loop deblocking and Overlap off, and (B) on. These deblocking features can for a healthy reduction in blocking artifacts.
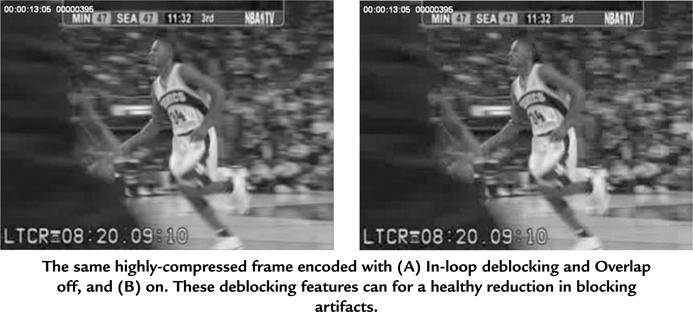
Figure: In-Loop On/Off
Intensity compensation
Intensity compensation modify the overall brightness level of a frame, which makes compression of fades to or from black or white much more efficient than with past codecs.
Dynamic resolution change
VC-1 offers the ability to dynamically change frame size in the bitstream, so harder-to-encode scenes can be encoded at a smaller frame size to avoid strong artifacting. In Main Profile only 2x scaling is allowed, so a 640 × 480 stream could only throttle down to 320 × 240 if needed. In Advanced Profile, any legal resolution can be chosen per GOP; even pixel aspect ratio can be changed. This is a key feature in the new Smooth Streaming Encoding SDK.
Unfortunately, some hardware decoders using DXVA aren’t capable of smoothly handling dynamic resolution changes midstream, leading to some flashing or other visual distortions. The feature shouldn’t be used in generic WMV files, since they may be played on an incompatible system.
WMV and VC-1 FAQ
Is VC-1 The Same as Windows Media Video 9?
Yes: VC-1 is the SMPTE standardized version of Windows Media Video 9. The output of of a VC-1 encoder is bitstream compatible with a Windows Media Video 9 decoder that supports the profile, level, and features used.
Is VC-1 The Same Thing as WMV?
The VC-1 spec just defines the video bitstream; it doesn’t cover the ASF file format (used in .wmv and .wma) or any WMA codec. VC-1 Advanced Profile can be stored in other file format wrappers, including MPEG-4 (standard or fragmented, the latter used for Smooth Streaming) and MPEG-2 transport stream (as used on Blu-ray or IPTV). Only VC-1 Advanced Profile has format independence; VC-1 Simple and Main profiles are only supported in WMV files.
Can I Use Expression Encoder to make Files That Play in Windows Media Player 9?
Yes, absolutely. VC-1 Main Profile is identical to the old Windows Media Video 9. A Windows Media file you make using VC-1 Simple and Main will work perfectly in WMP 9 out of the box. A stock XP Service Pack 2 machine that hasn’t been updated in years would play it without issue.
Will Users Have to Install An Update If I Encode with VC-1?
No. Everyone with Windows Media Player 9 or higher can play VC-1 Simple and Main Profile already. Windows Media Player 11 can play Advanced Profile as well. Users of WMP 9 or 10 will be prompted to install a VC-1 Advanced Profile decoder if they try to play a WMV file using that. All Vista and Windows 7 systems shipped with full VC-1 Advanced Profile support, so the only issue is XP users who haven’t installed WMP 11 or the updated decoder.
Can I Encode for Blu-ray from Windows Media Encoder or Expression Encoder?
Since Windows Media Video 9 Advanced Profile is the same as VC-1 Advanced Profile, and VC-1 AP is supported on Blu-ray, one might think you could encode Blu-ray compatible stream in Windows Media Encoder. Alas, no. There are specific technical constraints for Blu-ray VC-1 that WME and the Windows Media Format SDK weren’t designed to support. The VC-1 Encoder SDK was designed with optical discs in mind, and can produce Blu-ray-compatible VC-1 elementary stream with products that expose it. Expression Encoder 3 doesn’t do elementary streams, but Rhozet’s Carbon Coder 3.12 and higher do. The primary product used for making VC-1 on Blu-ray is CineVision PSE.
How do Windows Media Video 9 and VC-1 Profiles relate?
The details are in Table 17.1.
Table 17.1 VC-1 Profiles and Windows Media Video 9.
| VC-1 Profile | Windows Media codec | WME Decoder Complexity | Four Character Code (4CC) | Introduced with… | Downlevel to… |
| VC-1 Simple Profile | Windows Media Video 9 | Simple | WMV3 | WMP 9 | WMP 6.4 |
| VC-1 Main Profile | Windows Media Video 9 | Main | WMV3 | WMP 9 | WMP 6.4 |
| Windows Media Video 9 | Complex | WMV3 | WMP 9 | WMP 6.4 | |
| Windows Media Video 9 Advanced Profile (original) | WMVA | WMP 10 | WMP 9 | ||
| VC-1 Advanced Profile | Windows Media Video 9 Advanced Profile (SMPTE compliant) | WVC1 | WMP 11 | WMP 9 |
What was Complex Profile?
Windows Media Video 9 originally had three profiles: Simple, Main, and Complex. Simple and Main are the same as the VC-1 Simple and Main Profiles. Complex was deprecated, and replaced by Advanced Profile. As Complex isn’t part of the VC-1 spec, it will normally only work on decoders from Microsoft, or based on Microsoft’s porting kit implementations. Even if you have a product that can encode Complex Profile, don’t use it. Beyond the lesser compatibility, it hasn’t been tuned in ages, and will offer lower-quality and lower decoder performance than modern Main and Advanced Profile implementations.
What’s the Difference between WMVA and WVC1?
There were two flavors of Windows Media Video 9 Advanced Profile. The first, with a “WMVA” 4CC, was introduced with WMP 10 and used as the basis for VC-1 AP. But some changes were made in the final specification that kept it from being entirely compatible. An updated SMPTE VC-1 compliant version of Windows Media Video 9 Advanced Profile was introduced with WMP 11, using a “WVC1” 4CC was introduced with WMP 11, and that is what should be used.
Anyone wanting to make the real “WVC1” WMV 9 Advanced Profile needs to have Format SDK 11 installed (the easiest way is to install WMP 11), use a VC-1 Encoder SDK based product like Expression Encoder 2, or use another updated app like Flip4Mac or Episode. This is mainly an issue with running Windows Media Encoder on Windows Server 2003, which only supports up to Format SDK 9.5.
If it’s the Same Codec, Why are There Different Windows Media Video 9 and VC-1 Encoders?
All that said, there is one last practical difference between WMV 9 and VC-1: encoders that call it VC-1 are normally based on the newer, faster, higher-quality, and more flexible VC-1 Encoder SDK. This isn’t about a change in the codec standard, just the usual improvement of encoder implementations over time, like we saw with the Format SDK 9, 9,5, and 11 releases, and will be seeing again in future releases.
VC-1 Profiles
Main Profile
We start with Main Profile because it’s the mainstream choice for WMV files. If you’re looking for classic WMV playback on the web or desktop, it’s really all you need. There are three main features available in Advanced missing from Main Profile (described in detail in the “Advanced Profile” section):
• Interlaced coding
• Transport independence
• Differential quantization on I-Frames (P and B DQuant are supported in Main)
Only I-frame DQuant matters at all for typical WMV use.
Most tools default to Main Profile over Simple Profile, as they should; 99 percent of “Windows Media Video 9” content is Main Profile.
Simple Profile
VC-1 Simple Profile is a pared-down verison that leaves out some computationally expensive features to decode. The significant features it leaves out from Main Profile are:
• In-loop deblocking filter
• B-frames
• Motion search range beyond 64 pixels horizontally and 32 pixels vertically
• Differential quantization
• Intensity compensation
Honestly, unless you’re targeting mobile phones that only have software decoding, Simple Profile is probably not needed. There aren’t any Simple Profile–only decoders in the wild, and the simplification of Simple Profile means higher bitrates are needed to achieve the same quality. A phone that can only do Main Profile at 200 Kbps may be able to do Simple at 300 Kbps, but Simple is unlikely to look that much better.
Advanced Profile
Advanced Profile (AP) VC-1 adds two major and one minor feature over Main Profile, as mentioned earlier.
Transport independence
What’s turned out to be the most-used feature of AP is transport independence. Simple and Main Profile were created to live inside the ASF format, and therefore work natively only inside a WMV. There have been various hacks around that in special cases, but nothing that’s been either satisfying or broadly supported.
With AP, the codec was designed to support arbitrary file types, and there are official VC-1 mapping standards for a variety of common file formats. The notable non-ASF formats include the following:
• VC-1 elementary stream. This is a .vc1 file that is just the binary video stream, equivalent to an .m2v file. This is what is produced by Blu-ray VC-1 compression tools and imported by authoring/mux tools.
• MPEG-2 Transport Stream, as used in digital broadcasting (IPTV, ATSC, DVB, etc.) and Blu-ray discs.
• MPEG-2 Program Stream, as was used in HD DVD.
• MPEG-4 Program, as used in typical .mp4 files.
• MPEG-4 Program in fragmented mode, as used in Smooth Streaming.
Interlaced coding
AP added a native interlaced mode for VC-1. Similar to the MPEG-2 implementation, each frame can be either progressive or interlaced, and each 16 × 16 block can be either progressive or interlaced.
While not widely used outside of Blu-ray, the VC-1 interlaced format offers good efficiency. For example, encoding 480i30 content as interlaced and then performing a bob deinterlace on playback to 480p60 can be done at about 30 percent lower bitrate with the same quality as bobbing source to 480p60 and encoding as that.
The Windows Media [Pipeline supports this bob deinterlacing, but on XP and Vista it’s off by default for Windows Media Player and needs to be turned on with a registry key (Figure 17.2). Interlaced video simply doesn’t play in Silverlight. Thus interlaced VC-1 is really only useful with Windows 7, custom applications, and hardware devices with interlaced support, like Blu-ray.
Figure 17.2 Turning on Windows’ automatic deinterlacer for interlaced VC-1 playback.
Differential quantization on I-frames
One of the VC-1 developers cited this as his most regretted omission from Main Profile, simply because there wasn’t any technical reason not to have it. Main Profile can apply Differential Quantization (also called DQuant; the ability to apply different levels of compression to different macroblocks in a frame) to P and B frames, but not I-frames. DQuant can be useful, particularly in reducing blocking and preserving detail in smoother areas of the image. The current VC-1 DQuant implementations are tuned for very high bitrates, so this omission isn’t broadly applicable to web-rate content today. However, for scenes with smooth gradients that would otherwise get visibly blocky, DQuant just on I-frames can provide a good reference for all the frames of the GOP. And while it does increase the bitrate of the I-frame, with longer GOPs that won’t significantly reduce bitrate of other frames.
Levels in VC-1
Like other standardized codecs, VC-1 specifies levels within each profile that determine maximum bitrate, frame rate, and other parameters (see Table 17.2). Actual devices rarely map to these profiles directly, instead supporting subsets. For example, the second- and third-generation Zune players support Main Profile at Medium Level resolutions, but with a lower maximum bitrate of 3 Mbps (more than sufficient for progressive standard def content).
Table 17.2 Profiles and Levels in VC-1.
| Profile | Level | Maximum Bit Rate | Max Resolution/frame Rate Combos |
| Simple | Low | 96 Kbps | 176×144p15 |
| Simple | Medium | 384 Kbps | 240×176p30 352×288p15 |
| 352×288p15 | |||
| Main | Low | 2 Mbps | 320×240p24 |
| Main | Medium | 10 Mbps | 720×480p30 |
| 720×576p25 | |||
| Main | High | 20 Mbps | 1920×1080p30 |
| Advanced | L0 | 2 Mbps | 352×288p30 |
| Advanced | L1 | 10 Mbps | 720×480p/i30 |
| 720×576p/i25 | |||
| Advanced | L2 | 20 Mbps | 720×480p60 |
| 1280×720p30 | |||
| Advanced | L3 | 45 Mbps | 1920×1080p24 |
| 1920×1080p/i30 | |||
| 1280×720p60 | |||
| Advanced | L4 | 135 Mbps | 1920×1080p60 |
| 2048×1536p24 |
Where VC-1 Is Used
Windows Media
VC-1, as Windows Media Video 9 or Windows Media Video 9 Advanced Profile, has been the primary video codec in Windows Media since the 9 Series launch in 2003. Main Profile dominates Windows Media use, mainly because the additional AP features aren’t all that useful, nor are the performance improvements of SP meaningful to most scenarios.
Smooth Streaming
Smooth Streaming is a new media delivery technology for Silverlight. There are lots more details in Chapter 27, but from a content creation perspective, the critical fact is that Smooth Streaming can dynamically switch between different video streams at different data rates. Seamless switching is done by requesting a new chunk of video every few seconds, assembling video and audio streams from those, and then feeding a constant bitstream into the decoder. There are a few requirements to enable this seamless switching:
• Each chunk of video needs to start with a sequence header indicating frame size and frame rate.
• They need to start with a closed GOP, so there are no references outside the chunk.
• All streams must start each chunks on the same frame.
Beyond that, there’s a huge amount of potential variability with chunks (whether in the same stream or different streams) being able to vary by the following:
• Frame size
• Frame rate (as integer multiples so the switching frames align)
• Data rate
• Aspect ratio
For products using the VC-1 Encoder SDK, Smooth Streaming compatibility will be delivered by following these settings:
• Closed GOP: On
• Adaptive GOP: Off
These settings ensure that all streams will follow the fixed cadence of the GOP length, not resetting based on scene changes. Expression Encoder 2 Service Pack 1, the first Smooth Streaming encoder, used this mechanism.
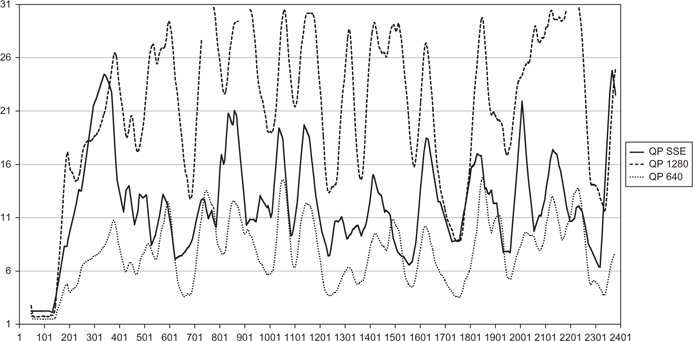
The Smooth Streaming Encoder SDK (SSESDK) produces Smooth Streaming–compatible content with dramatically better quality than VC1ESDK (Figure 17.3). In particular, the SSESDK will:
• Vary the GOP length to align with edits, instead of using a fixed cadence (typically an average of every 2 seconds with a maximum of 4 seconds)
• Use 2-pass VBR for each chunk for much better rate control and consistent quality
• Dynamically adjust encoded frame size per chunk based on image complexity, reducing frame size as needed to minimize objectionable artifacts. This includes aspect ratio changes, compressing the image along the primary axis of motion where motion blur would reduce detail anyway
Figure 17.3 How the Smooth Streaming Encoder SDK keeps QP more consistent by varying frame size, enabling easy sections to match the detail of 1280x, and the hard sections to match the low artifacting of 640x.
Variable Resolution: How It Works
One of the cool new features of Smooth Streaming is its abilty to vary the frame size used in a chunk based on the complexity of the video in that chunk. Variable Resolution takes advantage of Smooth Stream’s ability to have independent chunks, with no references to frames outside of that chunk. Since they’re independent, each can have its own sequence header, which defines the frame size, aspect ratio, frame rate, and other parameters. That was originally used to switch between streams at different data rates, but we later realized it could be used to switch parameters within a particular bitrate. Thus we could get out of normal encoding’s “one size fits all” approach of picking a frame size that’s neither too big for the hardest parts of the video nor too small for the easiest portion.
There are a lot of approaches that could be taken to determine what the resolution of a chunk should be, and I’m sure we and others will continue to tune it over time. But the basic concept is to keep quantization inside a given chunk from getting high enough for distracting artifacts, and instead picking the frame size that offers optimal quality.
Since only VC-1 Advanced Profile supports sequence headers, Main or Simple Profile output won’t use this feature. Lacking transport independence, they aren’t compatible with Smooth Streaming anyway.
Figure 17.4 A frame from the encode used in Figure 17.3, showing how lower resolution can produce better quality by preventing artifacts. Figure 17.4A is the full 1280 × 528, while 17.4B was down – rezed to 704 × 304.

Blu-Ray
VC-1 is one of the mandatory codecs in Blu-ray, along with MPEG-2 and H.264, with all players required to support it. VC-1 dominated the rival HD DVD format; and several studios used the same VC-1 encode for both formats.
One theoretical advantage of VC-1 on Blu-ray is that its better decoder performance would make playback in software easier. PC-based Blu-ray playback hasn’t caught on broadly, however, and most PCs that play Blu-ray are high-end models with GPUs capable of hardware acceleration of all three codecs.
The biggest advantage to VC-1 for Blu-ray has been the CineVision PSE encoding product available for it.
IPTV
VC-1 has been used in a number of IPTV deployments. There’s long been a spec for mapping VC-1 to the industry standard MPEG-2 transport stream wrapper. However, since any IPTV set-top box with VC-1 also includes High Profile H.264 decoders, the decoder complexity advantage of VC-1 isn’t meaningful. IPTV streams proper are largely converging on H.264 and the big market of broadcast-grade H.264 live encoders there.
VC-1 is more commonly used in the “over-the-top” content, delivered via cable broadband, but using more PC-like delivery technologies like Windows Media and soon Smooth Streaming.
Basic Settings for VC-1 Encoding
Most VC-1 implementations in the market are created by Microsoft or based on code licensed from Microsoft, so there’s more commonality in settings than with MPEG-2 or H.264, where different vendors can provide wildly different encoder modes and presentations thereof. So I’m able to offer more specific advice for VC-1 best practices than for the other major codecs.
Complexity
Complexity often gets forgotten and left at the product’s default, but it’s quite important. Complexity controls the tradeoff between speed and quality of the encode—each value is roughly 2x slower than the one below it, but can provide better quality at a given data rate. By default, Windows Media Encoder and many Format SDK apps default to a complexity of 4 for offline encoding and 1 for live encoding, a reasonable default when it shipped. But today’s dual-core laptops are many times more powerful than the biggest encoding box available back then. So a typical machine today should be able to do Complexity 3 for live 1 for 320 × 240 29.97 fps. And for offline, tuning of Complexity 3 in recent versions have given it nearly the same compression efficiency as 4, at about twice the speed.
As frame size and frame rate go up, complexity needs to come down on the same hardware. 720p30 at complexity 1 is quite doable on a quad-core Intel i7 system.
One key addition in the VC-1 Encoder SDK is Dynamic Complexity for live encoding, which automatically adjusts complexity in real-time to the highest the hardware can handle at any given moment, ensuring that quality is optimized without any frames dropped. This was introduced in Inlet’s Spinnaker and is supported in professional-grade live encoders from ViewCast, Winnov, Digital Rapids, Envivio, and Telestream. It is also included in Expression Encoder.
Recommendation: 3 for general use, 4 for high-quality offline encodes. As high as doesn’t drop frames for live encodes. See Figure 17.5.
Figure 17.5 The motion search ranges of VC – 1. For inside out: 64 × 32, 128 × 64, 512 × 128, and 1024 × 256. 512 × 128 might sounds like a huge area, but it gets pretty small when comparing two 1080p frames separated by two B – frames.

Buffer Size
The buffer size is the duration over which the data rate is averaged. For Windows Media, this is described in bitrate over time. For example, encoding with a peak of 200 Kbps with a 2-second buffer means that any 2-second chunk out of video needs to be 400 Kbits or less. Conversely, using a 10-second buffer with the same 200 Kbps bitrate means any 10-second chunk needs to be 2000 Kbits or less. But within that 2000 Kbits, there’s much more flexibility to reduce bitrate in easy parts and increase it in complex parts, delivering more consistent quality. The big drawback to large buffers is that they can increase the start-up and random access times. A 4-second buffer is a reasonable default for most content where latency isn’t a concern. While WME doesn’t expose it, buffer size can go down below 1 second in EE and some other tools for when very low latency is required.
Recommendation: 4–seconds if no other constraints, potentially lower for very low bitrates.
Keyframe Rate
Typically, your keyframe rate is going to be around your buffer size, since they both control latency and random access timing. Too frequent keyframes hurt compression efficiency, and can result in keyframe “pulsing” where there’s a visible change or “jump” in the image at every keyframe. A keyframe every 4–10 seconds is typical for streaming, with higher data rates using more frequent keyframes. Blu-ray has a maximum GOP duration of 1 second (2 for 15 Mbps or lower peak bitrates), and Smooth Streaming uses 2 on average and 4 as a typical max.
Recommendation: 4 seconds if no other constraints.
Advanced Settings for VC-1 Encoding
The various VC-1 SDKs have many options available for fine tuning. Some offer quality/speed tradeoffs beyond Complexity, others are only applicable for certain types of content and scenarios.
Setting these with the Format SDK requires setting registry keys, which is a pain, particularly for automation as each encode uses the state of the registry keys at the time its encode starts.
VC-1 Encoder SDK offers parameters via the API, making it easier to offer full control in a user interface.
The initial release of the Smooth Streaming Encoder SDK locks in most of the advanced settings, using the optimum choice for Smooth Streaming automatically.
GOP Settings
Number of B-frames
As discussed in Chapter 3, a B-frame is a bidirectional frame that can reference both the previous and next I- or P-frames. They are therefore more efficient to encode, and can be dropped on playback for scalability.
Turning on B-frames in VC-1 also allows flash compensation, where single-frame images (like those caused by strobe lights and camera flashes) get turned into intracoded B-frames (BI-frames; see Figure 17.6), functionally a form of I-frame (or keyframe) that will allow the following frame to reference the previous frame. Thus, a keyframe doesn’t have to get inserted after every flash. This dramatically improves quality for those parts of video, without any drawbacks. To get flash compensation, you’ll need to be using:
• 2-pass encoding, or 1-pass encoding with Lookahead on
• Number of B-frames at least 1
Figure 17.6 The GOP structure of VC-1 with a BI-frame.

I recommend setting at least 1 B-frame to enable those features. 1 is also the optimum value for the vast majority of content (contrasting with MPEG-2, where two B-frames are typically best). Rarely animation content without any noise is better with two B-frames, and two B is often better for 50/60p, and I’ve used up to four B-frames for screen recordings.
Random access times are proportional to the number of P-frames per GOP, so using more B-frames means that I-frames can be further apart while preserving the same random access performance.
Recommendation: 1.
Lookahead
The Lookahead parameter tells the codec to analyze and buffer a specific number of frames before deciding how to process them. This enables the codec to peek into the future and optimize frame type accordingly. Specifically, it enables some important 2-pass encoding features in 1-pass mode:
• Improves I-frame detection and selection in 1-pass encoding, reducing chances of getting a bunch of I-frames or no I-frames with a funky transition
• Enables flash compensation by setting a flash frame to be a BI-frame
• Enables fade compensation in 1-pass encoding by turning off B-frames during fades
The full Lookahead of 16 is recommended unless very low latency is needed. Even for lowlatency encodes, four frames of Lookahead can be quite useful.
Recommendation: On for 1-pass CBR or VBR, unless Lookahead Rate Control available.
Lookahead rate control
Lookahead Rate Control (LRC) is a mode in the VC1 Enterprise SDK that buffers ahead about half a second before allocating bitrate. This lets the codec provide much more consistent quality with content that varies a lot in complexity. It generally offers a quality boost beyond Lookahead, and should be used instead when available.
In the 2009 VC-1 implementations, LRC in 1-pass CBR typically produces better quality than 2-pass CBR (and is obviously faster to encode as well).
LRC also adds about a half-second of latency to the encode, limiting its utility for extremely low latency scenarios.
Recommendation: On if available for 1-pass CBR encoding.
LRC is turned on in Expression Encoder 3 if
• 1-pass CBR is being used
• GOP duration is less than 5 seconds
• Clossed GOP is On
Filter Settings
Noise reduction
Noise Reduction is just a simple filter to reduce video noise in the source. Ideally clean source footage will be used, but shooting in low light can get pretty noisy. Five levels of reduction are supported in FDSK—use the lowest one that makes the video clean enough; too high a level will make the video distractingly soft. VC1ESDK and thus EEv3 only has on/off for noise reduction, but it does a better job of preserving edges than the FSDK version. While upstream noise reduction can offer a lot more control and choice of mechanisms, the VC1ESDK version rarely degrades content, and is helpful when noise is pushing QP up to where visible artifacts are seen.
Recommendation: Off unless noisy source with no other noise reduction available.
Edge noise removal
The Edge Noise Removal filter attempts to blank out noise in the image typically seen around the edges of an analog video source. In particular, it’ll blank out the Line 21 (subtitle) dashed lines at the top of the screen. Again, it’s much better to have clean sources in the first place (a simple crop would be much better), but this feature is there in a pinch.
Recommendation: Only if enocoding a live source with no other way to crop.
Perceptual Options
In-Loop filter
The In-Loop deblocking filter should always be used for MP and AP, and isn’t available in SP. While it does have a slight impact on decode performance (perhaps 5 percent on modern players), it helps efficiency more than that, so you can get better quality at the same performance by using a slightly lower bitrate with In-Loop on than a higher bitrate with In-Loop off.
Recommendation: On.
Overlap filter
The Overlap transform isn’t as complex as the Loop filter, as it only applies to intra-coded blocks, and so is available in Simple Profile. However, it can sometimes reduce detail. Overlap is nearly always useful at web rates, but should be left off for encodes aiming for quality irrespective of bitrate. Overlap is automatically turned off below QP 4 regardless.
Recommendation: On.
Adaptive deadzone (ADZ)
This fearsome sounding feature allows the codec to sacrifice some detail in order to reduce artifacts. The Conservative mode is generally helpful for most content, and in particular can reduce blocking artifacts in shadows and other smooth areas. The Aggressive mode is theoretically useful to further reduce banding at challenging bitrates, but in practice almost always hurts the image more than it helps. Turning off ADZ can yield a more mathematically accurate compression, but rarely helps quality; as it’s an adaptive mode, the times it reduces detail are times where artifacts would otherwise likely intrude.
Recommendation: Conservative.
B-Frame Delta QP
B-Frame Delta QP specifies how much more to compress B-frames versus reference frames. As B-frames are discarded after playback, increasing B-Frame QP saves bits for I- and P-frames.
This can improve quality of the B-frames, as the saved bits are spent to improve the quality of the reference frames B-frames are based on. Beyond a certain point, there can be a visible change in image quality between frames, yielding a distracting “strobing.”
However, all current VC-1 implementations adaptively apply B-frame Delta QP from 0–2 based on the amount of motion in the frame. It’s only in special cases (again, like animation or screen recordings) that a different value would be any better. And with low-motion content, B-frames are already quite small.
Recommendation: Default/unspecified.
DQuant
DQuant is a form of perceptual optimization that varies QP across a frame, giving smoother parts of the image lower QP than more complex parts. This can help video quality, especially where there might be visible blockiness in smoother areas like gradients. This is particularly an issue with dark content as viewed on LCD displays.
The drawback to DQuant is that the bits it applies to the smooth areas are taken from the other parts of the image, increasing their QP. While the FDSK version is tuned for lower bitrates, VC1ESDK’s implementation was tuned for HD DVD and Blu-ray. While very effective at reducing blocking in flat areas, it uses so many bits doing so that the textured areas can look a lot worse. For 1080p24, it’s generally only worthwhile at average bitrates around 15 Mbps or higher. There was a much better implementation of DQuant introduced in CineVision PSE 2.1; hopefully it will make it into future VC-1 implementations. For web rate, if it is useful at all, it’s I-frame only for longer GOP content. That helps static parts of the image look good for the whole GOP referencing that I-frame, while only increasing bitrate on a single frame.
The default is Off (Table 17.3). Even in FSDK it’s best on be I- and P-frame only. This is a good compromise for much content, since the B-frames can be based on the DQuant’ed frames, but more bits don’t get spent on non-reference frames that are immediately discarded.
Table 17.3 DQuant Options.
| Options |
| Off |
| Apply to I-frame only |
| Apply to I- and P-frames |
| Apply to I-, P-, and B-frames |
DQuant method
The FSDK DQuant has a variety of modes (Table 17.4). If you’re using DQuant, most of the time you’re just fine using Regular mode. The Fixed QP modes are very bit-hungry, and not really suitable for typical Internet use. The Dark modes apply DQuant only to low luma levels, like shadow detail. The VC-1 Encoder SDK just has a simple on/off.
Table 17.4 DQuant Method Options.
| Options | Description |
| Off | No DQuant |
| Regular | Standard mode, most useful for lower-moderate bitrates |
| Fixed QP – Smooth | QP 2 for smooth areas |
| Fixed QP – Very Smooth | QP 1 for smooth areas (only mode in VC1ESDK) |
| Fixed QP – Dark | QP1 for dark areas |
| Regular – Dark | Regular DQuant applied only to dark areas |
| Adaptive | Newer mode only in CineVision PSE to date |
Recommendation: Off or I-frame only for VC-1 Encoder SDK, I P Regular for FSDK Advanced Profile.
Motion Estimation Settings
Motion search level
Motion Search Level (Table 17.5) controls whether and how color is included with motion search. Most previous codecs have done motion search purely in the luma (black-and-white) channel, just assuming that the chroma (color) channels follow along. Motion Search Level activates a separate chroma search, which can provide big improvements in quality and efficiency with highly colorful content, like motion graphics. The True modes apply chroma search to the whole frame; the Adaptive modes use it on the 50 percent of the macroblocks estimated most likely to benefit.
Table 17.5 Motion Search Level Values.
| Usage |
| Luma only |
| Luma with nearest-integer chroma |
| Luma with true chroma |
| MB-adaptive with true chroma |
| MB-adaptive with nearest integer chroma |
For absolute best quality, the True Chroma option delivers, but encoding can be up to 50 percent slower than the default luma-only mode. For decent speed and improved quality, Adaptive True delivers most of the value of chroma search, with only half the performance hit. If there isn’t enough horsepower for even that, adaptive-integer chroma can still help with a more modest performance hit yet.
Recommendation: Luma Only for speed, Luma with True Chroma for quality, particularly with animation or motion graphics.
Motion Search Range
Motion Search Range (Table 17.6) controls how big an area the codec looks in for motion vectors in its reference frame(s). A larger search window will help find faster motion, but has a big impact on performance—CPU requirements roughly double each level. This is not available in Simple Profile, which always uses the lowest 64/32 range.
Table 17.6 Motion Search Range Values.
| Usage |
| +63.75/–64.0 H, +31.75/–32.0 V |
| +127.75/–128.0 H, +63.75/–64.0 V |
| +511.75/–512.0 H, +127.75/–128.0 V |
| +1023.75/–1024.0 H, +255.75/–256.0 V |
| Macroblock-adaptive |
For FSDK live encoding, your best bet is to pick the highest value you can encode without dropping frames. For on-demand, or for when using an encoder with Dynamic Complexity, the Macroblock Adaptive mode is generally the best—it’ll pick the most efficient mode dynamically. When coupled with Dynamic Complexity, complexity may go down as motion search goes up, making for a coarser motion search over a broader range for high-motion scenes, but reverting to a more precise search for lower-motion scenes. This can provide a big boost in the quality of high-motion frames.
Recommendation: Adaptive.
Table 17.7 Motion Match Method.
| Usage |
| SAD |
| Adaptive |
| Hadamard |
Motion Match Method
Motion Match Method (Table 17.8) chooses between the fast Sum of Absolute Differences and the better but slower Hadamard methods to measure the accuracy of motion matches. Hadamard is a pretty expensive feature, so set this only once you’ve already got at least Complexity 4 and Chroma Search.
Table 17.8 VideoType Values.
| Usage |
| Progressive frame |
| Interlace frame |
| Interlace field |
| Auto Interlace frame/field detection |
| Auto Progressive/Interlace frame/Interlace field detection |
The Adaptive mode uses Hadamard for the 50 percent of macroblocks with the most motion, and so is between SAD and Hadamard in performance. Interestingly, slightly outperforms Hadamard in quality more often than not.
Recommendation: SAD for speed, Adaptive for quality.
VideoType
The VideoType parameter (Table 17.9) is applicable only when doing interlaced encoding with Advanced Profile. The default of Field interlaced does well for most frames. Some are more efficiently encoded as interlaced frame, but that varies from scene to scene, so Auto Field/Frame is a good default although somewhat slower. If the content is likely to contain truly progressive frames, Auto Field/Frame/Progressive is the most efficient mode yet, albeit the slowest.
Table 17.9 Options per Profile.
| Setting | SP | MP | AP |
| DenoiseOption | Yes | Yes | Yes |
| Dquant Option | Yes | Yes | Yes |
| Dquant Strength | Yes | Yes | Yes |
| Force B Frame Delta QP | No | Yes | Yes |
| Force Encoding Height/Force Encoding Width | No | No | Yes |
| Force LoopFilter | No | Yes | Yes |
| Force NoiseEdgeRemoval | Yes | Yes | Yes |
| Force NumThreads | Yes | Yes | Yes |
| Force Overlap | Yes | Yes | Yes |
| Force Video Scaling | Yes | Yes | Yes |
| Lookahead | Yes | Yes | Yes |
| Macroblock Mode Cost Method | Yes | Yes | Yes |
| Motion Match Method | Yes | Yes | Yes |
| Motion Search Level | Yes | Yes | Yes |
| Motion Search Range | No | Yes | Yes |
| Motion Vector Coding Method | No | No | Yes |
| Motion Vector Cost Method | Yes | Yes | Yes |
| NumBFrames | No | Yes | Yes |
| Adaptive Deadzone | Yes | Yes | Yes |
| VideoType | No | No | Yes |
Recommendation: Interlaced Field for speed, Auto Frame/Field for general use, Auto Field/Frame/Progressive for best quality or if content contains many truly progressive frames.
Number of Threads
This parameter controls the number of threads that are used in a particular instance of the VC-1 encoder. The maximum number of threads was 4 in FSDK 11 and the initial version of the VC1ESDK, and 8 in EEv3, SSE SDK, and Windows 7. In the current implementation, the frame is sliced into as many horizontal bands as the number of threads, and motion vectors don’t cross between those bands. So small frames with a lot of vertical motion lose a bit of efficiency as the number of threads goes up. For high quality encoding, I recommend using at least 64 pixels high per slice, thus:
• < 128 pixels high: 1 thread
• 128–255 pixels high: 2 threads
• 256–511 pixels high: 4 threads
• 512+ pixels high: 8 threads
Options per Profile
Not all of the codec features are available in each profile. Table 17.9 lists what is or isn’t available with each. Using a registry key to set a mode that isn’t supported in that profile can yield a noncompliant stream and so should be avoided. For example, Setting NumBFrames to anything other than 0 shouldn’t be done when encoding to Simple Profile.
Registry keys – a guide and an apology
Yes, registry keys can be fearsome and a pain, but what’s the best way to go about them?
1. Your best bet is to use a product that uses the VC1ESDK and hence offers all controls integrated into the application, so registry keys aren’t needed. This includes EEv3 and most enterprise-grade WMV compression products. But, if not, see option 2.
2. Regedit.exe has been built into Windows forever, and allows registry keys to be input. But it’s also quite terrifying, particularly when a negative number is needed.
3. If you must use registry keys, download Alex Zambelli’s WMV9 PowerToy from http://www.alexzambelli.com/wmv (Figure 17.7). This app offers a convenient way to set registry keys, with integrated tooltip help. It also includes useful decoder options and diagnostics.
4. If you want to batch-encode using different registry key values, Alex also has an updated WMECmd.vbs script that can batch encode using the Format SDK, with full control over registry keys.
Figure 17.7 WMV9 PowerToy’s encode settings.
Now that you’ve gotten this far, option 1 is probably looking better than ever.
Encoding Mode Recommendations
“Always-On” choices
This is a good set of defaults with no significant performance downside that almost always helps quality.
Perceptional option: Adaptive Deadzone
This maps to the “Adaptive Deadzone: Conservative” option from Expression Encoder. This lets the codec reduce detail before introducing artifacts, and generally improves quality at lower bitrates.
In-loop filter: On
This turns on the In-Loop deblocking filter, which softens the edges of block artifacts. This improves the current frame, and also future frames based on it.
Overlap filter: On
This filter further smoothes the edges of blocks. It can reduce detail a little at high bitrates, but is almost always helpful at typical web bitrates.
B-frame number: 1
Turns on B-frames, and hence enables flash/fade detection when using Lookahead or 2-pass encoding, and also improves compression efficiency.
Lookahead: 16
Tells the codec to buffer ahead 16 frames in 1-pass (CBR or VBR) encoding, letting the codec detect flash frames and fades and switch the frame type based on it. Always on in Expression Encoder. It will increase end-to-end latency by that many frames in live encoding, but is generally well worth it due to quality improvements.
Complexity: 3
Complexity 3 is the sweet spot; higher values are a lot slower and don’t look that much better, while lower values get a significant quality degradation. Note the WME/FSDK default is 4, not 3, and it’s controlled by the app, not by registry key.
Graphic:
WMV9 PowerToy and EEv3 settings for Always On choices
High-quality live settings
Assuming you have a machine fast enough to run these settings in at least Complexity 3, they will improve the live experience.
Motion Search Range: Adaptive
This tells the encoder to switch to a bigger motion search range for frames with high motion, and then go back to a smaller range when motion dies down. This dramatically improves quality with higher motion at bigger frame sizes, while keeping performance high when there is less motion. The default range is 64 pixels left/right and 32 pixels up/down, so if any objects move more then that between any two P-frames, then this feature will help.
Lookahead Rate Control: On
LRC offers a great quality boost. It’s only available in VC-1 Encoder Enterprise SDK–based products.
Dynamic Complexity: On
Dynamic Complexity lets your system use all its horsepower without dropping frames. Also Enterprise Only.
High-quality offline
These settings offer maximum quality for offline encoding, and are slower yet. Use them when you’ve got the time.
Complexity: 4
A little better, and quite a bit slower than Complexity 3.
Motion Search Level: Fixed True Chroma
This is a full-precision motion search for chroma. It never hurts, and can help quality a lot with motion graphics and animation.
Motion Match Method: Adaptive
This switches between the Sum of Absolute Differences (SAD) and the Hadamard method to compare motion between frames as appropriate for each macroblock. Full Hadamard can be higher quality for some very complex content, but the Adaptive mode is faster and produces better results most of the time.
Insane offline
This is for those cases where you don’t want to worry that it’s not a smidge worse than it could possibly be, and don’t care if it takes 10x longer to encode than something essentially as good. If nothing else, no one will complain you were lazy! Most of the time this is just a placebo with a lot of waste heat.
Complexity: 5 (VC1ESDK) or 4 (FSDK)
Complexity 5 is slower and ever so slightly better than 4 in VC1ESDK. Complexity 5 disables the specified chroma search and motion match modes in FSDK and so generally produces worse quality than a tuned Complexity 4.
Threads: 1
In FSDK and VC1ESDK, motion vectors don’t cross slice boundaries. So for content with a lot of vertical motion (which is rare; we largely live on the horizontal), you can get a slight efficiency improvement for that Handycam footage of the International Pogo Stick Finals.
Tools for VC-1
This section focuses on tools with specialized depth for VC-1, all of which are based on the VC-1 Encoder SDK. Windows Media–only tools are also covered in the previous chapter.
Expression Encoder 3
Expression Encoder 3 is the only free encoder with relatively complete support for VC-1 Encoder SDK functions. It’s a bit of a hybrid, combining features from both Windows 7 (8-way threading, speedup, “swirling” fix) and the VC-1 Encoder SDK.
EEv3 also includes the first public release of the Smooth Streaming Encoder SDK VC-1 implementation, which is used in the “Smooth Streaming VBR” mode.
EEv3 doesn’t expose all modes from the VC-1 Encoder SDK (Figure 17.8). Specifically, it doesn’t:
• Support interlaced VC-1
• Create elementary streams
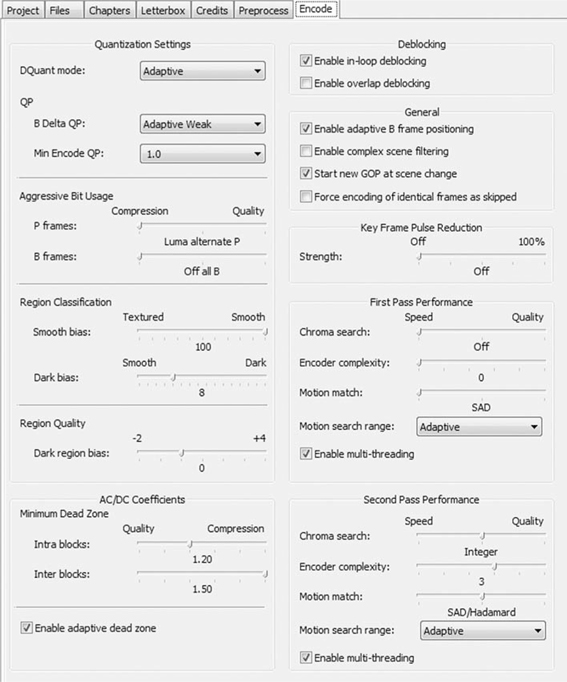
Figure 17.8 EEv3’s Advanced dialog for VC-1.
Inlet Fathom
Inlet’s Fathom was the first professional-grade VC-1 encoder, originally introduced in 2005 as a front-end to a hardware accelerated capture and compression board. Its current 3.7 version mainly is used as a software encoder, with either live or file-based input, including live streaming to WMS. Its standout VC-1 feature is segment reencoding; it’ll allow tweaking of compression parameters for particular sections of a video.
Fathom has the deepest implementation of VC-1 Encoder SDK, with the SSE SDK coming soon as well. See Figure 17.9.
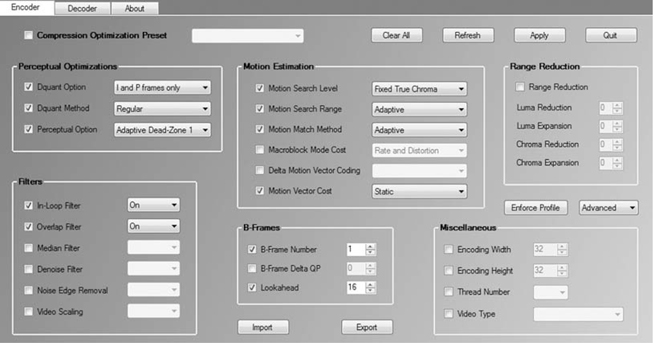
Figure 17.9 Fathom’s main VC – 1/WMV pane, with a potentially overwhelming array of options.
Rhozet Carbon
Carbon offers both Format SDK (“Windows Media File”) and VC-1 Encoder SDK (“VC-1 Exporter”)–based encoding modes. Carbon’s pioneering implicit preprocessing mode makes it a good choice to do many-to-many transcoding operations, with multiple targets rendering simultaneously:
• Carbon supports interlaced VC-1 encoding, not available in EEv3.
• Elementary stream output and byte-based buffer control allows for Blu-ray-compatible .vc1 exports.
• The VC-1 Exporter supports 1-pass CBR audio only, alas.
• Rhozet has announced Smooth Streaming Encoder SDK support will be available in 2009, likely before this book arrived in your hands.
CineVision PSE
Last but not least, we have the grand-daddy of VC-1, Sonic’s CineVision PSE (Figure 17.10). This is a very high-end commercial Blu-ray encoder born out of Microsoft work on HD DVD. It has been responsible for around 90 percent of HD DVD titles and about a quarter of Blu-ray titles to date. It includes some great features that haven’t been adopted by other VC-1s yet:
• Grid encoding: the encode can be automatically split over multiple machines for fast turnaround.
• Studio-grade Segment re-encode: individual scenes, shots, or frames can be re-encoded with tweaked settings.
• Region of interest encoding: change parameters for specific areas of the frame.
• Adaptive DQuant: a Differential Quantization mode that works better at lower bits pre pixel.
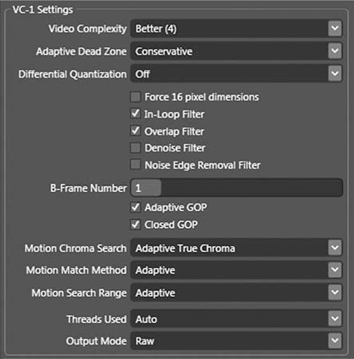
Figure 17.10 CineVision PSE’s VC – 1 dialog, with options not yet seen in any other tool.
VC-1 Tutorial
This project is publishing a HD movie trailer to the web for a trailer site, playable in Silverlight, WMP, and a variety of other media players.
Scenario
We’re on the postproduction team of the marketing department of a Hollywood studio. We’re creating a destination site for one of our summer blockbusters, and want to provide a high-end HD experience to get the fans juiced.
The web site uses a Silverlight web player, and we want to make the same files also available for download for local playback, as well as through media extenders like the Xbox 360 and PlayStation 3.
Following typical convention, we’ve been asked for 480p, 720p, and 1080p versions so that users of slow computers and connections can also get a good experience. The decision has been made not to use Smooth Streaming, given the short duration of the content and high-quality goals; for marketing purposes, we’d rather have viewers buffer then see low-bitrate video.
Three Questions
What Is My Content?
Our source file is a 1920 × 1080 AVI file using the 10-bit 4:2:2 Cineform HD codec. The film itself is a letterboxed 2.39:1. The audio mix had some last-minute changes, and we have an updated 5.1-channel WAV file.
The content was short on film, and has nearly constant, fast cutting, and a fair amount of grain. It looks like a hard encode.
Who Is My Audience?
The audience is going to be summer movie fans, typically younger males, but with crossover appeal to young women.
We also know that film critics and bloggers are going to review the trailer, so we want to make sure they have a great, thrilling experience.
We’re counting on them to be patient for a little buffering; they can pick the 480p clip if they’re in a hurry. As movie buffs, they’ll be familiar with being given three bitrate choices. They include a disproportionate number of Mac users (about 25%), so we want to make sure our Flip4Mac playback experience is good as well.
What Are My Communication Goals?
To provide an awesome HD experience for potential fans of the movie. It’s more important for quality to be great than to have fast startup time, but we also don’t want to use any more bits than we need to to hit our quality targets.
Tech Specs
We know we want to play back in:
• Silverlight
• Windows Media Player 9 or higher
• Flip4Mac
• Xbox 360
• PlayStation 3
• Zune HD
All of these support at least VC-1 Main Profile (most do Advanced) and WMA 9 Pro (but not the WMA 10 Pro LBR modes covered in the next chapter).
Because the source is letterboxed, HD “1080p” really means “1920 wide.” So, given our 2.39:1 aspect ratio, and rounding to Mod 16, we get:
• “1080p” = 1920/2.39 = 803 = 1920 × 800 = 1536000 pixels/frame
• “720p” = 1280/2.39 = 536 = 1280 × 528 = 675840 pixels/frame
• “480p” = 640/2.39 = 268 = 640 × 272 = 174080 pixels/frame
We’re not exactly sure what bitrates we should be using yet. We’ll start by trying a few encodes at the top bitrate, and then based on the “power of 0.75 rule” extrapolate from that to the lower bitrates. We’ll keep our maximum bitrate for 1080p at 8 Mbps, though, based on published recommendations for Silverlight playback.
We’ll encode with 5.1 audio in all cases, using 192 Mbps at our lowest band, 256 Mbps at the medium band, and 384 Mbps at the high band. This version of Carbon didn’t support 2-pass VBR audio with VC-1 exports, but that will be supported in Carbon 3.14 by the time you’re reading this. Since audio peaks aren’t hard to decode, I would have just used 2-pass VBR Unconstrained with the same bitrates.
Settings
We’ll do this with Rhozet Carbon Coder, a popular compression tool in postproduction facilities.
First, we load our source video as a source, and then use the “Audio Stream Selection” to attach our updated audio file to the video.
Going into Video Filter, we use a Relative Crop to specify the active video region. Movie trailers are often a little bit off, and can have a little black on the left and right, but this trailer is a perfect 140 crop top/bottom to make 1080–140 × 2 = 800 lines.
The audio sounded a bit quiet, so we add a Normalize to Mean RMS filter, which will raise the volume while keeping dynamic range accurate.
Carbon lets us apply multiple targets to the same source, making for more efficient encoding. We’ll start with a basic VC-1 target for 1080p, and add some quality-over-bitrate tuning choices. The default settings are already very tuned for quality over speed, but we’ll set:
• Width and Height to 1920 × 800
• Frame rate to 23.976
• Bitrate Mode to 2-pass constrained VBR
• Profile: Main
• Video Bitrate at 6000 (the max we’ll try)
• Closed GOP Off (slight efficiency improvement)
• Maximum Bitrate at 8000
• GOP Size 96 frames (4 seconds)
• VBV Buffer Size: 4000000 (8000 Kbps = 000000 Bytes/sec × 4 sec = 4000000)
• Overlap Filter On (reduces artifacts)
• Audio Codec: WMA 10 Pro: 6 Channel 48 KHz 24-bit 384 Kbps
And we’ll then duplicate that with additional average bitrates at 5000, 4000, and 3000 Kbps and encode.
Based on that test encode, the 5000 Kbps version looks like our winner; it’s obviously of higher quality than the 4000 Kbps, but almost as good as the 6000. When content varies, sometimes it’s just trial and error.
Using the power of 0.75 rule and our pixels/frame counts, we can estimate:
• 720p: (675840/1536000)^0.75 = 0.54 × 5000 = 2700 Kbps
• 480p: (174080 /1536000)^0.75 = 0.20 × 5000 = 1000 Kbps
And thus we can take tune in final settings.
1080p
• Raise Complexity to 5 (this is our summer blockbuster, after all)
720p
• Width and Height to 1280 × 528
• Video Bitrate: 2700
• Maximum Bitrate: 4000
• VBV Buffer: 2000000
• Audio Bitrate: 256 Kbps
480p
• Width and Height to 640 × 272
• Video Bitrate: 1000
• Maximum Bitrate: 1500
• VBV Buffer: 750000
• Audio Bitrate: 192 Kbps 44.1 KHz
And there we go (Figure 17.11). We hit Convert, and Carbon outputs our three final files in high quality. We chose the slowest, highest-quality modes so that even on an 8-core machine, it might take an hour or two to output.
Figure 17.11 Our final tutorial settings in Carbon Coder.
