After you understand how to identify computer evidence and you know what equipment you can access, you are ready to begin collecting evidence. The steps you take during the collection process determine whether that evidence will be useful once the investigation is completed. You must ensure that your evidence has been acquired properly and remains pristine. This section discusses several concepts necessary to ensure that collected evidence remains valid for later use.
Definition
chain of custody
Documentation of all steps that evidence has taken from the time it is located at a crime scene to the time it’s introduced in a courtroom. All steps include collection, transportation, analysis, and storage processes. All accesses to the evidence must be documented as well.
All evidence presented in a court of law must exist in the same condition as it did when it was collected. Simply put, evidence cannot change at all once you collect it; in legal terms, the evidence must be in pristine condition. You’ll be required to prove to the court that the evidence did not change during the investigation. That means you must provide your own evidence that all collected evidence exists, without changes, as it did when it was collected. The documentation that chronicles every move and access of evidence is called the chain of custody. The chain starts when you collect any piece of evidence.
The chain of custody is so named because evidence has the potential to change each time it is accessed. You can think of the path evidence takes to the courtroom as a chain in which each access is a link in the chain. If any link breaks (and thereby breaks the integrity of the evidence), the whole chain breaks at that point.
The court expects the chain of custody to be complete and without gaps. You demonstrate a complete chain of custody by providing an evidence log that shows every access to evidence, from the time of its collection to its appearance in court.
A complete chain of custody log also includes procedures that describe each step. For example, an entry might read “checked out hard disk drive serial number BR549 to create a primary analysis image.” You should also include a description of what “creating a primary analysis image” means. The defense will examine the chain of custody documents, looking for gaps or inconsistencies. Any issue with the chain of custody has the real potential of causing the court to throw out the evidence in question. If that happens, any evidence you collect becomes useless and your credibility will be questioned.
Controls
Each step in the chain of custody must impose specific controls to maintain the integrity of the evidence. The first control could be to take pictures of the evidence’s original state. This, of course, is only applicable for real evidence. Once you photograph and/or document the initial state of the entire scene, you can begin to collect evidence.
From the very first step, you must list all procedures you use during the collection process and be ready to justify all of your actions. For example, when you collect a disk drive for analysis, you must carefully follow standard practices regarding disk identification, removal, handling, storage, and analysis. Each step in the evidence collection and handling process must have at least one associated control that preserves the state of the evidence.
Continuing our disk drive evidence example, you must use proper handling techniques with disk drives, and you must also document each step in that process. Before you start, take precautions against disk drive damage. Such precautions include:
- Grounding to prevent static discharge
- Securing and padding the work surface to prevent physical shock
- Noting power requirements to protect against inadvertent power-related damage
You’ll also need to implement and document all controls that prevent accidental changes to the evidence. These precautions include:
- Implementing a write blocker to prevent accidental writes to the media
- Generating a snapshot of the media using a hash or checksum before any analysis (Hash and checksums are discussed in more detail in Chapter 8.)
- Using analysis tools that have been verified to run using read-only access
Needless to say, you must plan each step along this path. At every step, make sure at least one control is present to ensure that the evidence stays pristine and unaltered. The section entitled “Leave No Trace,” which appears later in this chapter, covers some specific controls; however, the preceding list illuminates the level of detail required to satisfy a court of law that evidence has not changed since it was collected.
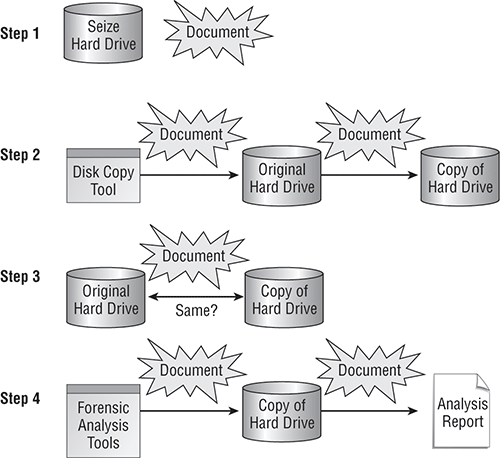
The following steps illustrate how to handle a disk drive you suspect contains evidence:
1. After you have determined that you need to analyze a hard disk drive, the first step is to seize the drive. You must fully document the entire process, including:
- Seizure authority
- Seizure process
- Safety precautions
- Source location, time, and person who performed seizure actions
- Packing and transportation method
- Destination location, time, and person who transferred the item to secure storage
- Description of storage facilities, including procedures to ensure evidence security
2. After seizing the drive, mount it in read-only mode and make a copy of the drive for analysis. Make sure you:
- Document the process of mounting the device
- Describe the precautions taken to prevent changes to the media
- List all of the steps in the copy process
3. Compare your copy of the drive to the original to ensure that you have an exact copy. Make sure you:
- Describe the process and tools used to compare drive images
4. After making a clean copy of the original drive, you can begin your analysis of that copy.
Figure 3-2 illustrates the process.
Figure 3-2: Documenting chain of custody when seizing a disk drive as evidence


Tales from the Trenches: Computer Evidence
The computer forensic expert is often called on to save the day, even when that “day” occurred over a year and a half ago.
The statute of limitations for sexual harassment can range from as few as 30 days for federal employees to as long as three years in certain states. After being contacted by senior management for a small publicly traded company located in a state with an extended statute of limitations for this crime, I boarded a flight to see if I could help locate evidence that was more than 18 months old.
A senior manager for the company was being sued for sexual harassment by an employee who had left the company 18 months earlier. The employee had not made any allegations when leaving the company and had only recently filed suit. After speaking with the senior manager named in the suit, the company officials were hoping I might be able to locate proof that the romance was mutual and consensual and thus did not constitute sexual harassment.
As is the norm in a majority of businesses, when the complaining employee left the company, the employee’s desktop computer hard disk had been reformatted, reloaded, and that computer reassigned to another employee. The company CIO was able to track down the computer and presented it to me to see what I could locate. By this time, the computer had been in use by another employee for almost 15 months. The senior manager’s laptop computer had been lost six months ago. In addition, the company recently implemented a new installation of Microsoft Exchange and had no backup tapes from the old e-mail server.
I imaged the hard drive using the Image MASSter Solo 4 Forensic Portable Evidence Seizure Tool from Intelligent Computer Solutions and created a new case file using AccessData’s Forensic Toolkit (FTK). I added the acquired image of the hard disk as evidence in the case file in FTK and then indexed the case. After this prep work, things happened quickly.
One of the strengths of FTK is its ability to quickly locate e-mails. I swiftly sorted all the e-mails by date and began reading a string of “love letters” sent from the employee to the manager and from the manager to the employee. It was obvious from the tone of the letters that the relationship was indeed mutual. Additionally, I was able to locate calendar entries from the employee’s Outlook .pst file that listed planned meeting times and locations for the couple. I found one particularly humorous and potentially case-defeating file on the computer in an e-mail attachment sent from the employee to the manager. It was a self-photographed nude picture of the employee taken using a mirror.
I located more than enough data to show the relationship was mutual. When presented with all this evidence, the employee dropped the lawsuit. This case illustrates that potential evidence can be found on computers long after incidents occur, if an investigator takes the time and knows how to look for it.
Documentation
The first item in your hands when you enter a crime scene should be a camera, and the second item a pencil. The key to providing a chain of custody that a court will accept is meticulous documentation. You must enter notes into an evidence log, listing all information pertinent to accesses to the evidence.
Each and every time evidence is accessed (including initial collection) the evidence log should include at least the following items of information:
- Date and time of action
- Action type (choose one)
- Initial evidence collection
- Evidence location change
- Remove evidence for analysis
- Return evidence to storage
- Personnel collecting/accessing evidence
- Computer descriptive information
- Computer make and model
- Serial number(s)
- Location
- Additional ID information
- BIOS settings specific to disk drives
- Disk drive descriptive information
- Disk drive manufacturer, model number, and serial number
- Drive parameters (heads, cylinders, sectors per track)
- Jumper settings
- Computer connection information (adapter, master/slave)
- Handling procedure
- Preparation (static grounding, prevention of physical shock, etc.)
- Contamination precautions taken
- Step-by-step events within the events of each action
- Inventory of supporting items created/acquired (e.g., hash or checksum of drive/files)
- Complete description of action
- Procedure used
- Tools used
- Description of each analysis step and its results
- Reason for action
- Notes
- Comments not specifically requested anywhere else in the log
- The notes section provides additional details as an investigation unfolds
This log provides the court with a chain that can be traced back to the point at which the evidence was collected. It provides the beginning of the assurance that the evidence has not changed from its original state. The next step in the process is to justify that each step in the chain was carried out according to industry best practices and standards. Once you establish that you have handled evidence in an appropriate manner and maintained the integrity of the evidence, you are ready to take it to court.
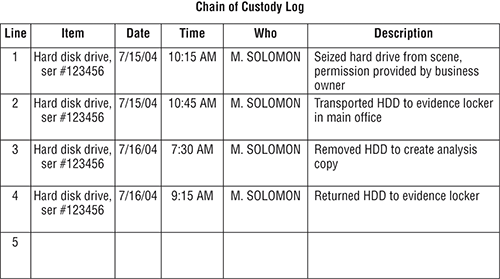
Figure 3-3 illustrates a minimal log format. This type of log usually needs supporting documents for each line item. The minimal log format gives a brief overview of evidence handling history, and the detailed description for each line item would provide the additional details mentioned previously.
Figure 3-3: Chain of custody log

Before you take evidence to court, you need to ensure that it will be acceptable. In the next section, we cover the rules that govern what evidence is admissible in a court of law.
