
Part of your role as an investigator is to ensure that a nearly perfect snapshot of the system can be taken. The challenge is that nearly anything you do to a system can change it. For example, unplugging the network cable will change the system—but leaving the network plugged in will change it, too. Even if you decide to do nothing, the system will change because its clock will continue keeping time. It’s easy to see the dilemma that a computer forensic investigator faces!
It’s important to capture as accurate a representation of the system as possible and to document each step that you take along the way. Remember, any information gathered may end up in court so you need to be ready (and able) to defend your processes. At a minimum, make certain you document:
- What actions were performed
- Who performed those actions (This may be important to establish a chain of ownership, most commonly referred to as the Chain of Custody, of the evidence gathered.)
- When those actions were performed
- Why you chose a particular course of action
Simply copying all the potentially useful files from a system is probably not going to be sufficient for a complete forensic investigation. For example, if a suspect has deleted all file system–level clues, it would be difficult for a forensic investigator to fully piece together the incident using existing files alone.
imaging
The process of creating a complete copy of a disk drive where the disk is copied sector-by-sector.
One of the tools that helps the forensic investigator glean hidden information is imaging. Imaging is the process of creating a complete sector-by-sector copy of a disk drive. A forensic investigator frequently performs imaging as a part of the data collection process. Often, you will want (or need) to make a complete copy of a disk drive at the start of the investigation to preserve evidence and then do low-level analysis of the image at a later time.
Most computer users are unaware that the majority of operating systems do not overwrite the contents of sectors when information or files are deleted. Instead of deleting information, most operating systems simply unlink the sectors from the file system table and leave the data untouched until they need those sectors again for some other purpose. With a complete image of a disk drive, a computer forensic investigator may be able to locate useful information or evidence in the unallocated sectors on the hard drive. Analyzing a disk image allows a computer forensic investigator to dive deeper into a system’s state and conduct a more complete investigation.
As a matter of best practice, a forensic investigator will image all disk drives that he finds as a part of his initial efforts. The cost of imaging a disk drive is nominal although today’s huge hard drives can make imaging somewhat time-intensive. A number of hardware and software tools are available that make the entire imaging process much easier to conduct. Some of these tools are covered later in this chapter. Imaging disk drives is an endeavor well worth the time it takes—particularly if the payoff is information relevant to your investigation.
Evidence Collection Order
Request for Comments (RFC)
Started in 1969, RFCs are a series of notes about the Internet. An Internet document can be submitted to the Internet Engineering Task Force (IETF) by anyone, but the IETF decides when and if a document becomes an RFC. Each RFC is designated by an RFC number. Once published, an RFC never changes. Modifications to an original RFC are assigned a new RFC number.
Before we get into imaging, let’s go over the order in which you process evidence. The most volatile data is memory that is highly sensitive to system use, such as registers, memory, and cache. Such data is lost whenever a system is used. Because of the nature of this volatile data, it should always be collected first to minimize corruption or loss. Request for Comments (RFC) 3227, entitled “Guidelines for Evidence Collection and Archiving,” illustrates the typical order of volatility on a normal system from more to less volatile as follows:
1. Registers, cache
2. Routing table, ARP cache, process table, kernel statistics
3. Memory
4. Temporary file systems
5. Disk
6. Remote logging and monitoring data that is relevant to the system in question
7. Physical configuration, network topology
8. Archival media
We cover the collection of certain specific items later in the chapter. In the meantime, let’s go over some procedures you should avoid.
Evidence Collection Methods to Avoid
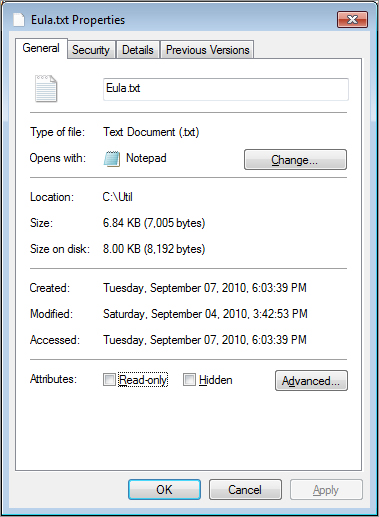
An individual who uses the suspect system itself to search for evidence often jeopardizes the investigation. An example of this would be an investigator who used the built-in search capabilities of a Windows computer under analysis to search for and open files. By opening a file to review the file’s properties, the access date changes, as illustrated in Figure 5-1. Note that the dates may differ. The “created” date is the date and time the file was created. The “modified” date is the last date the file’s contents were modified. The “accessed” date is the last date the file was opened for reading or writing.
Figure 5-1: On Windows, viewing a file’s properties changes the access date.

Tales from the Trenches: Don’t Touch That Data!
Here’s an example of a how a suspect compromised his own defense. A man who left his employer admitted that he took documents with him that shouldn’t have taken. A year later, the man stated that since he left the company he’d done nothing with those documents. Since he had not even looked at them, he claimed that no damage had been done.
The man agreed to turn over his computer to me for forensic examination. I would be able to image the drive and check the last access date for the files, supporting his claim that he had not looked at them. Unfortunately, the night before the man was to provide the computer for evaluation, he opened all of the files “so that he could be sure that he knew what was in them.” By doing so, he destroyed his defense. Because the computer only maintains the last access date and not each access date, this man compromised the evidence that could have supported his case.
Preparing Media and Tools
Use properly prepared media when making forensic copies to ensure that there is no commingling of data from different cases. Consider using solid-state disks to store collected data. Solid-state disks are currently more expensive than electromechanical disks, but they offer forensic investigators some advantages over electromechanical disks. First, solid-state disks experience fewer failures during repetitive and long read/write streams. Since some of the hard drives you examine may be rather large, you don’t want to waste time unnecessarily by having to restart a task owing to mechanical failure. Secondly, solid-state disks provide faster access time to the data, which can reduce your analysis time. These advantages, coupled with the falling prices of solid-state disks, can make them a viable alternative to electromechanical disks.
Sanitize all media that is to be used in the examination process. If you cannot afford new media for each case, be sure that all previously used media has been properly sanitized. The media must not contain any viruses or other contaminants.
To properly sanitize a drive, all data must be removed and overwritten. The sanitization process overwrites all data on the drive (active and inactive file space, space between the end of a file and the end of a block or sector, file allocation tables, directories, block maps, and so forth) multiple times to ensure the drive is clean before evidence is added to it.
The U.S. Department of Defense, in its clearing and sanitizing standard DoD 5220.22-M, recommends overwriting all addressable locations on writable media with a character, its complement, a random character, and then verifying that random character. (However, this method is not approved for media containing top secret information.) To sanitize your media using this method, overwrite first with a certain byte value, such as 00000000 (0x00), and then with 11111111 (0xFF), and finally with a randomly chosen byte value. Of course, you’ll need to record the randomly chosen value you used for the third pass. The verification pass ensures that you read back the same value you wrote in the third pass.
During the sanitization process, document your steps. You can sanitize and document the process in several different ways. Software sanitizing programs (such as the open source program Darik’s Boot and Nuke, or DBAN, Ontrack DataEraser, and WinHex) are available for this purpose. All of them work by overwriting the entire disk, usually several times, in a way designed to destroy all traces of preexisting information.
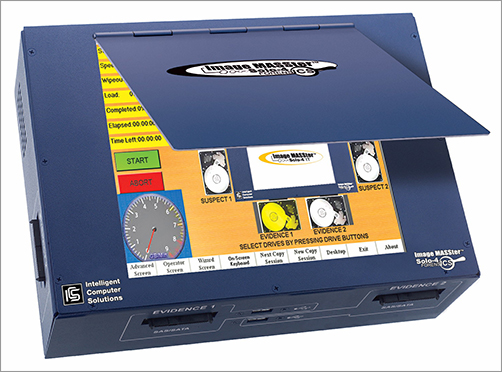
Besides software programs, some companies have equipment designed specifically for this process. The device shown in Figure 5-2—the Image MASSter Solo-4—can make multiple copies and sanitizes at full SATA-2 speed, conforms to U.S. Department of Defense Standard DoD 5220.22-M, and gives you a forensic audit printout after wiping each drive.
Figure 5-2: Image MASSter Solo-4 disk sanitizing equipment
(Photograph Courtesy of Intelligent Computer Solutions, Inc. 2010)
Next, check to make sure that all forensic software tools are properly licensed for use and that all lab equipment is in working order. Several companies offer forensic imaging tools.
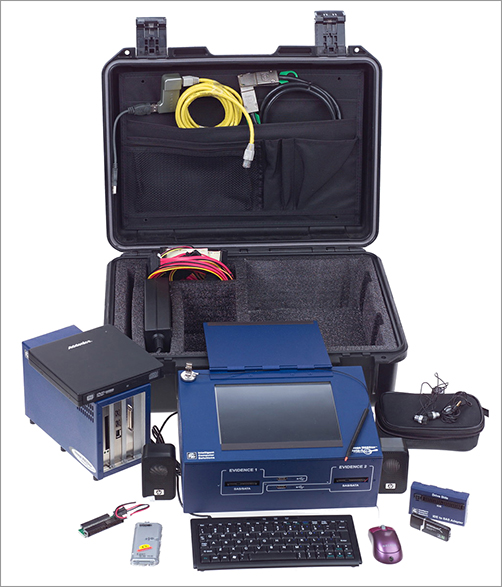
Forensic kits are also available. A kit includes additional tools that you may need for capturing data. The kit shown in Figure 5-3 includes tools made for seizing data from computers that cannot be opened in the field. High-speed data transfers can be performed between any suspect hard drives through the computer’s SATA, eSATA, Fast SCSI, FireWire A/B, Express Memory Card, or Universal Serial Bus (USB) ports. The kit includes a bootable CD to start up the suspect’s computer and run the acquisition program.
Figure 5-3: Image MASSter Forensic Toolkit
(Photograph Courtesy of Intelligent Computer Solutions, Inc. 2010)
Collecting the Volatile Data
In some cases, evidence that is relevant to a case may only exist temporarily. Evidence can be lost when a computer is powered down. As a matter of practice, if the computer system is off when you first locate it, leave it shut down when you seize the computer to avoid further potential loss of data. If the computer system is still powered on, the forensic investigator faces a dilemma because powering down the computer to seize it may result in loss of data valuable to the investigation. When faced with this scenario (and you will be at some point during your career as a forensic investigator), you’ll need to assess the risk of losing data and then decide how and when to shut down the system. You can somewhat reduce the effects of potentially losing volatile data by collecting a snapshot of the physical memory prior to shutting the computer down.
This is why the “Guidelines for Evidence Collection” (RFC 3227) lists the volatile data as the first kind of data you should try to capture. By capturing the volatile data before unplugging the computer, you get a snapshot of the system at the time you arrived on the scene. The following information should be collected:
- System date and time
- Current network connections
- Current open ports and applications listening on those ports
- Applications currently running
To capture this information, you may choose to conduct a live acquisition.
Live acquisitions should only be performed by a properly trained forensic examiner, because any action taken on a live system may change the evidence.
In a live acquisition, goal is to collect the information without impacting the data on the system. The two most practical ways to do this are
- Saving the information to a remote forensic system
- Saving the information to a removable drive
To save the information to a remote system, you can use a tool called Netcat, which is a free tool used to create a reliable TCP connection between the target system and the forensic workstation. Using Netcat allows you to get on and off the target system in a relatively short amount of time. You can then analyze the data you have collected at a later time. You can also use Cryptcat, which is an encrypted version of Netcat. With Cryptcat, the traffic is encrypted between the target system and the forensic workstation. By using this type of process, the risk of data contamination or compromise is nearly eliminated.
Tools for Volatile Data Collection
Address Resolution Protocol (ARP)
A protocol used on the Internet to map computer network addresses to hardware addresses.
Let’s look at how you can gather some pieces of information with individual tools, starting with volatile components first. One of the first places to capture information is from the Address Resolution Protocol (ARP) cache. The ARP cache is a table that maintains a mapping of each physical address and its corresponding network address. This information tells you to which other computers the computer you are working with is connected. The ARP cache indicates their network and hardware addresses, as shown in Figure 5-4.
Figure 5-4: ARP cache indicating the network and hardware addresses
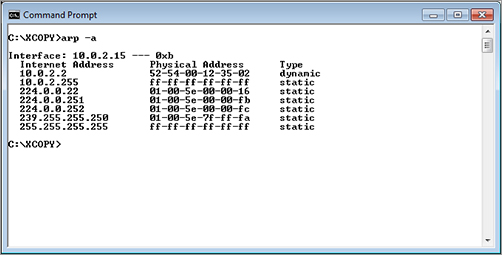
You can see that the computer maintains a listing of addresses for two additional computers. This information can be especially useful for a forensic situation in which a company may have been attacked from the inside (internally).
The information in the ARP cache is held for a maximum of 10 minutes, and then its entries are deleted.
traceroute/tracert
A command used to see where a network packet is being sent and received in addition to all the places it goes along the way to its destination. (It’s traceroute for UNIX and tracert for Windows.)
Another useful piece of information is the output of the traceroute command. Originally developed for the UNIX operating system, traceroute (or tracert on Windows) is used for many operating systems and most routers. You use traceroute to track the path a packet takes to get to its destination. For example, if you need to request records from service providers in regard to a case, the information contained in the traceroute output tells you through which company’s routers the data traveled.
Many firewalls do not issue error messages, so the traceroute client might time out. This means that it may stop at a certain point owing to firewall restrictions or router rules.
Figure 5-5 shows an example of tracert command output.
Figure 5-5: Output of tracert command
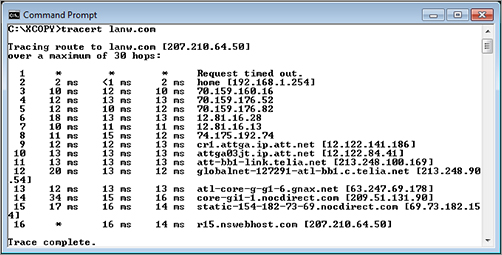
You can see that the path a packet took from our computer to the final destination passed through the following companies:
- ATT
- TeliaSonera
- Global Net Access
When tracing the route of a particular packet, the trace should go to the point where the packet originated and where it terminated. If the packet originated from a suspect’s own computer, the suspect might notice the trace. In cases where a bot is used by the suspect, the trace won’t go to the suspect’s computer. (Bots are a particularly malicious type of malware. Intruders using bots are able to gain complete control over the subject’s computer.)
Next, an investigator may choose to collect a list of running services. Figure 5-6 shows the file output of a program called PsService, which we used to capture this data.
Figure 5-6: PsService output shows running processes (also called services).


PsService is not native to the Windows environment. It’s obtained from the SysInternals site at http://technet.microsoft.com.
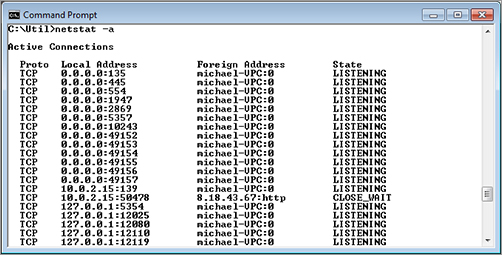
Netstat
A utility that displays the active port connections on which the computer is listening.
The Netstat utility (Figure 5-7) displays all active computer connections. This information provides the investigator with a list of what protocols are running and what ports are open.
Figure 5-7: Netstat output shows active connections.
The Shutdown Dilemma
After you’ve collected all the volatile data from the computer system at the scene, you may need to decide how to shut the system down for transport. Do you pull the plug? Or, would an orderly shutdown process be the better practice? Each situation is different and deciding how to shut down the system can be a difficult call. As the forensic investigator, people will look to you for guidance. You’ll need to carefully weigh the risks involved in both methods and balance the risks against how to maintain the integrity of the original evidence. Some things to consider when making your decision include:
Normal shutdown process If you elect to shut down the computer through the normal shutdown method, then file systems as well as individual files are more likely to be intact. On the other hand, each file written to the system during the shutdown process can result in fewer recoverable deleted files. It’s also important to remember that there are destructive programs designed to delete data during a normal shutdown. It’s always possible that a suspect may be running such programs. Also, a normal, orderly system shutdown clears space on the disk used for virtual memory, possibly taking valuable evidence along with it.
Disconnecting the power cord Sometimes, depending on the evidence and information you have going into an incident scene, you may want to simply disconnect the computer system directly—that is, unplug it from the wall. If you decide to take this path, exercise caution. You run the risk of losing data, depending on the system the suspect computer is using. For example, there is an increased risk of losing data if the suspect system is running UNIX.
Forensic investigators should know the type of system that the suspect computer is using prior to disconnecting power to minimize the potential for lost data. Pulling the plug on a machine with an electromechanical disk causes any volatile data that you haven’t already collected to be lost, including open files or data that hasn’t been flushed from the cache to the disk. This makes collecting volatile data first even more important.
One scenario not yet discussed is live systems using encrypted files. If you are working with a live system that uses encrypted files that are mounted, you’ll need to collect the evidence with a live acquisition. For more information, see “Collecting the Volatile Data,” earlier in this chapter.
Remember, there are pros and cons for each shutdown method. It’s easy to lose data (which may very well be valuable evidence) regardless of the method used so do your homework when making your decision!
Creating a Duplicate Hard Disk
Disk evidence is the foundation of computer forensics. Judges and juries can understand digital evidence on a disk as being analogous to files in folders or a filing cabinet. In a legal environment, the completeness and accuracy of digital evidence collection is often questioned. For this reason, careful collection of evidence is critical to forensic investigators. It’s necessary to create a copy of the original disk for analysis because of the volatility of the data on a disk and the potential that evidence could be destroyed during handling and analysis. To be complete and accurate, the copy should be a bit-for-bit clone of the original disk, commonly called a bit stream image, or forensic image.
bit stream backup
Bit stream backups (also known as mirror image or evidence grade backups) are used to create an exact replica of a storage device.
Whether you choose to literally pull the power plug (which immediately stops all disk writes) or properly shut down the computer, after the system is off, you can begin the process of creating a duplicate hard disk. An original method for creating hard drive images consisted of booting from a floppy boot disk and then creating a bit stream backup of the hard disk. A bit stream backup is a recording of every single bit of data that resides on a storage device. Using a bit stream method to make your backup copy not only copies working files (which any conventional backup utility automatically finds) but also copies hidden, erased, fragmented, corrupted, temporary, and special attribute files which may not be easily found otherwise. For example, temporary files might contain data from a document that was worked on but never saved to disk. This type of data can be recovered using a bit stream backup. AccessData’s FTK and EnCase are two widely used tools for making forensic images that every forensic investigator should consider including in their investigative toolkit. (Forensic tools are discussed in more detail in Chapter 8, “Common Forensic Tools.”)
Drive imaging can be performed in several ways:
- Disk–to–disk image, which is mainly used to test booting
- Disk–to–image file, which results in faster searches and is compressible
- Image file–to–disk, which is used to restore an image
Disk imaging is not the same as using backup software. Backup software programs generally copy data only, while imaging software makes a full, exact copy of the hard drive, including the operating system, software, file organization, as well as the data.
Among network administrators, tools such as Norton Ghost are popular for disk imaging. However, this type of software might not be suitable for forensic investigations. Ghost does not create an exact duplicate of the disk by default. It recreates the partition information and the file contents. A hash of the image will almost always result in a value different from the original disk. The validity of the evidence might be challenged, because the rules of evidence generally require that any copy be an exact duplicate of the original. If you have no other disk-imaging options available, however, use Ghost. It is better than having no image at all. A white paper on the use of Ghost as a forensic tool is available on the SANS Web site (www.sans.org).
forensically sound
Procedures whereby absolutely no alteration is caused to stored data. All evidence is preserved and protected from all contamination.
Regardless of whether the examiner performs a direct device-to-device copy of the media or creates forensic evidence copies for examination or restoration, the copy process should be forensically sound and the examination of media should be conducted in a forensically sound environment. A forensically sound environment is one in which the investigator has complete control. No procedures are permitted without the investigator approving them. The use of physical write-blocking devices or software write-blocking devices can ensure that no writes impact the original media. These devices operate between the operating system and disk driver device or are plugged in between the disk controller and the physical disk to block any write requests. Nonforensic software can write to the drive, so using a write-blocking device eliminates this issue. (Hardware and software write blocking and proper documentation are discussed in Chapter 3, “Computer Evidence.”)
Understanding Full-Volume Copying
Moving on, let’s define some terms and features in regard to making full-volume copies of data:
forensic duplicate
A process used to copy an entire hard drive that includes all bits of information from the source drive stored in a raw bit stream format.
The first step in the forensic examination of a computer hard drive is to create the bit stream copy or forensic duplicate. This bit stream image of the original media is then used for analysis. Bit stream images capture not only the existing files but also the slack and unallocated space so deleted files and file fragments can be recovered.
Forensic duplicates can be created by using a hardware duplicator, such as the Image MASSter Solo-4 Forensic unit or the Forensic MD5 unit.
Many of the common tools used for obtaining a forensic duplicate are built into the software accompanying tools such as the Image MASSter Solo-4 Forensic unit. For example, Figure 5-8 shows this process using WinHex. (WinHex is a universal hexadecimal editor used in computer forensics, data recovery, low-level data processing, and IT security.)
Figure 5-8: WinHex clone disk copy
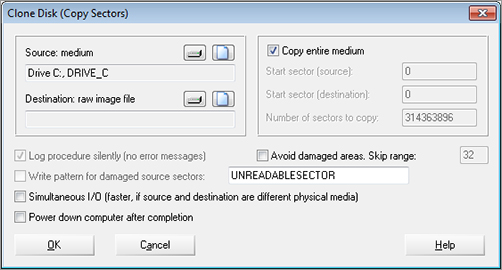
Creating a forensic image of the suspect drive, and using only the image for investigation and analysis, ensures the integrity of the original drive. The integrity of the original media must be maintained throughout the entire investigation. In a computer investigation, therefore, there is no substitute for properly obtaining a good working copy. An investigator must duplicate a disk using sound practices before performing any analysis; otherwise, the investigation can be jeopardized. If not done properly, your analysis will almost certainly alter file access times. Examinations should be conducted on a forensic duplicate of the original evidence, or via forensic evidence files. Using unsound tools can make it more to difficult get evidence admitted in court.
forensic compression
The compacting of an image file by compressing redundant sectors to reduce the amount of space it takes up.
spanning across multiple discs
Breaks the image file into chunks of a certain size so the image file can be backed up onto multiple CDs or other media.
As explained previously, forensic duplicating includes copying every bit of information on the disk regardless of whether or not it is part of the live data. This image provides a way for an investigator to do an in-depth analysis without altering the original evidence. Keep in mind that the speed of the duplication process varies greatly based on the physical state of the media, processor, and type of connection used for data transfer. In addition, some forensic tool kits offer forensic compression and spanning options. Forensic compression reduces image file size by compressing redundant sectors. Spanning across multiple discs is used when target media is smaller than the image file. For example, say that you are imaging or cloning a 500 GB drive and the drives you are using only hold 160 GB. You will need four drives to copy all the data. Spanning automatically breaks up the image into several smaller files (some programs let you preset file sizes).
cyclic redundancy check (CRC)
A common technique for detecting data transmission errors. Each transmitted message carries a numerical value based on the number of set bits in the message. The receiving device then applies the same formula to the message and checks to make sure the accompanying numerical value is the same, thereby verifying data integrity.
After an image is made, you need to verify that it was made correctly. Verification confirms that the original media did not change during the copy procedure. How can you be sure that the copy is identical to the original? Programs that perform a cyclic redundancy check (CRC), including CrCheck.exe, and CRC32, are available to do this job quite nicely for smaller storage devices. Larger storage devices require the use of a mathematical algorithm, such as the “fingerprint checker” Message Digest 5 (MD5) to show if a file or an entire hard drive image is the same or different. Secure Hash Algorithm SHA-1 and SHA-2 are more secure replacements for MD5. SHA-1 It’s SHA-1and SHA-2 were designed by the National Security Agency (NSA) and are two of a number of cryptographic hash functions published by the National Institute of Standards and Technology as a U.S. Federal Information Processing Standard.
The original suspect drive is hashed prior to imaging. The next step is to hash the image and see if they match.
These types of programs all use a checksum or hashing algorithm that holds up in court, verifying that a copy made using these tools is accurate and reliable.
Message Digest 5 (MD5)
MD5 is a one-way hash function, meaning that it takes a message and converts it into a fixed string of digits, which is then used to verify that the message hasn’t been altered.
Both the cyclic redundancy check (CRC) and the Message Digest 5 (MD5) confirmation ensure that the copying procedure did not corrupt the data. When MD5 is used, a change to even one bit of information on a large drive packed with data produces a different message digest. By comparing the original disks and copies, these methods can be used in computer forensic examinations to ensure that an image is an exact replica of the original.
Tools for Imaging the Hard Drive
When you need to make an exact image of the hard drive, you should have a variety of tools in your lab. Each tool has its own strengths and weaknesses. You should work with as many tools as you can, and you should become familiar with them so that you know their strong points and how to apply each of them.
host protected area (HPA)
Area of a hard drive created specifically to allow manufacturers to hide diagnostic and recovery tools. (Sometimes referred to as hidden protected area or hardware protected area.)
Basic Input Output System (BIOS)
Responsible for booting the computer by providing a basic set of instructions.
When choosing tools, one important consideration should be whether a tool can detect the presence of a host protected area (HPA). These areas are created specifically to allow manufacturers to hide diagnostic and recovery tools. In essence, a portion of the disk is set aside and can’t be used by the operating system. Neither the Basic Input Output System (BIOS) nor the operating system can see this hidden area. Companies such as Phoenix Technologies have developed products that can use this protected space to hold utilities for diagnostics, virus protection, emergency Internet access, and remote desktop rebuilds, but these products also allow consumers to use this area to hide data. Technically savvy criminals may conceal their activity in this area.
Full imaging will copy each sector of the original media, including data that is hidden, partially erased, encrypted, data contained in space that was swapped out of memory, and all of the unused space. A full image copy provides a wealth of information to the forensic investigator. When working with a suspect computer and making the image, remember these points:
- Record the time and date reported in the BIOS. This can be important, especially when time zones come into play.
- Remove the storage media (such as hard drives, etc.) before powering on the PC to check the BIOS.
- Do not boot a suspect machine’s operating system, as booting it can destroy evidence.
- When making a bit stream image, be sure to document how that image was created. This includes recording the date, time, examiner, and tools used.
When making the image, make sure that the tool you use does not access the file system of the target media containing the evidence.
- Use tools that do not make any writes or change the file access time for any file on the evidence media.
After the image is made, the original evidence media should be sealed in an electrostatic-safe container, cataloged, and initialed on the seal. The container should then be locked in a safe room. Anyone who comes in contact with the container should initial it as well. Consider making a second bit stream image of your first image, especially if the seized machine was used in a workplace. The employer may want to put the machine back into service.
Extracting Data from Personal Portable Devices
In addition to extracting images from hard drives, you can use tools for memory imaging and forensic acquisition of data from personal portable devices such as cell phones, iPads, iPods, GPS devices, and personal digital assistants (PDAs).
Obtaining a bit-for-bit image of the selected memory region can properly preserve evidence. During this process, no data is modified on the target device, and the data retrieval is not detectable by the device user. The memory image of the device includes all user applications and databases, passwords, and various other pieces of information that may be useful in a forensic investigation.
One such tool, Device Seizure from Paraben, enables you to acquire a wealth of data, including:
- SMS history (text messages)
- Deleted SMS (text messages)
- Phonebook (both stored in the memory of the phone and on the SIM card)
- Call history
- Received calls
- Dialed numbers
- Missed calls
- Call dates and durations
- Datebook
- Scheduler
- Calendar
- To-do list
- File system (physical memory dumps)
- System files
- Multimedia files (images, videos, etc.)
- Java files
- Deleted data
- Quicknotes
- GPS waypoints, tracks, routes, etc.
- RAM/ROM
- PDA databases
- Registry (Windows mobile devices)
In these devices, just as on a hard disk, you can hide databases, data between the application and file partitions, and data in unused file system space. A hacker can write a program that accesses a database upon synchronization of the device. The normal user or untrained investigator will have no idea it is there. Mobile forensic software will enable you to capture a bit-for-bit image of the memory and dump the contents into a file that can be examined by a hex editor.
Image and Tool Documentation
Chapter 3 briefly described the evidence log documentation necessary to present a good case. Let’s go into a little more detail here and specify some particular items of interest to document when you examine a system and make an image of its drive or memory contents:
- Collect the system date and time from the BIOS. Compare it to a reliable, known time source and note any differences.
- Record the drive parameters and boot order, along with the system serial numbers, component serial numbers, hardware component hashes, etc.
- On hard drives, record the number and types of partitions.
- On CDs, record the number of sessions.
- Note all operating and file systems used on the media.
- Document installed applications.
As an investigator, you must be prepared to prove your methods and documentation. The case of United States v. Zacarias Moussaoui, Criminal No. 01–00455-A, is a good example in which a defendant’s attorney disputed the authentication of hard drives submitted as evidence in discovery. The response explains that the FBI used three methods to image the drives. Page 2 of the response refers to methods approved by National Institute of Standards and Technologies (NIST). This brings up an interesting point. NIST does not approve imaging software. It tests the imaging software using internally accepted standards and publishes the results. Since all testing is done using standard methodologies, forensic investigators can easily compare tool sets and choose the ones that meet their requirements. The Web site for the Computer Forensic Tool Testing (CFTT) Project is http://www.cftt.nist.gov/. The “Imaging/Capture Tools” section references these tests for some of the tools.
To read the whole story about the drives in United States v. Zacarias Moussaoui, go to news.findlaw.com/hdocs/docs/terrorism/usmouss90402grsp.pdf or notablecases.vaed.uscourts.gov/1:01-cr-00455/docs/67282/0.pdf.
Many of today’s tools can capture all information needed for an investigation. But as the size of hard drives increases, so does the time it takes to sort through the volume of data acquired. When a case needs to move swiftly or disk space is limited, what do you do? In the next section, we’ll cover partial volume images and capturing individual types of information rather than doing a full volume image.