Chapter 3. Basic Animations
In This Chapter
• The Differences Between Window, View, and Layer Animation
• Preparing a View to Perform Layer Animation
Core Animation is a powerful and mature technology that enables you to create animations that are as simple as you like or as complex as you need. To perform simple animations on windows and views, Apple provides the animation proxy object that, when called, causes an implicit animation to play when some visual component such as the view frame, opacity, or location is changed. For basic layer animation, the CABasicAnimation class provides a way to animate between two values, a starting value and an ending value. In this chapter, we look at these most basic methods for implementing animation in your application.
The Simplest Animations
With Core Animation integrated into Cocoa, you can animate windows, views, and layers implicitly by simply setting the value of the parameter you are interested in animating to some new value. When using a layer (CALayer), all you need to do is set the value with a direct call. For example, if you want to change the bounds of a layer, you simply call [layer setBounds:newFrame] where layer is the CALayer object you’ve created and added to your layer tree and newFrame is a CGRect containing the values of the new bound’s size and origin. When this code is run, the change to the bounds of the layer is animated using the default animation for the keypath “bounds.”
Similarly, when using a window (NSWindow) or view (NSView), all you need to do is set the value of the window or view property using the animation proxy object. This means that instead of calling [view setFrame:newFrame] to set the view frame, for example, you instead call [[view animator] setFrame:newFrame]. The difference is that we have instructed the view’s animator proxy object to set the property for us—which implicitly animates the value from the current value to the value specified in newFrame.
The Animation Proxy Object
So what is the animator proxy object? The animator proxy object is available in both NSView and NSWindow. It implements the protocol NSAnimatablePropertyContainer. This container uses Key-Value Coding to set the actual value of whatever parameter was specified while doing the value interpolation and animation behind the scenes.
As the name implies, the animator proxy acts as an agent that takes the value you give it and handles animating the property from the starting or current value to the value specified. It then sets the property as if you had called set on the property explicitly.
The Differences Between Window, View, and Layer Animation
The idea behind animation in windows, views, and layers is the same; however, the implementation differs. In this section, we discuss one of the most common animations you will likely want to implement—frame resizing.
Window Resizing
Since the first version of Mac OS X, the ability to animate a window’s frame has been available to developers in the method -(void)setFrame:(NSRect)windowFrame display:(BOOL)displayViews animate:(BOOL)performAnimation. The first parameter is the new frame you are animating to. The second parameter tells the window to call –displayIfNeeded on all of its subviews, and the third parameter tells the window to animate the transition from its current frame to the frame specified in the first parameter. If this last parameter is set to NO, the change to the new frame happens immediately rather than progressively with animation.
NOTE
This call is different than what you use for changing the frame in both NSViews and CALayers. They both have a method called –setFrame. We discuss that more in moment.
With this built-in window frame resizing capability, why would you need to use Core Animation for changing a window’s frame? The answer is, simply, you don’t. For many cases when resizing, you can use the built-in functionality and you probably should. There may be times, however, when you want more control over animating windows. Keep several things in mind when doing so. NSWindow has an animator proxy just like NSView. When you call the animator, it animates the parameter you specified, but the parameter is the catch. If you want to move the window to a different position on the screen, for instance, you can either call - (void)setFrame:(NSRect)windowFrame display:(BOOL)displayViews (notice the missing third parameter) on the animator proxy object, or you can add an animation to the animations dictionary of the window itself.
First, let’s look at how to use the animator proxy. Take a look at the following.
[[window animator] setFrame:newFrame display:YES];
This makes it simple to animate the frame.
By default, the animation plays back over the course of 0.25 seconds. If you want to change the duration, use an NSAnimationContext object, which is the NSView/NSWindow counterpart to the CATransaction. If we wrap the call to –setFrame in an NSAnimationContext, the animation runs at the duration we specify. Listing 3-1 demonstrates how to do this.
LISTING 3-1 Wrap Frame Change in an NSAnimationContext

This causes the frame to change over the course of 5 seconds rather than the default of 0.25 seconds. As you see in the next section, this grouping mechanism is also what you use when you want to change the duration of an animation for an NSView.
Basic animation using Core Animation can also be used on windows and views, but there is a slight difference in how the animation is set up. As an alternative to calling –setFrame on the window animator proxy, we can create a CABasicAnimation and animate the frame property. Take a look at Listing 3-2 to see how to create, add, and run a basic animation on a window.
LISTING 3-2 Adding an Animation to the Window Animations Dictionary
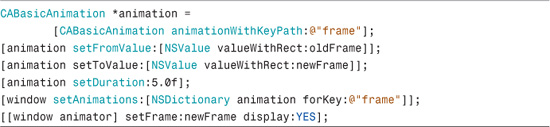
The visual effect is identical to what you see occur when running the code in Listing 3-1.
View Resizing
Views can be resized the same as windows can, but the keypath you use differs. You can call -setFrame on a view using the same code you used for a window, as shown in Listing 3-3.
LISTING 3-3 Animate View Frame Change in an NSAnimationContext

The only difference between this code and the code in Listing 3-1 is the object we’re calling –setFrame on—a view in this case.
If you want to use explicit animation, instead of animating the frame, animate the frameOrigin and the frameSize. Listing 3-4 shows how to animate both of these properties.
LISTING 3-4 Explicitly Animating Frame Origin and Size

Layer Resizing
Animating a layer’s frame is a bit different from doing the same in windows and views. There is no animator proxy available in a CALayer object, but rather animation is always used when you make an explicit change to a property. In fact, if you don’t want animation used, you have to explicitly turn animation off. Listing 3-5 demonstrates how to do this.
LISTING 3-5 Explicitly Disabling Layer Animation

NOTE
Notes on Disabling Animations
Alternatively, you can disable animations in a layer based on a keypath by using the delegate method:- (id<CAAction>)actionForLayer:(CALayer *)layer forKey :(NSString *)key
It returns an object that implements the CAAction protocol. It might also return NSNull, which in effect disables the animation for the key specified in the key parameter of the delegate method. When you implement this delegate method, simply check to see if the layer passed in is the one you are working with, and then check to see if the key field is the same as the keypath for which you want to disable animation. If it is, return NSNull.
The CATransaction class is the Core Animation analogue to AppKit’s NSAnimationContext object we used in Listing 3-2 and 3-4 for windows and views. Just like NSAnimationContext, CATransaction enables us to set the animation duration. Listing 3-6 demonstrates how to do this.
LISTING 3-6 Setting Animation Duration in a Layer

As you might suspect, we can also animate properties of a layer explicitly. To achieve the exact same effect as we did with the code in Listing 3-6, we can instead use the code in Listing 3-7.
LISTING 3-7 Explicitly Animating the Layer Bounds Property

NOTE
Notes on Frame Animation
You might have noticed in the layer example code, we are calling –setBounds rather than –setFrame. It is common to want to move a layer around its containing view, which causes many first-time Core Animation programmers to attempt to use frame as the keypath for layer resizing. As you will quickly learn, however, animating the frame itself won’t work. The frame field of the layer is a derived value—calculated from the position, bounds, anchorPoint, and transform properties. This means that although you can set the frame explicitly, it will not animate. This is not a problem though. You just need to determine whether you want to move the frame or resize the frame. If you want to animate the size of the layer’s rectangle, use bounds as your keypath. If you want to move the frame, use position as your keypath. If you want to move and resize the layer at the same time, create two animations, one to animate the bounds and one to animate the position.
In Listing 3-6, we used the CABasicAnimation class, the primary animation object for basic animation. We take a deeper look at it shortly, but first we are going to set up a simple Xcode project to demonstrate basic layer animation.
Preparing a View to Perform Layer Animation
The first thing you want to do when you create a Core Animation based project is to make sure the root layer of your view is layer backed. Let’s walk through creating a Core Animation-based project and set up the root layer on OS X.
Create the Xcode Project
To create our application, follow these steps:
1. In Xcode, press Shift-![]() -N and select Cocoa Application in the Project Templates dialog.
-N and select Cocoa Application in the Project Templates dialog.
2. Name the project CA Basics and click Save.
3. Expand the Frameworks group, Control-click the Linked Frameworks subgroup, and select Add > Existing Frameworks.
4. In the resulting dialog, navigate to /System/Library/Frameworks and select QuartzCore.framework. Click Add twice, as prompted.
5. Control-click the Classes group and select Add > New File.
6. In the New File template dialog, select Objective-C class under the Cocoa group and click Next.
7. Name the file AppDelegate.m and make sure Also Create “AppDelegate.h” is checked; click Finish.
8. Select AppDelegate.h to open the file in the code editor and add the following code:

9. Select AppDelegate.m to open the file in the code editor and add the following code:
10. Under the Resources group in your project, double-click MainMenu.xib to open the XIB in Interface Builder.
11. From the Library palette in Interface Builder, drag an NSObject object into MainMenu.xib and rename it to AppDelegate.
12. Make sure the AppDelegate object is selected. In the object inspector, click the Identity tab and change the Class field to AppDelegate.
13. In the MainMenu.xib, Control-click on File’s Owner and drag the connection to the AppDelegate object. Select delegate in ensuing context menu.
14. In the MainMenu.xib, Control-click on AppDelegate and drag the connection to the Window object. Select window in the ensuing context menu.
15. Save the xib file and return to Xcode.
The project is now set up. In the preceding steps, we created an application delegate that we use to provide control to our layer, window, and view.
Add the Animation Layer to the Root Layer
To add a layer that we will be animating, do the following:
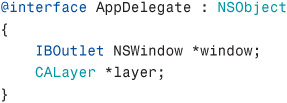
1. Open AppDelegate.h and add a CALayer instance variable:
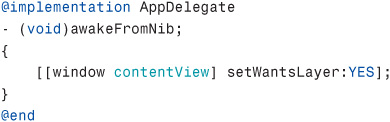
2. Open AppDelegate.m and add the layer initialization code in -awakeFromNib:
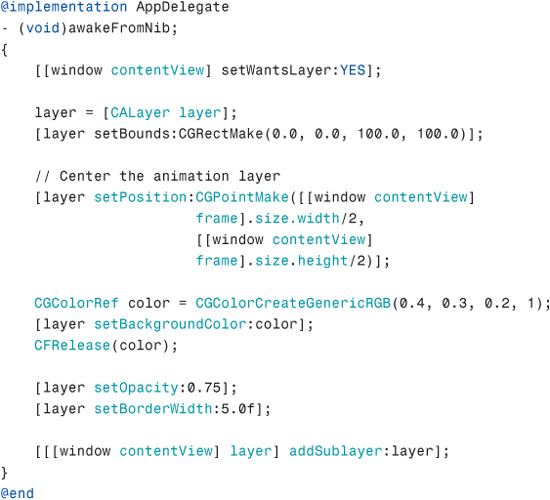
Note About Centering the Layer
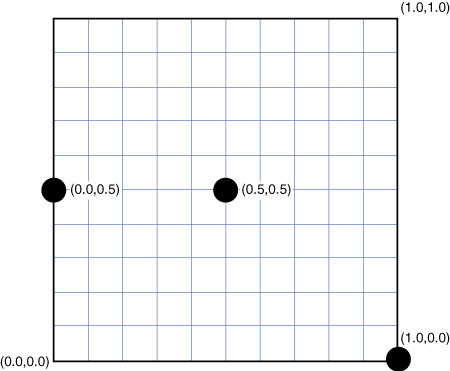
We could call –setFrame on the layer before adding it to the root layer of our window’s contentView layer tree. However, we have decided instead to set the bounds of the layer first and then set the position. (Remember frame is a derived value based on position, bounds, anchorPoint, and transform.) Setting the bounds and position properties like this makes it simpler to center the layer in the containing view. We simply obtain the parent view’s width and divide it in half, and then we take the parent view’s height and divide it in half. We then call –setPosition on the layer, which perfectly centers our layer in the contentView. This works because the layer’s anchorPoint defaults to 0.5,0.5—the center of the containing view. If we were to change the anchorPoint to 0.0, 0.0 the bottom left of the layer would then display at the center of the contentView. Figure 3-1 shows the values for the different anchor points you can use on your layer.
FIGURE 3-1 Layer Anchor Points
Layer Allocation Considerations
Another consideration of which you should be aware when you set up your layers is that even though you have an instance variable (ivar) of your CALayer, it is not retained unless you explicitly retain it. In the world of memory management in Objective-C, the rule of thumb is that you retain only that which you need to retain. You should not retain objects you don’t need to hold onto, and you should retain objects that you do need. It sounds simple, but in practice it tends to be more elusive. In our code in the previous steps, you see we allocate our layer by using the convenience initializer layer = [CALayer layer];. This allocates an auto-released CALayer object. When the layer object goes out of scope in the –awakeFromNib, it will be auto-released unless it is retained. In our case, we are adding it to the contentView layer sublayers array, which is retaining the layer for us. If, however, we wanted to wait until later to actually add the layer that we initialized in –awakeFromNib to the sublayers array, we need to allocate the layer by using layer = [[CALayer alloc] init]. Then we need to release the layer in the dealloc method with a call to [layer release];.
The first time you go to use the CALayer method called –removeFromSuperlayer, you will find that if you try to add the layer to the sublayer array again, it will crash your application. This is because the layer will be released in the call to –removeFromSuperlayer. You must retain the layer yourself if you want to remove it from its superlayer but keep it around in memory.
Using CABasicAnimation
At this point, you have already seen the CABasicAnimaion object in action. In this section, however, we consider in detail how to take advantage of this class and basic animations.
Basic animation as implemented using the CABasicAnimation class animates a layer property between two values, a starting and an ending value. To move a layer from one point to another in its containing window, for example, we can create a basic animation using the keypath position. We give the animation a start value and an ending value and add the animation to the layer. The animation begins immediately in the next run loop. Listing 3-8 demonstrates how to animate the position of a layer.
LISTING 3-8 Animate the Layer Position
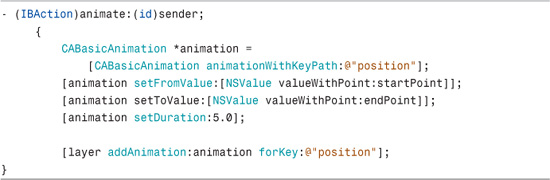
This code moves the position of a layer from startPoint to endPoint. These two values are NSPoint objects. The position property is the center point of the layer. It is set relative to its containing layer.
If you add this listing to your project we created in the previous section, you simply connect a button to the action in Interface Builder. To do so, follow these steps:
1. Open AppDelegate.h and add an action declaration, as follows:

2. Open AppDelegate.m and add the animate implementation code provided in Listing 3-8.
3. Open Interface Builder. From the Objects Library, drag a button onto the main window.
4. Control-click the button you just dragged on the main window and drag a connection to the AppDelegate object. Select the animate action.
5. Return to Xcode and Build and Go to see this animation run.
That’s it. That is really all there is to animating a layer. You create the animation, set the to and from values, set a duration (which is optional as the default 0.25 seconds will be used if you don’t specify a duration explicitly), and add the animation to the layer you want to animate.
That being said, you will not likely leave it at that because the details of implementation add nuance and complexity. For example, the first time you run the animation from Listing 3-8, you notice that while your layer animates to the correct position in the parent view using the duration you specified, when the animation completes, it jumps right back to its starting position. Is this a bug? How can we fix it? We get to that next.
Animating Versus Setting Layer Properties
When you create your CABasicAnimation, you need to specify a start and stop value for the animation using the calls to –setFromValue and –setToValue respectively. When you add your basic animation to a layer, it runs. However, when the property animation finishes, in the case of animating the position property, the layer snaps right back to its starting position.
Remember that when animating, you use at least two objects. These objects are the layer itself, a CALayer or CALayer-derived object, and the animation that you assign to it—the CABasicAnimation object in our previous examples. Just because you have set a final value (destination) for your animation object does not mean that the layer property being animated assumes this value when the animation has finished. You must explicitly set the layer’s property so that when the animation has finished, the property you animated will actually be set in the layer to the to-value you specified.
You can simply cause your animation to stop at the end point you specify, but this is only a visible stickiness, if you will. The internal value is still the same. To actually change the internal model value, you have to explicitly set the property in question. For example, to explicitly set the position property, you need to call –setPosition on the layer. This creates a little problem, though.
If you set the value of a property by calling -set on that property explicitly, the default animation will be used rather than one you might set for the property you are animating. Listing 3-9 demonstrates one way you might try to set the position. Notice that we have created a basic animation to use for the position property; however, the explicit call to –setPosition on the layer overrides the animation we set in the line that follows it, making the basic animation completely useless. If you try this code, you see that although our layer ends up in the right position, it uses the default duration of 0.25 seconds rather than the 5 seconds we have explicitly set in the animation.
LISTING 3-9 Animating and Updating the Position Property
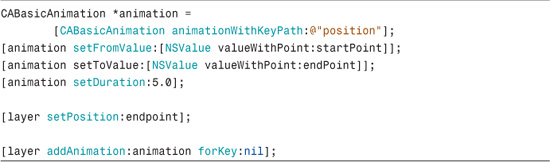
So now the question becomes, how can you get the animation to use the specified duration? Take a look at the last line in Listing 3-9. Notice that the forKey: parameter of the call is set to nil. This is the reason why the animation is not overriding the default. If you change the last line to [layer addAnimation:animation forKey:@”position”], the animation will work using the duration as expected. This tells the layer to use the new animation we have specified for this keypath whenever it needs to be animated.
Implicit Layer Animation and the Default Timing Function
We can use the CATransaction class to override the default duration as we previously did in this chapter, and it does make it simple to animate the layer using the duration we specify. If we use the code in Listing 3-10, the position property is set in the layer and the property is animated on its way there as you might expect.
LISTING 3-10 Overriding the Default Duration for Implicit Animation
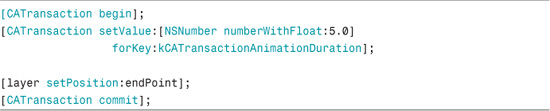
However, when you run this code, you see that although it animates the position over a five second duration, it also applies the default media timing function that is kCAMediaTimingFunctionEaseInEaseOut. This function causes the animation to start slowly and then speed up only to slow down again as it approaches its destination. This functionality is fine if that is the media timing function you want, but if you want it to be linear (kCAMediaTimingFunctionLinear), for example, you need to consider another way. And there is no apparent way to set the default media timing function for implicit animations.
This means that if you want to use any other timing function than the default, you have to use explicit animation, as shown in Listing 3-9.
Visual Stickiness
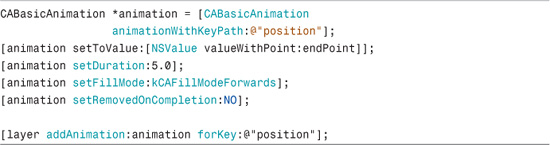
Another approach we might take is to set several properties in our animation object that cause the animation to be sticky when it finishes. In other words, the layer will appear to be at the destination value. The stickiness in this scenario, however, is visual only, which is to say that the underlying value of the layer property, position continues to be the value the position was when the animation started. This is a fine approach if you don’t need the internal value to be updated. Listing 3-11 shows how to implement this method, making the layer stick at the end of its duration.
LISTING 3-11 Making the Layer Position Sticky
NOTE
This code effectively causes the animation to finish at the destination, but remember it is only a visible effect. The internal position value of the layer is still at the start value. This becomes problematic if you need to obtain the current value after your animation has run.
We need to set two animation properties for the layer to stay at the destination position. First is the fill mode. We tell it to anchor the animation value to the final value by calling –setFillMode, passing it the constant kCAFillModeForwards. Then we must tell the animation not to remove itself from the layer’s array of animations when the animation completes by calling –setRemovedOnCompletion passing it NO.
Useful Animation Properties
You have already discovered all the properties that you can animate in a layer. However, there are numerous properties available in the animation (CABasicAnimation) object that can give you greater control and enhance your animations.
• Autoreverses
By setting autoreverses to YES, the animated property returns to its starting value after it has reached its destination value, but instead of snapping back to the start value, it animates there.
• Duration
Duration is a parameter you are quite familiar with at this point. It sets the amount of time to be taken between the fromValue and toValue of the animation. Duration is also affected by the speed property.
• RemovedOnCompletion
The default value for this property is YES, which means that when the animation has finished its specified duration, the animation is automatically removed from the layer. This might not be desirable. If you want to animate the property you’ve specified again, for example, you want to set this property to NO. That way, the next time you call –set on the property being animated in the animation, it will use your animation again rather than the default.
• Speed
The default value for this property is 1.0. This means that the animation plays back at its default speed. If you change the value to 2.0, the animation plays back at twice the default speed. This in effect splits the duration in half. If you specify a duration of 6 seconds and a speed of 2.0, the animation actually plays back in three seconds—half the duration specified.
This property is useful in an animation group. It specifies a time for the animation to begin playing in relation to the time of the parent group animation’s duration. The default is 0.0. Animation grouping is discussed in the next section, “Animation Grouping.”
• TimeOffset
If a time offset is set, the animation won’t actually become visible until this amount of time has elapsed in relation to the time of the parent group animation’s duration.
• RepeatCount
The default is zero, which means that the animation will only play back once. To specify an infinite repeat count, use 1e100f. This property should not be used with repeatDuration.
• RepeatDuration
This property specifies how long the animation should repeat. The animation repeats until this amount of time has elapsed. It should not be used with repeatCount.
Animation Grouping
In the previous section, “Useful Animation Properties,” we defined two particular properties that are only pertinent to animation grouping: beginTime and timeOffset. Before discussing those, however, let’s consider why you might want to use an animation group rather than just adding a list of animations to the layer.
In Listing 3-12, you can see that we build up a list of basic animations and simply add them to the layer. If you want all your animations to begin at the same time and each of them have the same duration, this method is perfectly adequate.
LISTING 3-12 Adding a List of Animations to the Layer
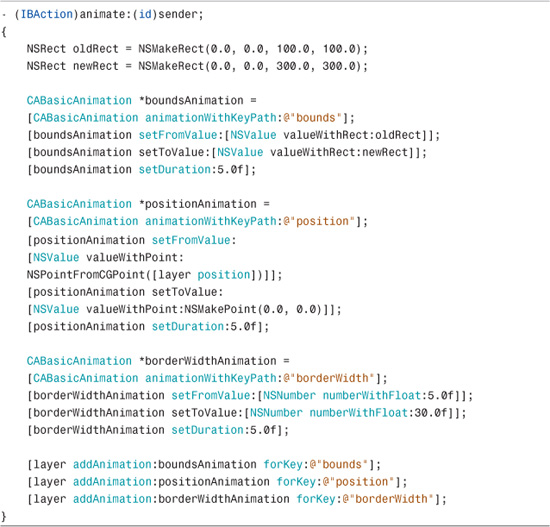
Each animation has a duration of 5 seconds, and they begin to play back simultaneously in the next run loop and they end at the same time. The position of the layer moves to the bottom left corner, the border width grows to 30 pixels, and size of the layer grows from 100 × 100 pixels to 300 × 300 pixels.
Let’s say that we would prefer that, rather than having all our animations play simultaneously, we want them to play back sequentially—one following the previous. We can achieve this by using a group animation and setting the beginTime field. I should mention now that in this case it might make more sense to use a keyframe animation instead, but you need to read Chapter 4, “Keyframe Animation,” to see how that works.
We must explicitly specify the duration of our animation group so that the time for each individual animation can be split up accordingly. In our example, we set our duration of the animation group to last 15 seconds and get each of our individual animations to play back for 5 seconds. Listing 3-13 shows how we can take a previous example and instead use animation grouping for greater control over animation playback.
LISTING 3-13 Using Animation Grouping

Notice that we have set the duration for each of the individual animations to the full fifteen seconds, but each of the animations have their begin times set to start one after the other at 0.0, 5.0, and 10.0.
You also notice that the only thing we add to the layer is the group animation. The animation objects in the group have been added with a call to –setAnimations.
You can see that there is a good bit of flexibility provided through grouping. You just need to tweak your durations and begin times to suit your needs. If you want the animations to overlap, you just change the begin times to reflect when you want them to start playing back. You want to keep your duration times all the same; otherwise each keypath value (that is, bounds, position, and borderWidth) in the layer snaps back to its original value when its duration has completed, which gives predictable, yet seemingly sporadic, behavior. Keeping all the durations the same makes them wait the full duration before they snap back. If you don’t want them to snap back, you need to explicitly set their values when the animation finishes, which we previously discussed in the section, “Using CABasicAnimation.”
Summary
Basic animation is powerful. You have a lot of flexibility in the way you can achieve your application animation goals. Often you won’t need to go beyond what is provided for you in basic animation. Keep it simple. If all you need is the animator proxy, use it. If all you need is to set a layer property, call that property’s set method and let Core Animation handle the rest. If you need to have more flexibility over the animation parameters, use a CABasicAnimation object and set all the animation properties yourself. Just remember that probably more often than not, you only need basic animation.