Chapter 9. Quartz Composer Layer
In This Chapter
• Creating a Multi-Video Stream with Quartz Composer
• The Quartz Composition Layer and OpenGL
Quartz compositions provide a method for developing complex visualizations. Quartz Composer is a visual development tool that enables you to create visualizations such as screensavers and motion graphic animations by simply dragging and dropping patches and connecting the different inputs and outputs from one patch to another. Although you can create your own custom patches, there are plenty of patches to choose from in Quartz Composer’s toolbox. Simply drag the patches you are interested in to the patch editor and start connecting the inputs and outputs.
NOTE
Okay, it’s not that simple, but you get the general idea. If you want to learn more about how to use Quartz Composer, be on the lookout for Real-Time Motion Graphics with Quartz Composer, by Graham Robinson and Surya Buchwald, coming soon from Addison-Wesley.
Inputs are often things such as images or the video input of your iSight camera. Outputs are often things such as composited images that have had some effect applied to them, such as a filter, mask, or transformation.
If you are not familiar with Quartz Composer, you might want to do a search for .qtz files on your computer, and open them in Quartz Composer to see the kinds of visualizations that are possible.
In this chapter, you create a simple Quartz Composition using Quartz Composer. You then load the composition into a QCCompositionLayer and add some Cocoa controls for controlling the various input values of the composition.
Creating a Multi-Video Stream with Quartz Composer
In keeping with the theme of the previous two chapters, we continue to use video as the rendering medium. This composition will consist of two Movie Loader source patches and two Billboard patches that display the movies loaded by our Movie Loader patches. Movie Loader patches simply do what the name implies—they load movies from disk to be used as an input source for a composition. It is a type of source patch. Billboard patches are renderer patches that display the video for us. You connect the output image of the Movie Loader patch to the input image of the Billboard patch and the movie will render.
Quartz Composer is found in /Developer/Applications. Go ahead and start it.
To create the composition, follow these steps:
1. Select File > New Blank in Quartz Composer to create a new blank composition.
2. Drag two Movie Loader Source patches from the Patch Browser to the editor in the Root Macro Patch.
3. Drag two Billboard Renderer patches from the Patch Browser to the editor in the Root Macro Patch.
4. Drag a Clear Renderer patch from the Patch Browser to the editor in the Root Macro Patch.
5. Click the Image output of one of the Movie Loader patches, and drag it to the Image input of one of the Billboard patches.
6. Click the Image output of the other Movie Loader patch, and drag it to the Image input of the remaining Billboard patch.
7. Click the Clear patch number badge and set it to Layer 1. This ensures that our clear color is the backmost layer.
8. Select one of the Movie Loader patches and provide a path to a QuickTime movie in the Movie Location input parameter in the patch inspector (see Figure 9-1). Repeat this for the other Movie Loader patch.
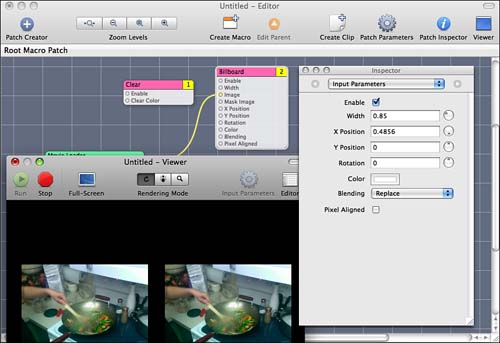
9. As shown in Figure 9-2, adjust the X Position and Width parameters for each of the Billboard patches so that the videos display side by side.
For Billboard Layer 2, specify Width: 0.85, X Position: -0.4856.
For Billboard Layer 3, specify Width: 0.85, X Position: 0.4856.
These settings cause the videos to display side by side.
FIGURE 9-1 Set Movie Location Parameter in Movie Loader
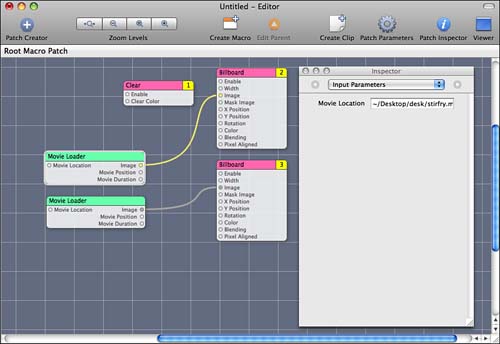
FIGURE 9-2 Set X/Y and Width/Height for the Billboards
10. Save the composition to a .qtz file.
11. If the composition is not already running, click the Run button in the composition viewer to watch the two videos play back.
Creating Controllable Parameters
The power of using Quartz Compositions is found in its capability to provide inputs and outputs that are controllable outside of the composition. Our QCCompositionLayer provides a way to set any parameter that we have published in the composition.
When we created our composition, we explicitly specified the path to the movie files we want to use in the Movie Loader patches. What if instead we decide we want to allow the user to specify the paths to video files to use and pass those paths along to the composition? This is done by publishing the Movie Location parameters of the Movie Loader patches.
To publish the Movie Location input parameters, do the following:
1. In Quartz Composer, Control-click the Movie Location input on the first (top) Movie Loader patch and select Published Input > Movie Location.
2. Name the input movie1_location and press Enter.
3. Control-click the Movie location input on the other Movie Loader patch and select Published Input > Movie Location.
4. Name the input movie2_location and press Enter.
5. Save the composition.
Now, the locations of the movie files can be set from within our application code. Next, we create an Xcode project that uses a QCCompositionLayer to display the composition.
Creating the Xcode Project
To create our hosting application, do the following:
1. In Xcode, press Shift-![]() -N and select Cocoa Application in the Project Templates dialog.
-N and select Cocoa Application in the Project Templates dialog.
2. Name the project Dual Video QC Composition and click Save.
3. Expand the Frameworks group, Control-click the Linked Frameworks subgroup, and select Add > Existing Frameworks.
4. In the resulting dialog, navigate to /System/Library/Frameworks and select both QuartzCore.framework and Quartz.framework. You need to click Add twice, when prompted.
5. Control-click the Classes group and select Add > New File.
6. In the New File template dialog, select Objective-C class under the Cocoa group and click Next.
7. Name the file AppDelegate.m and make sure Also Create “AppDelegate.h” is checked. Click Finish.
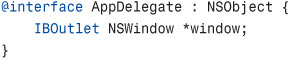
8. Click AppDelegate.h to open the file in the code editor and add the following code:
9. Click AppDelegate.m to open the file in the code editor and add the following code:
10. Under the Resources group in your project, double-click MainMenu.xib to open the nib in Interface Builder.
11. From the Library palette, drag an NSObject object into MainMenu.xib and rename it to AppDelegate.
12. Make sure your AppDelegate object is selected. In the object inspector, click the Identity tab and change the Class field to AppDelegate.
13. In MainMenu.xib, Control-click on File’s Owner and drag the connection to the AppDelegate object. Select delegate in the ensuing context menu.
14. In the MainMenu.xib, Control-click on AppDelegate and drag the connection to the Window object. Select window in the ensuing context menu.
15. Save the XIB file and return to Xcode.
The project is now set up. In the preceding steps we created an application delegate that we can use to provide functionality between our views and our data. In the next section, we demonstrate how to implement adding a Quartz Composition layer, QCCompositionLayer, to our window.
Adding a QCCompositionLayer to the Window
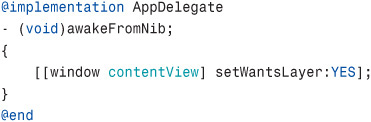
Now that we have an outlet defined for the window in the AppDelegate class, we can add the QCCompositionLayer to the root layer of the window’s content view. Listing 9-1 demonstrates how this is done in our –awakeFromNib method.
LISTING 9-1 Implementing the QCCompostionLayer
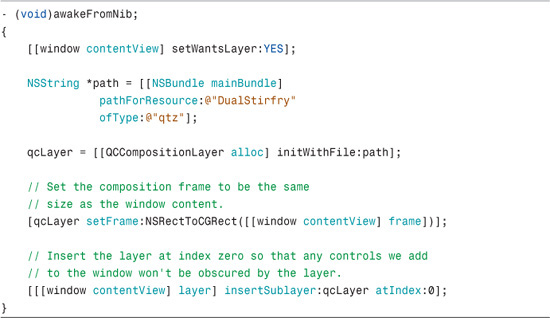
The instance variable qcLayer is declared in the AppDelegate header file. We initialize it here in the –awakeFromNib because we are guaranteed that our window and view are initialized and can, therefore, be used.
Notice that the path we use to load the Quartz Composition file we created earlier is obtained from the main bundle. At this point you should add your Quartz Composition file that you created earlier to the project by Control-clicking the Resources group in the project tree and selecting Add Existing Files. Navigate to the location of your Quartz Composition file and click Add when you’ve located it. Now the file will be included in the application bundle when it is built and you can access it using the code specified in Listing 9-1.
Passing Parameters to the Quartz Composition
The parameters or inputs that we published while creating the Quartz Composition called movie1_location and movie2_location can now be accessed through key-value coding. We have set default values for these fields in the actual composition, but now we can set them to something else based on user input. We just need to add a couple of buttons and an open file dialog to set the path for each input parameter based upon user selection.
To obtain the path for the selected file, you need to create two buttons in Interface Builder and two IBActions in Xcode. First create the actions in Xcode. Listing 9-2 demonstrates how to use an NSOpenPanel to obtain the path to a movie file and then set the parameter called movie1_location.
LISTING 9-2 Obtain Movie Path Using NSOpenPanel
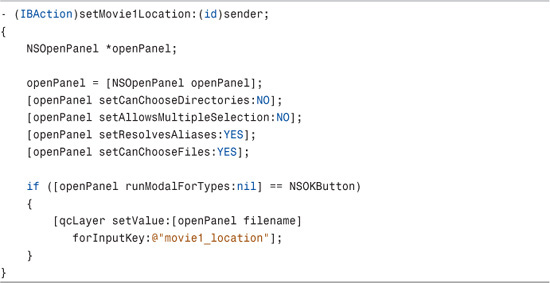
You can duplicate this code in a second IBAction method called –setMovie2Location and simply change the input key to movie2_location.
The Quartz Composition layer provides the method –setValue:forInputKey through the QCCompositionRenderer protocol specifically for setting the value of a published input inside of your composition. What is interesting, though, is that we could also set the movie location field using Key-Value Coding with a call to –setValue:forKeyPath. You can simply change the –setValue to use the following instead:
![]()
Prior to the availability of QCCompositionLayer, you had to use a QCView object to display Quartz Compositions in a Cocoa application. If you wanted to control patches using bindings, you also had to instantiate a QCPatchController. The keypath, patch.movie1_location.value is the keypath you need if you use a QCPatchController because “patch” refers to the root level patch in the composition. This mechanism is preserved in a QCCompositionLayer, so you can access the value directly using bindings. This is especially useful for when you want to bind a value for one of your Cocoa controls using Interface Builder.
Getting Image Data from the Composition
In the same way that we published the inputs for our movie locations, we can publish outputs as well, but first let’s change our composition to add a filter to the image output. Then we can capture that image output back in our Cocoa application.
To add a filter to the compositions:
1. Open the Quartz Composition file in Quartz Composer, and drag a Dot Screen patch from the filters in the Patch Creator list to the editing area.
2. Drag the Image output of the second Movie Loader to the Image input of the Dot Screen patch.
3. Drag the Image output of the Dot Screen patch to the Image input of the second Billboard patch.
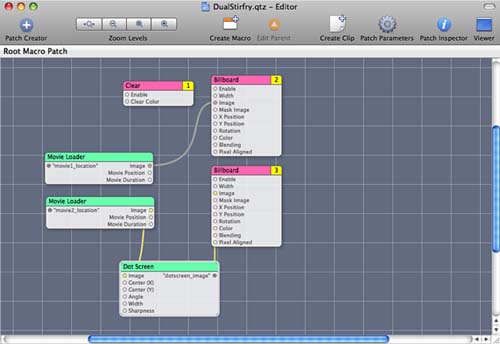
Your composition should now look like what you see in Figure 9-3.
FIGURE 9-3 Composition with Dot Screen Patch
Now we need to publish the Image output for the Dot Screen patch so that we can obtain the current image with the filter applied at any time during the video playback. To publish the Image output of the Dot Screen patch, follow these steps:
1. Control-click the Dot Screen patch.
2. Select Published Outputs > Image.
3. Name it dotscreen_image and press Enter.
4. Save the composition.
Obtaining the Current Image in Code
Now that we have published the Image output in our composition, we can obtain the image data for the current image as an NSImage object. In fact, we can obtain the image data in several different formats by specifying the type in our call to –valueForOutputKey:ofType. In the example code we are simply going to set the contents field of our root layer to the current image. In that case, we want to obtain a CGImageRef instead of an NSImage. This is trivial because all we need to do is specify CGImage as the type to return to our –valueForOutputKey call. Listing 9-3 demonstrates how we can obtain the current image as a CGImageRef and set the contents of the root layer.
LISTING 9-3 Obtaining Image Data as CGImageRef
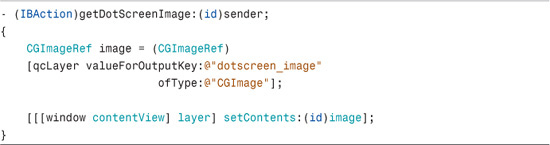
We request the dotscreen_image output from the composition with a type of CGImage, and we get back a CGImageRef object that we use to set the contents of the root window content view layer.
The call to –valueForOutputKey:ofType can return an NSImage, NSBitmapImageRep, CGImage, CIImage, CVPixelBuffer, CVOpenGLBuffer, or CVOpenGLTexture. Simply substitute for the name CGImage and change the type returned according to the image type you want to receive instead.
Notice that the –getDotScreenImage call is an IBAction. In interface builder, you need to add a button to the window and connect it to this action in the AppDelegate object. Figure 9-4 shows what the example project looks like when run.
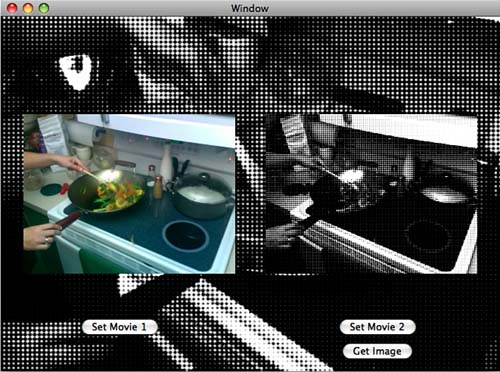
FIGURE 9-5 shows what the example project looks like when the Get Image button has been pressed. It sets the contents field of the root layer to the current image from Movie 2, which has had the dot screen filter applied to it.
You determine which inputs and outputs are available to your code in Quartz Composer. You can develop complex visualizations and then easily control them programmatically. Just keep in mind that you can access only inputs and outputs that are available in the Root Patch. If you create a macro patch (a patch that encapsulates other patches), you need to expose inputs and outputs at the Root Patch level, or you cannot access them in your calls to –setValue:forInputKey and –valueForOutputKey:ofType.
FIGURE 9-4 Running the QCCompositionLayer Example Project
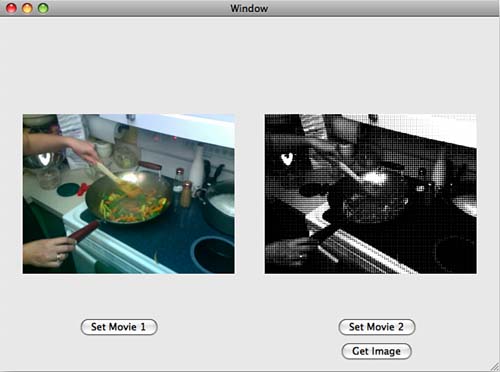
FIGURE 9-5 Setting the Contents of the Root Layer to the Current Filtered Image
The Quartz Composition Layer and OpenGL
All the power of OpenGL is at your fingertips in a QCCompositionLayer as it inherits directly from CAOpenGLLayer, which we discuss in detail in Chapter 8, “OpenGL Layer.” What we learned in that chapter is that we first determine whether we should draw using –canDrawInCGLContext and then draw in the context using –drawInCGLContext. We can override both of these methods if we create our own QCCompositionLayer-derived class and add additional functionality.
This gives you the power to do any additional rendering you might want to do before displaying the current frame in the composition. Remember that Quartz Compositions are playing, which is to say that they are rendering to the screen on a regular basis. The frequency is not something that you control because it is related to your hardware and the video refresh rate. What you do know, however, is that if –drawInCGLContext has been called, the next frame is ready to be rendered, and –drawInCGLContext has provided you a CGLContextObj object into which you can render your own drawing. Listing 9-4 demonstrates what the default implementation of a QCQuartzCompositionLayer derived class looks like.
LISTING 9-4 Default QCCompositionLayer Derived Class Implementation
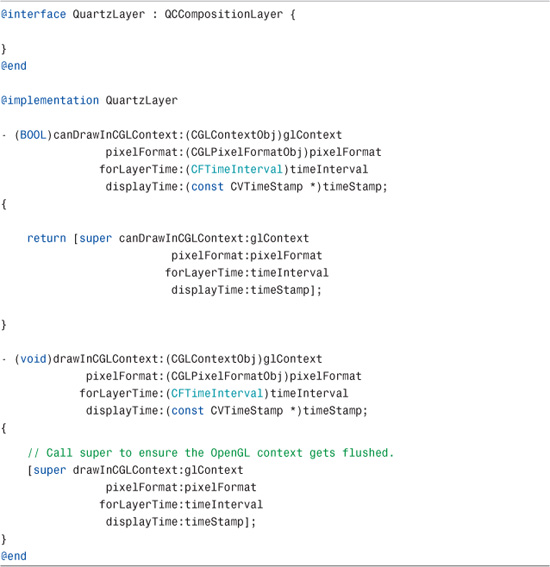
The call to –canDrawInCGLContext can be overridden depending on whatever criteria you specify. When rendering video like we did in the Chapter 8, we used this call to determine if the next video frame were ready to draw. If it were, we returned YES; otherwise we returned NO. Then, if we returned YES, –drawInCGLContext actually handled the drawing of our quads in the OpenGL context. Take a look at Chapter 8 if you want understand how to take advantage of this feature.
Summary
Quartz compositions provide a simple way to create complex visualizations. The limit is only in what you can think up. This sounds like a cliché, however, it is actually the truth. There are times when your application requires animation or other visual elements and you might be tempted to code them by hand. You might want to reconsider that approach depending on how complex the visualization is.
Why write code when you can simply add the elements and effects to a Quartz composition and control those effects and elements by publishing inputs and outputs? When you start thinking this way, ideas can begin to open up in your mind. The Core Animation Quartz Composition Layer, QCCompositionLayer, provides an intuitive way to incorporate your compositions into your Cocoa applications.