Chapter 11. User Interaction
In This Chapter
• Hit Test
• Example Application: Color Changer
What is the point of a graphical interface if a user cannot interact with it? However, a quick exploration of the Core Animation API reveals that it has no direct way to receive user interaction!
This chapter focuses on how to add interaction points to an application, specifically to Core Animation. We look at both mouse interaction and keyboard input.
The Click of a Mouse
The most common interaction users expect from your application is the ability to click the mouse on various interface elements to perform some function, such as clicking a Save button. In a normal Cocoa application, these type of events are handled with NSResponder. However, because Core Animation was designed to be as light as possible, CALayer does not inherit from NSResponder, and the layer cannot accept mouse events. Instead, you need to route the event through NSView.
When working with layer-backed views, your app can capture mouse events in an NSView and process them there. However, things get a little more interesting when you work in a configuration in which there is only one NSView for an entire stack of CALayer objects. Because the NSView is the only object that receives events, it must figure out what layer was clicked on and what action to take.
Hit Testing CALayer Objects
When an application has only one (or at least very few) NSView object, all user interaction becomes the responsibility of that lone NSView. It receives all mouse and keyboard input and needs to determine how to process that input. Before diving into the meat of figuring out how to receive events, we first need to create a custom NSView that receives mouse events and hands them off to a delegate object, as shown in Listing 11-1.
LISTING 11-1 LZContentView Header for Receiving Mouse Events
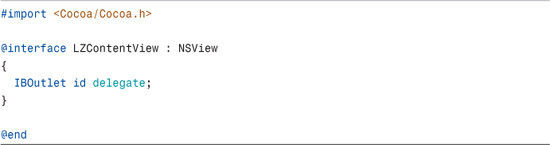
The header subclasses NSView adds one instance variable (or ivar) to the object; the delegate. Because this delegate is assigned in Interface Builder, it is flagged as an IBOutlet. Whenever we want to bind an object in Interface Builder that is not defined as an id, we need to declare it as an IBOutlet to let Interface Builder know it should be exposed.
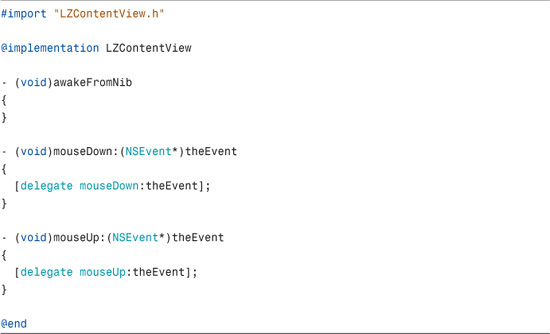
We want to capture only the -mouseDown: and -mouseUp: events in the NSView subclass, as shown in Listing 11-2. When captured, those events are sent to the delegate, which handles all other interactions.
LISTING 11-2 LZContentView Implementation File for Receiving Mouse Events
Hit Test
When a user clicks on an application, two NSEvent objects are generated for that click. One event is generated when the mouse button is pushed down and a second when the button is released. To follow this example, applications should also differentiate between mouseDown and mouseUp events and react accordingly.
When acting on a mouse event, the first thing we need to do is to determine which layer is being clicked on. Because the NSView has an unknown number of layers in its hierarchy, we cannot assume which layer is being clicked just by its location. Fortunately, CALayer has a -hitTest: method designed to solve this issue. When CGPoint is passed to the root CALayer, it returns the deepest CALayer that the point falls within. This enables you to quickly determine which CALayer has been clicked so that your app can act accordingly.
NOTE
This is an important point to note. Most events in OS X that we think of as reacting to a mouse click are actually reacting to NSEvent’s mouseUp method. For example, click on a window’s Close button and drag the mouse cursor off the button before releasing the mouse button. You notice that the window did not close. This is intended as a last chance for the user to cancel an action they did not intend.
Example Application: Color Changer
To demonstrate how the hit test works, we build a simple application that has three buttons: Red, Green, and Blue, along with a color bar that displays the choice, as shown in Figure 11-1.
FIGURE 11-1 Color Chooser Example
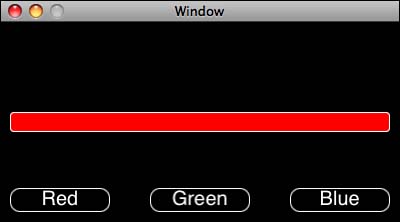
The buttons and the color bar are built using CALayer objects. In the first version of this application, we determine which button is clicked on and respond.
LZButtonLayer
The first step to building this application is building the buttons. The buttons are composed of two CALayer objects:
• The main layer (the LZButtonLayer itself), which handles the border and corner radius (as shown in Listing 11-3)
• A CATextLayer object, which display the text (as shown in Listing 11-4)
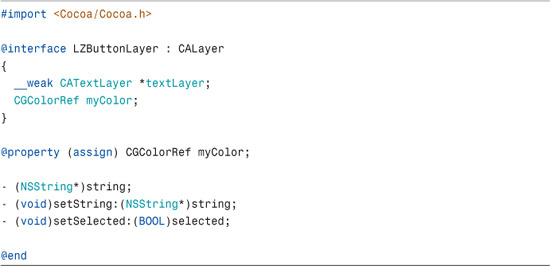
The header, shown in Listing 11-3, retains a reference to the CATextLayer sublayer, which enables you to adjust its text as needed. We also have a reference to the associated color object. The header also includes a pair of accessors, –string and –setString, which set the strings on the CATextLayer sublayer. Finally, the –setSelected method informs the layer when it is actively being clicked.
WARNING
Because CATextLayer objects cannot be centered vertically, you cannot build the buttons on a single layer. Therefore, each button needs to be in its own layer so that we can place each one where we want it.
LISTING 11-3 LZButtonLayer Header File
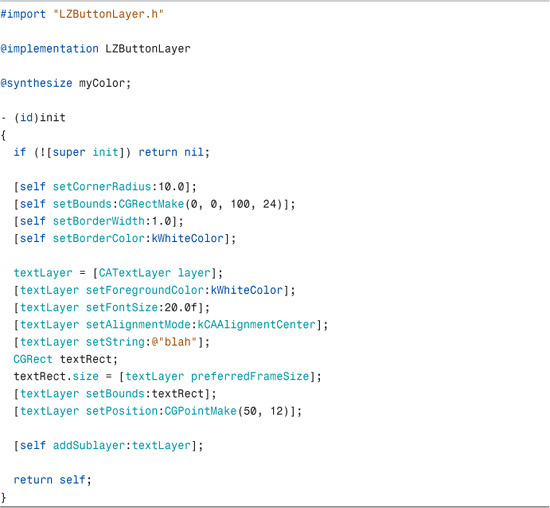
Whenever [CALayer layer] is called, the init method is also called as the default initializer, as shown in Listing 11-4. The button layer overrides the default initializer and configures the button itself. When the [super init] finishes its task, the background layer of the button is configured by setting its cornerRadius, bounds, borderWidth, and borderColor.
NOTE
Weak References
Weak references were added in Mac OS X Leopard (v 10.5) and effectively zero out the reference if the referenced object is released. This is primarily used when the garbage collector is turned on, but it is a helpful flag to use when doing non-GC development (such as for the iPhone) as well.
Next, the textLayer is initialized. Even though the textLayer is an autoreleased object (because we did not call alloc or copy when we created it), we continue referencing it. Because we define this as a weak reference, we are not retaining it but instead letting the layer hierarchy handle its retention. With the CATextLayer initialized, the next step is to set the layer’s default properties and assign its position attribute to the center of the button’s background layer.
LISTING 11-4 LZButtonLayer -init
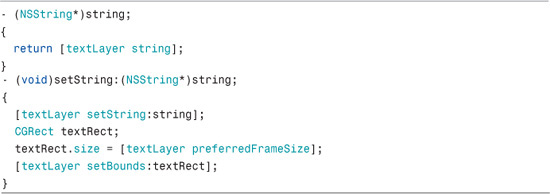
The –string and –setString: methods (shown in Listing 11-5) retrieve and pass the string value into the underlying CATextLayer. This provides opaque access to the underlying CATextLayer as a convenience.
LISTING 11-5 LZButton -setString: and -string: Implementations
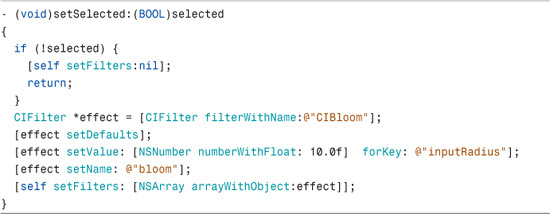
The –setSelected: method (as shown in Listing 11-6) provides visible feedback to the user so that they can see the click has an effect on the application. To show this effect, we add and remove a Core Image filter (CIBloom) to the button layer depending upon the BOOL value being passed in.
LISTING 11-6 LZButton -setSelected: Implementation
NOTE
Remember that Core Image filters are currently only available on the desktop. Therefore, the filter changes in the -setSelected: method will not work on a Cocoa Touch device.
Interface Builder
With the LZButton layer designed, the next thing we build is the AppDelegate. The AppDelegate contains all the layers; add them to the window’s contentView and receive the delegate calls.
The only thing we do in Interface Builder is change the window’s contentView to an instance of LZContentView. After the class type has been changed, bind the ContentView’s delegate to the AppDelegate. This enables the AppDelegate to receive mouseUp and mouseDown events from contentView.
Building the Layers
After launching, the application builds the interface layers before presenting the window to the user. The best way to do this is to implement the –awakeFromNib method in the AppDelegate class, as shown in Listing 11-7. This method is called before the application renders anything onscreen and is processed as the application starts up. We want to set up everything before display to avoid an ugly redraw as the application appears on screen.
LISTING 11-7 AppDelegate –awakeFromNib implementation
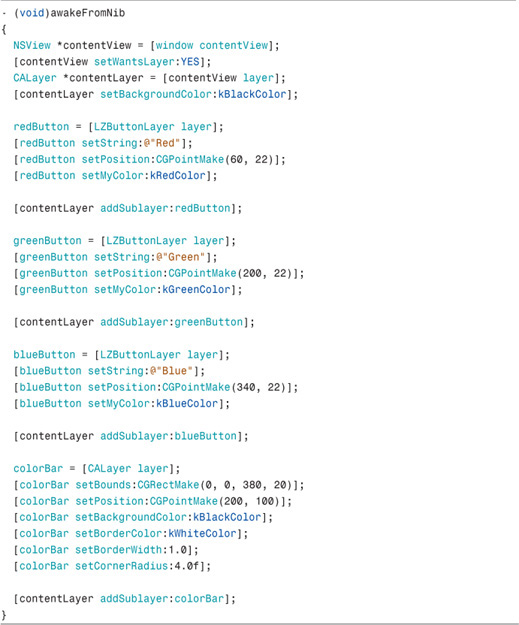
In Listing 11-7, the –awakeFromNib grabs a reference to the window’s contentView and makes it layer-backed. We then grab a reference to the contentView’s layer and use it as the root layer for the rest of the interface.
When we have the rootLayer, the next step is to initialize three copies of the LZButtonLayer that we previously built, assign each one to a color, and set their position within the root layer. When each button is fully initialized, add it as a sublayer to the root layer.
Finally, create a generic CALayer, named colorBar, and add it as a sublayer to the root layer. Because colorBar is a CALayer, it needs to be fully defined here.
This now gives us the interface shown earlier in Figure 11-1. Next, add the interaction code to the AppDelegate that tells us which layer is being interacted with. To start the interaction, we abstract the hit test because it will be used in multiple places. This enables you to reuse the code and avoid having multiple copies of it through the application.
LISTING 11-8 AppDelegate –buttonLayerHit Implementation
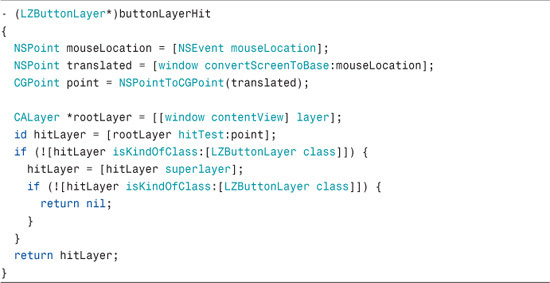
When accessing mouseLocation, it gives us the location clicked as screen coordinates (x and y values). These coordinates are not the same as those used by the application, so you need to convert them to window coordinates by using one of the methods built into the NSWindow and NSView classes. Also, because CALayer objects deal in CGPoints instead of NSPoints, we also need to change the window coordinate’s returned NSRect into a CGRect.
Now that we have the correct mouse coordinates, we need to find out which is the deepest layer under the mouse. A call to –hitTest: on the rootLayer returns the correct CALayer information.
The deepest layer is defined as the layer that has no sublayers that would contain the point being passed in. For instance, if you click on the text within LZButtonLayer, CATextLayer is returned from the –hitTest: call because it has no sublayers that contain the CGPoint being passed in. If, however, the edge of the button is clicked, then LZButtonLayer is returned instead. Finally, the root layer is returned if the background root layer is clicked (see Figure 11-2).

However, we care only if the user clicked on LZButtonLayer. It is possible that the user thought they were clicking on LZButtonLayer, but were in fact clicking its sublayer. Therefore, an additional check was added. If the clicked layer were not a LZButtonLayer, we check that layer’s superlayer to see if it is a LZButtonLayer. If the clicked layer is, then its superlayer is returned instead. If neither the clicked layer nor its superlayer is a LZButtonLayer, we return nil.
With the hit test method defined, it’s now time to handle mouseUp and mouseDown events using the code shown in Listing 11-9.
LISTING 11-9 AppDelegate -mouseDown: Implementation

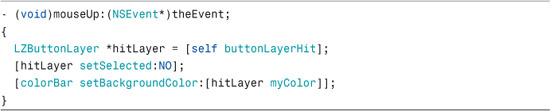
When the mouseDown event is received, we want to tell the selected button that it is selected and have it change its appearance. Because the –buttonLayerHit method returns only LZButtonLayer or nil, we can safely nest its call within the –setSelected: call, as shown in Listing 11-10.
LISTING 11-10 AppDelegate -mouseUp: Implementation
Watching the Mouse
Playing with this initial version shows a few issues right away. If the mouse button is pressed over the LZButtonLayer and released while off of it, the button stays selected. Worse, if one button is pressed and released on another, the second button’s color is selected while the first button stays selected!
To fix these issues, we need to refine the mouseUp and mouseDown methods, as shown in Listing 11-11.
LISTING 11-11 Updated AppDelegate -mouseDown: Implementation
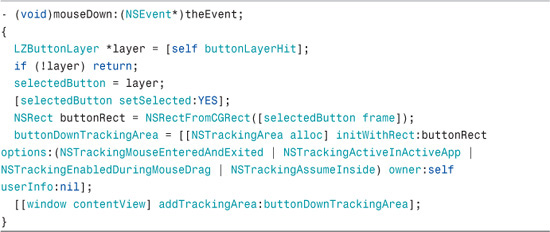
The key issue here is that we need to determine when the mouse has left the button. However, tracking the mouse all the time throughout the entire window is processor-intensive, so you don’t want to do that; we want to limit mouse tracking as much as possible. To accomplish this, add an NSTrackingArea to the contentView when the mouseDown event is received, and we limit this NSTrackingArea to the rectangle containing the button that was pressed.
The AppDelegate is set within the NSTrackingArea as the owner of the area, which tells the area to notify AppDelegate whenever the mouse enters or exits the rectangle, but only when we are the active application. We also tell NSTrackingArea to assume it is starting within the rectangle so that the first event we receive is when the mouse exits.
In addition to adding an NSTrackingArea, we also keep a pointer to the button that was pressed. This pointer is used in other methods to turn the selection of the button on and off and to properly handle the mouseUp event.
This addition to the –mouseDown: method causes two other methods to be called: -mouseExited: and –mouseEntered:; both are defined in Listing 11-12.
LISTING 11-12 AppDelegate -mouseExited: Implementation
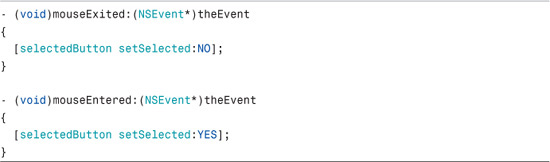
After adding these methods, the button that was pressed selects and unselects as the mouse enters and exits its rectangle. This gives the user visual feedback while the mouse button is down so that they know the button click can still be canceled.
LISTING 11-13 AppDelegate -mouseUp: Implementation
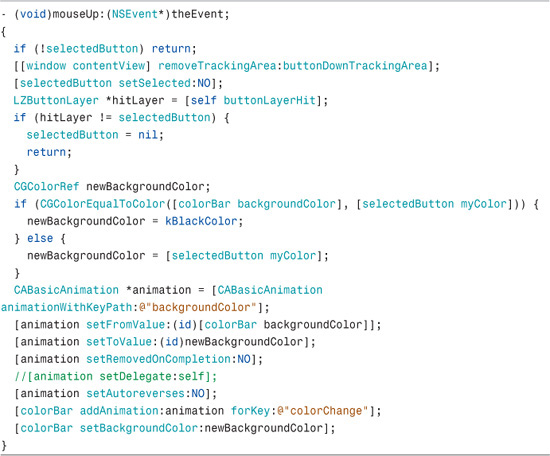
The changes required in the mouseUp, as shown in Listing 11-13, are the most aggressive. First, if there was no button selected previously, we abort right away. This prevents an accidental click if the mouse is moved over a button after the mouse button has been pressed.
Next, remove the tracking area to stop receiving mouseEntered and mouseExited events. Now that the mouse button is up, there is no need to further update the LZButtonLayer.
The next step is to find out if the mouse is currently over the same LZButtonLayer that we started with. We do this by requesting the current LZButtonLayer that is under the mouse. If that is not the same LZButtonLayer that we started with, we abort by setting the selectedButton to nil and returning out of the method. This prevents the wrong button from being clicked when the user presses down the mouse on one button but releases the mouse over a different button.
After all the logic checks have passed, set the backgroundColor of the colorBar. While doing this, first check to see if the backgroundColor is already set to the button’s color. If it is, the background is set to black instead. Otherwise we set it to the button’s color.
Now when the application is run, not only does the colorBar change to the appropriate color, but also we can cancel a click of the button by moving the mouse off the button and then releasing.
Keyboard Events
Keyboard and mouse events are handled in a similar way. As with mouse events, only NSResponder objects can receive keyboard events. However, unlike mouse events, keyboard events do not have a point and are passed only to the current first responder. In the color application example, the window is the first responder. Because we want to receive and process key events, we first want to make our LZContentView accept first responder status. We do this by overriding the –acceptsFirstResponder method, as shown in Listing 11-14.
LISTING 11-14 LZContentView -acceptsFirstResponder Implementation

Like the mouseUp and mouseDown events in Listing 11-14, we want to handle key events within the delegate instead of directly in the view. Therefore, the -keyUp: method passes the event to the delegate, as shown in Listing 11-15.
LISTING 11-15 LZContentView -keyUp: Implementation

Back in the AppDelegate, we need to give the contentView first responder status on start up so that it can receive key events. To do this, call [window setFirstResponder:contentView] within the –awakeFromNib method.
Now that the events are routed to where we want them, it is time to do something with them. When the -keyUp: event is triggered, we want to set the background color based on the key that was pressed. See Listing 11-16.
LISTING 11-16 Updated AppDelegate -keyUp: Implementation
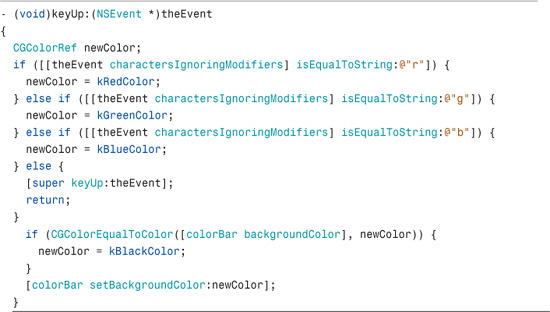
We are testing for the three key events in this method: r, g, and b. If the incoming event does not match any of those three, we abort by passing the event up the chain and returning out of the method. If it does match, we test against the current background color of the colorBar and either set it or unset it as appropriate.
Layer-Backed Views
So far, we have discussed situations in which the entire user interface is built using Core Animation with a single “root” NSView supporting it all. The other equally common situation is working with layer-backed views as opposed to stand-alone layers.
Unlike the single NSView design, layer-backed views are subclasses of NSResponder. Therefore, it is possible to accept mouse and keyboard input at a much lower level. However, you need to consider a few things when adding user interaction to a layer-backed view design:
• Keyboard input
As previously mentioned, because keyboard input does not have an input “point,” the application needs to keep track of which NSResponder receives the key events. This is done via the responder chain. When developing custom layer-backed NSView objects, we need to be aware of the responder chain and handle it appropriately. If we receive an event and we don’t handle it, we need to pass it up the responder chain so that a potential parent can handle it. If we do not pass the event up, we can accidentally block things such as keyboard shortcuts to the menus, and so on.
• Mouse coordinates
Mouse events are easier to handle than keyboard events. When a custom NSView receives the mouse event, it is guaranteed to belong to either that NSView or one of its children. However, care does need to be taken to properly translate the coordinates of that event. As previously discussed in Listing 11-8, [NSEvent mouseLocation] returns the coordinates of the mouse in screen coordinates. Those need to be first translated to the coordinates of the window and then translated again to the view that received the event. Because each NSResponder has its own internal grid, we need to make sure we work with the correct coordinates before responding to the click.
Summary
This chapter introduced you to the concepts behind capturing user input in a Core Animation environment. Using the concepts discussed in this chapter, you can build compelling interactive interfaces.
Although it is easier to develop user interfaces that take advantage of layer-backed views, you can build the entire interface in stand-alone layers, or build custom layers that get passed in the mouse and/or keyboard events and allow them to be handled in smaller chunks than what was demonstrated here.