Chapter 4. Keyframe Animation
In This Chapter
• Two Methods to Specify Keyframe Destinations
• From Basic Animation to Keyframe Animation
• Keyframe Animation for UI Cues
Core Animation provides a way for you to have complete control over your animations. This control comes in the form of what is called keyframe animation. Keyframe animation enables you to specify the values for each of the major steps in your animation and then fills in the rest for you.
The terminology used to describe keyframe animation is rooted in the film industry. As film animation moved to computers, this concept of filling in between the keyframes has remained a necessary part of creating smooth animations using a process called tweening. Core Animation is no different. You specify the keyframes in your animation, and Core Animation handles the tweening process for you. It calculates what needs to be done in between each keyframe based on the property you have specified in your animation and interpolates all the intermediary values. It’s quite convenient and makes animation coding tasks much simpler.
In this chapter, we discuss how to move from basic animation to keyframe animation. It is similar, so the transition should be smooth. We also introduce you to layer rotation and how to add some content to your layer by drawing a path.
Changing Values Over Time
Core Animation offers a wide range of properties that you can animate. Keyframe animation is the process of changing one of these properties over time. You can think of a keyframe animation as a group of basic animations strung together and run in sequence.
In the context of Core Animation, interpolation (which is analogous to tweening in film) uses the value of a property between each keyframe to calculate the starting and stopping values of the surrounding keyframes. Another way to think about this is to imagine the bases of a baseball diamond. Each base is a key frame. The runner knows that when he hits the ball, he must run to first base, then second base, third, and then home if he wants to score a run (and doesn’t get thrown out in the process). The steps between each base don’t concern him though he must run to get to each of those destinations. Similarly, the animation in a keyframe animation runs to each destination point (keyframe) in sequence until all destinations have been reached.
Of course, in the case of a baseball diamond shape, your last keyframe value would be the same as your first.
Two Methods to Specify Keyframe Destinations
When you want to animate a property, you can either specify an array of values that the property will reach in sequence, or you can specify a Core Graphics path:
• An array of values is more readily used to specify things like color changes to backgrounds and borders or border widths and rectangle sizes or even CGImage(s) for the content key path. You can also animate the transform property by specifying a list of CATransform3D objects to the values array.
• Core Graphics paths are used for moving objects from point-to-point around the screen on a path. Whenever a CGPoint is the type of the property, a Core Graphics path is likely the right choice. You will use the anchorPoint and position properties to animate paths.
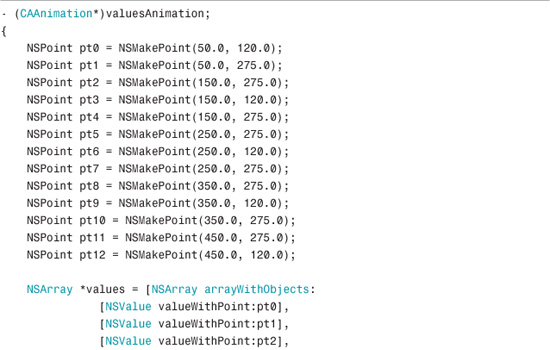
In terms of precedence, a path overrides an array of values. This means that if you specify a path with a call to –setPath, anything specified in the values field with a call to –setValues will be ignored. The code in Listing 4-1 and Listing 4-2 demonstrates how to use a Core Graphics path and an array of values, respectively. The listings are functionally the same, yet the result is quite different. The animation in Listing 4-1 causes the layer to bounce across the screen in an arcing parabolic pattern. Listing 4-2 causes the layer to bounce across the screen in more of a square tooth pattern.
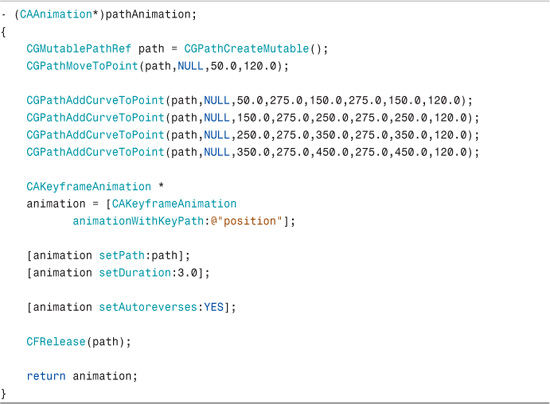
You can see both patterns in Figure 4-1. You could add many more points to the values array to more closely mimic the pattern you get using a path, but using a path is much more convenient.
FIGURE 4-1 Animation Patterns, Path Versus Values
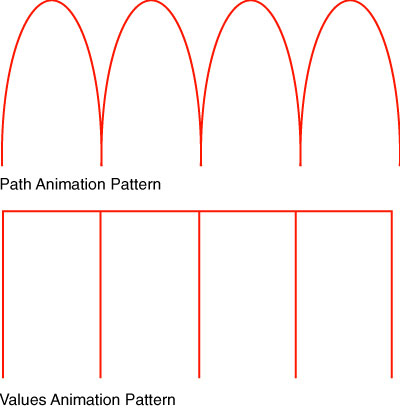
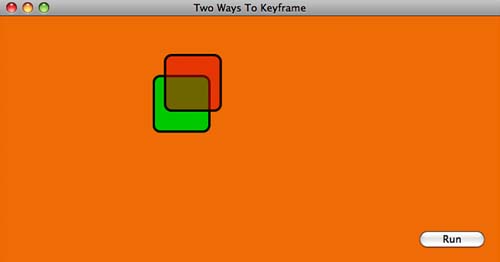
FIGURE 4-2 shows the animation of two layers running in tandem: a parabolic pattern with the green layer running along the path as specified in Listing 4-1, and the square-toothed pattern in the red layer running to each value as specified in Listing 4-2.
FIGURE 4-2 Two Ways to Keyframe Demo Application
From Basic Animation to Keyframe Animation
Although a basic animation requires you to specify only the start and stop value and/or by value, keyframe animation enables you specify
• An array of values for each keyframe. For example, you could use an array of CGColorRef objects to animate a background color change.
• An array of values between 0.0 and 1.0 used specify the percentage of the total time spent between each keyframe.
• An array of timing function objects (CAMediaTimingFunction) used to specify the pace of each animation process between key frames. These fields specify with one of the predefined functions, such as kCAMediaTimingFunctionEaseIn, that the animation should start off slowly and then speed up over time.
Keyframe animation is actually quite simple. First, consider the basic steps you need to successfully animate a property using keyframe animation:
1. Decide which property you want to animate (for example, frame, background color, anchor point, position, border width, and so on).
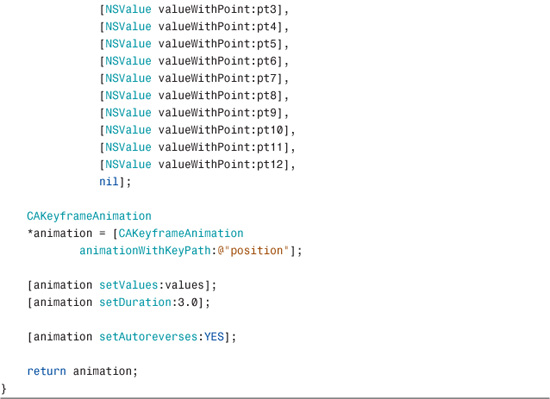
2. In the values field of the animation object, specify the start value, the end value, and all values in between. These are your keyframes. (See Listing 4-2 for an example).
3. Specify the full duration of the animation using the duration field.
4. Optionally, specify time durations for the animation that will occur between each keyframe using the times field. If you don’t specify these, Core Animation evenly divides the duration by the number of values provided in the values field, minus one.
5. Optionally, specify the timing functions to control animation pacing.
That is all you need to do. You create your animations and add them to your layer. The –addAnimation call starts the animation.
Keyframe Animation Timing
Core Animation provides a high level of granularity for specifying how your animation will play. By default, a keyframe animation plays back evenly, dividing the time specified in the animation’s duration field by the total number of keyframes minus one. You can use the following formula to determine how much time each keyframe of the animation gets
duration/(number of keyframes – 1)
For example, if we specified a 10-second animation with five keyframes, the time given to each keyframe is 2.5 seconds:
10 / (5 – 1) = 2.5
You can gain further control of your animation timing with the keyTimes field, which you can use to specify a percentage for each keyframe from the animation’s total duration. With five keyframes specified in an animation, each keyTime takes up 25 percent of the total time. If we were to explicitly set up our animation to use the keyTimes field in a way that would essentially do the same as the default, the code would look like Listing 4-3.
LISTING 4-3 Explicitly Setting Key Times to Mimic the Default
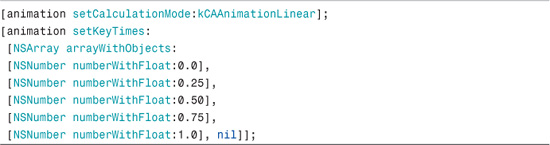
You might have noticed that we specified five values in Listing 4-3, which might not seem to match our default formula. However, when you realize that the first value (0.0) is simply a starting value, it becomes clear that we are only specifying four destination times, which matches the formula discussed earlier.
The animation in Listing 4-3 is identical to what you see if you didn’t specify key times at all; this simply shows you how to specify the key times should you need to do that in your animation. You can alter these values to lengthen or shorten the amount of time spent between the keyframes. Just remember that each subsequent value must be greater than the previous and must not exceed 1.0. The duration and number of keyframes provide enough information for Core Animation to interpolate the values in the exact same way by simply dividing the duration by the number of keyframes minus one.
The key times are used according to the calculationMode field, as shown in Listing 4-3. When specified as paced (kCAAnimationPaced), the key times are ignored. This is the same as if you didn’t specify key times at all. When specified as linear (kCAAnimationLinear) the times in between keyframes are interpolated, which means that you see every step of the animation between keyframes. This is the process of tweening that we discussed at the beginning of this chapter. When specified as discrete (kCAAnimationDiscrete), the keyframes are the only frames displayed, with no interpolation between frames. If you moved a layer to random points on a window, for instance, you would not see the layer move to each point. Instead, you would see the layer jump to each point when the time for that keyframe was reached.
Monitoring Keyframe Destinations
To further understand how to apply the key times formula, go to the companion website at informit.com/coreframeworks and open the demo project called Keyframe Steps. You notice we have added timers that fire at various stages of the animation to show which point we have reached in the animation. In the Keyframe Steps example code, we animate a dot around the window in the path of a five-pointed star, as shown in Figure 4-3. As the animation reaches each point, we draw the segment of the path from the previous point to the next; this is done with timers. First, however, we had to determine how many keyframes we needed and then determined how many timers we would need.
FIGURE 4-3 Keyframe Steps Demo Application
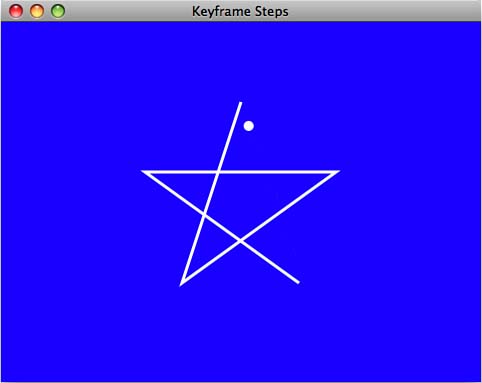
In the sample code, we have specified 10 seconds as the animation’s duration. To determine how much time the animation would spend between each destination point, we applied the formula based on the duration and the number of keyframes. Including the animation’s starting and ending points, there are a total of 6 keyframes. We then apply the animation timing formula as follows:
Duration / (keyframes –1) = time per keyframe
10 / (6–1) = 2.0 seconds per keyframe
Notice in Listing 4-4 that NSTimer is used to schedule a selector to run every 2 seconds during the animation. This causes the path to be updated and redrawn to show the star path as each destination is reached.
LISTING 4-4 Set Up the Animation and Create Timers to Monitor Animation Progress


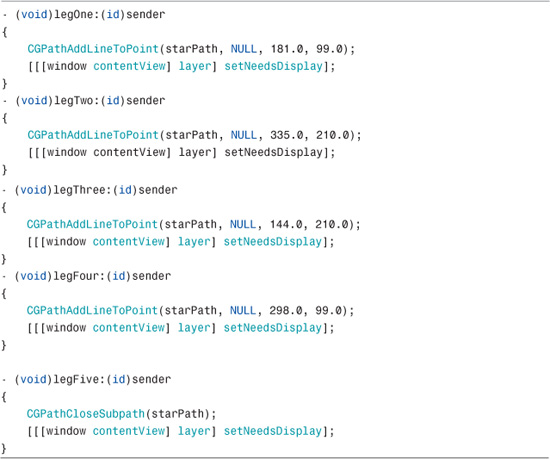
As each time is reached, another point is added to the starPath path, and the root layer updates its display, as shown in Listing 4-5. The final call, legFive, closes the path.
LISTING 4-5 Selector Methods for Each Timer Add a New Point to the Path
When we call –setNeedsDisplay on the root layer, -drawLayer gets called and the path in its current state gets drawn to the layer, as shown in Listing 4-6.
LISTING 4-6 Draw the Path We Have Been Building at Each Timer Call
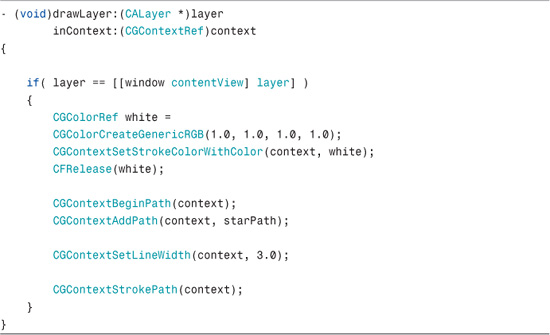
Listing 4-6 is drawing the same path on each call, but the path has been extended each time the timer fired causing the lines extending from one point to the next to be drawn in succession.
Keyframe Animation for UI Cues
Core Animation was originally written for Apple’s iPhone platform and then made available to Mac OS X Leopard. If you have ever seen an iPhone or the iPod touch in action, you have witnessed Core Animation because nearly every UI action has some animation feature on these platforms. Whether you use a simple drill down menu (which slides the views in and out from the sides), or if you close your current application and return to the Home screen where the icons animate in from both sides at the same time, you see the effects of Core Animation.
One such interesting animation on the iPhone/iPod touch is what you see when you touch and hold your finger down on an icon on the Home screen. This causes all the application icons to wriggle and twist, like they’re trying to get away. In this editable state, you can move the application icons around on the screen so that you can organize them to suit your needs (see Figure 4-4). Another thing you notice is a close box in the upper-left corner of the icons to indicate which applications can be deleted from your iPhone/iPod touch. If you press the Home button, all the icons stop shaking and return to their normal state.
NOTE
Nondeletable iPhone/iPod Touch Applications
When you press and hold your finger on the application icons on your iPhone/iPod touch, you notice that certain applications won’t have the little close box in the upper-left corner. One quick glance tells you that these are the default applications that ship with the device (for example, Camera, Clock, Photos, Settings, Safari, Weather, and so on). If you have found better third-party applications for these (well, maybe with the exception of Settings), you might consider dumping the unused default applications onto their own screen.
FIGURE 4-4 The iPhone/iPod Touch in Edit Mode

This user interface cue helps the user know that the iPhone/iPod touch is now in a different state, and you can now make changes to something. It might not be immediately obvious what that something is; however, once you start tap-dragging, it becomes apparent what you are supposed to do. Cues like this enhance the user experience and make applications incredibly intuitive. This is one of Core Animation’s most useful features, so let’s see how it is done.
Implementing the Icon Shake Using Keyframe Animation
We implement this icon shaking animation with Cocoa on OS X, though the implementation on the iPhone is similar. We begin by creating the animation and playing it over a longer duration to show how each parameter of the animation affects what it looks like when run. Then we set the duration to run at a time that is more on par with what you actually see on the iPhone/iPod touch.
You might want to open the sample project to see what the effect looks like. We have provided an example project for both OS X and the iPhone. They are called Icon Dance for OS X and Icon Dance iPhone for the iPhone.
Certain aspects of the Icon Dance application are going to be different than what you see on the iPhone home screen. Because Cocoa Touch currently isn’t available for use with desktop applications, you can’t touch your screen to start or stop the icon animation, or drag the icons around using your finger. However, the methods and associated code demonstrate how we can implement the icon shake, and it works on either platform, as you will soon see.
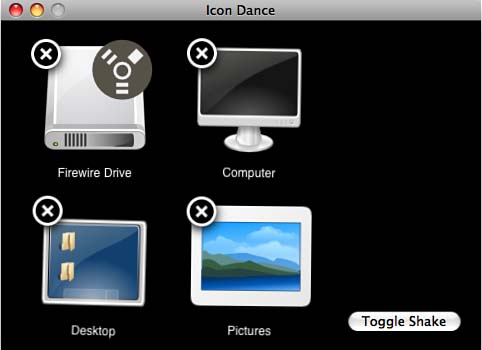
Figures 4-5 and 4-6 show what our application looks like when run on OS X. Figure 4-5 shows what it looks like before we add the close box, and 4-6 shows what it looks like after the close box has been added.
FIGURE 4-5 Icon Dance Demo Application
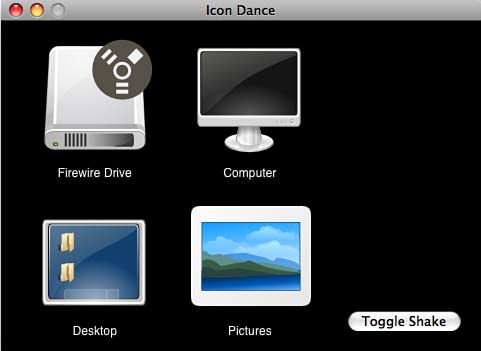
FIGURE 4-6 Icon Dance with Close Box
Using the steps to implement a keyframe animation (see the previous section “From Basic Animation to Keyframe Animation,” in this chapter), let’s map out the steps to implement the Icon Dance, as shown in Table 4-1.
TABLE 4-1 Icon Shake Animation Implementation Steps
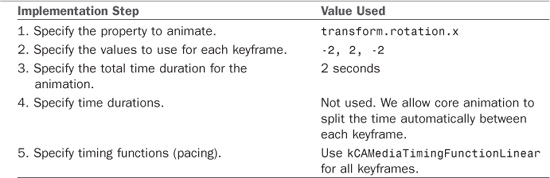
We are only going to specify three keyframe values to keep this example pretty simple. (Plus, that’s all this animation really needs.) We simply set a large repeat number on the animation and it loops indefinitely.
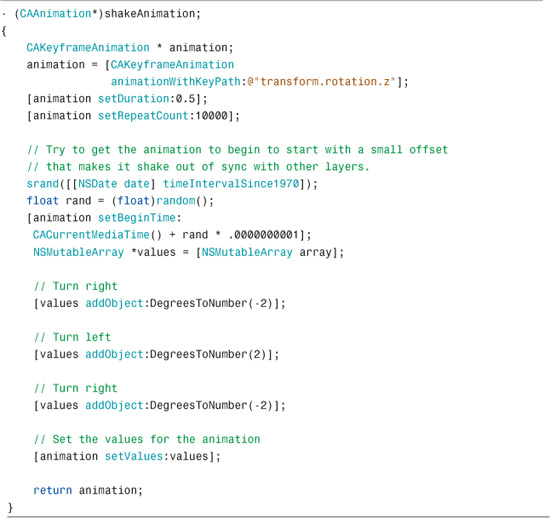
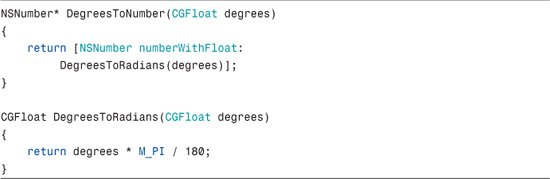
Take a look at the animation creation code in Listing 4-7. Notice that the three keyframes are specified as NSNumber objects as indicated by a call to the utility function, DegreesToNumber. You can see the declaration of this function in Listing 4-8. DegreesToNumber takes a CGFloat value for its parameter and returns an NSNumber with degrees converted to radians, which is done by a second utility function called DegreesToRadians.
LISTING 4-7 Shake Animation for Rotating Each Layer Around the Center Axis
LISTING 4-8 Utility Functions for Converting Degrees to Radians
The first keyframe in Listing 4-7 turns the icon two degrees to the right, the second turns it two degrees to the left, and the third turns it two degrees to the right again. When the animation has completed, it starts over again and runs 10,000 times as indicated by our call to –setRepeatCount:10000. This gives the visual impression of the image shaking on a center axis. To stop the animation, remove it from the layer with a call to –removeAnimationForKey:@”rotate”.
NOTE
Random Shaking
You might have noticed in Listing 4-7 that we set the begin time for the animation using a small random offset. If we don’t do this, all the icons shake in sync with each other. To achieve the same effect as what you see on the iPhone, having this random offset is necessary. We use the current time in seconds to seed the random number generator. Then we grab that next random number and multiply it by .0000000001 to get a small offset. We set the animation start time to this value and return the animation. When it gets added to the layer, it plays back starting at that offset from the time it was actually added to the layer.
Rotation Axis and Layer Geometry
In this example, the rotation of our layer revolves around the center of the layer. This is the default anchor point for layers (0.5, 0.5). If you want to rotate around a different axis, for example the bottom left corner, you need to specify in the layer itself a new anchor point with a call to –setAnchorPoint:CGPointMake(0.0, 0.0). For this example, though, the default is appropriate. Layer geometry is discussed in greater detail in Chapter 6, “Layer Filters.”
Perfecting the Effect
With some minor changes to the duration parameter and each of the keyframe values, we can get it to look just right. If you run the code in Listing 4-7, you notice that the shaking effect seems to run a little too slow. To make this run faster, simply change the duration field to something more appropriate. We are currently telling the animation to complete within half of a second, 0.5. If you change it to instead be finished within one-fifteenth of a second (changing setDuration:0.5 to setDuration:0.15), the animation gives you more of the desired effect.
NOTE
If you have an iPhone or iPod touch, from the Home menu, tap and hold any icon and you can see the animation run. Now run the Icon Dance example in Xcode to see how similar the effect looks.
Adding the Close Box
This part of the project is not related in particular to keyframe animation, but it will show you how to complete this effect and introduce you to drawing in layer contents.
NOTE
Close Box User Interaction
If you want to receive an event when the close box is clicked, you need to obtain the click position from the backing view and then do a hit test on the layer to see if it is in range because Core Animation layers don’t themselves receive events. See Chapter 11, “User Interaction,” for more details.
While the animation is running, you notice a circular close box with an X inside. This is intended to indicate that an application can be deleted on the iPhone/iPod touch. In the Icon Dance application, the close box doesn’t do anything, but it enables you to see the effect.
For this example, we will do the following:
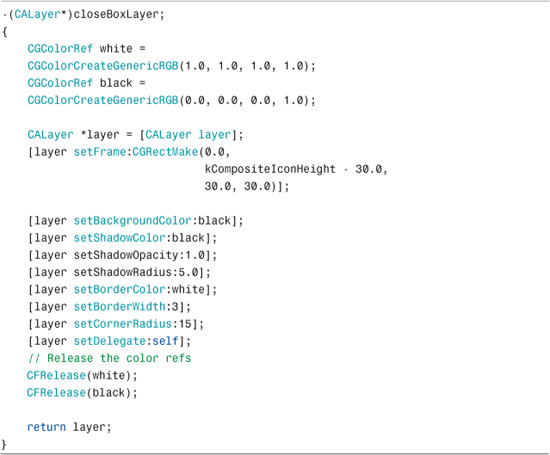
• Set the border width for the close box layer to 3 pixels.
• Set the frame to 30 × 30 pixels.
• Set the corner radius to 15 (half the frame size) to make it look like a circle.
• Set the background color to black.
• Set the drop shadow color to black.
• Set the shadow radius to 5 pixels.
• Set the shadow opacity to 1.0 (opaque).
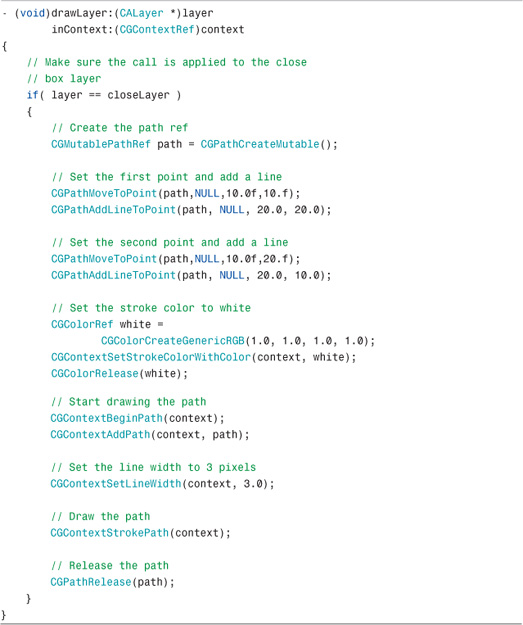
The code in Listing 4-9 implements each of these items. Notice that we set the delegate for the layer to self. This enables us to call - (void)drawLayer:(CALayer *)theLayer inContext:(CGContextRef) theContext (see the beginning of Listing 4-10), which enables us to add the code that draws the X in the middle of the close box layer. The code used to draw the X (shown in Listing 4-10) uses a Core Graphics path that sets a point and draws the first leg, and then sets another point and draws the second leg.
LISTING 4-9 Define the Close Box Layer
NOTE
Use an Image as Layer Content
If you prefer, you can instead use an image for the close box layer contents. Just load the image in an NSImage for OS X or a UIImage for the iPhone and get a CGImageRef object. Then set the layer’s contents to that CGImageRef. Preferring an image over explicitly drawing is mostly a matter of preference; however, for our purposes, Listings 4-9 and 4-10 demonstrate how to achieve the desired look by drawing explicitly.
LISTING 4-10 Draw an X In the Close Box Layer
Starting and Stopping the Animation
Core Animation doesn’t directly provide start and stop methods. However, the animation starts when you add an animation to a layer, and the animation stops when you remove an animation from a layer. To determine if an animation is currently running, query the animation’s dictionary to determine if the animation is still there. If it is, the animation is still running. If it is not, the animation has stopped.
Listing 4-11 demonstrates how you start and stop the shake animation. When the animation starts, add the close box layer first and then add the animation for key rotate. This key is important because it is used to refer to the animation when you want to stop it and to see if it is still running.
LISTING 4-11 Controlling Animation Start and Stop
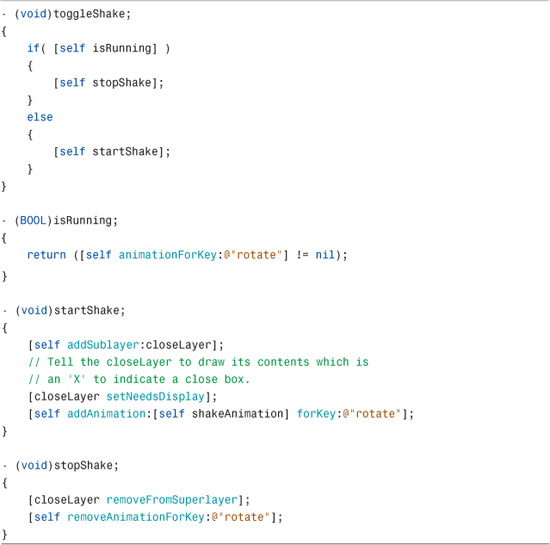
When–stopShake is called, the close box layer is first removed from its parent layer and then we remove the animation from the layer. To determine whether the animation is still running, -isRunning checks to see if the animation is still in the animations dictionary. If it is there, the animation is running, otherwise, it is not.
Summary
Basic animation is known as single keyframe animation. This definition helps to explain what keyframe animation provides. The keyframes in an animation are like a list of what CABasicAnimation refers to as its toValue field: the destination value. A list of these values can be supplied to the keyframe animation using either the animation’s values field or its path field. Each of these values are destinations that the animation reaches at some point in its duration.
Keyframe animation provides a powerful way to animate any animatable layer property using a simple list of values, making it easy for the developer because the in-between values are automatically interpolated. This simplicity makes it a snap to create animation-based user interfaces informative, intuitive, and easy to implement.