
Although Java is growing into a first-rate, general-purpose program language as its class libraries mature, that is not the reason for all the hype that surrounds it. We think it is fair to say that the excitement derives from the possibility of delivering executable content (applets) over the Internet (see Chapter 10 of Volume 1, for example). Obviously, delivering executable code is practical only when the recipients are sure that the applets can’t go rogue. For this reason, security was and is a major concern of both the designers and the users of Java. This means that unlike other languages and systems, where security was implemented as an afterthought or a reaction to break-ins, security mechanisms are an integral part of Java.
Three mechanisms in Java help ensure safety:
Language design features (bounds checking on arrays, legal type conversions only, no pointer arithmetic, and so on).
A “sandbox” mechanism that controls what the code can do (such as file access).
Code signing—Code authors can use standard cryptographic algorithms to embed a “certificate” into a Java class. Then, the users of the code can determine exactly who created the code and whether the code has been altered after it was signed.
The Java Virtual Machine checks for bad pointers, invalid array offsets, and so on. The other steps require controlling what goes to the Java Virtual Machine.
This chapter shows you how class files are loaded into the virtual machine and checked for integrity. More importantly, we show you how to control what goes to the virtual machine by building your own class loader. For maximum security, both the default mechanism for loading class and a custom class loader need to work with a security manager class that controls what actions code can perform. (All browsers have a security manager that controls what actions applets can perform; these security managers may or may not be configurable.) You’ll see how to write your own security manager class next. Security manager classes can be quite flexible; for example, you’ll see in this chapter how to make one that can control what applications can do. Finally, you’ll see the cryptographic algorithms supplied in the java.security package, which allow for, among other things, code signing.
A Java compiler converts source into the machine language of a hypothetical machine, called, naturally enough, the Java Virtual Machine. This intermediate code is stored in a class file with a .class extension. Class files contain the code for all the methods of one class. These class files need to be interpreted by a program that can translate the instruction set of the Java Virtual Machine into the machine language of the target machine. Note that the Java interpreter loads only those class files that are needed for the execution of a program. Here are the steps to run MyProgram.class.
The Java interpreter has a mechanism to load class files; it uses this to load the
MyProgramclass file.The Java interpreter then executes the
mainmethod inMyProgram(which is static, so no instance of a class needs to be created).If the
mainmethod requires additional classes, these are loaded next.Also, whenever a class has data fields or superclasses of a particular type, these class files are loaded. (The process of loading all the classes that a given class depends on is called resolving the class.)
Of course, the default mechanism built into a Java interpreter or JIT knows about the CLASSPATH environment variable, how to locate classes in ZIP and JAR files, and so on. Methods loaded through this mechanism are called system classes.
The default mechanism is the least secure mechanism for loading classes. Since these are Java programs, you still get checks for things like null pointers or array bounds checking but you won’t get checks on much more. If you need more control, you should replace the default mechanism for loading classes with what is called a class loader. The most common example of a class loader is the applet class loader. The applet class loader knows how to load class files across a network and how to authenticate signed JAR files. The applet class loader will also set up separate name spaces so that classes loaded from one host don’t conflict with classes from other hosts.
A custom class loader like the applet class loader replaces the built-in mechanism for locating and loading class files. It lets you carry out specialized security checks before you pass the bytecodes to the virtual machine. As you might expect, Java programmers can write their own class loaders. For example, you can write a class loader that can refuse to load a class that has not been marked as “paid for”. The next few sections show you how.
A class loader is an implementation of the abstract class ClassLoader. The loadClass method in this class determines how to load the top-level class. Once a class is loaded through class loader, all other classes that it references are also loaded through that class loader.
To write your own class loader, you simply override the method
loadClass(String className, bool resolve)
(All other methods of the ClassLoader class are final.)
Your implementation of this method must:
Check whether this class loader has already loaded this class. For this purpose, your class loader needs to keep a record of the classes that it has previously loaded.
If it is a new class, you need to check whether it is a system class. Otherwise, load the bytecodes for the class from the local file system or from some other source.
Call the
defineClassmethod of theClassLoaderbase class to present the bytecodes to the virtual machine.
If the resolve flag is set, you must call the resolveClass method of the ClassLoader base class. Your class loader will be called again to load any other classes that this class refers to. (Your loadClass method might be called with resolve set to false if the virtual machine merely attempts to find out if a class exists, but every class must be fully resolved before you can create an instance or call a method.)
Usually, a class loader uses a hash table to store the references to the already loaded classes. The following code example shows the framework of the loadClass method of a typical class loader.
public class TypicalClassLoader extends ClassLoader
{  protected synchronized Class loadClass(String name, boolean
      resolve)
      throws ClassNotFoundException
   {  // check if class already loaded
      Class cl = (Class)classes.get(name);

      if (cl == null) // new class
      {  try
         {  // check if system class
            return findSystemClass(name);
         }
         catch (ClassNotFoundException e) {}
         catch (NoClassDefFoundError e) {}

         // load class bytes--details depend on class loader

         byte[] classBytes = loadClassBytes(name);
         if (classBytes == null) throw new
            ClassNotFoundException(name);

         cl = defineClass(name, classBytes, 0,
            classBytes.length);
         if (cl == null) throw new ClassNotFoundException(name);

         classes.put(name, cl); // remember class
      }

      if (resolve) resolveClass(cl);

      return cl;
   }

   private byte[] loadClassBytes(String name)
   {  . . .
   }


   private Hashtable classes = new Hashtable();
}
In the program of Example 8-1, we implement a class loader that loads encrypted class files. The program asks the user for the name of the first class to load (that is, the class containing main ) and the decryption key. It then uses a special class loader to load the specified class and calls the main method. The class loader decrypts the specified class and all nonsystem classes that are referenced by it. For simplicity, we will ignore 2,000 years of progress in the field of cryptography and use the venerable Caesar cipher for encrypting the class files—so that we can safely export this book.
[1]
Our version of the Caesar cipher has as a key a number between 1 and 255. To decrypt, simply add that key to every byte and reduce modulo 256. The Caesar.java program of Example 8-2 carries out the encryption. To decrypt, the code simply subtracts the key. The decryption occurs in the class loader. We give the encrypted class files an extension .caesar to distinguish them from the regular class files. On the CD-ROM for this book, you will find a file, Calculator.caesar, encrypted (for historical reasons) with a key value of 3. You cannot load it via the regular Java interpreter, but you can run it by using the custom class loader defined in our ClassLoaderTest program.
Encrypting class files has a number of practical uses (provided, of course, that you use a cipher stronger than the Caesar cipher). Without the decryption key, the class files are useless. They can neither be executed by a standard Java interpreter nor readily disassembled.
This means that you can use a custom class loader to authenticate the user of the class or to ensure that a program has been paid for before it will be allowed to run. Of course, encryption is only one application of a custom class loader. You can use other types of class loaders to solve other problems, such as walling off part of your file system. We believe that the ability to control the class loading process via a custom class loader is one of the great advantages of the Java Virtual Machine.
Example 8-1. ClassLoaderTest.java
import java.util.*;
import java.io.*;
import java.lang.reflect.*;
import java.awt.*;
import java.awt.event.*;
import corejava.*;

public class ClassLoaderTest
   extends CloseableFrame
   implements ActionListener
{  public ClassLoaderTest()
   {  setLayout(new GridBagLayout());
      GridBagConstraints gbc = new GridBagConstraints();
      gbc.fill = GridBagConstraints.NONE;
      gbc.anchor = GridBagConstraints.EAST;
      add(new Label("Class"), gbc, 0, 0, 1, 1);
      add(new Label("Key"), gbc, 0, 1, 1, 1);
      gbc.anchor = GridBagConstraints.WEST;
      add(nameField, gbc, 1, 0, 1, 1);
      add(keyField, gbc, 1, 1, 1, 1);
      gbc.anchor = GridBagConstraints.CENTER;
      Button loadButton = new Button("Load");
      add(loadButton, gbc, 0, 2, 2, 1);
      loadButton.addActionListener(this);
   }

   public void add(Component c, GridBagConstraints gbc,
      int x, int y, int w, int h)
   {  gbc.gridx = x;
      gbc.gridy = y;
      gbc.gridwidth = w;
      gbc.gridheight = h;
      add(c, gbc);
   }

   public void actionPerformed(ActionEvent evt)
   {  try
      {  ClassLoader loader
            = new CryptoClassLoader(keyField.getValue());
         Class c = loader.loadClass(nameField.getText());
         String[] cargs = new String[] {};
         Method m = c.getMethod("main",
            new Class[] { cargs.getClass() });
         m.invoke(null, new Object[] { cargs });
         setVisible(false);
      }
      catch (Exception e)
      {  System.out.println(e);
      }
   }

   public static void main(String[] args)
   {  Frame f = new ClassLoaderTest();
      f.setSize(300, 200);
      f.show();
   }

   private IntTextField keyField = new IntTextField(3, 4);
   private TextField nameField = new TextField(30);
}
class CryptoClassLoader extends ClassLoader
{  public CryptoClassLoader(int k)
   {  key = k;
   }

   protected synchronized Class loadClass(String name,
      boolean resolve) throws ClassNotFoundException
   {  // check if class already loaded
      Class cl = (Class)classes.get(name);

      if (cl == null) // new class
      {  try
         {  // check if system class
            return findSystemClass(name);
         }
         catch (ClassNotFoundException e) {}
         catch (NoClassDefFoundError e) {}

         // load class bytes--details depend on class loader

         byte[] classBytes = loadClassBytes(name);
         if (classBytes == null)
            throw new ClassNotFoundException(name);

         cl = defineClass(name, classBytes,
            0, classBytes.length);
         if (cl == null)
            throw new ClassNotFoundException(name);

         classes.put(name, cl); // remember class
      }

      if (resolve) resolveClass(cl);

      return cl;
   }

   private byte[] loadClassBytes(String name)
   {  String cname = name.replace('.', '/') + ".class";
      FileInputStream in = null;
      try
      {  in = new FileInputStream(cname);
         ByteArrayOutputStream buffer
            = new ByteArrayOutputStream();
         int ch;
         while ((ch = in.read()) != -1)
            buffer.write(ch);
         return buffer.toByteArray();
      }
      catch (IOException e)
      {  if (in != null)
         {  try { in.close(); } catch (IOException e2) {}
         }
         return null;
      }
   }

   private Hashtable classes = new Hashtable();
   private int key;
}
Example 8-2. Caesar.java
import java.io.*;

public class Caesar
{  public static void main(String[] args)
   {  if (args.length != 3)
      {  System.out.println("USAGE: java Caesar in out key");
         return;
      }

      try
      {  FileInputStream in = new FileInputStream(args[0]);
         FileOutputStream out = new FileOutputStream(args[1]);
         int key = Integer.parseInt(args[2]);
         int ch;
         while ((ch = in.read()) != -1)
         {  byte c = (byte)(ch + key);
            out.write(c);
         }
         in.close();
         out.close();
      }
      catch(IOException e)
      {  System.out.println("Error: " + e);
      }
   }
}
java.lang.ClassLoader

Class defineClass(String name, byte data[], int offset, int length)adds a new class to the virtual machine.
Parameters:
namethe name of the class. Use . as package name separator, and don’t use a
.classsuffixdataan array holding the bytecodes of the class
offsetthe start of the bytecodes in the array
lengththe length of the bytecodes in the array
void loadClass(String name, boolean resolve)is implemented by a class extending
ClassLoader. It obtains the bytecodes for the class and then callsdefineClassand, if theresolveflag istrue,resolveClass. The class loader should implement a cache to ensure that previously loaded classes are not loaded again.Parameters:
namethe name of the class. Use . as package name separator, and don’t use a
.classsuffixresolvetrueif theresolveClassmethod needs to be called after the class is loadedvoid resolveClass(Class c)should be called by
loadClassif theresolveflag istrue. It keeps loading dependent classes until all the classes that the class refers to either directly or indirectly are fully known to the virtual machine. Once the class is resolved, the virtual machine can create objects of the class and call class methods.Parameters:
cthe class to be resolved
Class findSystemClass(String name)finds the system class with the specified name and loads it, if necessary. A system class is a class loaded from the local file system in a platform-dependent way, using the value of the
CLASSPATHenvironment variable. System classes have no class loader.Parameters:
namethe name of the class. Use . as package name separator, and don’t use a
.classsuffix
When your class loader (or the default class loading mechanism) presents the bytecodes of a newly loaded Java class to the virtual machine, these bytecodes are first inspected by a verifier. The verifier checks that the instructions cannot perform actions that are obviously damaging.
Actually, there are three possible verification levels:
Verify all loaded classes.
Skip verification for system classes and verify only classes loaded with a class loader (the default).
Do not verify classes.
The verification level is a startup option of the virtual machine—it cannot be changed after the virtual machine has been launched. When starting the Java interpreter, you can specify one of three options, -verify, -verifyremote (the default), and -noverify. For example,
java -verify Hello
Here are some of the checks that the verifier carries out:
That variables are initialized before they are used
That method calls match the types of object references
That rules for accessing private data and methods are not violated
That local variable accesses fall within the run-time stack
That the run-time stack does not overflow
If any of these checks fails, then the class is considered corrupted and will not be loaded.
This strict verification is an important security consideration. Accidental errors, such as uninitialized variables, can easily wreak havoc if they are not caught. More importantly, in the wide open world of the Internet, you must be protected against malicious programmers who create evil effects on purpose. For example, by modifying values on the run-time stack or by writing to the private data fields of system objects, a program can break through the security system of a browser.
However, you may wonder why there is a special verifier to check all these features. After all, the Java compiler would never allow you to generate a class file in which an uninitialized variable is used or in which a private data field is accessed from another class. Indeed, a class file generated by a Java compiler always passes verification. But the bytecode format used in the class files is well documented, and it is an easy matter for someone with some experience in assembly programming and a hex editor to manually produce a class file that contains valid but unsafe instructions for the Java Virtual Machine. Once again, keep in mind that the verifier is always guarding against maliciously altered class files, not just checking the class files produced by a Java compiler.
Here’s an example of how to construct such an altered class file. We start with the program VerifierTest.java of Example 8-3. This is a simple program that calls a function and displays the function result. The program can be run both as a console program and as an applet. The fun method itself just computes 1 + 2:
static int fun()
{  int m;
   int n;
   m = 1;
   n = 2;
   int r = m + n;
   return r;
}
As an experiment, try to compile the following modification of this program:
static int fun()
{  int m = 1;
   int n;
   m = 1;
   m = 2;
   int r = m + n;
   return r;
}
In this case, n is not initialized, and it could have any random value. Of course, the Java compiler detects that problem and refuses to compile the program. To create a bad class file, we have to work a little harder. First, run the javap program to find out how the compiler translates the fun method. The command
javap -c VerifierTest
shows the bytecodes in the class file in mnemonic form.
Method int fun()
0 iconst_1
1 istore_0
2 iconst_2
3 istore_1
4 iload_0
5 iload_1
6 iadd
7 istore_2
8 iload_2
9 ireturn
We will use a hex editor to change instruction 3 from istore_1 to istore_0. That is, local variable 0 (which is m ) is initialized twice, and local variable 1 (which is n ) is not initialized at all. We need to know the hexadecimal values for these instructions. These are readily available from The Java Virtual Machineby Tim Lindholm and Frank Yellin [Addison-Wesley, 1997].
0 iconst_1 04
1 istore_0 3B
2 iconst_2 05
3 istore_1 3C
4 iload_0  1A
5 iload_1  1B
6 iadd     60
7 istore_2 3D
8 iload_2  1C
9 ireturn  AC
We will use Hex Workshop (which is included in the companion CD-ROM for this book), our favorite hex editor, to carry out the modification. In Figure 8-1, you see the class file VerifierTest.class loaded into Hex Workshop, with the bytecodes of the fun method highlighted.
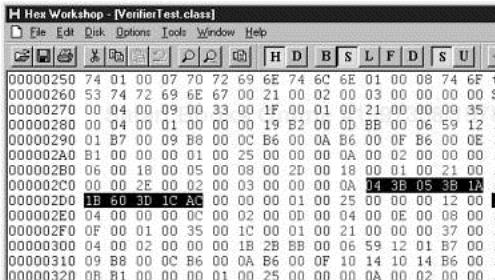
We simply change 3C to 3B and save the class file. (If you don’t want to run the hex editor yourself, you can find the edited VerifierTest.class on the CD-ROM. Just make sure not to compile the VerifierTest source file again.)
Now, when this class file is executed, the result is surprising. The fun method returns a seemingly random value. This is actually 2 plus the value that happened to be stored in the variable n, which never was initialized. Here is a typical result:
1 + 2 = 15102330
This result shows that a class loaded as a system class does not go through the bytecode verifier. You can force verification by using the -verify option when invoking the Java interpreter:
java -verify VerifierTest
Then, the Java interpreter will refuse to load the class, giving the somewhat confusing error message “Can’t find class VerifierTest.”
However, to demonstrate how the Java interpreter verifies classes that are loaded by a class loader, let us use the class loader of the previous section.
Copy
VerifierTest.classtoVerifierTest.caesar.Start the
ClassLoaderTestprogram.Load the
VerifierTestclass file with a key of 0.
You will see that the call to resolveClass throws an exception. This result indicates that the virtual machine has run the verifier and that the bad class file has been rejected.
To see how browsers handle verification, we wrote this program to run either as an application or an applet. Load the applet into a browser, using a file URL:
file:///C|/CoreJavaBook/v2ch8/VerifierTest/VerifierTest.html
Then, you see an error message displayed indicating that verification has failed (see Figure 8-2).

Example 8-3. VerifierTest.java
import java.security.*;
import java.io.*;
import corejava.*;

public class CipherTest
{  public static void main(String[] args) throws Exception
   {  Security.addProvider(new CoreJavaProvider());
      KeyGenerator keyGen
         = KeyGenerator.getInstance("CAESAR");

      SecureRandom rand = new SecureRandom();
      keyGen.initialize(rand);
      Key caesarKey = keyGen.generateKey();
      System.out.println("The key is " + caesarKey);

      Cipher cipher = Cipher.getInstance("CAESAR");
      cipher.initEncrypt(caesarKey);

      InputStream in = new FileInputStream("plain.txt");
      OutputStream out = new CipherOutputStream
         (new FileOutputStream("encrypted.txt"), cipher);
      int ch;
      while ((ch = in.read()) != -1)
      {  out.write((byte)ch);
      }
      in.close();
      out.close();

      System.out.println("The plaintext was:");
      cipher.initDecrypt(caesarKey);
      in = new CipherInputStream
         (new FileInputStream("encrypted.txt"), cipher);
      while ((ch = in.read()) != -1)
      {  System.out.print((char)ch);
      }
      in.close();
      System.out.println();
   }
}Once a class has been loaded into the virtual machine by a class loader or by the default class loading mechanism and checked by the verifier, the third Java security mechanism springs into action: the security manager. A security manager is a class that controls whether a specific operation is permitted. Operations checked by a security manager include:
Whether the current thread can create a new class loader
Whether the current thread can create a subprocess
Whether the current thread can halt the virtual machine
Whether the current thread can load a dynamic link library
Whether a class can access a member of another class
Whether the current thread can access a specified package
Whether the current thread can define classes in a specified package
Whether the current thread can access or modify system properties
Whether the current thread can read from or write to a specified file
Whether the current thread can delete a specified file
Whether the current thread can accept a socket connection from a specified host and port number
Whether the current thread can open a socket connection to the specified host and port number
Whether the current thread can wait for a connection request on a specified local port number
Whether the current thread can use IP multicast
Whether the current thread can invoke a
stop,suspend,resume,destroy,setPriority/setMaxPriority,setName, orsetDaemonmethod of a given thread or thread groupWhether the current thread can set a socket or stream handler factory
Whether a class can start a print job
Whether a class can access the system clipboard
Whether a class can access the AWT event queue
Whether the current thread is trusted to bring up a top-level window
The default behavior when running Java applications is that no security manager is installed, so all these operations are permitted. The applet viewer, on the other hand, immediately installs a security manager (called AppletSecurity ) that is quite restrictive. For example, applet code is not granted any unauthorized local file access. Of course, other functions in the ambient execution environment need to have more access privileges than the applet code itself, so the security manager must check who is attempting a particular operation. For example, applets are not allowed to exit the virtual machine, but the applet viewer itself must be able to shut down. Here is the implementation of the checkExit method of the AppletSecurity class that lets the applet viewer do this.
public synchronized void checkExit(int status)
{  if (inClassLoader())
   // current class was loaded by applet class loader
      throw new AppletSecurityException("checkexit",
         String.valueOf(status));
}
Here, inClassLoader is a method of SecurityManager that checks whether any of the currently pending calls were made by a class that was loaded by a class loader. If the method returns false, then the code that is currently executing is system code and not code that was called from an applet. In that case, the checkExit method simply returns. Otherwise, the method throws an AppletSecurityException.
The checkExit method is called from the exit method of the class Runtime. Here is the entire code of the exit method:
public void exit(int status)
{  SecurityManager security = System.getSecurityManager();
   if (security != null)
      security.checkExit(status);
   exitInternal(status);
}
Here, exitInternal is a private native method that actually terminates the virtual machine. There is no other way of terminating the virtual machine, and since the exitInternal method is private, it cannot be called from any other class. Thus, any Java code that attempts to exit the virtual machine must go through the exit method. That method has been programmed to call the checkExit method. If the security manager wishes to disallow exiting, the checkExit method throws an exception and exitInternal is not called.
Clearly, the integrity of the security policy depends on careful coding. The providers of system services in the standard library must be careful to always consult the security manager before attempting any sensitive operation.
When you run a Java application, the default is that no security manager is running. Your program can install a specific security manager via a call to the static setSecurityManager method in the System class. Once your program installs a security manager, any attempt to install a second security manager results in a SecurityException. This is clearly essential; otherwise, a bad applet could install its own security manager. Thus, while it is possible to have multiple class loaders, a Java program can be governed by only one security manager. It is up to the implementor of that security manager to decide whether to grant all classes the same access or whether to take the origins of the classes into account before deciding what to do.
In this section we show you how to build a simple yet complete security manager. We call it the smut security manager. It monitors all file access and ensures that you can’t open a file if it contains “bad” words (such as sex, drugs, C++). We can do this by overriding the checkRead method of the security manager class.
Our version of this method opens the file and scans its contents, then grants access to the file only when it didn’t find any of the forbidden words. There is just one catch in this scenario. Consider one possible flow of events.
A method of another class opens a disk file.
Then, the smut security manager springs into action and uses its
checkReadmethod.
But the checkRead method must open the disk file in order to check its contents, which calls the security manager again! This would result in an infinite regress unless the security manager has a way of finding out in which context it was called. The getClassContext method is the way to find out how the method was called. This method returns an array of class objects that gives all the classes whose calls are currently pending. For example, when the security manager is called for the first time, that array is
class SmutSecurityManager
class java.io.FileInputStream
class java.io.FileReader
class SecurityManagerTest
. . .
class java.awt.EventDispatchThread
The class in the [0] index gives the currently executing call. Unfortunately, you only get to see the classes, not the names of the pending methods. When the security manager itself attempts to open the file, it is called again and the getClassContext method returns the following array:
class SmutSecurityManager
class java.io.FileInputStream
class java.io.FileReader
class SmutSecurityManager
class java.io.FileInputStream
class java.io.FileReader
class SecurityManagerTest
. . .
class java.awt.EventDispatchThread
In this case, the security manager should permit the file access. How can we do this? We could test whether
getClassContext()[0] == getClassContext()[3]
but this approach is fragile. Here’s an obvious case of where it can go wrong: Imagine that if the implementation changed, for example, so the FileReader constructor calls the security manager directly, then the test would be meaningless because the positions would not be the same in the array. It is far more robust to test whether any of the pending calls came from the same security manager. Here is the entire code for a checkRead method that does this:
public void checkRead(String file)
{  Class[] cc = getClassContext();
   for (int i = 1; i < cc.length; i++)
      if (getClassContext()[0] == getClassContext()[i]) return;
   BufferedReader in = null;
   try
   {  in = new BufferedReader(new FileReader(file));
      String s;
      while ((s = in.readLine()) != null)
      {  for (int i = 0; i < badWords.length; i++)
         if (s.toLowerCase().indexOf(badWords[i]) != -1)
            throw new SecurityException(file);
      }
      in.close();
   }
   catch(IOException e)
   {  throw new SecurityException();
   }
   finally
   {  if (in != null)
         try { in.close(); } catch (IOException e) {}
   }
}
As you can see, we first test whether the read request comes from the same security manager. If not, we open the file and read it line by line. If one of the bad words is found, we throw a security exception. Otherwise, the method simply returns.
Example 8-4 shows a program that puts this security manager to work. The security manager is installed in the main function. (This is the most common place to install a security manager.) When running the program, you can specify a file. The program will load its contents into the text box. However, if the file fails the security check, the program catches the security exception and displays a message instead.
Example 8-4. SecurityManagerTest.java
import java.awt.*;
import java.awt.event.*;
import java.io.*;
import java.net.*;
import java.util.*;
import corejava.*;

public class SecurityManagerTest extends CloseableFrame
   implements ActionListener
{  public SecurityManagerTest()
   {  System.setSecurityManager(new SmutSecurityManager());
      MenuBar mbar = new MenuBar();
      Menu m = new Menu("File");
      MenuItem m1 = new MenuItem("Open");
      m1.addActionListener(this);
      m.add(m1);
      MenuItem m2 = new MenuItem("Exit");
      m2.addActionListener(this);
      m.add(m2);
      mbar.add(m);
      setMenuBar(mbar);
      add(fileText, "Center");
   }

   public void actionPerformed(ActionEvent evt)
   {  String arg = evt.getActionCommand();
      if (arg.equals("Open"))
      {  FileDialog d = new FileDialog(this,
            "Open text file", FileDialog.LOAD);
         d.setFile("*.txt");
         d.setDirectory(lastDir);
         d.show();
         String f = d.getFile();
         lastDir = d.getDirectory();
         if (f != null)
         {  filename = lastDir + f;
            loadTextFile();
         }
      }
      else if(arg.equals("Exit")) System.exit(0);
   }

   public void loadTextFile()
   {  try
      {  fileText.setText("");
         BufferedReader in
            = new BufferedReader(new FileReader(filename));
         String s;
         while ((s = in.readLine()) != null)
         fileText.append(s + "
");
         in.close();
      }
      catch (IOException e)
      {  fileText.append(e + "
");
      }
      catch (SecurityException e)
      {  fileText.append("I am sorry, but I cannot do that.");
      }
   }

   public static void main(String[] args)
   {  Frame f = new SecurityManagerTest();
      f.show();
   }

   private TextArea fileText = new TextArea();
   private String filename = null;
   private String lastDir = "";
}

class NullSecurityManager extends SecurityManager
{  public void checkCreateClassLoader() {}
   public void checkAccess(Thread g) {}
   public void checkAccess(ThreadGroup g) {}
   public void checkExit(int status) {}
   public void checkExec(String cmd) {}
   public void checkLink(String lib) {}
   public void checkRead(FileDescriptor fd) {}
   public void checkRead(String file) {}
   public void checkRead(String file, Object context) {}
   public void checkWrite(FileDescriptor fd) {}
   public void checkWrite(String file) {}
   public void checkDelete(String file) {}
   public void checkConnect(String host, int port) {}
   public void checkConnect(String host, int port,
      Object context) {}
   public void checkListen(int port) {}
   public void checkAccept(String host, int port) {}
   public void checkMulticast(InetAddress maddr) {}
   public void checkMulticast(InetAddress maddr, byte ttl) {}
   public void checkPropertiesAccess() {}
   public void checkPropertyAccess(String key) {}
   public void checkPropertyAccess(String key, String def) {}
   public boolean checkTopLevelWindow(Object window)
   { return true; }
   public void checkPrintJobAccess() {}
   public void checkSystemClipboardAccess() {}
   public void checkAwtEventQueueAccess() {}
   public void checkPackageAccess(String pkg) {}
   public void checkPackageDefinition(String pkg) {}
   public void checkSetFactory() {}
   public void checkMemberAccess(Class clazz, int which) {}
   public void checkSecurityAccess(String provider) {}
}
class SmutSecurityManager extends NullSecurityManager
{  public void checkRead(String file)
   {  Class[] cc = getClassContext();
      for (int i = 1; i < cc.length; i++)
         if (getClassContext()[0] == getClassContext()[i])
            return;
      BufferedReader in = null;
      try
      {  in = new BufferedReader(new FileReader(file));
         String s;
         while ((s = in.readLine()) != null)
         {  for (int i = 0; i < badWords.length; i++)
            if (s.toLowerCase().indexOf(badWords[i]) != -1)
               throw new SecurityException(file);
         }
         in.close();
      }
      catch(IOException e)
      {  throw new SecurityException();
      }
      finally
      {  if (in != null)
            try { in.close(); } catch (IOException e) {}
      }
   }

   public void checkRead(String file, Object context)
   {  checkRead(file);
   }

   private String[] badWords = { "sex", "drugs", "C++" };
}
java.lang.System
void setSecurityManager(SecurityManager s)sets the security manager for remainder of this application. If a security manager has already been set and
sis notnull, throws aSecurityException. Ifsisnull, no action is taken.SecurityManager getSecurityManager()gets the system security manager; returns
nullif none is installed.
java.lang.SecurityManager
public boolean getInCheck()returns the value of the
inCheckfield. That field is a protected Boolean variable of theSecurityManagerbase class. Security managers should set it totruewhile they carry out a security check.Class[] getClassContext()returns an array of the classes for the currently executing methods. The element at position 0 is the class of the currently running method, the element at position 1 is the class of the caller of the current method, and so on. Only the class names, not the method names, are available.
int classDepth(String name)scans the execution stack for the most recent method of the class specified by the (fully qualified) name. Returns the position of that method, or –1 if no method of that class was found.
boolean inClass(String name)scans the execution stack for a method of the class specified by the given name; returns
trueif the method exists. Returnsfalseif no method of that class is found.Class currentLoadedClass()scans the execution stack for the most recent method of a class loaded by a class loader and returns that class.
ClassLoader currentClassLoader()scans the execution stack for the most recent method of a class loaded by a class loader and returns that class loader, or returns
nullif all currently executing methods are methods of system classes.int classLoaderDepth()scans the execution stack for the most recent method of a class loaded by a class loader, and returns the position of that method. Returns –1 if all currently executing methods are methods of system classes.
boolean inClassLoader()scans the execution stack for the method of a class loaded with a class loader; returns
trueif such a method exists. Returnsfalseif all currently executing methods are methods of system classes.void checkCreateClassLoader()checks whether the current thread can create a class loader.
void checkAccess(Thread g)checks whether the current thread can invoke the
stop,suspend,resume,setPriority,setName, andsetDaemonmethods on the threadg.void checkAccess(ThreadGroup g)checks whether the current thread can invoke the
stop,suspend,resume,destroy,andsetMaxPrioritymethods on the thread groupg.void checkExit(int status)checks whether the current thread can exit the virtual machine with status code
status.void checkExec(String cmd)checks whether the current thread can execute the system command
cmd.void checkLink(String lib)checks whether the current thread can dynamically load the library
lib.void checkRead(FileDescriptor fd)void checkRead(String file)void checkWrite(FileDescriptor fd)void checkWrite(String file)void checkDelete(String file)check whether the current thread can read, write, or delete the given file.
void checkRead(String file, Object context)checks whether another thread can read the given file. The other thread must have called
getSecurityContext, and the return value of that call is passed as the value of thecontextparameter.void checkConnect(String host, int port)checks whether the current thread can connect to the given host at the given port.
void checkConnect(String host, int port, Object context)checks whether another thread can connect to the given host at the given port. The other thread must have called
getSecurityContext, and the return value of that call is passed as thecontextparameter.void checkListen(int port)checks whether the current thread can listen for a connection to the given local port.
void checkAccept(String host, int port)checks whether the current thread can accept a socket connection from the given host and port.
void checkSetFactory()checks whether the current thread can set the socket or stream handler factory.
void checkPropertiesAccess()void checkPropertyAccess(String key)void checkPropertyAccess(String key, String def)check whether the current thread can access the system properties, or the system property with the given key.
void checkSecurityAccess(String key)checks whether the current thread can access the security property with the given key.
boolean checkTopLevelWindow(Object window)returns
trueif the given window can be displayed without a security warning.void checkPrintJobAccess()checks whether the current thread can access print jobs.
void checkSystemClipboardAccess()checks whether the current thread can access the system clipboard.
void checkAwtEventQueueAccess()checks whether the current thread can access the AWT event queue.
void checkPackageAccess(String pkg)checks whether the current thread can load classes from the given package. This method is called from the
loadClassmethod of some class loaders.void checkPackageDefinition(String pkg)checks whether the current thread can define new classes that are in the given package. This method is often called from the
loadClassmethod of a custom class loader.void checkMemberAccess(Class cl, int member_id)checks whether the current thread can access a member of a class. (See Chapter 10 on how to obtain member IDs.)
To this point, we have described the security model common to both Java 1.0 and Java 1.1. The class loader, verifier, and security manager mechanisms, when combined, provide enough security to reasonably assure you that when you load applets from anywhere on the Internet, you can run them safely on your local machine. Admittedly, on a few occasions, a very clever person has found a subtle flaw in the implementation of one of these mechanisms. By exploiting such faults, one could have written applets that could break out of the sandbox and theoretically create damage on the local machine.
Sun has actively encouraged the hunt for security bugs. When one is found, Java developers squash it as quickly as possible. (James Gosling said in a speech at the first JavaOne conference that all security bugs are regarded as mission-critical bugs for which Sun will have zero tolerance.)
One way Sun encourages the hunt for new security bugs is to make the source code for the Java Virtual Machine and the security manager available to all interested parties. On the surface, this open policy may appear to be poor public relations—it seems that every few weeks, another very clever person finds another subtle security bug, and, to people who don’t compare the severity of different security threats, Java’s security may look bad. In truth, however, the open policy is a tremendous benefit for Java developers and Java users, and Sun is doing both the right and smart thing. As more and more people understand the security mechanisms and their implementation, it is reasonable to assume that all serious loopholes will be closed. [2]
As we said earlier, applets were what started the Java craze. In practice, people discovered that although they could write animated applets like the famous “nervous text” applet, applets could not do a whole lot of useful stuff in the Java 1.0 security model. For example, because applets under Java 1.0 were so closely supervised, they couldn’t do much good on a corporate intranet, even though essentially no risk attaches to downloading an applet from your company’s secure intranet. It quickly became clear to Sun that, for applets to become truly useful, it was important for users to be able to assign different levels of security, depending on where the applet originated. If an applet comes from a trusted supplier and it has not been tampered with, the user of that applet can then decide whether to give it more privileges.
This added control is now possible because of the applet-signing mechanism in Java 1.1. To give more trust to an applet, we need to know two things:
Where did the applet come from?
Was the code corrupted in transit?
In the past 50 years, mathematicians and computer scientists developed sophisticated algorithms for ensuring the integrity of data and for electronic signatures. The java.security package contains implementations of many of these algorithms. Fortunately, you don’t need to understand the underlying mathematics
[3] to use the algorithms in the Java 1.1 security package. In the next sections, you will see how message digests can detect changes in data files and how digital signatures can prove the identity of the signer.
A message digest is a digital fingerprint of a block of data. For example, the so-called SHA1 (secure hash algorithm #1) condenses any data block, no matter how long, into a sequence of 160 bits (20 bytes). As with real fingerprints, one hopes that no two messages have the same SHA1 fingerprint. Of course, that cannot be true—there are only 2160 SHA1 fingerprints, so there must be some messages with the same fingerprint. But 2160 is so large that the probability of duplication occurring is negligible. How negligible? According to James Walsh from True Odds--How Risks Affect Your Everyday Life [Merritt Publishing, 1996], the chance that you will die from being struck by lightning is about one in 30,000. Now, think of 10 other people, for example, your 10 least favorite managers or professors. The chance that you and all of them will die from lighting strikes is about the same as that of a forged message having the same SHA1 fingerprint as the original. (Of course, more than 10 people, none of whom you are likely to know, will die from lightning. But we are talking about the far slimmer chance that your particular choice of people will be wiped out.)
A message digest has two essential properties.
If one bit or several bits of the data are changed, then the message digest also changes. Of course, there is a very slight possibility that two arbitrary messages have the same fingerprint, but if the messages are similar, then the fingerprints should be able to tell them apart.
If a forger has a given message and its fingerprint, that person cannot modify the message by any sequence of steps so that the resulting message has the same fingerprint as the original.
The second property is again a matter of probabilities, of course. Consider the following message by the millionaire father:
“Upon my death, my property shall be divided equally among my children; however, my son George shall receive nothing.”
That message has an SHA1 fingerprint of
2D 8B 35 F3 BF 49 CD B1 94 04 E0 66 21 2B 5E 57 70 49 E1 7E
The distrustful father has deposited the message with one attorney and the fingerprint with another. Now, suppose George can bribe the lawyer holding the message. He wants to change the message so that Bill gets nothing. Of course, that changes the fingerprint to a completely different bit pattern:
2A 33 0B 4B B3 FE CC 1C 9D 5C 01 A7 09 51 0B 49 AC 8F 98 92
Can George find some other wording that matches the fingerprint? If he had a million computers, each computing a million messages a second, it would take about 100,000 years to find a message he could substitute.
A number of algorithms have been designed to compute these message digests. The two best-known are SHA1, the secure hash algorithm developed by the National Institute of Standards and Technology, and MD5, an algorithm invented by Ronald Rivest of MIT. Both algorithms scramble the bits of a message in ingenious ways. For details about these algorithms, see, for example, Network and Internetwork Securityby William Stallings [Prentice-Hall, 1995]. Note that recently, subtle regularities have been discovered in MD5, and some cryptographers recommend avoiding it and using SHA1 for that reason. (Both algorithms are easy to compute.)
Java implements both SHA1 and MD5. The MessageDigest class is a factory for creating objects that encapsulate the fingerprinting algorithms. It has a static method, called getInstance, that returns an object of a class that extends the MessageDigest class. This means the MessageDigest class serves double duty:
As a factory class
As the base class for all message digest algorithms
For example, here is how you obtain an object that can compute SHA fingerprints.
MessageDigest alg = MessageDigest.getInstance("SHA-1");(To get an object that can compute MD5, use the string "MD5" as the argument to getInstance. )
After you obtained a MessageDigest object, you feed it all the bytes in the message by repeatedly calling the update method. For example, the following code passes all bytes in a file to the alg object created above to do the fingerprinting:
FileInputStream in = new FileInputStream(f);
int ch;

while ((ch = in.read()) != -1)
   alg.update((byte)ch);
When you are done, call the digest method. This method pads the input—as required by the fingerprinting algorithm—does the computation, and returns the digest as an array of bytes.
byte[] hash = currentAlgorithm.digest();
The program in Example 8-5 computes a message digest, using either SHA or MD5. You can load the data to be digested from a file, or you can type a message in the text area. Figure 8-3 shows the application.
Example 8-5. MessageDigestTest.java
import java.io.*;
import java.security.*;
import java.awt.*;
import java.awt.event.*;
import corejava.*;

public class MessageDigestTest extends CloseableFrame
   implements ActionListener, ItemListener
{  public MessageDigestTest()
   {  Panel p = new Panel();

      CheckboxGroup g = new CheckboxGroup();
      addCheckbox(p, "SHA-1", g, true);
      addCheckbox(p, "MD5", g, false);
      add(p, "North");
      add(message, "Center");
      add(digest, "South");
      digest.setFont(new Font("Courier", Font.PLAIN, 12));

      setAlgorithm("SHA-1");

      MenuBar mbar = new MenuBar();
      Menu m = new Menu("File");
      MenuItem m1 = new MenuItem("File digest");
      m1.addActionListener(this);
      m.add(m1);
      MenuItem m2 = new MenuItem("Text area digest");
      m2.addActionListener(this);
      m.add(m2);
      MenuItem m3 = new MenuItem("Exit");
      m3.addActionListener(this);
      m.add(m3);
      mbar.add(m);
      setMenuBar(mbar);
   }

   public void addCheckbox(Panel p, String name,
      CheckboxGroup g, boolean v)
   {  Checkbox c = new Checkbox(name, g, v);
      c.addItemListener(this);
      p.add(c);
   }

   public void itemStateChanged(ItemEvent evt)
   {  if (evt.getStateChange() == ItemEvent.SELECTED)
         setAlgorithm((String)evt.getItem());
   }

   public void setAlgorithm(String alg)
   {  try
      {  currentAlgorithm = MessageDigest.getInstance(alg);
      }
      catch(NoSuchAlgorithmException e)
      {  digest.setText("" + e);
      }
   }
   public void actionPerformed(ActionEvent evt)
   {  String arg = evt.getActionCommand();
      if (arg.equals("File digest"))
      {  FileDialog d = new FileDialog(this,
            "Open text file", FileDialog.LOAD);
         d.setFile("*.txt");
         d.setDirectory(lastDir);
         d.show();
         String f = d.getFile();
         lastDir = d.getDirectory();
         if (f != null)
         {  filename = lastDir + f;
            computeDigest(loadBytes(filename));
         }
      }
      else if (arg.equals("Text area digest"))
      {  String m = message.getText();
         computeDigest(m.getBytes());
      }
      else if(arg.equals("Exit")) System.exit(0);
   }

   public byte[] loadBytes(String name)
   {  FileInputStream in = null;

      try
      {  in = new FileInputStream(name);
         ByteArrayOutputStream buffer
            = new ByteArrayOutputStream();
         int ch;
         while ((ch = in.read()) != -1)
            buffer.write(ch);
         return buffer.toByteArray();
      }
      catch (IOException e)
      {  if (in != null)
         {  try { in.close(); } catch (IOException e2) {}
         }
         return null;
      }
   }

   public void computeDigest(byte[] b)
   {  currentAlgorithm.reset();
      currentAlgorithm.update(b);
      byte[] hash = currentAlgorithm.digest();
      String d = "";
      for (int i = 0; i < hash.length; i++)
      {  d += new Format("%02X ").form(hash[i] & 0xFF);
      }
      digest.setText(d);
   }

   public static void main(String[] args) throws Exception
   {  Frame f = new MessageDigestTest();
      f.setSize(300, 200);
      f.show();
   }

   private TextArea message = new TextArea();
   private TextField digest = new TextField();
   private String filename = null;
   private String lastDir = "";
   private MessageDigest currentAlgorithm;
}
java.security.MessageDigest
static MessageDigest getInstance(String algorithm)returns a
MessageDigestobject that implements the specified algorithm. Throws aNoSuchAlgorithmExceptionif the algorithm is not provided.Parameters:
algorithmthe name of the algorithm, such as
"SHA-1"or"MD5"void update(byte input)void update(byte[] input)void update(byte[] input, int offset, int len)update the digest, using the specified bytes.
byte[] digest()completes the hash computation, returns the computed digest, and resets the algorithm object.
void reset()resets the digest.
In the last section, you saw how to compute a message digest, a fingerprint for the original message. If the message is altered, then the fingerprint of the altered message will not match the fingerprint of the original. If the message and its fingerprint are delivered separately, then the recipient can check whether the message has been tampered with. However, if both the message and the fingerprint were intercepted, it is an easy matter to modify the message and then recompute the fingerprint. After all, the message digest algorithms are publicly known, and they don’t require any secret keys. In that case, the recipient of the forged message and the recomputed fingerprint would never know that the message has been altered. In this section, you will see how digital signatures can authenticate a message. When a message is authenticated, you know
The message came from the claimed sender.
The message was not altered.
To understand how digital signatures work, we need to explain a little bit behind what is now called public key cryptography. Public key cryptography is based on the notion of a public key and private key. The idea is that you publicize to the world a method of encrypting information (via the public key). However, once data is encrypted, only the person who has the private key can figure out what the original message was. Thus, encrypted messages can be sent over unsecure channels [4]. Many cryptographic algorithms, such as DSA (the Digital Signature Algorithm) and RSA (the encryption algorithm invented by Rivest, Shamir and Adleman), use this idea. The exact structure of the keys and what it means for them to match depend on the algorithm. For example, here is a matching pair of public and private DSA keys:
Public key:
p: fca682ce8e12caba26efccf7110e526db078b05edecbcd1eb4a208f3ae16
17ae01f35b91a47e6df63413c5e12ed0899bcd132acd50d99151bdc43ee7375
92e17

q: 962eddcc369cba8ebb260ee6b6a126d9346e38c5

g: 678471b27a9cf44ee91a49c5147db1a9aaf244f05a434d6486931d2d1427
1b9e35030b71fd73da179069b32e2935630e1c2062354d0da20a6c416e50be79
4ca4

y: c0b6e67b4ac098eb1a32c5f8c4c1f0e7e6fb9d832532e27d0bdab9ca2d2a
8123ce5a8018b8161a760480fadd040b927281ddb22cb9bc4df596d7de4d1b97
7d50
Private key:
p: fca682ce8e12caba26efccf7110e526db078b05edecbcd1eb4a208f3ae16
17ae01f35b91a47e6df63413c5e12ed0899bcd132acd50d99151bdc43ee73759
2e17

q: 962eddcc369cba8ebb260ee6b6a126d9346e38c5

g: 678471b27a9cf44ee91a49c5147db1a9aaf244f05a434d6486931d2d1427
1b9e35030b71fd73da179069b32e2935630e1c2062354d0da20a6c416e50be79
4ca4

x: 146c09f881656cc6c51f27ea6c3a91b85ed1d70a
There is a mathematical relationship between these keys, but the exact nature of the relationship is not interesting for practical programming. (If you are interested, you can look it up in Network and Internetwork Securityby William Stallings [Prentice-Hall, 1995, page 345] or The Handbook of Cryptographymentioned earlier.)
The obvious question is how to generate the pair of keys. Usually, this is done by feeding the result of some random process in to a deterministic procedure that returns the key pair to you. Luckily, how to get a random key pair for public key cryptography is not a question anyone but cyptographers and mathematicians need to worry about.
What is implicitly being assumed is that it is impossible to compute the private key from the public key in any reasonable amount of time. (For example, RSA depends on factoring large numbers; this is assumed to be computationally infeasible for the 200+ digit numbers routinely used for strong version of RSA.) This means you can safely place your public key onto your Web page or send it by e-mail. However, you must keep your private key very safe.
One reason for keeping your private key safe is that you can use it to prove who you are—what is particularly neat about public key cryptography is that you can also use it to sign a message. This signature depends on the results of applying the public key and then the private key giving you the original message regardless of which you do first.
So, say Joe wants to send his friend Tom a message, and Tom of course wants to know this message came from Joe. What Tom does is use his private key to encrypt something like “I, Joe, wrote this message,” Tom, of course, knows Joe’s public key. So, since the order is irrelevant, Tom can apply the public key to the message and see if he gets Joe’s message or just gibberish. If he gets Joe’s message, he can rest assured that Joe sent the message. See Figure 8-4.

You can see why security for your private key is all important. If someone steals your private key or if a government can require you to turn it over, then you are hosed. The thief can impersonate you by sending messages that others will believe come from you.
Finally, it may seem difficult to believe that nobody can compute the private key from the public keys, but nobody has ever found an algorithm to do this for DSA or RSA. Except in special cases what is used is essentially a more sophisticated version of brute force”, trying lots of the possible private keys and checking if they match. With sufficient key length, a brute-force attack would require more computers than can be built from all the atoms in the solar system crunching away for thousands of years. Most cryptographers believe that keys with a “modulus” of 2,000 bits or more are completely safe from any attack.
The Java security package comes with DSA. If you want to use RSA, you’ll need to buy the classes from RSA (www.rsa.com). Let us put the DSA algorithm to work. Actually, there are three algorithms:
To generate a key pair
To sign a message
To verify a signature
Of course, you generate a key pair only once and then use it for signing and verifying many messages. To generate a new random key pair, make sure you use truly random numbers. For example, the regular random number generator in the Random class, seeded by the current date and time, is not random enough. (The jargon says the basic random number generator in java.util is not “cryptographically secure.”) For example, supposing the computer clock is accurate to 1/10 of a second; then, there are at most 864,000 seeds per day. If an attacker knows the day a key was issued (which one can often deduce from the expiration date), then it is an easy matter to generate all possible seeds for that day.
The SecureRandom class generates random numbers that are far more secure than those produced by the Random class. You still need to provide a seed to start the number sequence at a random spot. The best method for doing this is to obtain random input from a hardware device such as a white-noise generator. Another reasonable source for random input is to ask the user to type away aimlessly on the keyboard. But each keystroke should contribute only one or two bits to the random seed. Once you gather such random bits in an array of bytes, you pass it to the setSeed method.
SecureRandom secrand = new SecureRandom();
byte[] b = new byte[20];
// fill with truly random bits
secrand.setSeed(b);
If you don’t seed the random number generator, then it will compute its own 20-byte seed by launching threads, putting them to sleep, and measuring the exact time when they are awakened.
NOTE

This is an innovative algorithm that, at this point, is not known to be safe. And, in the past, algorithms that relied on timing other components of the computer, such as hard disk access time, were later shown not to be completely random.
Once you seed the generator, you can then draw random bytes with the nextBytes method.
byte[] randomBytes = new byte[64];
secrand.nextBytes(randomBytes);
Actually, to compute a new DSA key, you don’t compute the random numbers yourself. You just pass the random number generator object to the DSA key generation algorithm.
To make a new key pair, you need a KeyPairGenerator object. Just as with the MessageDigest class of the preceding section, the KeyPairGenerator class is both a factory class and the base class for actual key pair generation algorithms. To get a DSA key pair generator, you call the getInstance method with the string “DSA ”.
KeyPairGenerator keygen = KeyPairGenerator.getInstance("DSA");The returned object is actually an object of the class sun.security.provider.DSAKeyPairGenerator, which is a subclass of KeyPairGenerator.
To generate keys, you must initialize the key generation algorithm object with the key strength and a secure random number generator. Note that the key strength is not the length of the generated keys but the size of one of the building blocks of the key. In the case of DSA, it is the number of bits in the modulus, one of the mathematical quantities that makes up the public and private keys. Suppose you want to generate a key with a modulus of 512 bits:
SecureRandom secrand = new SecureRandom();
secrand.setSeed(...);
keygen.initialize(512, secrand);
Now you are ready to generate key pairs.
KeyPair keys = keygen.generateKeyPair();
KeyPair morekeys = keygen.generateKeyPair();
Each key pair has a public and a private key.
PublicKey pubkey = keys.getPublic();
PrivateKey privkey = keys.getPrivate();
To sign a message, you need a signature algorithm object. You use the Signature factory class:
Signature signalg = Signature.getInstance("DSA");Signature algorithm objects can be used both to sign and to verify a message. To prepare the object for message signing, use the initSign method and pass the private key to the signature algorithm.
signalg.initSign(privkey);
Now, you use the update method to add bytes to the algorithm objects, in the same way as with the message digest algorithm.
while ((ch = in.read()) != -1)
   signalg.update((byte)ch);
Finally, you can compute the signature with the sign method. The signature is returned as an array of bytes.
byte[] signature = signalg.sign();
The recipient of the message must obtain a DSA signature algorithm object and prepare it for signature verification by calling the initVerify method with the public key as parameter.
Signature verifyalg = Signature.getInstance("DSA");
verifyalg.initVerify(pubkey);
Then, the message must be sent to the algorithm object.
while ((ch = in.read()) != -1)
   verifyalg.update((byte)ch);
Finally, you can verify the signature.
boolean check = verifyalg.verify(signature);
If the verify method returns true, then the signature was a valid signature of the message that was signed with the matching private key. That is, both the sender and the contents of the message have been authenticated.
Example 8-6 demonstrates the key generation, signing, and verification processes.
Example 8-6. SignatureTest.java
import java.security.*;

public class SignatureTest
{  public static void main(String[] args)
   {  try
      {  KeyPairGenerator keygen
            = KeyPairGenerator.getInstance("DSA");
         SecureRandom secrand = new SecureRandom();
         keygen.initialize(512, secrand);

         KeyPair keys1 = keygen.generateKeyPair();
         PublicKey pubkey1 = keys1.getPublic();
         PrivateKey privkey1 = keys1.getPrivate();

         KeyPair keys2 = keygen.generateKeyPair();
         PublicKey pubkey2 = keys2.getPublic();
         PrivateKey privkey2 = keys2.getPrivate();

         Signature signalg = Signature.getInstance("DSA");
         signalg.initSign(privkey1);
         String message
            = "Pay authors a bonus of $20,000.";
         signalg.update(message.getBytes());
         byte[] signature = signalg.sign();
         Signature verifyalg = Signature.getInstance("DSA");
         verifyalg.initVerify(pubkey1);
         verifyalg.update(message.getBytes());
         if (!verifyalg.verify(signature))
            System.out.print("not ");
         System.out.println("signed with private key 1");

         verifyalg.initVerify(pubkey2);
         verifyalg.update(message.getBytes());
         if (!verifyalg.verify(signature))
            System.out.print("not ");
         System.out.println("signed with private key 2");
      }
      catch(Exception e)
      {  System.out.println("Error " + e);
      }
   }
}
java.security.KeyPairGenerator
static KeyPairGenerator getInstance(String algorithm)returns a
KeyPairGeneratorobject that implements the specified algorithm. Throws aNoSuchAlgorithmExceptionif the algorithm is not provided.Parameters:
algorithmthe name of the algorithm, such as
"DSA"void initialize(int strength, SecureRandom random)Parameters:
s
trengthan algorithm-specific measurements, typically, the number of bits of one of the algorithm parameters
randomthe source of random bits for generating keys
KeyPair generateKeyPair()generatesa new key pair.
java.security.KeyPair
Key getPrivate()returns the private key from the key pair.
Key getPublic()returns the public key from the key pair.
java.security.Signature
static Signature getInstance(String algorithm)returns a
Signatureobject that implements the specified algorithm. Throws aNoSuchAlgorithmExceptionif the algorithm is not provided.Parameters:
algorithmthe name of the algorithm, such as
"DSA"void initSign(PrivateKey publicKey)initializes this object for signing. Throws an
InvalidKeyExceptionif the key type does not match the algorithm type.Parameters:
privateKeythe private key of the identity whose signature is being computed
void update(byte input)void update(byte[] input)void update(byte[] input, int offset, int len)update the message buffer, using the specified bytes.
byte[] sign()completes the signature computation and returns the computed signature.
void initVerify(PublicKey publicKey)initializes this object for verification. Throws an
InvalidKeyException if the key type does not match the algorithm type.Parameters:
publicKeythe public key of the identity to be verified
boolean verify(byte[] signature)checks whether the signature is valid.
Suppose you get a message from your friend, signed by your friend with his private key, using the method we just showed you. You may already have his public key, or you can easily get it by asking him for a copy or by getting it from your friend’s Web page. Then, you can verify that the message was in fact authored by your friend and has not been tampered with. Now, suppose you get a message from a stranger who claims to represent a famous software company, urging you to run the program that is attached to the message. The stranger even sends you a copy of his public key so you can verify that he authored the message. You check that the signature is valid. This proves that the message was signed with the matching private key and that it has not been corrupted.
Be careful: you still have no idea who wrote the message. Anyone could have generated a pair of public and private keys, signed the message with the private key, and sent the signed message and the public key to you. The problem of determining the identity of the sender is called the authentication problem.
The usual way to solve the authentication problem is simple. Suppose the stranger and you have a common acquaintance whom you both trust. Suppose the stranger meets your acquaintance in person and hands over a disk with the public key. Your acquaintance later meets you, assures you that he met the stranger and that the stranger indeed works for the famous software company, and then gives you the disk (see Figure 8-5). That way, your acquaintance vouches for the authenticity of the stranger.
In fact, your acquaintance does not actually need to meet you. Instead, he can apply his private signature to the stranger’s public key file (see Figure 8-6). When you get the public key file, you verify the signature of your acquaintance, and because you trust him, you are confident that he did check the stranger’s credentials before applying his signature.

However, you may not have a common acquaintance. Some trust models assume that there is always a chain of “trust”—a chain of mutual acquaintances, so that you trust every member of that chain. In practice, of course, that isn’t always true. You may trust your acquaintance, Amy, and you know that Amy trusts Bob, but you don’t know Bob and aren’t sure if you trust him. Other trust models assume that there is a benevolent big brother in whom we all trust.
Some companies are working to become such big brothers, such as Verisign, Inc. (www.verisign.com), and, yes, the United States Postal Service.
In real life, people will use some combination of the two approaches. That’s why you may be asked to sign someone’s public key. Digital signatures may also be signed by one or more groups who will vouch for the authenticity, and you will need to evaluate to what degree you trust the authenticators. You might place a great deal of trust in Verisign, seeing that they went to a great deal of trouble by hiring a CEO with aquiline features and by requiring multiple people with black attache cases to come together into a secure chamber whenever new master keys are to be minted.
However, you should have realistic expectations about what is actually being authenticated. Stratton Sklavos, the CEO of Verisign, does not personally meet every individual who has a public key that is authenticated by Verisign. More likely, that individual just filled out a form on a Web page (see Figure 8-7).

Such a form asks the requestor to specify the name, organization, country, and e-mail address. Typically, the key (or instructions on how to fetch the key) is mailed to that e-mail address. Thus, you can be reasonably assured that the e-mail address is genuine, but the requestor could have filled in any name and organization. With a “class 1” ID from Verisign, that information is not verified. There are more stringent classes of IDs. With higher classes of IDs, Verisign will require the requestor to appear before a notary public, will check the financial rating of the requestor, and so on. Other authenticators will have different procedures. Thus, when you receive an authenticated message, it is important that you understand what, in fact, is being authenticated.
The basic types in the Java authetication framework are the Principal interface and the Identity class. A principal is a real-world entity such as a person, organization, or company. A principal has a name. An identity is a principal with a public key. An identity can have certificates that authenticate it. Thus, an identity has three important accessor methods:
Identity id = new Identity("James Smith");
String name = id.getName();
PublicKey pubkey = id.getKey();
Certificate[] certs = id.certificates();
Certificate is an interface. A certificate has a principal, the identity that is being certified, and a guarantor, the identity with which the principal is associated for this certificate. The encode and decode methods let you write certificates to a stream and read them from a stream. Actual certificate classes must implement these methods. They also must supply other important details, in particular, the claims that the certificate actually certifies.
The name and key of an identity must be unique within its identity scope. The IdentityScope class represents a collection of identities.
IdentityScope departmentScope = new IdentityScope("Java
   Technology group");
. . .
Identity[] identities[] = departmentScope.identities();
Conversely, each identity stores its scope.
IdentityScope scope = id.getScope();
For example, the Java Technology group within Famous Software can be an identity scope. That way, the name “James Smith” in the Java Technology group doesn’t conflict with “James Smith” in the Finance department. Of course, there are Java Technology groups and finance departments in many organizations. To keep those names safe from conflicts, the IdentityScope class extends the Identity class, that is, identity scopes themselves have identity scopes. In our example, Famous Software is an identity scope, and it is the scope of the Java Technology group scope. You set the scopes as the second argument of the Identity and IdentityScope constructors.
IdentityScope companyScope = new IdentityScope("Famous
   Software");
IdentityScope departmentScope = new IdentityScope("Java
   Technology group", companyScope);
Identity id = new Identity("James Smith", departmentScope);
Note that identity scopes can themselves have keys and certificates.
Each Java Virtual Machine has a system identity scope, an object of class IdentityScope (or a subclass), which is available to all Java programs using that virtual machine. You get the system identity scope by calling the static getSystemScope method:
IdentityScope systemScope = IdentityScope.getSystemScope();
By default, this is an instance of the class sun.security.provider.IdentityDatabase, a subclass of IdentityScope. You can set another class by editing the system.scope entry in the file jdklibsecurityjava.security. Or, you can set another system scope for your own use with the static setSystemScope method, without affecting other users of the virtual machine. Actually, you won’t normally want to replace the system identity scope. It is easier to use your own identity scope and add it to the system identity scope.
The last class in the authentication framework that we need to discuss is Signer. A signer is simply an identity with a public and private key pair. Figure 8-8 shows the relationships between these classes and interfaces.
Unfortunately, in the current version of Java, no public classes put this framework to use. JavaSoft promises support for certificates for Java 1.2. Java 1.1 supports only signed applets. Therefore, there actually are Java classes for generating, reading, and using certificates. However, these classes are in the private “sun” hierarchy. For example, the class sun.security.x509.X509Cert (which implements the Certificate interface of the security framework) represents a certificate in the X.509 format.
In the next two sections, we look at the structure of X.509 certificates and the Java tools used to generate them.
java.security.Identity
Identity(String name)constructs an identity with the specified name and no scope.
Identity(String name, IdentityScope scope)constructs an identity with the specified name and scope. Throws a
KeyManagementExceptionif there is already an identity with the same name in the scope.void addCertificate(Certificate c)adds a certificate for this identity.
void removeCertificate(Certificate c)removes a certificate from this identity.
Certificate[] certificates()returns an array of all the certificates for this identity.
String getName()returns the name of this identity.
void setPublicKey(PublicKey k)sets the public key of this identity.
PublicKey getPublicKey()returns the public key of this identity.
IdentityScope getScope()returns the identity scope of this identity.
java.security.Signer
Signer(String name)Constructs a signer with the specified name and no scope.
Identity(String name, IdentityScope scope)constructs a signer with the specified name and scope.
PrivateKey getPublicKey()returns the private key of this signer.
void setKeyPair(KeyPair k)sets the public and private key of this signer.
java.security.IdentityScope
IdentityScope(String name)constructs a new identity scope with the specified name.
IdentityScope(String name, IdentityScope scope)constructs an identity scope with the specified name and scope. Throws a
KeyManagementExceptionif there is already an identity scope with the same name in the parent scope.static IdentityScope getSystemScope()returns the system identity scope, a scope that is established by the Java Virtual Machine.
Identity getIdentity(String name)returns the identity in this scope with the specified name, or
nullif no match is found.Identity getIdentity(Principal principal)returns the identity in this scope with the same name as the specified principal, or
nullif no match is found.Identity getIdentity(PublicKey key)returns the identity in this scope with the specified key, or
nullif no match is found.void addIdentity(Identity id)adds an identity to this scope. Throws a
KeyManagementExceptionif there is already an identity with the same name in the scope.void removeIdentity(Identity id)removes an identity from this scope. Throws a
KeyManagementExceptionif the identity could not be found.Enumeration identities()returns an enumeration of all identities in this identity scope.
int size()returns the number of identities within this identity scope.
java.security.Certificate
Principal getGuarantor()returns the principal who guarantees the authenticity of this certificate. To be useful, this must be a trusted entity, such as a certificate authority.
Principal getPrincipal()returns the owner of the key pair that is being guaranteed by this certificate.
PublicKey getPublicKey()returns the public key that is being guaranteed by this certificate.
void encode(OutputStream stream)encodes this certificate to an output stream in a format that can be read by the
decodemethod.void decode(InputStream stream)decodes this certificate from an output stream.
String getFormat()returns the name of the encoding format, such as
"X.509".
One of the most common formats for signed certificates is the X.509 format. X.509 certificates are widely used by Verisign, Microsoft, JavaSoft, and many other companies, for signing e-mail messages, authenticating program code, and certifying many other kinds of data. The X.509 standard is part of the X.500 series of recommendations for a directory service by the international telephone standards body, the CCITT. In its simplest form, an X.509 certificate contains the following data:
Version of certificate format
Serial number of certificate
Signature algorithm identifier (algorithm ID + parameters of the algorithm used to sign the certificate)
Name of the signer of the certificate
Period of validity (begin/end date)
Name of the identity being certified
Public key of identity being certified (algorithm ID + parameters of the algorithm + public key value)
Signature (hash code of all preceding fields, encoded with private key of signer)
Thus, the signer guarantees that a certain identity has a particular public key.
Extensions to the basic X.509 format make it possible for the certificates to contain additional information. For more information on the structure of X.509 certificates, see http://www.ietf.cnri.reston.va.us/ids.by.wg/X.509.html.
The precise structure of X.509 certificates is described in a formal notation, called “abstract syntax notation #1” or ASN.1. Figure 8-9 shows the ASN.1 definition of version 3 of the X.509 format. The exact syntax is not important for us, but, as you can see, ASN.1 gives a precise definition of the structure of a certificate file. The basic encoding rules, or BER,describe precisely how to save this structure in a binary file. That is, BER describes how to encode integers, character strings, bit strings, and constructs such as SEQUENCE, CHOICE, and OPTIONAL. (Actually, the BER rules are not unique; there are several ways of specifying some elements. The distinguished encoding rules (DER) remove these ambiguities. For a readable description of the BER encoding format, we recommend A Layman’s Guide to a Subset of ASN.1, BER, and DERby Burton S. Kaliski, Jr., available from http://www.rsa.com/rsalabs/pubs/PKCS/).
Example 8-9. ASN.1 definition of X.509v3
Certificate  ::=  SEQUENCE  {
         tbsCertificate      TBSCertificate,
         signatureAlgorithm  AlgorithmIdentifier,
         signature           BIT STRING  }

   TBSCertificate  ::=  SEQUENCE  {
         version         [0]  EXPLICIT Version DEFAULT v1,
         serialNumber         CertificateSerialNumber,
         signature            AlgorithmIdentifier,
         issuer               Name,
         validity             Validity,
         subject              Name,
         subjectPublicKeyInfo SubjectPublicKeyInfo,
         issuerUniqueID  [1]  IMPLICIT UniqueIdentifier OPTIONAL,
                              -- If present, version must be v2
                                    or v3
         subjectUniqueID [2]  IMPLICIT UniqueIdentifier OPTIONAL,
                              -- If present, version must be v2
                                    or v3
         extensions      [3]  EXPLICIT Extensions OPTIONAL
                              -- If present, version must be v3
         }

   Version  ::=  INTEGER  {  v1(0), v2(1), v3(2)  }

   CertificateSerialNumber  ::=  INTEGER

   Validity ::= SEQUENCE {
        notBefore       CertificateValidityDate,
        notAfter        CertificateValidityDate }

   CertificateValidityDate ::= CHOICE {
        utcTime        UTCTime,
        generalTime    GeneralizedTime }

   UniqueIdentifier  ::=  BIT STRING

   SubjectPublicKeyInfo  ::=  SEQUENCE  {
        algorithm             AlgorithmIdentifier,
        subjectPublicKey      BIT STRING  }

   Extensions  ::=  SEQUENCE OF Extension

   Extension  ::=  SEQUENCE  {
        extnID      OBJECT IDENTIFIER,
        critical    BOOLEAN DEFAULT FALSE,
extnValue OCTET STRING }The JDK 1.1 comes with the javakey program, which is a rudimentary tool to generate and manage a set of certificates. Ultimately, the functionality of this tool will be embedded in other, more user-friendly programs that interact with actual certificate authorities. But right now, we need to use javakey to generate sample certificates. We do not discuss all of the javakey features—see the JDK documentation for complete information.
The javakey program manages a database of identities and signers. By default, that database is called identitydb.obj, and it is stored in the Java installation directory (such as c:jdk ). You can change that location by adding a line
identity.database=database location
to the security file jdklibsecurityjava.security. In fact, if you were to use the javakey -generated database for any serious purpose, you would need to safeguard this file—it contains the private keys of signers. By the way, the file identitydb.obj is a serialized object of type sun.security.provider.IdentityDatabase, a class that extends the IdentityScope class described previously.
To add new identities and signers to the database, call javakey with the -c (create identity) or -cs (create signer) flag, followed by the name of the principal. In our examples, we use e-mail addresses as names since they are guaranteed to be unique.
javakey -cs [email protected]
javakey -c [email protected]
To see the state of the database, use the -ld (list details) option. The command
javakey -ld
produces the following output, showing that Gary is stored as an identity and Cay as a signer.
[email protected][identitydb.obj][not trusted]
         no public key
         no certificates
         No further information available.


[Signer][email protected][identitydb.obj][not trusted]
         no keys
         no certificates
         No further information available.
We discuss the trust level (which by default is “not trusted”) in the section on code signing. For javakey, the trust level specifies only whether you trust an identity to produce safe code. A signer who is “not trusted” can still sign certificates.
You will see later in this section how to add keys and certificates into the database. You can add further information of your choice by running javakey with the -ii (input information) command, followed by the name of the principal. Then, type in any information you like. The information can extend over multiple lines. End the input by typing an end-of-file marker (Ctrl+Z in Windows, Ctrl+D in Unix).
javakey -ii [email protected]
Cay S. Horstmann
http://www.horstmann.com
Ctrl+Z
To generate keys, use the -gk option. For example,
javakey -gk [email protected] DSA 512
creates a new DSA key pair with modulus 512 and stores it in the database.
To make a public key available to others, you generate an X.509 certificate with the -gc (generate certificate) command. Unlike the other javakey commands that we saw up to now, the “generate certificate” command uses a file, not command-line parameters, to specify the certificate parameters. For example, here is a typical input file to generate a certificate:
[email protected]

[email protected]
subject.real.name=Cay Horstmann
subject.org.unit=San Jose
subject.org=Horstmann Software
subject.country=USA

start.date=1 Jan 1997
end.date=31 Dec 1998
serial.number=1006

out.file=cay.x509
Most of the directives are self-explanatory. The X.509 terminology is slightly different from the Java terminology. “Subject” is the principal, the identity that is being certified. “Issuer” is the signer of the certificate. Note that this particular certificate is self-signed. There is no independent signer vouching for the information in the certificate.
Place these directives into a file, cay.dir, and run javakey with the command
javakey -gc cay.dir
As a result, the certificate is stored in the identity database and in the file named in the out.file directive, that is, [email protected].
To display the contents of a certificate file, use the -dc (display certificate) option.
javakey -dc cay.x509
The command displays the following information:
[
  X.509v1 certificate,
  Subject is CN=Cay Horstmann, OU=San Jose, O=Horstmann
     Software, C=USA
  Key:  Sun DSA Public Key
parameters:
p: fca682ce8e12caba26efccf7110e526db078b05edecbcd1eb4a208f3ae1
617ae01f35b91a47e6df63413c5e12ed0899bcd132acd50d99151bdc43ee7375
92e17
q: 962eddcc369cba8ebb260ee6b6a126d9346e38c5
g:
678471b27a9cf44ee91a49c5147db1a9aaf244f05a434d6486931d2d14271b
9e35030b71fd73da179069b32e2935630e1c2062354d0da20a6c416e50be794c
a4

y:
8d2197afb5208432a819982b59ce9e2684caa44ec6fe9195466561d70ab07d
dd9636dc09f5f0da31d729e01a6d9c38853fb41e73d6ad4591771562b07fcf3c
a0
  Validity <Tue Dec 31 16:00:00 PST 1996> until <Wed Dec 30
     16:00:00 PST 1998>
  Issuer is CN=Cay Horstmann, OU=San Jose, O=Horstmann
     Software, C=USA
  Issuer signature used [SHA1withDSA]
  Serial number =     03ee
]
As you can see, javakey is somewhat confused about the date—it doesn’t convert to universal time when it writes the certificate, but it thinks it did when it reads it.
Now, let’s use the key to certify the public key of an identity. We want to simulate the following scenario. Gary created his own public/private key pair on his own computer. He forwarded the public key to Cay through a trusted channel so that Cay can sign the certificate. Then, anyone who trusts Cay can use Gary’s public key to authenticate information signed by Gary.
Note that Gary is a signer in his own identity database, but just an identity in Cay’s database and the other databases that use his certificate. That is, you really need two computers to try out the simulation. On the second computer, add Gary as a signer, generate keys, and create a self-signed certificate. You will find such a certificate on the CD-ROM. You can import it into your own certificate database with the “import certificate” command:
javakey -ic [email protected] gary.x509
If you run the javakey -ld command again, you get the following output.
Scope: sun.security.IdentityDatabase, source file:
   D:JDKBIN..identitydb.obj
[email protected][identitydb.obj][not trusted]
   public key initialized
   certificates:
   certificate 1 for  : CN=Gary Cornell, OU=Department of
      Mathematics, O=University of Connecticut, C=USA
         from : CN=Gary Cornell, OU=Department of Mathematics,
            O=University of Connecticut, C=USA
   No further information available.
[Signer][email protected][identitydb.obj][not trusted]
   public and private keys initialized
   certificates:
   certificate 1 for  : CN=Cay Horstmann, OU=San Jose,
      O=Horstmann Software, C=USA
         from : CN=Cay Horstmann, OU=San Jose, O=Horstmann
            Software, C=USA
Cay S. Horstmann
http://www.horstmann.com
That is, the database now contains the public key of Gary. Now, Cay can generate a certificate in which he signs Gary’s public key. In this case, the name of the issuer and subject in the certificate file are different.
[email protected]
issuer.cert=1
[email protected]
subject.real.name=Gary Cornell
subject.org.unit=Department of Mathematics
subject.org=University of Connecticut
subject.country=USA

start.date=1 Jan 1997
end.date=31 Dec 1998
serial.number=1007

out.file=gary-by-cay.x509
Since this is not a self-signed certificate, you also need to specify which of the issuer’s certificates to use to certify the subject. You need to run javakey -ld to find out the numbers that javakey assigns to the certificate. In our case, we specify issuer.cert=1 to indicate that we want to use Cay’s first (and only) certificate to sign Gary’s certificate.
Cay can then return the signed certificate to Gary via a channel that need not be secure. Anyone who has Cay’s public key (through a secure channel) can now verify Gary’s certificate.
Note that, currently, javakey supports only version 1 of the X.509 format. You cannot yet import certificates from Verisign or those created with the Microsoft makecert utility.
The program in Example 8-7 checks a certificate for validity. You give the name of the certificate on the command line, such as
java CertificateTest gary-by-cay.x509
The program then loads the certificate and finds its guarantor. Note that there is no standard Java class yet to describe certificates; the loaded certificate is of type sun.security.x509.X509Cert.
The program then traverses the identity database, as described in the preceding section, and looks at every identity. Unfortunately, the X.509 name of the guarantor differs from the identity name, so we need to look at each certificate and compare its principal’s name to that of the guarantor of the loaded certificate. When the names match, we have found a certificate that might have been used to sign the loaded certificate.
We then extract the public key of the database certificate and pass it to the verify method of the loaded certificate. That method is defined in the sun.security.x509.X509Cert class. It checks that the current date falls between the start and end dates of the certificate, and it checks that the DSA signature is valid. If not, it throws an exception.
To test this program, you can do the following experiment. Make sure that the certificate cay.x509 is added in your identity database. Then, run
java CertificateTest gary-by-cay.x509
The certificate will be verified. We made a copy of that certificate, in a file bad-gary-by-cay.x509, and used Hex Workshop to modify it slightly by changing the name of the organization to “CoreJava State University”. If you run
java CertificateTest bad-gary-by-cay.x509
then the modified certificate will be rejected, as it should be.
NOTE
The current version of the javakey program does not check certificates for validity when importing them. You can import bad certificates into javakey, even when the identity database already contains the guarantor’s certificate. Even though it would be an easy matter to check whether the new certificate is valid, javakey does not do this check.
Example 8-7. CertificateTest.java
import java.security.*;
import java.io.*;
import java.util.*;
import corejava.*;

public class CertificateTest
{  public static void main(String[] args) throws Exception
   {  if (args.length != 1)
      {  System.out.println
            ("USAGE: java CertificateTest certificate");
         return;
      }
      sun.security.x509.X509Cert cert
         = new sun.security.x509.X509Cert();
      InputStream in = new FileInputStream(args[0]);
      cert.decode(in);
      in.close();
      System.out.println("Principal is "
         + cert.getPrincipal().getName());
      Principal guarantor = cert.getGuarantor();
      System.out.println("Guarantor is "
         + guarantor.getName());

      // now try to find the guarantor

      IdentityScope identitydb
         = IdentityScope.getSystemScope();

      Enumeration ids = identitydb.identities();
      while (ids.hasMoreElements())
      {  Identity id = (Identity)ids.nextElement();
         Certificate[] c = id.certificates();
         for (int i = 0; i < c.length; i++)
         {  if (c[i].getPrincipal().getName()
               .equals(guarantor.getName()))
            {  PublicKey pubkey = id.getPublicKey();
               try
               {  cert.verify(pubkey);
                  System.out.println("Certificate verified");
                  return;
               }
               catch(SecurityException e)
               {  // verification failed
               }
            }
         }
      }
      System.out.println("Certificate cannot be verified");
   }
}One of the most important uses of authentication technology is signing executable programs. If you download a program, you are naturally concerned about damage that a program can do. For example, the program could have been infected by a virus. If you knew where the code came from and that it had not been tampered with since it left its origin, then your comfort level would be a lot higher than without this knowledge. In fact, if the program was also written in Java, so that you have the benefits of the Java language, you can then use this information to make a rational decision about what privileges you will allow that program to have. You might just want it to run in a sandbox as a regular applet, or you might want to grant it a different set of rights and restrictions. For example, if you download a word processing program, you might want to grant it access to your printer and to files in a certain subdirectory. But you may not want to give it the right to make network connections, so that the program can’t try to send your files to a third party without your knowledge. Or you may want to be able to monitor access to the network and permit or deny it on a case-by-case basis.
You now know how to implement this sophisticated scheme.
First, use authentication to verify the origin of the Java code.
Then, run the code with a security manager that enforces the customized security policy that you want to grant the program, depending on its origin.
At this point, the infrastructure for the signing of Java code is just beginning to emerge. The JDK contains a rudimentary tool to manage signatures and certificates, and the HotJava browser is able to interpret them. We describe this mechanism in this section. Then, we speculate how it might be extended in the future.
To sign an applet, you must first place it in a JAR file. For example,
jar cvf Calculator.jar CalculatorApplet.class
Then, create a directive file such as applet-by-cay.dir with the following lines:
[email protected]
cert=1
chain=0
signature.file=SIGNATUR
The first line identifies the identity signing the applet. It must be an identity that is stored in the current identity database. The second line (cert = 1 ) identifies the certificate that is to be used (an identity can have multiple certificates). You need to list all certificates with the javakey -ld command to find out the certificate number. The third line is a currently unsupported option; later versions of javakey will be able to add a chain of certificates to a JAR file. The fourth line gives the file name that is to be used inside the JAR file for the signature and certificate files. The file name must be at most 8 characters, but it does not actually matter what you call it—it is always stored in the directory META-INF, away from all other files in the JAR file. We simply always call it SIGNATUR.
Now, invoke javakey to sign the JAR file, as follows:
javakey -gs applet-by-cay.dir Calculator.jar
This makes a file: Calculator.jar.sig. The only difference between the signed JAR file and the original is that the signed file has two additional files in the META-INF directory: the file SIGNATUR.DSA that contains the certificate key and the file SIGNATUR.SF that contains the signature of the JAR file.
At the time of this writing, only beta versions of Netscape and Internet Explorer can execute a Java 1.1 applet or interpret the javakey signature. However, the HotJava browser is able to interpret signatures, and it allows the user to adjust the security level according to the level of trust placed in the originator of the code.
If you load into HotJava a Web page that refers to the signed JAR file Calculator.jar.sig initially, nothing surprising happens. The calculator program runs normally. However, when you select the menu option Edit|Preferences|Applet Security, then click on Advanced Security, you will see that HotJava has added a new certificate to its certificate list (see Figure 8-10).

NOTE
Currently, the only way to add a certificate to HotJava is to load a signed applet. There is no other way to directly import certificates
Try this yourself—load the Calculator-sig.html file from the CD-ROM into HotJava and look at the advanced security page.
The text below the certificate states that its issuer is unknown—this makes sense; after all, the certificate is self-signed. Anyone can create a self-signed certificate, and the browser will not trust it any more than it would trust an unsigned applet. HotJava suggests that you contact the owner of the certificate to verify the fingerprint. To see the fingerprint, select the certificate and click on the Detail button (Figure 8-11).
Verification is a reasonable suggestion. If, when you can reach the owner through a channel you trust, the owner tells you the signature’s fingerprint and it matches the one you received, then you can trust the certificate. (There is a small problem—the JDK does not provide a tool to compute the fingerprint of a signature. But if the owner of the certificate has a copy of this book, he or she is in luck. The fingerprint is simply the MD5 message digest of the X.509 file, and it can be computed by loading the file into the MessageDigestTest program that you saw previously.) If you accept the fingerprint, HotJava will remember the signature as one that you trust.
Once you’ve verified the signature, you can then trust that the applet’s class files are identical to those that were originally included in the signed JAR file. That is, you know that nobody tinkered with the contents of the JAR file. Can you trust the applet? Not yet. You first need to trust that the certificate owner guarded the private key, so that it is guaranteed that the code in the JAR file really originated with the certificate owner. Finally, and most importantly, before executing the code, you need to believe that the certificate owner is neither malicious nor incompetent. As you can see, trust is a tricky business, and the certificate infrastructure cannot make the decision for you. You have to know how much you trust the author of a program before you run that program. The certificates do have an important benefit: They verify that the trust decision involves only you and the program’s creator, that is, that no third parties have tampered with the software.
In the last example, we used a self-signed certificate. Of course, it is usually impractical to manually verify certificate fingerprints whenever you run an applet from a new source. This is where signed certificates come in. In our next example, we look at an applet that was signed with the gary-by-cay signature. If you have followed through the last example and loaded the Calculator-sig.html file into HotJava, then verified the fingerprint of the signature, then you are ready to follow this example as well. Load the file FileRead-sig.html from the CD-ROM. The browser goes through the following steps:
It sees that the applet is signed with Gary’s certificate.
It sees that Gary’s certificate is signed with Cay’s certificate.
It sees that it already knows Cay’s certificate as trusted.
It, therefore, trusts that Gary’s certificate is valid.
It, therefore, trusts that the applet code has not been tampered with.
Following its default security policy, HotJava now elevates the status of the applet to run under “medium security.” The security manager no longer automatically throws an exception when the applet tries to open a file or a network connection. Instead, it pops up a dialog to ask the applet user if the access is permissible (see Figure 8-12).
You can try this out with the FileReadApplet. As you can see from Example 8-8, this applet reads in a file from the local file system, something that is normally verboten for applets. But now that the applet has been signed, the HotJava security manager instead asks the user if the file access is allowed. If you accept, the file will be loaded.
This example shows how signed applets can be more functional than unsigned applets. The HotJava browser has a number of settings to automatically grant more permissions to applets from trusted sources. You can browse the security pages to find out what policies you can set.
Example 8-8. FileReadApplet.java
import java.applet.*;
import java.awt.*;
import java.awt.event.*;
import java.io.*;
import java.net.*;
import java.util.*;
import corejava.*;
public class FileReadApplet extends Applet
   implements ActionListener
{  public void init()
   {  setLayout(new GridBagLayout());
      GridBagConstraints gbc = new GridBagConstraints();
      gbc.fill = GridBagConstraints.BOTH;
      add(new Label("File name:"), gbc, 0, 0, 1, 1);
      add(fileName, gbc, 1, 0, 1, 1);
      add(openButton, gbc, 2, 0, 1, 1);
      add(fileText, gbc, 0, 1, 3, 1);
      openButton.addActionListener(this);
   }

   public void add(Component c, GridBagConstraints gbc,
      int x, int y, int w, int h)
   {  gbc.gridx = x;
      gbc.gridy = y;
      gbc.gridwidth = w;
      gbc.gridheight = h;
      add(c, gbc);
   }

   public void actionPerformed(ActionEvent evt)
   {  String arg = evt.getActionCommand();
      if (arg.equals("Open"))
      {  try
         {  fileText.setText("");
            BufferedReader in
               = new BufferedReader(new
               FileReader(fileName.getText()));
            String s;
            while ((s = in.readLine()) != null)
            fileText.append(s + "
");
            in.close();
         }
         catch (IOException e)
         {  fileText.append(e + "
");
         }
         catch (SecurityException e)
         {  fileText.append
               ("I am sorry, but I cannot do that.");
         }
      }
   }

   private Button openButton = new Button("Open");
   private TextArea fileText = new TextArea(10, 40);
   private TextField fileName = new TextField(30);
}As we write this chapter, the mainstream browsers do not yet handle signed applets, and the major programming environments do not yet support applet signing.
Java must support the industry-standard version 3 of the X.509 certificate format, as used by Verisign and other certificate issuers. Publishers and Web sites must be able to easily integrate the applet signing process into their development process. The current javakey tool is cumbersome, and the current implementation of the identity database is insecure. And browsers must manage certificates more conveniently. For example, right now it is difficult or impossible to move certificates from one browser to another.
Eventually, the problems of interoperability, security, and convenience will be worked out. At that time, Java will have a terrific security model. Untrusted applets can play in the sandbox. You can run applets that you believe to be trustworthy and be notified whenever the applet does something unexpected. And you can give complete freedom to trusted applets, for example, those from well-established vendors or from the corporate intranet. This model goes way beyond what Microsoft’s ActiveX model, which relies solely on signing, can ever do.
So far, we have discussed one important cryptographic technique that is implemented in the Java security API, namely, authentication through digital signatures. A second important aspect of security is encryption. When information is authenticated, the information itself is plainly visible. The digital signature merely verifies that the information has not been changed. In contrast, when information is encrypted, it is not visible. It can only be decrypted with a matching key.
Authentication is sufficient for code signing—there is no need for hiding the code. But encryption is necessary when applets or applications transfer confidential information, such as credit card numbers and other personal data.
Java has good support for authentication. In particular, the DSAalgorithm is very powerful, and it is a widely used standard. Unfortunately, the support for encryption is currently incomplete, for two reasons. Until very recently, all encryption algorithms using highly secure public/private key pairs had been protected by patents. For example, if you want to use the RSA algorithm (named after its inventors, Rivest, Shamir, and Adleman), you need a license from RSA Security Inc., and you would probably need to pay them a substantial fee. (For example, RSAquotes a royalty charge of 3% of your product price, with an advance of $25,000 if you want to license the JSAFE library, which contains a Java implementation of RSA.) This situation is likely to change soon. In October 1997, the patent for the Diffie-Hellmann algorithm expired, and anyone is now able to use that algorithm freely without having to pay royalties. The second reason for the lack of encryption support in Java is the export restriction imposed by the United States government. It is a crime in the United States to export cryptographic products without an export license. Export licenses are usually granted only for low-grade security (such as 40-bit RC4 keys, which can be broken relatively easily). Recently, higher-grade 128-bit keys were permitted for use by financial institutions overseas. As we write this, there are even efforts by the White House to pass legislation that would make it illegal for any American to use encryption that did not have a back door for law-enforcement agencies. In our opinion, these efforts are ultimately futile and counterproductive. Encryption software, without trapdoors for law enforcement, and with very high grades of security, is widely available over the internet, and the Internet knows no national borders. For example, you can get a free copy of Personal PGP from http://web.mit.edu/network/pgp-form.html. However, the patent law and export controls have prevented many companies, including JavaSoft, from offering strong encryption. [5]
Java 1.1 contains no support for encryption. But in February 1997, a specification for Java cryptographic extensions (called JCE) was published. It outlines how cryptographic algorithms will be integrated into the Java security framework. In May, an alpha version of the code was released. It contains an implementation of framework classes and the DES (Data Encryption Standard) algorithm. This is a private-key, freely usable algorithm with a key length of 56 bits.
In this section, we show you how to add a new algorithm to the security framework. As an example, we will simply use the Caesar cipher again. Its patent expired 2,000 years ago, and because key recovery is trivial, we won’t be arrested for making the code available overseas. But it is instructive to see the hooks in the security framework that let you add new services.
The Java cryptographic extensions contain a class Cipher that is the base class for encryption algorithms. This class, like other security algorithm classes, has two sets of methods: an application programmer interface (API) and a security provider interface (SPI). Among the API methods are:
void initEncrypt(Key)
void initDecrypt(Key)
byte[] crypt(byte[])
These are methods that are called by programmers who use the class for carrying out encryption and decryption. For example, to encrypt a block of memory with the DES algorithm, you use the following code:
byte[] input = . . .;
KeyGenerator keyGen = KeyGenerator.getInstance("DES");
keyGen.initialize(new SecureRandom());
Key desKey = keyGen.generateKey();
Cipher cipher = Cipher.getInstance("DES");
cipher.initEncrypt(desKey);
byte[] output = cipher.crypt(input);
There are five SPI methods:
int engineBlockSize()
int engineOutBufferSize(int inLen, boolean final)
void engineInitEncrypt(Key k)
void engineInitDecrypt(Key k)
int engineUpdate(byte[] in, int inOff, int inLen,
   byte[] out, int outOff)
These methods are part of the interface of the Cipher class, but they are not meant to be called by the user of the Cipher class. For that reason. they are defined as protected. Instead, each class that implements a particular cipher, such as the DES class in the JCE library or the CaesarCipher class that we will define shortly, needs to override the five methods to implement the particular cryptographic method.
When implementing a new cipher, you must supply three classes:
A class that extends
Cipherand implements the SPI methodsA class that implements
Keyand stores the value of an encryption or decryption keyA class that extends
KeyGeneratorthat can generate random keys for the particular algorithm
In our case, the key is very simple. A key is simply one byte. The code of Example 8-9 shows the implementation of the CaesarKey class. Two methods of the key interface, namely, getFormat and getEncoded, are not of interest for us. These methods are needed if there is a standard format for saving keys for disks. We return null to indicate that these keys are not stored.
Example 8-9. CaesarKey.java
package corejava;

import java.security.*;

public class CaesarKey implements SecretKey
{  public CaesarKey(byte k)
   {  key = k;
   }
   public String getAlgorithm() { return "CAESAR"; }
   public String getFormat() { return null; }
   public byte[] getEncoded() { return null; }
   public String toString()
   { return "CAESAR key: " + (key & 0xFF); }
   byte getKeyValue() { return key; }

   private byte key;
}
The key generator class, shown in Example 8-10, is also simple. It simply generates a random number and uses its lowest byte as the encryption key.
Example 8-10. CaesarKeyGenerator.java
package corejava;

import java.security.*;

public class CaesarKeyGenerator extends KeyGenerator
{  public CaesarKeyGenerator() { super("CAESAR"); }
   public void initialize(SecureRandom r) { random = r; }
   public SecretKey generateKey()
   { return new CaesarKey((byte)random.nextInt()); }
   private SecureRandom random;
}
The code for the encryption and decryption is implemented in the CaesarCipher class (see Example 8-11). We need to implement only the SPI methods; the base class calls them when necessary for encryption and decryption. The engineBlockSize returns the number of bytes per cipher block. In our case, each byte is encrypted separately, so the block size is 1. In the case of DES, the block size is 8 bytes. The engineOutBufferSize method returns the number of bytes required to hold an input block of a certain size.
The engineInitEncrypt and engineInitDecrypt methods receive a key and store it for use during encryption and decryption. Since the type of the key is the base class Key, these methods check that the caller passed in an appropriate key, in this case, a CaesarKey. If not, they throw an exception.
The actual encryption is carried out in the engineUpdate method. That method receives an array of input bytes and an array to hold the output bytes. When implementing this method, you can rely on valid arguments: the length will always be a multiple of the block size, and there will be sufficient space to hold the output. In our case, the implementation is particularly simple. We simply add or subtract the key, depending on whether the state is ENCRYPT or DECRYPT.
Example 8-11. CaesarCipher.java
package corejava;

import java.security.*;

public class CaesarCipher extends Cipher
{  public CaesarCipher() { super("CAESAR"); }

   protected int engineBlockSize() { return 1; }

   protected int engineOutBufferSize(int inLen, boolean last)
   { return inLen; }

   protected void engineInitEncrypt(Key k)
   {  if (k instanceof CaesarKey)
         key = (CaesarKey)k;
      else throw new IllegalArgumentException
         ("Not a CAESAR key: " + k);
   }

   protected void engineInitDecrypt(Key k)
   {  if (k instanceof CaesarKey)
         key = (CaesarKey)k;
      else throw new IllegalArgumentException
         ("Not a CAESAR key: " + k);
   }

   protected int engineUpdate(byte in[], int inOff, int inLen,
      byte out[], int outOff)
   {  int k = key.getKeyValue();
      if (getState() == Cipher.UNINITIALIZED) return 0;
      if (getState() == Cipher.DECRYPT) k = -k;
      for (int i = 0; i < inLen; i++)
      {  out[i + outOff] = (byte)(in[i + inOff] + k);
      }
      return inLen;
   }

   CaesarKey key;
}
You may wonder why the engineInitEncrypt and engineInitDecrypt methods do not set the encryption state. However, keep in mind that users of the class call the initEncrypt and initDecrypt API methods of the Cipher base class. These methods set the state and call the engine methods. Thus, the engine methods deal only with those aspects of encryption that are specific to a particular algorithm. That makes life easy for the implementor of a new algorithm. Those parts that are generic to all encryption and decryption processes are carried out by the Cipher base class. This class is a good example of an abstract class with several nonabstract, hard-working methods.
java.security.Cipher
static Cipher getInstance(String algorithm)returns a
Cipherobject that implements the specified algorithm. Throws aNoSuchAlgorithmExceptionif the algorithm is not provided. By default, this method returns a block cipher (in ECB mode) with no padding. If you want another mode or padding, you must specify that in the algorithm string.Parameters:
algorithmthe name of the algorithm, such as
"DES"or"DES/ECB/PKCS#5"int getState()returns the current state, one of
UNINITIALIZED,ENCRYPT, orDECRYPT.int blockSize()returns the size (in bytes) of a cipher block.
void initEncrypt(Key key)initializes this cipher for encryption. If the key is not of the correct type, a
KeyExceptionis thrown.void initDecrypt(Key key)initializes this cipher for encryption. If the key is not of the correct type, a
KeyExceptionis thrown.byte[] crypt(byte[] in)byte[] crypt(byte[] in, int off, int len)int crypt(byte[] in, int inOff, int inLen, byte[] out, int outOff)encrypts or decrypts the specified data. Note: If the cipher performs padding, you must present it with the entire data block. If the number of bytes in the array is not a multiple of the block size, then an
IllegalBlockSizeExceptionis thrown.int outBufferSize(int inLen)returns the size (in bytes) required to store the output when the input has
inLenbytes.protected int engineBlockSize()returns the size (in bytes) of a cipher block. This is an SPI method that should be defined by the implementor of a cipher.
protected int engineOutBufferSize(int inLen, boolean last)returns the size (in bytes) required to store the output when the input has
inLenbytes. Iflastistrue, then the result must take padding into account. This is an SPI method that should be defined by the implementor of a cipher.Parameters:
inLensize of the input block
lasttrueif this is the last block of the dataprotected void engineInitEncrypt(Key key)initializes this cipher for encryption. If the key is not of the correct type, a
KeyExceptionis thrown. This is an SPI method that should be defined by the implementor of a cipher.protected void engineInitDecrypt(Key key)initializes this cipher for encryption. If the key is not of the correct type, a
KeyExceptionis thrown. This is an SPI method that should be defined by the implementor of a cipher.protected int crypt(byte[] in,int inOff, int inLen, byte[] out, int outOff)encrypts or decrypts the specified data. This method will be called with block-sized chunks of data. This is an SPI method that should be defined by the implementor of a cipher.
java.security.KeyGenerator
static KeyGenerator getInstance(String algorithm)returns a
KeyGeneratorobject that implements the specified algorithm. Throws aNoSuchAlgorithmExceptionif the algorithm is not provided.Parameters:
algorithmthe name of the algorithm, such as
"DSA"void initialize(SecureRandom random)Parameters:
randomthe source of random bits for generating keys
SecretKey generateKey()generates a new key.
In addition to calling the encryption engine methods, the Cipher class has to carry out one additional job: padding the size of the text to be encrypted. Consider the DES cipher. It has a block size of 8 bytes. Suppose the last block of a plain text input has less than 8 bytes. Of course, we can fill the remaining bytes with 0, to obtain one final block of 8 bytes, and encrypt it, but during decryption, the result will have several trailing 0 bytes appended to it. Therefore, it will be slightly different from the original input file. That may well be a problem, and a padding scheme is needed to avoid it. A commonly used padding scheme is the one described in the Public Key Cryptography Standard (PKCS) #5 by RSA Security, Inc., at (http://www.rsa.com/rsalabs/pubs/PKCS/html/pkcs-5.html) In this scheme, the last block is not padded with a pad value of zero, but with a pad value that equals the number of pad bytes. In other words, if L is the last (incomplete) block, then it is padded as follows:
L 01                        if length(L) = 7
L 02 02                     if length(L) = 6
L 03 03 03                  if length(L) = 5
. . .
L 07 07 07 07 07 07 07      if length(L) = 1
Finally, if the length of the input is actually divisible by 8, then one block
08 08 08 08 08 08 08 08
is appended to the input and decrypted. During decryption, the very last byte of the input is a count of the padding characters to discard.
In our example, we were lucky—the Caesar cipher required no padding. If padding is required, it is carried out by the Cipher methods, not by engine methods. According to the preliminary JCE specification, the Cipher class can be instructed to use either no padding or PKCS#5-style padding. To request the latter, you add a mode and padding string to the cipher name, such as
Cipher des = Cipher.getInstance("DES/ECB/PKCS#5");Here, the mode ECB refers to “electronic code book” mode, which simply means that each block is encrypted separately. There are three other modes (called CBC, CFB, and OFB) in which the result of encrypting one block influences the encryption of subsequent blocks—see Network and Internetwork Securityby William Stallings, [Prentice Hall, 1995, pages 58–63] for an explanation of these modes.
Now that we have implemented the three classes to support the Caesar cipher, we want to make them available to Java programmers in the same way that other algorithms are obtained. That is, a key generator should be obtained as
KeyGenerator keyGen = KeyGenerator.getInstance("CAESAR");and the cipher object itself should be obtained as
Cipher cipher = Cipher.getInstance("CAESAR");These getInstance methods are static methods of the various algorithm classes (such as Cipher or, as we saw previously, Signature ). These methods query the installed security providers for algorithms. Therefore, we must implement a provider class, which we call CoreJavaProvider —see Example 8-12. It extends the Provider base class, which itself extends Hashtable. It only has one function, namely, to add algorithm names and the names of the corresponding implementation classes into the hash table. The format is somewhat ad hoc. For example, the call
put("Cipher.CAESAR", "corejava.CaesarCipher");means “If the user calls the getInstance method of the class Cipher with an algorithm name of "CAESAR", then create an object of the class corejava.CaesarCipher and return it.”
Example 8-12. CoreJavaProvider.java
package corejava;
import java.security.*;

public class CoreJavaProvider extends Provider
{  public CoreJavaProvider()
   {  super("COREJAVA", 1.0,
         "CoreJava Security Provider Example");

      put("Cipher.CAESAR",
         "corejava.CaesarCipher");
      put("KeyGenerator.CAESAR",
         "corejava.CaesarKeyGenerator");
   }
}
Once the provider is implemented, it needs to be installed. There are two ways for installing it. You can add a line to the security description file, jdklibsecurityjava.security. By default, there is already a security provider: sun.security.provider.SUN. To add a second provider, add the line
security.provider.1=corejava.CoreJavaProvider
Or, you can dynamically load another security provider with the addProvider method of the Security class:
Security.addProvider(new CoreJavaProvider());
java.security.Provider
protected Provider(String name, double version, String info)constructs a new provider object. The provider needs to put all provided algorithms into its superclass hash table, with calls like
put("algorithm superclass name.service name", "algorithm
class name");
java.security.Security
static int addProvider(Provider provider)adds a provider to the set of providers.
static void removeProvider(String name)removes the provider with the specified name, or does nothing if no matching provider exists.
static Provider[] getProviders()returns the currently installed providers.
static Provider getProvider(String name)returns the provider with the specified name, or
nullif no matching provider exists.static String getProperty(String key)gets a security property. By default, security properties are stored in the file
jdklibjava.security.static void setProperty(String key, String value)sets a security property.
The easiest method for encrypting or decrypting data is with the crypt method of the Cipher class. The call
byte[] input = . . .;
byte[] cipher.crypt(input);
returns an array of bytes with the encrypted or decrypted input. (Select encryption or decryption by initializing the cipher object with either initEncrypt or initDecrypt.)
However, if the encryption algorithm performs padding, this method works only if you present it with the entire input you want to encrypt. The crypt method will pad the last bytes when encrypting, and it will interpret the last bytes as padding when decrypting. To encrypt or decrypt a byte at a time, use the CipherInputStream and CipherOutputStream classes.
These classes are filter streams, as described in Chapter 1. They read from input and decrypt, or write to output and encrypt. They buffer the input and output streams until sufficient bytes are available in the buffer to pass on to the update method of the cipher, and they signal to the cipher when the last block has been reached, so that the cipher can carry out padding. All this is transparent to the user. When using these streams, you simply read and write as you would with any other stream. For example, the following code encrypts an input file:
Cipher des = Cipher.getInstance("DES/ECB/PKCS#5");
des.initEncrypt(desKey);
InputStream in = new FileInputStream("plain.txt");
OutputStream out = new CipherOutputStream
   (new FileOutputStream("encrypted.txt"), des);
int ch;
while ((ch = in.read()) != -1)
{  out.write((byte)ch);
}
in.close();
out.close();
Example 8-13 pulls together all the encryption classes. It loads the Core Java provider. It then generates a random key for the Caesar cipher and encrypts a file, plain.txt into a file, encrypted.txt. It then decrypts the file and displays it on System.out.
We do not distribute the JCE alpha code on the CD-ROM accompanying the book. Instead, the ch8CipherTest directory contains simplified implementations of the classes Cipher, KeyGenerator, CipherInputStream, and CipherOutputStream that will be added to the java.security package. Only the methods that are needed for the CipherTest example are supplied. In particular, there is no support for padding. You will need these classes if you don’t have the JCE libraries installed. If you installed the JCE code, or if you are working with a later version of Java that contains the cryptographic extensions, make sure that the JCE library occurs before "." in your class path, or delete the javasecurity subdirectory.
Example 8-13. CipherTest.java
import java.security.*;
import java.io.*;
import corejava.*;

public class CipherTest
{  public static void main(String[] args) throws Exception
   {  Security.addProvider(new CoreJavaProvider());

      KeyGenerator keyGen
         = KeyGenerator.getInstance("CAESAR");

      SecureRandom rand = new SecureRandom();
      keyGen.initialize(rand);
      Key caesarKey = keyGen.generateKey();
      System.out.println("The key is " + caesarKey);

      Cipher cipher = Cipher.getInstance("CAESAR");
      cipher.initEncrypt(caesarKey);

      InputStream in = new FileInputStream("plain.txt");
      OutputStream out = new CipherOutputStream
         (new FileOutputStream("encrypted.txt"), cipher);
      int ch;
      while ((ch = in.read()) != -1)
      {  out.write((byte)ch);
      }
      in.close();
      out.close();

      System.out.println("The plaintext was:");
      cipher.initDecrypt(caesarKey);
      in = new CipherInputStream
         (new FileInputStream("encrypted.txt"), cipher);
      while ((ch = in.read()) != -1)
      {  System.out.print((char)ch);
      }
      in.close();
      System.out.println();
   }
}
java.security.CipherInputStream
CipherInputStream(InputStream in, Cipher cipher)constructs an input stream that reads data from
inand decrypts or encrypts it, using the given cipher.int read()int read(byte[] b, int off, int len)read data from the input stream, which is automatically decrypted or encrypted.
java.security.CipherOutputStream
CipherOutputStream(OutputStream out, Cipher cipher)constructs an output stream that writes data to
outand encrypts or decrypts it, using the given cipher.void write(int ch)void write(byte[] b, int off, int len)read data from the input stream, which is automatically decrypted or encrypted.
void flush()flushes the cipher buffer and carries out padding, if necessary.
[1] See, for example, David Kahn’s wonderful book The Code Breakers, [Macmillan, NY, 1967 p. 84] where he refers to Suetonious as a source. Kahn says that Caesar shifted the 24 letters of the Roman alphabet by 3 letters. Strong encryption methods are tightly controlled by the U.S. Government, though the laws are currently in flux.
[2] Arguably, it is probably impossible to prove that Java is secure because such proof would contradict some known theorems in computer science.
[3] One reference for this fascinating topic with lots of code is Applied Cryptography: Protocols, Algorithms, and Source Code in C, by Bruce Schneier [John Wiley &Sons, 1995]. For the mathematics behind the code, look at the Handbook of Applied Cryptographyby Meekness et al. [CRC Press, 1996].
[4] Kahn remarks in the new edition of his Codebreakers that this was the first new idea in cryptography in hundreds of years.
[5] Ironically, Sun Microsystems will be allowed to sell to foreign customers strong encryption that was developed by a Russian company that Sun hired to create encryption products.