
4
Transformation, Strength & Gratitude
AS WE COMPLETE OUR CREATE YOUR LIFE BOOK JOURNEY, we start to transform our creative blocks and fears. We experience the powerful use of color for deeper, broader personal change and strengthening our intention- setting. After this, we look at ways to protect our personal and creative journey. We finish with a gathering of gratitude to encourage living a happy life.
The first project tackles creative blocks and blank page fear by connecting to the deeper messages beneath these experiences. Finding compassion for ourselves in the moment helps to move beyond these difficult periods and builds a practice for the future. The next project takes us further on our journey of transformation and change—applying colors and crystals to our own situations to experience support and clarity.
In the third project, we introduce Page Wardens to protect the deep creative journey in which we are now invested. These illustrations are designed to help us continue forward, remain focused, and stay positive during our process. And finally, we end with a project that cultivates acknowledgment and gratitude for all we have in our lives. This lays a foundation for allowing our creative efforts to flourish and bring us joy and happiness.
PROJECT 15
Metamorphose
Work through Creative Block & Blank Page Fear
ANY ARTIST, NO MATTER how experienced, has to deal with feeling creatively stuck or blocked from time to time. There can be many reasons for feeling stuck.
Exploring Creative Blocks & Possible Solutions
Here are ideas about what might be going on and how to work through your specific issue.
1. Check back in with your inner critic. What stories are going on in your mind? Very often, creative block is caused by a rampant inner critic, inner perfectionist, or outer critic messages internalized. We may have set ourselves high expectations or tell ourselves that the work “must be great/perfect” and as a result, find ourselves paralyzed and unable to create. If you notice any inner critic chatter, use Project 11 to work through it.
2. Check whether you are comparing your own work to other work too much. Comparing your work to other people’s works can create a big creative block. Together with this comes the sense that you should be doing what all the other artists are doing (succumbing to trend pressures). Soon there are so many shoulds in there that of course you are going to feel paralyzed and blocked.
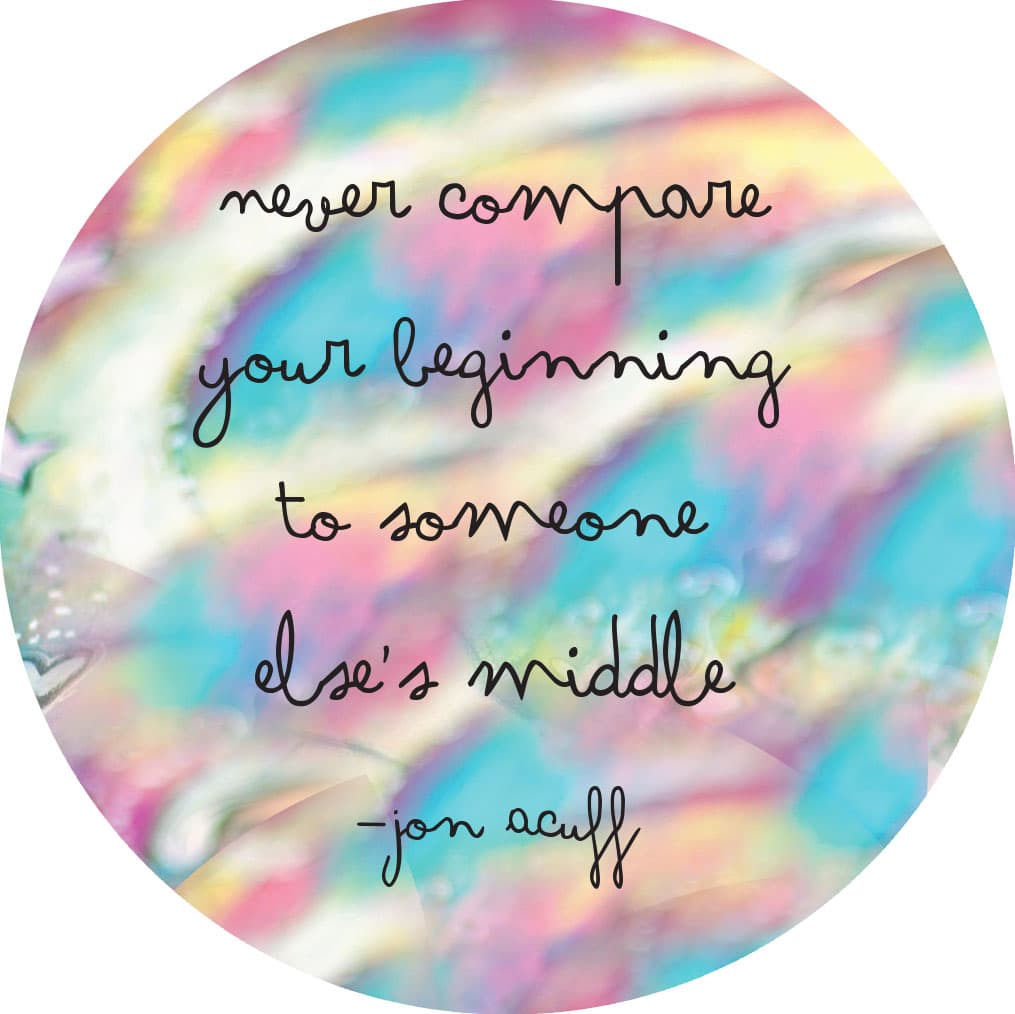
• IF YOU NOTICE that you’re comparing your work to other people’s work, it’s time to come back to your center and put your blinkers on. Take time away from social media and other places where you might see other people’s artwork and refocus on your own creative process, bliss, and joy. Remember this great quote from Jon Acuff: “Never compare your beginning to someone else’s middle.” Honor where you are on your creative journey. Do not get lost in other people’s journeys. Every piece of art you make is a valuable, honorable, and courageous stepping stone on your personal creative journey.
3. Ask yourself whether you have a fear of the blank page or blank canvas. Often blank page fear is there because you’ve got some high expectations of yourself and you don’t want to fail. It is also likely that your inner perfectionist is present if the blank page or canvas scares you. A good way of bypassing this fear is falling back into a playful and tactile approach to art making. First, check your expectations; lower them. Tell yourself, “I’m just playing, and there’s no pressure,” and then drop back into the body and just start mark making, scribbling, sketching, or play with colors or inks. Do something that is easy and fun to get yourself back into the joy of creating. Do anything you know that you enjoy the process of and let go of having to make a beautiful painting. Playful mark making will help with letting go of fear. See here for two easy and fun techniques you can use to get yourself out of blank page fear.
4. Eliminate mind noise. As you’ve noticed by now, I’m a big advocate for helping creative people get out of their heads and into their hearts and bodies more. Don’t get me wrong: I love my mind. It’s helped me out on so many occasions. But the mind is limited and can, at times, become repetitive, distracting, overwhelming, and/or a source of major stress and anxiety.
• IF YOU NOTICE that you feel stopped by too much mind noise, take a break. Step away from the creative process altogether for a while: meditate; listen to a beautiful song that you love; dance it out; go out for a walk in nature; unwind; slow down; empty yourself of yourself; read a book; quiet your thoughts; come back to yourself, your heart, and your soul; and then when you feel ready, come back to the page and begin again.
5. Simply need ideas or inspiration? Get a prompt or set yourself a challenge. Okay, maybe for you it’s not about comparison, blank page fear, or too much noise in your head. Maybe you just feel like you can’t think of anything interesting to paint or create. You need inspiration or a prompt or both. Here are some ideas: Start a “prompt jar.” Write down a whole lot of words or sentences that you like the sound of (they could even be from poetry or song lyrics), fold them all up, stuff them in a jar, and when in need, pick a prompt! You could also set yourself some challenges such as limiting your supplies, working with only three colors, or focusing on specific topics or themes. Or you could join sites that give you prompts or challenges; Illustration Friday, for example, sends prompts to your inbox every Friday. Yay!
6. Find inspiration in your own work. If you’re trying to paint, but you’re just sitting there and nothing makes a difference—not starting with a random background, not prompts, and not walks through nature—one thing that I like to do is look through my own work. I search for paintings that I really like and that I remember I really liked making.
• I LOOK FOR THE ONES that made my heart sing when I created them, and I simply try and replicate the same painting or the same technique, just to recapture the same feeling and inspiration I had when I created a painting that I really liked and loved. This often lifts me out of creative block and back into action and joy.
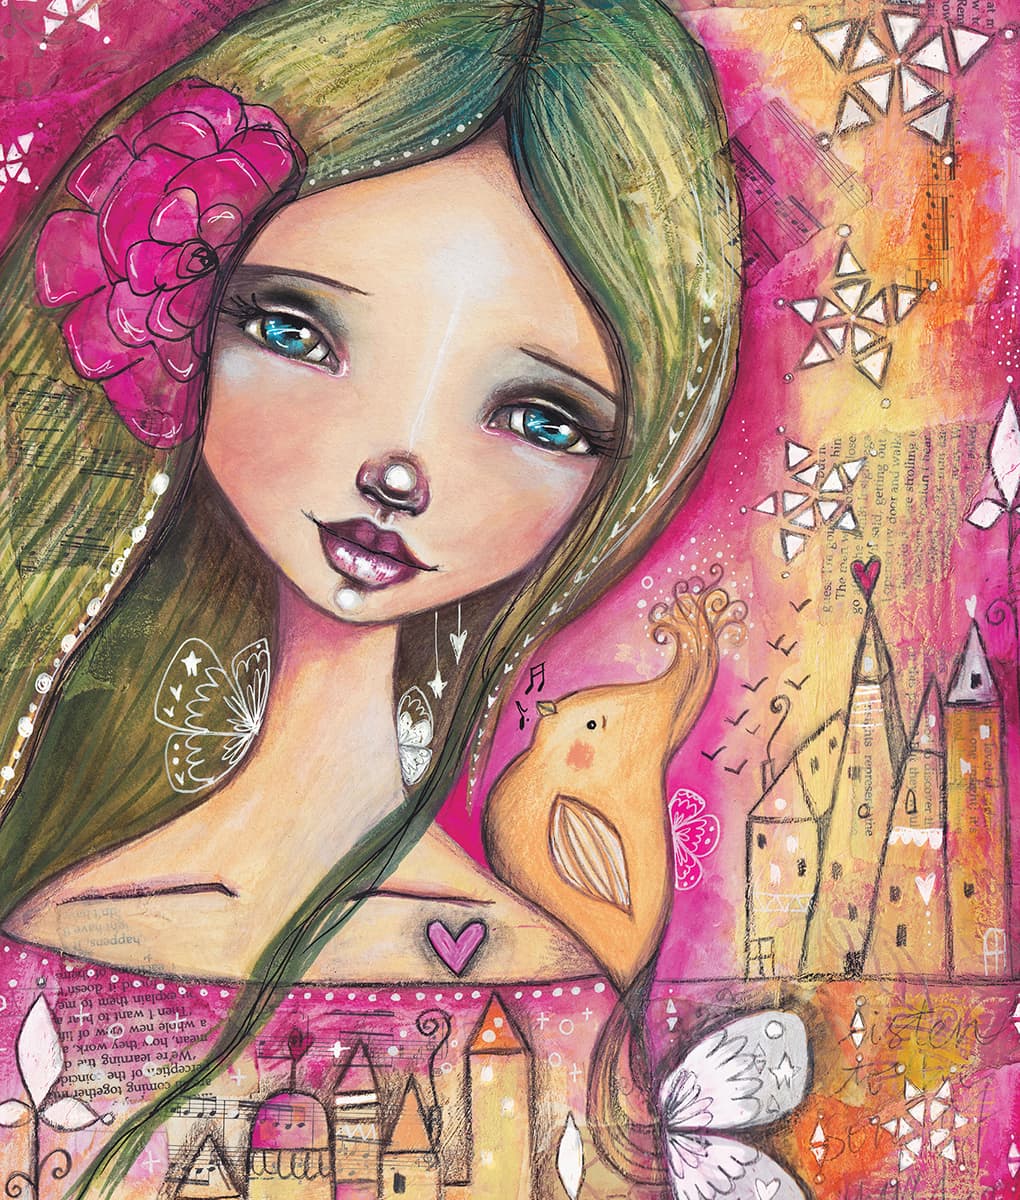
Art Page: Paint Over Collage
I also find this more directed technique useful for getting out of creative block. It’s a paint-over-collage technique in which you start with a collage and paint over it to create a completely new painting. I love using this technique when I’m a bit stuck; it’s wonderful to have a collage as a base to guide you instead of starting with a fully blank page. It’s also a great technique for working on transformation and metamorphosis because the painting changes so much.

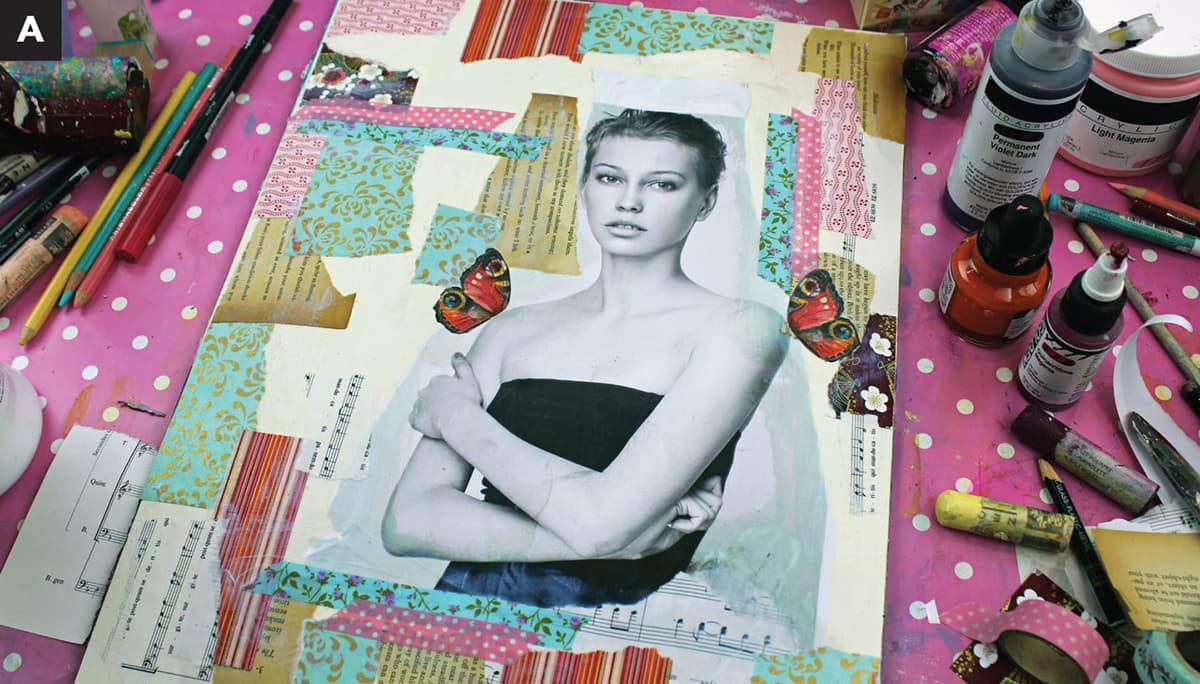
Create Your Collage
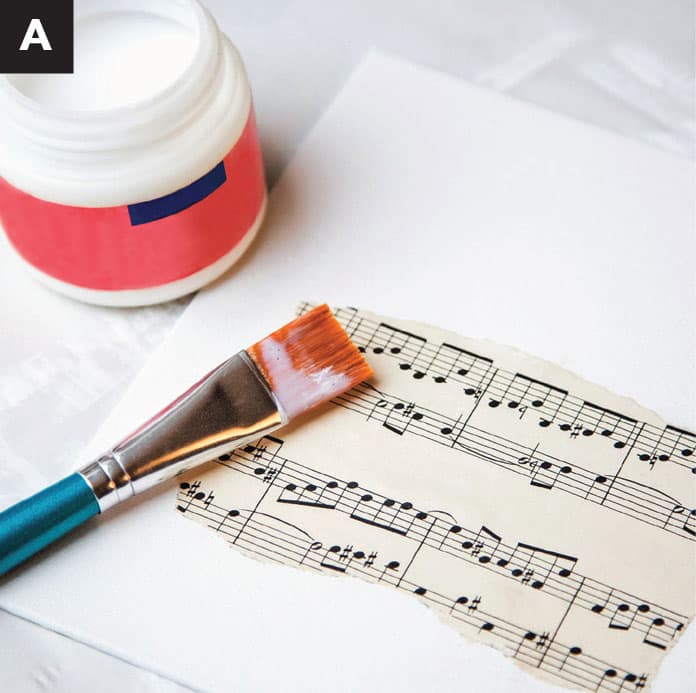
1. Gather collage materials from magazines, newspapers, and/or the internet. For this project, we’ll include a person of some sort. It’s easiest to work on a bigger rather than smaller face. Try not to work on a face that’s smaller than 2.5 to 3 inches (6 to 7.5 cm). You’ll also need some patterned collage papers such as book pages, musical scores, and scrapbooking pages. Lay out and then glue down your collage (A).
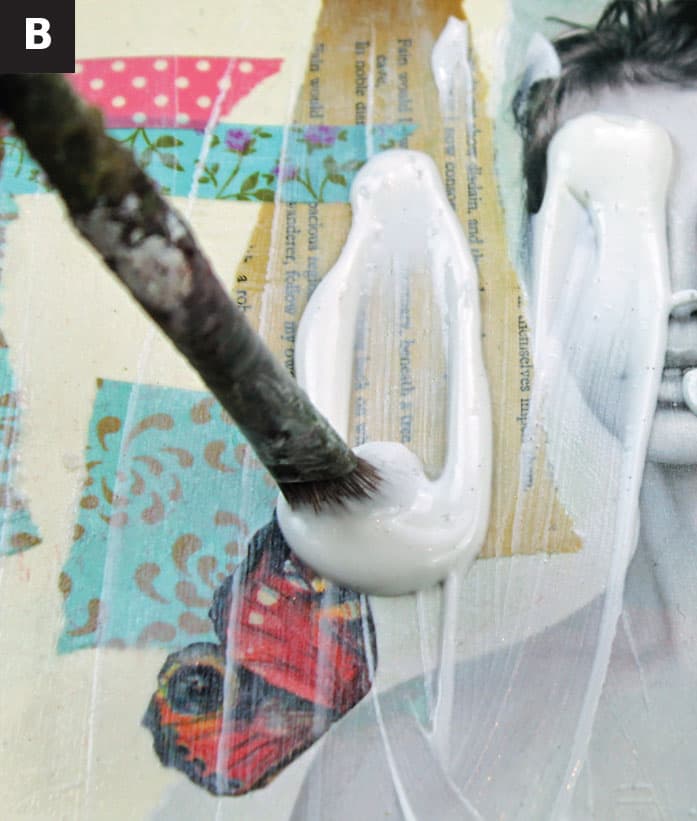
2. Apply a layer of clear gesso. This will lock in your collage and give you a new, transparent layer on which you can create your subsequent layers (B). Important: Once your collage is glued down and dry, take a photo of it. It’s super fun to see it transform. You can also use the photo as a reference if you want to follow the original shading.
Enhance & Embellish
1. Draw over your collage. You can change facial features, add hair, add doodles, or whatever calls you (C).

2. Add paint and color over the collage. I painted her face by starting with a layer of salmon-colored crayon (D).

3. Add further paint and gesso where you feel called to. I added white gesso to her hair (E).

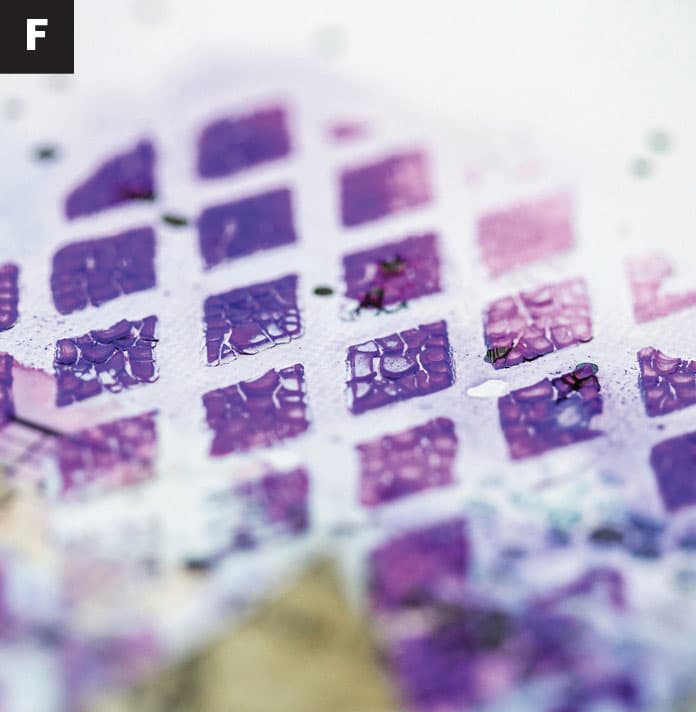
4. With colored pencils, markers, and Posca markers, I added further shading to the face (F).

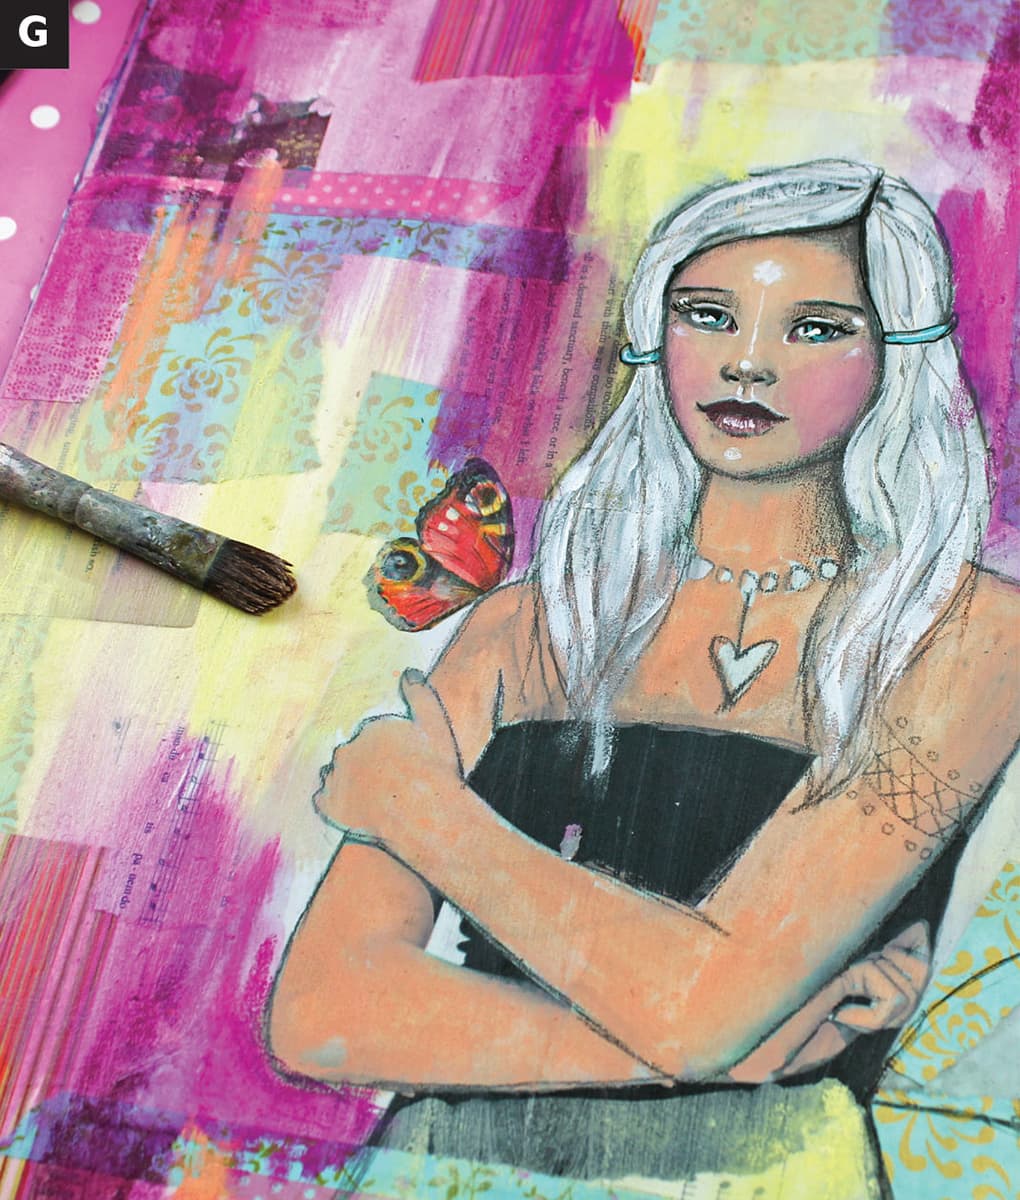
5. I then added color to the background with watercolor crayons, activating them with water (G).
6. Add gesso with a brayer to unify the layer (H).

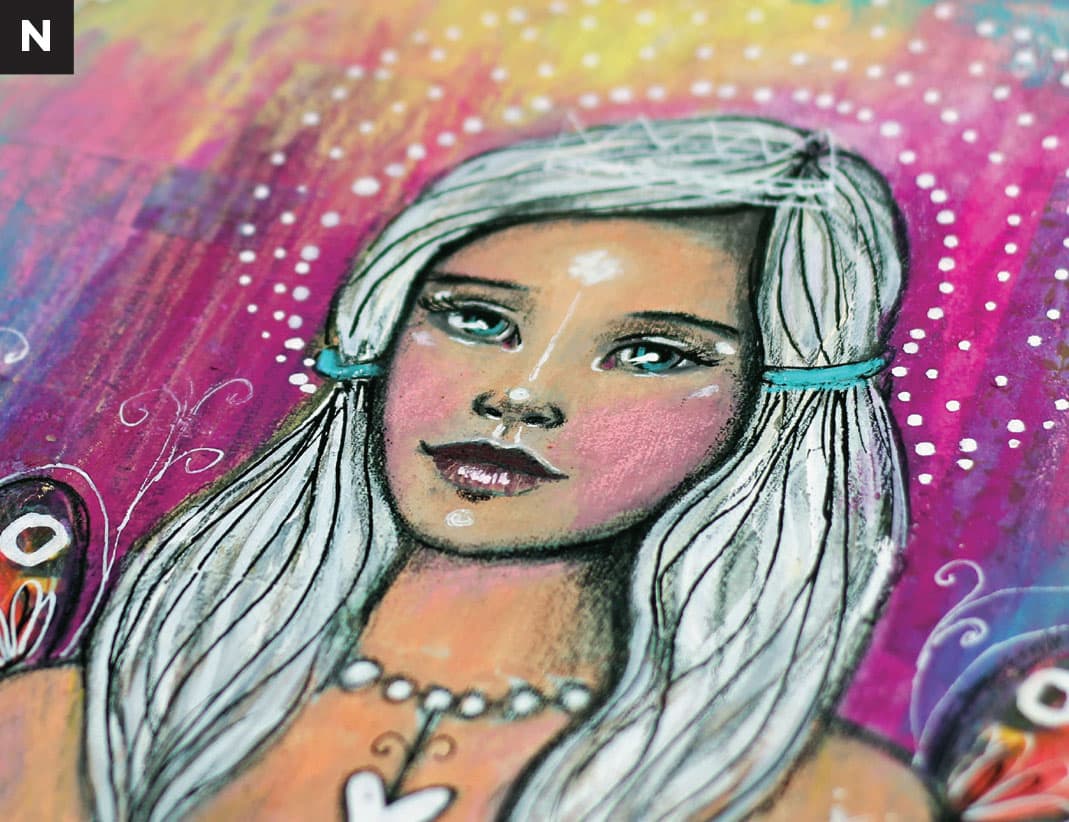
Add an Aura & Finishing Touches
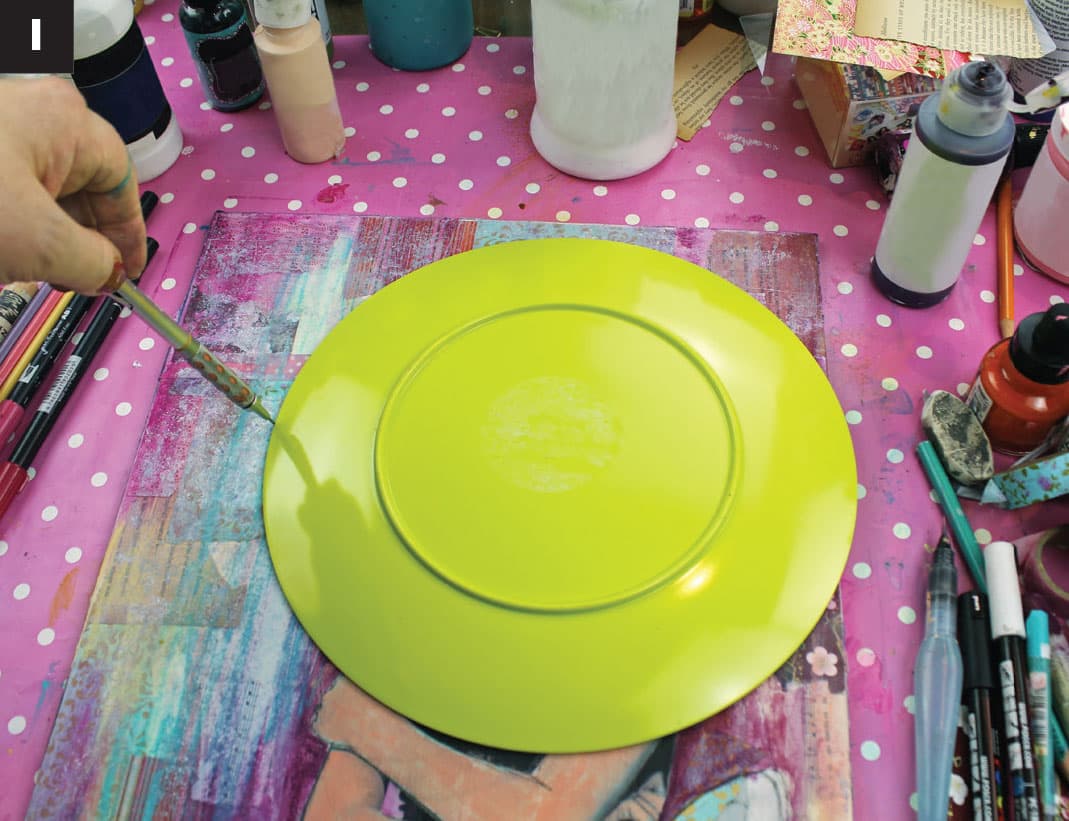
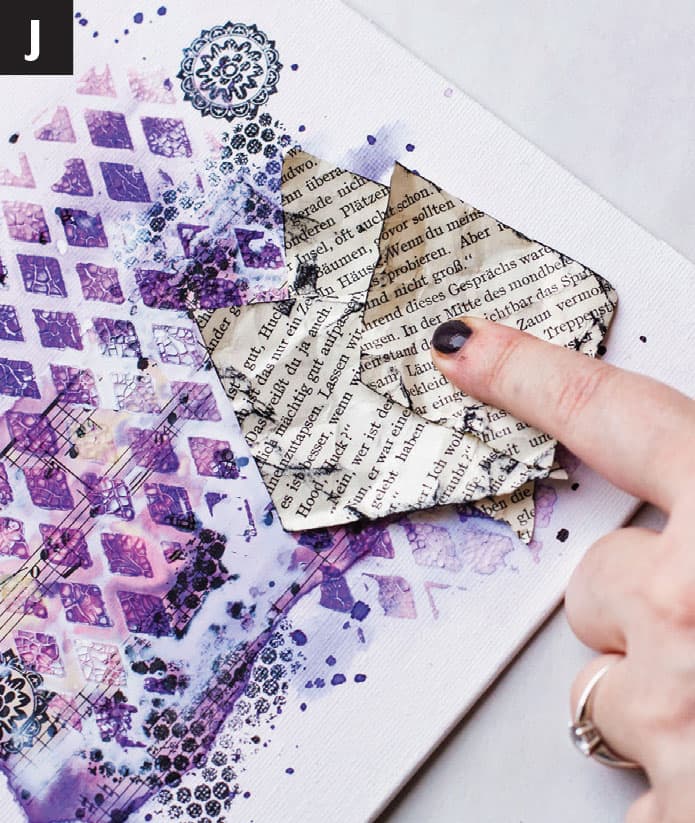
1. I wanted her to have an aura around her, so I traced around a plate (I).
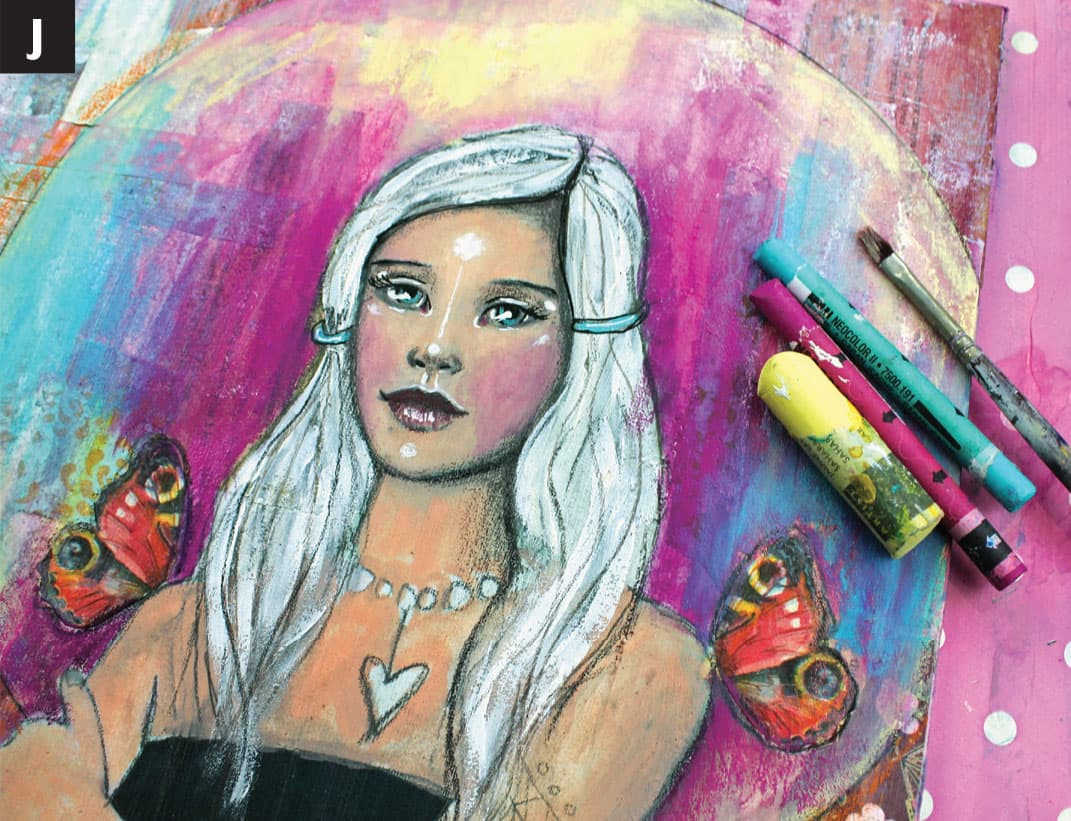
2. I added color to the inside and outside of the aura to make it stand out and illuminate the girl’s face and upper body (J & K).
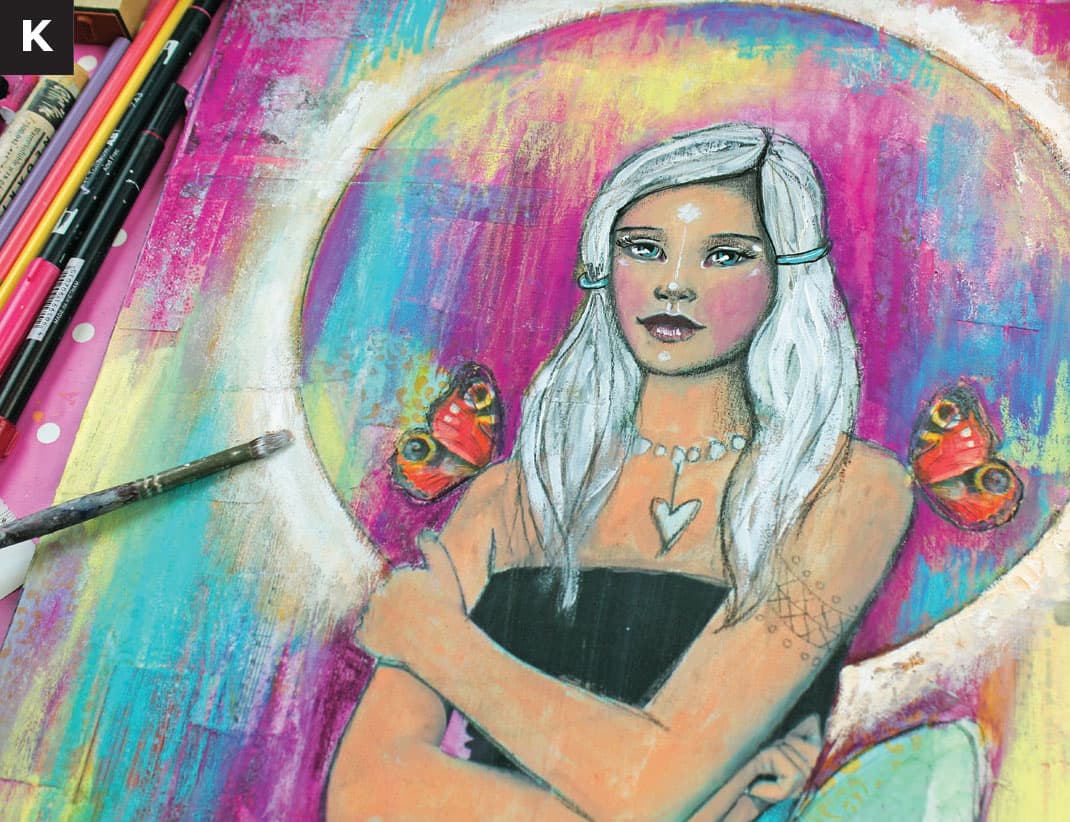
3. With a white pen, I added little dots and doodles to the painting (L).
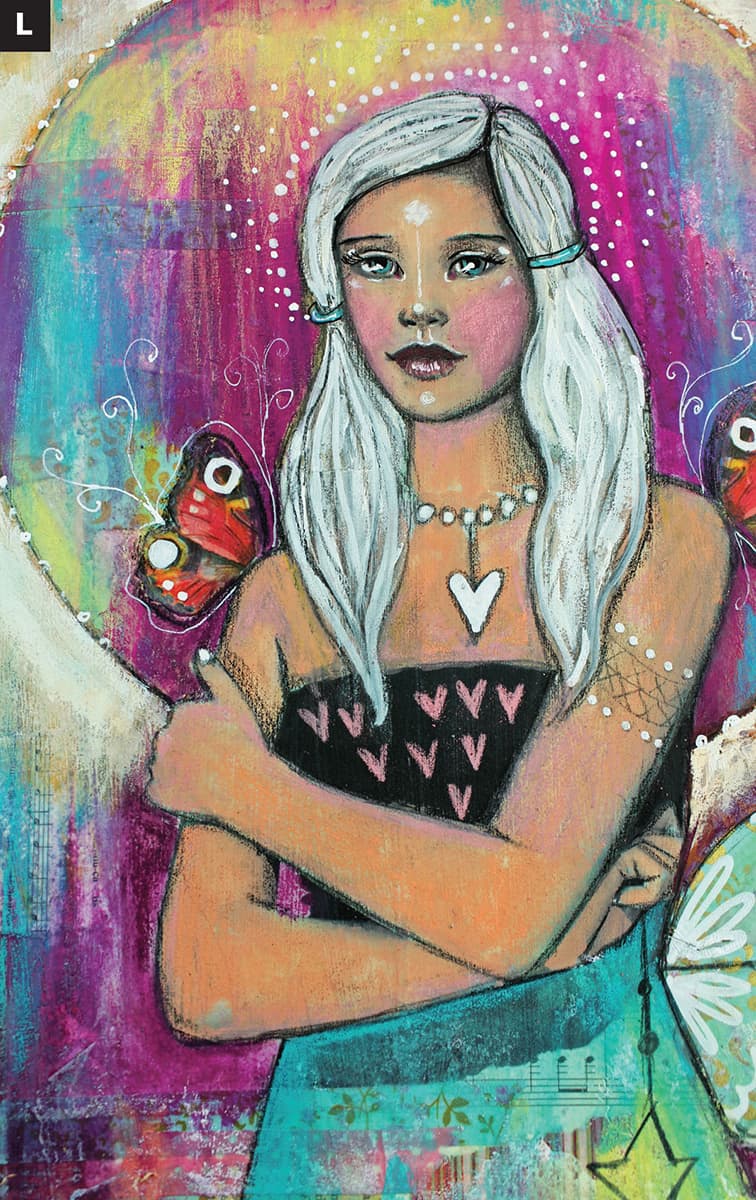
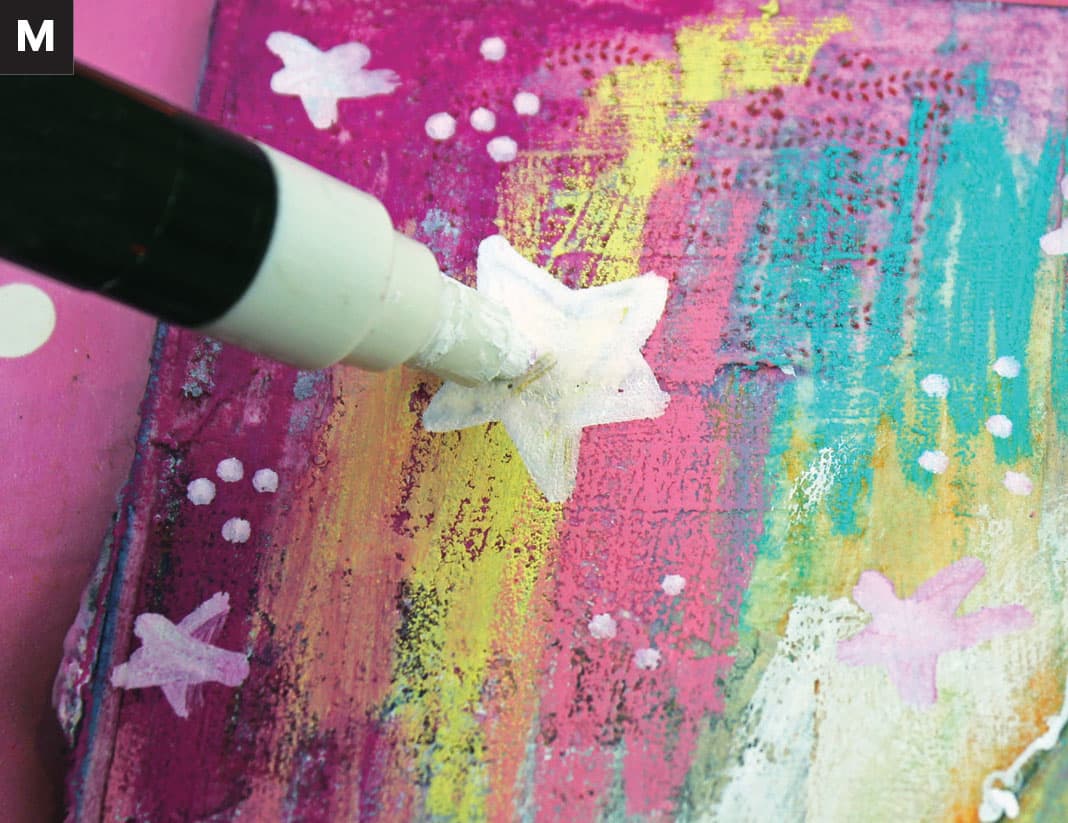
4. I then added imagery that I love (little houses, floral/natural shapes, and stars). Choose imagery that you like; add it playfully (M, N &O).

PROJECT 16
The Beauty & Power of Colors & Crystals
Cultivate Mood with Color
CONTRIBUTING ARTIST ANDREA GOMOLL
ASK YOURSELF, “What do I want to bring into my life? What do I need help with? What do I want to change or improve?” Set a goal or intention and pick a corresponding stone or crystal to help you incorporate that intention into your artwork.
When I think of change and transformation, I immediately think of things that can help me with my intention and that can support the process of transformation.
Art in general is a great tool for transformation because it’s a constant curve of learning, playing, developing new skills, and improving on what you have learned already. It’s a very powerful combination for me to connect art with other things that can be helpful for the process of transformation.
For this project, I have focused on the use of colors in combination with crystals and stones. Both can have a big impact on how we feel.
Exploration: Listening to Color
Colors in general have a big influence on our mood and on our well-being. Red, for example, is a very energizing, powerful color; blue, on the other hand, is a very serene, calming color. Every color has its very own aspects and influences on humans. Color theory is so much more than just the color wheel! Working with colors that match your intention can be a good place to start with a piece of art that will support your transformation.
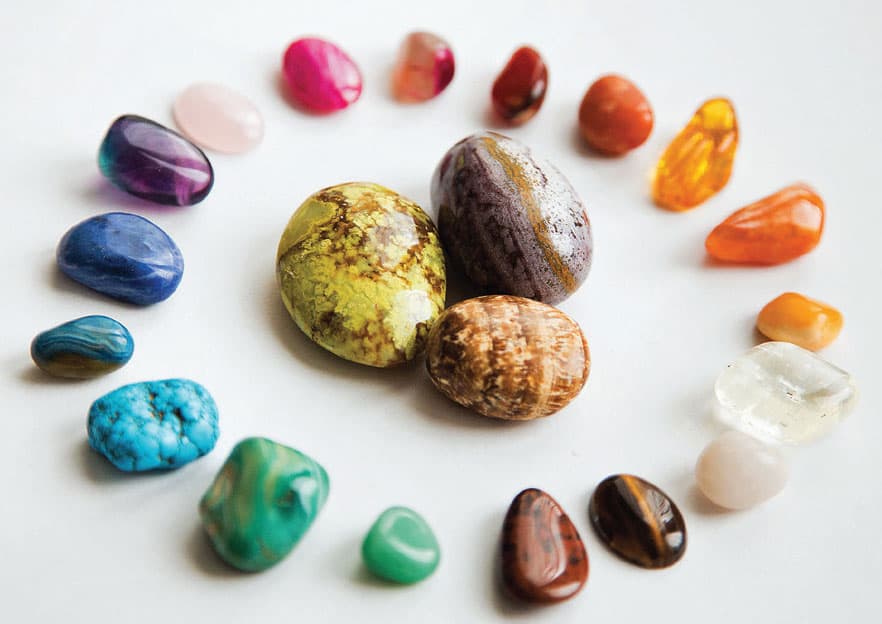
Stones and crystals also inspire me a lot and are very powerful. Amethyst, clear quartz, tiger eye, and rose quartz, just to name a few, each hold different energies that can have a positive influence on our well-being and that can help us with our wish for transformation. I love to incorporate crystals into my artwork. Even if you don’t believe in their energetic power, they’re super pretty to look at. The amazing colors they come in and the endless variety of textures and patterns they have can totally inspire us in our art.
Let those colors and patterns inspire you. Let’s listen to our inner voice telling us what we need right now. Need something joyful, inspiring, and energetic? Then red or orange would be a good color to work with, and crystals such as orange calcite and red chalcedony could add beauty and meaning to your artwork. If that’s something that sparks your interest, do a little research on the power of colors and crystals.
Art Page: The Beauty & Power of Colors & Crystals
I hope you’ll enjoy my project, which is inspired by the beauty and power of colors and crystals, and have fun creating these small treasures with me. They’re not only fun to make and beautiful to look at in the end, but they’re also a reminder of the change we want to attract to our lives.

1. Prime your canvas board with gesso. Add two or three even layers of gesso with a flat brush (let it dry between layers) to create a well-prepared surface to work on.
2. Tear a piece of vintage paper (from an old book page, old sheet music, etc.) and use collage glue to adhere it to your canvas board (A).
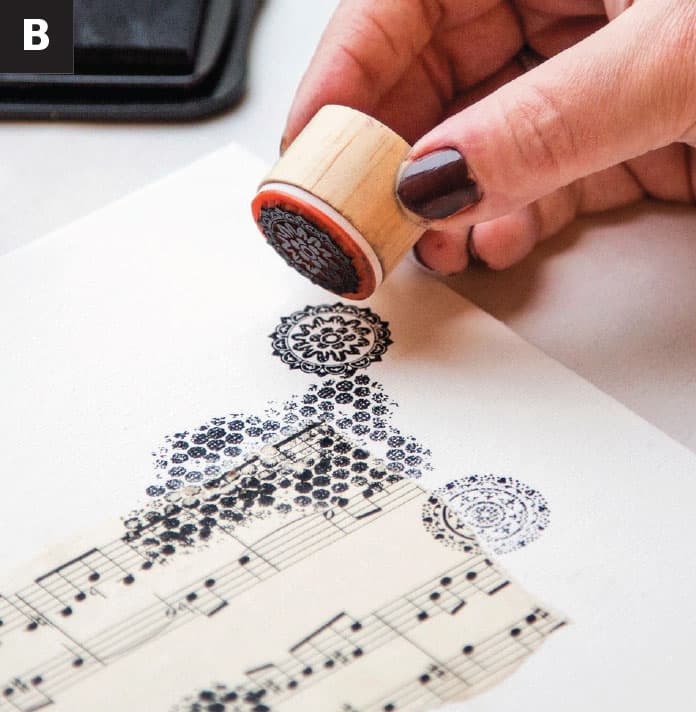
3. Use stamps to add designs and visual texture to your canvas board. Because we will continue to work with wet media, make sure to use a waterproof ink pad for this. Everything goes—just use stamps with patterns and designs you enjoy. You might also want to add stamped words that go with your intention (B).
4. Now grab a stencil with a design of your choice, a palette knife, and some crackle medium. A medium that dries clear will give you the best results when adding the watercolors in the next step, so keep that in mind. Put the stencil onto your canvas board, hold it in place, and scrape the gel medium across the stencil using the palette knife. Make sure to leave a nice, thick, smooth layer of the paste for best crackling results. Let it dry for the crackle effect to unfold (C).

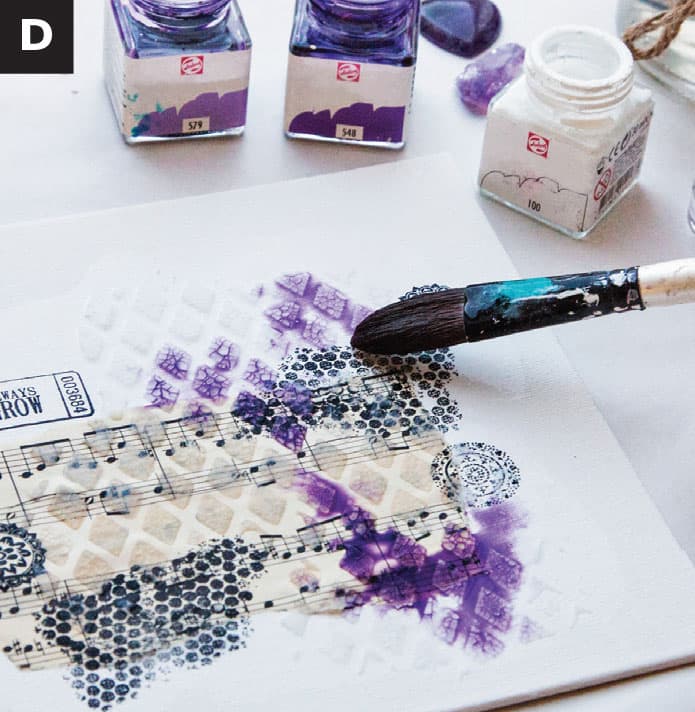
5. Now pick your color scheme. I decided on a purple color scheme inspired by the purple amethyst stones that I will add to my canvas later. Gather watercolors (liquid watercolors work best, but you can also use tube or pan watercolors with lots of water) matching the color scheme. Also consider some sparkling or pearlescent watercolors for a special effect, as well as white and black for interest and contrast. Load your brush with a watery mixture of the color and lay it onto the canvas. Start light; then add more color step by step and add more water if needed. Enjoy the process and let the colors and the water “do their own thing” on the canvas. That’s the beauty of watercolor, and it will result in stunning effects (D).
6. For even more fun, you can add in a second color, a special effect color, or white and black (E).

7. The crackle medium texture we put down earlier will create a very pretty resist effect now, adding a cool mixed-media touch to the watercolor (F).
8. Once everything is dry, load your brush with some more color, hold it close above the surface, and slightly tap it with your finger to add some random paint splatters to the background for a playful touch (G).

9. Cut shapes (circles, diamonds, hearts, etc.) from vintage paper. You will need three or four of them for layering, making sure to have some variation in the sizes. Crumple them up and open them again (H).

10. Flatten them out, but make sure to keep a little bit of the texture. Slide an ink pad along the edges of the shape for a distressed edge look (I).

11. Adhere the paper shapes to your canvas, layering them on top of each other. Only add glue to the center, so the edges are still loose for a dimensional look (J).
12. Nest the crystals and stones as a focal point element right on top of the paper shapes (K). Again, let your intuition guide you as to where to place the shapes and stones—but I would suggest placing them slightly off-center on the canvas board for more visual interest (L).


Two more art pages in other gem-inspired colorways
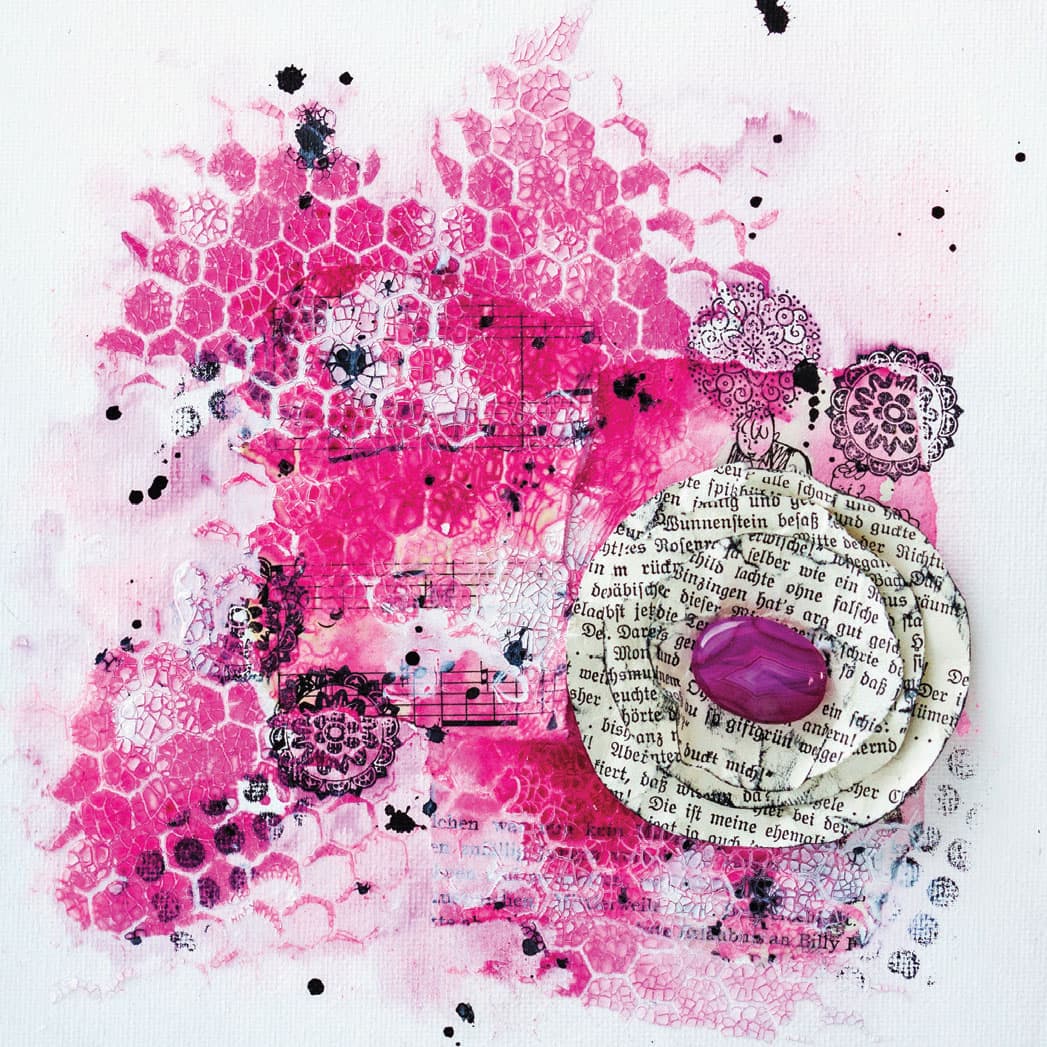
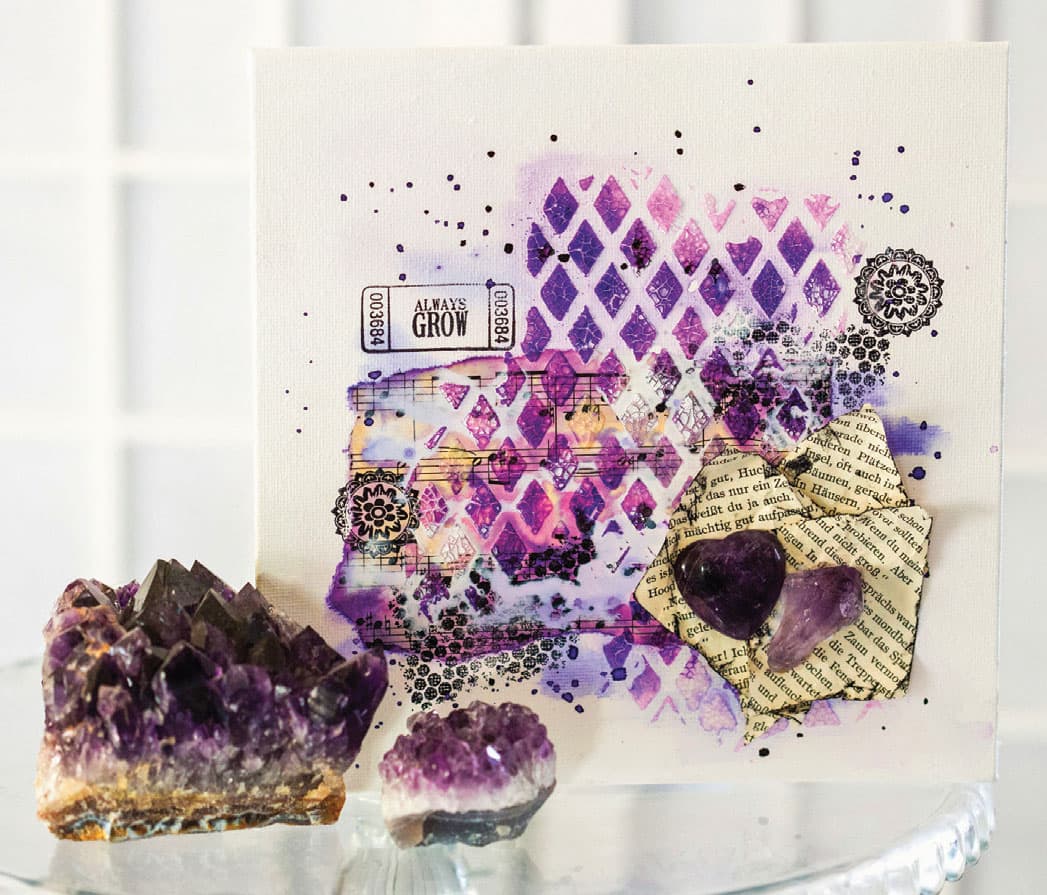
Art pages displayed with the stones or gems that inspired them

PROJECT 17
Page Wardens
Protect Your Creative Journey
CONTRIBUTING ARTIST ROXANNE COBLE
WHEN I WAS IN ART SCHOOL, I constantly felt beaten down—beaten down by my professors, self-doubt, and an ongoing fear of creative failure. (It’s hard to avoid those feelings when you’re graded on what you create!) Although these emotions were heightened for me during my fine art studies, let’s face it: we all experience this from time to time when making art.
Exploration: Friendly Reminders
One of the greatest things I learned while in the trenches of art school, however, was how to focus positively on my process. I began thinking, “We leave reminders for ourselves all the time in life—sticky notes on the fridge or an alarm on your phone—so why not apply this same idea to creative work?” I did just that. I began to leave notes and reminders for myself around my art studio to stay positive and keep working. Several years later, I still practice this in my studio—and it’s from this very thinking that Page Wardens were born.
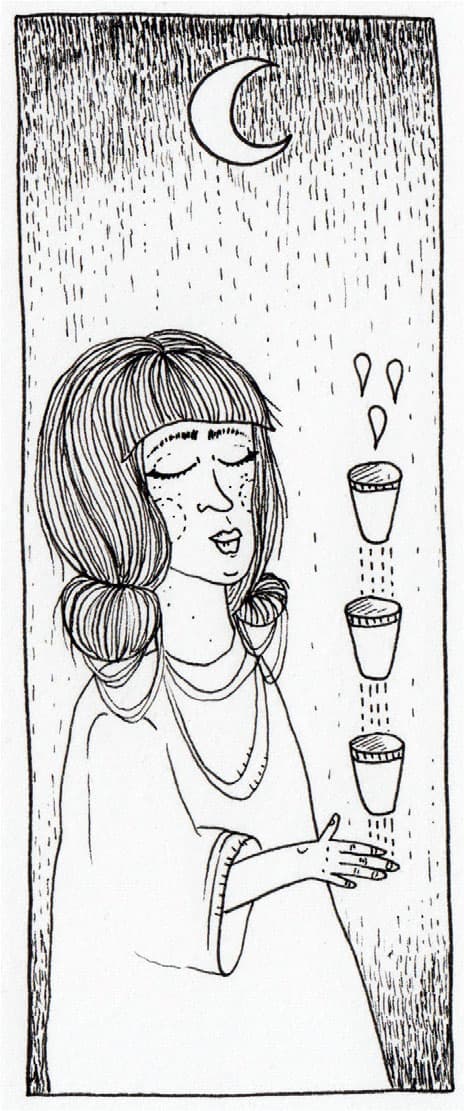
This illustration is inspired by the Three of Cups, which usually pertains to love, socialization, and personal relationships. Known as the most creative card in the tarot, this Warden reminds us to turn to our friends and creative circles when we need to.
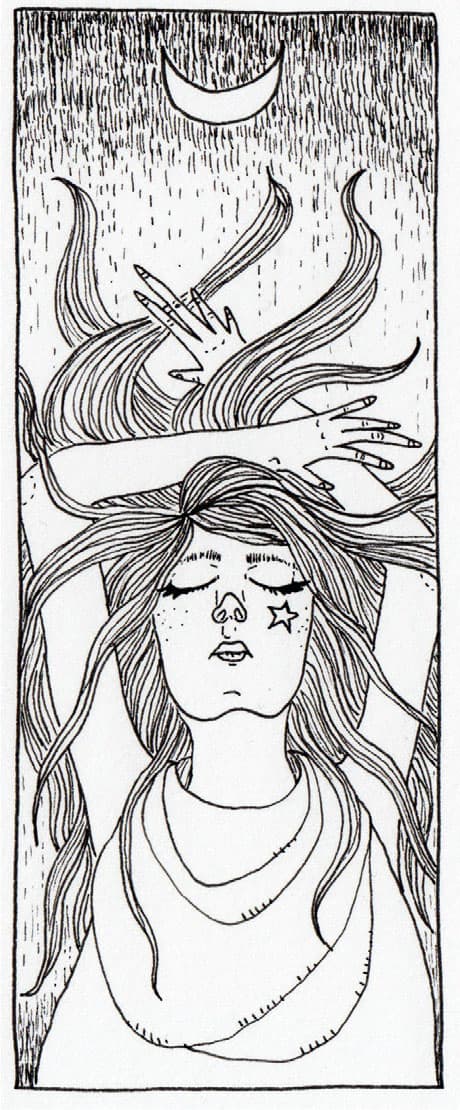
This illustration is inspired by the High Priestess, one of the most powerful cards in tarot. Her meaning is connected to knowledge, wisdom, and subconscious self. She is most closely tied to being a protector or guardian, so think of this Warden as the protector of your creative process and journey!
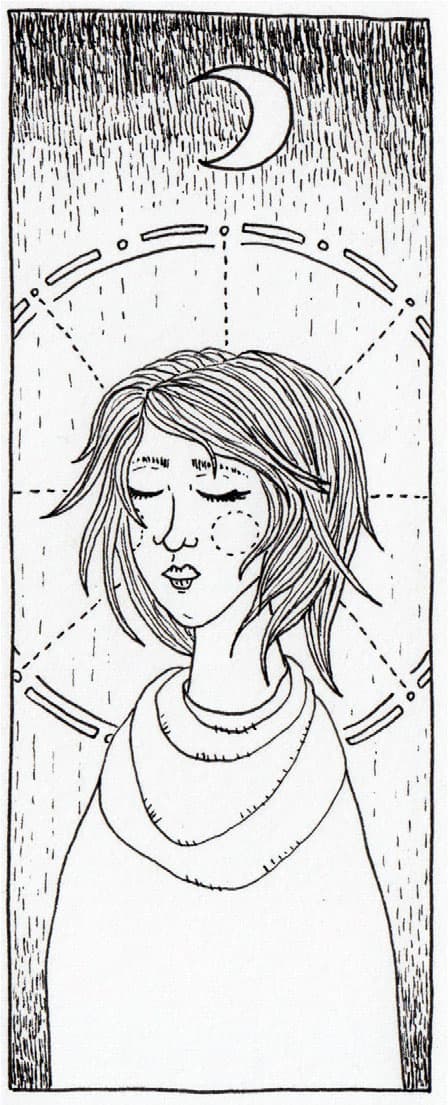
This illustration is inspired by the Wheel of Fortune, which recognizes the ebbs and flows of life. It reminds us that sometimes negative situations or events in life are often out of our control—and not to blame or be too hard on ourselves when they happen. The idea behind this card could also be applied to our creative practice, when we aren’t feeling inspired or when what we’re working on isn’t coming together as expected. This Warden reminds you to not be so hard on yourself!
Art Page: Page Wardens
Page Wardens are the protectors of your creative journey. They’re made to be nestled within the pages of your art journal, where they remind you to continue forward, remain focused, and stay positive during your process. For this project, I created three illustrations for you to use. They are inspired by tarot cards, which influence my artwork often.
Each Page Warden illustration, which you may photocopy to include in your art page, is inspired by a card found in a tarot deck. Their meanings are described on the opposite page.
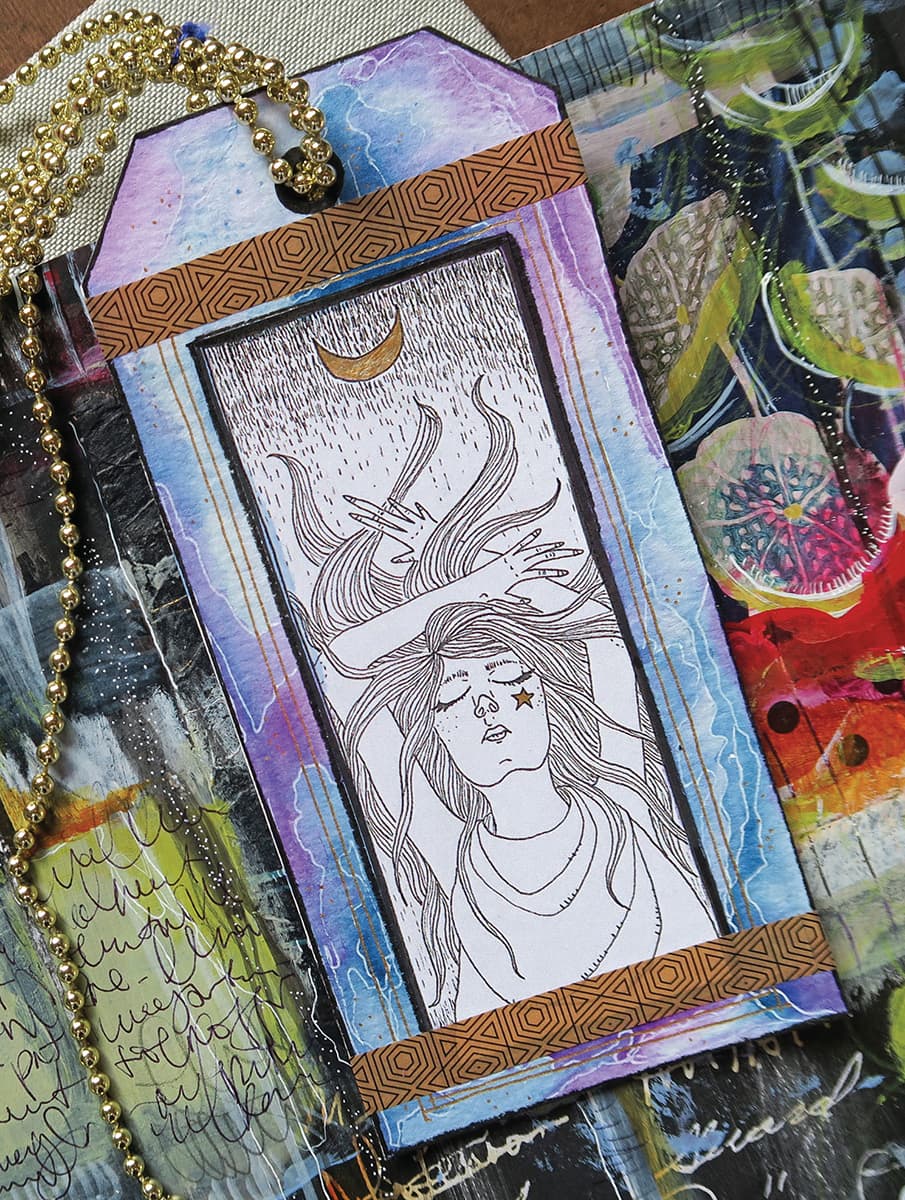
1. Begin by making a photocopy of the illustrations shown here. (If you want to use your own artwork, create a pen drawing of your own Warden image.) Cut out the Warden you wish to use.
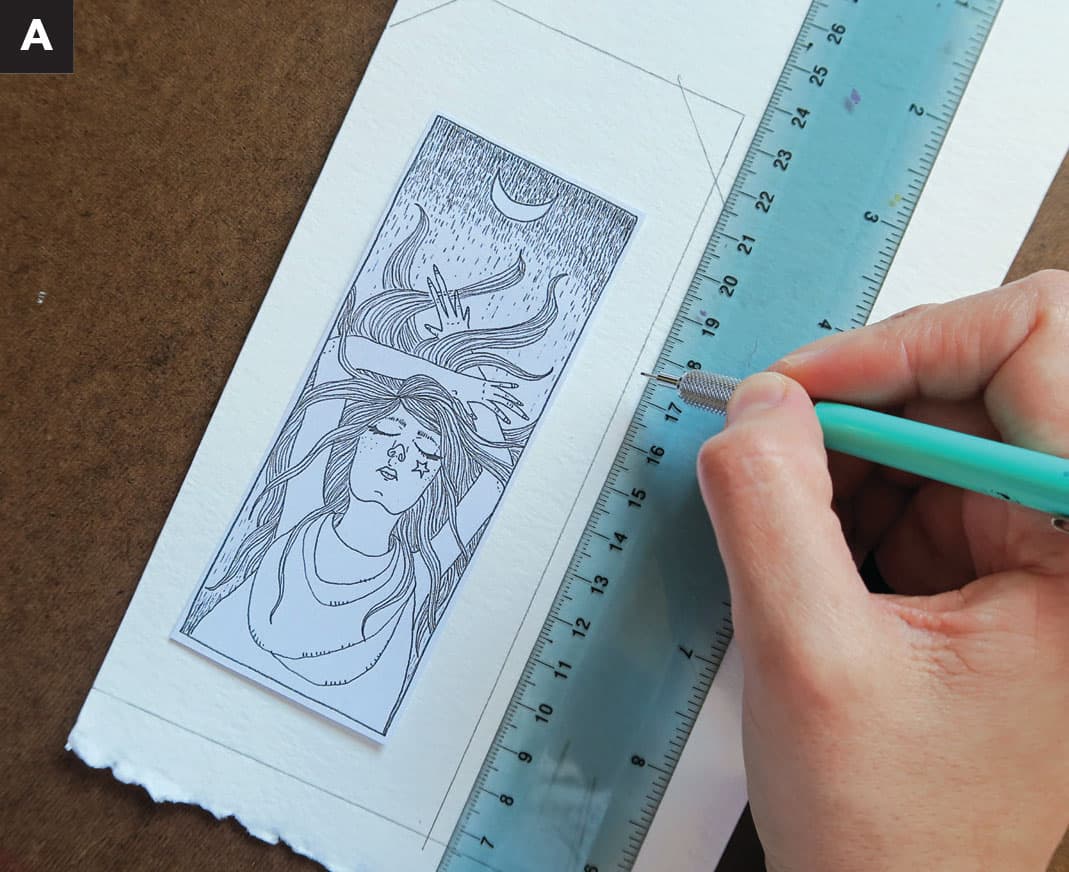
2. Once cut, lay the printed illustration on a piece of watercolor paper to determine the shape of your Page Warden. You can keep it simple with just a rectangle or create a tag-like shape. Leave white space around the printed illustration for watercolor later (A). Cut it out.
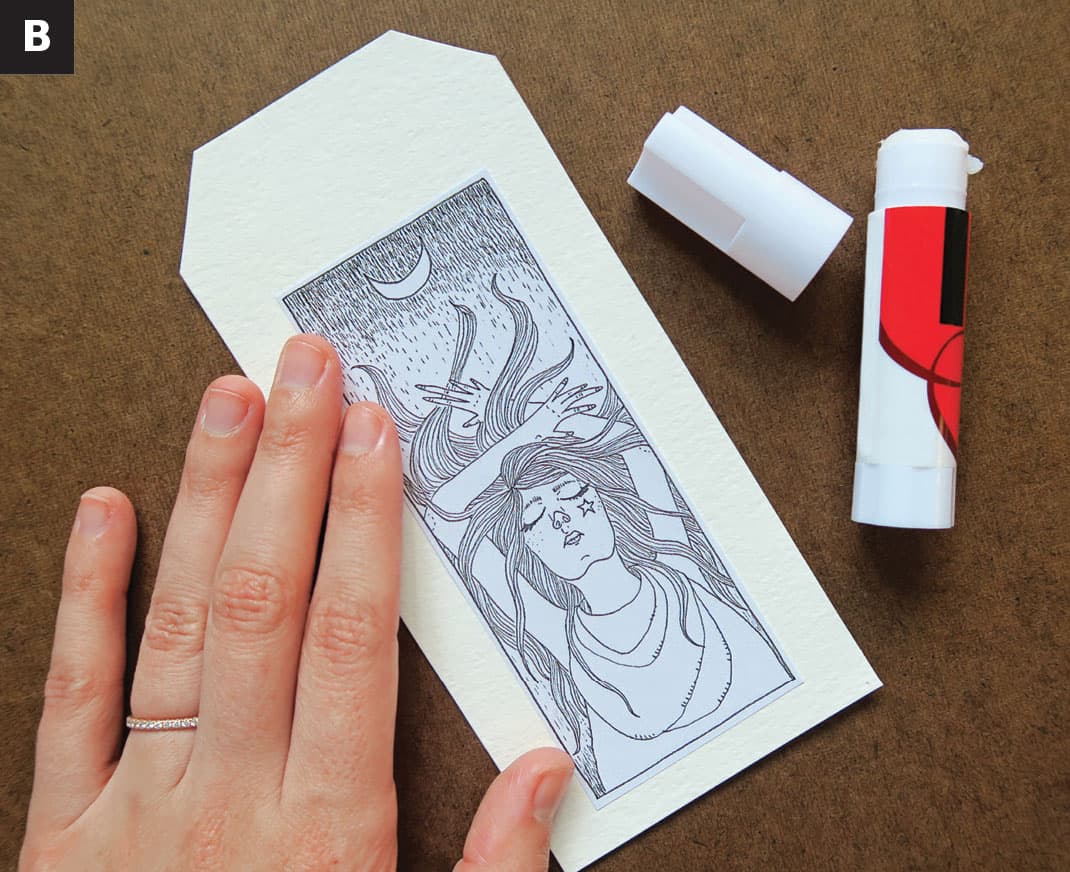
3. Adhere the illustration or your artwork to your cut-out paper shape using a glue stick (B).
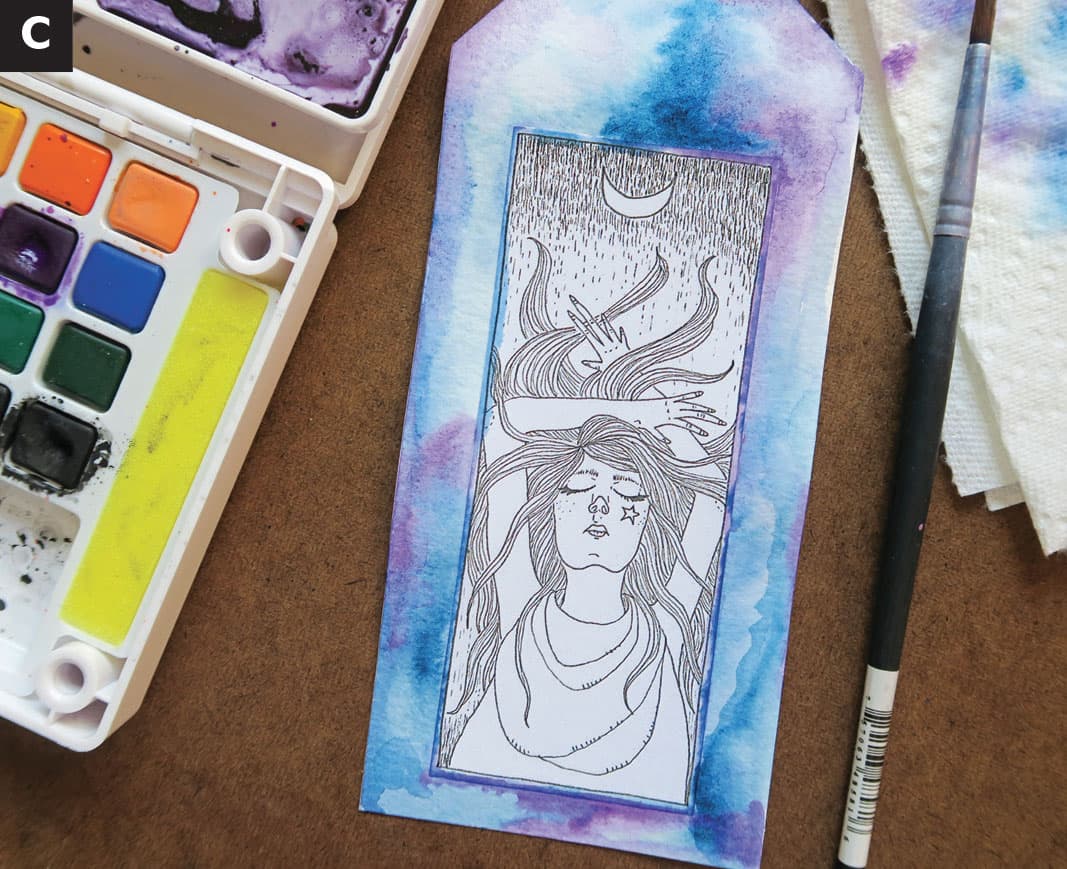
4. Using a wet-on-wet watercolor technique, begin by wetting random areas of your watercolor paper using a paintbrush and water. While still wet, apply doses of watercolor paint to the areas where you have applied water. This will cause the pigment to bleed out and create various organic lines, shapes, and bursts of color.
5. Repeat with a second and third color, allowing time to dry in between. Analogous color palettes work best! I also tend to use variations of blues, purples, and pinks to create a more cosmic look (C).
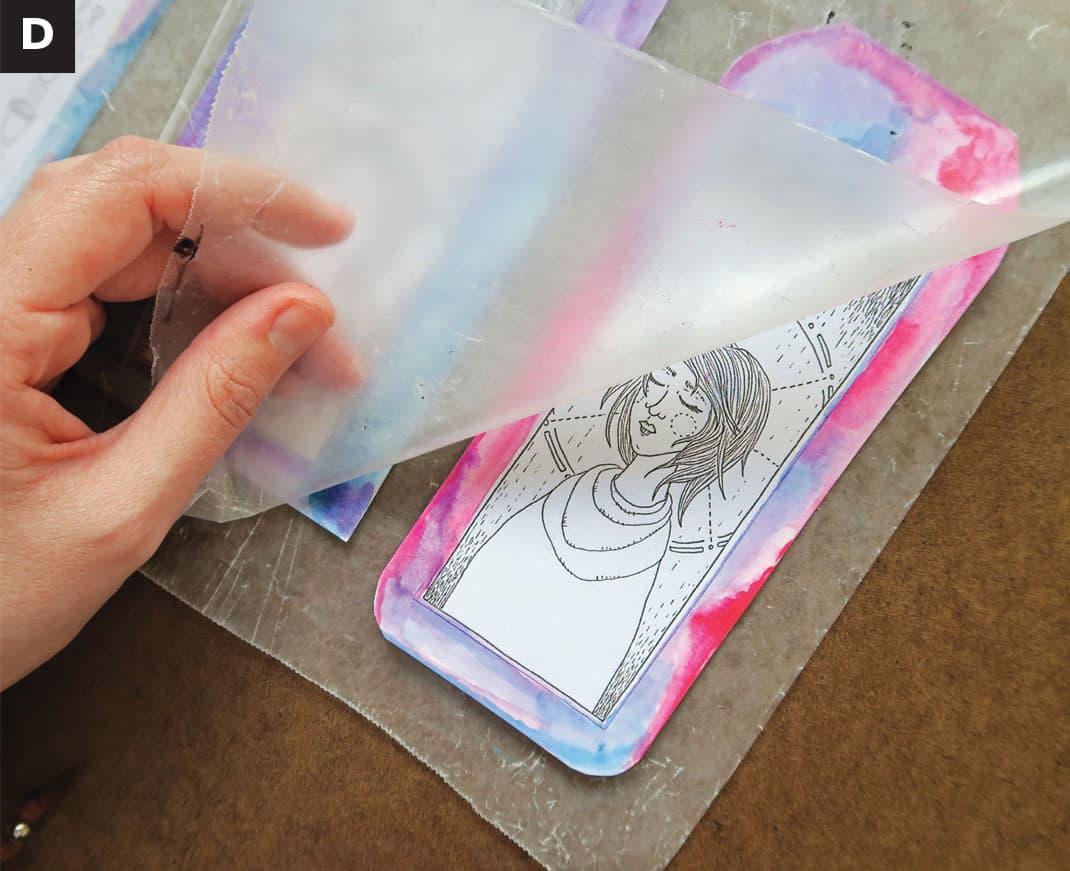
6. Allow your painting to dry. Then place it under a heavy book, sandwiched in between sheets of waxed paper, if you need to flatten it out (D).
7. After your Warden is flat and dry, punch or cut a small hole at the top for trim (E).

8. Add pen details to your Warden by drawing small lines and/or dots or by outlining your watercolor with a gel pen. You can also add washi tape for extra color and pizazz (F & G).


9. To finish, tie trim through the hole at the top of your Warden to hang it outside of your art journal (H).

PROJECT 18
Counting Your Blessings
Cultivate Gratitude to Live a Happy Life
A DAILY (OR WEEKLY) PRACTICE of focusing on and recording the things we are grateful for has been shown to have positive benefits in our lives. It can help with:
• alleviating stress
• becoming more mindful
• creating more peace and contentment
• creating more joy
• manifesting more of what we are grateful for
Though we all go through hard times, taking some time in the day or week to look at the things you are grateful for can help shift perspective, help you focus on the moment, and means you are attracting more of what you’re grateful for, simply by recounting and feeling joy by reliving the memory.
A note: Focusing on gratitude is not done in a “should” manner. It’s not helpful to think, “Even though things are bad for me right now, I should be grateful for all the things I do have.” This approach is punishing and doesn’t honor the fullness and wholeness of you. If you’re feeling resentment or pain over some traumatic or damaging experiences in your life and you’re finding it hard or painful to try and be grateful for other things, that’s okay and understandable. If this is happening for you, I suggest that instead, before you embark on a daily or weekly gratitude exercise, you spend time honoring and empathizing with the pain you’re experiencing first. It’s okay to spend time with your pain, feel it, and acknowledge it. This might be a necessary step before you embark upon a gratitude exercise. This is not to say that a gratitude habit could not help you overcome your resentment and pain, but I would avoid doing the gratitude exercises if you’re telling yourself you should be doing them. Work first instead on honoring and feeling your pain.
Exploration: How Do We Cultivate Gratitude?
Cultivating gratitude can be as simple as writing down five things that you’re grateful for daily. You can do this in a special gratitude journal or on separate sheets, or you can layer your gratitude list into pieces of art (gratitude art). The point is that you consciously spend 5 to 10 minutes every day focusing on things you are or have been grateful for.
To figure out what makes you grateful (sometimes we’re not aware), you can ask yourself questions like:
• What/who made me smile today?
• What/who gave me a sense of peace and contentment?
• What/who inspired me today?
• What/who created a sense of awe in me?
Remember that the things you are grateful for need not be grand things. They can be everyday little things such as ladybirds, the blue sky, avocados (yum!), flowers, autumn leaves, puppies, warm blankets, a smile, your toothbrush, the smell of bath soap, your spouse making dinner, and much more.
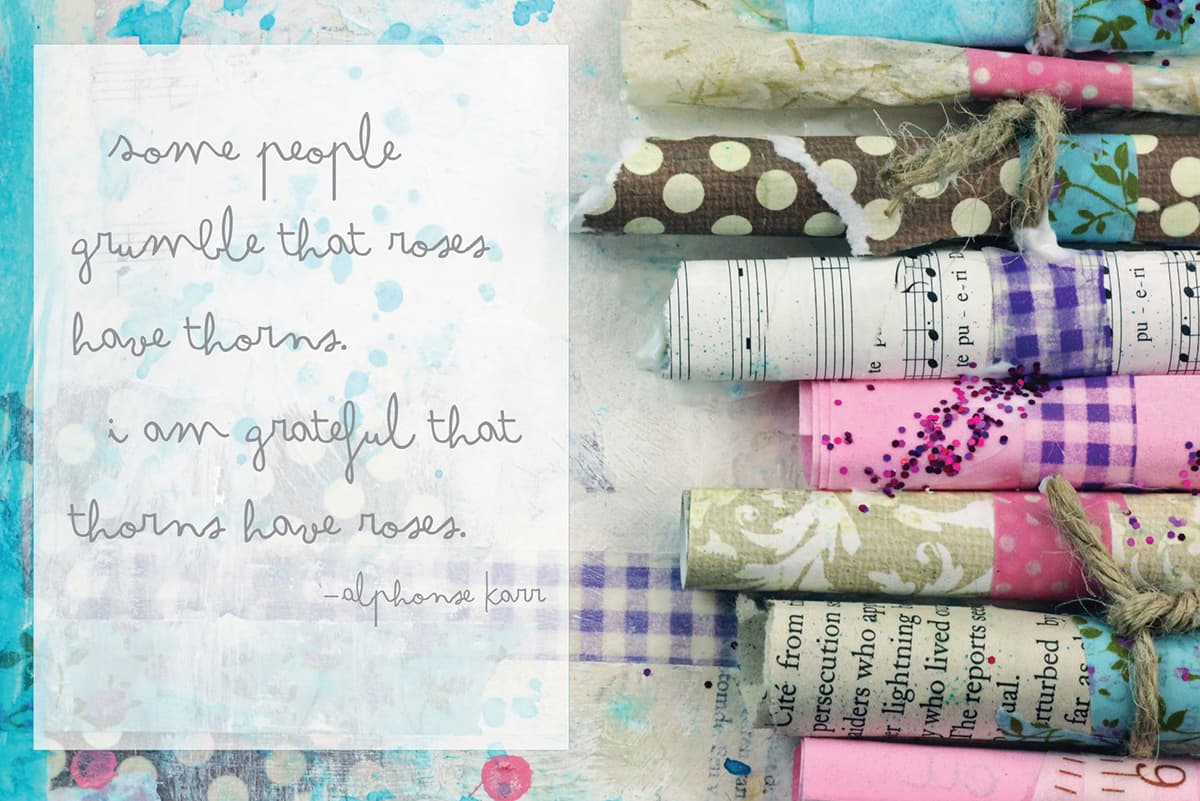
Art Page: Gratitude List
For this project, we will create a list of things we are grateful for (count our blessings) and express gratitude for them on little notes that we’ll roll up and put together in a fun and joyful mixed-media page.

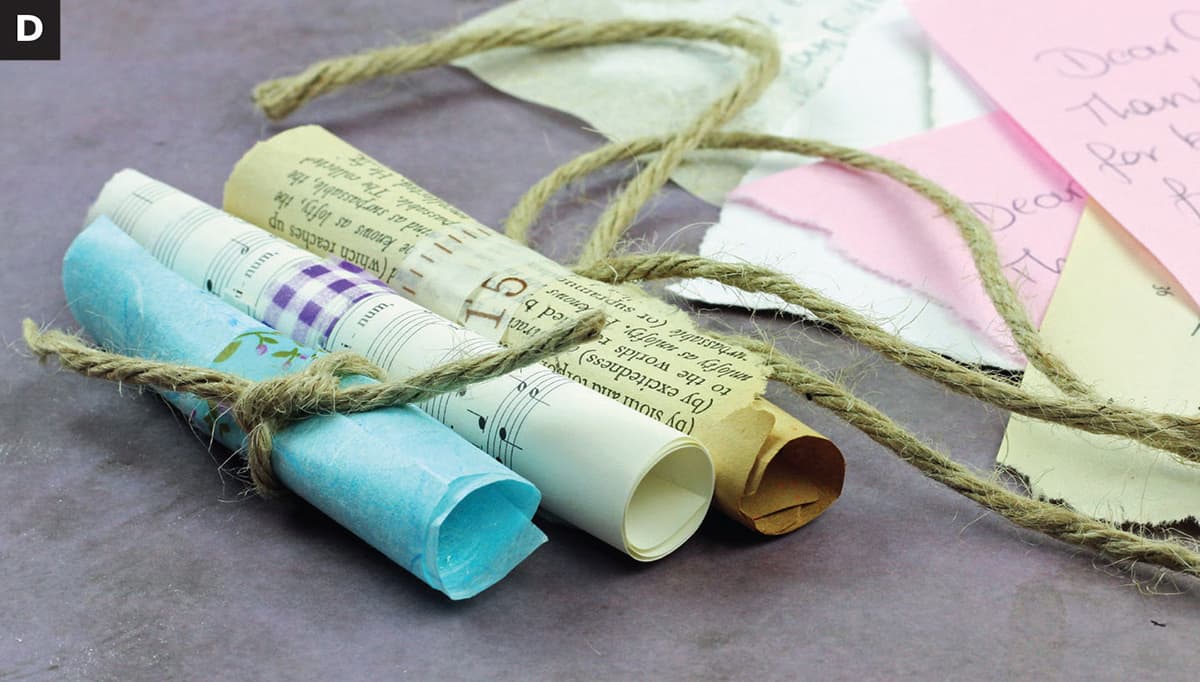
Create the Notes
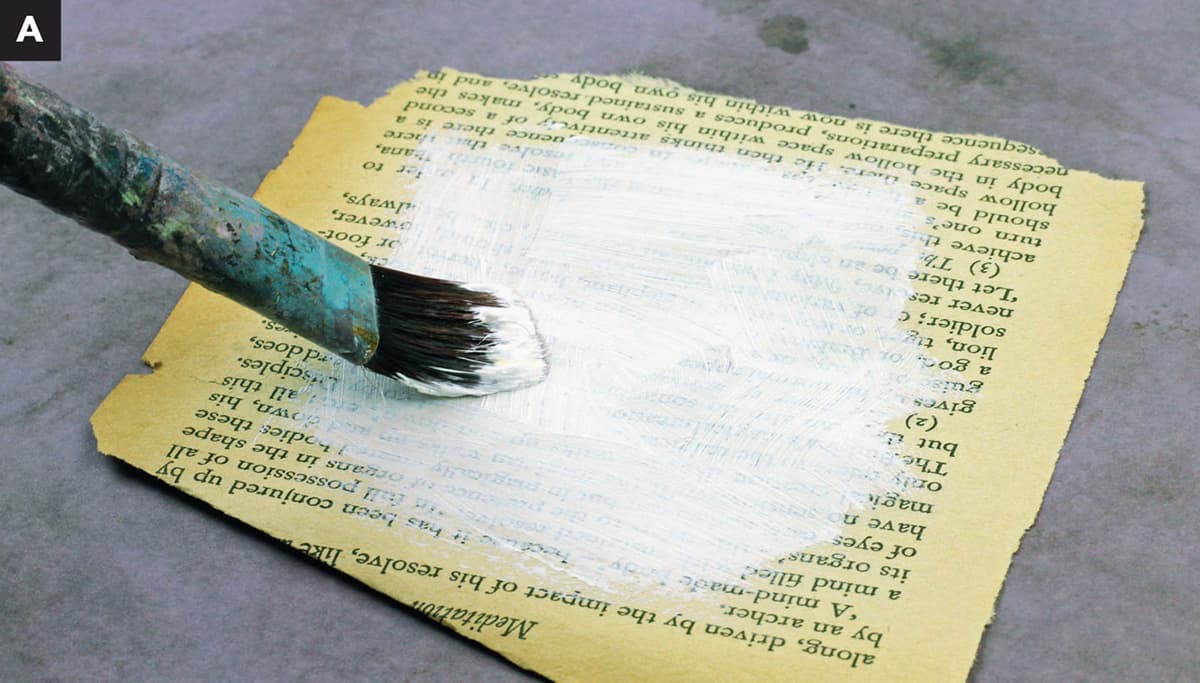
1. Gather together little pieces of collage papers, roughly 4 × 4 inches (10 × 10 cm). Tear them rather than cutting them so you get nice rough edges. Prepare each piece of paper with a layer of white gesso; this is where you will write your little gratitude note (A). Let dry.
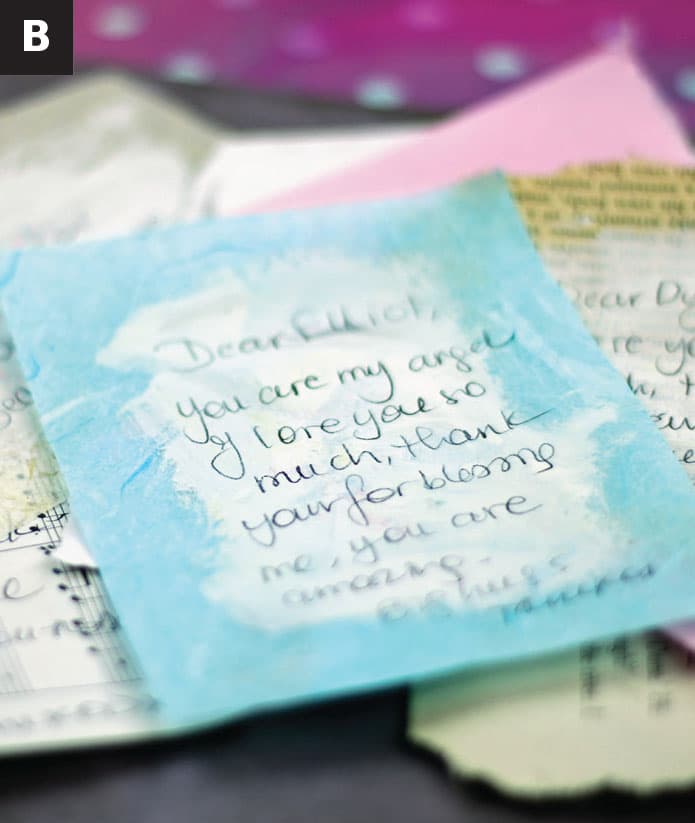
2. Write messages of love and gratitude to people, animals, elements, and/or experiences in your life that you are grateful for (B). (Remember, it doesn’t have to be a big thing, though it could be.) You can be grateful for the sunshine, a mild breeze, your coat, a beautiful song, or your neighbor smiling at you. It doesn’t matter what it is.
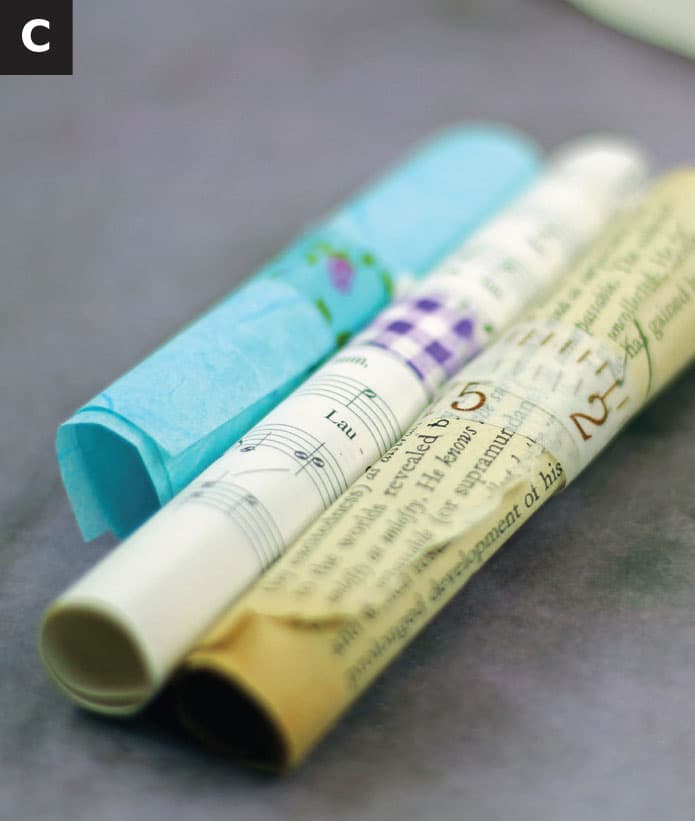
3. Once you’ve written your messages, roll up the papers into little parchment rolls, using pieces of washi tape to hold them together (C).
4. On some of your paper rolls, you can add embellishments such as string, ribbon, or stickers (D).
Develop the Background
1. Once you have about eight to twelve notes, start on your background. I’m working on 16 × 12 inch (40.5 × 30.5 cm) watercolor paper. Add collage. Use similar papers to the ones you used for the notes. Put your collage pieces near the edges only, leaving the center of the page untouched. Glue down with gel medium (E).

2. Add color over the collaged areas with crayons or watercolor paint (F).

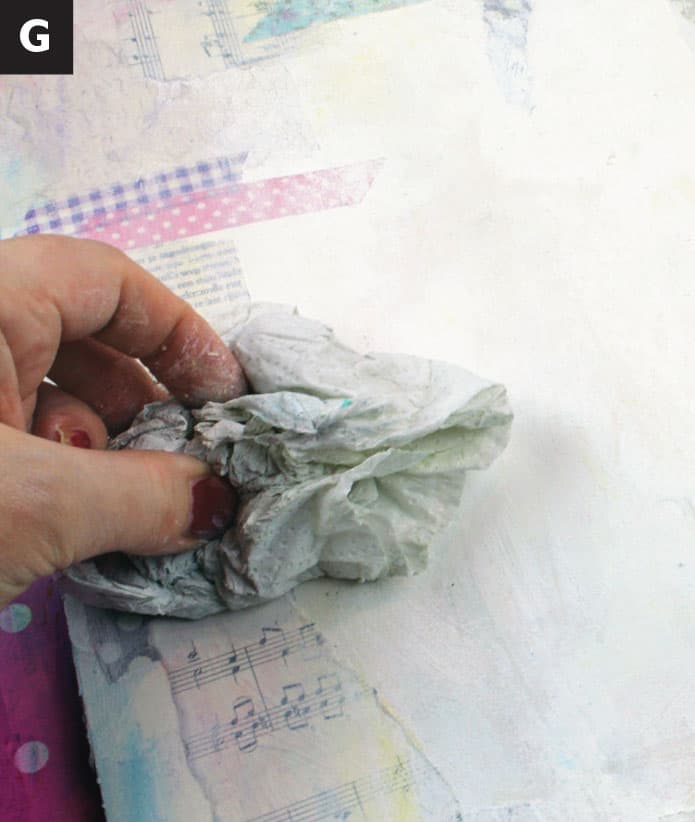
3. With a palette knife or hard plastic card, apply white gesso to the center of the page, spreading out to the edges. Wipe away excess gesso with a tissue or baby wipe; you want a milky, transparent layer over your collage (G).
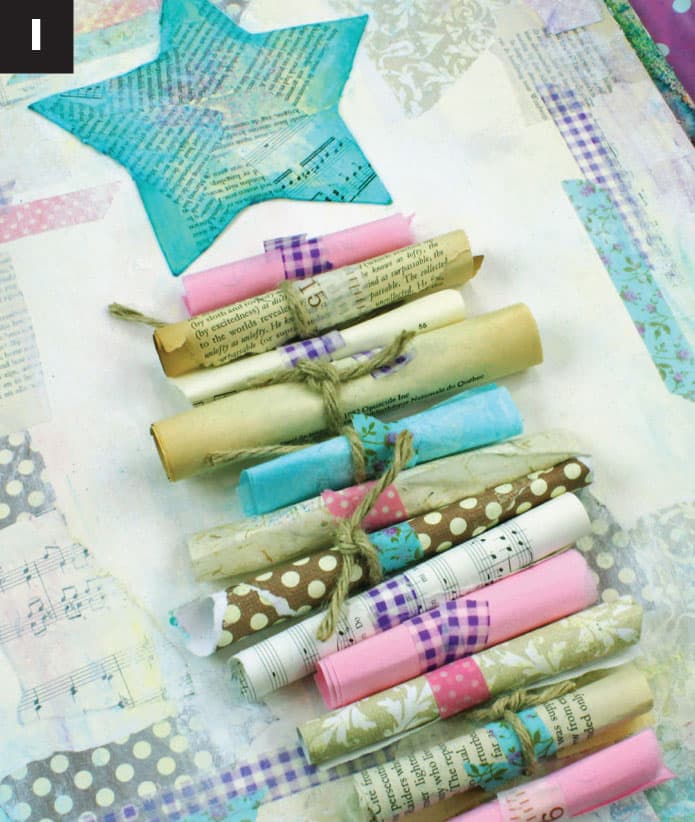
Assemble the Project; Add Finishing Touches
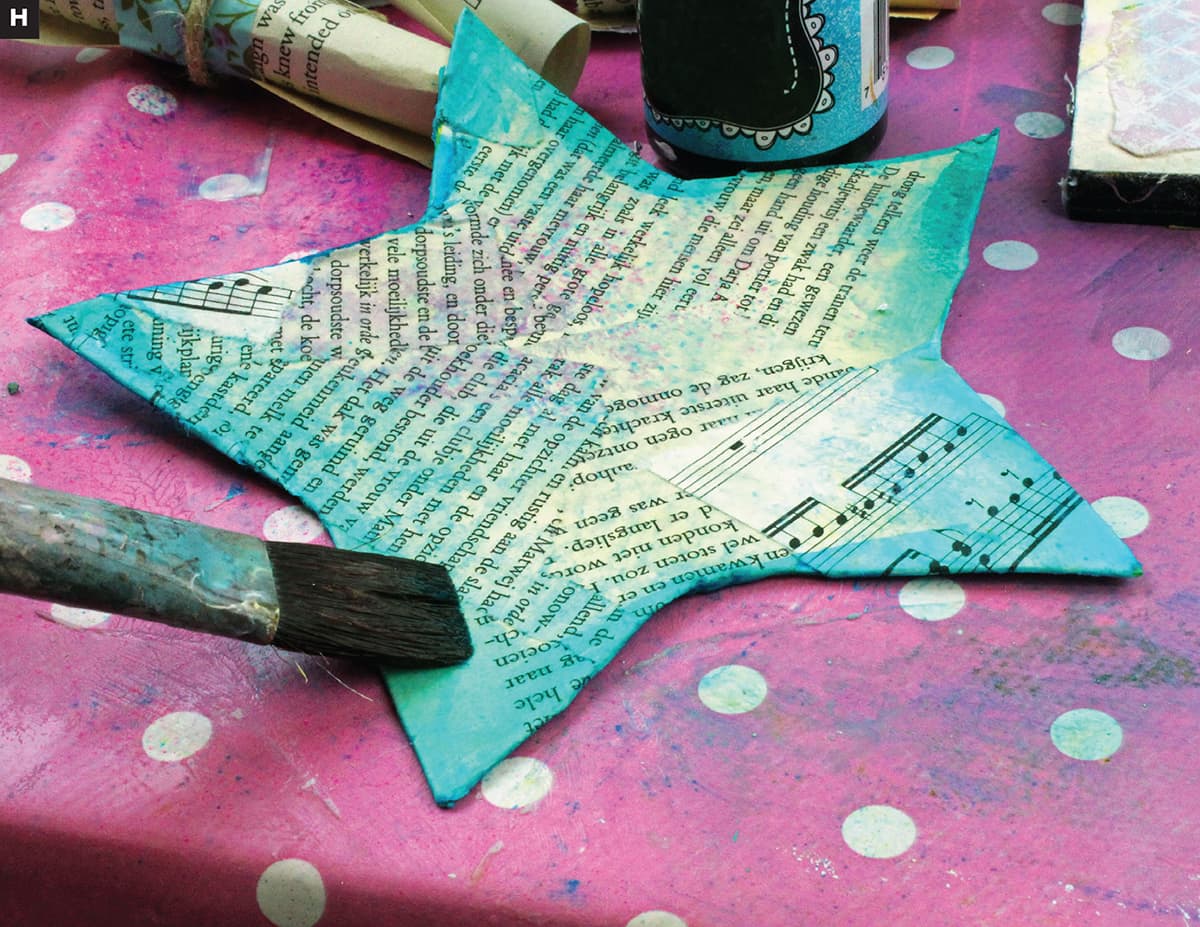
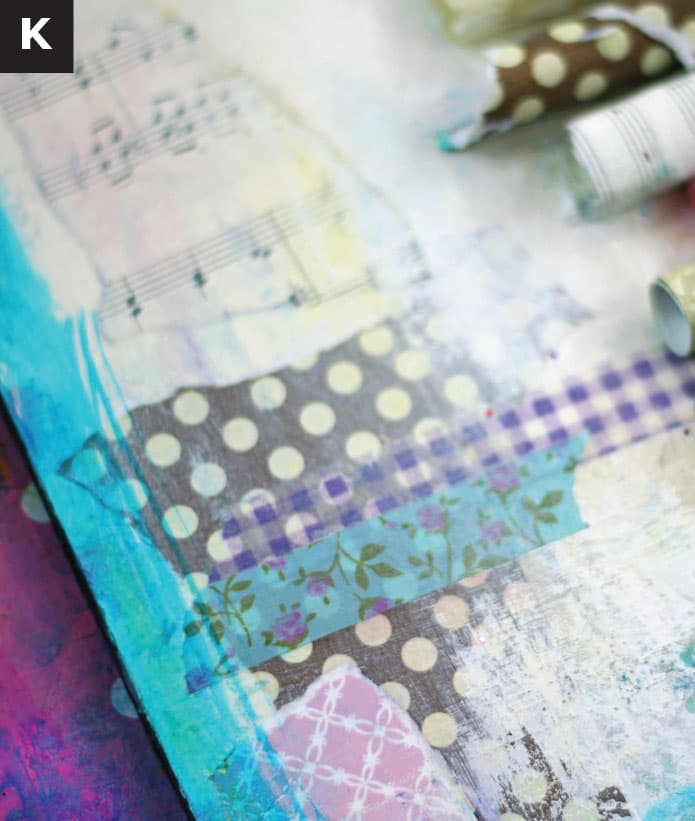
1. Lay out your parchments in row. Allow for some space above the row and cut a star (or other symbol you resonate with) out of watercolor paper to be placed above the parchments. The imagery I’m trying to create here is a star on whose tail hang all my blessings. Decorate the star with collage and inks (H).
2. Glue down the star and the parchment rolls with gel medium (I).
3. Put gel medium on the rolls and then sprinkle with glitter (J).
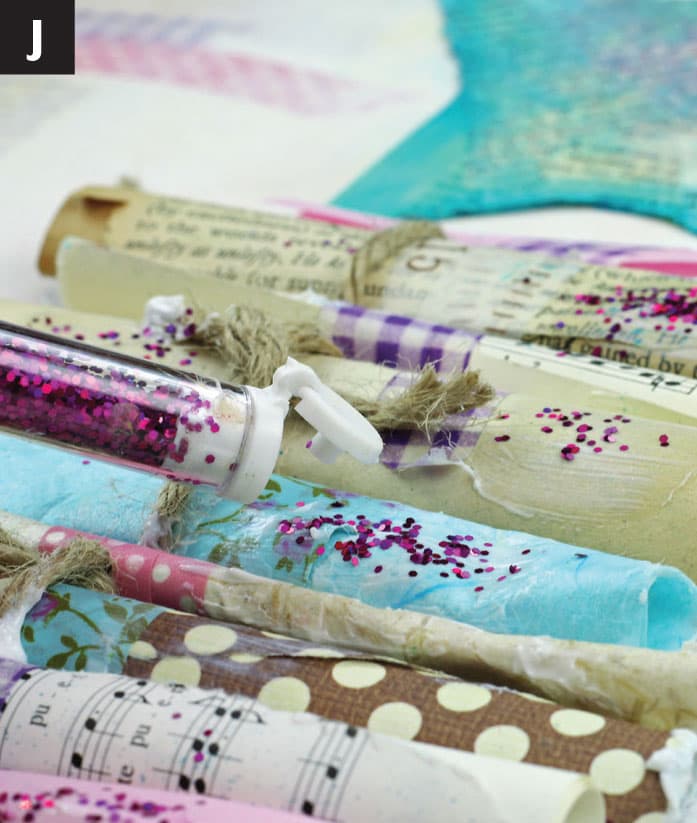
4. Add color to the edges of your painting, as if to frame the star and notes (K).
5. Outline your star with color and pencil if you feel it needs it (L).

6. As a final touch, I added splatter around the star and notes, plus I added pink dots with a cotton swab (M & N).

