

Application Lifecycle Management on a software development project
This chapter describes how Application Lifecycle Management orchestrates the activities involved in the software development project, which is related to the business scenario described in 1.2, “The business scenario” on page 14.
The following topics are covered:
3.1 Define the IBM Application Lifecycle Management methodology
Playing in a band is like being on an ideal team, where each member has a different part to play. The ideal team that works together synergistically knows exactly what to do and when, and they get immediate feedback during their concerts (see Figure 3-1).

Figure 3-1 The ideal team works together synergistically
For a software development project, the efforts are more complicated. Teams are dispersed, frequently across widely separated time zones, with pressure to deliver more functions with fewer resources. The team needs to adhere to standards and follow processes that are difficult to apply consistently across the different disciplines.
Deploying a software project to production is a live performance. All rehearsals are in the past.
Application Lifecycle Management is the vehicle that brings the teams and disciplines together. It drives the transparency of their progress and governs how the team works. Today’s software development teams can produce high-quality applications and deployments using Application Lifecycle Management.
Application Lifecycle Management coordinates a set of contributions among all team members. Coordination efforts involve people, processes, information, and tools, including the underlying transparency and shared responsibility for success. Stated simply, what one team member produces, another team member consumes, and this concept is employed during the entire development lifecycle. Understanding these dependencies helps a project team to:
•Organize their efforts
•Streamline their ability to produce software
•Produce a productive and efficient software development environment
Application Lifecycle Management provides relationships that help teams to successfully manage software development projects. The goal of Application Lifecycle Management is to help teams coordinate and manage their efforts and to deliver software projects successfully.
3.2 Define Collaborative Lifecycle Management
The IBM Collaborative Lifecycle Management is the IBM Rational solution for Application Lifecycle Management, as it addresses Application Lifecycle Management capabilities using IBM Rational products.
Collaborative Lifecycle Management coordinates software development activities across a number of components of software development:
•Systems and business requirements
•Design
•Development
•Build
•Test
•Delivery
|
Note: This book describes the IBM Rational products that apply to the business scenario discussed in 1.2, “The business scenario” on page 14.
|
3.2.1 Products and applications
Collaborative Lifecycle Management can be used to link artifacts for traceability in a web-like navigation to create reports and dashboards, and to do so across your Collaborative Lifecycle Management applications. Each Collaborative Lifecycle Management application consists of one or more capabilities. The following Rational products are part of Collaborative Lifecycle Management:
•Rational Requirements Composer: This product addresses the requirements management capability and uses the Requirements Management application. This capability provides tools to capture, organize, and collaboratively review, analyze, and report on requirements, especially in relation to their associated development work items and test artifacts.
•IBM Rational Team Concert™: is a team collaboration tool that is built on a scalable, extensible platform. Rational Team Concert uses the Change and Configuration Management (CCM) application to provide features that integrate development project tasks including iteration planning, process definition, change management, defect tracking, source control, build automation, and reporting. This product addresses the following capabilities:
– Change Management: The main feature of change management is work items, which track and coordinate stories, defects, plan items, and ordinary tasks. The work items and the workflow process they follow can be customized to suit your project.
– Planning: The planning capability provides tools to assist with the planning, tracking, and workload balancing for entire projects, for teams within those projects, and for individual developers. Plans are accessible to everyone on the team, and show the progress on releases and iterations at any point in time.
– Software configuration management: The component-based source control system provides strong support for parallel development, agile development, and geographically distributed teams. It integrates tightly with defect tracking, builds, and process automation.
– Automation: The automation capability provides build management control to the development and test teams. Team members can track build progress, view build alerts and results, request builds, and trace the relationship of builds to artifacts, such as change sets and work items.
– Reports: Customizable reports provide both real-time views and historical trends of artifacts across the entire lifecycle, including requirements, work items, builds, test cases, and test results. Team reports and dashboards help to keep tabs on the health of your project. Dashboards provide an at-a-glance view of work item queries, event feeds, reports, and other items critical to understanding the progress of the project.
•Rational Quality Manager: This product consists of Requirements Management, Change and Configuration Management, and Quality Management applications. Features include dynamic test plans, governed workflows, lab efficiency, test coverage analysis, and manual test authoring. These features integrate with other lifecycle artifacts, such as work items and requirements, and with reporting and dashboards. They provide detailed and highly customizable analytics to help you monitor the health and progress of a project.
These products are delivered as a set of applications together with an IBM Jazz™ Team Server.
The Jazz Team Server (JTS) serves as an integration hub for the applications. It provides the foundational services, such as user management and license management, that enable the Collaborative Lifecycle Management applications to work together as a single logical server (see Figure 3-2).

Figure 3-2 ALM capabilities covered by the Rational Collaborative Lifecycle Management Solution
|
Note: For more information about IBM Collaborative Lifecycle Management and other IBM Rational Products available, see the following website:
|
3.3 Configure a lifecycle project using Collaborative Lifecycle Management
This section describes how to create a lifecycle project and how to configure the application integration for the project.
|
Note: For Collaborative Lifecycle Management installation, setup, and support, see:
|
Table 3-1 shows the Rational products that are used in the scenario discussed in 1.2, “The business scenario” on page 14.
Table 3-1 Rational products included in the business scenario
|
IBM Rational product
|
Version
|
|
Rational Requirements Composer
|
4.0.6
|
|
Rational Team Concert
|
4.0.6
|
|
Rational Quality Manager
|
4.0.6
|
Table 3-2 lists the defined roles for a project that uses the Collaborative Lifecycle Management solution to orchestrate software development project activities:
Table 3-2 Defined roles in the Collaborative Lifecycle Management solution
|
Role
|
Definition
|
Role name in this book
|
|
Stakeholder
|
Customer
|
stakeholder
|
|
Project manager
|
Project manager
|
manager
|
|
Project leader
|
Project team leader
|
leader
|
|
Business analyst
|
Business requirements analyst
|
analyst
|
|
Developer
|
Developer
|
developer and developer_A
|
|
Tester
|
Tester
|
tester
|
|
Release Engineer
|
System Integrator
|
release_engineer
|
3.3.1 Create the lifecycle project
After the Collaborative Lifecycle Management products are installed, proceed with the following steps to create the lifecycle project:
|
Note: This book uses the Open Unified Process (OpenUP), which is a lifecycle software development process and industry standard that provides a disciplined approach for task and responsibility management. To learn more about OpenUp, see:
|
1. Navigate to the Change and Configuration Management administration page, at https://<server_url>:9443/admin/web/projects (see Figure 3-3 on page 32).
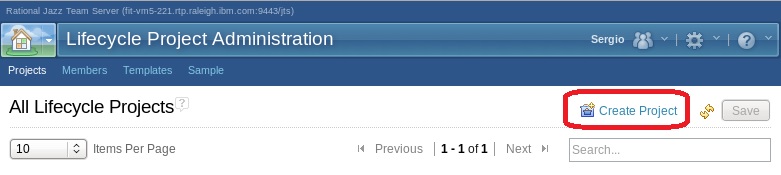
Figure 3-3 Create a new Collaborative Lifecycle Management project
2. Create a name for the project (see Figure 3-4).
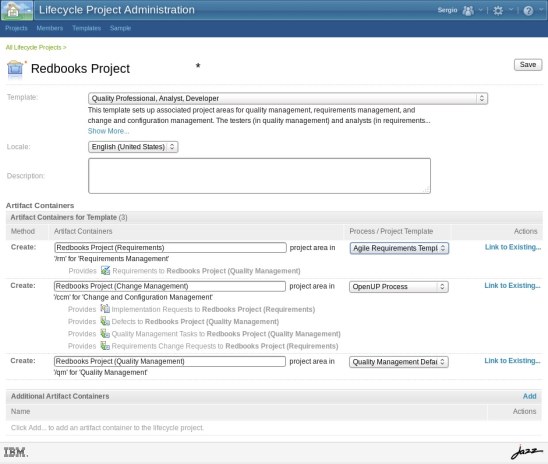
Figure 3-4 This book uses the OpenUP industry standard for requirements
3. Click Save to create your project.
4. Click an application of interest in the Configured Artifacts Containers section (see Figure 3-5 on page 33).

Figure 3-5 Select an application in the Configured Artifacts Container to configure each project area
For each application, one project area is created. A project area is an area in the repository where information about one or more software projects is stored. A project area defines deliverables, team structure, process, and schedule (see Figure 3-6 on page 34). You can also configure project area information using the Rational Team Concert client.

Figure 3-6 You can also configure Project Area information using Rational Team Concert Client
|
Tip: After creating the lifecycle project, you can use the application to add users as members to each of the project areas that belong to the lifecycle project. You can customize the roles, permissions, iteration types, access control, team areas, categories, and process definitions as needed. For more information, see the following website:
|
3.4 Contribute to a Collaborative Lifecycle Management project
Team members on a software development project play critical roles during the implementation of the solution. Information defined by the stakeholder is used during all lifecycle projects.
If a request is lacking the necessary level of detail, the business analyst is called upon to provide further detail to the stakeholder’s request. Context is provided in the form of a business process or application sketches, storyboards, models, and other rich text content.
The next steps are assuming the following scenes:
•Stakeholder submits a Stakeholder’s Requirement (we can name it “Business Need”).
•The Project Team Leader requests Project Manager approval for that Stakeholder’s Requirement.
•The Project Manager approves the Stakeholder’s Requirements.
•The Project Manager estimates the Stakeholders Requirements and request Stakeholder approval for the estimate.
•The Stakeholder approves the estimate.
•The Project Team Leader defines and manages the requirements management.
•The Analyst specifies all Requirements.
•The Project Team Leader plans the sprints and assigns all developers activities. He also defines all Test Management effort and Releases.
•Developers coding.
•Testers testing.
•Release Engineer deploys and releases the application.
Defining and creating the requirements
Project activities begin with clearly defined requirements from the stakeholder. The Stakeholder can convey the business need by using the language and vocabulary of their business and its customers using Rational Requirements Composer. Requirements definition and management activities ensure that the business can capture and communicate their ideas to the solution team, and, at the same time, the solution team can learn the nuances and expectations of the customer.
The Stakeholder’s request is reviewed to assess if it aligns with the business goals and strategy for the project team. If the request aligns with the strategy and can be contained within a given iteration, the request is added to the iteration plan. These kinds of activities allow an organization to capture the details of the business that might not be included in the request. Requirements content evolves through these efforts. It is critical that the business and solution teams create a common vision for the solution being developed. This process is typically similar to the following:
1. The Analyst organizes and manages the requirements, including capturing important requirement descriptors, such as priority, release, and origin, among others. Additionally, pertinent traceability information for related requirements can also be captured. In this case, we create all the requirements described in our Business Scenario 1.2, “The business scenario” on page 14.
2. The Stakeholder accesses the Rational Requirements Composer.
3. On the Artifacts page, click the down arrow next to the Create button. From the drop-down list, select Stakeholder Requirement, and another window displays.

Figure 3-7 The stakeholder enters initial content
The Stakeholder can access the Requirements for latter edition by clicking the requirement on Artifacts > Browse Artifacts.
5. The Project Leader accesses the project dashboard to review the new requirements using the Dashboards Widgets (see Figure 3-8 on page 37).

Figure 3-8 The project leader uses the Rational Requirements Composer dashboards to manage requirements
6. The Project leader reviews the stakeholder’s requirements and requests an approval workflow.
7. All assigned reviewer participants review or approve the artifact (Figure 3-9 on page 38).

Figure 3-9 All participants use the review process for project review and approval
8. After the artifact is reviewed and approved, the Analyst collects requirement specifications and software requirements from the original stakeholder’s requirements (see Figure 3-10 on page 39).

Figure 3-10 The business analyst creates the Requirements Specification
9. When the review and approval process is finished, the business analyst creates an Artifact Collection, grouping the requirements specification and the software requirements and starting the review and approval of the collection.
Browsing a collection can help the team to confirm the requirements that are planned for a release. The artifacts can be grouped by different options to make them easier to find or to create tighter associations (see Figure 3-11).

Figure 3-11 The business analyst creates a Requirements Collector to group the approved requirements
10. When the Artifact Collection is fully approved, it is used by the project leader to plan the project.
|
Tip: You can manage requirements by using traceability links, tags, attributes, filtering, and dashboards to create relationships between requirements and other artifacts, categorize requirements, assign properties to requirements, and monitor relationships and status among team applications.
|
3.4.1 Plan the project
The project leader can review the plan with the stakeholder, discuss the outcome with the team, and update the requirements accordingly.
Planning the project consists of the following phases:
1. Defining the iterations
The iteration plan contains a list of items to be resolved. Members of the solution team collaborate about these items. As part of the planning process, activities are created and executed as part of an iteration.
|
Note: Collaborative Lifecycle Management tools allow you to use OpenUP on business process management projects. To learn more about OpenUp, see the following site:
|
For development projects using the iterative development approach, organize the project into a sequence of phases or iterations. The open source OpenUP defines four phases:
– Inception:
In this phase, the Team Leader, the Project Manager, and Stakeholder come to agreement on a set of requests to define the initial scope of the project. In addition, an initial architectural vision is created, and an assessment of the project team, tools, and environment is completed.
– Elaboration:
This phase focuses on driving out technical risk by producing an end-to-end demonstration of the solution to prove and refine the architecture. Feature details are not addressed, but rather a “skeleton” of the system is completed to prove feasibility and identify areas of technical risk. For this book, this phase will not be executed.
– Construction:
This phase involves one or more iterations that focus on completing the functionality. Each iteration involves planning, design, development, build, and testing. Agile teams advocate multiple two-week to four-week iterations, while more traditional teams might only have one iteration. This book highlights a single iteration in the Construction phase.
– Transition:
After the acceptance criteria has been met, the solution moves into the Transition phase for stabilization testing. Unacceptable defects found in this phase cause the solution to go back to the Construction phase where the defect is fixed. The release candidate is then sent back to the Transition phase for stabilization testing until all expected tests have passed.
Each of these phases has one or more iterations.
The business scenario (described in 1.2, “The business scenario” on page 14) uses a predefined template (the OpenUp process template), a development project timeline, a release, and iterations that were created during the project creation (Figure 3-12).

Figure 3-12 Showing the iterations and team members
You can create iterations by clicking “Create Iteration” on the Rational Team Concert Eclipse plug-in, Team Artifacts view.

Figure 3-13 Iterations created to cover our business scenario
2. Define the release plan
The release plan provides a high-level overview of the work associated with a product release. The plan might be for a major release and include significant development work, or for a maintenance release.
In the plan, you can view and manage work items that are targeted for the release iterations:
To create a release plan, the project leader needs to do the following:
a. In the Team Artifacts view, expand a project area.
b. Right-click the Plans folder and click New → Plan.
c. In the New Plan window, type a name for the plan, and select plan type Release Plan.
d. In the Owner field, select a project or team area.
e. If the plan is for a project area, select a timeline and an iteration. If the plan is for a team area, select a team area and an iteration.
f. Open the Advanced Options section.
g. Change the plan type, if needed.
h. Check the Always load all execution items check box.
i. Click Next.
j. Link the requirements collection to the release plan. Then, create work items from the requirements in the collection. The new work items are linked to the corresponding requirements:
i. Determine the number and length of iterations.
ii. Estimate the amount of work that the team can complete for the release.
iii. Record the planning decisions on the release plan Overview tab.
k. Access the plan by clicking Plan → All Plans. All the plans for the business scenario in this book are presented (see Figure 3-14).

Figure 3-14 Listing all plans created on Rational Team Concert
3.4.2 Define development lifecycle activities
Now the Release Plan has been created, and it contains all of the work items associated with the release or iteration you selected. The project leader now needs to create activities:
1. Assign the activities to a Release Plan (the Planned For field)
2. Estimate the effort for each task (the Estimating field)
3. Assign them to an Owner (Owned By field)
The created activities are shown in Figure 3-15.

Figure 3-15 Creating tasks
4. The project leader links each task to the related Requirement or Artifact Collection. If one task contains other tasks, the project leader defines the wanted link type (for example, a child or parent link). See Figure 3-16 on page 44.

Figure 3-16 Defining links between work items
After all activities are created, the project leader places the created activities directly in the Release Plan, where Owner, Change Dates, Priorities, and so on, can be defined (see Figure 3-17).

Figure 3-17 Use the Rational Team Concert Plan View to manage plan activities
3.4.3 Developers working on a Collaborative Lifecycle Management project
Developers use the approved requirements and design information to implement the solution. The developers now have an understanding of the following concerns:
• The business need and problem
• What is expected to address that need
• Potential designs or constraints that affect the implementation of the requirement
All of the planned activities have been created and assigned to developers (see Figure 3-17). The developers can now start to work on their assigned tasks. They use the Rational Team Concert dashboard to track their activities and dependencies. The Rational Team Concert dashboard displays a real-time view of team activities (see Figure 3-18).

Figure 3-18 Developers can track their activities using the Rational Team Concert dashboards
|
Tip: You can customize Rational Team Concert Dashboards to address the need of a team. There are many Dashboard Widgets available for customization (Figure 3-19).
|

Figure 3-19 Available Rational Team Concert Dashboards Widgets
Click the wanted Task to execute it (see Figure 3-20).

Figure 3-20 Developers can also use the Rational Team Concert web UI to manage activities
|
Note: If the developer uses any Eclipse integrated development environment (IDE) client for development, the client must be integrated with Rational Team Concert using the Rational Team Concert plug-in. This plug-in controls and tracks all of the activities that the developer executes, along with the assigned Rational Team Concert Workitem (task). To see how to integrate an Eclipse IDE with Rational Team Concert using this plug-in, see Appendix A, “Integrating the Eclipse environment with IBM Rational Collaborative Lifecycle Management” on page 223.
|
..................Content has been hidden....................
You can't read the all page of ebook, please click here login for view all page.