Chapter 5. Creating a Simple Gadget with RSS/Atom Feed
"The ability to simplify means to eliminate the unnecessary so that the necessary may speak"
—Hans Hoffman
IN THIS CHAPTER
- Feed Gadgets
- Basic Framework of the MyBlog Gadget
- How the MyBlog Gadget Works
- Parts of the MyBlog Gadget
Feed Gadgets
One type of information gadget is the feed gadget, a gadget that uses an online feed to display data. A feed typically uses an XML data format, which contains all the data along with the information about the data—the metadata. A typical feed icon is shown in Figure 5.1.
FIGURE 5.1. A standard feed icon. A website with this icon indicates that the contents are available in the form of RSS syndication.

A feed can be in the form of RSS 2.0 or Atom 1.0. Both these formats store metadata in the form of an XML file.
Brief Background on Feeds
Really Simple Syndication (RSS) and Atom are the syndication formats used for blog feeds. RSS was developed by Harvard University. It is a closed standard and cannot be extended, whereas Atom, which is based on RSS, is the newer, open, and extensible format. It supports all kinds of payloads, such as XML, XHTML, base64-encoded binary, and so on, along with text and HTML, as originally supported by RSS. More information on RSS can be found at the Harvard website, http://cyber.law.harvard.edu/rss/rss.html, and about the Atom syndication format at http://tools.ietf.org/html/rfc4287.
Another difference also comes in the way the formats store data. Here is a simple example of a node in an Atom and an RSS format. Note the difference in the metadata fields and content type.
ATOM 1.0 node:
<entry>
<title>WidgetBox: A Windows Vista Sidebar Gadget</title>
<link href="http://www.innovatewithgadgets.com/2007/07 "/>
<id>2786381406870346951</id>
<published>2007-07-25T17:39:00.000-07:00</published>
<updated>2007-07-26T11:35:05.078-07:00</updated>
<content type='html'> ...Actual content of of the blog... </content >
</entry>
RSS 2.0 node:
<item>
<title>WidgetBox: A Windows Vista Sidebar Gadget</title>
<link>http://www.innovatewithgadgets.com/2007/07</link>
<description> ...Actual content of of the blog... </description>
<pubDate>Tue, 04 September 2007 04:00:00 GMT</pubDate>
<guid> 2786381406870346951</guid>
</item>
As you can see from these samples, an individual entry in an Atom node starts with the field tag <entry>, whereas an RSS node starts and ends with <item>. The other noticeable difference is the content, which in RSS is stored inside a <description> tag, whereas in Atom it's inside a <content> tag. RSS allows text and HTML in the description section, whereas content in Atom can be of type XML, XHTML, image (in the form of base64-encoded data), and is specified in the attribute type as in this example, which is <content type='html'>.
In development, during the parsing of an XML file, you just have to switch the tags for each type of the syndication format. If you are reading a date, you have to look for <pubDate> in RSS format and <published> in Atom format.
About the MyBlog Gadget
The MyBlog Gadget is an information gadget that displays data from an online blog feed. It supports both RSS 2.0 and Atom 1.0 feeds. This example needs the title of the blog, which is to be displayed on the Sidebar. The gadget also fetches the blog entry, the actual content of each blog, and the date published from the web feed.
The MyBlog Gadget is designed to display the last five blog titles in the Gadget window, and when the user clicks on the title, the description of the blog is shown in the flyout window (see Figure 5.2). For this example, when the gadget is loaded for the first time, it reads the blog available at www.innovatewithgadgets.com/atom.xml.
The user has the option to change the feed URL from the Settings page.
FIGURE 5.2. The MyBlog Gadget displays the last five titles from my blog from an online feed. It also displays full blog entries in the flyout window.

The goal of the first version of the MyBlog Gadget is to create a simple gadget with the following:
- The gadget displays the last five titles of the blog.
- It displays the contents of the blog, with dates, in the flyout window.
- The gadget supports both RSS 2.0 and Atom 1.0 formats.
- It enables the user to change the feed.
Basic Framework of the MyBlog Gadget
To create a Sidebar gadget you need an HTML editor and a way to group related files. Dreamweaver, Visual Studio, Visual Studio Express Edition (free download), and Microsoft Expression Studio are some of the HTML editors you can use for this purpose. Visual Studio Express editions can be downloaded at http://www.microsoft.com/express/download/.
All the examples in the book are created using Visual Studio 2005. To create a gadget, follow these steps:
1. Create a new website in Visual Studio (Shift+Alt+N), choose the location as file system and Empty Web Site among the Visual Studio Installed templates, and enter the path as %userprofile%AppDataLocalMicrosoftWindows SidebarGadgetsMyBlog.Gadget. This creates a folder for it, called MyBlog.Gadget, in %userprofile%AppDataLocalMicrosoftWindows SidebarGadgets.
Note
%userprofile% is equivalent to the user's profile folder. For example, if your username to log in to Vista is John, the %userprofile% translates to C:UsersJohn. Try typing %userprofile% in Windows Explorer.
2. Create a new folder inside the project and name it Images to store the images related to the gadget. Creating a gadget directly in the standard gadget folder makes it available for side-by-side testing while in development.
3. After you have the required files in the MyBlog.Gadget folder, the gadget can be added in the Sidebar through the Gadget Picker window.
4. To directly view the gadget files and structure of the gadget that comes along with the book, install the gadget MyBlog.Gadget and then open a web project inside Visual Studio 2005.
5. Choose the location type as file system, browse, and give the path as %userprofile%AppDataLocalMicrosoftWindows SidebarGadgetsMyBlog.Gadget.
Required Files
To create a Sidebar gadget you need at least two files: an HTML file that becomes the main window of the gadget, and an XML manifest file with the name Gadget.xml, which is the gadget configuration file. All other files are optional.
Two other HTML files are needed if we want functionality: one for the Flyout window and one for the gadget's Settings panel. You also need a script file for the core features and a stylesheet file for the gadget presentation. Granted, a script and stylesheet can also be included in the Gadget.html file, but it is normally a good practice to have them as separate files.
The list of files required for the MyBlog Gadget includes:
- Gadget.html for the gadget's main window
- Gadget.css for the gadget stylesheet
- Gadget.js, the gadget script file that provides the core functionality
- Flyout.html for the flyout window that displays the blog entry
- Settings.html for the Settings dialog page
- Gadget.xml to maintain the gadget configuration
In all, the MyBlog Gadget requires six files to be placed in the MyBlog.Gadget folder and a few images for the icon, background, and logo inside the Images folder.
Directory Structure
The directory structure of a gadget consists of a folder named MyBlog.Gadget, which contains three HTML files: Gadget.HTML, Flyout.HTML, and Settings.HTML. There is also one stylesheet file, Gadget.css, one JavaScript file, Gadget.js, and a manifest file, Gadget.xml, with a subfolder, Images (see Figure 5.3).
FIGURE 5.3. The directory and file structure of a simple gadget contain some HTML files, a JavaScript file, a stylesheet file, and an XML file.

Adding a folder inside MyBlog.Gadget with the name of the locale—for example, en-US for English, fr-FR for French (France), and so on—and adding the entire file list inside the folder makes the gadget available for that locale (see Figure 5.4).
FIGURE 5.4. The directory and file structure of a simple gadget with locale information.

Having a locale-specific folder helps when you need to create multiple versions of the gadget for multiple locales. For example, consider a gadget that displays text in French in France but in English in the United States. The gadget can have two folders, for example: one en-US, that contains English versions of the files, and the other fr-FR with French versions of the same folders inside. The Vista Sidebar automatically checks for the locale folder and displays the appropriate language accordingly. More details can be found in Chapter 7, "The MyBlog Gadget Revisited."
CAUTION
The gadget shown in Figure 5.4 works only in the English-locale computers, but the gadget with structure as shown in Figure 5.3 works in all locales.
The Images folder contains image files related to the gadget. The paths for these files need to be referenced in the gadget manifest file as well as in the gadget's main window's HTML file.
Here is the list of image files used in the MyBlog Gadget:
- about.png is used on the settings page to display the About This Gadget image.
- background.png is the gadget's wallpaper.
- drag.png is displayed when the gadget is dragged in the Gadget Picker.
- icon.png is used to distinguish different gadgets in the Gadget Picker.
- logo.png is used for branding and is displayed when the user clicks on more details in the Gadget Picker window.
You can see what each of these files looks like in Figure 5.5.
In Table 5.1 you can see a summary of each file necessary to create the MyBlog gadget.
TABLE 5.1. A Gadget Uses at Least the Following Set of Files
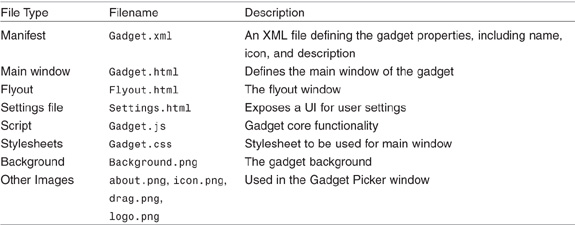
FIGURE 5.5. A set of images is used for a sidebar gadget.

How the MyBlog Gadget Works
So far we discussed the files needed to make a gadget and the gadget's directory structure. This section goes deeper into the gadget's workings and tries to lay out the steps involved, from the first time the gadget is loaded to the point when it displays the data and what happens when user changes the settings.
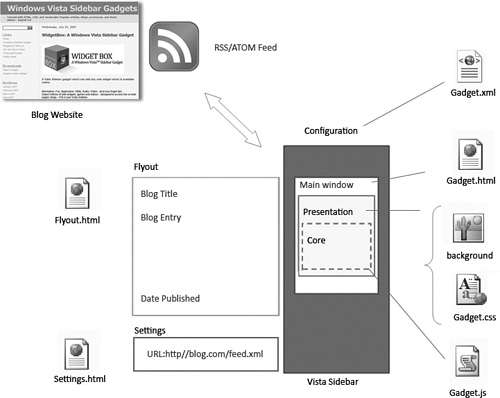
Figure 5.6 shows a detail layout of an information gadget. The figure shows a gadget inside a Vista Sidebar, which reads a feed from an online blog website. In this case, the blog is http://innovatewithgadgets.com/atom.xml. All the different files are also shown to give you an idea of their role in the Vista Sidebar. As you can see, Gadget.html becomes the gadget's main window of the gadget and Gadget.xml is used to configure the gadget and is explicitly used by the Vista Sidebar to distinguish between different gadgets.
FIGURE 5.6. The figure shows a complete layout and the architecture of the MyBlog Gadget.
The following list describes the steps taken by Windows Vista Sidebar when the gadget is loaded:
1. Windows Vista Sidebar reads the Gadget.xml manifest file to find the HTML file used for the main window (Gadget.html in this example).
2. Gadget.html is loaded inside the gadget window; it has the reference to the Gadget.css stylesheet as well as the Gadget.js script file.
3. The gadget's main window retrieves and displays style information from Gadget.css.
4. The core gadget code is defined inside the Gadget.js JavaScript file, which has code to fetch the online feed, using the default feed.
5. The Settings page (Settings.html) is used to change the default feed.
6. After the data is fetched, the feed's title is written in the gadget's main window and other required information, such as details, date published, and so on, is stored in memory to be displayed in the Flyout window.
The Manifest File
The gadget's root file is the Gadget.xml manifest file. It contains gadget-level configuration information that the Windows Vista Sidebar requires to identify each gadget, including its name, author, and so on. It also contains the name of the HTML file that defines the gadget's layout. Here is the content of the manifest file for the MyBlog Gadget:
<?xml version="1.0" encoding="utf-8" ?>
<gadget>
<name>Blog Gadget</name>
<namespace>Innovate.Gadgets</namespace>
<version>1.0</version>
<author name="Rajesh Lal">
<logo src="images/logo.png" />
<info url="www.innovatewithgadgets.com" />
</author>
<copyright>Copyright© 2008</copyright>
<description>Display XML Feeds from blogs</description>
<icons>
<icon width="70" height="80" src="images/icon.png" />
</icons>
<hosts>
<host name="sidebar">
<base type="HTML" apiVersion="1.0.0" src="gadget.html" />
<permissions>Full</permissions>
<platform minPlatformVersion="1.0" />
<defaultImage src="images/drag.png"/>
</host>
</hosts>
</gadget>
Figure 5.7 shows the gadget in the Gadget Picker window. Gadget.xml directly translates to the values displayed in the Gadget Picker. The name of the gadget and the icon are shown among other gadgets. The logo, description, author, copyright, and info URL are shown in the detail section when the user clicks on the gadget and selects View Details in the bottom left corner.
Table 5.2 lists the keywords found in the gadget.xml file, along with their value and description.
TABLE 5.2. A List of the Most Commonly Used Fields and Their Values

FIGURE 5.7. The Gadget Picker window, showing the MyBlog Gadget. Notice how the corresponding values of gadget.xml display in the Gadget Picker window.

These values are used in the Gadget Picker window.
NOTE
The Gadget Picker is the window used to install and uninstall a gadget. It's the window that appears when you click Add Gadgets in the Vista Sidebar.
Apart from the configuration, the user also needs to know where the Settings page is and how to customize the gadget's values; in this case, the feed the gadget is intended to track. This topic is covered in the next section.
Gadget Settings
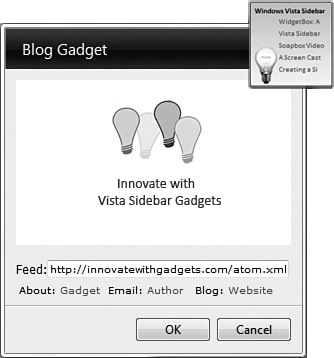
The Settings page is an HTML file which can be used to change the values for the current session. The MyBlog Gadget uses the Settings page to enable the user to change the feed URL, as shown in Figure 5.8. All changes made by the user are stored in memory and are managed by the Vista Sidebar.
FIGURE 5.8. The Settings page is an HTML file that enables the user to change the default feed.
The default feed URL, until changed by the user, is an Atom format feed with the URL www.innovatewithgadgets.com/atom.xml. This default feed is set in the gadget load function in the Gadget.js file. This can also be thought of as initialization with a default value, which occurs when the gadget is loaded for the first time. The Settings page enables the user to change the default value for the feed URL. This change is effective when the Settings page is closed, with the gadget taking the new value from memory.
The following JavaScript code initializes the value of the feed URL in the gadget's main window. It checks whether the user has set the feed URL and, if not, sets the URL to the default value. After the user sets the feed URL, the gadget fetches the data from the new URL.
if (System.Gadget.Settings.read("FeedURL")=="")
{
DefaultFeed = "http://innovatewithgadgets.com/atom.xml";
System.Gadget.Settings.write ("FeedURL", DefaultFeed);
}
FeedURL is the variable that stores the URL of the feed in the memory and fetches the data based on the source specified in the value.
The Settings page uses two JavaScript functions to load and save the URL feed information. LoadSettings, as shown here, loads the initial value of the feed URL:
function loadSettings()
{
if (System.Gadget.Settings.read("FeedURL") == "")
{
document.getElementById('TextBoxFeedURL').value =
"http://innovatewithgadgets.com/atom.xml";
}
else
{
document.getElementById('TextBoxFeedURL').value =
System.Gadget.Settings.read("FeedURL");
}
}
Next, the function SaveSettings saves the value that the user enters:
function saveSettings()
{
System.Gadget.Settings.write("feedChanged",true);
System.Gadget.Settings.write("FeedURL", document.getElementById('TextBoxFeedURL').value );
}
TextBoxFeedURL is the text box that takes the feed's value in the settings page as shown previously, in Figure 5.8.
The variable feedchanged is also set along with the FeedURL to let the gadget know that the feed has been changed and the data needs to be refreshed from the new online source. document.getElementById is the method used to get the value of the text box.
Both of these functions need to reside in the Settings page as JavaScript code. If you open the Settings.html file in Visual Studio designer, you can see both these functions.
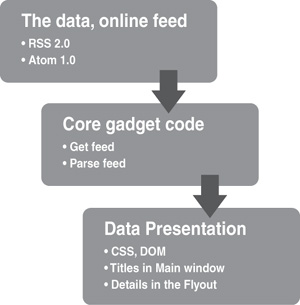
Parts of the MyBlog Gadget
The gadget can be further divided into three parts: the data that is fetched from the online feed in the form of an XML file in RSS/Atom format, the core function(s) that fetches the data, and finally the presentation of the data (see Figure 5.9).
FIGURE 5.9. The gadget comprises data, core functionality, and the presentation.
The following sections address these three parts in more detail.
The Data
- The title of the online feed, such as "Blog on Windows Vista Sidebar" or "XYZ's Blog"
- The author of the blog
- The titles of last five blog entries posted
- The description of the last five blog entries (to be displayed in the flyout window)
- The date published for each of the blog entries (to be displayed in the flyout window)
The first thing required is to find out whether the online feed is in RSS or Atom format.
Here's a typical Atom feed:
<? xml version="1.0" encoding="UTF-8" ?>
<feed xmlns="http://www.w3.org/2005/Atom" xml:lang="en">
<entry>
<title></title>
<content></content>
<published></published>
</entry>
<entry>... </entry>
</feed>
This is what a typical RSS feed looks like:
<? xml version="1.0" encoding="UTF-8" ?>
<rss version="2.0">
<channel>
<item>
<title></title>
<description></description>
<pubDate></pubDate>
</item>
<item>...</item>
...
</channel>
</rss>
The root node of an Atom feed is identified by the <feed> tag and each item in the feed is a child node of the <entry> tag, whereas the root tag in RSS is <rss> and each child node is inside a <channel> tag and identified by the <item> tag.
The data needed for this gadget are in the <title>, <content>, and <published> tags in an Atom file. In the case of an RSS feed, this same data is inside the <title>, <description>, and <pubDate> tags.
Core Functionality of the Gadget
The core code of the MyBlog Gadget is actually a set of JavaScript functions inside the Gadget.js file. This includes functions that set up the gadget for the first time, communicate with the online feed, and download and parse the data. This file also includes code for storing the downloaded data in memory and displaying it in the main window and the flyout window. Finally, the code for managing the user settings and displaying the flyout windows is also found in the Gadget.js file.
The core JavaScript file Gadget.js is included in three files: the main gadget file Gadget.html, the settings file Settings.html, as well as the flyout window Flyout.html with the help of the <script> tag as shown in the following line. The functionality of the Settings page was already discussed in the last section. This section deals with the core functionality surrounding the main window Gadget.html and the data displayed in the flyout window.
<script src="Gadget.js" type="text/javascript"></script>
Gadget.html uses the core functions for the following:
- Set up the gadget for the first time
- Set up the path of the flyout and settings HTML
- Set the default feed URL
- Get the feed using Ajax
- Parse the feed
- Save the data in memory to display in the flyout window
The Settings.html file embeds JavaScript to load settings and save settings. And finally, the Flyout.html file embeds JavaScript to create the content dynamically based on the title, which is clicked and the data corresponding to the title is stored in the memory.
Main Gadget Window
The first step is to set up the gadget for the first time. Gadget.html calls a body on load function Setup(), which is defined inside the Gadget.js.
The Setup function takes care of
- The sizing and position of elements of the main gadget
- Setting the flyout windows and the Settings window
- Calling the getFeed function with the default settings
When this is done, it's time, with the help of the Gadget API, to set up the path of the Settings window and the flyout:
System.Gadget.Flyout.file = "Flyout.html";
System.Gadget.settingsUI = "Settings.html";
Now you need to get the feed using Ajax. The GetFeed() function makes the remote call and downloads the online feed. This process uses an XMLHTTPRequest object to make an asynchronous call to open the feed URL and call a function when done. The callback function, parseFeed(), is responsible for parsing the XML file received.
NOTE
JavaScript Object Notation (JSON) is a lightweight data-interchange format and is comparable to XML. More information on JSON can be found at http://www.json.org.
XMLHTTPRequest is an object JavaScript uses to fetch data through the Internet. The data can be in the form XML, HTML, Text, or JSON. This is the core component of AJAX (Asynchronous JavaScript and XML), which is what makes an information gadget work. For any gadget that needs to fetch data from the Web, you need to use the XMLHTTPRequest object.
To create an XMLHTTPRequest object, enter the following:
var req = new ActiveXObject("Microsoft.XMLHTTP");
The common methods and properties of the object are listed in Table 5.3.
TABLE 5.3. Common Methods and Properties of the XMLHTTPRequest Object

The GetFeed function uses the XMLHTTPRequest object to get the data from the URL:
rssObj = new ActiveXObject("Microsoft.XMLHTTP");
rssObj.open("GET", System.Gadget.Settings.read("FeedURL"),true);
rssObj.onreadystatechange = function()
{
if (rssObj.readyState === 4)
{
if (rssObj.status === 200)
{
rssXML = rssObj.responseXML;
parseRSS();
}
else
{
error.innerText = " Service not available";
chkConn = setInterval(getFeed, 30 * 60000);
}
}
else
{
loading.title = "Connecting...";
}
}
rssObj.send(null);
NOTE
readyState = 4 denotes that the XMLHttpRequest object has completed the data-fetching process and 200 is the numeric code returned by the server. A status of 200 means the data has been successfully received.
In this code we try to load the feed URL and, on state change, call the function, which checks for the current state and either calls parseRSS(), if the status returned is 200, or sets the Service Not Available screen.
The act of parsing the XML actually scans the data received and filters the information the application requires. After the XML feed is loaded in the rssXML object, check whether the feedType is Atom or RSS, and based on the feedType, store the values in an array. The code checks the XML data, rssXML, for the tag name entry and based on that decides whether the feed type is RSS or Atom.
if ( rssXML.getElementsByTagName("entry").length > 0 )
{
feedType = "Atom";
}
else
{
feedType = "RSS";
}
if ( feedType == "Atom" )
{
rssItems = rssXML.getElementsByTagName("entry");
blogTitles = rssXML.getElementsByTagName("title");
blogAuthor = rssXML.getElementsByTagName("author")[0].firstChild.text;
myblogTitle = blogTitles[0].text + " - " + blogAuthor ;
}
else
{
rssItems = rssXML.getElementsByTagName("item");
blogTitleChannel = rssXML.getElementsByTagName("channel");
myblogTitle = blogTitleChannel[0].firstChild.text;
}
Because the data also needs to appear in the flyout window, the next step is to create arrays and store the values in those arrays, as in the following code:
var Descriptions = new Array();
var Titles = new Array();
var PublishedList = new Array();
var Authors = new Array();
As you have seen, the gadget's core functionality comes from the code in the script file. The gadget first sets up the gadget's flyout window and Settings page, initializes the feed URL, and then fetches the data using Ajax technology. After the data is received, the parseFeed function parses the data and stores the value in the arrays in the memory.
Presenting with CSS and DOM
The final part of the gadget deals with the presentation of the data in the gadget window, the flyout, and the Settings page. The presentation uses the fetched data to make the structure of the gadget display; that is, the HTML portion of the gadget. The CSS file associated with the gadget is used for the gadget's presentation. The raw data is styled with standard font face and size as defined in the CSS file. The CSS file also determines the gadget's dimension and the location of the HTML elements in the gadget. Finally, the Document Object Model (DOM) is used to dynamically set the value. You have already seen the use of the functions GetElementById and GetElementByTagNames. These are the standard functions used to access the elements of the document.
CSS
A cascading stylesheet is used for the presentation of the data. It helps to separate the data's structure from the window style.
You can use a single CSS file for all the HTML files (Gadget.html, Settings.html, and Flyout.html). All you need to do is link the CSS file in the corresponding HTML file.
In the MyBlog Gadget, Gadget.html is linked to the CSS file with this statement:
<link rel="stylesheet" type="text/css" href="gadget.css" />
CSS information can also be put directly in the HTML file, as is done in the Flyout.html file. The stylesheet is defined inside the <head> tag of the HTML file as follows:
<style>
body
{
font-family: Calibri;
font-size: 2px ;
width:500px;
height:620px;
margin:0px;
padding:0px;
overflow: auto;
}
</style>
Notice how the overflow property of the body ensures that a scrollbar appears in the flyout window if the HTML page content is longer than the specified height.
The content in the main window HTML files is wrapped in DIV blocks, which are used in the CSS file for applying the appropriate style. DIV blocks also allow the JavaScript to access the elements inside the DOM.
<div id="blogtitle">Windows Vista Sidebar </div>
<div id="content">
<div id="loading" title ="Connecting...wait"></div>
<div id="error"></div>
<a href="http://www.innovatewithgadgets.com" title ="blog website" >
<div id="mylogo" title ="Go to Gadgets Blog Website">
The blogtitle block has the following entry in the CSS file; this ensures that the blog title appears at the upper-left corner (10px, 10px) and is displayed in the color navy:
#blogtitle
{
position:absolute;
left:10px;
top: 10px;
color: Navy;
font-weight:bold ;
}
DOM
Document Object Model is a standard representation of an HTML file. It enables scripts to dynamically access and update the content, structure, and style of documents.
For example, to set the text inside the blogtitle block, you need to call
document.getElementById("blogtitle").title ="Vista Gadget";
The getElementById function is a standard function in DOM to access the elements the HTML document.
Here are some more examples of DOM accessing the DIV blocks mentioned earlier. The following DOM methods are called inside the gadget's resize function:
document.getElementById("contenttable").height = "90%";
document.getElementById("content").style.top ="24px";
document.getElementById("content").style.width = "80px";
document.getElementById("content").style.left = "38px";
document.getElementById("content").style.fontsize ="11px";
document.getElementById("mylogo").style.left ="2px";
document.getElementById("mylogo").style.top ="70px";
document.getElementById("mylogo").style.height="70px";
Titles in Main Window
When the data is fetched, the parseRSS function first updates the title in the gadget's main window. The DIV blocks in the Gadget.html page need to be updated with the last five titles in the blog. The following code shows the first DIV element that will be updated with the blog title. The id is cell0. The five elements are cell0, cell1, cell2, cell3, and cell4, which are updated with the blog entry titles.
<table id="contenttable" width="100%" height="100%" border="0"
![]() cellpadding="0" cellspacing="0">
cellpadding="0" cellspacing="0">
<tr>
<td class="title" valign="middle"
onmouseover="this.style.background='url(images/shadow.png)'"
onmouseout="this.style.background='none'">
<div title="Hello" id="cell0"></div>
</td>
</tr>
</table>
The following code adds the title of the blog entry to each of the five DIV elements, using a loop:
for (i=0; i<5; i++) {
if (feedType == "Atom" )
{
if (rssItems[i].getElementsByTagName("title")) { rssTitle =
![]() rssItems[i].getElementsByTagName("title")[0].text; }
rssItems[i].getElementsByTagName("title")[0].text; }
if (rssItems[i].getElementsByTagName("content")) { rssSummary =
![]() rssItems[i].getElementsByTagName("content")[0].text; }
rssItems[i].getElementsByTagName("content")[0].text; }
if (rssItems[i].getElementsByTagName("published")) {rssPubDate =
![]() rssItems[i].getElementsByTagName("published")[0].text; }
rssItems[i].getElementsByTagName("published")[0].text; }
}
else
{
if (rssItems[i].getElementsByTagName("title")) {rssTitle =
![]() rssItems[i].getElementsByTagName("title")[0].text;}
rssItems[i].getElementsByTagName("title")[0].text;}
if (rssItems[i].getElementsByTagName("description")) {rssSummary =
![]() rssItems[i].getElementsByTagName("description")[0].text; }
rssItems[i].getElementsByTagName("description")[0].text; }
if (rssItems[i].getElementsByTagName("pubDate")[0]) {rssPubDate =
![]() rssItems[i].getElementsByTagName("pubDate")[0].text; }
rssItems[i].getElementsByTagName("pubDate")[0].text; }
}
Titles[i] = rssTitle
Descriptions[i] = rssSummary;
PublishedList[i] = rssPubDate;
document.getElementById("cell" + (cell)).innerHTML =
'<div align="left" onclick="showFlyout('' + i + '')">'
+ Mid(rssTitle,0,12) + '</div>';
document.getElementById("cell" + (cell)).title = rssTitle;
}
This code shows how the DIV elements are set for the blog entry titles. Notice the showFlyout function, which is also added in the cell's innerHTML. The showFlyout(i) function is called when the title is clicked on in the gadget window. Both the ShowFlyout and HideFlyout functions use the Gadget Object Model's built-in namespace System.Gadget.Flyout to show or hide the flyout window.
function showFlyout(i)
{
if (System.Gadget.Flyout.show == false)
{
myWidthVariable =System.Gadget.Settings.read("FlyoutWidth");
myHeightVariable =System.Gadget.Settings.read("FlyoutHeight");
System.Gadget.Settings.write("currentClickedCell", i);
System.Gadget.Flyout.file = "Flyout.html";
System.Gadget.Flyout.show = true;
}
else
{
hideFlyout();
}
}
function hideFlyout()
{
System.Gadget.Flyout.show = false;
}
When the flyout window is loaded, the startUpPage function is called, which sets the width and height of the flyout window. The following code is the HTML for the flyout window:
<body onload="startUpPage()">
<table cellpadding = 10 cellspacing = 10 width=100% height = 100%><tr>
![]() <td valign=top>
<td valign=top>
<script type="text/javascript">BuildMyBlog();</script>
</td></tr>
</table>
</body>
Here is the startupPage function in the Gadget.js file:
function startUpPage()
{
document.body.style.width = System.Gadget.document.parentWindow.
![]() myWidthVariable;
myWidthVariable;
document.body.style.height = System.Gadget.document.parentWindow.
![]() myHeightVariable;
myHeightVariable;
}
The main function, which creates the content of the blog, is the BuildMyBlog function. This function takes the values from the parent window Gadget.html arrays:
function BuildMyBlog()
{
var BlogTitle= System.Gadget.document.parentWindow.Titles;
var BlogDescription = System.Gadget.document.parentWindow.Descriptions;
var BlogPublished = System.Gadget.document.parentWindow.PublishedList;
var i = System.Gadget.Settings.read("currentClickedCell");
try
{
document.write('<h3><font face ="Calibiri" color="#006699">' +
BlogTitle[i] + '</font></h3><hr noshade="true" size="1"><font face
="Calibiri" size = "2">' + BlogDescription[i] + '</font><hr
noshade="true" size="1"> <font face ="verdana" size = 1>Date
Published:"' + BlogPublished[i] + '</font>'),
}
catch(e)
{
document.write('Error occured !')
}
}
The BuildMyBlog function uses JavaScript's Document.Write to create the content dynamically, based on the value of I and the corresponding value stored in the array BlogTitle, BlogDescription, and BlogPublished.
Putting It All Together
It's time to look at the complete picture. So far there are three HTML pages, all of which are linked with Gadget.js files. The main window is responsible for initialization of the gadget, fetching the data, and parsing and storing the data in the list. The Settings page loads the settings from memory as well as enables the user to change the settings, which are, again, stored in memory. And last of all, the flyout window, based on the parsed data stored in the parent gadget window array, displays the blog entries and the date published. The flyout window also sets its own dimension on startup.
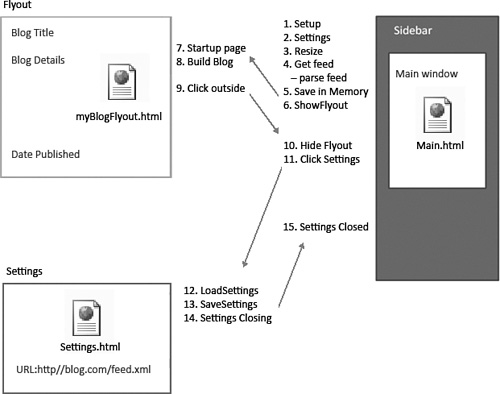
Here is a list of JavaScript functions used for the MyBlog Gadget. You can get a visual sense of how each of these functions is used from Figure 5.10.
Main window:
- Setup
- Settings
- Resize
- Get feed—parse feed
- Save in memory
- Settings closed
- LoadSettings
- SaveSettings
Flyout page:
- Startup page
- Build blog
FIGURE 5.10. The figure shows the sequence of functions called in the gadget.
After all the files have been created and the gadget tested in the local machine, you need to zip the complete folder as MyBlog.zip and change the extension from MyBlog.zip to MyBlog.Gadget.
CAUTION
Sometimes a zip folder also includes the folder structure. This is not a valid package for the gadget. To do this correctly, open the MyBlog.Gadget folder, select all the files inside the folder, choose Send To in the context menu, and select Compressed (Zipped) Folder from the submenu. The zip file will be named after one of the files in the folder. When you are finished, rename the zip file to the name you want for the gadget and then change the extension of the zip file to .gadget.
You are ready to deploy and share the gadget. You can distribute your gadget as a single file with the extension .gadget. To install the gadget the end user needs to double-click the gadget file, which automatically installs the gadget.
In Figure 5.11, you can see how the Windows compression tool is used to create the zip file.
FIGURE 5.11. Rather than choose MyBlog.Gadget to zip, select the files inside the MyBlog.Gadget folder to zip.
