
Chapter 11: Traps, Deceptions, and Honeypots
Pen testers should be concerned about the security of their own machines, especially those machines that contain sensitive information, passwords, reports, and so forth. Pen testers are prime target for adversaries, and I know pen testers that were compromised by real-world adversaries.
Additionally, if you have ever participated in a red versus red operation, you will notice that many of the discussion topics and ideas for tools in this chapter will probably sound familiar. This chapter will highlight a few custom tools and techniques that you can employ to have better insights and protection, or at least hopefully steer some discussions to implement improvements. It is expected that you have knowledge around the operating systems mentioned in this chapter and are familiar with scripting and software engineering skills. A lot of the content in his chapter is not for beginners as it might require debugging and troubleshooting.
After reading this chapter, you will have a good understanding of how auditing works on various operating systems. You will know how to audit and alert for malicious file access to build traps for adversaries in case they compromise your machines. In addition, you will know how to implement a Windows Service as well as a custom Audit Dispatcher Plugin on Linux.
The following topics will be covered in this chapter:
- Understanding and using Windows Audit System Security Access Control Lists (SACLs) with decoy files to monitor for malicious access
- Notifications for file audit events on Windows
- Building a Homefield Sentinel—a basic Windows Service for defending hosts
- Monitoring access to decoy files on Linux using auditd and custom plugins
- Alerting on macOS for suspicious file access with fs_usage and OpenBSM
Technical requirements
The examples in this chapter cover multiple operating systems, and in order to follow them all Windows, Linux, and macOS are needed. We also will use Visual Studio Community Edition to build a Windows Service. Other than that, the majority of examples will leverage built-in operating system features. There is a lot of information in the second part of the book, some debugging and troubleshooting might be required; the content is not for beginners.
The code for this chapter can be found at https://github.com/PacktPublishing/Cybersecurity-Attacks-Red-Team-Strategies/tree/master/Chapter11.
Actively defending pen testing assets
The creation of digital traps (frequently referred to as canary tokens, honeypots, or honeytokens) is a useful technique that a mature blue team deploys to trick adversaries and red teamers. The red team should leverage the same tactic to defend assets. Interesting although outdated or fake information, such as passwords, keys, documents, and pen test reports, is deployed in the environment to trick adversaries to access it. When the item or assets are accessed, security events and notifications are triggered. This is an important technique that a red team that operates for a longer time must consider, due to the amount of sensitive information and collateral the team aggregates.
In this chapter, we will explore a range of options that can be leveraged. The idea is for pen testers who might not be as well-versed in blue team and monitoring topics to dive into these aspects and gain a better understanding of how deceptions can be leveraged.
Understanding and using Windows Audit ACLs
On Windows, a good way to implement canary tokens and decoy files is via Audit ACLs. In Windows, every object can have a security descriptor, and there is even a language called the security descriptor definition language (SDDL) that articulates them.
The security descriptor basically contains a discretionary access control list (DACL) and an optional SACL. The former contains various Access Control Entries (ACEs) that contain information such as which account/group owns the resource and which account can read, write, and modify a particular resource.
The SACL (which is the lesser known aspect of the security descriptor) can be used for auditing purposes. This is an ACL that allows us to monitor an object for access. Using SACLs is perfect for sentinel objects and honeytokens. This is what we are going to do next.
Configuring a file to be audited by Windows using SACLs
As we mentioned previously, SACLs are used for auditing. Let's create a honeypot file and configure access monitoring using the following steps:
- First, create a folder at sharesecretsPROD.
- Then, store an interesting looking password.txt file there:
C:sharesecretsPROD> echo "it_admin:P@$$W0rd1!" > .passwords.txt
A curious adversary might be tempted to open the PROD password file. This is what we are looking for, in order to catch them!
- The final step is to add an SACL entry to the password.txt file. This can be done manually by right-clicking the file in Explorer, opening the Security tab, and clicking the Advanced button:

Figure 11.1: Viewing the file permission dialog
The above screenshot shows that the Permissions, which are the DACLs that have been set for the object. The area we are interested in, however, is the Auditing tab.
- Let's click the Auditing tab:

Figure 11.2: Exploring audit entries (SACL)
- Now, we can select the exact activity to audit for:

Figure 11.3: Adding SACL to a filesystem object
In the preceding user interface, select Read and Read & execute to configure auditing for the password.txt file accordingly.
- Afterward, click OK. Congratulations, you have set an audit entry!
- If you are interested, you can look at the Windows event log to observe the change in audit settings that occurred. Open Event Viewer or use the following PowerShell command:
PS C:> Get-EventLog -LogName Security -Newest 10
The command might return a lot of secrutiy events, and there are options to limit the number of results, for instance using the -Newest parameter
The following screenshot shows the output of running the preceding command:

Figure 11.4: Retrieving audit events with Get-EventLog
The preceding screenshot shows the various events in the security event log and that the very first entry is Auditing settings on object were changed. To explore the details of an event log entry, you can select certain properties of an event, for instance, the Message property:
PS C:> Get-EventLog -LogName Security -Index 14626 | Select-Object Message | Format-List
For comparison, the same event, when viewed in Event Viewer, looks as follows:
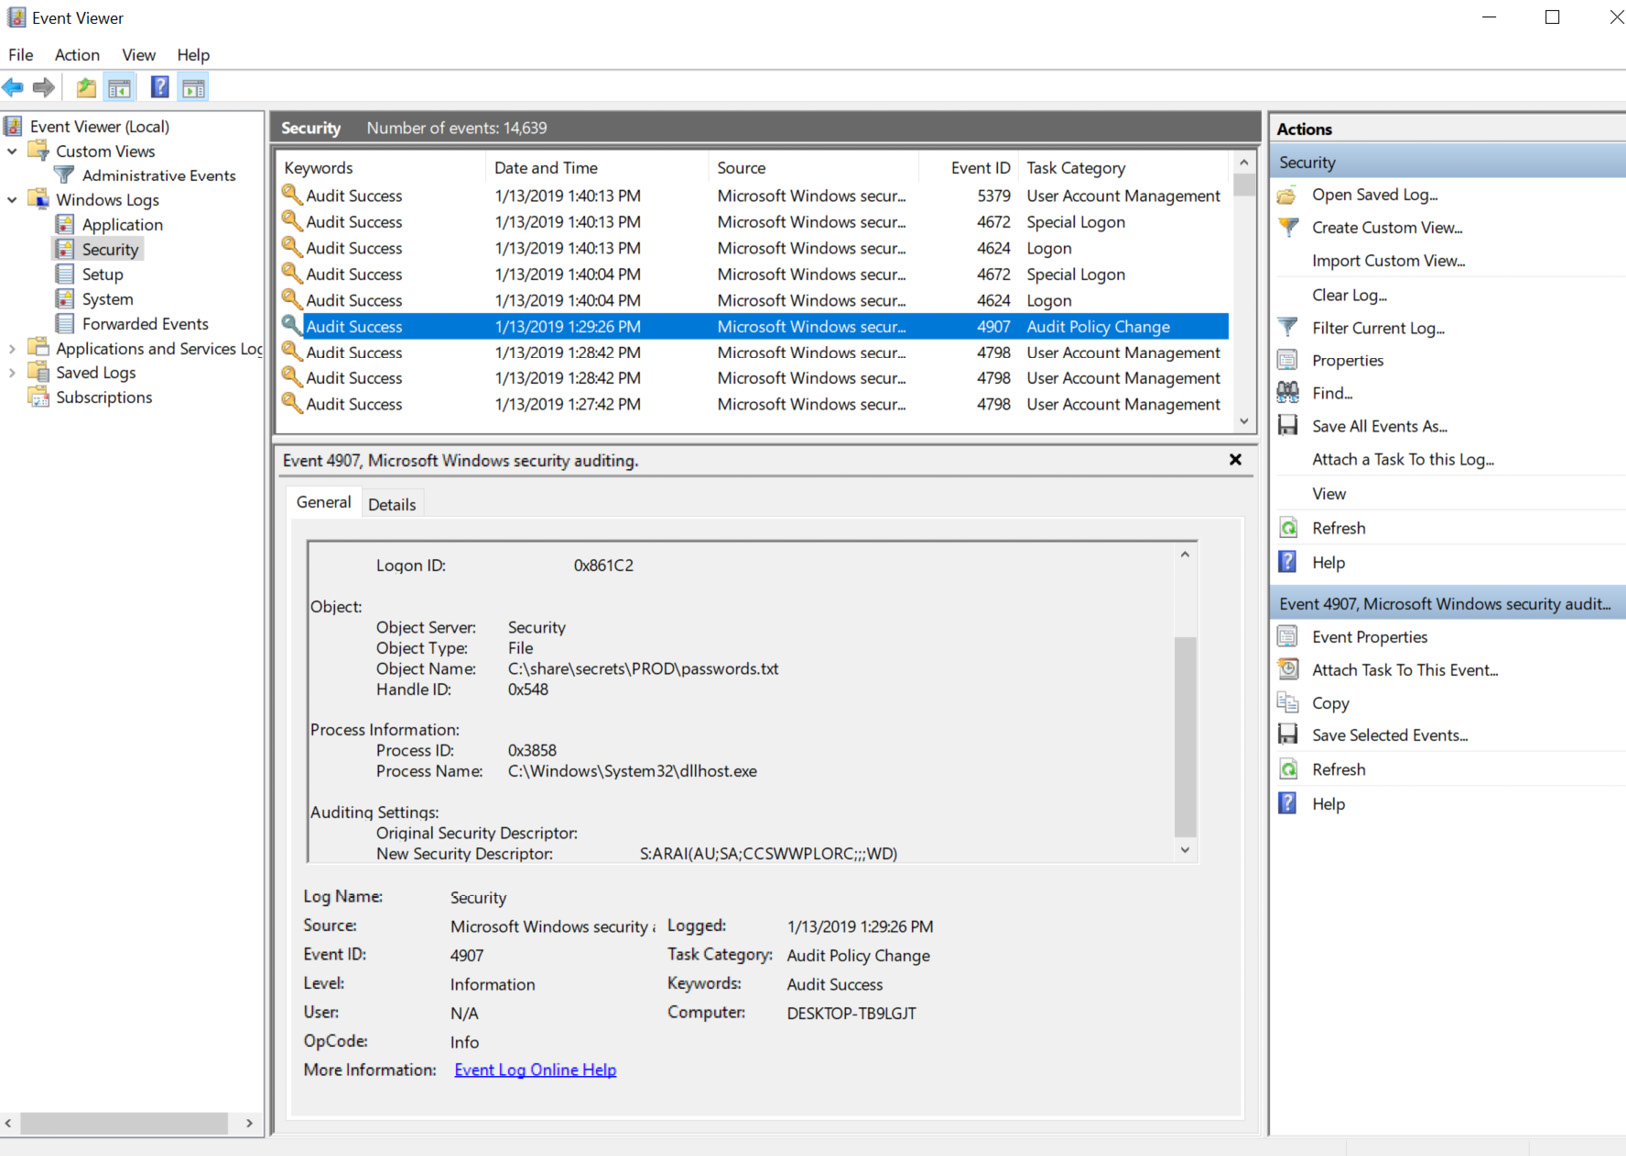
Figure 11.5: Viewing audit events in Event Viewer
The preceding screenshot also shows the SDDL that was set (notice the Auditing Settings entry and New Security Descriptor that was applied).
What we want to do next is access the file and observe the creation of audit events.
Triggering an audit event and changing the Windows Audit Policy
What we are going to do now is read the file and make sure that auditing for read access is working correctly. To do that, let's open the file in Notepad to see if it triggers an audit event:
PS C:> notepad.exe notepad sharedsecretsPRODpasswords.txt
If you refresh the event log, however, you will see that there is still no audit entry being created for access to the file. Why is that?
In order to enable file and registry auditing for the local machine system, the local security policy has to be updated. This can be done via the following steps:
- Run the secpol.msc management plugin or the auditpol tool. Just typing secpol.msc in a command window will open the MMC snap-in, as shown in the following screenshot:

Figure 11.6: Updating the Audit Policy to enable auditing object access
- As shown in the preceding screenshot, locate the Audit Policy folder under Local Policies and look at the Audit object access configuration. It is likely that it is not enabled on your machine.
- Enable both Success and Failure attempts. We can enable auditing accordingly:

Figure 11.7: Enabling auditing
- Select the appropriate checkboxes and click OK. Now, Windows will emit audit events into the security event log if there is a SACL specified on an object.
- Now, let's open the file again by running the following command:
PS C:> notepad.exe notepad sharedsecretsPRODpasswords.txt
- If we look at Event Viewer now, we will see additional audit events being emitted. We can see that the password.txt file was accessed. The events contain a lot of other interesting information, such as which process opened it, which user did, and from which host:

Figure 11.8: Viewing audit events of password.txt access in Event Viewer
To get a detailed XML representation of the information, switch to the Details view:

Figure 11.9: Reviewing details of the audit event
Interestingly, we can observe that I didn't use notepad.exe and used the UI instead, which is denoted by ProcessName pointing to explorer.exe.
So far, we've learned how to configure auditing on Windows and how to set audit entries so that Windows emits event log entries whenever someone reads an audited file. Next, we are going to look at how to create notifications when such events occur.
Notifications for file audit events on Windows
We covered this topic when we walked through monitoring for successful and failed logon events. Like the logon notification Sentinel that we built in the previous chapter, it's possible to build out a file audit Sentinel with notifications by subscribing to new Audit ACL events and notifying the user when an interesting one is generated.
The following steps show the code/commands in PowerShell to do so:
- First, we create an EventLogWatcher for the Security event log and enable it:
$watcher = New-Object System.Diagnostics.Eventing.Reader.EventLogWatcher("Security")
$watcher.Enabled = $true
- Then, we implement the method that should be called whenever a new event is created. We will call it OnEventWritten:
$OnEventWritten =
{
$e = $event.sourceEventArgs.EventRecord
if ($e.Id -eq 4656)
{
if ($e.FormatDescription() -like "*passwords.txt*")
{
Add-Type -AssemblyName System.Windows.Forms
$notification = New-Object System.Windows.Forms.NotifyIcon
$notification.Icon = [System.Drawing.SystemIcons]::Warning
$notification.Visible = $true
$notification.ShowBalloonTip(10000, "[Sentinel] – Honeypot file accessed!", "Review the Security Event Log for more details", [System.Windows.Forms.ToolTipIcon]::Warning)
}
}
}
This method receives the input events and compares whether the incoming event matches the audit event ID. If that is the case, it checks whether the description contains the word passwords.txt—remember that this is the name of the decoy file. If that is the case, we create a simple balloon popup.
Important Note
To improve the user experience around the notification, you can leverage BurntToastNotifications (https://github.com/Windos/BurntToast). This allows you to make more customizations for notifications. Feel free to review the previous chapter again for more details regarding BurntToastNotifications, as well as examples.
- Finally, we register the watcher and associate the OnEvenWritten method with it:
Register-ObjectEvent -InputObject $watcher -EventName EventRecordWritten -Action $OnEventWritten -SourceIdentifier SentinelNotify
- Now, we get notifications whenever someone triggers our file decoy trap! Try it out by opening the file in Notepad, for instance.
- To remove the event registration, use Unregister-Event:
Unregister-Event -SourceIdentifier SentinelNotify
That's it. The preceding commands showed how to set up monitoring as well as simple alerting using PowerShell.
Important Note
To run this Watcher continuously, it needs to be launched at startup and as a scheduled task. However, this is not ideal since if it crashes, it would stop working without the user knowing. There are two solutions to this problem.
The first is to run the task more frequently, such as once per minute, and add a check to see if the script is running already. If it's not, then launch it.
The arguably better second approach is to create a Windows Service. In case you have never created your own Windows Service, we will walk through creating a Homefield Sentinel Windows Service later in this chapter.
Sending notifications via email on Windows
Another helpful thing is to add notifications when someone accesses a file or triggers audit events. There are a couple of ways to go about this. One way is to use the PowerShell COM Outlook automation scenario we walked through in the previous chapter. That approach has one fundamental drawback, which is that the user has to be logged in at the time.
For a notification scenario, it's better to use the PowerShell Send-MailMessage command, as follows:
Send-MailMessage -From "Sentinel Notifictaion <[email protected]>" -To "Sentinel Notification <[email protected]" -Subject "[Sentinel Notification] Honeypot file accessed." -Body $e.FormatDescription() -Priority High -DNO onSuccess, onFailure -SmtpServer "smtp-mail.outlook.com" -UseSSL -Credential $creds
In order to have the credentials available in a service or scheduled task, we can store them in the Credential Manager (of the account that runs the script) and then retrieve them when needed.
The following example script shows how to store a password in the Windows Credential Manager (you can either store the content in a file and execute it, or run the commands individually in PowerShell):
[void][Windows.Security.Credentials.PasswordVault, Windows.Security.Credentials, ContentType=WindowsRuntime]
$vault = New-Object Windows.Security.Credentials.PasswordVault
$credential = Get-Credential
$cred = New-Object Windows.Security.Credentials.PasswordCredential(
"Sentinel", $credential.GetNetworkCredential().Username, $credential.GetNetworkCredential().Password)
$vault.Add($cred)
The following screenshot shows what adding credentials looks like when being performed in PowerShell. The Get-Credential command is used to prompt the user to enter an account name and a password:

Figure 11.10 Adding a credential to the Windows Credential Manager
The preceding screenshot shows how to add a new credential to the Windows Credential Vault. In order to retrieve the stored credential, we can use the Retrieve method:
$vault.Retrieve("Sentinel","[email protected]")
Windows uses its data protection capabilities to encrypt the password. This means the password can only be decrypted using the same account that stored the secret in the Credential Manager.
The following screenshot shows retrieving the clear text password:

Figure 11.11: Example of how to retrieve a web credential from the Credential Manager
Using these APIs, we are equipped to run the script from a scheduled task, without having to store the password for the email account in clear text in the script. Let's look at how we can leverage a Scheduled Task to invoke the PowerShell script.
Creating a Scheduled Task to launch the Sentinel monitor
Previously, we leveraged EventLogWatcher to inspect logon events. The following script puts these various concepts together, including reading and decrypting the password to send email notifications.
What we will do in this section is create a PowerShell script that implements the Watcher and notifications, and then create a scheduled task to continuously run. Let's get started:
- First, we create the Watcher for the Security event log and enable it:
$watcher = New-Object
System.Diagnostics.Eventing.Reader.EventLogWatcher("Security")
$watcher.Enabled = $true
- Next, we implement the OnEventWritten method that will be invoked whenever a new security event is recorded. Then, we set the variables for the log files, search patterns, and email configuration that we'll use in the script:
$OnEventWritten =
{
### Configuration Settings
$logfile = "$env:USERPROFILEsentinel.log"
$searchfilter = "*passwords.txt*"
$email = "[email protected]"
$smtp_server = "smtp-mail.outlook.com"
$subject = "[Sentinel Notification] Honeypot file accessed".
- Next, we will read the incoming EventRecord and compare it to the audit event ID of interest. If it matches, we check if it contains the search filter (pattern) of the decoy file that we want to be alerted about. If the search pattern matches, we write the event description to the log file. The following snippet shows these steps:
$e = $event.sourceEventArgs.EventRecord
if ($e.Id -eq 4656)
{
try
{
if ($e.FormatDescription() -like $ searchfilter)
{
### write a log entry
$e.FormatDescription() >> $logfile
- Additionally, we will send an email notification. To do so, we decrypt the password that we stored in Credential Vault earlier, and then invoke the Send-MailMessage method:
[void][Windows.Security.Credentials.PasswordVault,
Windows.Security.Credentials,
ContentType=WindowsRuntime]
$vault = New-Object Windows.Security
.Credentials.PasswordVault
$emailpwd = ($vault.Retrieve("Sentinel",$email)
.Password) | ConvertTo-SecureString
-AsPlainText -Force
$emailcreds = New-Object System.Management
.Automation.PsCredential($email,
$emailpwd)
Send-MailMessage -From $email -To $email
-Subject $subject -Body $e.FormatDescription()
-Priority High -SmtpServer $smtp_server – Port
587 -UseSSL- Credential $emailcreds
}
}
Important Note
As can be seen in the preceding code, we leverage the password that we stored in the Credential Vault earlier.
- If an exception is raised while processing the event, we write it to the log file:
catch
{
$_ >> $logfile
}
}
}
- The last step for creating the script is to register the event handler and link the OnEventWritten method accordingly, as shown in the following code:
### Register the Event Handler
Register-ObjectEvent -InputObject $watcher -EventName EventRecordWritten -Action $OnEventWritten -SourceIdentifier SentinelNotify
- Save the final script at the following location of the account that will run the script: %userprofile%sentinel.ps1
- Afterward, run the following command as an Administrator to create a scheduled task that runs PowerShell and invokes the sentinel.ps1 script when the machine starts up:
SCHTASKS /CREATE
/SC ONSTART
/TN "Sentinel Schedule"
/RL Highest
/TR "powershell -ExecutionPolicy bypass
-WindowStyle Hidden -NoExit
%userprofile%sentinel.ps1"
/RU %username%
/RP
This will schedule a startup task that invokes the PowerShell script. /RP will request the password for the account specified via /RU. This is needed so that the script runs even if the user is not logged in. This is especially important in case the workstation reboots and the user does not log in.
- To launch the scheduled task right away (and not have to wait for a system reboot), run the following command:
SCHTASKS /RUN /TN "Sentinel Schedule"
If you prefer working with the user interface of Task Scheduler, launch it by typing Task Scheduler in the Windows search bar. This will show Task Scheduler, as shown in the following screenshot:
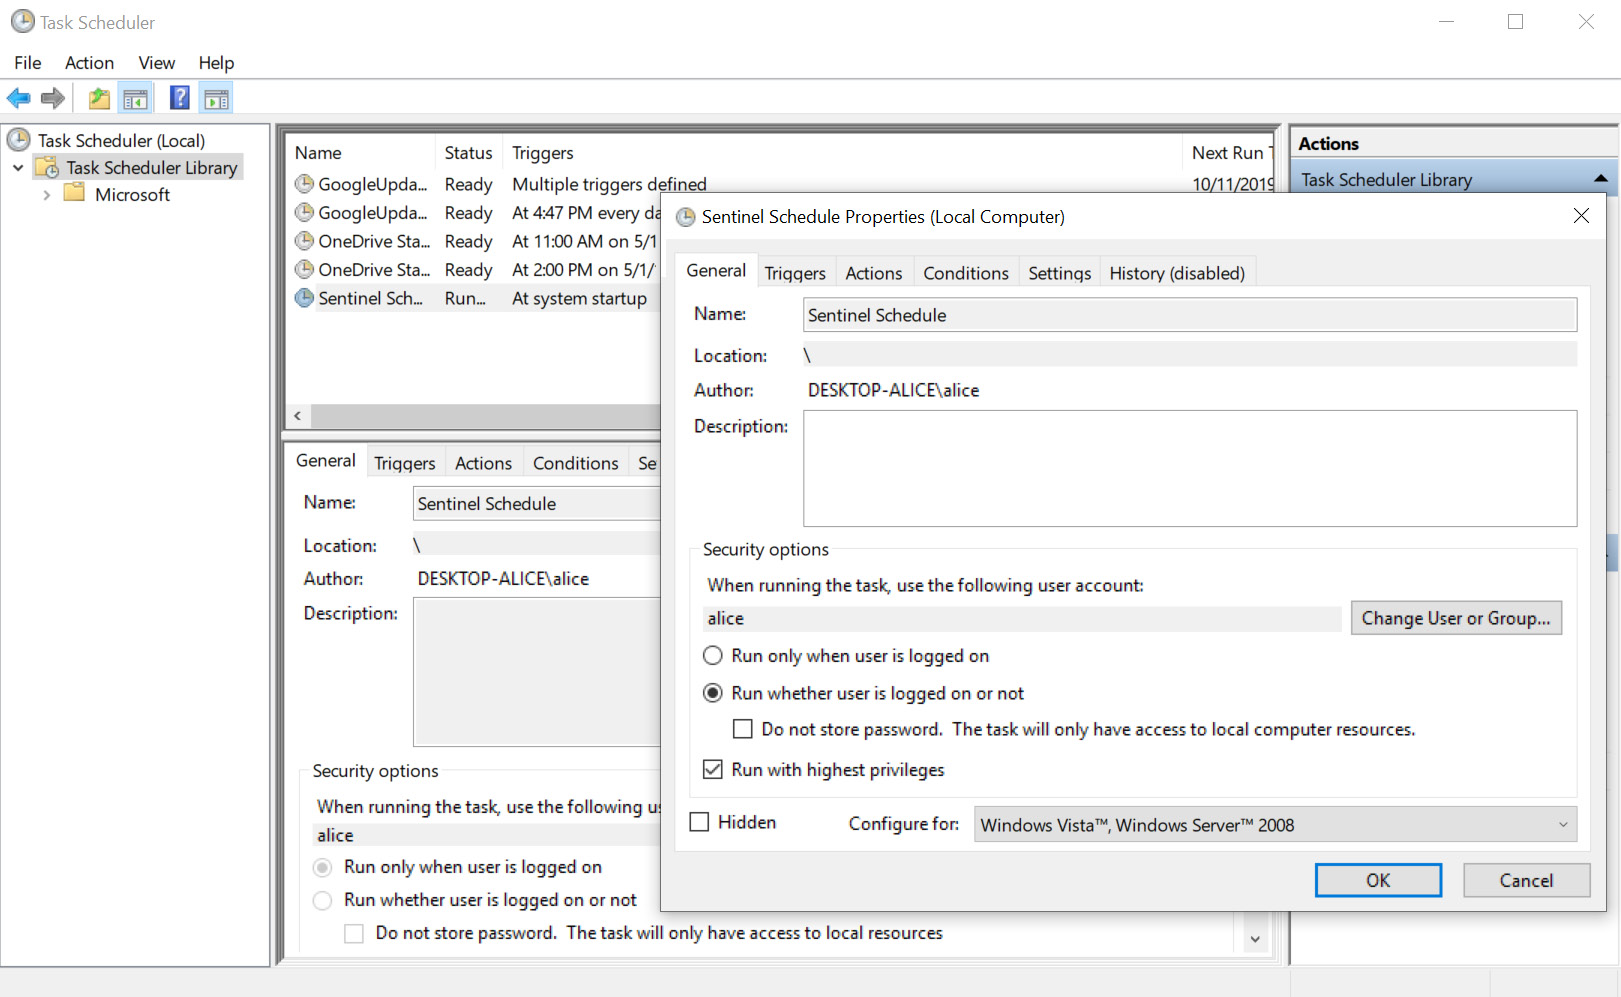
Figure 11.12: Exploring the newly created task using Task Scheduler
That's it. Now, you can manually launch the task or reboot the machine and it will start by itself. To improve reliability (without using a Windows Service), we could launch the task more frequently and check whether it is running already. If not, we launch the script.
As soon as someone reads the honeypot file in the c:sharedPRODsecretspasswords.txt file, we will receive a notification email. The following screenshot shows what such an email will look like:
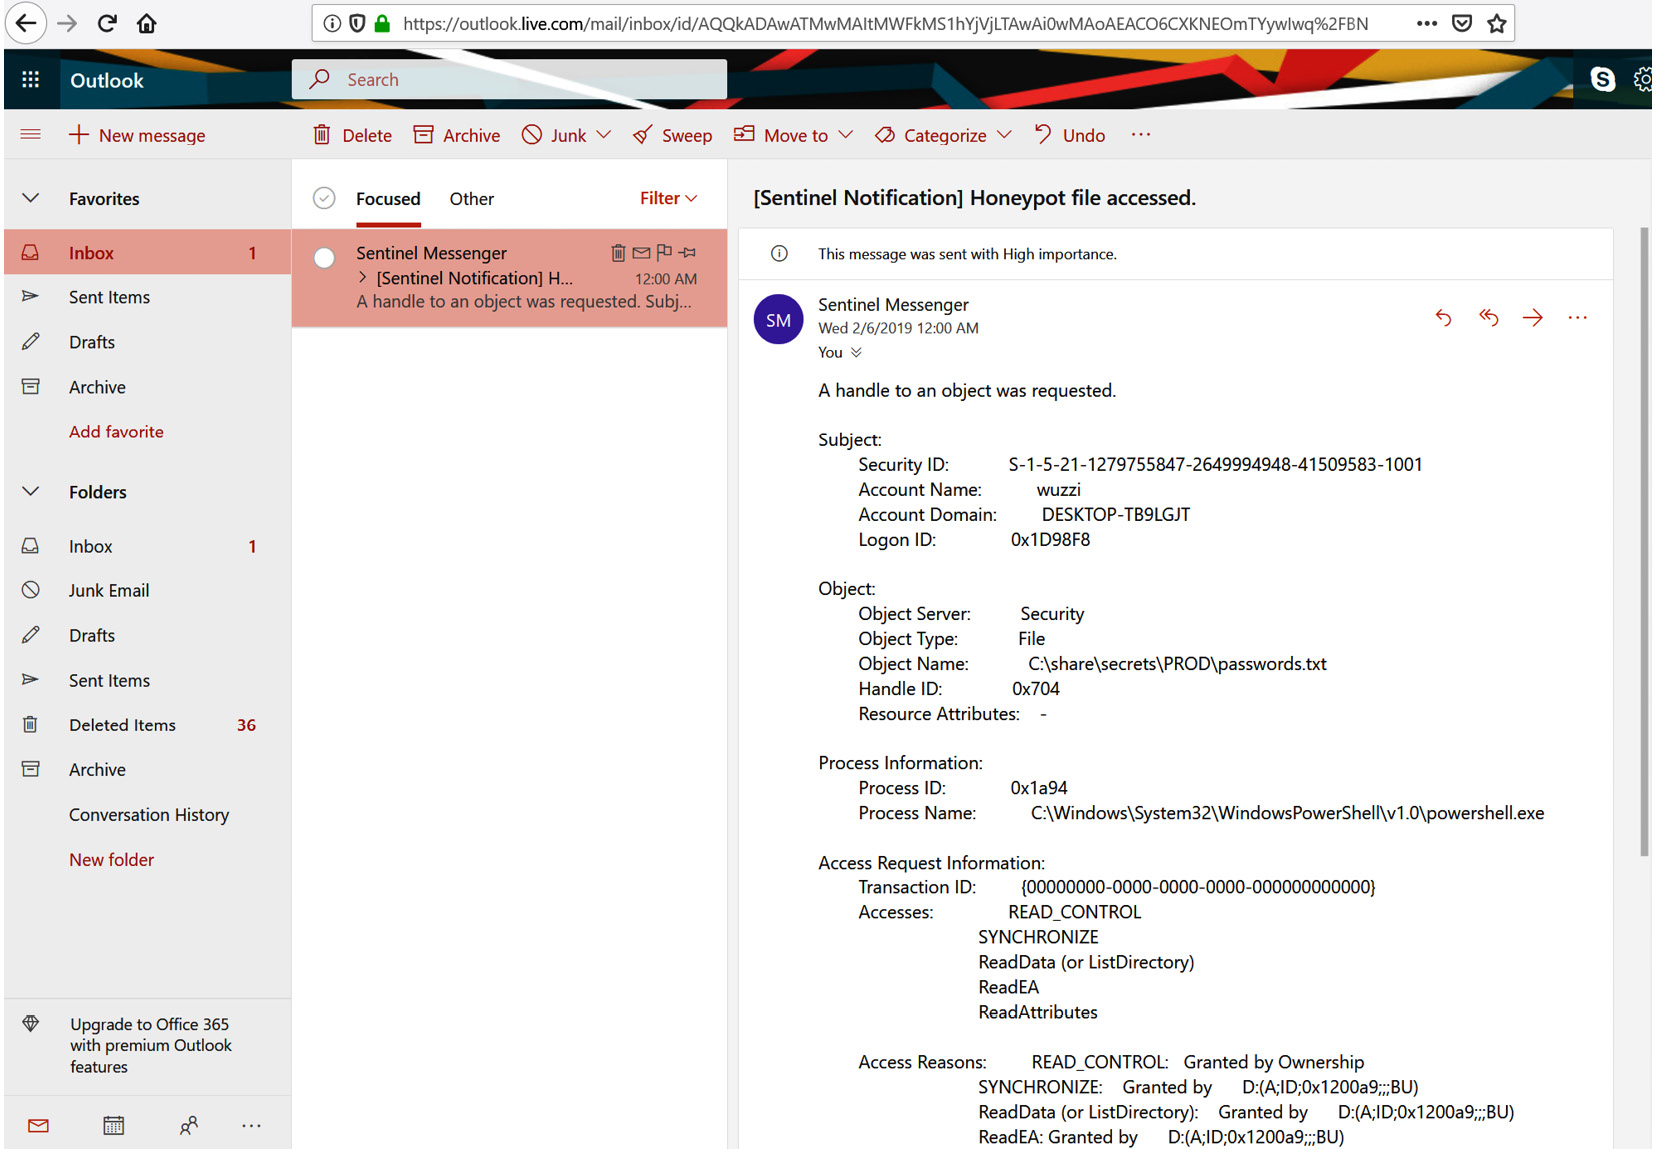
Figure 11.13: Retrieving notification mails from the Sentinel service
As shown in the preceding screenshot, we have all the details of the specific event available in an email. This can be customized to your needs, including having less or more details in the email.
Although this works, and it was a good exercise to understand SACLs, scheduled tasks, and how to leverage PowerShell in a scheduled task, this solution has some limitations. For instance, if it crashes, it will not start again automatically. Another solution is to implement an actual Windows Service. This is what we will tackle next.
Building a Homefield Sentinel – a basic Windows Service for defending hosts
There is one flaw with the Scheduled Task solution that we've discussed so far. If someone kills the task or it crashes, it won't be started again automatically. This can be worked around by launching the task more often and querying whether the process is running, and if not, launching it.
There is another approach that can be taken on Windows, which includes the creation of a proper Windows Service. Since building a Windows Service can be quite handy at times (as well as to establish persistence during red teaming), the following section provides a walk-through on how to create a honeypot service that does some basic monitoring. A more advanced version of the Homefield Sentinel can be found at https://github.com/wunderwuzzi23/Sentinel. The goal of this section is to understand how to scaffold the basic service so that you know how to build your own deceptions or detections for scenarios.
You can use the free Visual Studio Community Edition to build and improve it.
Installing Visual Studio Community Edition and scaffolding a Windows Service
To get started, download the latest version of Visual Studio Community Edition. At the time of writing, the download links are located at https://visualstudio.microsoft.com/downloads/.
When you're asked what Workloads to install, make sure to select Windows – .NET Desktop Development. That will ensure the proper libraries and tools are installed. Feel free to install more components if you would like to explore other features. Installation might take a little time.
After the installation has finished, launch Visual Studio. Go ahead and create a New Project. As the project type, we'll find the Windows Service project template. In this example, we will use C# to create the service, which basically includes all the scaffolding needed for a Windows Service.
The following screenshot shows the New Project dialog (the screen might look different depending on the version of Visual Studio being used):
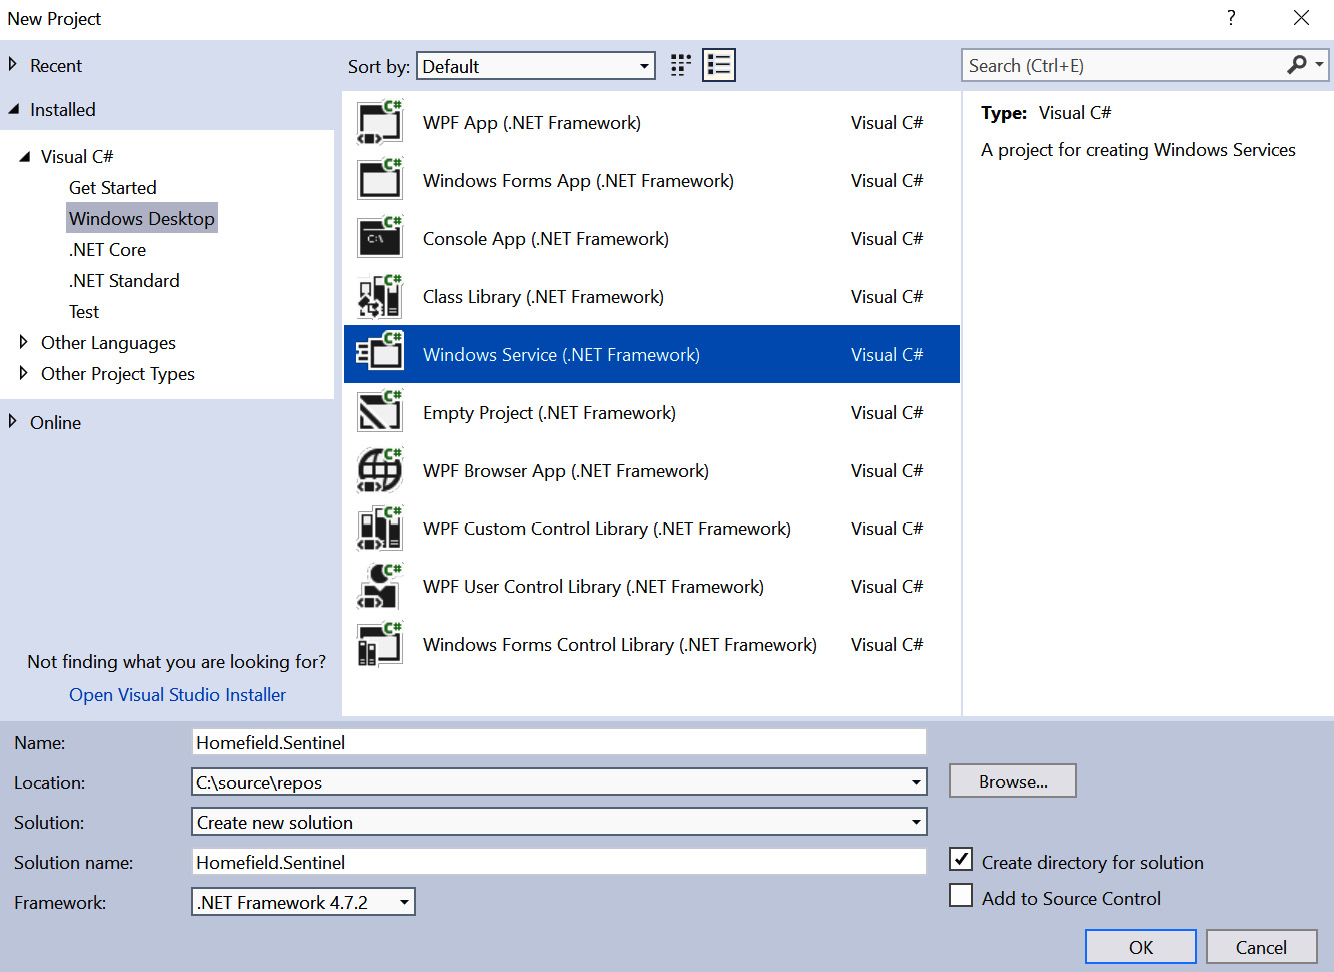
Figure 11.14: Creation of a new Windows Service using Visual Studio
After entering all the necessary information, click OK. Visual Studio will create all the code needed for a basic Windows Service.
Adding basic functionality to the scaffold
In this section, we will create the basic outline for a Windows Service that will watch for file audit events. The goal of this exercise is to learn about the basics of a Windows Service so that you can extend it with other auditing functionality as you see fit. After creating the project as we did in the previous section, we can start adding functionality to it:
- If there is only a Service1.cs file visible in your project, rename it SentinelService.cs. The following screenshot shows the class highlighted in Solution Explorer:

Figure 11.15: Scaffolding the service
Feel free to inspect the file. At this point, nothing exciting is happening, besides some initialization.
- Let's add a new class that will hold the core functionality of our Homefield Sentinel. This is done by right-clicking the project and selecting Add New Class.
- Call the new class TheSentinel.cs, as shown in the following screenshot:

Figure 11.16: Adding the Sentinel.cs file
The code of TheSentinel.cs contains three core methods:
- Starting the service
- Handling the audit events
- Stopping the service
The following steps show the implementation that looks for audit events for the password.txt file.
Let's walk through the details of defining these methods:
- Initially, we define the class and its members:
class TheSentinel
{
SmtpClient smtpClient;
EventLogWatcher logWatcher;
Logger log;
//event log query to retrieve event id 4656 (Audit ACLs)
EventLogQuery logQuery = new EventLogQuery("Security", PathType.LogName, "*[System/EventID=4656]");
- Next, we start by implementing the method for StartWatching for audit events:
public void StartWatching()
{
try
{
log = new Logger("sentinel.log");
log.WriteLine("Starting...");
this.smtpClient = new SmtpClient( "smtp-mail.outlook.com", 587);
this.logWatcher = new EventLogWatcher(logQuery);
this.logWatcher.EventRecordWritten +=
this.logWatcher_EventRecordWritten;
this.logWatcher.Enabled = true;
this.smtpClient.EnableSsl = true;
//project on github encrypts the credentials
this.smtpClient.Credentials = new NetworkCredential(
"youremail", "youremail");
log.WriteLine("Started.");
- Next, we add the catch exception handler to log any unexpected errors to the log file:
}
catch (Exception e)
{
log.WriteLine( " Error during startup: " + e.ToString());
}
}
- Afterward, we implement the logWatcher_EventRecordWritten method, which will be called whenever a new event is recorded:
private void logWatcher_EventRecordWritten(object sender,
EventRecordWrittenEventArgs e)
{
if (e.EventRecord.Id == 4656)
{
//Is this for the file of interest
if (e.EventRecord.FormatDescription().Contains("passwords.txt"))
{
try
{
log.WriteLine("Honeypot file accessed");
log.WriteLine(e.EventRecord.FormatDescription());
log.WriteLine("*********************************");
- Additionally, we add some code to send an email to the logWatcher_EventRecordWritten method:
string email =
((NetworkCredential)this.smtpClient.Credentials).UserName;
MailMessage mail = new MailMessage(email, email);
mail.Subject = "[Sentinel Notification] Honeypot file accessed.";
mail.Body = e.EventRecord.FormatDescription();
mail.Priority = MailPriority.High;
mail.IsBodyHtml = false;
smtpClient.Send(mail);
- Next, we add exception handling to add any errors to the log file for debugging, and we close the if statements, catch block, method, and class definitions by adding the necessary closing brackets:
}
catch (Exception ex)
{
log.WriteLine(
"Error OnEventWritten: " + ex.ToString());
}
}
}
}
- Finally, we add functionality to stop watching for audit events and close the class definition:
public void StopWatching()
{
this.logWatcher.Enabled = false;
log.WriteLine("Stopped.");
}
}
At a high level, the preceding steps implement the Watcher. Whenever it is triggered, the code will write the notification to the log file as well as sending an email. In order to update the email configuration, please change the code accordingly to reflect the desired account.
Important Note
This is a simple implementation of a basic Watcher service. The project that you can find on GitHub at https://github.com/wunderwuzzi23/Sentinel has a lot more configuration options.
- Let's continue the creation of the service by replacing the class definition of the TheSentinel.cs scaffold with the preceding code snippet.
- Afterward, you will notice some references and namespaces are missing. Make sure to add them accordingly. In particular, the following three using statements will be needed:
using System.Net.Mail;
using System.Diagnostics.Eventing.Reader;
using System.Net;
- Afterward, there will still be a reference to the Logger class, which we haven't implemented yet. This is okay for now.
- Now, let's integrate the Sentinel into the main service, SentinelService.cs, by instantiating it and running it when the service receives the Start command:
namespace Homefield.Sentinel
{
public partial class SentinelService : ServiceBase
{
TheSentinel sentinel; public SentinelService()
{
InitializeComponent();
/// create the sentinel
sentinel = new TheSentinel();
}
- Next, we implement the code for when the service is started and stopped. In particular, these methods call the StartWatching and StopWatching functionality of the TheSentinel that we implemented:
protected override void OnStart(string[] args)
{
sentinel.StartWatching();
}
protected override void OnStop()
{
sentinel.StopWatching();
}
}
}
- Also, add the following using statement in addition to the one that is already present:
using Homefield.Sentinel;
So far, we have created the code for the core service as well as the specific Sentinel class. What we will do next is add logging functionality.
Adding logging functionality to the service
Since a Windows Service does not typically interact with the user interface, it's a good practice to write all errors and interesting messages to a log file. In order to do this, we will implement a Logger class. Let's get started:
- Create the Logger class and name it Logger.cs:
namespace Homefield.Sentinel
{
class Logger
{
StreamWriter writer;
public Logger(string filename)
{
writer = File.CreateText(filename);
}
public void WriteLine(string text)
{
string now = DateTime.Now.ToString("yyyy.MM.dd HH:mm:ss");
lock (writer)
{
writer.WriteLine(now + ": " + text);
writer.Flush();
}
}
}
}
- For the Logger, we add the following using statement at the beginning as well:
using System.IO;
This class will allow the Sentinel to write information to a log file. At this point, we are basically done with creating the scaffold of the Homefield Sentinel. What we are still missing is allowing configurations to be driven by a config file and creating an installer to register the service with Windows Service Control Manager. These two things are what we are going to do next.
Leveraging a configuration file to adjust settings
For simplicity, the code provided in this book does not encrypt the password and the parameters are not configurable. However, a prototype of the project can be found on GitHub, which contains code you can use to encrypt the password at rest in a configuration file so that it is not in source code in clear text. The project is located at https://github.com/wunderwuzzi23/Sentinel.
Feel free to explore and extend the Homefield Sentinel as you see fit.
Adding an installer to the service
The final step we are missing is creating a proper installer for the service. We need to do this in order to register the service with Windows. This is straightforward when using Visual Studio:
- Add an installer by right-clicking the SentinelService.cs class in design mode and selecting Add Installer. The following screenshot shows where to right-click to find the Add Installer functionality:
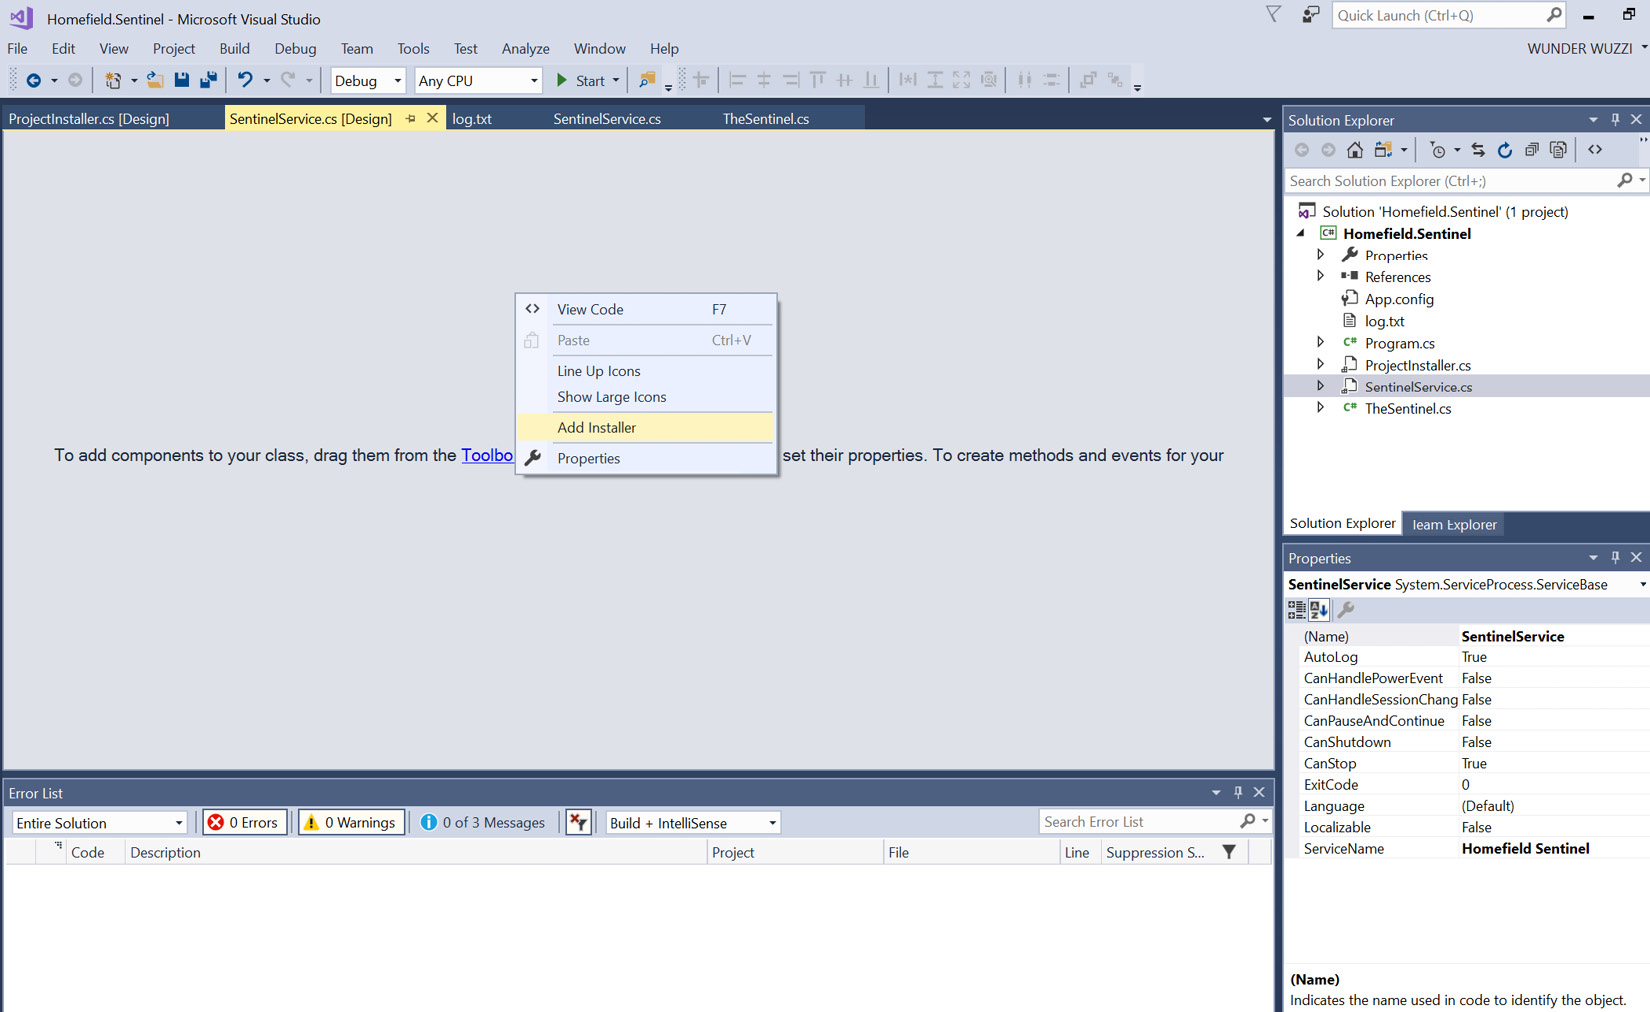
Figure 11.17: Adding an installer via the design view
- Clicking Add Installer will add a ProjectInstaller.cs class to the Service.
- After the installer has been added, explore the detailed properties of the serviceInstaller1 class. There is a set of properties that control how the service will be called and how it will be shown in Windows Service Control Manager after it's been installed. The following screenshot shows these properties:

Figure 11.18: Configuring the properties of the service installer
- To allow the service to read the security event log, update the configuration to run the service as LocalSystem. This can be specified in the serviceProcessInstaller1 properties:
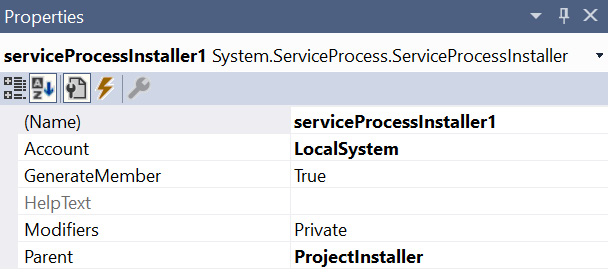
Figure 11.19: Updating the account under which the service will run
The preceding screenshot shows the changes to serviceProcessInstaller1. Those of you who are security minded will notice that running the entire service with such high privileges is not desirable. However, for this basic service, we'll keep the solution straightforward.
- As the final step, we will now go ahead and install the service and get it registered with Service Control Manager. Open a Visual Studio Command Prompt as an Administrator. To do that, type developer command into the Windows search bar. A list of programs will show up. Right-click Developer Command Prompt and select Run as administrator, as shown in the following screenshot:
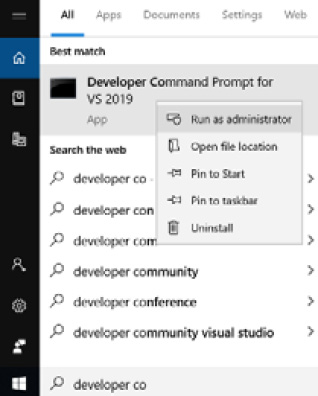
Figure 11.20: Opening Developer Command Prompt as an Administrator
Make sure to right-click and specify Run as administrator. This will open an administrative shell that has the right path variables set to find the .NET-specific developer tools that we will use. The following screenshot shows the Developer Command Prompt being run as an Administrator:

Figure 11.21 Administrative Command Prompt
- Navigate to the output folder of your project to locate the Homefield.Sentinel.exe binary, and then run installutil Homefield.Sentinel.exe. The following screenshot is the output of the installation of the service:

Figure 11.22: Using InstallUtil to install the Windows Service
- Now, open Service Control Manager by running services.msc in Command Prompt. After the user interface appears, look through the list of services and locate the Homefield Sentinel service from the list of Windows Services, as shown in the following screenshot:
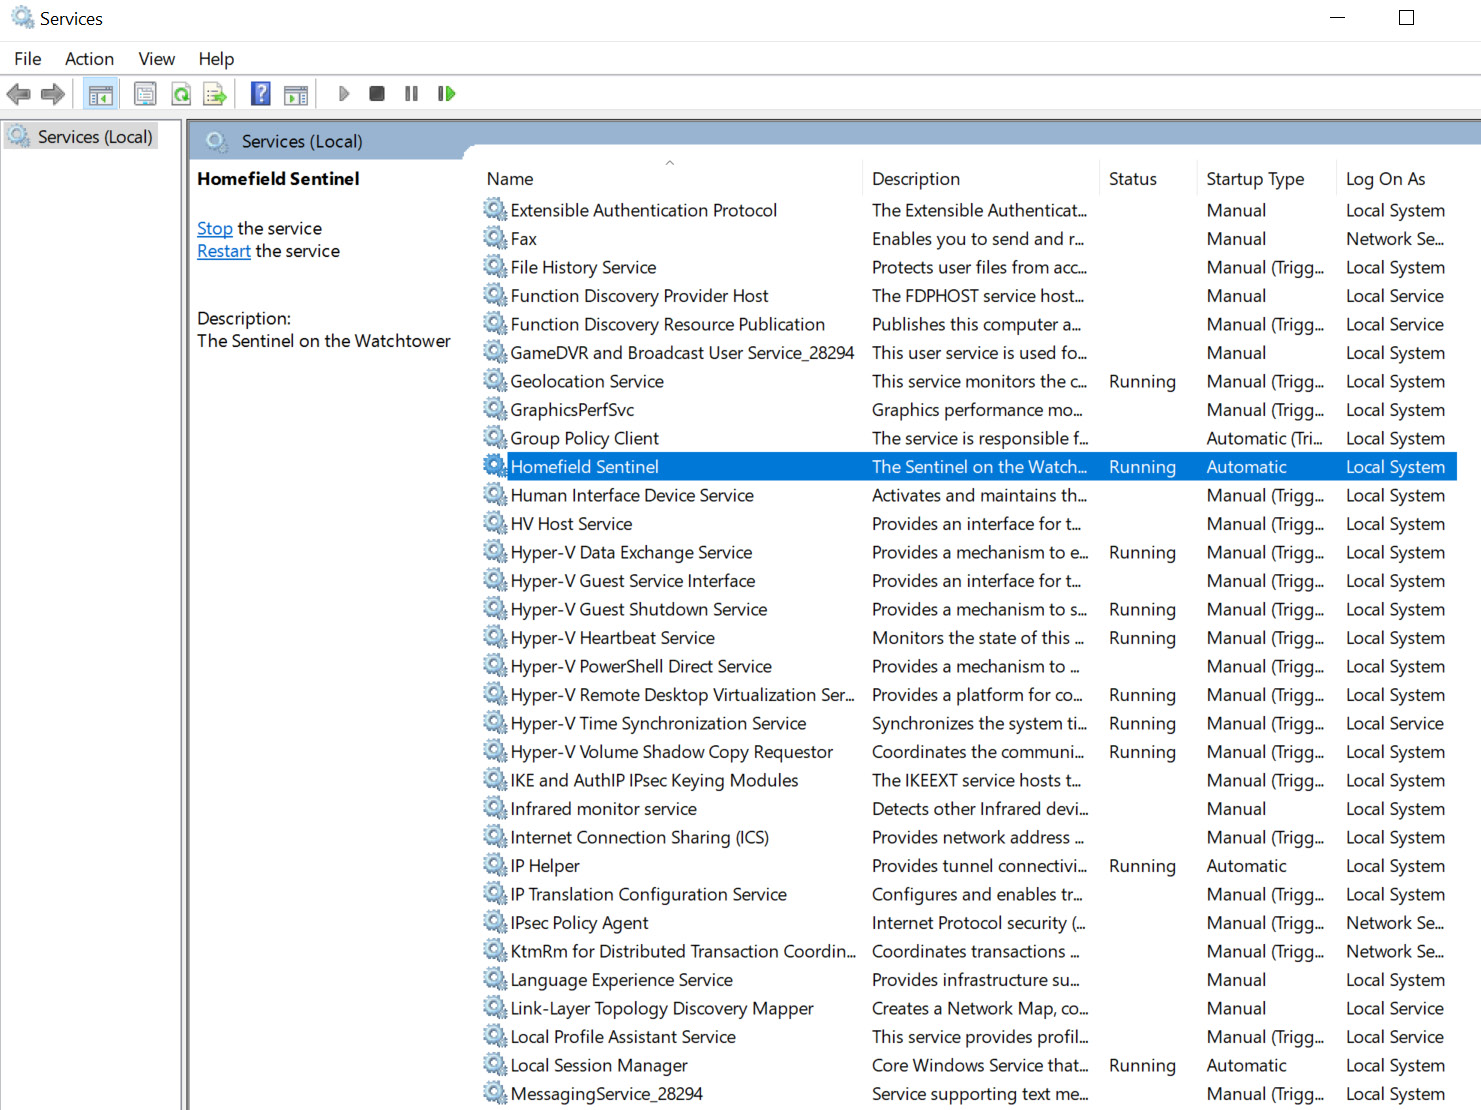
Figure 11.23: Opening Service Control Manager to find the Homefield Sentinel
- An alternative method is to use sc.exe to query for the service. This can be done in the following way:
sc.exe queryex "Homefield Sentinel"
The following screenshot shows running the command and its output:
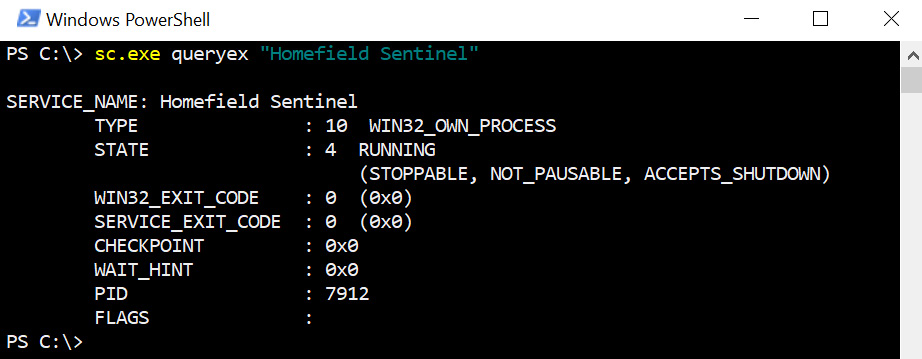
Figure 11.24: Running sc and querying for the Homefield Sentinel service
As we can see, the service was stopped.
Uninstalling the Homefield Sentinel service
Similar to installing the service, we can use the installutil.exe tool and specify /u to uninstall the Homefield Sentinel service:
installutil.exe /u Homfield.Sentinel.exe
After running this command (as an Administrator), the service will be removed from the system again.
In this section, we made a quick detour to learn more about Windows Services and how to leverage them to implement a basic monitoring service for a machine. We provided a walk-through of Visual Studio regarding how to scaffold, implement, extend, install, and uninstall a Windows Service.
The Homefield Sentinel service is available on GitHub. The version that's been published there includes more features, such as email notifications and installation configuration, so make sure to check it out if you are interested in exploring this more: https://github.com/wunderwuzzi23/Sentinel.
The next section will focus on options for creating and monitoring access to trap files and honeypot files on Linux and macOS.
Monitoring access to honeypot files on Linux
In Linux, there are a couple of ways to go about implementing decoy files to alert the red team of suspicious activities on hosts. The simplest way is probably using the inotifywait utility. Its use cases in this regard are limited. In this section, we will explore both inotifywait and auditd. The latter provides a lot of capabilities. First, let's create some credentials that might trick an adversary.
Creating a honeypot RSA key file
A good deception tactic to trick adversaries or other red teamers is to create fake SSH key files (something such as prod_rsa). This might trick someone to promptly try to inspect the file as it might appear to give access to production assets. Consider placing the file in a user's ~/.ssh folder because this is where adversaries will look for credentials.
The following screenshot shows how to use ssh-keygen to create a keypair:
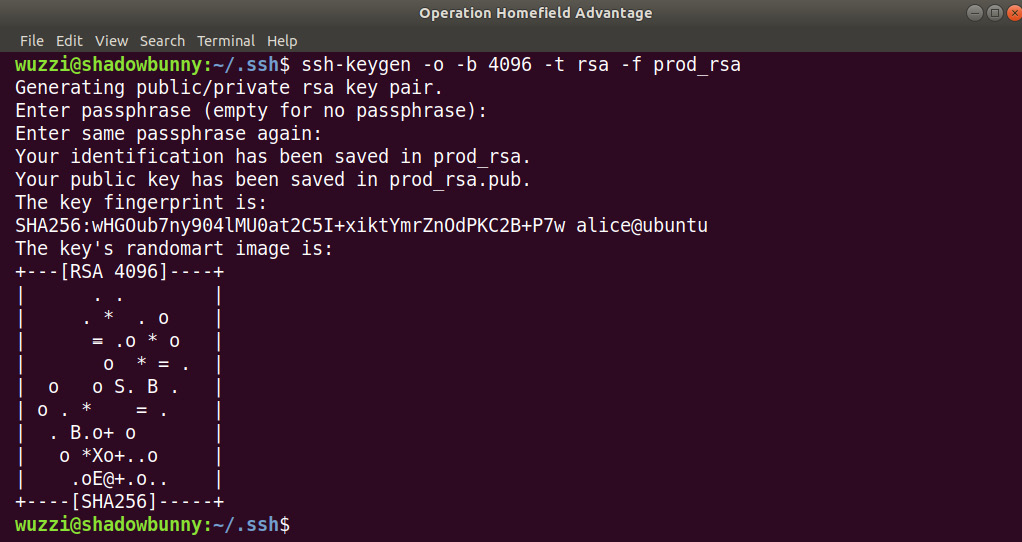
Figure 11.25: Creation of the honeypot RSA key files
The preceding screenshot highlights the creation of an RSA key to use as a decoy token on red team hosts. Next, let's explore options regarding how to monitor access to the file. We will look at two scenarios: inotifywait and auditd.
Using inotifywait to gain basic information about access to a file
The simplest and quickest way to receive notifications for file reads on Linux is to use inotify. However, it has limitations, which we will highlight in this section. If inotifywait is not installed, install it with the following command:
$ sudo apt install inotify-tools
To set up a Watcher, use inotifywait. The following is an example that monitors for open and read access to the prod_rsa key that we created earlier:
$ inotifywait -m -e open,access ~/.ssh/root_rsa
The following screenshot shows running the command:

Figure 11.26: Running inotifywait to monitor for open and read access on a honeypot file
The preceding screenshot shows how inotifywait is now watching for access. Now that it is running, go to another shell and simulate malicious access to the file:
root@shadowbunny:~$ cat /home/wuzzi/.ssh/prod_rsa
The following screenshot shows the output of inotifywait after gaining file access:

Figure 11.27: Using inotifywait to monitor file access
The preceding screenshot shows the OPEN and ACCESS notifications. What is missing in this case is any context around which user opened the file, or what program accessed the file. Although inotify does have its valid use cases, for these scenarios, there are better, more versatile solutions.
Leveraging auditd to help protect pen test machines
On Linux, a good way to gain insights into what happens on a machine is by leveraging the Linux auditing framework. It's highly configurable via audit rules. To get started, make sure that auditd is installed on your machine:
$ sudo apt install auditd
To quickly understand and see what kind of auditing auditd provides by default, go ahead and run the following command:
$ sudo ausearch -r | more
This will show the audit events that were already recorded in their raw output form:
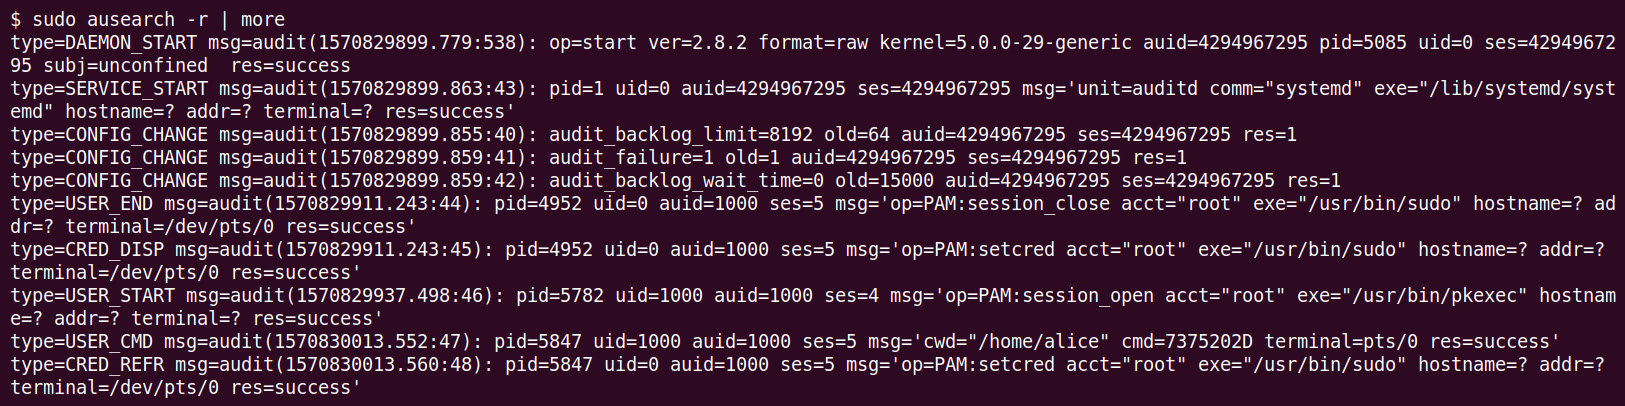
Figure 11.28: Using ausearch to look at raw audit events
The preceding screenshot shows the raw audit content that is displayed by ausearch -r.
Information note
Auditd is configured via /etc/audit/auditd.conf. One setting to look at is log_group so that you can understand which users can access logs by default. If your account is not a member of this group, you might have to run the ausearch command as root.
For a better readable version, you can leverage --format text or --format CSV as options as well using the following command-line option:
$ sudo ausearch --format text
The following screenshot shows some example output of running the preceding command:

Figure 11.29: Printing the ausearch output in text format
The preceding screenshot shows how the user ran commands as root and so forth.
As an exercise, perform a failed sudo command with an incorrect password or simulate a failed su command with an incorrect password and look at the audit log using ausearch --format text.
Can you find the relevant entries in the audit log?
More specifically, you can limit/filter searches via command-line arguments, as follows:
$ sudo ausearch -m USER_AUTH
As an example, this is what a failed su logon attempt looks like:
type=USER_AUTH msg=audit(1510830195.079:149): pid=6145 uid=1000 auid=1000 ses=5 msg='op=PAM:authentication acct="mallory" exe="/bin/su" hostname=? addr=? terminal=/dev/pts/2 res=failed'
Those of you who are observant have probably already noticed how auditd can also be leveraged to solve some of the earlier challenges around monitoring for logons to a host. However, for this exercise, we want to focus on auditing and alerting suspicious access to honeypot files.
What we need to do now is create a Watcher for the decoy file that we created earlier. This can be done by updating the auditd configuration. This is what we will do next.
Modifying the auditd configuration
The prod_rsa file is not being watched by the auditing infrastructure just yet. This means that we will not receive an audit event when someone accesses it. In this case, we want to watch for access to the prod_rsa key file. Audit rules are configured in the audit.rules file.
The following steps show how to update the audit configuration:
- Use your favorite text editor to open the file:
$ sudo nano /etc/audit/rules.d/audit.rules
- Navigate to the bottom of the file and add the following rule pointing to the honeypot file (prod_rsa keyfile) we created earlier:
-w /home/wuzzi/.ssh/prod_rsa -p rwxa -k Sentinel
The following screenshot highlights adding the Watcher to audit.rules:
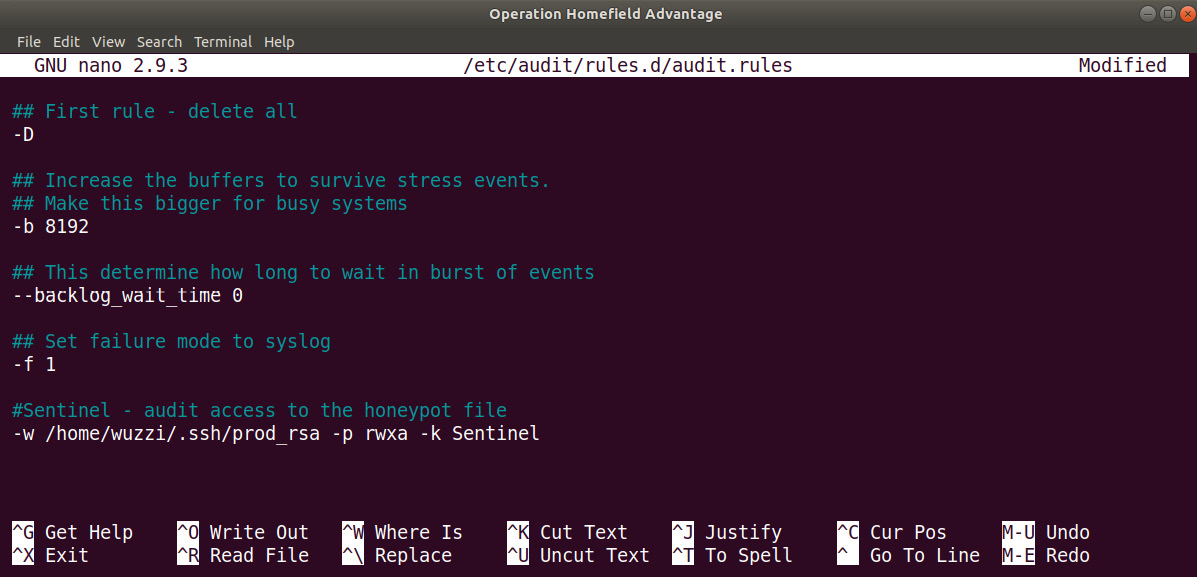
Figure 11.30: Configuring auditd audit rules
- Save the file.
- Then, restart auditd to apply the changes:
$ sudo service auditd restart
This will load the new rules accordingly.
- It's also possible to use the auditcl command to view, delete, and add rules or load the rules from a separate file:
# auditctl -l
The following screenshot shows the rules as a listing:

Figure 11.31: Listing and loading rules using auditctl
- To delete an entry, just use the -W option:
# auditctl -W /home/wuzzi/.ssh/prod_rsa -p rwxa -k Sentinel
The following points provide a quick explanation of the preceding auditctl command:
a) -w means a new entry for a file Watcher.
b) -p defines the access mode. In our case, we want to look for read (other options include w for write, x for execute, and a for attribute).
c) -k allows us to add a custom string that can be used to tag audit events. In our case, we use the string Sentinel. Afterward, we can search for that keyword easily. This is quite useful.
- Now, let's access the file to simulate an adversary poking around on our pen test machine:
$ cat /home/wuzzi/.ssh/prod_rsa
- Finally, search the audit log for our Sentinel tag to see the relevant entries:
# ausearch -k Sentinel
[…]
time->Sat Feb 9 17:13:01 2019
type=CONFIG_CHANGE msg=audit(1549761181.508:786): auid=1000 ses=3 op=add_rule key="Sentinel" list=4 res=1
----
time->Sat Feb 9 17:13:29 2019
type=PROCTITLE msg=audit(1549761209.485:787): proctitle=636174002F686F6D652F77757A7A692F2E7373682F70726F645F727361
type=PATH msg=audit(1549761209.485:787): item=0 name="/home/wuzzi/.ssh/prod_rsa" inode=1052502 dev=08:01 mode=0100644 ouid=1000 ogid=1000 rdev=00:00 nametype=NORMAL cap_fp=0000000000000000 cap_fi=0000000000000000 cap_fe=0 cap_fver=0
type=CWD msg=audit(1549761209.485:787): cwd="/home/wuzzi"
type=SYSCALL msg=audit(1549761209.485:787): arch=c000003e syscall=257 success=yes exit=3 a0=ffffff9c a1=7ffd0974d7ea a2=0 a3=0 items=1 ppid=7292 pid=7438 auid=1000 uid=0 gid=0 euid=0 suid=0 fsuid=0 egid=0 sgid=0 fsgid=0 tty=pts0 ses=3 comm="cat" exe="/bin/cat" key="Sentinel"
$
- If you are curious what the hex string in the log is, convert it into a string:
$ echo 636174002F686F6D652F77757A7A692F2E7373682F70726F645F727361 | xxd -r -p
What is the result?
There are a lot of commands and features that are available. For instance, it's possible to directly search for entries that are only relevant to the prod_rsa file, as follows:
# ausearch -f prod_rsa
- As a final command, run aureport, which provides a good overview of the activity that's happening on the machine. With the -f argument, it's possible to analyze the file Watcher events:
# aureport -f
File Report
===============================================
# date time file syscall success exe auid event
===============================================
1. 2/9/2019 16:20:25 /home/wuzzi/.ssh/prod_rsa 257 yes /bin/cat 1000 296
2. 2/9/2019 17:19:47 /home/wuzzi/.ssh/prod_rsa 257 yes /bin/nano 1000 486
3. 2/9/2019 17:19:47 /home/wuzzi/.ssh/ 257 yes /bin/nano 1000 487
So far, we have explored some of the basics of auditing on Linux. There are many more features to explore and leverage to provide a holistic auditing experience for pen test machines. At the same time, these exercises can be quite useful for red teamers to better understand what techniques are used by blue teams to catch them.
Notifications using event dispatching and custom audisp plugins
The missing piece is to set up automated notifications, such as receiving an email upon someone accessing our honeypot file or even live notifications on the desktop. This can be done via audisp, which is an event multiplexer that allows us to invoke commands when certain events occur.
Unfortunately, there is no built-in audisp plugin that enables such scenarios.
Important Note
This section is for advanced users. We will create our own custom audit dispatcher and then integrate it with auditd. If you are familiar with C and do not mind compiling the code and setting up a config file for the plugin, then this is straightforward and provides the best experience for notifications.
There is a blog post by Steve Grubb from Red Hat showing how to implement custom audisp plugins. It also includes examples of how to extend them with sendmail functionality. The blog posts are located here for your reference: http://security-plus-data-science.blogspot.com/2017/04/sending-email-when-audisp-program-sees.html.
This blog post is the basis of the audisp-sentinel prototype that we will discuss now. It is a slightly modified version that allows us to pass an email recipient as an argument. To create and install audisp-sentinel, follow these steps:
- Clone audisp-sentinel from https://github.com/wunderwuzzi23/audisp-sentinel.
- Compile audisp-sentinel using the following command:
gcc -o audisp-sentinel audisp-sentinel.c -lauparse -laudit
- Afterward, copy audisp-sentinel to /sbin/audisp-sentinel.
- Then, create a configuration file that describes the plugin. For our purpose, we'll call it sentinel.conf and store it at /etc/audisp/plugins.d/. This file contains the configuration details of how the plugin integrates with auditd. The following screenshot shows the content of the file. The modified version of our audit dispatcher takes two arguments. The first one is the key in the audit to look for, while the second one is the recipient of the email, as shown here:
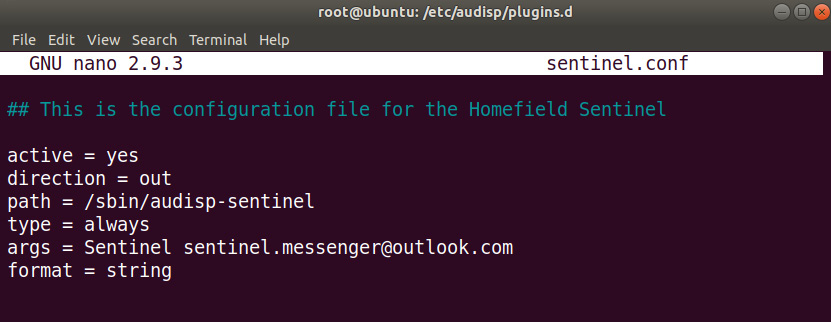
Figure 11.32: Examining the sentinel.conf plugin (notice the two arguments being passed in)
The preceding screenshot shows the configuration file of the newly created auditd plugin, including the additional argument for the mail recipient of the notifications.
- After saving the configuration file, restart the audit daemon using the following command:
$ sudo service auditd restart
Make sure that the audit rules (for example, the file Watcher) are still in in place, as well as that sendmail has been configured correctly. We walked through these steps earlier in this chapter. Feel free to go back and review this.
- Then, trigger the file audit rule; for example, read the prod_rsa key using the following command:
$ cat /home/wuzzi/.ssh/prod_rsa
The following screenshot shows the email being received by the email program:

Figure 11.33: Receiving the email in Outlook
- The preceding screenshot shows the email that audisp-sentinel sent. Feel free to clone the code, modify and compile it to suit your needs, and improve the audisp-sentinel prototype.
In this section, we looked at creating custom audit dispatchers, which allow us to integrate with an audit daemon to create notifications. This is one of the best techniques to use as it is very versatile and allows for plenty of customizations. In the next section, we will look at how to achieve file access monitoring on macOS.
Alerting for suspicious file access on macOS
On macOS, there are a couple of ways to monitor file access. There is OpenBSM. The Basic Security Module (BSM) was originally created by Sun Microsystems and can be used for auditing. There are also tracing utilities such as fs_usage. In this section, we will explore multiple ways to monitor access to decoy files.
To get started, go ahead and create two decoy files with interesting names that might trick an adversary who is poking around your machines:
$ echo "S3cr3tP@$$W0Rd!" > /Users/john/password.txt
$ echo "S3cr3tP@$$W0Rd!" > /tmp/password.txt
The preceding commands will create two decoy files. We will set up monitoring for read access to these files later and trigger notifications when the file is being accessed. Now, let's explore how we can monitor access to these files. To get started, let's explore the fs_usage tool.
Leveraging fs_usage for quick and simple file access monitoring
The fs_usage utility is a tool that allows you to monitor for various system events, including observing filesystem access. The good thing about fs_usage compared to other tracing utilities on macOS is that it works even when System Integrity Protection is enabled.
The following steps show you how to use it for monitoring access to the decoy file:
- Go ahead and run the utility to see the detailed amount of information it provides. To filter the output, go ahead and use the following command to only print lines that contain open and password.txt information:
$ sudo fs_usage | grep "open.*password.txt"
- After running this, go to another Terminal window and access the file. For instance, using the following command:
$ sudo cat /Users/john/password.txt
After accessing the file, the terminal we launched fs_usage in will report the file open requests as seen in the following screenshot:
- The following screenshot shows the output of the tool when other processes open the file. We filter events via egrep to find the opening of the password.txt file:

Figure 11.34: Running fs_usage and filtering for password.txt
The preceding screenshot highlights how the decoy file, password.txt, was opened using cat and nano, as well as the mdworker daemon. You can also apply other high-level filters using the -f command. fs_usage allows you to filter for filesystems, networks, processes, and other events.
That's how simple it is to get some basic access monitoring in place. The next step is to have the script run in the background and whenever an event is triggered, notify the main user. In this case, we will use a desktop notification. To achieve that, we can use a LaunchDaemon, which is what we will do next.
Creating a LaunchDaemon to monitor access to decoy files
A LaunchDaemon is a job that macOS will run at certain times, much like cron jobs. For our monitoring solution, let's call it the Audit Sentinel. The Audit Sentinel should begin monitoring when the machine starts up. To do that, we have to create a bash script that we will run when the machine starts up and runs the Audit Sentinel.
The following steps show how to create and set up a LaunchDaemon to run the Audit Sentinel:
- First, let's create a bash script that monitors access to the decoy password.txt file. Use your favorite text editor to create it. Let's call it auditsentinel.sh. The following listing shows the script:
#!/bin/sh
echo "Homefield Sentinel!"
#Search pattern to look for
PATTERN="open.*password.txt"
#Account to notify
ACCOUNT="bob"
fs_usage | while read line; do
if [[ «$line» =~ $PATTERN ]]; then
echo «Sentinel: $line»
su -l $ACCOUNT -c "osascript -e 'display notification "Honeypot file accessed. Review logs." with title "[Sentinel Notification]"'"
fi
done
echo "Done."
The preceding script does the following:
a) Configures a variable for PATTERN, that reflects the regular expression pattern we are looking for in events.
b) Configures a variable for ACCOUNT, which is the account that will receive a notification on the desktop.
c) The script waits for events using fs_usage.
d) For each event, we compare the incoming $line with the defined regular expression, $PATTERN, to see if they contain the open and password.txt keywords.
e) Whenever we have such a hit, we launch osascript to send a notification to the defined $ACCOUNT. In this example, this is the user account bob. We leverage su before running the command.
- Store this file as auditsentinel.sh on your host (consider locking it down to root). The following is the final content of the script:

Figure 11.35: Script to continuously monitor access and display a notification when the decoy file is read
- Don't forget chmod 700 for auditsentinel.sh to lock down access to the file:
# chmod 700 auditsentinel.sh
- Test the script by executing it. Whenever someone reads the file, the macOS Notification Center will pop up a message, like the following screenshot shows:
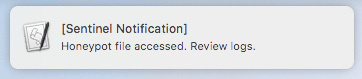
Figure 11.36: Honeypot notification popup on macOS
- To make this useful, by default, we want to launch this at system startup via a LaunchDaemon. To do this, create a file named auditsentinel.plist under /Library/LaunchDaemons/. The main task of the daemon is to launch the auditsentinel.sh script. The following screenshot shows the contents of the file:

Figure 11.37: LaunchDaemon to start auditsentinel.sh
The preceding screenshot shows the launch daemon plist configuration. Feel free to type the configuration in by hand. Alternatively, you can copy one of the other LaunchDaemons and then update the plist file accordingly.
- After saving the preceding plist file, use launchctl to run the LaunchDaemon:
$ sudo launchctl load /Library/LaunchDaemons/auditsentinel.plist
- Now, test the configuration by accessing the password files. You will observe the notification being sent and showing up on the desktop. The good thing with this configuration is that the script will also be loaded at system startup.
As with the scenarios we've covered already, sending an email is probably also a good idea (for example, via sendmail, as we did in the previous chapter). This is the most straightforward way to implement file read access monitoring on macOS. Next, we'll look at the OpenBSM auditing system in more detail.
Observing the audit event stream of OpenBSM
BSM was originally created by Sun Microsystems, and it is available on macOS as well, in the form of OpenBSM.
Audit events are streamed to /dev/auditpipe. The event stream is in a binary format. Using a utility called praudit, we can parse the events in text and XML:
$ sudo praudit -xl /dev/auditpipe | more
We can force praudit to write the output per event in one line using the -l command. If you prefer parsing XML, that is possible using -x. The following screenshot shows the output of running this command:

Figure 11.38: Printing the auditpipe stream
The preceding screenshot shows the audit events being displayed as XML with the praudit utility. If you prefer parsing or investigating past data, the audit files are located at /var/audit/. The active audit file in that folder has a symlink called current.
Let's explore how to configure OpenBSM in more detail.
Configuring OpenBSM for auditing read access to decoy files
Now that we've covered some basics, let's explore configuration details. What operations are audited can be configured via /etc/security/audit_control.
In order to log file operations, we add fr (file read) to the flags line in the configuration file. The following steps explain how to set up file access monitoring and how to create notifications as well:
- Use your favorite text editor to update /etc/security/audit_control:
$ sudo nano /etc/security/audit_control
The following screenshot shows the file opened in the nano editor with the file read flag added:

Figure 11.39: Updating audit_control
- After adding the file read (fr) flag, save the file.
- Then, run audit -s to resynchronize the audit_control file, as shown in the following screenshot:

Figure 11.40: Resynchronizing the audit_control file with the audit daemon
The preceding command will synchronize the settings and the audit configuration.
- Launch praudit and grep for password.txt to monitor for anyone opening the file:
$ sudo praudit -lx /dev/auditpipe | grep password.txt
- Then, simulate accessing the file, for instance, with cat /Users/john/password.txt.
- You should see events being written to the console by praudit.
Important Note
There is an alternative called supraudit that has more and better features and improvements. It is a custom download that can be found at http://newosxbook.com/tools/supraudit.html.
supraudit works much better compared to praudit. It allows color output and shows the process name that accessed the file. It also appears to be more reliable when it comes to capturing audit events. For the remainder of this chapter, we will be using supraudit.
- If you want to try supraudit, the following screenshot shows its usage and output:

Figure 11.41: Using supraudit
As can be seen in the preceding screenshot, the output of supraudit is much cleaner compared to praudit. It offers features such as printing in color or JSON. Note that it shows the process that opened the decoy file (in this case, cat and nano).
Using the -F option, supraudit allows us to filter for certain events, such as network, file, or process operations. Going forward, we will use supraudit, but you can also follow along using praudit. In particular, we will be using -S (for SuperAudit records, which seem to be more reliable compared to praudit).
Now that we have the audit framework monitoring file read access, we can create LaunchDaemon to continuously watch for anyone opening the decoy file, as we did earlier. This is the same approach that we used with fs_usage, which we walked through earlier in this section. This is what the script that invokes supraudit looks like:

Figure 11.42: auditsentinel.sh using supraudit to monitor events and notify the user
As you can see, it is the same script that we used with fs_usage; we just replaced the call to fs_usage with supraudit to filter for events.
Important Note
There are other ways to monitor file operations; for instance, WatchPaths in LaunchAgents. These can be configured to run commands when certain files change on the system. Read up on Launch Agent configuration files and the WatchPaths setting to learn more.
In this section, we discussed useful techniques and ideas for event auditing and how to leverage built-in operating features. One core aspect that we have focused on so far is that all our monitoring, alerting, and notifications were happening on the machine itself. This is sort of a guerilla-style type of monitoring, which fits a red team well.
Although having better insights at scale is an important part of a good strategy to protect the pen test assets, it is also beneficial to offload monitoring and audit logs as soon as possible from the machine to another system. This topic is the focus of the next chapter.
Summary
In this chapter, we looked at the important aspects of actively protecting pen testing assets by using decoy files and explored other related deception ideas.
We looked at various operating systems and explored how to implement decoy files. We also highlighted the benefits and trade-offs of various solutions. Decoy files might trick an adversary who attempts to gain access to your machine by opening interesting looking files. For notifications, we leveraged pop-up notifications on the desktop, emails, as well as logging to files and security event logs.
For Windows, we learned how to build a Windows Service that uses a System Access Control List to audit important files and alert us when they are accessed.
Additionally, we learned how to use OpenBMS on macOS and auditd on Linux to help monitor and audit access. For those who wanted to try out more advanced tasks, we looked at the creation of auditd plugins, which can be leveraged to integrate and customize the auditing infrastructure on Linux.
In the next chapter, we will learn about common off-the-shelf blue team tools. Knowing about these is beneficial for red teamers for two reasons. First, you might consider protecting your own fleet with them, and second, knowing the blue team tools will allow you to bypass or attack them.
Questions
- What is the Windows Security Event ID for a failed logon?
- What is the command utility on Windows to schedule tasks?
- How can auditd notifications be extended on Linux?
- Name a few shell alternatives to bash for Unix-based systems.