
15
Shooting Movies with the D800
As you’ve probably gathered, movie-making is an extension of the live view concept. Once you’ve directed the output of the sensor to the LCD, capturing it as a video file—with audio—is relatively easy. All the focus modes and AF-area modes described for plain old live view mode can be applied to movie-making.
If you’ve absorbed all the basics of live view from Chapter 14, you need only a little more information to begin capturing video. First, here are some considerations to think about:
![]() Stills, too. You can take a still photograph even while you’re shooting a movie clip by pressing the shutter release all the way down. You won’t miss a still shot because you’re shooting video. However, movie shooting will cease after you take the still, and must be re-activated by pressing the red movie button again. The still image is saved at the current 16:9 aspect ratio image setting, either 1920 × 1080 or 1280 × 720 pixels.
Stills, too. You can take a still photograph even while you’re shooting a movie clip by pressing the shutter release all the way down. You won’t miss a still shot because you’re shooting video. However, movie shooting will cease after you take the still, and must be re-activated by pressing the red movie button again. The still image is saved at the current 16:9 aspect ratio image setting, either 1920 × 1080 or 1280 × 720 pixels.
![]() Exposure compensation. When shooting movies, exposure compensation is available in plus/minus 3EV steps in 1/3 EV increments.
Exposure compensation. When shooting movies, exposure compensation is available in plus/minus 3EV steps in 1/3 EV increments.
![]() Size matters. Individual movie files can be up to 4GB in size (this will vary according to the resolution you select), and no more than 29 minutes, 59 seconds in length (20 minutes when shooting in high quality mode). The speed and capacity of your memory card may provide additional restrictions on size/length.
Size matters. Individual movie files can be up to 4GB in size (this will vary according to the resolution you select), and no more than 29 minutes, 59 seconds in length (20 minutes when shooting in high quality mode). The speed and capacity of your memory card may provide additional restrictions on size/length.
WHAT FRAME RATE: 24 fps or 30 fps?
Even intermediate movie shooters can be confused by the choice between 24 fps and 30 fps, especially since those are only nominal figures (with the D800, the 24 fps setting actually yields 23.976 frames per second; 30 fps gives you 29.97 actual “frames” per second).
The difference lies in the two “worlds” of motion images, film and video. The standard frame rate for motion picture film is 24 fps, while the video rate, at least in the United States, Japan, and other places using the NTSC standard, is 30 fps (actually 60 interlaced fields per second). Most computer video-editing software can handle either type, and convert between them. The choice between 24 fps and 30 fps is determined by what you plan to do with your video.
The short explanation is that, for technical reasons I won’t go into here, shooting at 24 fps gives your movie a “film” look, excellent for showing fine detail. However, if your clip has moving subjects, or you pan the camera, 24 fps can produce a jerky effect called “judder.” A 30 fps rate produces a home-video look that some feel is less desirable, but which is smoother and less jittery when displayed on an electronic monitor. I suggest you try both and use the frame rate that best suits your tastes and video-editing software.
![]() Use the right card. You’ll want to use a UDMA-compatible Compact Flash card with a read/write speed of 40/60 MB/second, or an SDHC/SDXC card with Class 6 or higher speed; if you use a slower card, like a Class 4 or especially Class 2, the recording may stop after a minute or two. In either case, choose a memory card with at least 4GB capacity; 8GB or 16GB are even better. If you’re going to be recording a lot of HD video that could be a good reason to take advantage of the ability to use SDXC cards of 64GB capacity. Just make sure your memory card reader is compatible and your computer can read the files from that type of card.
Use the right card. You’ll want to use a UDMA-compatible Compact Flash card with a read/write speed of 40/60 MB/second, or an SDHC/SDXC card with Class 6 or higher speed; if you use a slower card, like a Class 4 or especially Class 2, the recording may stop after a minute or two. In either case, choose a memory card with at least 4GB capacity; 8GB or 16GB are even better. If you’re going to be recording a lot of HD video that could be a good reason to take advantage of the ability to use SDXC cards of 64GB capacity. Just make sure your memory card reader is compatible and your computer can read the files from that type of card.
I’ve standardized on fast 32GB 600X Compact Flash cards and Class 10 32GB SDHC cards when I’m shooting movies; one of these cards will hold at least three to six hours of video. However, the camera cannot shoot a continuous movie scene for more than 29 minutes. You can start shooting the next clip right away, though, missing only about 30 seconds of the action. Of course that assumes there’s enough space on your memory card and adequate battery power.
![]() Carry extra cards. You’re probably used to shooting still photographs. It’s easy to estimate how much of your memory card’s capacity you’ve already consumed, and how much is left, based on the shots remaining indicator on the D800’s LCD monitor and viewfinder displays. Video usage is a bit of a different animal. While the camera does show how much space you have remaining for a clip as you shoot, it’s often difficult to make the connection to the remaining capacity of your memory card. It’s necessary to make a trip to the Movie Settings entry in the Shooting menu to see exactly how much space you have left. So, the best practice is to carry along many more cards than you think you need. I stuff a pair of 64GB CF and SDXC cards in my D800—enough for 5 hours of video each—but always carry along five 32GB cards as backup.
Carry extra cards. You’re probably used to shooting still photographs. It’s easy to estimate how much of your memory card’s capacity you’ve already consumed, and how much is left, based on the shots remaining indicator on the D800’s LCD monitor and viewfinder displays. Video usage is a bit of a different animal. While the camera does show how much space you have remaining for a clip as you shoot, it’s often difficult to make the connection to the remaining capacity of your memory card. It’s necessary to make a trip to the Movie Settings entry in the Shooting menu to see exactly how much space you have left. So, the best practice is to carry along many more cards than you think you need. I stuff a pair of 64GB CF and SDXC cards in my D800—enough for 5 hours of video each—but always carry along five 32GB cards as backup.
WHY THE 29-MINUTE LIMITATION?
Vendors are really cagey about revealing the reason for the seemingly arbitrary/non-arbitrary 29 minute, 59 second limitation on the length of a single video clip—not only with Nikon still cameras, but with other brands as well. So, various theories have emerged, none of which have proven to be definitive. That’s especially true since Nikon puts a shorter, 20-minute limit on its so-called “high quality” movie files.
![]() The sensor will overheat when you shoot continuously. In a mirrorless camera, the sensor is active virtually all the time the camera is turned on, so that idea doesn’t hold water. Plus, you can shoot one 29-minute clip, then immediately begin another one. Thermal protection doesn’t seem to be a problem, or the reason for the limitation.
The sensor will overheat when you shoot continuously. In a mirrorless camera, the sensor is active virtually all the time the camera is turned on, so that idea doesn’t hold water. Plus, you can shoot one 29-minute clip, then immediately begin another one. Thermal protection doesn’t seem to be a problem, or the reason for the limitation.
![]() Some countries, particularly in the European Union, classify cameras that can capture clips of 30 minutes or more as camcorders, at a higher duty rate.
Some countries, particularly in the European Union, classify cameras that can capture clips of 30 minutes or more as camcorders, at a higher duty rate.
![]() The FAT32 file format limits the size of video clips to 2GB, or about 30 minutes. Actually, it’s the FAT16 file format (used in pre-SDHC memory cards) that has the 2GB limitation. All memory cards larger than 2GB will let you create a file that’s 4GB in size. Further, my 64GB SDXC card allows files up to 2 terabytes in size, but when I insert one into my D800, I still can’t exceed 29 minutes, 59 seconds.
The FAT32 file format limits the size of video clips to 2GB, or about 30 minutes. Actually, it’s the FAT16 file format (used in pre-SDHC memory cards) that has the 2GB limitation. All memory cards larger than 2GB will let you create a file that’s 4GB in size. Further, my 64GB SDXC card allows files up to 2 terabytes in size, but when I insert one into my D800, I still can’t exceed 29 minutes, 59 seconds.
![]() Theories aside, the only people who want to shoot clips longer than 30 minutes are the proud parents who plop the D800 down on a tripod and capture an entire Spring Pageant or high school musical. Those who want to go beyond camcorder ennui will shoot segments of only a few seconds each and, perhaps, piece them together into an effective production using easy-to-master editing software.
Theories aside, the only people who want to shoot clips longer than 30 minutes are the proud parents who plop the D800 down on a tripod and capture an entire Spring Pageant or high school musical. Those who want to go beyond camcorder ennui will shoot segments of only a few seconds each and, perhaps, piece them together into an effective production using easy-to-master editing software.
![]() Add an external mic. For the best sound quality, and to avoid picking up the sound of the autofocus or zoom motor, get an external stereo mic. I’ll have more advice about capturing sound in Chapter 16.
Add an external mic. For the best sound quality, and to avoid picking up the sound of the autofocus or zoom motor, get an external stereo mic. I’ll have more advice about capturing sound in Chapter 16.
![]() Minimize zooming. While it’s great to be able to use the zoom for filling the frame with a distant subject, think twice before zooming. Unless you are using an external mic, the sound of the zoom ring rotating will be picked up and it will be audible when you play a movie. Any more than the occasional minor zoom will be very distracting to friends who watch your videos. And digital zoom will definitely degrade image quality. Don’t use the digital zoom if quality is more important than recording a specific subject such as a famous movie star far from a distance.
Minimize zooming. While it’s great to be able to use the zoom for filling the frame with a distant subject, think twice before zooming. Unless you are using an external mic, the sound of the zoom ring rotating will be picked up and it will be audible when you play a movie. Any more than the occasional minor zoom will be very distracting to friends who watch your videos. And digital zoom will definitely degrade image quality. Don’t use the digital zoom if quality is more important than recording a specific subject such as a famous movie star far from a distance.
![]() Use a fully charged battery. A fresh battery will allow about one hour of filming at normal (non-Winter) temperatures, but that can be shorter if there are many focus adjustments. Individual clips can be no longer than 29 minutes, however.
Use a fully charged battery. A fresh battery will allow about one hour of filming at normal (non-Winter) temperatures, but that can be shorter if there are many focus adjustments. Individual clips can be no longer than 29 minutes, however.
![]() Keep it cool. Video quality can suffer terribly when the imaging sensor gets hot so keep the camera in a cool place. When shooting on hot days especially, the sensor can get hot quicker than usual; when there’s a risk of overheating, the camera will stop recording and it will shut down about five seconds later. Give it time to cool down before using it again.
Keep it cool. Video quality can suffer terribly when the imaging sensor gets hot so keep the camera in a cool place. When shooting on hot days especially, the sensor can get hot quicker than usual; when there’s a risk of overheating, the camera will stop recording and it will shut down about five seconds later. Give it time to cool down before using it again.
![]() Press the Movie button. You don’t have to hold it down. Press it again when you’re done to stop recording.
Press the Movie button. You don’t have to hold it down. Press it again when you’re done to stop recording.
Capturing Video
In the Movie Settings entry of the Shooting menu, you can make the following choices:
![]() Frame size/frame rate. Choose your resolution. Use the Movie Settings entry in the Shooting menu. Or, when live view is activated, and before you start shooting your video clip, you can select the resolution/frame rate of your movie. Your choices are as follows:
Frame size/frame rate. Choose your resolution. Use the Movie Settings entry in the Shooting menu. Or, when live view is activated, and before you start shooting your video clip, you can select the resolution/frame rate of your movie. Your choices are as follows:
![]() 1920 × 1080 at 30 fps.
1920 × 1080 at 30 fps.
![]() 1920 × 1080 at 25 fps.
1920 × 1080 at 25 fps.
![]() 1920 × 1080 at 24 fps.
1920 × 1080 at 24 fps.
![]() 1280 × 720 at 60 fps.
1280 × 720 at 60 fps.
![]() 1280 × 720 at 50 fps.
1280 × 720 at 50 fps.
![]() 1280 × 720 at 30 fps.
1280 × 720 at 30 fps.
![]() 1280 × 720 at 25 fps.
1280 × 720 at 25 fps.
![]() Movie Quality. Choose High or Normal quality
Movie Quality. Choose High or Normal quality
![]() Microphone. Here you can set audio sensitivity. Choose from Off, Auto, or Manual sensitivity, with options in a range from 1-20. A meter at the bottom of the screen (see Figure 15.1) shows the current audio levels. You’ll find more about working with microphones later in this chapter and in Chapter 16.
Microphone. Here you can set audio sensitivity. Choose from Off, Auto, or Manual sensitivity, with options in a range from 1-20. A meter at the bottom of the screen (see Figure 15.1) shows the current audio levels. You’ll find more about working with microphones later in this chapter and in Chapter 16.
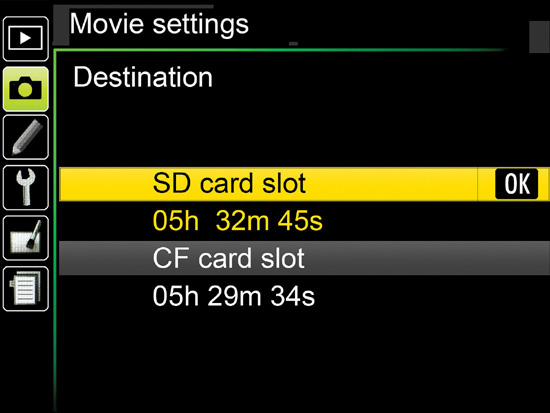
![]() Destination. Select the SD or CF card. The display will show how much recording time is available with the memory cards currently installed in each slot. (See Figure 15.2.)
Destination. Select the SD or CF card. The display will show how much recording time is available with the memory cards currently installed in each slot. (See Figure 15.2.)
Figure 15.1 Microphone sensitivity can be set manually, using an audio meter (bottom) as a reference.
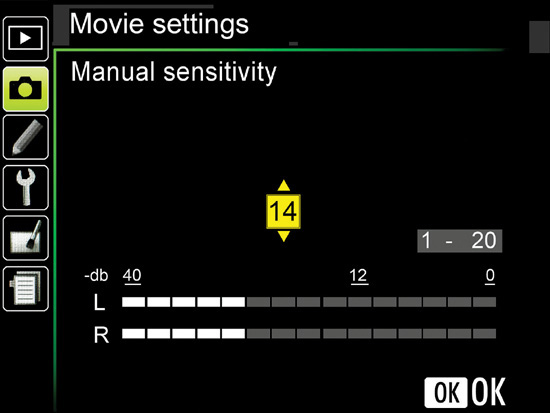
Figure 15.2 Choose the destination for your video clips; usually you’ll want to select the fastest card or the one with the highest capacity.
Unless you are shooting an entire performance from a fixed position, such as a stage play, the near-30-minute limitation on HDTV movie duration won’t put much of a crimp in your style. Good motion-picture practice calls for each production to consist of a series of relatively short clips, with 10 to 20 seconds a good average. You can assemble and edit your D800 movies into one long, finished production using one of the many movie-editing software packages available. Andy Warhol might have been successful with his 1963 five-hour epic Sleep, but the rest of us will do better with short sequences of the type produced by the Nikon D800.
To shoot your movies, follow these steps, which are similar to those for using live view:
1. Plug in microphone. If you want to use an external monaural or stereo microphone with a 3.5mm stereo mini plug, attach it to the microphone jack on the left side of the camera.
2. Choose an exposure mode. Select Program, Shutter-priority, Aperture-priority, or Manual exposure. The D800 uses Matrix metering based on readings from the sensor itself to determine exposure.
3. Adjust exposure. The adjustments you can make depend on the exposure mode you select. You’ll find more about exposure in the section that follows this one.
![]() Program/Shutter-priority. Adjust only exposure compensation by pressing the EV button on top of the camera and rotating the main command dial. The screen image will brighten and darken as you make adjustments. Shutter speed and ISO sensitivity are selected for you by the D800.
Program/Shutter-priority. Adjust only exposure compensation by pressing the EV button on top of the camera and rotating the main command dial. The screen image will brighten and darken as you make adjustments. Shutter speed and ISO sensitivity are selected for you by the D800.
![]() Aperture-priority. You can change the f/stop by rotating the sub-command dial, and adjust exposure compensation with the EV button and the main command dial. Shutter speed and ISO sensitivity are selected for you by the D800.
Aperture-priority. You can change the f/stop by rotating the sub-command dial, and adjust exposure compensation with the EV button and the main command dial. Shutter speed and ISO sensitivity are selected for you by the D800.
![]() Manual exposure. The main command dial changes the shutter speed (from 1/25th to 1/8000th second), and the sub-command dial adjusts the aperture. Press the ISO button and rotate the main command dial to change the ISO sensitivity.
Manual exposure. The main command dial changes the shutter speed (from 1/25th to 1/8000th second), and the sub-command dial adjusts the aperture. Press the ISO button and rotate the main command dial to change the ISO sensitivity.
4. Start live view. Activate live view by rotating the live view switch to the movie position. Then press the LV button.
5. Choose a focus mode. Select from autofocus or manual focus with the AF/MF switch on the camera body. Choose AF-S or AF-F by pressing the focus mode button in the center of the AF/MF switch and rotating the main command dial. Note that you can refocus by pressing the AF-On button.
6. Choose an AF-area mode. Select autofocus area by pressing the focus mode button in the center of the AF/MF switch and rotating the sub-command dial. Choices include Face-priority AF, Wide-area AF, Normal-area AF, or Subject-tracking AF. You’ll find complete descriptions of focus and AF-area modes in Chapter 5.
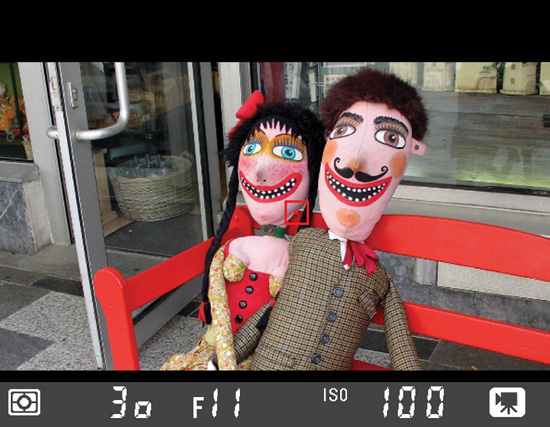
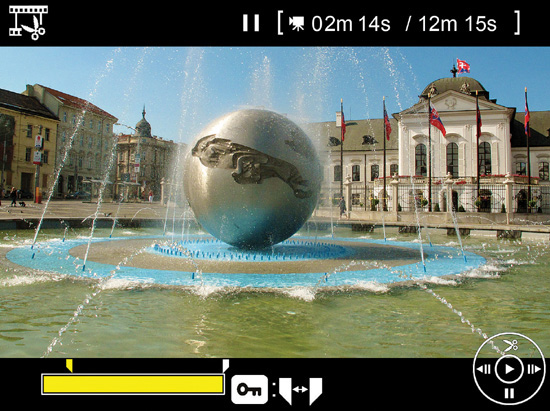
7. Start/Stop recording. Press the red movie recording button to lock in focus and begin capture. Press again to stop recording. The live view display as you’re capturing video looks like Figure 15.3. You can press the Info button to increase or decrease the amount of information overlaid on the screen during movie recording. The displays in movie live view mode are similar to still mode and include: information on, information off, grid framing guides, virtual horizon, and a live histogram.
8. Mark indices. While you are shooting you can add an index to a specific spot that will enable you to locate a specific frame during editing. As many as 20 indices can be added for any given clip by pressing the Preview button during capture. A cyan balloon icon appears on the live view screen at the upper-right side to indicate that an index has been stored. The icon turns red when you exceed the 20-indice limit. To enable this capability, you must choose Index Marking as the function for the Preview button using CSM #g2, described in Chapter 12.
Figure 15.3 The live view display during movie capture.
Stop That!
You might think that setting your D800 to a faster shutter speed will help give you sharper video frames. But the choice of a shutter speed for movie-making is a bit more complicated than that. First, you can’t select the shutter speed at all for your movies when you’re using P, S, or A exposure modes. You can select a shutter speed only if you switch to Manual exposure. Here’s how it works:
![]() Program and Shutter-priority modes. The D800 selects the shutter speed (such as 1/30th second) and ISO sensitivity appropriate for your lighting conditions. Your only exposure adjustment option is to press the EV button and add/subtract exposure compensation. As you might guess, P and S modes are not the best choices for those who want to shoot creatively.
Program and Shutter-priority modes. The D800 selects the shutter speed (such as 1/30th second) and ISO sensitivity appropriate for your lighting conditions. Your only exposure adjustment option is to press the EV button and add/subtract exposure compensation. As you might guess, P and S modes are not the best choices for those who want to shoot creatively.
![]() Aperture-priority mode. This is the mode to use when you want to put selective focus to work by choosing an aperture that will provide more, or less, depth-of-field. In A mode, you can select any f/stop available with your lens, and the D800 will choose a shutter speed and ISO setting to suit. Generally, if you choose a large aperture, the camera will lower the ISO sensitivity as much as it can, to allow sticking with a shutter speed of 1/30th second. It will then select shorter shutter speeds, if necessary, under very bright illumination. My D800 has jumped up to 1/250th second outdoors under bright daylight when I try to shoot at f/1.8 or f/1.4. In A mode, you can still add or subtract exposure compensation.
Aperture-priority mode. This is the mode to use when you want to put selective focus to work by choosing an aperture that will provide more, or less, depth-of-field. In A mode, you can select any f/stop available with your lens, and the D800 will choose a shutter speed and ISO setting to suit. Generally, if you choose a large aperture, the camera will lower the ISO sensitivity as much as it can, to allow sticking with a shutter speed of 1/30th second. It will then select shorter shutter speeds, if necessary, under very bright illumination. My D800 has jumped up to 1/250th second outdoors under bright daylight when I try to shoot at f/1.8 or f/1.4. In A mode, you can still add or subtract exposure compensation.
![]() Manual exposure mode. In this mode, you have full control of aperture, shutter speed (from 1/30th second all the way up to 1/8000th second), and ISO—even if your settings result in video that is completely washed out, or entirely black. Because video capture is in the range of 24 to 60 frames per second, you can’t select a shutter speed that is longer than the frame interval. That is, if your video mode is 1920 × 1080 at 30 fps, you can’t choose a shutter speed longer than 1/30th second. What you can’t do in M mode is add or subtract exposure compensation, but with full control over all three legs of the exposure triangle, you shouldn’t have to.
Manual exposure mode. In this mode, you have full control of aperture, shutter speed (from 1/30th second all the way up to 1/8000th second), and ISO—even if your settings result in video that is completely washed out, or entirely black. Because video capture is in the range of 24 to 60 frames per second, you can’t select a shutter speed that is longer than the frame interval. That is, if your video mode is 1920 × 1080 at 30 fps, you can’t choose a shutter speed longer than 1/30th second. What you can’t do in M mode is add or subtract exposure compensation, but with full control over all three legs of the exposure triangle, you shouldn’t have to.
So, how do you select an appropriate shutter speed? As you might guess, it’s almost always best to leave the shutter speed at 1/30th second, and allow the overall exposure to be adjusted by varying the aperture and/or ISO sensitivity. We don’t normally stare at a video frame for longer than 1/30th or 1/24th second, so while the shakiness of the camera can be disruptive (and often corrected by VR), if there is a bit of blur in our subjects from movement, we tend not to notice. Each frame flashes by in the blink of an eye, so to speak, so a shutter speed of 1/30th second works a lot better in video than it does when shooting stills.
Higher shutter speeds actually introduce problems of their own. If you shoot a video frame using a shutter speed of 1/250th second, the actual moment in time that’s captured represents only about 12 percent of the 1/30th second of elapsed time in that frame. Yet, when played back, that frame occupies the full 1/30th of a second, with 88 percent of that time filled by stretching the original image to fill it. The result is often a choppy/jumpy image.
Faster shutter speeds do have some specialized uses for motion analysis, especially where individual frames are studied. The rest of the time, 1/25th or 1/30th of a second will suffice (or a multiple, such as 1/50th or 1/125th—to reduce the chattery look). If the reason you needed a higher shutter speed was to obtain the correct exposure, use a slower ISO setting, or a neutral-density filter to cut down on the amount of light passing through the lens.
A good rule of thumb when shooting progressive video (as opposed to interlaced video, which is not offered by the D800) is to use 1/50th second or slower when shooting at 24 fps; 1/60th second or slower at 30 fps; and 1/125th second or slower at 60 fps.
Viewing Your Movies
Once you’ve finished recording your movies, they are available for review. Film clips show up during picture review, the same as still photos, but they are differentiated by a movie camera icon overlay. Press the center of the multi selector to start playback.
During playback, you can perform the following functions:
![]() Pause. Press the multi selector down button to pause the clip during playback. Press the multi selector center button to resume playback.
Pause. Press the multi selector down button to pause the clip during playback. Press the multi selector center button to resume playback.
![]() Rewind/Advance. Press the left/right multi selector buttons to rewind or advance (respectively). Press once for 2X speed, twice for 8X speed, or three times for 16X speed. Hold down the left/right buttons to move to the end or beginning of the clip.
Rewind/Advance. Press the left/right multi selector buttons to rewind or advance (respectively). Press once for 2X speed, twice for 8X speed, or three times for 16X speed. Hold down the left/right buttons to move to the end or beginning of the clip.
![]() Skip to index. Rotate the main command dial to skip to the next or previous index marker. If there are no indices saved, the command dial moves to the last or first frame of the clip.
Skip to index. Rotate the main command dial to skip to the next or previous index marker. If there are no indices saved, the command dial moves to the last or first frame of the clip.
![]() Change volume. Press the Zoom In and Zoom Out buttons to increase/decrease volume.
Change volume. Press the Zoom In and Zoom Out buttons to increase/decrease volume.
![]() Trim movie. Press the OK button and follow the steps in the next section.
Trim movie. Press the OK button and follow the steps in the next section.
![]() Exit Playback. Press the multi selector up button to exit playback.
Exit Playback. Press the multi selector up button to exit playback.
![]() Return to shooting mode. Press the shutter release button to return to shooting mode.
Return to shooting mode. Press the shutter release button to return to shooting mode.
![]() View menus. Press the MENU button to interrupt playback to access menus.
View menus. Press the MENU button to interrupt playback to access menus.
Trimming Your Movies
In-camera editing is limited to trimming the beginning or end from a clip, and the clip must be at least two seconds long. For more advanced editing, you’ll need an application capable of editing AVI movie clips. Google “AVI Editor” to locate any of the hundreds of free video editors available, or use a commercial product like Corel Video Studio, Adobe Premiere Elements, or Pinnacle Studio. These will let you combine several clips into one movie, add titles, special effects, and transitions between scenes.
In-camera editing/trimming can be done from the Retouch menu, or during Playback. The procedure is the same. To do in-camera editing/trimming, follow these steps:
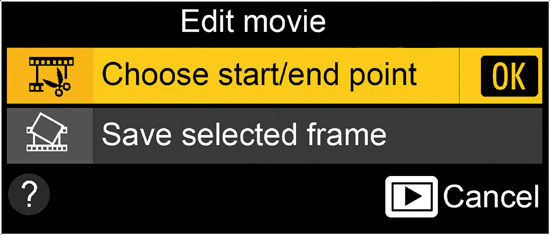
1. Start movie clip. Use the Playback button to start image review, and press the multi selector center button to start playback when you see a clip you want to edit. It will begin playing. Then follow the instructions beginning with Step 2. Or, when you see the clip on the screen that you want to edit, press the OK button to produce the Edit Movie screen shown in Figure 15.4. Highlight Choose Start/End Point, and press OK to continue.
2. Activate edit. To remove video from the beginning of a clip, view the movie until you reach the first frame you want to keep, and then press the down button to pause. The movie progress bar at the bottom left of the screen will show the current position in the movie, as shown in Figure 15.5. To trim video from the end of a clip, watch the movie until you reach the last frame you want to keep and then press the down button to pause. You can jump to the next saved index point in the clip by rotating the main command dial.
3. Select start/end point. When the video is paused, press the OK button to show the movie edit options, and select Choose Start/End Point. You’ll be asked whether the current frame should be the start or end point. Highlight your choice and press OK again.
Figure 15.4 Choose editing options from this menu.
4. Resume playback. Press the center button of the multi selector to start or resume playback. You can use the Pause, Rewind, Advance, and Single frame controls plus the main control dial (to jump to the next saved index point) as described previously to move around within your clip.
5. Confirm trim. A Proceed? prompt appears. Choose Yes or No, and press OK.
6. Save movie. You have four choices when saving the trimmed movie:
![]() Save As New File. The trimmed clip will be stored as a new file, and the original movie preserved.
Save As New File. The trimmed clip will be stored as a new file, and the original movie preserved.
![]() Overwrite Existing File. The trimmed clip replaces the original movie on your memory card. Use this option with caution, as you’ll be unable to restore your unedited clip.
Overwrite Existing File. The trimmed clip replaces the original movie on your memory card. Use this option with caution, as you’ll be unable to restore your unedited clip.
![]() Cancel. Return to the editing mode.
Cancel. Return to the editing mode.
![]() Preview. View the trimmed version. You can then save as a new file, overwrite, or cancel.
Preview. View the trimmed version. You can then save as a new file, overwrite, or cancel.
You’ll see a Saving Movie message and a green progress bar as the D800 stores the trimmed clip to your memory card. Storage takes some time, and you don’t want to interrupt it to avoid losing your saved clip. So, make sure your camera has a fully charged battery before you start to edit a clip.
Saving a Frame
You can store any frame from one of your movies as a JPEG still, using the resolution of the current video format. Just follow these steps:
1. Pause your movie at the frame you want to save. Press the OK button to access the Edit Movie screen.
2. Choose Save Selected Frame and press OK.
3. Choose Proceed to confirm.
4. Your frame will be stored on the memory card, and will be marked with a scissors icon.
The actual resolution of your video “stills” is shown in Table 15.1.
