
C
Software Tools
Unless you only take pictures, and then immediately print them directly to a PictBridge-compatible printer, somewhere along the line you’re going to need to make use of the broad array of software available for the Nikon D800. The picture-fixing options in the Retouch menu let you make only modest modifications to your carefully crafted photos. If your needs involve more than fixing red-eye, cropping and trimming, and maybe adjusting tonal values with D-Lighting, you’re definitely going to want to use a utility or editor of some sort to perfect your images. After you’ve captured some great images and have them safely stored on your Nikon D800’s memory card, you’ll need to transfer them from your camera and memory card to your computer, where they can be organized, fine-tuned in an image editor, and prepared for web display, printing, or some other final destination.
Fortunately, there are lots of software utilities and applications to help you do all these things. This chapter will introduce you to a few of them. Please note that this is not a “how-to-do-it” software chapter. There’s no space, even in this massive volume, to explain how to use all the features of Nikon Capture NX 2, nor how to tweak RAW file settings in Adobe Camera Raw. Entire books have been written about both products. This chapter is intended solely to help you get your bearings among the large number of utilities and applications available, to help you better understand what each does, and how you might want to use them.
The basic functions found in most of the programs discussed in this chapter include image transfer and management, camera control, and image editing. You’ll find that many of the programs overlap several of these capabilities, so it’s not always possible to categorize the discussions that follow by function. In fact, I’m going to start off by describing a few of the offerings available from Nikon.
Nikon’s Applications and Utilities
If nothing else, Nikon has made sorting through the software for its digital cameras an interesting pursuit. Through the years, we’ve had various incarnations of programs with names like PictureProject, NikonView, and Nikon Capture. Some have been compatible with both the Nikon dSLR and amateur Coolpix product lines. Many of them have been furnished on disk with the cameras. Others, most notoriously Nikon Capture NX 2, have been an extra-cost option, which particularly infuriated those of us who had paid several thousand dollars for a Nikon dSLR, and found that we’d need to pay more to get the software needed for the camera. The next few sections provide some descriptions of the Nikon software you’ll want to use with your D800.
Nikon ViewNX 2
This latest incarnation of Nikon’s basic file viewer is better than ever, making it easy to browse through images, convert RAW files to JPEG or TIFF, and make corrections to white balance and exposure, either on individual files or on batches of files. It works in tandem with Nikon Transfer and Nikon Capture NX, as you can open files inspected in ViewNX in one of the other programs—or within a third-party application you “register.”
First and foremost, Nikon ViewNX is a great file viewer. There are five modes for looking at images: a Thumbnail Grid mode for checking out an array of small previews of your images; a Thumbnail List that presents the tiny previews in a single column you can scroll through rapidly; an Image Viewer mode (see Figure C.1) that shows a group of thumbnails along with an enlarged version of a selected image; a Geotag View that can place images with embedded GPS information (say, from the Nikon GP-1 device) on a Google map (see Figure C.2); and Full Screen mode, which allows you to examine an image in maximum detail. The program senses whether you have a secondary display (as I do), and when you press F will show the selected image full screen on that other monitor.
If you like to shoot RAW+JPEG, you can review image pairs as if they were a single image (rather than view the RAW and JPEG versions separately), and work with whichever version you need. The active focus area can be displayed in the image, and there are histogram, highlight, and shadow displays to help you evaluate an image. You can crop and straighten images, fix red-eye automatically, boost color, and make simple adjustments for exposure compensation, white balance, Picture Controls, Sharpness, Contrast, Brightness, and other parameters. That’s a lot of control for a simple file viewer.
Should you want to organize your images, there are 10 color-coded labels available to classify images by criteria such as images printed, images copied, or images sent as e-mail, and you can mark your best shots for easier retrieval with a rating system of one to five stars. ViewNX also allows you to edit embedded XMP/IPTC Information in fields such as Creator, Origin, Image Title, and suitable keywords. The utility can be downloaded from the support/download pages of the Nikon website at www.nikonusa.com.
Figure C.1 Nikon ViewNX is a great basic file viewing utility.

Figure C.2 Geotagged images can be placed on a map.

Nikon Transfer
It seems like everyone offers some sort of image transfer system that automatically recognizes when a memory card is inserted in a reader, or a digital camera like the Nikon D800 is attached to a computer using a USB cable. The most popular operating systems, from Mac OS X to Windows XP, Vista, and Windows 7 have their own built-in transfer programs, and Adobe includes one in its utilities for Bridge and Photoshop Elements includes one in its suite of utilities.
Nikon Transfer is particularly well-suited for D800 owners, because it integrates easily with other Nikon software products, including ViewNX and Nikon Capture NX 2. You can download photos to your computer, and then continue to work on them in the Nikon application (or third-party utility) of your choice.
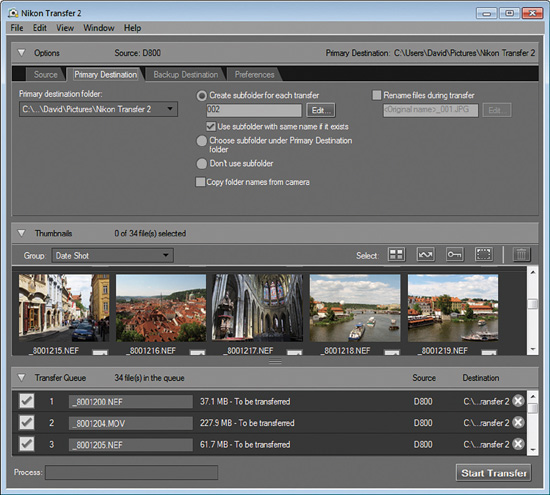
When a memory card is inserted into a card reader, or when the D800 is connected to your computer through a USB cable, Nikon Transfer recognizes the device, searches it for thumbnails, and provides a display like the one shown in Figure C.3. You can preview the images and mark the ones you want to transfer with checks to create a Transfer Queue.
Figure C.3 After Nikon Transfer displays thumbnails of the images on your memory card or camera, mark the ones you want to transfer.

Then, click on the Primary Destination tab (see Figure C.4) and choose a location for the photos that will be transferred. Nikon Transfer can create a new folder for each transfer based on a naming convention you set up (click the Edit button next to the box at top center in the figure), or copy to a folder named after the current folder in the D800’s memory card. You can keep the current filename as the files are transferred, or assign a new name with a prefix you designate, such as Prague12_. The program will add a number from 001 to 999 to the filename prefix you specify.
Figure C.4 Copy files to a destination you specify using an optional filename template you can define.
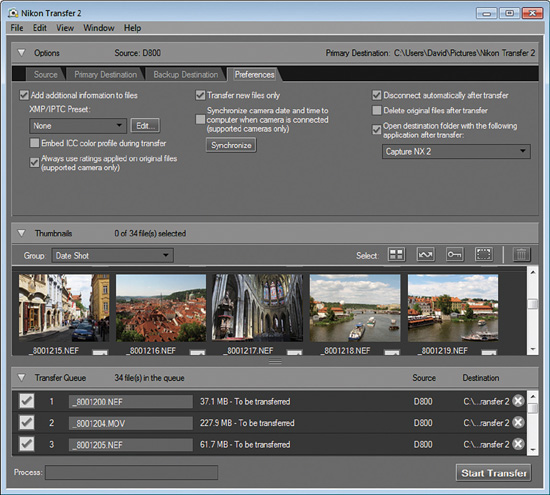
One neat feature is the ability to name a Backup Destination location, so that all transferred pictures can also be copied to a second folder, which can be located on a different hard disk drive or other media. You can embed information such as copyright data, star ratings, and labels in the images as they are transferred. When the file transfer is complete, Nikon Transfer can launch an application of your choice, set with a few clicks in the Preferences tab (see Figure C.5).
Nikon Capture NX 2
Capture NX is a pretty hefty chunk of software for the typical entry-level Nikon owner, but you, as a D800 buyer, should be up to it. However, this program is challenging to master (and is somewhat expensive at about $180, but available for about $130 from various sources), but if you’re ambitious and willing to plant your pitons for a steep climb up the learning curve, the program is indeed a powerful image-editing utility. It’s designed specifically to process Nikon’s NEF-format RAW files (although this edition has added the ability to manipulate JPEG and TIFF images as well). It includes an image browser (with labeling, sorting, and editing) that can be used to make many adjustments directly through the thumbnails. It also has advanced color management tools, impressive noise reduction capabilities, and batch processing features that allow you to apply sets of changes to collections of images. All the tools are arranged in dockable/expandable/collapsible palettes (see Figure C.6) that tell you everything you need to know about an image, and provide the capabilities to push every pixel in interesting ways.
Figure C.5 You can tell Nikon Transfer what to do after images are transferred in the Preferences tab.
Photographers tend to love Capture NX 2 or hate it, and it’s easy to separate the fans from the furious. Those who are enamored of the program have invested a great deal of time in learning its quirky paradigm and now appreciate just how powerful Capture NX 2 is. The detractors are usually those who are comfortable with another program, such as Photoshop or Lightroom and are upset that even the simplest functions can be confoundingly difficult for a new user to figure out. Capture NX 2’s murky Help system isn’t a lot of help; there’s room for a huge book (or two) to explain how to use this program.
For example, instead of masks, Capture NX uses Nik Software’s U Point technology, which applies Control Points to select and isolate parts of an image for manipulation. There are Color Control Points, with up to nine different sliders for each selected area. (See Figure C.7.) There are also Black and White Control points for setting dynamic range, Neutral Control Points for correcting color casts, and a Red-Eye Reduction Control Point that removes crimson glows from pupils.
Figure C.6 Capture NX 2’s tools are arranged in dockable palettes.

Figure C.7 Control Points are used to make common adjustments.

The workflow revolves around an Edit List, which contains a list of enhancements, including Camera Adjustments, RAW Adjustments, Light & Color Adjustments, Detail Adjustments, and Lens Adjustments, which can each be controlled separately. You can add steps of your own, cancel adjustments individually, and store steps in the Edit List as Settings that can be applied to individual images or batches. There are also Color Aberration Controls, D-Lighting, Image Dust Off, Vignette Control, Fisheye-to-Rectilinear Image Transformation (“de-fishing”), and a Distortion Control to reduce pincushion and barrel distortion.
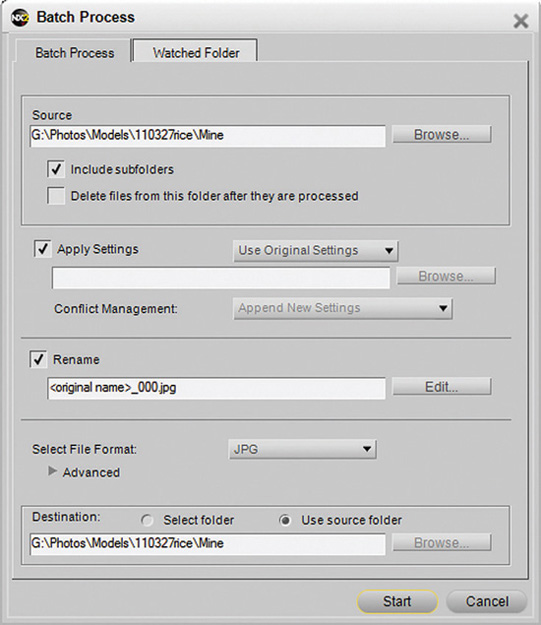
I really love NX 2’s Batch Process mode, which lets me apply a set of adjustments to an entire folder of images in one step. You can choose a specific folder, or select a “watched” folder in which any new files inserted will be processed automatically. (See Figure C.8.) I use the batch facility a lot to create duplicate files in an alternate format. Perhaps I’ve shot several hundred images in RAW, and now want some quick-and-dirty JPEGs to distribute, say, to a model who has donated her time in exchange for pictures. It’s unlikely that the model can work with NEFs, so I can use NX 2 to crank out her JPEGs automatically. Batch mode is also useful for renaming files after-the-fact.
Figure C.8 NX 2 allows processing whole groups of files in a batch.
Nikon Camera Control Pro
Nikon’s Camera Control Pro ($180) is a versatile utility that allows you to communicate directly with your camera from your computer through a USB cable. Once the two are linked, you can perform a variety of functions:
![]() Shoot stills and movies remotely. Just about any shooting function you can adjust on the camera can be performed remotely, as you can see from the cluster of tabbed dialog boxes. Set exposure mode, adjust the aperture, add or subtract exposure compensation, choose a focus area, change ISO sensitivity or white balance—all are at your command through the software. You can even change Quality and Size settings, turn on auto bracketing, and change image optimization settings. You can optionally disable the controls on the camera, to prevent having settings you made at the computer changed accidentally.
Shoot stills and movies remotely. Just about any shooting function you can adjust on the camera can be performed remotely, as you can see from the cluster of tabbed dialog boxes. Set exposure mode, adjust the aperture, add or subtract exposure compensation, choose a focus area, change ISO sensitivity or white balance—all are at your command through the software. You can even change Quality and Size settings, turn on auto bracketing, and change image optimization settings. You can optionally disable the controls on the camera, to prevent having settings you made at the computer changed accidentally.
![]() Preview your shots remotely. Of course, shooting remotely is most useful only when you can see what you’re capturing from your computer. Camera Control Pro has a full tethered shooting mode for the D800 that shows the live view image on your computer display. If you’re capturing video, you can even see the current audio levels at the bottom of the screen. (See Figure C.9.)
Preview your shots remotely. Of course, shooting remotely is most useful only when you can see what you’re capturing from your computer. Camera Control Pro has a full tethered shooting mode for the D800 that shows the live view image on your computer display. If you’re capturing video, you can even see the current audio levels at the bottom of the screen. (See Figure C.9.)
![]() Download directly to your computer. When shooting, especially when doing time-lapse photography, it’s convenient to use Camera Control Pro to transfer the images you take directly to the computer in tethered mode.
Download directly to your computer. When shooting, especially when doing time-lapse photography, it’s convenient to use Camera Control Pro to transfer the images you take directly to the computer in tethered mode.
![]() Upload comments. Frustrated by the Nikon D800’s text entry screen? Edit your Image Comment and upload it directly to the camera from your computer keyboard.
Upload comments. Frustrated by the Nikon D800’s text entry screen? Edit your Image Comment and upload it directly to the camera from your computer keyboard.
![]() Create and save custom curves. You can load a sample image and create a special tone compensation custom curve for that image using tools similar to those found in Photoshop.
Create and save custom curves. You can load a sample image and create a special tone compensation custom curve for that image using tools similar to those found in Photoshop.
![]() View and change Custom Settings. This is one of my favorite features. While changing the Custom Settings for any of the Custom Settings options using the D800’s menus isn’t difficult (particularly after you’ve absorbed the information in Chapter 12), Camera Control Pro makes playing with these options a joy.
View and change Custom Settings. This is one of my favorite features. While changing the Custom Settings for any of the Custom Settings options using the D800’s menus isn’t difficult (particularly after you’ve absorbed the information in Chapter 12), Camera Control Pro makes playing with these options a joy.
Figure C.9 See what you’re shooting in the live view mode.

The amount of control you have over the D800’s shooting functions is amazing, as you can see in Figures C.10 and C.11:
![]() Make exposure adjustments. Choose exposure mode, shutter speed (in Shutter-priority mode), aperture (in Aperture-priority mode), or both (in Manual mode), and exposure compensation. You can preview the effects of your exposure adjustments on the screen of your remote computer using live view. (See Figure C.10, left.)
Make exposure adjustments. Choose exposure mode, shutter speed (in Shutter-priority mode), aperture (in Aperture-priority mode), or both (in Manual mode), and exposure compensation. You can preview the effects of your exposure adjustments on the screen of your remote computer using live view. (See Figure C.10, left.)
![]() Set focus point, ISO, White balance, etc. Select the exact focus point when using an AF-area mode where the point is user selectable, plus parameters like metering mode, flash sync mode, ISO, and white balance. (Figure C.10, center.)
Set focus point, ISO, White balance, etc. Select the exact focus point when using an AF-area mode where the point is user selectable, plus parameters like metering mode, flash sync mode, ISO, and white balance. (Figure C.10, center.)
![]() Choose file format. Set all your image size and quality parameters, including bit depth and compression, plus destination for your captured images—PC, memory card slot (your choice), or both. (Figure C.10, right.)
Choose file format. Set all your image size and quality parameters, including bit depth and compression, plus destination for your captured images—PC, memory card slot (your choice), or both. (Figure C.10, right.)
![]() Fine-tune focus and other settings. You can choose AF-Area mode, select an AF mode, activate bracketing, and monitor battery level, as shown in Figure C.11, left.
Fine-tune focus and other settings. You can choose AF-Area mode, select an AF mode, activate bracketing, and monitor battery level, as shown in Figure C.11, left.
![]() Use Picture Controls, HDR, or A-DL. Select a Picture Control or Active D-Lighting setting on the fly, launch into automatic HDR mode, and adjust things like noise reduction. (Figure C.11 center.)
Use Picture Controls, HDR, or A-DL. Select a Picture Control or Active D-Lighting setting on the fly, launch into automatic HDR mode, and adjust things like noise reduction. (Figure C.11 center.)
![]() Select movie settings. Every setting you can make from the camera for movie-shooting is available (Figure C.11, right), including your choice of destination memory card and whether to store your clip in the camera, on your PC, or both.
Select movie settings. Every setting you can make from the camera for movie-shooting is available (Figure C.11, right), including your choice of destination memory card and whether to store your clip in the camera, on your PC, or both.
Figure C.10 Three dialog boxes allow making exposure adjustments, setting parameters like white balance, or selecting a file format.

Figure C.11 You can also fine-tune focus, work with Picture Controls, and choose movie settings.

Other Software Tools
When it comes down to serious image editing software, for most D800 owners the choice falls to one of two Adobe products—Adobe Photoshop or Adobe Lightroom. Or, perhaps, both, as these two applications are in many ways complementary. If you haven’t decided which camp you belong with, this section will provide a quick comparison to help you decide. But, because the choice of software used for image manipulation and/or cataloging is so personal, I recommend you explore your options fully through the magic of Google searches. This D800 guide concentrates on the use of photography equipment and camera techniques, and doesn’t pretend to be the last word on any software choice.
What About the Also-Rans?
Of course, there’s plenty of room for other software tools. For image editing and management, you might consider Adobe Photoshop Elements, Adobe Photoshop Premiere Elements (which adds movie editing/production features), Apple’s Aperture and iPhoto products, and various Corel offerings, including Corel Painter, Corel Paintshop Pro, and Corel PhotoImpact. Corel also offers a good non-destructive editing/RAW file converter utility called AfterShot Pro.
While all these programs have their fans, you’ll find that for owners of advanced cameras like the D800, Photoshop and Lightroom end up being the applications of choice. The Elements programs, while easier to use than Adobe’s other offerings, may not have the professional-level features you need, including advanced selection tools. Keep in mind that Photoshop and Lightroom experience are actual marketable skills, and nobody ever enhanced their resume by listing Elements Guru next to their name.
Because photography and graphics are two arenas in which the Macintosh is especially strong, you’d suspect that Aperture would also be a strong contender among those who have outgrown iPhoto. You’d be correct, but, still, both Photoshop and Lightroom are predominant on both PC and Mac platforms. However, Lightroom and Aperture are more alike than they are different, especially as they differ from Photoshop. So your choice of image software may very well boil down to Photoshop or Lightroom/Aperture.
Your research will also uncover specialized tools like DxO Lab’s DxO Optics Pro, which is ostensibly an image quality enhancement utility that “cures” some of the ails that plague even the best lenses. It also features a RAW conversion engine that uses a new demosaicing algorithm to translate your NEF files into images with more detail, less noise, and fewer artifacts. These features meld well with the program’s original mission: fixing the optical “geometry” of images, using settings custom-tailored for each individual lens. (I’m not kidding: when you “assemble” the program, you specify each and every camera body you want to use with Optics Pro, and designate exactly which lenses are included in your repertoire.)
Once an image has been imported into Optics Pro, it can be manipulated within one of four main sections: Light, Color, Geometry, and Details. It’s especially useful for correcting optical flaws, color, exposure, and dynamic range, while adjusting perspective, distortion, and tilting. If you own a fisheye lens, Optics Pro will “de-fish” your images to produce a passable rectilinear photo from your curved image.
Another RAW converter is Phase One Capture One Pro, aimed at photographers with high-volume needs (that would include school and portrait photographers, as well as busy commercial photographers). C1 Pro is available for both Windows and Mac OS X. Its latest features include individual noise reduction controls for each image, automatic levels adjustment, a “quick develop” option that allows speedy conversion from RAW to TIFF or JPEG formats, dual-image side-by-side views for comparison purposes, and helpful grids and guides that can be superimposed over an image. Photographers concerned about copyright protection will appreciate the ability to add watermarks to the output images.
You may find BreezeSystems’ NKRemote an attractive PC-only alternative to Nikon Camera Control Pro, and its latest Version 2.4 is compatible with both the D800 and D4. It links to your camera through the USB cable, and offers direct control of virtually every camera control through a well-designed user interface. You can shoot time-lapse photos to capture flowers blooming, construction sites constructing, or dawns breaking. It’s easy to adjust Picture Controls from your PC, too. One of my favorite features is the Photo Booth capability, which you can set up to operate like one of those three-shots-for-a-dollar photo booths at the County Fair. In this mode, the software automatically takes a series of photos in sequence, and then immediately prints them out. If you’re a professional (or aspiring pro), you can set up your photo booth at an event; otherwise, the feature is great fun to use at home.
Photoshop, Lightroom, or Both?
I’ve been using Photoshop since Version 2.0, and as far back in the 1980s struggled with a variety of other programs with names like Digital Darkroom, Image Studio, Picture Publisher, SuperPaint, UltraPaint, Dr. Halo, and Gray F/X (believe it or not, many early image editors could not handle color photos). Over the years, Photoshop has grown from being a simple image-editing program that was difficult to learn to a complete suite with basic and “extended” versions, and the capability to satisfy everyone from photographers to graphic designers to 3D artists working on motion picture production. It’s gone from being difficult to learn to something akin to quantum mechanics: nobody seems to know everything about it, and most of us could spend a lifetime adding little pieces of expertise in it to our repertoires.
Today Photoshop folds the capabilities of many other applications into its bulk. It does a decent job of assembling multiple RAW images into an HDR photograph. It retouches, it color corrects, it does an amazing job of compositing, and it can tame noise and create animations. My biggest relief when I upgraded to Photoshop CS6 was that, unlike some previous versions, the new edition was enough like the old one that I was able to use it comfortably from Day One. Drastic paradigm shifts are not as bad as they appear to be—but not when I’m trying to get work done.
Lightroom, on the other hand, is a newer tool that has some limited image-editing features similar to some of the pixel manipulation tools in Photoshop. However, the intent of Lightroom is to function as a workflow management application. Photoshop can do just about anything, except help you manage 100,000 different images effectively (even using its Bridge and Mini-Bridge organizing tools). Lightroom can’t do everything, but it excels at giving you a way to manage tens or hundreds of thousands of images easily. In these days of inexpensive, huge hard drives, bracketing, and ridiculously fast continuous shooting rates, it’s easy to amass that many photos. Two 3TB internal hard drives in my computer are dedicated to storing the images I shoot. (Don’t worry, all those photos are safely backed up to a pair of 6TB RAID-like arrays, plus multiple duplicate hard drives stored off-site.) It would be impossible to manage all those images without something like Lightroom.
The secret behind Lightroom’s image management prowess is a database it builds automatically from the EXIF data embedded in each image, with information that includes the camera model, date and time the image was captured, shutter speed, aperture, ISO, white balance, and other information. You can add more information to its catalog, including keywords that will help you retrieve a specific image later, and star ratings. (See Figure C.12.)
Figure C.12 Lightroom’s cataloging features are second to none.

Lightroom’s Develop module (see Figure C.13) includes correction using histograms, cropping/straightening, the ability to remove spots and correct red-eye problems, along with white balance. The exposure tools include recovery, fill light, blacks, brightness/contrast, clarity, vibrance, and saturation modules, similar to those found in Adobe Camera Raw. You can also adjust curves, perform sharpening and noise reduction, correct lens distortion, chromatic abberration, and vignetting from profiles specific for each lens. When you’re done with your images, you can assemble them into slide shows or web galleries quickly. (See Figure C.14.)
Photoshop has all those image manipulation tools—many of them embedded in Adobe Camera Raw. (See Figure C.15.) Indeed, when a new release of ACR becomes available, the update fine-tunes both Lightroom and Camera Raw to offer the same functionality. But while Photoshop has more extensive image-editing features, including sophisticated selection (including Skin-Tone Selection), layering, and masking tools, its changes to your files are usually “destructive.” You’ll need to save snapshots as you work, or use a limited history of Undo steps to reverse your changes. Lightroom, in contrast, never applies permanent changes to the original file.
Figure C.13 Lightroom’s Develop module can handle the majority of image-editing tasks.

Figure C.14 Create web galleries quickly from images you select.
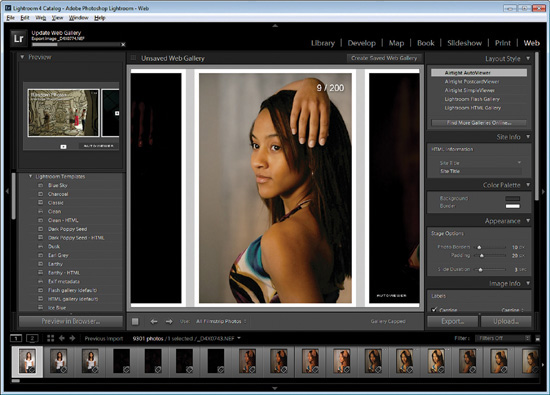
Figure C.15 Adobe Camera Raw allows you to fine-tune images before they are imported into Photoshop.

Which to choose? If you have large numbers of images to catalog and don’t need the most advanced Photoshop editing tools, Lightroom may be your best bet for organizing your workflow. While Photoshop includes image management in its Bridge module, there is no database catalog system comparable to Lightroom available in Photoshop. Lightroom is also best for batch processing many files quickly. You’ll probably find it easier to learn.
If you need to manipulate your images in complex ways, including compositing to combine objects from one image to another (or to move objects around within the same image), or to creatively remove unwanted image areas, dig in and learn Photoshop (see Figure C.16) in more depth. My favorite capabilities are probably Photoshop’s Content Aware editing tools, including the new Content Aware Move tool in CS6 that lets you seamlessly replace part of an image with a pattern that resembles the surrounding area. Should you be shooting a lot of movies with your D800, Photoshop CS6 is a great deal more video-friendly than the last edition of the program.
Now, should you need both the most sophisticated editing tools available and comprehensive workflow/image management capabilities, you probably will want both Photoshop and Lightroom. Buying both—even if you qualify for upgrades for one or the other—isn’t cheap. The full version of the basic Photoshop CS6 program costs $700, or $199 for the Photoshop CS 6 upgrade, if you don’t want to “subscribe” for $19.99 per month. Lightroom 4 is $149 or around $80 for the Lightroom 4 update. But if you want to get the most from your $3,000-$3,300 Nikon D800, having the right tools is well worth the investment.
Figure C.16 Photoshop CS6 has a huge number of palettes, menus, and tools to work with.
