
CHAPTER 9
Other Shapes
The great thing about inexpensive gear and quick build times is that they encourage experimentation. If a new design completely fails to fly, all I have lost is a few evenings and $5 worth of foam. While my ego may take a beating, my wallet and schedule have not. Another advantage of quick builds is that I can finish the experiment before my enthusiasm runs out. This chapter exists because it is so easy to play.
This chapter gives sufficient information for an experienced Brooklyn Aerodrome hacker to re-create these planes. I address why the airplane was built, design considerations, potential weaknesses, and areas of possible improvement. Some are very difficult to fly; none are hard to build. Have fun, and send me pictures of what you come up with to [email protected].
Inorganic Produce
The Banana, Strawberry, and Carrot planes in Figure 9-1 came to be as the result of Canadian artist Andrew de Freitas.
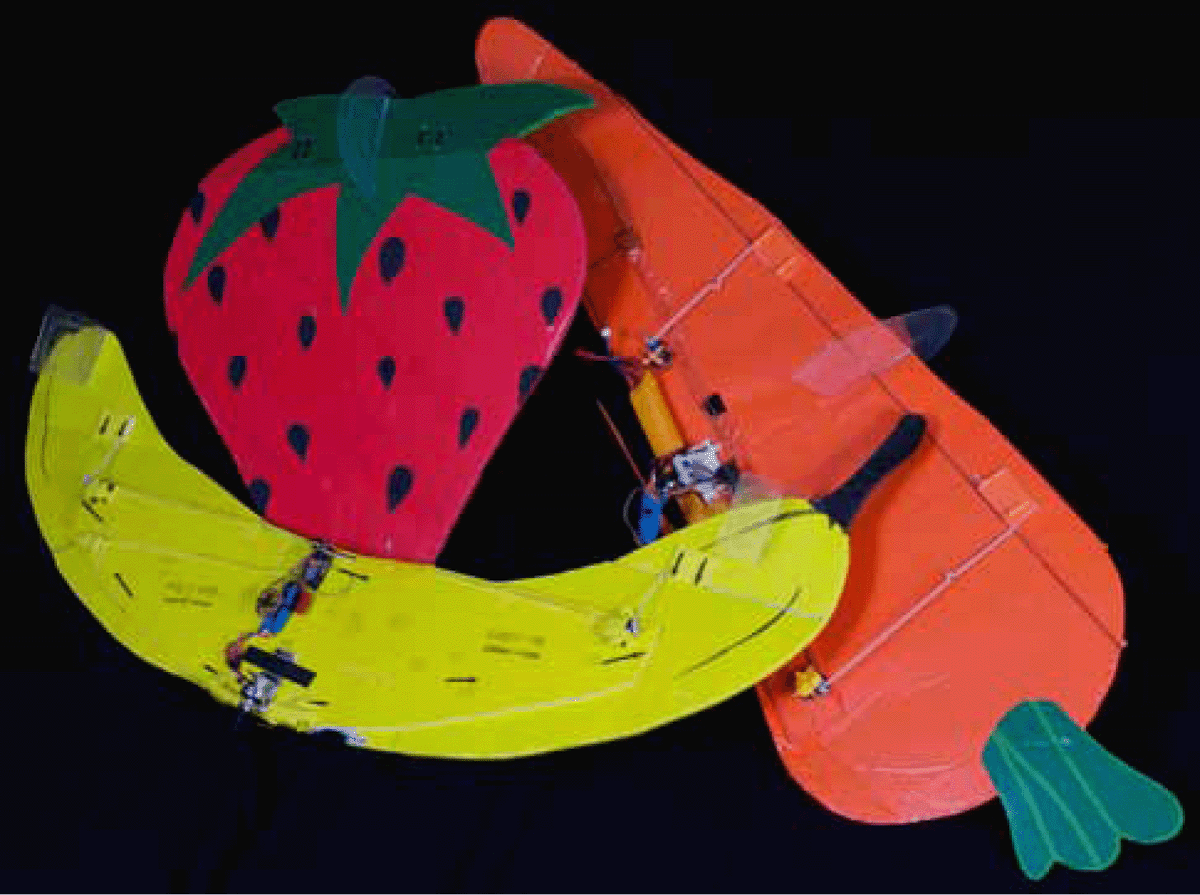
FIGURE 9-1 The planes of a collaboration with Andrew de Freitas.
Here’s the initial communication:
I am an artist and filmmaker originally from New Zealand but currently living and working in Montreal. I am in the process of developing a meandering film that weaves a narrative through documentary footage. The starting point for the film is a set of fibreglass fruits hanging from an awning at a grocer’s store here in Montreal. By tracing the history of these strange, enlarged objects, the film will take various turns. One turn I would be very interested in taking is toward the Brooklyn Aerodrome. Do you think it would be possible to make a flying banana or other kind of fruit item? I am eager to know and hope that—if it is possible—we can work together and incorporate this into the film project.
Andrew came to New York, and together we prototyped, built, and shot video over the course of a few days. All the planes were drawn out on blue foam and decorated by Andrew. I then added the flying gear—it was a fun collaboration. You can see the gliders we tested in Chapter 11. Technical details of the aircraft are given below.
Banana
The Banana reigns supreme in the minds of children as the most popular Brooklyn Aerodrome aircraft ever, other than the Flack. It is a shame that I rarely can fly it at fairs because it needs a lot of room to take off and land. It flies surprisingly well once it has some airspeed. It has the best glide ratio of any of our aircraft. Figures 9-2 and 9-3 show the outline. Note that there is a deck spanning the wing, adding considerable strength.

FIGURE 9-2 Top view of the Banana.
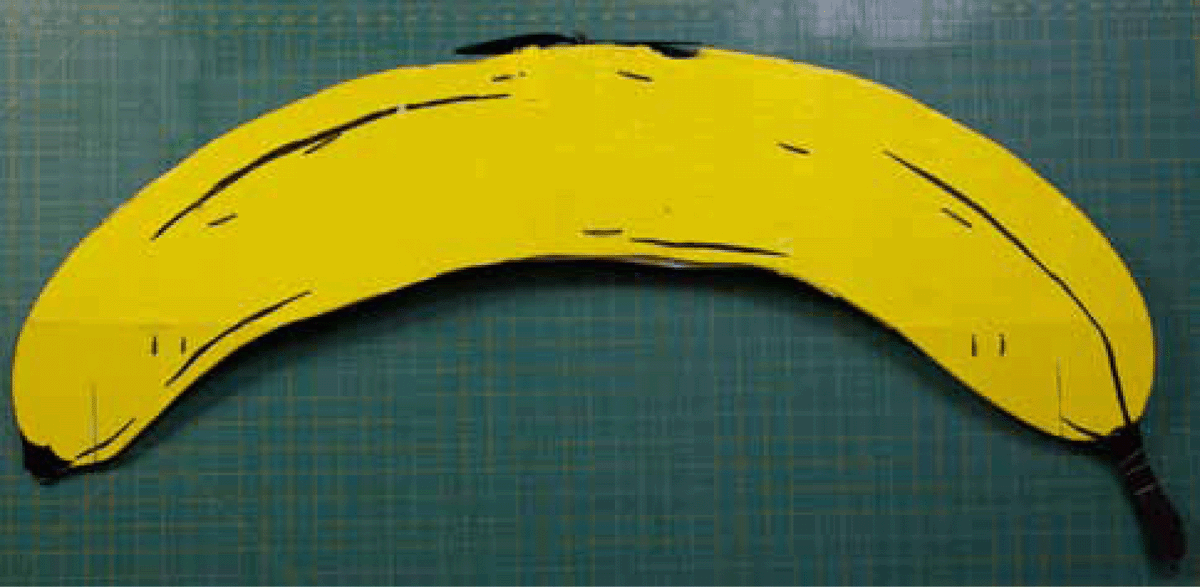
FIGURE 9-3 Bottom view of the Banana.
Its characteristics are as follows:
• Wing span: 46 inches
• Chord at center: 8.25 inches
• Center of gravity (CG): 4.5 inches from the leading edge
• Surface area: Unknown
• Wing loading: Unknown
• Weight: 581 grams
• Construction: Coroplast; blue foam covered with paper gift wrap; food-container lids for stabilizers
• Flight performance: Stable; long launch and landing area needed; not particularly acrobatic
Given the odd shape, the control surfaces were a bit of an experiment. They were sized by the “that looks about right” (TLAR) method, and the vertical stabilizers were cut out of clear take-home containers and attached to the elevons, as shown in Figure 9-2. The Banana flies remarkably well without stabilizers at all, but it requires a bit of subtlety to control the adverse yaw that the fixed stabilizers handle automatically.
Note that the servos are very close to the control surface, which made it simpler to set up the elevons, but extensions had to be soldered onto the leads. The outer holes of the servo arms were used to maximize control throw. I often do this with prototypes with unknown flight characteristics to ensure sufficient control authority. These throws are appropriate and fly very well.
The Banana and all the “inorganic produce” planes were set up with tractor propellers to minimize the visual impact of the propulsion system. Prop holes in the middle of these planes would have been a visual distraction. While they are not as safe as our midprop designs, these planes are much quieter and more prone to motor/prop damage on landing.
The Banana required a substantial amount of nose weight to balance on the CG, which was found to be 4.5 inches from the leading edge by experimentation. Discarded tire weights were placed on the leading edge of the wing around the propeller to achieve balance.
Flying the Banana is a pleasure if there is sufficient room to take off and land. It can barely loop and roll, but it does to a reasonable job of gliding, and people love to see it fly. I have flown it at the Figment Festival on Governor’s Island in New York over the past few years. Despite being covered in paper, it has held up remarkably well, and there is no reason not to expect to see it for a third year at the Figment Festival.
Carrot
The Carrot was a particular challenge because it didn’t present an obvious direction of flight. Flying with the sharp end forward is the most obvious approach, but very low aspect ratio wings can be tricky to fly, and I was not sure of how to get the control surfaces functional. Pitch control should not be a problem, but given the narrow wing, roll control might be an issue. Flying it blunt end first could work but was even less appealing from a control-surface standpoint.
The decision was made to fly it edgewise, which had the consequence that the Carrot was asymmetric, with one short, stubby wing and one long, thin wing, as shown in Figures 9-4 and 9-5. Getting this arrangement to work required determining where to split the wing in half. The details of how this was done are given in Chapter 10, but the short story is that the short, stubby wing is not as efficient as the long, thin wing in generating lift, so it requires more surface area. This, in turn, forces the center of the wing 2½ inches to the right. There is a large clear food container top acting as a stabilizer between the elevons, which was adequate, but still very close to the CG, which limited its effectiveness. Twin stabilizers may have been a better choice. As with the Banana, it needed a substantial amount of lead weight to achieve the 3-inch CG as measured from the leading edge at the motor.

FIGURE 9-4 Top view of the Carrot, one of the few asymmetric aircraft at the Brooklyn Aerodrome.
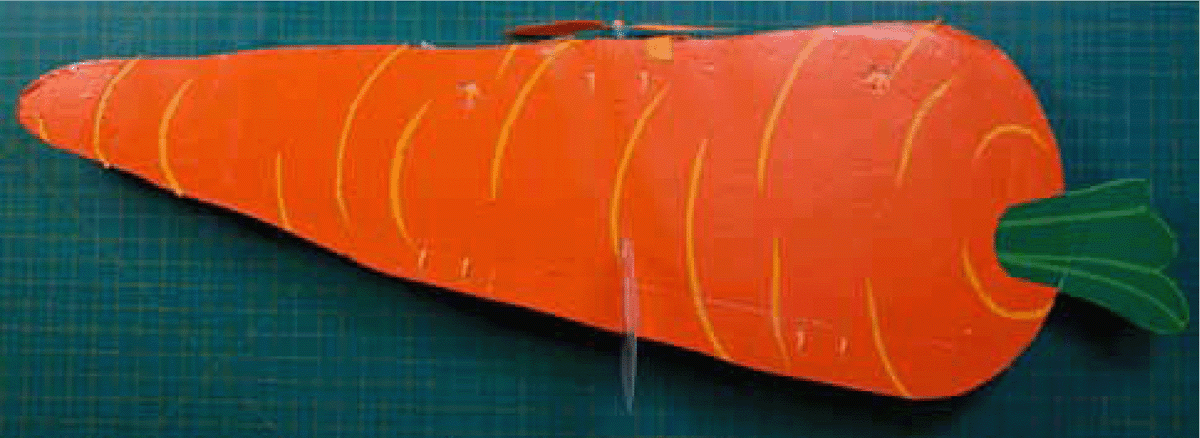
FIGURE 9-5 Bottom view of the Carrot, quite pretty for a vegetable that few people care for.
Flying the Carrot was quite a challenge. It had a bad tendency to tip stall, so it was vital to keep the airspeed up (a tip stall is when one wing stops generating lift, and the plane spirals toward the ground). It turned better to the right than the left because the high-aspect-ratio wing (long and skinny) did a better job of generating lift on the inside of the turn than the short, stubby wing. It was not a very fun plane to fly. It probably could be made to fly better with more work, but once we were done with the movie shoot, it never became a priority.
• Chord at center: 12 inches
• CG: 3 inches from the leading edge at the motor
• Surface area: 416 square inches
• Weight: 20 ounces
• Construction: Coroplast; blue foam covered with paper gift wrap; food container lids for stabilizers
• Flight performance: Nasty tip stall; turns better to the right; a handful to fly
Strawberry
The Strawberry was the conceptually easiest plane to design because it was quite close to being a delta wing. It was the only one of the “inorganic produce” collection that was designed without a full-scale prototype, but a glider was used to test its asymmetric flight properties that ultimately were not used in the design. It uses classic construction with a deck, tractor prop, and standard elevon layout and a clear stabilizer, as shown in Figures 9-6 and 9-7.

FIGURE 9-6 Top view of fast-flying Strawberry.
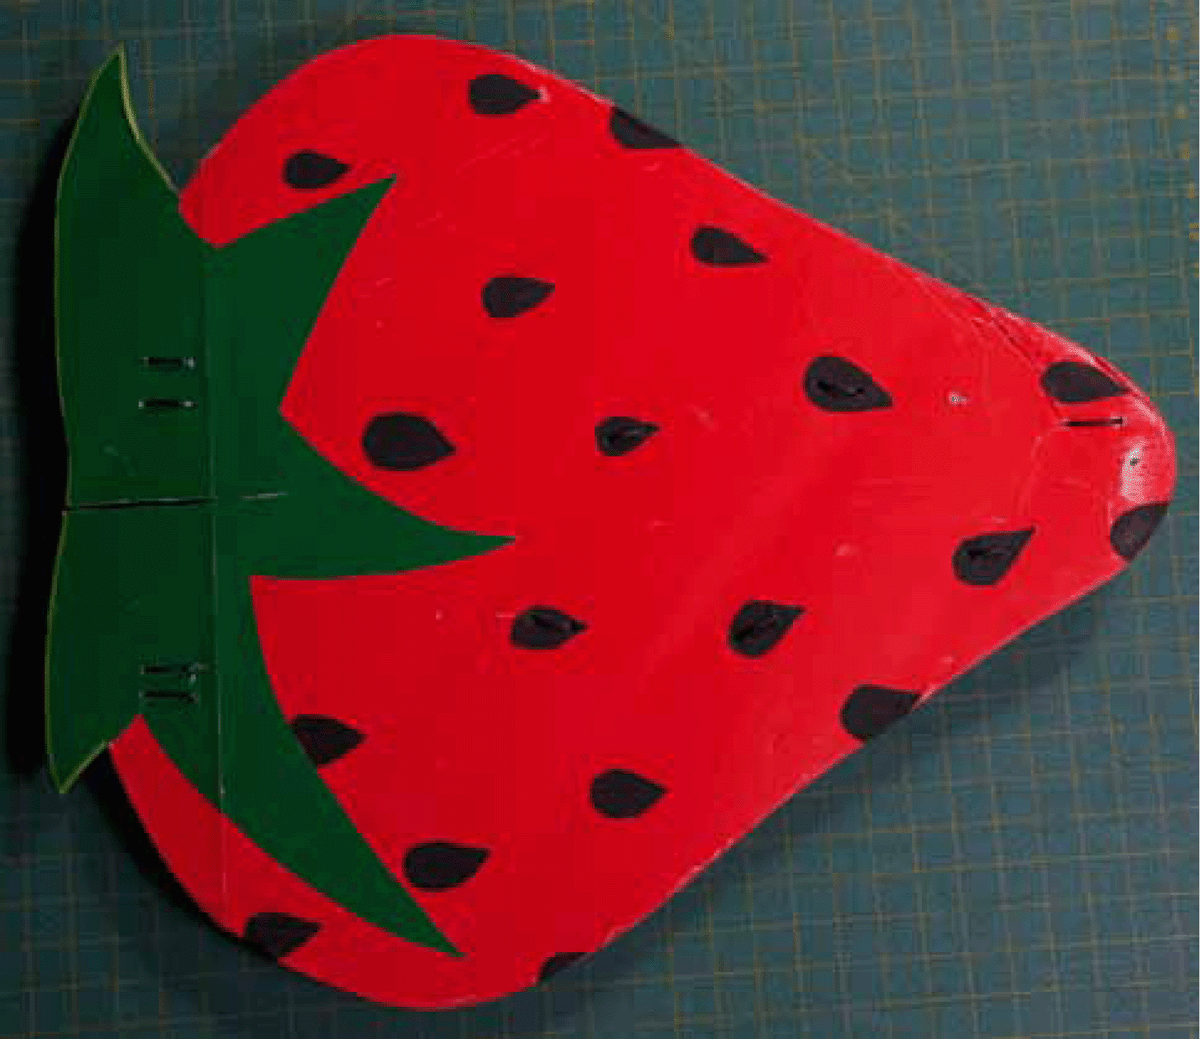
FIGURE 9-7 Bottom view of the Strawberry.
Because it is the smallest of the three planes, it had the highest wing loading and was quite aerobatic. It did not glide very well, though, and it had to be powered until just before landing. It did not stall gracefully and needed to be flown fairly fast.
• Wing span: 23 inches
• Chord at center: 26 inches
• CG: 10 inches from the leading edge
• Surface area: Unknown
• Weight: 16 ounces
• Construction: Coroplast; blue foam covered with paper gift wrap; food container lids for stabilizers
• Flight performance: Fast airplane with very poor glide ratio; quite aerobatic
Of the “inorganic produce” series, only the Banana sees continued use because it flies so well and amuses onlookers so much. The Carrot just doesn’t seem to generate the same enthusiasm. Next up is the Flying Heart.
Flying Heart
The Flying Heart was created for the Escape2NY Music Festival. The festival was done by the same folks who do Secret Garden Party in England, which is a Victorian-themed event, so something Alice in Wonderland-based was desired. What better than a flying heart that ended up looking like a flying spade (Figure 9-8).
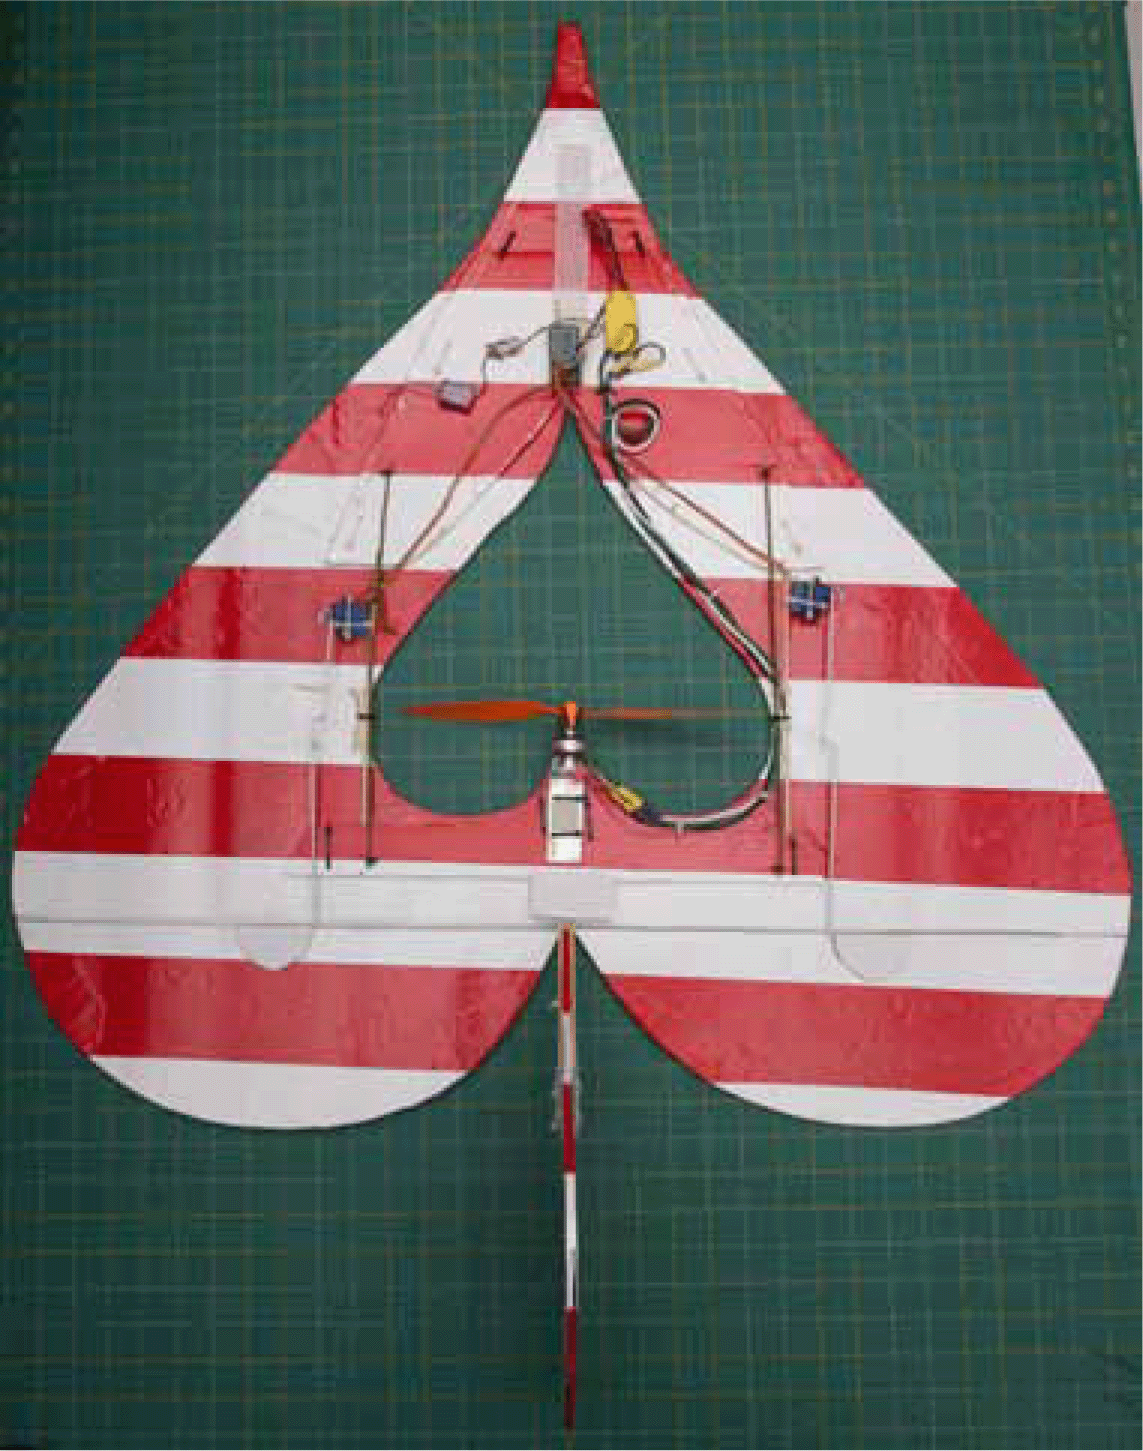
FIGURE 9-8 Top view of the Flying Heart.
SketchUp Is Your Friend
The basics of the design were done in Google SketchUp, which provided some crucial advantages over the free-hand approach used with “inorganic produce.” I used SketchUp to do the following:
1. I explored different versions of the basic heart shape. SketchUp allowed me to experiment with prop placement, width/length, and fitting inside the travel container.
2. The surface-area calculation in SketchUp allowed me to maintain important design parameters, including
a. Keeping the wing area of the Heart similar to that of the Flack. With similar wing loading, I was more confident that the airplane would fly with standard Flack gear.
b. Mirroring the elevon area of the Flack.
c. Determining the likely CG of the Heart. It was at the line that divides the wing into 25 and 75 percent of the surface area.
3. I produced full-scale plans to guide cutting the foam on a series of 8½- X 11-inch sheets. The full design was printed out onto 20 sheets. Joining them was quite time-consuming. To make joining and aligning the sheets easier, I added a chain-link-fence pattern to the wing, as done with the Manta Ray later in this chapter.
Once the Heart was cut out of the foam and the tail removed from the center, I began to flex the foam to see what kinds of reinforcement would be needed. I built two versions of the heart, one with purple balloon film and the other with sign vinyl. Since neither of these materials adds much stiffness, a Coroplast deck was added from stripes 2 through 5 back from the nose. The motor mount also was on Coroplast at the ninth stripe back. Note the hangers that have been added between the fore and aft Coroplast sections to add stiffness. If I were to build the Flying Heart again, I would extend the deck to be continuous with flutes going fore to aft.
The placement of the motor raised the issue of where the electronic speed controller (ESC) would go. Because of CG considerations, the battery would have to go as far forward as possible. Two options exist:
1. Bring the battery power to an aft-mounted ESC and receiver, which would allow very close placement of servos to the elevons.
2. Keep the ESC close to the battery, and run long motor leads and long control rods.
A largely unknown aspect of ESC design is that ESCs are not tolerant of long battery leads because of voltage induction spikes that occur when the ESC is switching on and off at a very high rate. So option 2 makes sense. The ESC can be modified with capacitors if there is no other solution.
A novel feature is that the tail is mounted on a Coroplast hinge that allows it to kick up on landing. It works very well.
The Flying Heart remains a huge success for the Brooklyn Aerodrome. The striped version is visually striking and flies like it is on rails. It is not very acrobatic, but it is a great cruiser that responds well to difficult flying conditions. It would likely make a fun night flyer as well.
Wing span: 32 inches
Length: 41 inches
CG: 10.5 inches from the elevon hinge
Surface area: Unknown
Weight: 605 grams
Construction: Coroplast; blue foam covered with balloon film or sign vinyl; bamboo skewers
Flight performance: Great flying airplane that cruises very well; has nicely controllable glide and climbs well
Travel Flack
The Travel Flack is meant to be a maximally portable version of the Flack. The box in Figure 9-9 contains a Flack and a charger and transmitter in a 15- × 16- × 3-inch case with a shoulder strap. It has flown as far south as Savannah, Georgia, as far west as the Black Rock Desert in Nevada, up to Warren, Vermont, in a northern direction, and as far east as East Hampton, New York. It is also a night flyer and has been taken out by a snowball in Alta, Utah. Visit this book’s website for more detail about this design.

FIGURE 9-9 Travel Flack halfway folded up.
Bat
The Bat (Figure 9-10) is another SketchUp-designed plane that would have been very difficult to create without the flexibility of the tool. Like the Flying Heart, the Bat had to fit in a standard-sized shipping container.
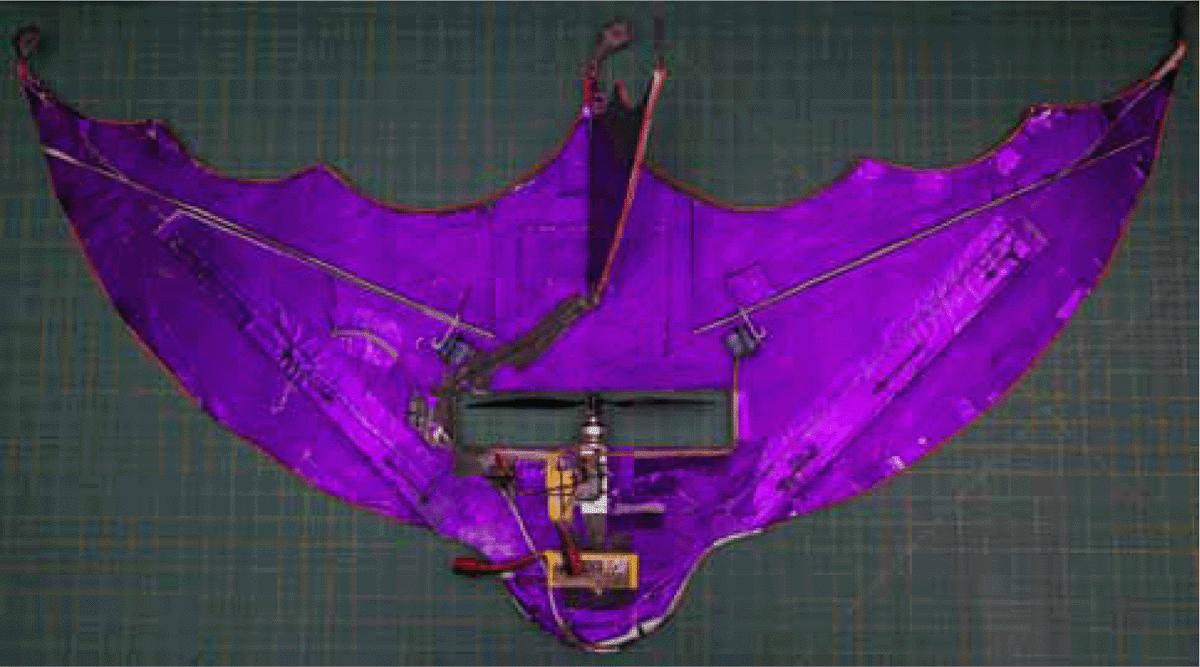
FIGURE 9-10 The Bat in all its aluminized glory.
The Bat did not go through a prototyping phase because I was extremely confident that it would fly given the surface area of the wings and their shape. What was more challenging with the bat was determining how to get the predicted CG given the size of the airframe and have it fit in the same amount of space as the Flack.
The interesting features of the airplane include the following:
1. Stiffening of the 48-inch span was achieved with another layer of blue foam glued in the back and zip-tied on the front edge, as shown later in Figure 11-4.
2. The covering was balloon plastic that added no additional stiffness.
3. The stabilizer is just another copy of the wingtip cut at 11 inches from the tip.
4. Electroluminescent wire (el-wire) was loosely attached to the elevons with enough slack to allow for full up and down movement.
5. The plane used an extra battery pack to balance the CG. The extra weight did not seem to affect flight performance very much. If I had been thinking, I would have driven the el-wire off the extra battery.
The Bat is the most relaxing night flyer I have ever flown. It flies like it is on rails, is extremely stable, and very clearly presents orientation information that significantly reduces pilot workload when flying. It does take a while to lose altitude with a fairly good glide ratio. It was flown a great deal at Burning Man 2011 and at Escape2NY.
• Wing span: 48 inches
• Length: 24 inches
• CG: 9 inches from the nose
• Surface area: Unknown
• Weight: 630 grams
• Construction: Blue foam covered with balloon film; el-wire edge illumination
• Flight performance: Great flying airplane that cruises very well; has nicely controllable glide and climbs well; look great in the air; most relaxing night flyer ever
Crystal Towel
A pilot walks into a bar carrying a Flack after a successful flight test. Some guy sitting next to him says, “Wow! What is that?” In the ensuing conversation (sorry, no punch line), it turns out that Pierre, who does sets for movies and plays, had a bunch of material that he was going to throw out. The result of that conversation was acquisition of polycarbonate greenhouse roofing that eventually made it into what is known as the Crystal Towel, shown in Figure 9-11. It is clearly a creature of the night, as shown in Figures 1-4 and 8-1.
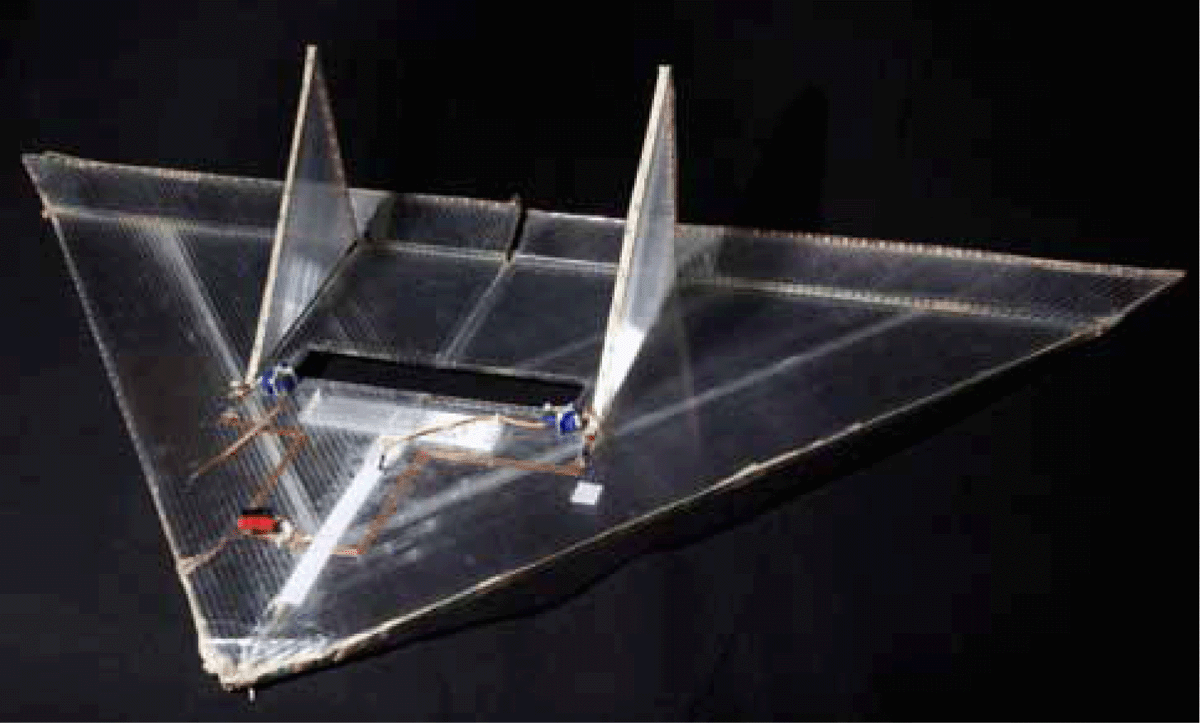
FIGURE 9-11 Crystal Towel in its most unassuming state. Crash damage is visible on the nose.
The wing and stabilizers are made of 6-millimeter polycarbonate with pink strip LEDs illuminating from the edges of the wing and stabilizers. The plane is built to the same dimensions as the Flack with the elevons extended a bit to make the airplane a perfect triangle. The greatest refractive effect is achieved by placing the LEDs parallel to the flutes, which motivated splitting the wing down the middle. That, in turn, led to needing to add a stiffening spar across the middle of the wing.
The polycarbonate is very difficult to cut with a knife. I did not use a saw because I didn’t want polycarbonate dust in the fluting. It was probably not worth the trouble.
To run power to the LED strips, I created a system of traces using stained-glass copper edging tape. The tape is very useful for low amperage (1 ampere or less power routing on rigid airframes), which is sufficient for servos and various lighting applications. The copper tape is not good for airframes that flex because it tends to get stress fractures. All soldering was done directly on the polycarbonate, but it has to be done quickly so as not to burn the plastic.
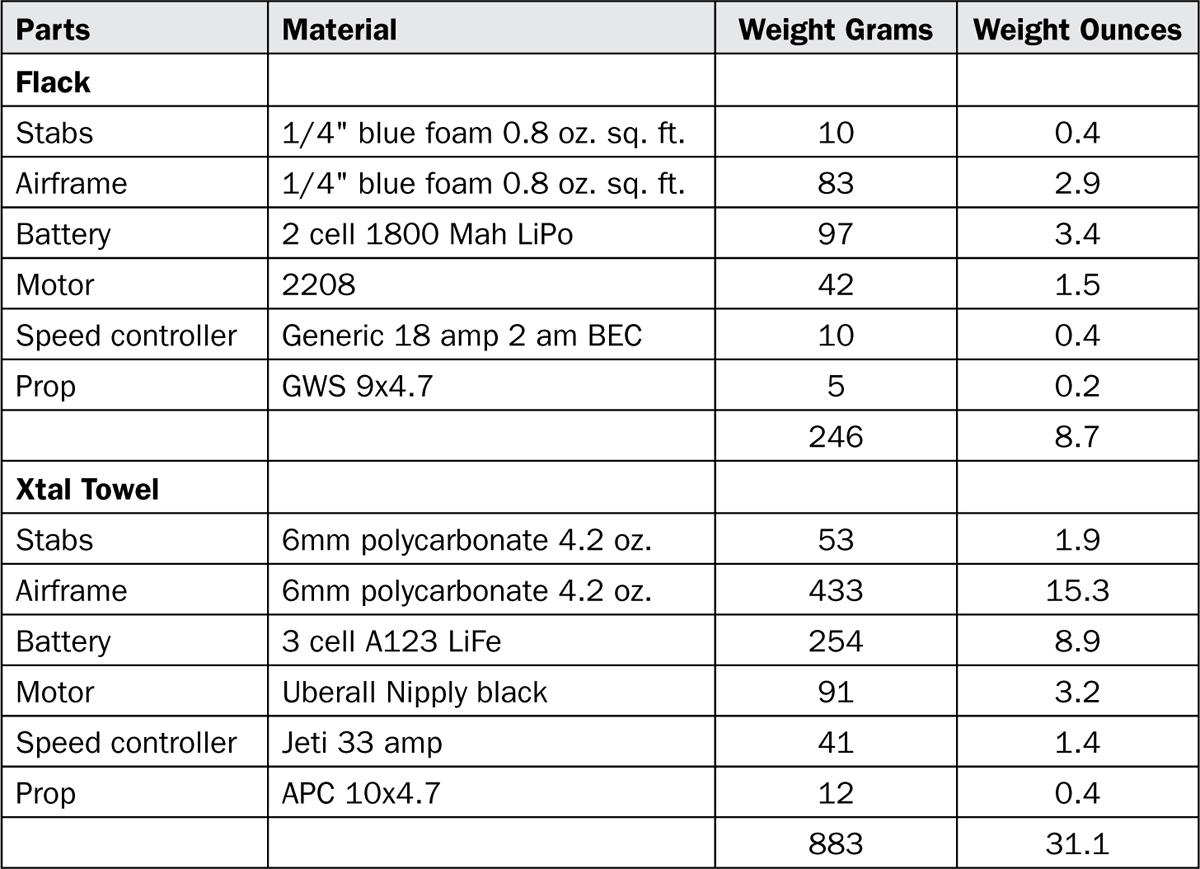
Fully built, the Crystal Towel is quite a bit heavier than the standard Flack. The polycarbonate weighs 4.2 ounces per square foot compared with 0.8 ounce per square foot for raw blue foam. This means that the design will be tail-heavy with standard components because most of the mass of the airframe is aft of the CG. Rather than use lead for nose weight, I opted for a bigger battery and bigger motor, which required a bigger speed controller. Table 9-1 presents a comparison of the different components and their weights.
TABLE 9-1 Comparative Materials of Crystal Towel and Flack
In designing the Crystal Towel, I did not cut the prop hole until I could test whether the increased weight of the battery and speed controller could offset the tail weight added by the polycarbonate. The motor and propeller are so close to the CG that it was not a consideration. It turned out that the plane balanced with the battery at the very end at 12 inches from the nose—the three-cell A123 is 2.5 times heavier than the standard lithium-polymer (LiPo) pack. All up, the Crystal Towel was just a bit over 1 kilogram, or 2.2 pounds.
How did it fly? Flying the Crystal Towel is terrifying both in the daytime or at night because it is very hard to maintain orientation. During the day, the plane is mostly transparent and disappears into the sky, and at night it presents an outline that acts like the Necker Cube visual illusion. Figure 9-12 shows the classic visual illusion, where the marked vertex snaps back and forth between being the nearest edge and the furthest away edge. The Crystal Towel has a similar effect, where the plane looks like it is flying away from the pilot with the marked vertex furthest away from the pilot, which switches to the marked vertex closest to the pilot with the plane flying in the opposite direction at the pilot!

FIGURE 9-12 Visual illusion experienced when flying the Crystal Towel that is similar to the Necker Cube illusion. The marked vertex on both images can appear to be the closest vertex to the viewer or the farthest. When flying, this confusion can be disastrous.
Because controls are reversed when the plane is flying at the pilot, very different inputs are required. If you are interested in building this aircraft, I strongly suggest that you use an autostabilization system to prevent these confusions from crashing the plane. One system is discussed in Chapter 12.
Additionally, this airplane is heavy, flies fast, and is very rigid. It could really hurt whatever it hits. This is not an airplane that should be flown where there is any chance of hitting things that go ouch. That said, it flies well and handles wind with confidence. You can see it fly at http://youtu.be/ZoUTLGYXee8.
• Wing span: 42 inches
• Chord at center: 23 inches
• CG: 12 inches from the leading edge
• Surface area: 475 square inches
• Weight: 1,009 grams
• Construction: 6-millimeter polycarbonate greenhouse roofing; edge lit with strip LED; more powerful motor; bigger battery
• Flight performance: Fast airplane that handles wind well; very difficult to maintain accurate perception; autostablization system highly recommended
Semi-Circle
The Semi-Circle (Figure 9-13) was an attempt to minimize wing loading by maximizing wing area while keeping the weight down. It was meant for indoor flying at a costume ball. The blue foam sheets are 48 X 24 inches, so the decision was made to try a semicircle. The major concern with this design is getting enough weight to the front of the airframe so that the CG is correct. The 25 percent chord point on the wing is 9 inches back from the nose, which is not very much room to establish balance. Add in that there is more material behind the CG with the extra wing area (274 extra square inches over the Flack with a shorter lever arm to balance it), which means that nose weight may be required to balance things out. This, in turn, compromises the goal of having very light wing loading. I achieved a wing loading of 3.4 ounces per square foot, whereas the Flack has a wing loading of 4.0 ounces per square foot. Given that flying speed drops as the square root of mass, there was no appreciable reduction in flying speed.

FIGURE 9-13 Semi-Circle flying wing with one eye. This was an experiment in light wing loading that failed.
It is clear that the prop hole has been moved as far forward as possible while still affording some protection from the prop. Carbon-fiber push rods were used to minimize aft-of-CG weight, and decoration was limited to tissue on one side with adhesive film on the other. The decision was made to reverse-mount the motor and have the battery aft of the prop hole for aesthetic reasons (the eye had to go somewhere). This was not quite enough nose weight, so two AA batteries were taped as far forward on the nose to balance the plane.
While I don’t do this anymore, I was jammed for time and conducted the first test flights in the park on the way to the ball. This is not recommended. While the plane was flown twice at the event, it was curtailed by lack of confidence in the flying qualities of the aircraft. However, it looked great.
The Semi-Circle could stand more development effort. The elevons could be bigger, and more effort could be put into optimizing component placement for CG. To cut flight speed in half would require a four-times reduction in wing loading, so perhaps a very different approach is called for.
• Wing span: 48 inches
• Chord at center: 24 inches
• CG: 9 inches from the leading edge
• Wing area: 894 square inches
• Weight: 590 grams
• Wing loading: 3.4 ounces per square foot
• Construction: Blue foam covered in adhesive plastic film on one side and tissue paper on other side; el-wire night-flying decoration added
• Flight performance: Flies in a “floaty” way that allows for indoor flying; more work is needed on design to optimize performance; perhaps bigger elevons
Manta Ray
The Jelly Fish (see Chapter 8) was a success, so more sea creatures flying out of context always seems like a good idea to keep pushing—behold the Manta Ray shown earlier in Figure 1-3. In addition, the Figment Festival was coming, and we could not help but put on a show. It is worth going into the design process a bit with the Manta Ray because it represented explorations both artistically and on the engineering front.
But first, what did we create? The Manta Ray is an animatronic approximation of an actual manta ray. The fins go up and down in a somewhat lifelike fashion in the same way Disney’s Country Bear Jamboree emulates bearness, but our Manta does not attempt the banjo or sing. The wing-tip movement is double action, involving two servos per wing, with directional control provided by two elevon servos that work like those on any other aircraft in this book. The tail wags in very un-manta-like ways, but it adds to the visual impact. The Manta Ray looks great in the air. Links to videos are available on this book’s website.
Design
The call for a Manta Ray came from the art department at Brooklyn Aerodrome, and the aero group had to pass judgment as to feasibility. What makes a design feasible? Look to Chapter 10 on making your own shapes fly for a process that increases the chances of success. In this case, we thought the shape was flyable without glider testing, so the issue was creation of a proper Manta Ray shape. Scouring the Internet for the general idea was very useful, and in the end, we had a two-dimensional design of our own making in SketchUp, as shown in Figure 9-14.
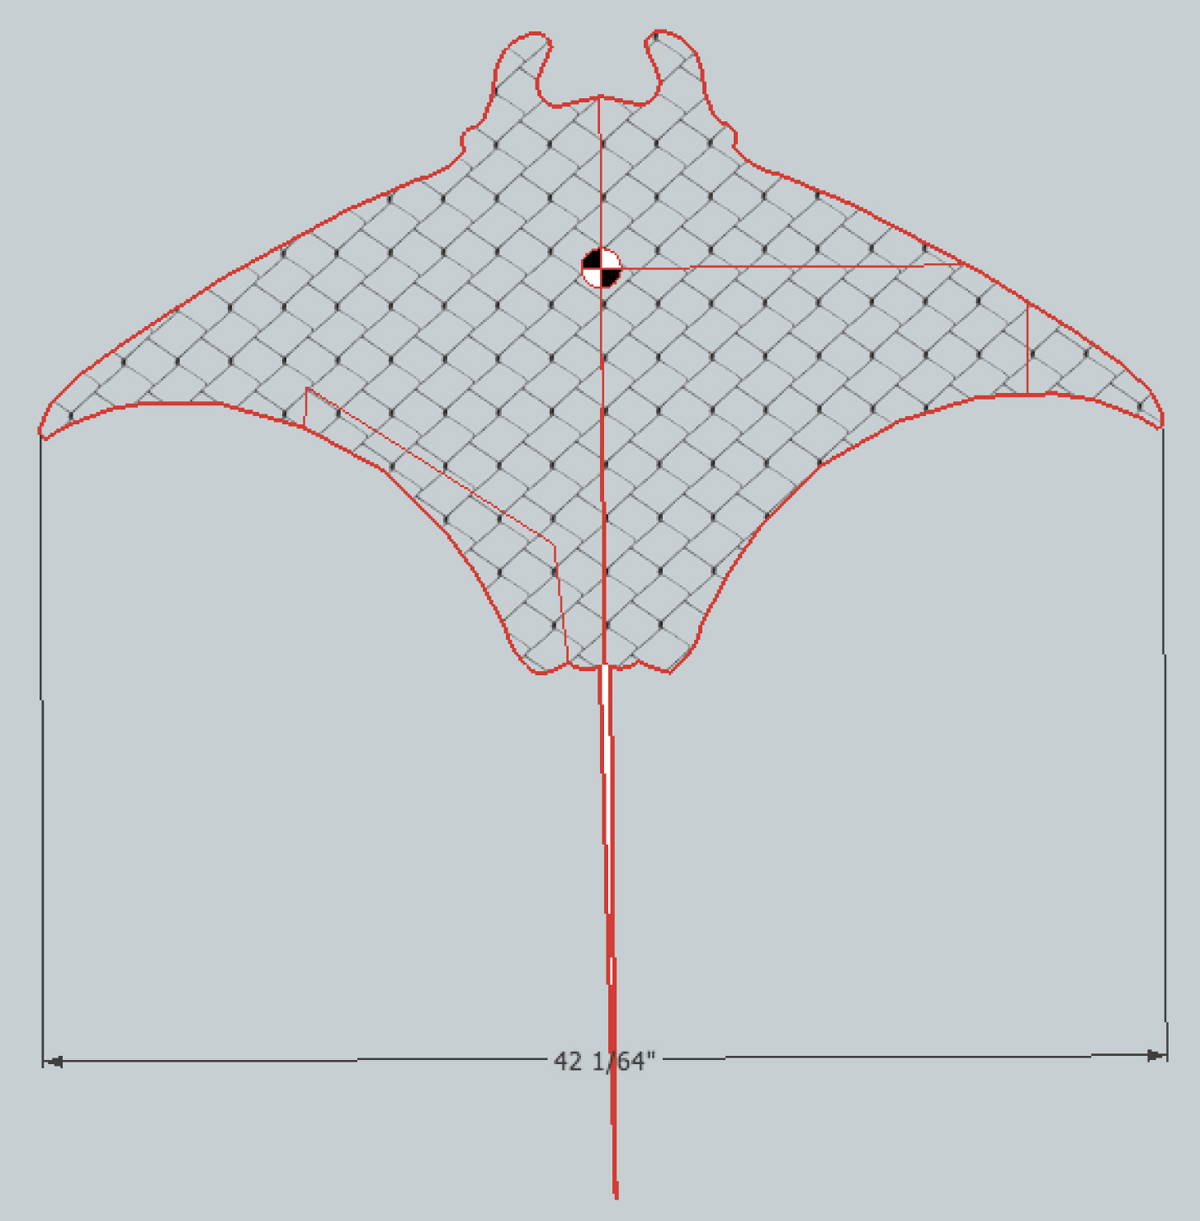
FIGURE 9-14 Manta Ray as designed in SketchUp. The chain-link-fence pattern helps to align 8- × 10-inch sheets of paper for scale plans.
Again, we had constraints that the Manta Ray had to be able to fit in a standard Flack shape because all the gear had to be carried in a highly modified baby jogger for transport to the Figment Festival via ferry. Welcome to modern urban flying!
Evolving the Moving Fins
Almost all our aircraft have a very two-dimensional and static quality to them that makes them less visually salient. The goal of the Manta Ray was to generate movement that would catch the eye. We also wanted the plane to look alive. Figure 9-15 shows the prototype Manta Ray with single movable fins and the production version next to it. The prototype flew well, and the fin movement had little effect on the flying characteristics. The visual impact, however, was less than ideal because the servo throw really didn’t move the fins that much with the 45 degrees of throw on each side of neutral, the fins were small, and the single hinge point didn’t look particularly natural.

FIGURE 9-15 Prototype Manta Ray fin next to production version that has more articulation because of double servo action.
The solution that I went with in the end involved double hinging the fins while retaining the same basic servo control mechanism as shown. This innovation was done on the final version with confidence that it would likely work out because the prototype flew well. In any case, the fins didn’t necessarily need to move if some flying issue arose.
There was one potential point of serious failure: Would the servos be strong enough to handle the forces on them? The outer servo would be fine, but the inner servo needed to move a fairly large surface through edge-on flow, and the surface weighed a few ounces. I had no solid idea what the forces would be on the inner servo. The servo issue was of sufficient concern that I did spend 15 minutes looking for some nice strong metal-gear servos for the inner fins but had no luck, so I went with the 16-ounce torque HXT 900 I had on hand.
To run power to the servos, I used stained-glass copper tape because it looked great, and it probably didn’t compromise the power getting to the servos too much. In the end, each servo was independently controlled, meaning that four channels controlled the fins and three channels controlled the throttle and elevons. The decision to have each fin individually controlled was to provide maximum flexibility in programming how it flew and to allow each fin segment to be trimmed independently. Servos shared positive and negative traces, with the signal channel being independent.
The Radio
When experimenting with “weird configuration” aircraft, it is very useful to have an easily programmed radio with lots of channels to play with. The Brooklyn Aerodrome radio of choice for these situations is the Multiple× P4000 shown in Figure 9-16. It is no longer being made but can be found used in good condition for around $500. Why the need for the P4000 in this situation? The Manta Ray uses seven channels with some odd properties. Three of the channels are the standard elevon mixing and throttle control. The remaining four were programmed to move with rudder commands (left stick, left to right movement) so that I could control the flapping behavior. The P4000 programming made it trivially easy to assign channels 4 through 7 to the rudder stick, center all the servos, and linearly increase up elevator when the fins were up or down to compensate for a minor but annoying trim change as the fins moved. Almost any seven-channel or up computer radio should be able to do the programming, but in my experience, most software in other radios gets cumbersome when straying outside traditional uses of channels for aircraft.
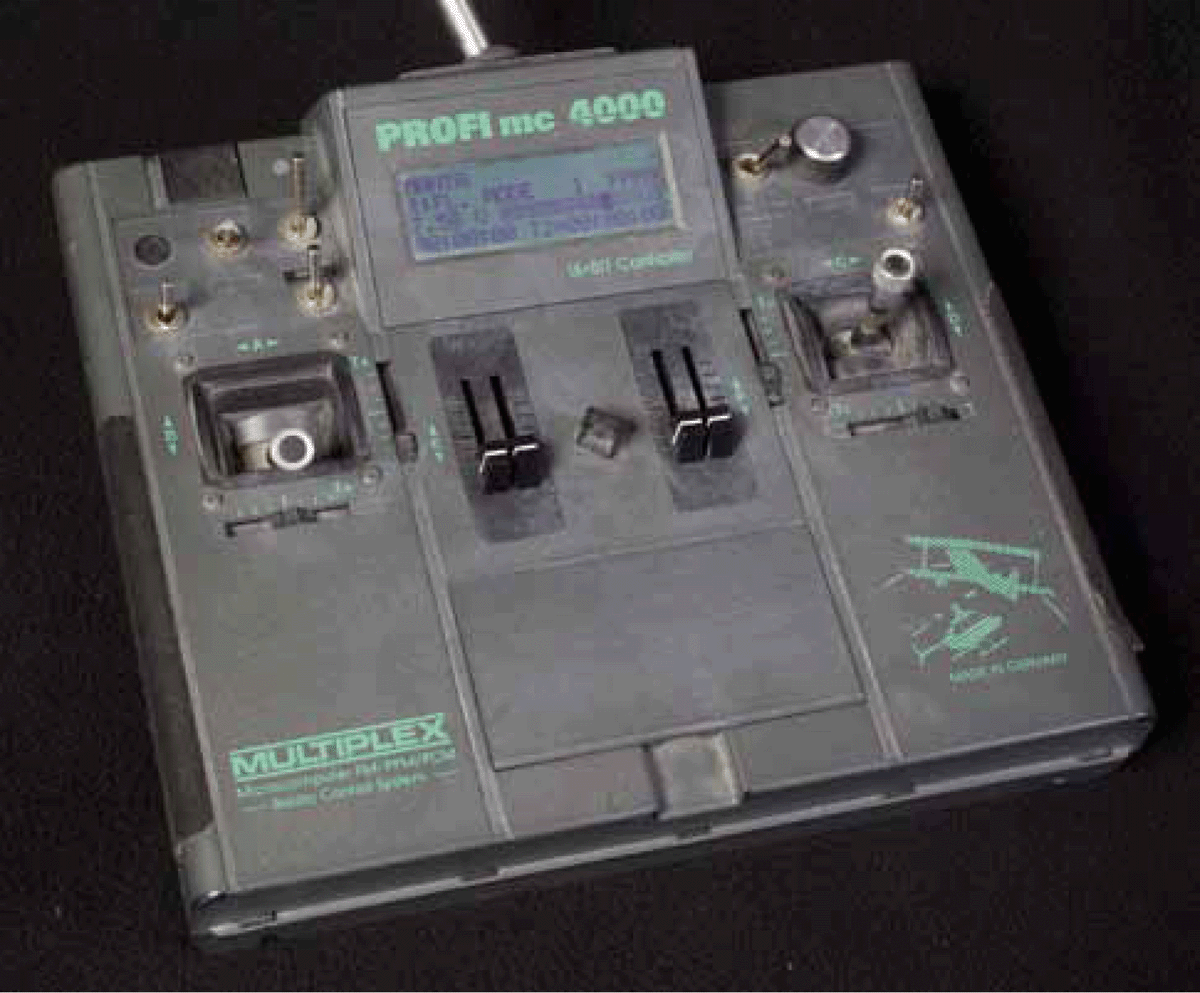
FIGURE 9-16 Multiplex P4000 radio.
The Build
Once the moving fins were sorted out, the rest of the build was standard. The painful process of aligning and joining many sheets of paper for full-size plans was made much easier by applying a regular texture to the image—in this case a chain-link-fence pattern. The flapping tail was achieved by segmenting the foam tail every 4 inches with a tape hinge. As with all the hinges on planes, it is important to use packing tape as the hinge material rather than covering material because coverings tend to get fatigue breaks. All control rods were kept as short as possible to maximize stiffness. Standard Flack motor, speed controller, battery, and props were used.
Flying
The Manta Ray flies well in wind and has considerable maneuverability and ample power. The movable fins were a bit awkward to use initially, but after a few flights, I found myself going into tight turns with the fins up and exiting with the fins down because the Manta Ray felt snappier that way. It certainly also looked good that way. It is less aerobatic than a Flack, but it climbs quickly and has the same miserable glide performance, meaning that small landing areas are easily managed.
• Wing span: 42 inches
• Chord at center: 21 inches
• CG: 6.5 inches from nose between eyes
• Wing area: 413 square inches
• Weight: 20 ounces
• Wing loading: 7 ounces per square foot
• Construction: Blue foam covered in blue adhesive plastic film; no deck
• Flight performance: Solid flyer with dramatic look in the air
3D Banana
The three-dimensional (3D) Banana addresses a few unsatisfied desires at the Brooklyn Aerodrome. First is that our day fliers are very flat and disappear in many flight orientations that interfere with the visual impact of the design. Second, the 2D flat-plate designs are very limited by what shapes can be flown because both lift must be generated and the shape must be controllable. Third and last, we wanted to represent objects as they actually are in three dimensions, not reduce them to a two-dimensional field. Figure 9-17 shows the 3D Banana.
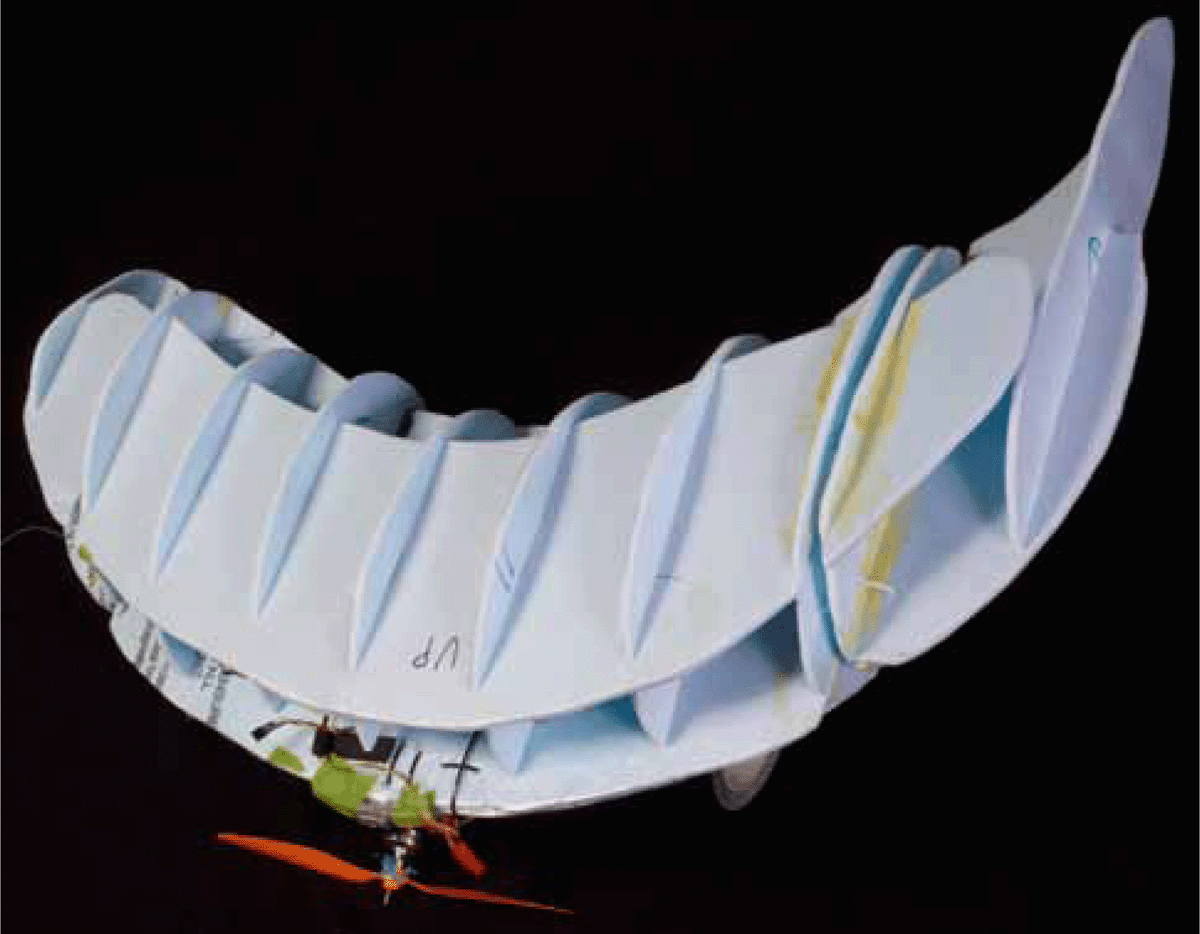
FIGURE 9-17 Triplane Banana.
The 3D Banana is a collaboration with an artist (Chris “Kit” Niederer) who took a 3D model of a Banana in Sketchup and applied a plugin called Slice Modeler to create a series of flat plates for the full 3D design shown in Figure 9-18. The resulting aircraft is technically a triplane.
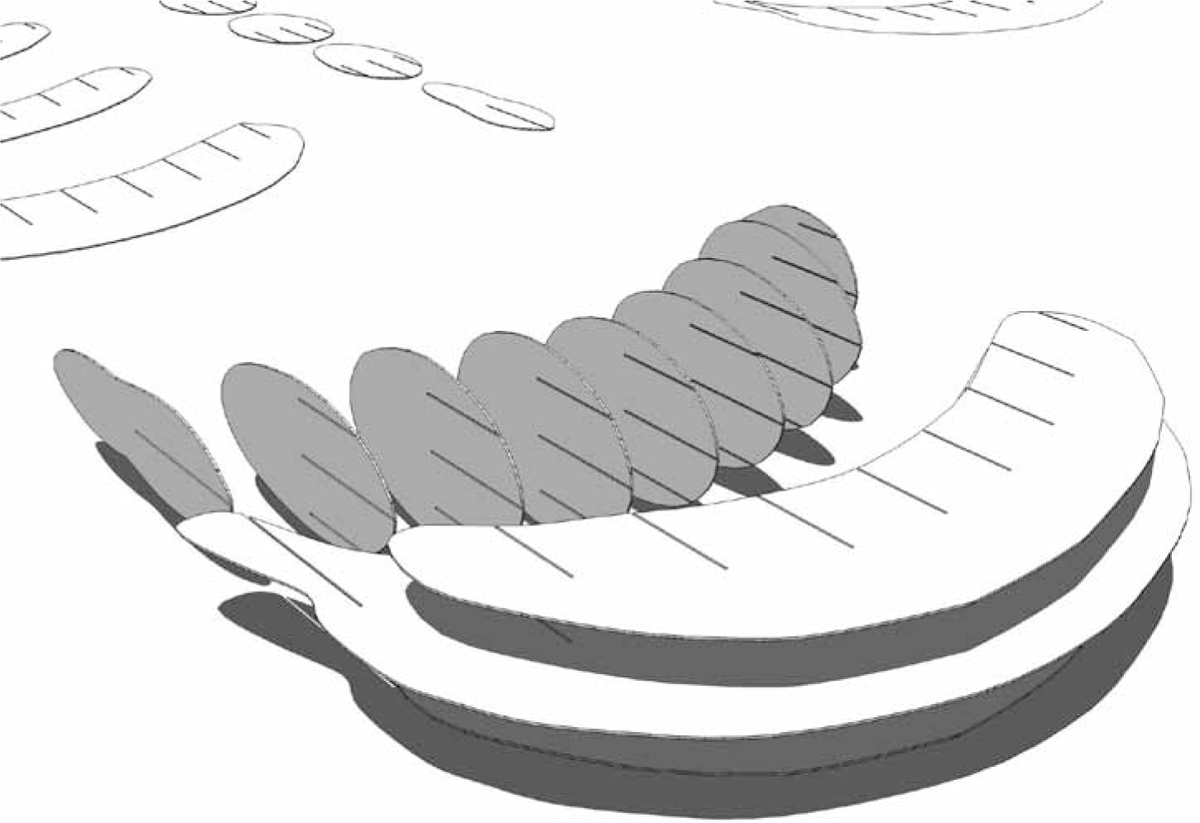
FIGURE 9-18 Full-on 3D Banana.
The major challenge of the build was figuring out how to control the shape. The elevons on the two-dimensional Banana were going to be tricky with the triplane, so an alternative approach was taken that mounted the tips of the banana on servos for full flying elevons, as shown in Figure 9-19—this is maybe the first ever example of such a control surface on a flying wing and almost certainly the first on a triplane flying wing. I think it is safe to say this is the first banana-shaped flying wing with full flying elevons, so our place in history is assured.
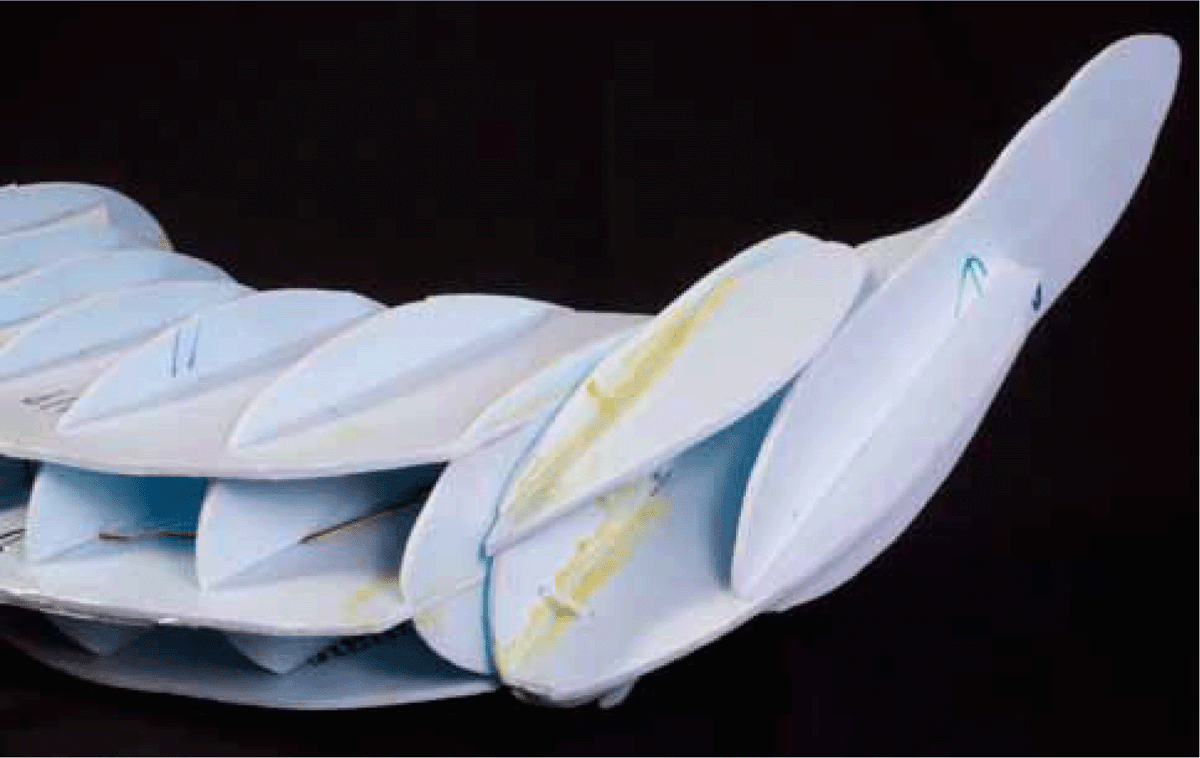
FIGURE 9-19 First ever full-flying banana elevons!
The 3D Banana is still in development. It has flown a few times and crashed a few because of programming errors that had roll control reversed. It looks to be a draggier version of the two-dimensional Banana the chapter started with, so it could use a more powerful motor.
• Wing span: 37 inches
• Chord at center: 12 inches
• CG: 4½ inches back from the motor—still being determined
• Wing area: Unknown
• Weight: 22 ounces
• Wing loading: Unknown
• Construction: Blue foam with Coroplast reinforcement
• Flight performance: Flies; needs more power
Conclusion
This chapter laid out the space of possibilities that we have considered here at the Brooklyn Aerodrome. Some lessons learned were that it is really fun to collaborate with artists—if it weren’t for these collaborations, I would still be making pure delta wings and hanging wriggly bits of el-wire off of them. Next up is a brief chapter on aerodynamics for the hacker.