CHAPTER 1
Get Your Stuff
My goal is getting you building and flying your own remote-control (RC) plane as quickly, economically, and easily as possible. This goal entails buying tools, buying parts, and most important, learning to fly. Ordering over the Internet normally takes a few days or weeks if you order from overseas. Assembling your aircraft takes some time as well. By far, learning to fly requires the most time. But you can cheat the time to learn by starting with computer software flight simulators while you’re waiting for tools and parts to arrive. There are some very good flight simulators available, either as free downloads or from commercial publishers. I recommend Flying Model Simulator (FMS) or Charles River Radio Controllers Simulation (CRRCsim) of the free-download variety—there is more information on this in Chapter 12. There are also simulators for Android and iOS devices. For about $20, you should get a USB faux RC controller for its standard joystick interface and ease of use. Have at it, and remember to send me a picture or video of what you come up with at [email protected].
Introducing the Flack
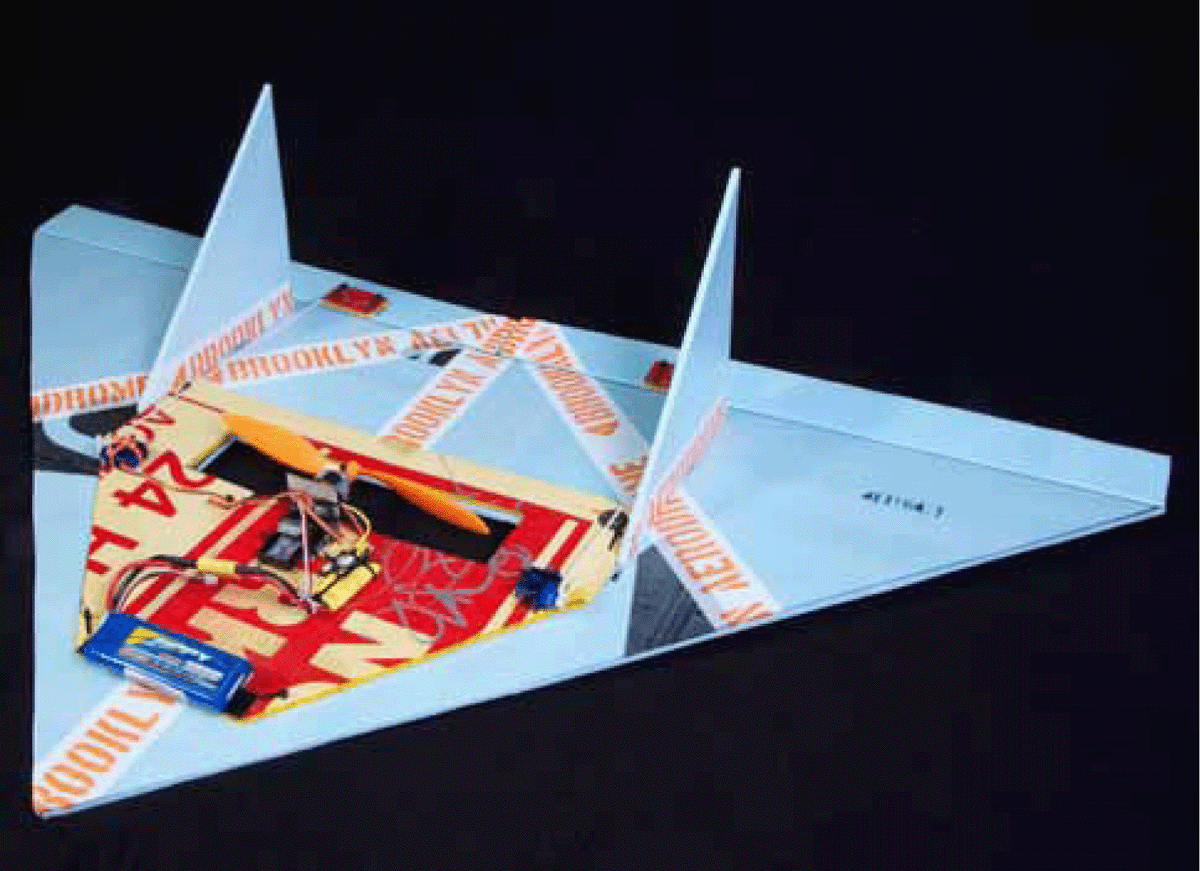
The basic flyer that you will learn to build from scratch is one we at the Brooklyn Aerodrome call the Flack, which is short for “flying” + “hack.” The standard form of the Flack can be seen in Figure 1-1. The Flack is designed to be easy to build, cheap, and durable because—trust me—you will crash it many times.
FIGURE 1-1 The Flack (“flying” + “hack”).
The Flack moniker was created by the family of Ed, Maxwell, and Madeline Gedvila in a renaming contest. It is a huge improvement over the old name the Towel.
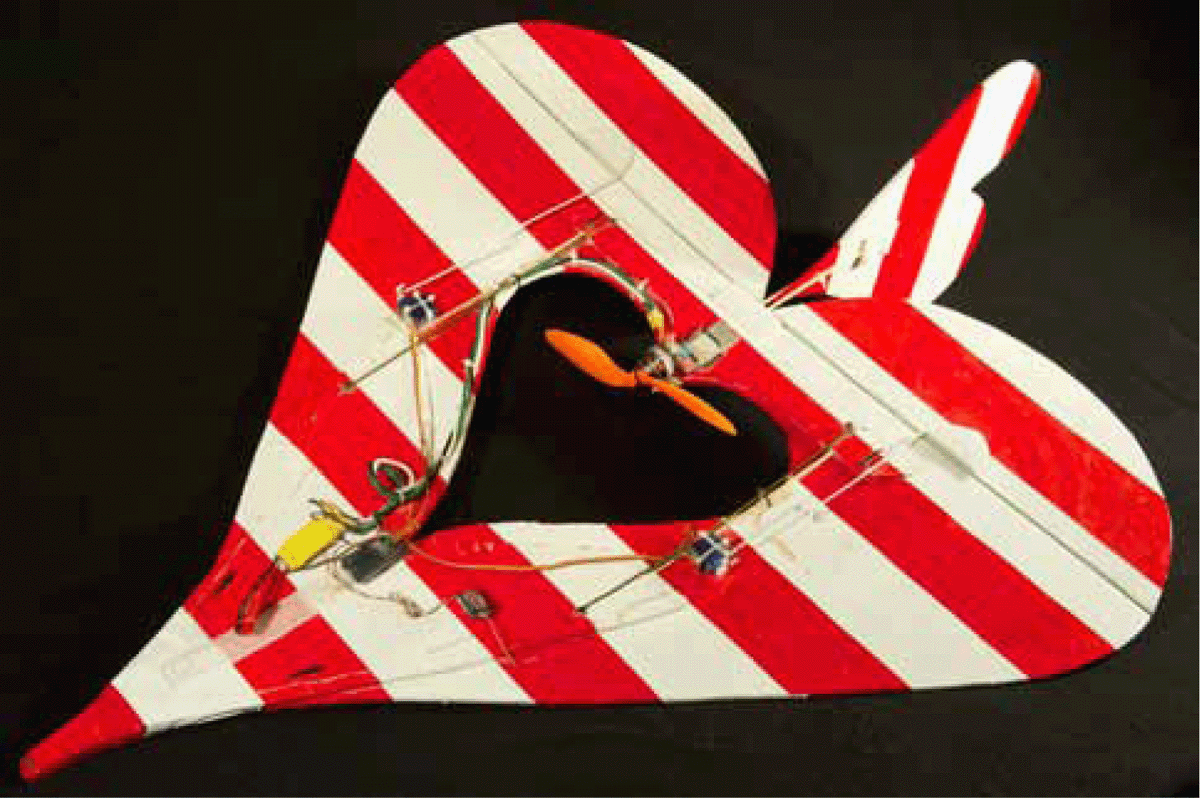
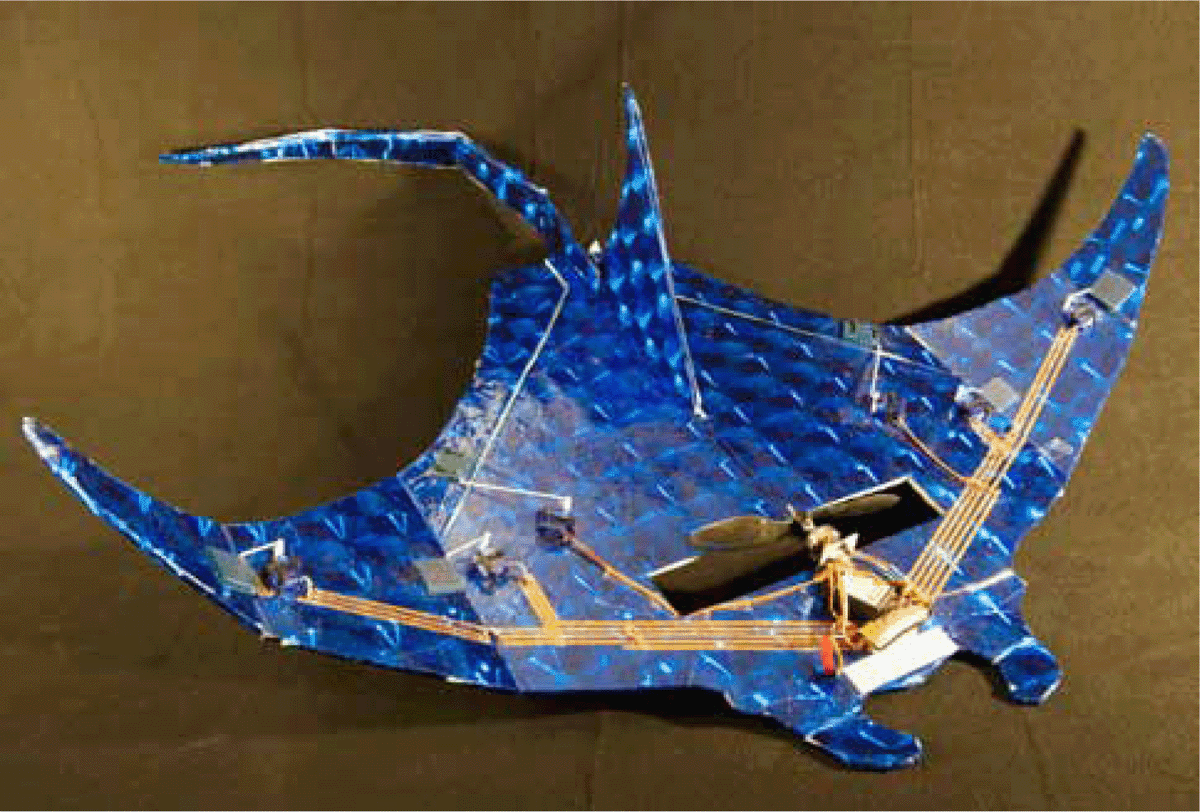
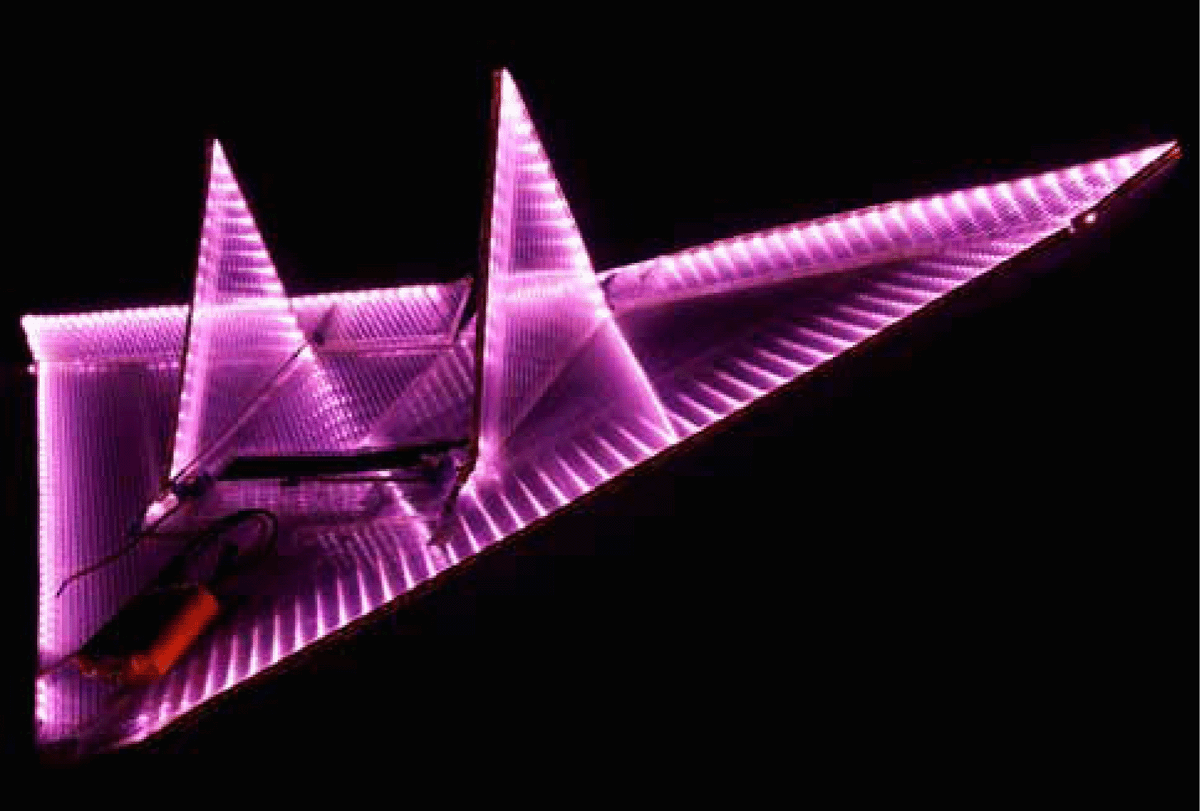
Once you have mastered the Flack, you’ll be able to extrapolate the design to all sorts of other fun shapes, including the Flying Heart (Figure 1-2), the Manta Ray (Figure 1-3), and the Crystal Towel night flyer made of polycarbonate (Figure 1-4). All the planes use the same basic concepts and skills. Your imagination and the laws of aerodynamics are the only limits to what you can build and fly.
FIGURE 1-2 The Flying Heart.
FIGURE 1-3 The Manta Ray.
FIGURE 1-4 The Crystal Towel.
My goal in the first five chapters is to get you flying quickly and inexpensively for around $150, on average. Chapter 1 handles shopping, Chapter 2 addresses what the parts do, and Chapter 3 is a very detailed step-by-step guide to building the deck, or soul, of the Flack. Chapter 4 handles creating an airframe that you will destroy again and again using the same deck to power. Chapter 5 teaches you how to fly. As of this writing, I have had five test builders who ranged from techies to parents with twins work through the instructions. They suffered so that you don’t have to. On completion of Chapter 5, you will have the skills to create completely novel aircraft that fly in day or night, which is what the rest of the book is about. The end result is a simple and robust approach to aircraft building. Build it, fly it, and send me a picture.
Time to go shopping.
Parts and Materials
This section describes all the supplies and parts you will need to build the Flack—tools will be covered in Chapters 3 and 4. I seek to keep costs in check while building a reliable, versatile flyer. In addition to the recommended components, I also point to alternatives that you may want to consider depending on your budget or level of ingenuity. Do not fail to visit the book website for updates on parts, plans, and videos. Kits also will be available on the website.
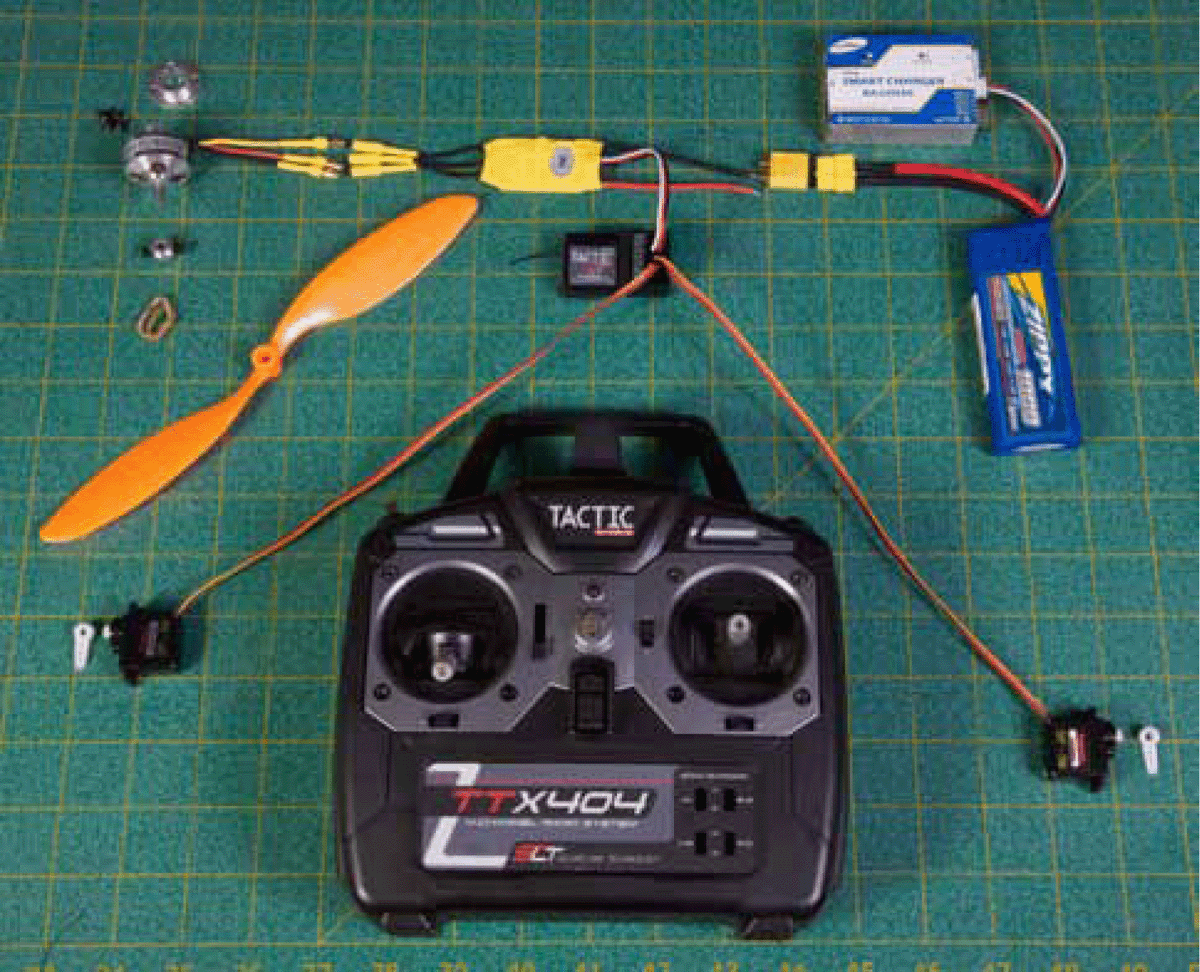
A checklist of recommended components with sources is given in Table 1-1. A list of recommended spares for frequently breaking parts is included as well. In addition, Figure 1-5 shows the components that are RC-specific. Each part is addressed in greater detail in the following sections with alternatives when appropriate.
TABLE 1-1 Recommended Component, RC-Specific Parts, and Sources
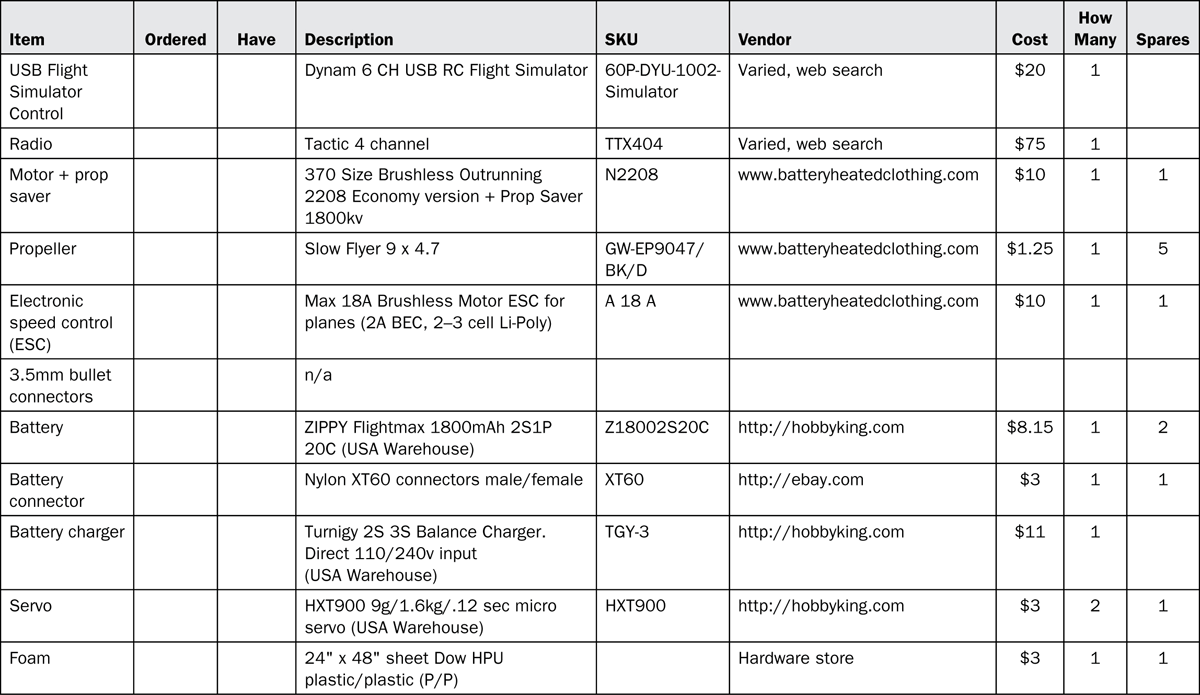
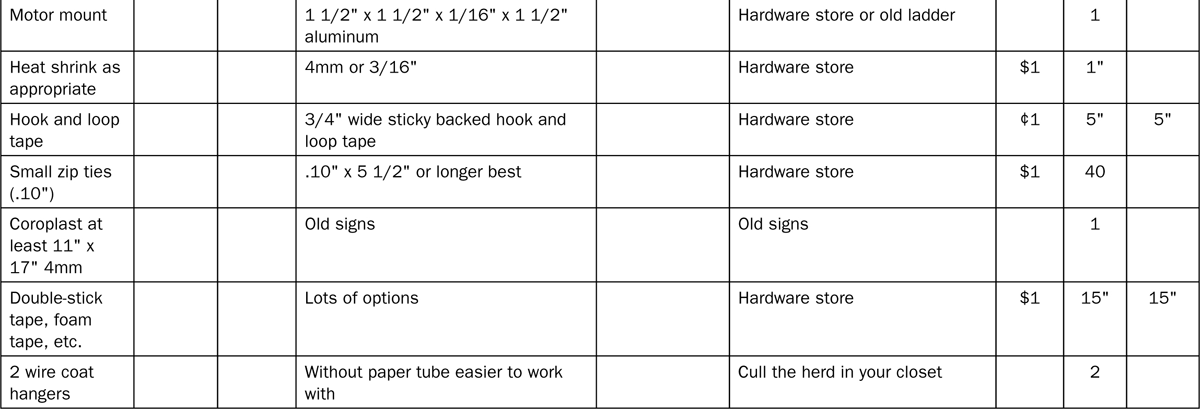
FIGURE 1-5 RC-specific parts.
Flight Simulator Controller
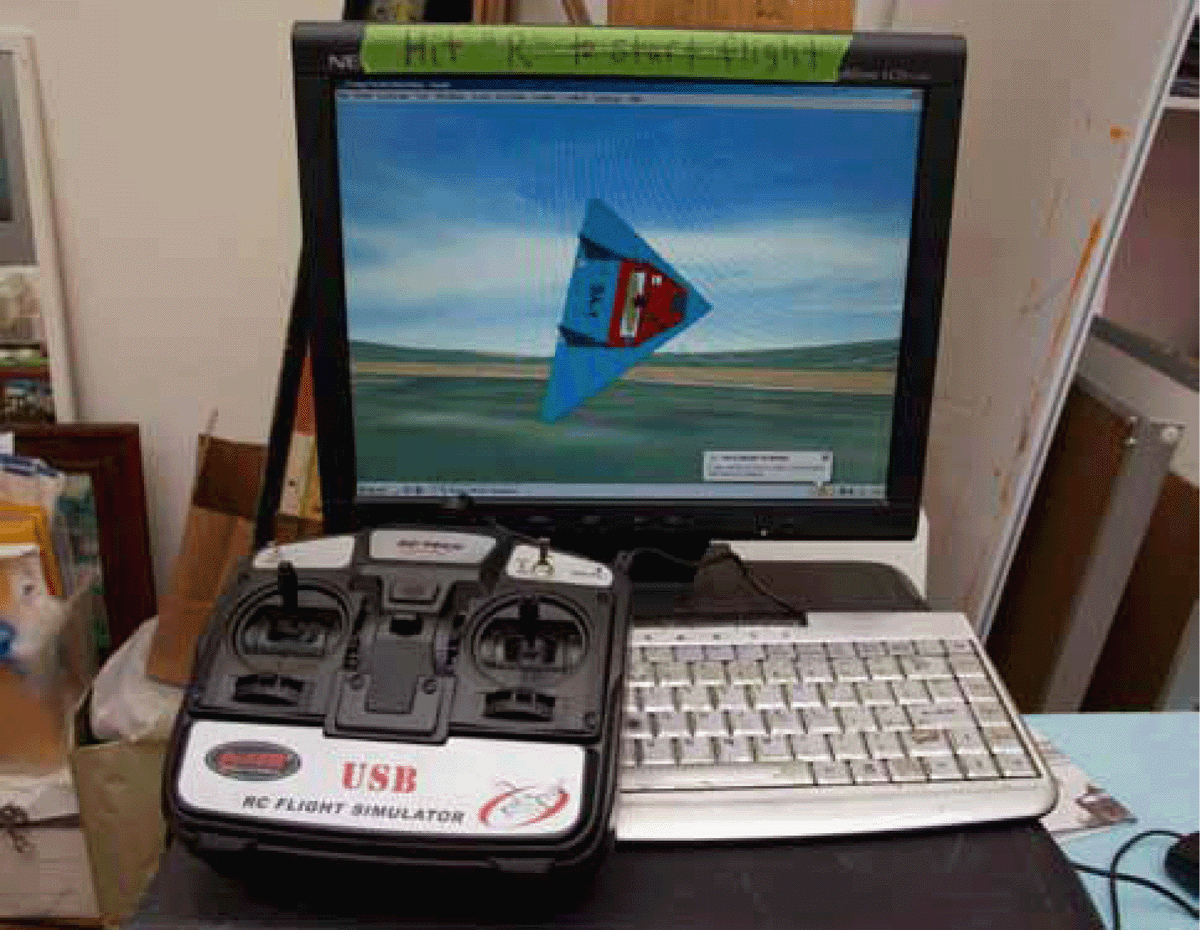
Unless you already know how to fly RC, please, please do yourself and the reputation of this book the favor of spending $20 on a USB controller that emulates an RC transmitter. This device, shown in Figure 1-6, allows you to use an RC transmitter-like controller to drive a variety of free simulators for Windows/Mac/Linux. I realize that it blows the budget and is another thing to order, but it will increase the chances of success from 50 to 90 percent in my very subjective estimation. And even better, Flack models are available for a few of the free airplane simulators, as shown in the figure.
FIGURE 1-6 Flight Model Simulator (FMS) with Flack and Dynam USB controller.
Once the controller arrives, go to Chapter 12 to see how to set it up for PC/Mac/Linux. There are lots of flight simulators that cost money, but no need—there are free ones that handle the basics quite nicely once you have a controller.
There are also Android/iPhone/iPad flight simulators available that have touch screen–based joystick emulators that may be of use. Some titles include Leo’s RC Simulator and Absolute RC Plane Sim.
Radios
The radio allows the pilot to communicate control inputs to the receiver, which, in turn, tells the motor how fast to turn and the position the servos should have, and the servos, in turn, adjust the elevons that are responsible for pitch and roll control. Radios have just undergone a major revolution in the adoption of the 2.4-gigahertz (GHz) standard pretty much worldwide. This means that a good deal of older, perfectly good older frequency gear exists that you might be able to get for cheap, but note that the suggested radio is $75 and that there is a $32 option. Receivers employing 2.4 gigahertz are not typically compatible across brands and sometimes even models of transmitters. Be sure to buy a receiver along with the transmitter to avoid this potential problem. All the recommended transmitters come with a matching receiver.
Modes 1 and 2
In the United States, we fly what is called Mode 2, which has aileron and elevator controls on the right stick and rudder and throttle controls on the left stick. It turns out that most of the world flies with a different control setup than the United States, which is called Mode 1. Mode 1 has throttle and aileron controls on the right stick and elevator and rudder controls on the left stick. It is rumored that Mode 2 is easier to learn on. Order your transmitter appropriately; otherwise, you will experience extreme awkwardness flying other folks’ planes or having them fly yours. This book assumes Mode 2 because I am in Brooklyn, New York, USA.
Recommended Radio and Receiver
The Tactic TTX404 is a solid radio/receiver at a slightly high price point, but I love it. It is a little odd to program—it feels a bit like a game of twister with the sticks to get elevon mixing working, but all in all, it is a solid piece of gear for around $75. The best feature is a toss-up between the great eco-friendly packaging that protects the radio well and the wireless buddy-box capability. It needs four AA batteries and has a nice neck strap to boot.
Alternate Radios
The Fly Sky FS-CT6B is my absolute favorite go-to radio for large groups, such as classes and camps. It can be had for $32 new as of this writing from hobbypartz.com. It has allowed hundreds of people to fly Brooklyn Aerodrome aircraft who otherwise might not. It provides a rock-solid radio link at park-flier distances (100 yards/meters) but burns through AA batteries quite quickly and is a hassle to program. There is a vendor who sells alternative software to program the radio if you do a search for “Digital Radio Fly Sky.” There are many brands of exactly the same radio with slightly different part numbers, and these include HobbyKing HK-T6A V2, Turborix, Exceed, Storm, CopterX, and Jamara. However, many of these brands do not include the programming cable. Come to brooklynaerodrome.com for programming instructions and the latest availability.
The Hitec Optic 5, 5-Channel 2.4-GHz Sport Radio System is a reasonable radio from a reasonable manufacturer that can be had for around $100 if you look hard. BPHobbies.com is a good source.
The FlySky/iMax/Turnigy 9x/Eurgle 9CH is a $75 radio that has a cult following, with lots of folks developing alternate EPROM upgrades and programming interfaces. I have no personal experience with this, but it looks to be good. If you have every played with an Arduino (a programmable microcontroller), this might be the radio for you.
Motors
Electric motors now rival internal-combustion motors for power and are much simpler to work with. They don’t need gas, don’t leave a sticky residue, and are utterly reliable. I use ones that generate lots of thrust at low airspeeds, which means swinging a 9- or 10-inch prop for their size.
There is no standardization around motors that make it easy to shop. In comparison, servos, batteries, and speed controllers are a paragon of clarity. My recommended motor is designated the “370 Size Brushless Outrunner 2208 Economy Version+Prop Saver 1800kV.” What does all that mean?
1. “370 Size” is an old designation for brushed motors based on how long the motor housing is in millimeters. Some standard ones are 280, 370, and 400, and those sizes came to be known as a rough designation of motor power. Flacks fly well on 370 to 400 size motors.
2. “Brushless” means that there are no physical contacts required for timing of electricity to the coils of the motor. Old-school electric motors relied on brushes to control which coils got current as the motor turned based on physical contact with the rotating part of the motor. Brushless motors use a sensing technology coupled with a microcontroller to drive the pulsing of energy to the three wires connected to the motor (only two wires are active at any time).
3. “Outrunner” means that the magnets are on the outside with the windings on the inside. This is the reverse of an inrunner. Outrunners are used for higher torque and lower rotations-per-minute (rpm) operation. Inrunners are used in higher-rpm and lower-torque applications.
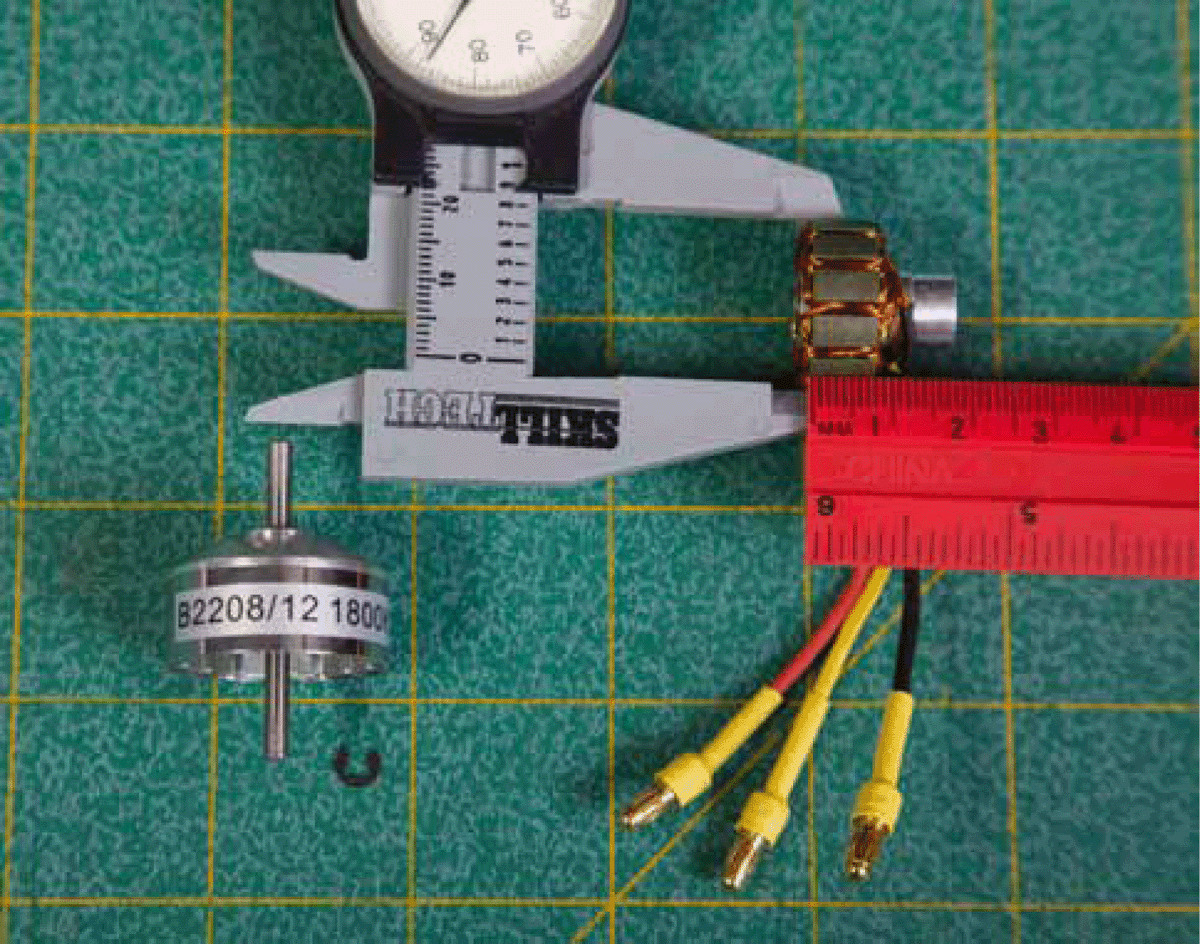
4. “2208” indicates that the stator diameter is 22 millimeters and that it is 8 millimeters long. See Figure 1-7.
5. “Economy Version” means tough as nails as far as the Brooklyn Aerodrome can tell.
6. “1800kV” means that the motor will turn 1,800 rpm per volt supplied with a small subtractive factor for the resistance of the motor windings. Other factors that determine how fast the motor will rotate include size and pitch of propeller. This is determined largely by how the motor is wound. To provide a rough idea of the calculation, the two-cell batteries I use start at 8 volts, meaning that the motor should spin at 8 × 1,800 = 14,400 rpm.
FIGURE 1-7 Stator measurements showing 22-millimeter diameter and 8-millimeter width.
There is not enough space herein to get into the grisly details of motor specifications, but the preceding should at least lay out the major dimensions behind motor designations. Often the vendors will provide data sheets on thrust, prop size, voltage, and amperes that are pretty conservative on prop size (smaller than possible) and optimistic on thrust.
Sizing Motors
As a rule, a 1:1 thrust-to-weight ratio for the aircraft helps to deal with typical flying conditions—gusty, windy, limited takeoff and landing areas. It is very useful to be able to power out of trouble in its many forms. Assuming that the aircraft weighs about 1 pound and the battery is a two-cell lithium-polymer (LiPo) pack, there are lots of options for getting off the ground. Note that suggestions are for single-vendor “combo” deals that match speed controls with motors and include suggested propellers from the same vendor. Stepping outside these combo deals means that you might end up with a speed control with different motor connectors than the motor and/or a prop adapter that doesn’t fit the prop. Take care, and check my website for current working combos.
Recommended Motor–Speed Control–Propeller Combo
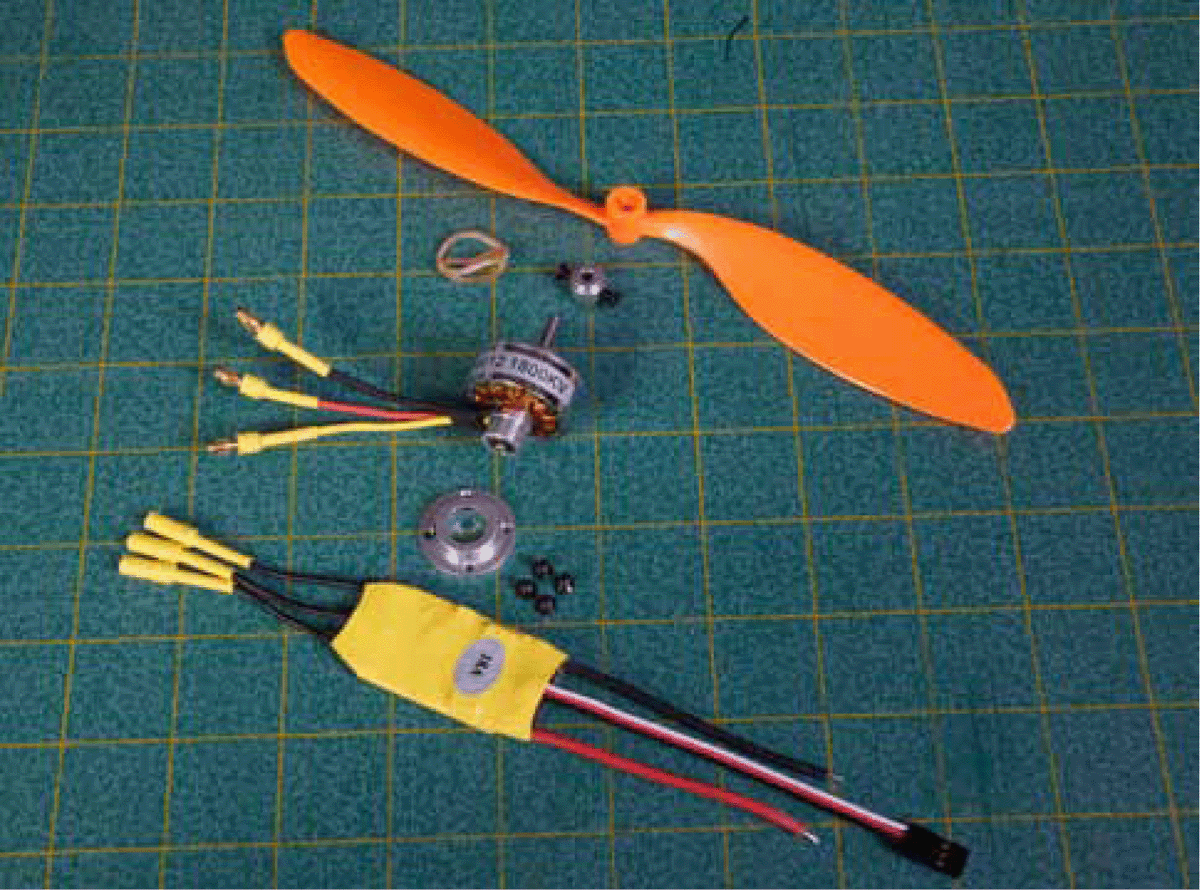
RCHotDeals.com (now batteryheatedclothing.com) has been providing motors to the Brooklyn Aerodrome for years. The go-to setup is the economy 370 size 2208/12 motor that runs at 1,800 rpm per volt with an 18-ampere speed control for around $18, as shown in Figure 1-8. It includes a prop saver, which protects the prop by making the attachment slightly flexible. In addition, 3-millimeter bullet connectors are soldered to both the speed control and motor, which is pretty rare and a big time saver. You still have to attach the battery connector, however.
FIGURE 1-8 Recommended motor, electronic speed control, propeller.
The appropriate propeller for beginners is the GWS RD 9×4.7 prop for $1.25, but get at least six because they break all the time. Decoding the propeller designation goes as follows:
1. “GWS” stands for the manufacturer, Grand Wing Servo.
2. “RD” stands for “reduction drive,” which in the old days meant a gearbox. The new outrunners have lots of torque at low rpms, so no gearbox is needed but the designation remains. How about “RD” standing for “rpm diminished”?
3. “9 × 4.7” works out as 9 being the diameter of the prop in inches, and the 4.7 indicates the pitch of the prop. For every turn of the prop, it would advance 4.7 inches if it didn’t have any slippage in the air.
I fly with a GWS 10x4.7 propeller with the recommended motor all the time, but it is a size that can easily overtax the motor if run at full throttle for more than a few seconds.
Alternate Motors–Speed Controls–Propellers
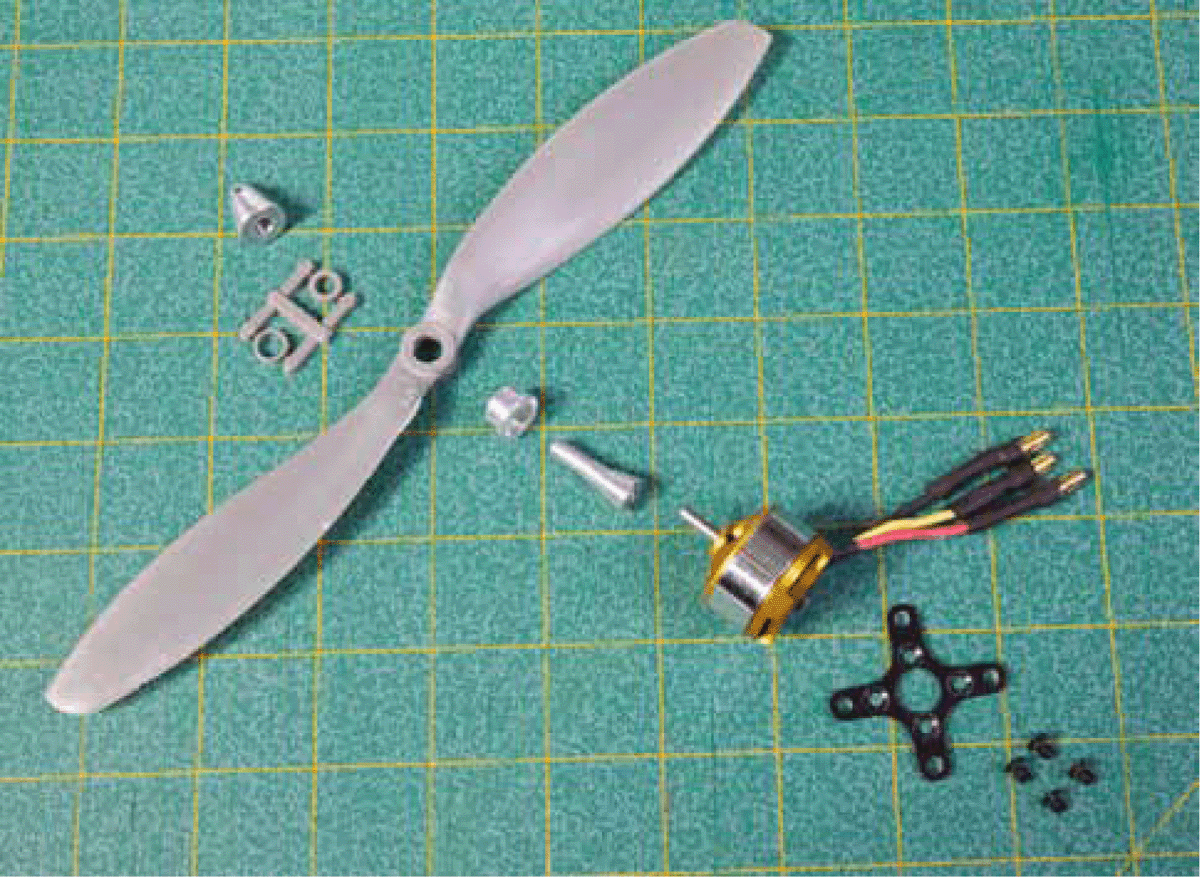
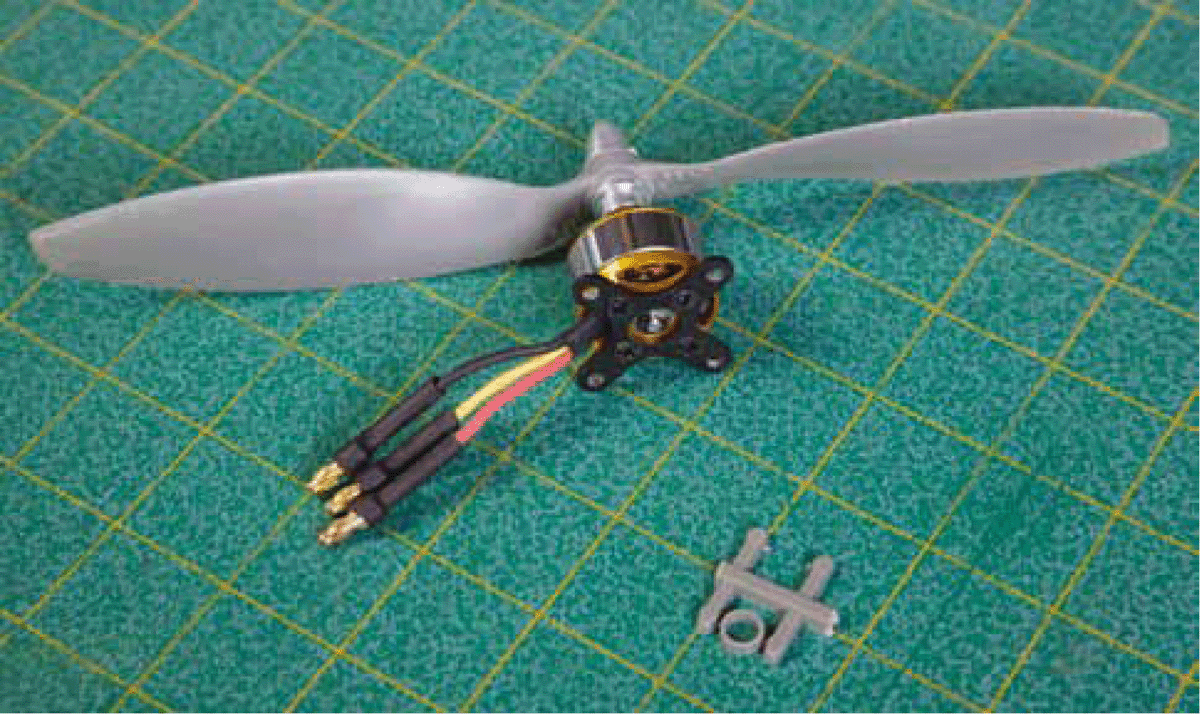
There is a noneconomy version of the 2208 motor that costs a bit more and has an appropriate propeller adaptor for Advanced Precision Composites (APC) style gray props. Figures 1-9 and 1-10 show the combo without a speed control. Note that a circular shim has been used to fit the prop to the prop shaft.
FIGURE 1-9 The 2208/12 noneconomy motor, prop adaptor, cross-motor mount, and 9x4.7 APC propeller.
FIGURE 1-10 The 2208/12 assembled.
See the section on mounting the propellers in Chapter 3 for more about these issues if you don’t get a combo deal that matches propeller, propeller adaptor, and motor. Alternatively, the economy 2212-10 1400kV with a 20-ampere speed control and a GWS 10x4.7 prop is overpowered in exactly the right way, but throttle management will be needed.
Another kind of prop to consider is the GWS DD (“direct drive”) 9x5 propeller. It has blades that are slightly thicker at the base and thinner at the tips, but it works fine.
My kits have used BP Hobbies’ parts, which are of high quality. The motor is a BP A2208-14 Brushless Outrunner Motor at 1450 kilovolts mated to the BP 18A Speed Control. The propeller adaptor works with APC props, and the 10x4.7 prop works great, but I consider them to be slightly more dangerous because they are sharper, heavier, and stiffer than the GWS versions. The assembly is the same as the non-economy 2208/12 shown earlier. It costs more but probably produces more thrust. You will need to solder the connectors onto the motor and the battery connectors to the speed control. The nice thing about ordering from BP Hobbies is that the company can get you all the RC-specific parts from a single vendor. The company sells the Hitec Optic 5 radio, the HS-55 servo, and Cheetah battery packs, chargers, and appropriate connectors.
Batteries
The revolution in motors was accompanied by a revolution in battery technology. The energy density of modern lithium-polymer (LiPo) batteries, combined with the amount of power they can provide at very cheap prices, has opened the door to a new class of aircraft. With this comes a warning: LiPo batteries can catch fire in very dynamic ways from charging, physical damage, or a change in the wind. A great idea is to have a collection of clay flowerpots in which to store and charge batteries. Don’t let the batteries get hotter than 120 degrees Fahrenheit or freeze.
A common way to destroy a battery is to leave it plugged in to the speed control when the plane is not being flown. If the battery is discharged too deeply, it will destroy the battery.
At the Brooklyn Aerodrome, we have settled on the 1,800-milliamperehour (mAh) or 1.8-amperehour two-cell battery pack because such battery packs are cheap and are around the correct weight to balance the Flack. For the more creative aircraft, such as the Bat, we double up battery packs for nose weight and will add lead tire weights if needed. It is easier to have a standard size and work around it than to have varying capacities that inevitably will have you at the flying venue with the wrong-sized battery pack. The other considerations around batteries are the speed-control connector and the balancing connector.
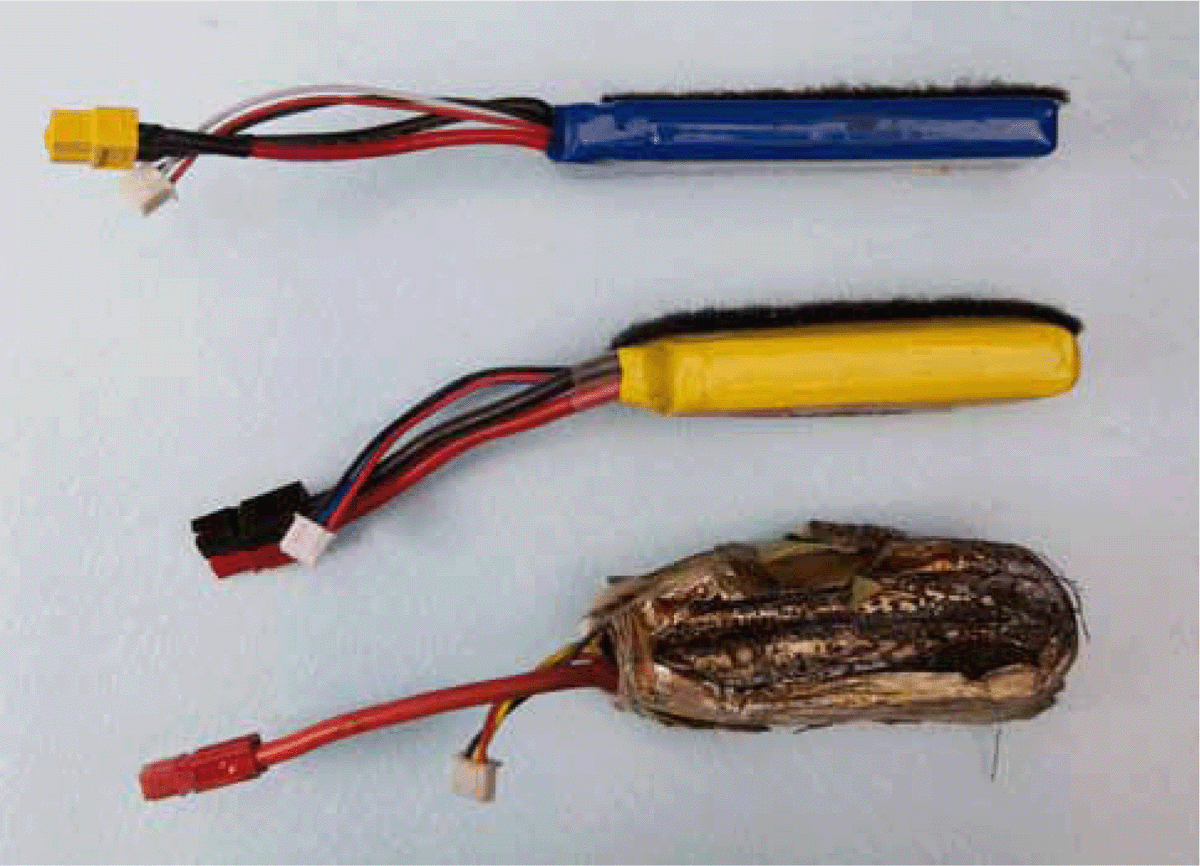
CAUTION These batteries carry a bunch of energy in a small space and can catch fire and explode on overcharging, physical damage, or just plain orneriness. Do not put freshly crashed batteries in your pocket or near anything flammable or burnable. Do not charge them unattended, and store and charge them in a fireproof container—LiPo sacks, a ceramic bowl, a ceramic flowerpot. Figure 1-11 shows new and exploded batteries.
FIGURE 1-11 (From top to bottom) New battery, a slightly puffed battery that may still work, and an exploded battery after a crash.
Recommended Battery Pack
HobbyKing.com has the least-expensive battery packs historically, and they perform okay. I use very high-quality Thunderpower packs that have not puffed out despite being five years old, but that is the difference between an $8 to $9 battery and a $30 battery. I suggest going cheap with low expectations. Lots of brands are available, but try to buy from a U.S. warehouse to minimize shipping costs and transit time.
Currently, I use the ZIPPY Flightmax 1,800-mAh 2S1P 20C (U.S. warehouse) at $8 to $9. This battery lasts about one to two years if treated well and has shown itself to be crash-tolerant. It has a JST-XH connector for charging and a male XT60 connector for powering the airplane. Be mindful of these connectors when buying chargers, and you will have to buy and solder a male XT60 connector onto your speed control. You can see this in Figure 1-5 and in Figures 3-24 and 3-25 in Chapter 3.
Alternative Battery Packs
Any two-cell LiPo pack with a 20C or greater rating will do. BP Hobbies offers the Cheetah Packs 7.4-V, 1,800-mAh, 35C lithium-polymer battery at $16 with JST-XH connectors for charging and Cheetah 4.0-mm controller connectors. Visit the Brooklyn Aerodrome website to see how we got this to work.
Be aware that lithium-iron-polymer (LiFePo) and lithium-iron (LiFe) batteries are now being sold that look very much like LiPo batteries but differ in a few ways. They have a lower voltage (6.6 volts versus 7.4 volts for LiPo), so if you go with these, be sure to go on the higher end of kilovolt ratings for the motor—1,800 kilovolts is about right—and consider using a 10-inch prop where I have been recommending a 9-inch prop. These batteries also will require a charger that is designed for them. A major advantage of LiFePo batteries is that they are less likely to catch fire.
Battery Connectors
Generally, the battery connector to the speed control is determined by the one soldered onto the battery. The site that sold you the battery also should have the appropriate connector for the speed control on sale as well. Be sure to get the appropriately gendered connector for the XT60, Deans, and others that don’t have the same connector for both sides. Powerpoles, EC2, and Cheetah use the same connector for both sides.
I have found that Deans and XT60 connectors can be difficult to get apart. Children in particular can struggle getting connectors apart and actually can damage the airplane when the connector finally gives way. Powerpole, EC2, and Cheetah connectors are easier to take apart.
Chargers and Power Supplies
Chargers are nearly as complex a world as radios with a broad range of possibilities. As with radios, higher quality comes with higher price and higher complexity. You also have to factor in how the charger is going to be powered—choices are alternating-current (ac) wall power (110/220 volts) or 12- to 17-volt direct current (dc) provided by a car battery or ac power supply. Chargers are the one place where the capacity of the charger is tightly linked to price. If you are dedicated to doing this project for around $150, then the charger will be $11 and will take between 2 and 3 hours to charge a battery. A more expensive charger at $45 will charge in 20 minutes. Even if you have a car that can power the charger, you almost certainly will want a power supply to run the charger in the house.
There are lots of other options out there. There always seems to be a decent charger available from my three choice vendors, Hobbypartz.com, BPHobbies. com, and RCHotdeals.com. Make sure that the charging connector on the battery matches that on the charger. Almost everyone is using the JST-XH connector, but check.
Recommended Cheap Charger Route
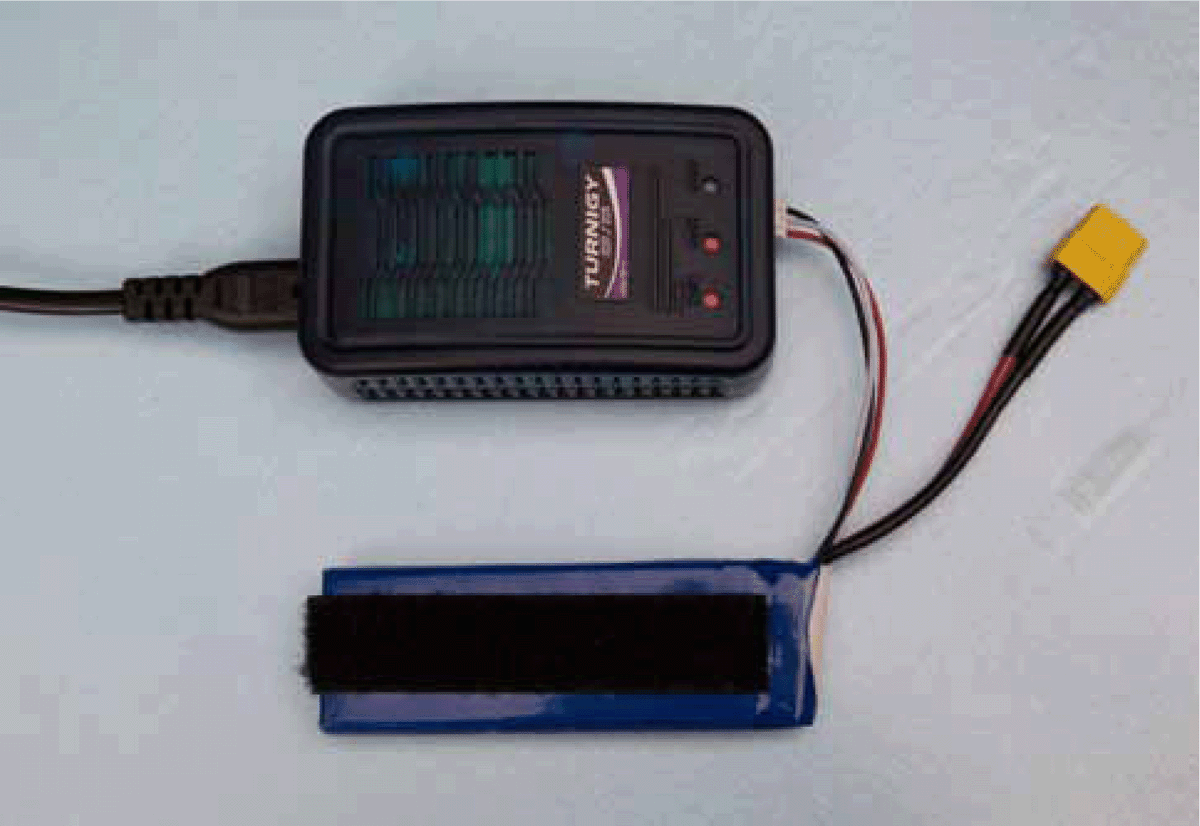
The Turnigy 2S, 3S Balance Charger with direct 110/240-volt INPUT (USA Warehouse) from Hobby King works well for all us urban folks who lack a car because it runs off 110-volt ac. We are pretty disenfranchised here in the city, but really, there is no other way. This charger also runs off 220-volt ac for similarly affected world citizens and is shown in Figure 1-12. The big downside is that batteries will take 2 to 3 hours to charge.
FIGURE 1-12 Charging connector attached to charger.
A bit of quick math on charger capabilities and time to charge is in order. The Turnigy charges at around 600 milliamperehours, or 0.6 ampere per hour, for a two-cell pack. The battery contains 1,800 milliamperehours, or 1.8 amperehours, of energy that, when depleted, needs to be recharged. The Turnigy will recharge at 0.6 amperes per hour, meaning a 3-hour charge for a completely depleted battery. See below for the 20-minute solution, but it is going to cost you.
Alternative Recommended Charger and Power Supply Combo
My go-to charger is the excellent but fussy-to-program Cellpro Multi4 Charger with GP/KO (JST XH/JST EH/HR) Adapter Combo at fmadirect.com or revolectrix.com ($65). The adaptor should fit the batteries suggested earlier, and the charger will need a 12- to 15-volt power source. Battery manufacturers overestimate risk and recommend charging only at what is called 1C. “1C” means “one times capacity,” which for our batteries is charging at 1.8 amperes per hour, which would take 1 hour to charge a completely depleted battery. Some modern batteries are advertised as capable of 2C (30-minute) or 3C (20-minute) charge rates. I play it safe and charge at 2C, and I make sure that I have some spare charged batteries on hand. This charger will let you charge at up to 4 amperes per hour, which is just a bit more than 2C.
Other Chargers
BP Hobbies offers the simple GWS (Grand Wing Servo) C3-LP Charger (GWCHG004) for $15 and the GWS DC 15-V Adapter for the C3-LP Charger (GWCHG006) at $10. Charge time is 2 to 3 hours. This will allow charging from a car or from a wall socket.
Power Supplies
Most chargers need a 12- to 15-volt power supply. You can use a regulated bench supply or a wall wart that delivers sufficient amperes for your charger. A good source of high-ampere power supplies is old computers. It takes a bit of effort to extract them, and you have to be comfortable digging around electronics that can kill you dead if you make a mistake. There are many how-to guides on this on the Internet.
Wherever you buy your charger, the vendor generally will offer an ac power supply to run the charger as an additional purchase. Be sure that the ampere requirement of the charger (expressed in amperes) is less than or equal to what the power supply can provide. Most wall warts have about 1 ampere of power at 12 volts—the specification should be listed on the power component.
Servos
Servos take the signal and power from the receiver and move the servo arm to the position indicated by the transmitter. This, in turn, allows us to control the elevons, which govern pitch (up/down) and roll. Servos are broadly and cheaply available at around $3 to $10 each—get a few extra because they can strip on crashes. If the servo has metal gears, you can expect it to be tougher and less likely to strip gears on crashes.
For the planes we fly, we use the class of servos defined by the canonical Hitec HS-55 ($10). The desired specs are a weight of around 10 grams and torque of 16 ounces per inch, meaning that it can raise 16 ounces 1 inch. You can go with bigger servos if you have them around. There are many options here, so try to find a good deal from either your radio, motor–speed control–propeller, or battery vendor, and add them in—it is hard to go wrong.
Recommended Servos
The Hobby King HXT900 ($2.69) has nice long servo wires and is a constant favorite. It now features fashionable black gears and servo arms.
Alternative Servos
RCHotdeals.com (batteryheatedclothing.com) has an 8-gram servo that is two for one at $7.99. BPHobbies.com stocks the Hitec HS-55 at $10. Read and react based on other places where you are buying servos, and take pleasure that these servos used to cost $25 back in the day.
Airframe Materials
Finally, we are out of the rarified world of RC electronics. All the stuff just mentioned is going to be very hard to hack, recycle, or otherwise create from whole cloth. Some day we will try to create a Flack from totally recycled parts, but that someday has not arrived yet. Now you can get creative. You need just a few major components.
Motor Mount
The motor mount for some reason is always a difficult point for me. I started with blue plastic gutter-like material that the neighboring venetian blind shop threw out, moved to a worn-out aluminum ladder, and have played with three-dimensional (3D) printed wonderfulness. Just be creative—all that is needed is a 90-degree support for the radial or cross-motor mount that comes with the outrunner and you are good. Examples are shown in Figure 3-8 of Chapter 3.
Industrial Solution. For Brooklyn Aerodrome kits, I use aluminum angle stock that is 1½ × 1½ × ![]() inches. You can get this from a hardware store. The problem is that you have to buy 8 feet of it at a time, which is a lot of motor mounts at 1½ inches wide. This is what is used in Chapter 3.
inches. You can get this from a hardware store. The problem is that you have to buy 8 feet of it at a time, which is a lot of motor mounts at 1½ inches wide. This is what is used in Chapter 3.
Aluminum Ladder. Do not cut a motor mount out of a working ladder! Seriously, you could kill somebody. I found a stepladder that was worn out (wear on the steps, believe it or not), and for about a year all Brooklyn Aerodrome planes featured steps from that ladder as motor mounts.
3D Printed Motor Mount. Technophobe thought that it could improve on the motor mount with a full 3D printed design; see it at www.thingiverse.com/thing:14507. I have one that remains untested because I don’t have a project worthy of the effort. I think this reveals why I like to build with trash.
Coroplast Motor Mount. For a while, after having run out of ladder, I built with a Coroplast motor mount that worked really well, except when it got hot and melted. It also required a lot of precision cutting, which is counter to the Brooklyn Aerodrome approach.
Deck Material
Coroplast or Plastic Cardboard. I hate this stuff, but I love the fact that every time someone builds my beginner plane, a bit of Coroplast stays out of the landfill and brings someone joy—it is the material used throughout Chapter 3 to attach the gear to. Please try to recycle this stuff—my first batch of signs was a bunch of Newport cigarette signs that someone had tossed. A happy end to the political season is the collection of yard signs no matter who wins. I use the 4-mm thickness the most. It is fairly light (2.8 ounces per square foot) and very durable. The two major uses are for decks on the Flack, reinforcement for the art planes, and elevon control horns. It is not a great material for wings and stabilizers because of its weight, potential to cause damage, and its tendency to be a little too flexible, which introduces a control-lockout situation with the elevons.
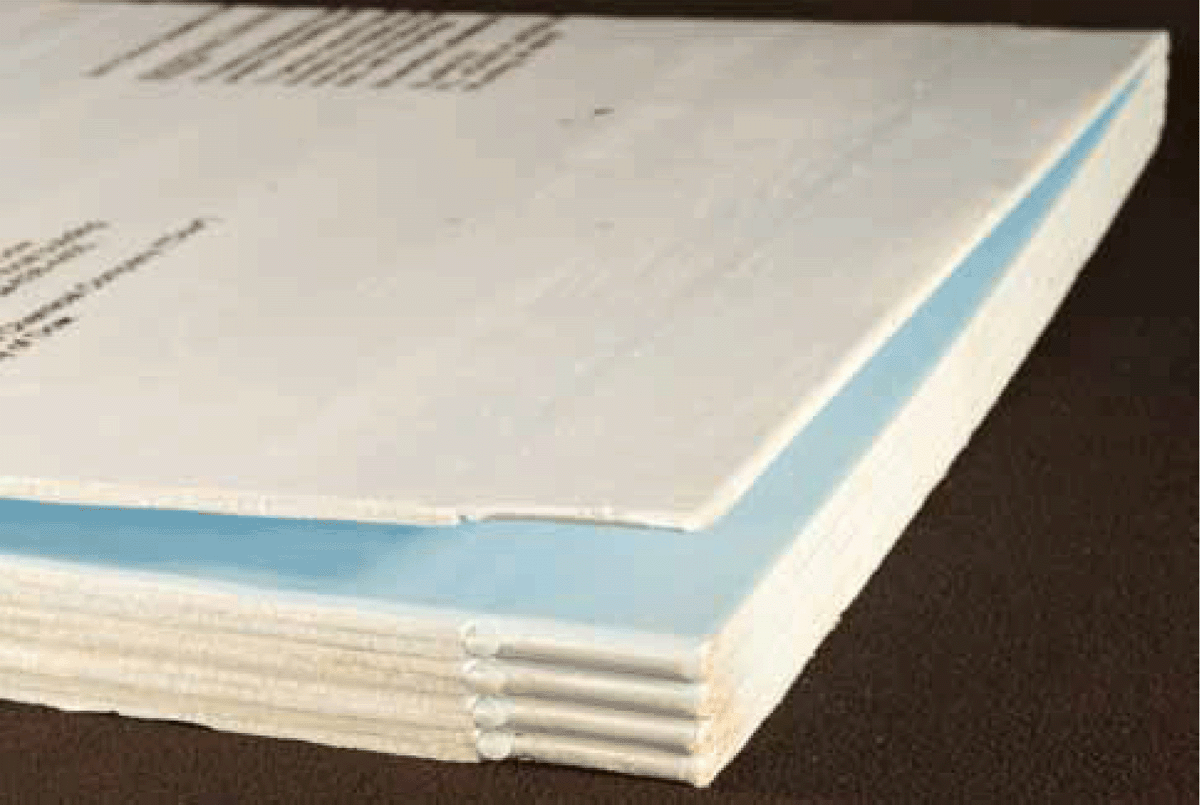
Blue Foam. The Dow blue fan-fold in Figure 1-13 is my bread-and-butter building material for wings and stabilizers. It is quite light (¾ ounce per square foot) and very stiff for its weight, but it can be very difficult to find. If you do find it, you have to buy a bunch, although I have heard of folks being able to buy just a few sheets. It comes in a fan-fold package of twenty-five 2- × 4-foot sheets, which is sufficient material for approximately 35 to 40 Flacks, and it costs around $50 to $70 a package. If you get the whole bundle, you can think of it as a sketchbook for creating flying things.
FIGURE 1-13 Dow HPU ¼-inch plastic/plastic (P/P) ready to fly.
The official name is ¼-inch Dow fan-fold high performance underlayment (HPU) insulation with plastic bonded to both sides (P/P). You may need to call Dow to find a source. Do not tell Dow that you want to build airplanes with it because the company will send you to a vendor who did a custom order of white foam that lacks the film on both sides, which adds a great deal of stiffness to the foam.
Note that Dow makes a version with film only on one side, which is less stiff. The foam stiffens up beautifully if faced with wrapping paper or adhesive film—but it also becomes less crash-tolerant.
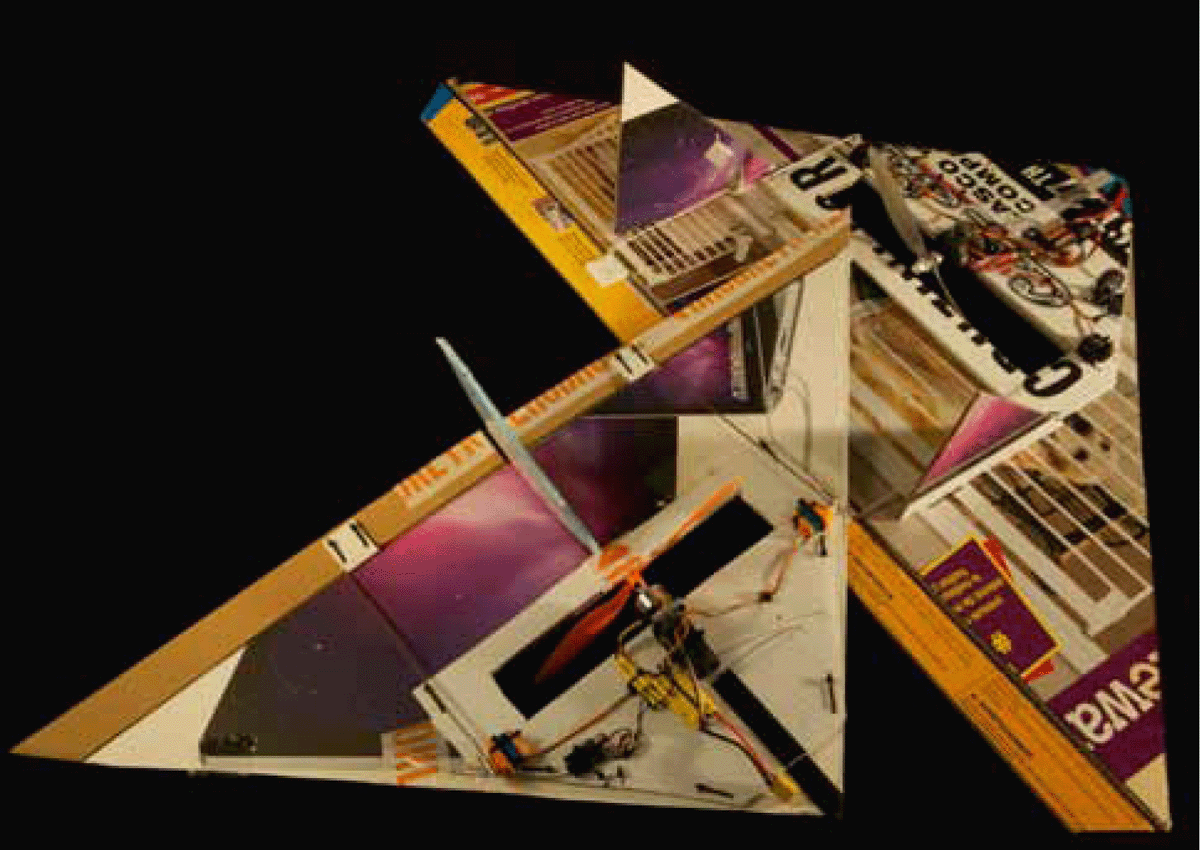
Cardboard. I have built planes from cardboard in pursuit of a more recycled plane but never really had great success with it. Figure 1-14 shows two efforts in cardboard that flew but not particularly well. The problem is that cardboard is quite heavy, which makes for an airplane that is underpowered with the typical motors. Also, the cardboard is not very damage-tolerant and doesn’t easily provide a stiff control surface. But don’t let my experiences limit you. Using this material will shift the center of gravity (CG) back. See Chapter 10 for ways to handle this.
FIGURE 1-14 Cardboard, a great idea, needs refinement.
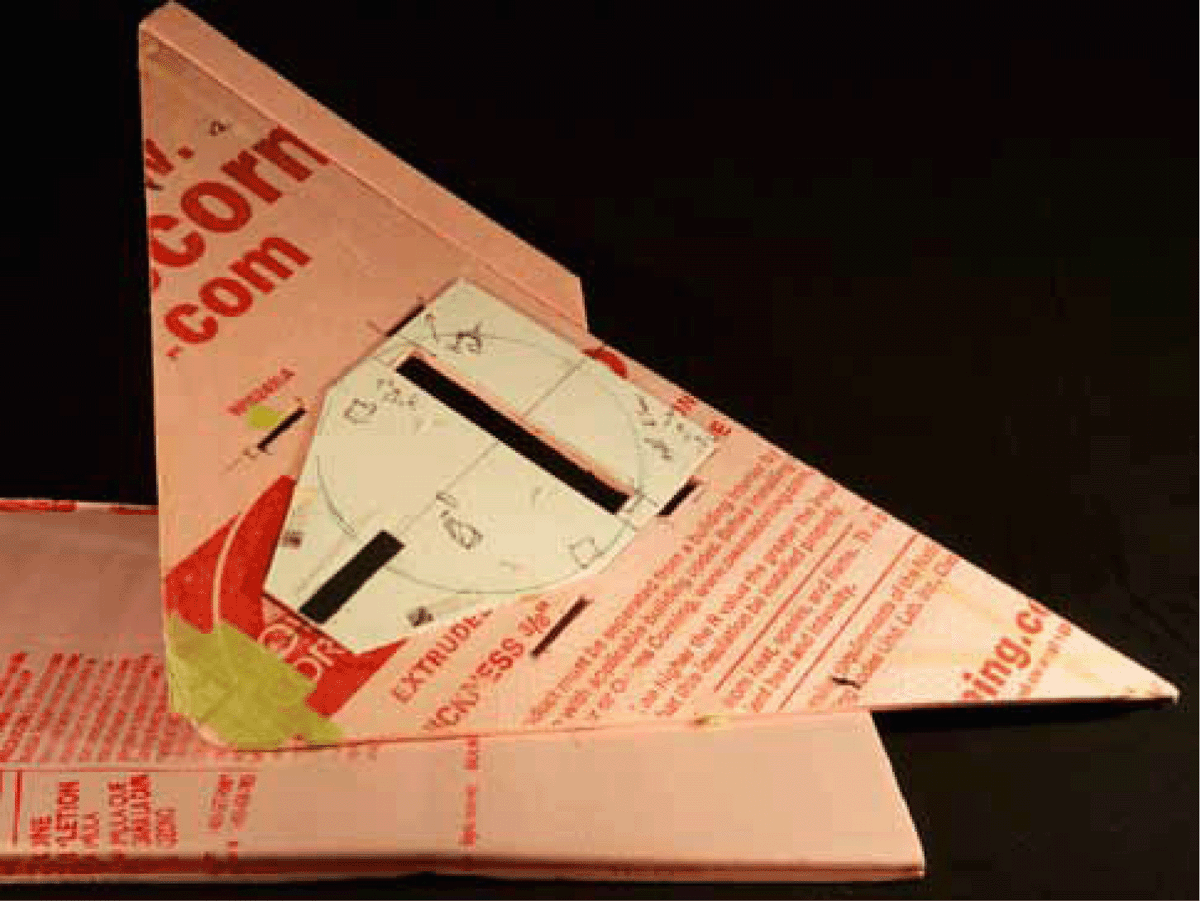
Pink Foam. Corning makes a pink version of the blue foam but in ⅜ inch that I have used in the past. In fact, the first Flack was made of it, as shown in Figure 1-15. It is a bit heavy but adequately stiff and thick enough that you can sand in a bit of an airfoil. Using this material will shift the CG back. See Chapter 10 for ways to handle this.
FIGURE 1-15 The first deck on the first Flack.
Depron. Depron is a flooring underlayment available in Europe and elsewhere and by special order in the United States. It also comes in white and lacks the stiffness of the Dow foam, but it is a popular building material. You may need to take measures to stiffen it.
Foam-Core Board. Most art shops carry foam-core board that can be used in the ¼-inch size. It is heavy, stiff, and damage-intolerant. I would be tempted to strip off the paper layers and work with the foam directly. Lots of this stuff gets thrown out every day, so it would be great to figure out a way to “aircycle” it.
Dollar-Store Foam Core. In the New York City area, there are various dollar stores that carry a fairly light but fragile foam-core board. Lowell, who is all of 13 years old, built his first Flack out of it. It doesn’t take damage particularly well, but it got Lowell going, which is the most important thing.
Tape
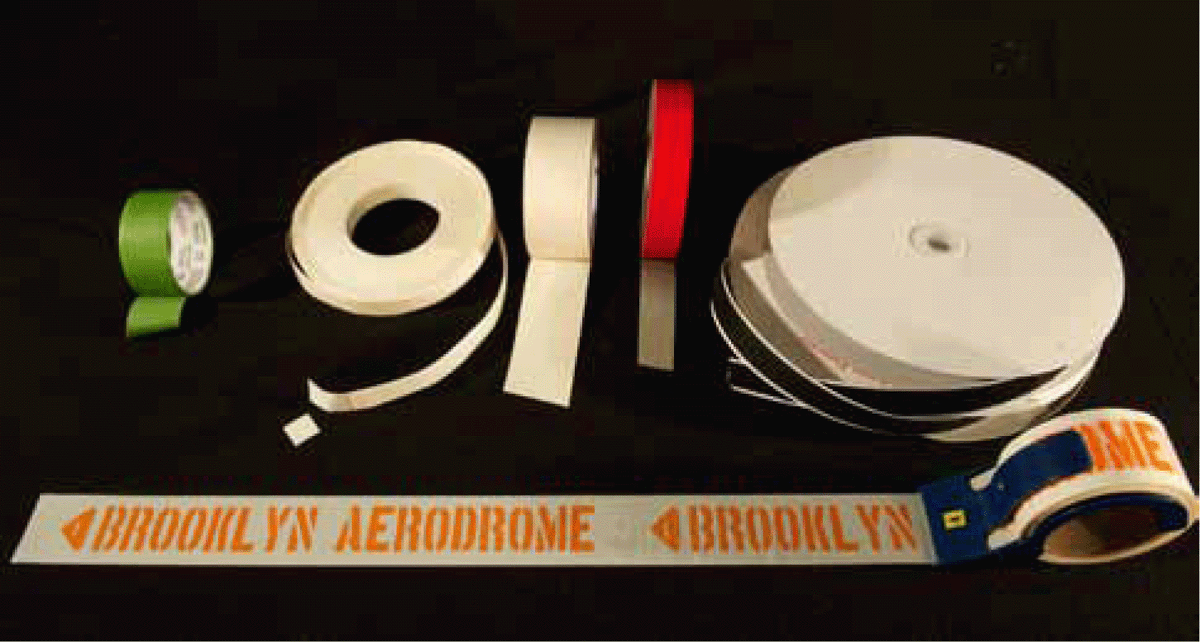
One of the more unexpected aspects of running the Brooklyn Aerodrome is the amount of experimentation we have done with tape. Every time I wander into a hardware store or an art store, I head over to see what the world is doing with tape. Even simple packing tape is quite a complex world of varying ultraviolet (UV) resistance, adhesive quality, and thickness. Colors can come into play, and Brooklyn Aerodrome even has custom tape. Figure 1-16 shows the kinds of tape we use.
FIGURE 1-16 (From left to right) Frog tape, foam tape in ¾-inch squares, carpet tape, high-stick tape, Velcro tape, and custom packing tape on the bottom.
Packing Tape
Packing tape provides the hinge for the elevons and reinforces the stabilizers and nose of the wing. It also can be used for decoration if colored. A dispenser, even a cheap one, makes the tape much easier to work with. I prefer thinner (2.2-mil) colored tape from a reliable brand such as Uline or Scotch/3M. Others can work fine, but I have had bad experiences with elevon hinges failing because of insufficiently sticky tape. I use 2-inch-wide tape.
Double-Stick Tape
Lots of components need positioning before reinforcing with zip ties. Double-stick tape helps tremendously. It also can add a lot of strength.
Some tapes we have used at Brooklyn Aerodrome are discussed below.
¾-Inch Foam Tape Squares. At the Brooklyn Aerodrome, we use thin foam tape from Uline (1/32 inch thick) in our kits and classes. It speeds up the building process. All sorts of other kinds of foam tape are used for mirror hanging, etc. All should work well.
Carpet Tape. Carpet tape is double-stick tape that is quite sticky and tends to release later without too much fuss. It is also pretty cheap at around $7 a roll. We get 2-inch rolls but have moved away from the material in favor of foam squares.
High-Stick Tape. This tape is strong enough to replace zip ties for servo and elevon control-horn placement. It is just a layer of adhesive as opposed to a paper or foam substrate that has adhesive on both sides. It is very good for sticking to decorated airplanes that have plastic skins and a plastic surface on the deck. It is expensive and hard to remove from components when it sets up. It also can release if it is very cold.
Velcro Tape
Velcro tape is used for attaching the battery to the airframe. Get the ¾-inch regular-strength variety. Higher grip strength (from the hook/loop side) makes it very difficult to replace the battery because it sticks so much. The adhesive also can release in the cold.
Frog Tape or Low-Stick Painter’s Tape
Frog tape comes in handy when you are positioning parts, packing stuff, or labeling things. My favorite is the green 1-inch Frog tape.
Cable Ties/Zip Ties
I use varying lengths of 0.10-inch UV-tolerant ties—usually the black ones. You can get 1,000 four-inch ties for about $5 online at Cabletiesandmore.com. Ties can be expensive at hardware stores ($3 for 100). However, the ties can be doubled or tripled to get longer lengths, as discussed in Chapter 3.
Conclusion
So this is the stuff we use to build at the Brooklyn Aerodrome. Check the website for up-to-date information, and please innovate and share. Chapter 2 goes into what these parts do.

