Chapter 13
Plugging In, Turning On: Setup and Connections
In This Chapter
![]() Setting up and connecting your turntables properly for DJ use
Setting up and connecting your turntables properly for DJ use
![]() Connecting everything to your mixer, and your mixer to everything
Connecting everything to your mixer, and your mixer to everything
![]() Troubleshooting why you’re not hearing what you should be hearing
Troubleshooting why you’re not hearing what you should be hearing
You’ve spent a heap of cash on your new turntables, CD decks and a mixer or a digital DJ setup, bought an amplifier loud enough to deafen the back row in a stadium, and everything’s turned on and ready to go – except you can’t hear anything.
You simply have to know the chain of inputs and outputs to check that you’ve plugged all your equipment into the right place.
This chapter assumes you’re connecting turntables, CD decks or MP3 players directly to the mixer; digital DJ setups add some extra complications, so be sure to read Chapter 9 for specific information about digital DJing after reading this chapter.
Getting Familiar with Connectors
 Before you connect your equipment together, getting familiar with the connections you’re using is a good idea. The three most common connection types you come across are RCA (also called phono), XLR and quarter-inch jacks (also known as TRS). In order for music to play in stereo, you usually encounter two of each of these for connecting your equipment. One cable and connector carries what you hear out of the left speaker; the other carries what you hear out of the right speaker. Quarter-inch-jack plugs are also available as a single stereo connector (as seen at the end of your DJ headphones).
Some turntables, CD decks and mixers use digital connections to keep audio quality at maximum. In order to make use of them, your mixer must have a digital input too. USB, FireWire and S/PDIF (Sony/Philips Digital Interface Format) combine both sides of the stereo signal and send it through one cable. The mixer then separates out the stereo sound and plays it back at crystal-clear quality.
RCA/phono connections
RCA connections are also known as phono connections, but I’ll continue to call them RCA to stop any confusion with the phono/line terminology for inputs on the back of the mixer.
These RCA connections are the most common connections you use as inputs to, and outputs from your DJ mixer. The connections come in pairs, one for each side of the stereo signal, and each of them is a different colour. The left signal cable is usually white, although it can be yellow or black, but the right-hand side of the audio signal is always red. The two ‘R’s make remembering which cable plugs into where easy: simply remember that Red = Right.
S/PDIF digital connections mentioned above often use the same RCA style of connection. These are usually coloured yellow (just to add to the confusion!).
XLRs
Used for amplifier connections and microphones, XLRs are the preferred connection for professional audio equipment, because they’re capable of reducing interference when using long cables, and because they lock into place so can’t accidentally pop out if a customer falls on them.
XLR connections (see Figure 13-1) come in two different flavours:
- Unbalanced XLRs are the more common ‘pro-sumer’ (professional and consumer) XLR connection. An unbalanced XLR simply sends the audio signal through the cable, and any unwanted electrical or radio interference that’s picked up by the cable is carried along with the music to the speakers or recording device.
- Balanced XLRs are used in professional audio equipment, and are made in a way that cancels out the unwanted sound interference.
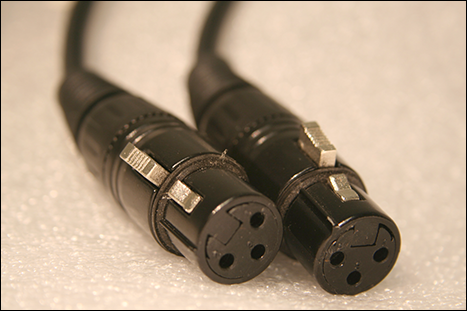
Figure 13-1: Two XLR connectors; one for the left, the other for the right.
XLR microphone (mic) inputs and master outputs on DJ mixers often work with cables and connectors that are both balanced and unbalanced. However, when buying a new microphone, amplifier or mixer, if you’re unsure of the connections of the equipment you use, it’s best to check the specifications.
Quarter-inch jack
A quarter-inch jack (also known as a TRS jack), is what you find at the end of your DJ headphones. It’s much larger that what you may have at the end of your iPod headphones (which is a 3.5-millimetre jack).
Quarter-inch jacks also come in balanced and unbalanced varieties like XLRs. Balanced connectors are mono, so you need two of them, but an unbalanced connector can carry a stereo signal, so it only needs one cable and jack plug (as found on your headphones). If you need to know whether the jack you’re holding in your hand is mono or stereo, look at the black bands on the tip; one band means it’s mono, two bands mean it’s a stereo jack – as shown in Figure 13-2.
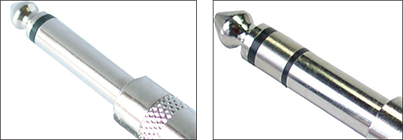
Figure 13-2: Left: A mono quarter-inch jack (TRS) connector. Right: A stereo quarter-inch jack connector.
Plugging Into the Mixer
The first time you look at the back of a mixer, all the different inputs and outputs can seem quite daunting, but after you’ve plugged in a couple of pieces of equipment you’ll find out just how simple it is back there.
For more information on mixers and any functions you’re unsure of that I mention in this section, refer to Chapter 10. Chapter 9 has information about connecting a computer to your mixer.
Connecting turntables to a mixer
Turntables are unique in their connection because they’re the only items of DJ equipment that plug into the phono input on the mixer and they have a thin ground wire (also called an earth) connection that you need to connect to prevent electrical hum and static from the turntables.
Connecting is simple:
- Take the two RCA cables that come out of the back of the turntable, and plug them into the phono input on the mixer.
 The red RCA is the right-hand side of the music signal, and white is the left-hand side (see the earlier section ‘RCA/phono connections’).
If your turntable uses detachable cables, connect the RCA cables to the correct colours on the turntable outputs as well as the mixer inputs.
- After you’ve connected the cables, set the line/phono switch on the mixer for the channel you’ve just plugged into to ‘phono’.
- Connect the ground (earth) wire. It’s usually a thin cable with a piece of bare wire exposed at the end, or a thin U-shaped metal hook.
Your DJ mixer will have something similar to a thumb screw on the back to which you connect the ground wire. Cinch the ground wires from both turntables between a washer on the screw and the body of the mixer (as shown in Figure 13-3).
Be sure that you have a secure connection for both turntables to this ground point. You’ll know if you haven’t properly grounded the turntables, because you’ll hear static or a really nasty loud hum playing through the speakers.
Connecting CD decks to a mixer
CD decks usually use two RCA outputs to connect to the mixer’s analogue line RCA inputs. However, if your CD decks have digital outputs and your mixer has a digital input (both are usually an RCA connection), use a single RCA cable to connect the CD deck to the mixer and keep the music digital.
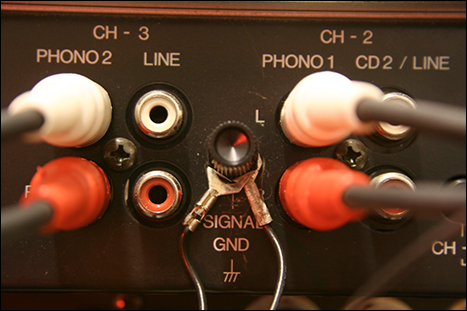
Figure 13-3: Two ground wires screwed to the back of the mixer.
 When connecting CD decks to the mixer through the analogue outputs and inputs (a pair of red and white RCA cables), be sure not to plug one of them into the digital connection by accident. If you hear only one side of the music and you have a digital input or output, this mistake could be why.
Connecting iPods and personal MP3 players to a mixer
Unless you’re using a mixer specifically designed with a dock for mixing with iPods, you need to use a cable that converts the output of your iPod (or any other personal digital music player) to two RCA plugs. You can get a cable that’s based on the dock connector of the iPod that splits into two RCA plugs (this is how a lot of people play their iPods through a home hi-fi), but without that, and for most of the other MP3 players, you need a cable that splits the headphone output into two RCA plugs.
You can buy these cables from most electronic spares stores, or simply type ‘3.5 mm stereo jack to RCA’ into any search engine or on eBay (www.ebay.co.uk) and you’ll find one for about £5. Just make sure that the jack on the end of the cable you go for is stereo (it’ll have two black bands on the tip), and that it’s a 3.5-millimetre jack, otherwise it won’t fit into the MP3 player’s headphone output.
As with the CD decks, simply plug the RCAs from this cable into the line input on the back of the mixer, making sure that the channel you use for this input on the mixer is switched over to ‘line’.
If you have to use the headphone output, bear in mind that it’s not meant to be used this way. So if you don’t have a line output on your device, in order to keep the volume of the MP3 music similar to that of the music from your CDs and turntables, you may have to set your MP3 player to a high volume or increase the gain on the mixer by more than you do for a CD or record – this can introduce unwanted noise or distortion to the music.
Choosing your mixer inputs
If you just use two turntables, CD decks or MP3 players, and have a two-channel mixer, connection is simple. Connect the CD deck/MP3 or turntable to your left to Channel 1 and the one on your right to Channel 2.
If you have more than two channels on your mixer, check whether any of them are designed for a certain input device. The Pioneer 600, 800 and the 900 Nexus mixers, for example, all differ in what devices can be connected and used to their full function in each channel.
If your mixer doesn’t have any specific connection requirements, you can connect to any two channels on the mixer. It’s still a good idea to connect the left deck to a lower channel number and the right deck to the higher number.
If you use two CD decks and two turntables and have a four-channel mixer, you may want to connect in the same way that the decks are arranged in front of you. Suppose that you arrange your equipment in this order:
Turntable 1 – CD 1 – Mixer – CD 2 – Turntable 2
A simple setup is to connect turntable 1 to channel 1, CD 1 to channel 2, CD 2 to channel 3, and turntable 2 to channel 4. This may cause less confusion about which channel controls which item of equipment. Just make sure that you switch the line/phono switch to ‘line’ for the CDs and ‘phono’ for turntables.
If you only have a two-channel mixer, you can still use two turntables and two CD decks. Plug turntable 1 into the phono input on channel 1, and CD 1 into the line input on channel 1. Then plug turntable 2 into phono on channel 2, and CD 2 into line on Channel 2. Now you just need to change the channel switch from ‘phono’ to ‘line’ (or vice versa) to use the right piece of equipment. Remember, though, that you won’t be able to mix from turntable 1 to CD 1 or mix from turntable 2 to CD 2, because even though they’re different machines, they both play into the same channel on the mixer.
Plugging in your headphones
Plugging in your headphones is as simple as finding the hole marked ‘headphones’ on your mixer and plugging the headphones in, but I want to mention it here so that I can bring up the use of 3.5-millimetre adaptors. These adaptors let you convert headphones with a small 3.5-millimetre jack into the big, 6.35-millimetre (quarter-inch) size that your mixer needs.
Some mixers have the headphone input on top of the mixer; others have it on the closest side to you, or even both. Find your input and plug in. Simple.
Connecting effects units to a mixer
You can connect separate effects units to the mixer in two ways:
- Between the mixer and the amplifier: Direct connection is the most basic and easiest way to connect your effects unit. Take the master output of your mixer (two RCAs) and plug it into the line input on the effects unit. Then, take the output of the effects unit (still two RCAs) and plug it into the input of the amplifier.
 The drawback to this method of connection is that the entire audio signal will be affected by the effects unit; you won’t be able to play one channel from the mixer (without effects) while the other one gets a whole load of crazy effects applied to it.
 - With send and return connections: You can send music from an individual channel on the mixer to an effects unit using the send and return option. With this, you can apply an effect to only one channel, leaving other channels to play unaffected through the speakers.
You can send the signal from the mixer to the effects processor (and return it) in two different ways:
- If the effects processor can accept multiple inputs, you can use a mixer with a separate send and return for each of the channels. Controls on the effects processor (and sometimes on the mixer) let you choose what channel on the mixer to apply the effect to. With the correct controls, you can ‘effect’ any number of channels while ‘un-effecting’ any number of channels. This method is by far the most versatile approach to using an effects processor, but does tend to require a large mixing desk instead of a compact DJ mixer.
- Some DJ-specific mixers with multiple channels may have only one pair of send and return connections but have a control on the mixer that assigns what channels are sent. The DJM-600 that I use lets you send any one of the four channels or the entire master output to an effects unit, so although it’s not quite as versatile as the option to include or exclude any number of channels, this way can still give you clean audio from one channel while ‘effecting’ another, which is good enough for me.
The connections for send and return vary, but on the DJM600 it’s a pair of mono quarter-inch jacks for each direction. One pair connect from send on the mixer to the input of the effects unit, then another pair connect from the effects unit to return on the mixer. You may find that some units use RCAs or stereo quarter-inch jacks for this purpose, so take a close look at your mixer and the effects unit so that you know what cables you need.
Connecting mixer outputs
After you have all the inputs connected to the mixer, you need to look at how to connect your mixer to an amplifier in order to hear the music, and maybe also connect to a recording device (tape, CD, digital recorder, PC and so on) so that you can capture the moments of greatness you’ll achieve in the mix.
Your mixer has two (or sometimes three) outputs:
- Master out is the connection to use when connecting to an amplifier. Using a stereo RCA cable (professional mixers may also use a second master output that uses XLR connections rather than RCA connections), connect one end to the master out on the mixer and the other end to an input on the amplifier. At home, you may use the same amplifier for DJing as you do for your TV, PlayStation or computer output. If this is the case, you may want to add sticky labels to change the normal ‘input 1, input 2’ labels that’ll be on the amp, to help you remember what channel lets you hear what.
The master out is affected by the master level control on the mixer, so if you turn that down, the volume of the music to the amplifier reduces.
- Record out is reserved for outputting to recording devices. The reasons you use this output rather than the master out are because:
- The master out is probably going to an amp anyway.
- The record out bypasses the master level control, so if you turn the master output down (maybe to take a phone call), the music level you send to the recording device won’t change.
Like the master output, connect the record outputs to the recorder’s inputs using a stereo RCA cable, making sure to continue to plug the red RCA output to the red RCA input and the white output to the white input. (For information on how to set the record levels on your recording device, see Chapter 19.)
- Booth output is where you feed the mixer into a separate amplifier and speaker in the DJ booth, known as the booth monitor. Chapter 14 has important information about setting the volume of the booth monitor and the headphones to allow you to mix properly.
The connection is the same as record out and master out: connect one end of a stereo RCA cable to the booth output on the mixer and the other end to the booth monitor’s input.
Connecting a mixer to your home hi-fi
Connecting to your home stereo (hi-fi) is similar to connecting to an amplifier. You make the connection using a stereo RCA cable from the master output on the mixer to the hi-fi – but you need to pay attention to the input you choose to use on the hi-fi. On the back of a hi-fi, you’ll probably see some of these inputs: line, CD, TV, DVD, aux and, if you have an old (or really good) hi-fi, a phono input too.
If a CD or MP3 player is already connected to the hi-fi, a TV is connected to the TV input, and the DVD input is in use too, you’re left with aux (auxiliary) or phono (which is meant for turntables only). Therefore, you should use the aux input to connect your mixer. Even though the music may be coming from turntables, by the time it’s played through and outputted from a mixer, the signal’s transformed into a line-level signal. Of course, if you don’t have a CD player or TV plugged into the hi-fi, you can use the TV and CD inputs too. Just stay away from the phono input unless you’re connecting turntables directly to the hi-fi.
Connecting a mixer to powered speakers
Sometimes, powered speakers only have a jack input (like the headphone output on your mixer), so check whether you need to buy an RCA-to-jack cable (RCA for the output from your mixer) for each of the speakers (left and right). You can find more information on using amplifiers, powered speakers and home hi-fis to play your music in Chapter 12.
Connecting a mixer to your PC/Mac
Whether you’re using the computer as an amplifier or you plan to record the mix to edit it or upload it to the Internet, the connection between your computer and your mixer is similar to all the other equipment you’ll connect. Take a look at the line input on your soundcard. Some use a 3.5-millimetre jack input – in which case you’ll need an RCA-to-jack cable to connect to the soundcard. Others use RCA inputs, so you can use an RCA-to-RCA cable. In either case, use the record output from the mixer if you’re only using the computer for recording, and use the master output if using the computer as an amplifier (this frees up the record output for a recording device).
If your soundcard comes with instructions and software for setting up the computer to be able to accept a line input, please refer to the manual carefully. If it’s a Windows-controlled soundcard, you can activate the line input through the volume control or recording devices window – found either by double-clicking the speaker icon in the taskbar or through the hardware/sound properties in the control panel. Mac users can access audio input controls through the sound section of system preferences.
You may want to turn off any other recording inputs (de-select them in the record control) or mute other playback devices in the volume control window (by selecting ‘mute’) to make sure that sounds from Windows or other programs aren’t accidentally combined with the sound from your mixer. Nothing’s worse than being halfway through a great mix only to have Swiper say ‘Aaw Maan!’ over the music when you get an email. Come to think of it, that might be quite cool …
Troubleshooting Setup and Connections
Sometimes you’re sure that you have everything plugged into the right place, you’ve turned everything on and everything’s playing, but you just can’t hear anything. To wrap up Part II of this book and the equipment information as a whole, the following list of troubleshooting issues may help to answer any of your connection and turntable setup problems.
Everything’s connected and switched on, a record (or CD) is playing, but I can’t hear anything from the speakers
Ask yourself the following questions:
- Are the LEDs on the mixer flashing up and down to show that the mixer is receiving some music? If not, there’s currently no signal.
- Have you used the correct inputs on the mixer for your MP3/CD players or turntables and set the line/phono switches accordingly (line for CD and MP3; phono for turntables)?
- If you’re currently playing one channel of music, have you made sure that the cross-fader is on that side and the channel fader is up at least to 75 per cent? And if the cross-fader has an assign function to control any of the channels, is it switched to control the correct channel?
- If the mixer LEDs are flashing, have you made sure that you’ve connected the mixer’s master output to a line input on the amplifier?
- If the amplifier has the capability for multiple inputs, have you made sure that you’ve set the input switch or button to the correct input?
- Are the master level and the input level on the amplifier set at a point where you should hear music?
- Are the speakers connected?
- Have you tried connecting something else to the amplifier to check that it isn’t a problem with the amplifier or the input channel you’re using?
I can hear the music from the amp now, but I can’t hear anything through the headphones
Try the following:
- First check that your headphones are plugged in, turned up and switched to monitor the correct channel.
- Try turning all the headphone cue switches on. If you can hear music now, you were pressing the wrong cue button or you’ve connected your equipment to a channel you didn’t intend to use.
- Plug your headphones into another piece of equipment with a headphone socket (such as the amplifier) to make sure that this problem isn’t a malfunction with your headphones.
One of the turntables is distorting and the high frequencies sound fuzzy
The first thing to do is look at your needles. Are they caked in dirt? (Remove the dirt from around them carefully.) Are they really old? (Replace them.) Are they inserted into the cartridge properly? (Check and re-insert them.)
If you think it’s a malfunction, try swapping the headshell from one turntable to another or try swapping the needle from one headshell to the other. In case you have a connection problem rather than a needle or headshell problem, try swapping around the turntable connections to the mixer.
Why do my needles keep jumping when cueing?
If you’re having a problem with your needles jumping around, try working through these possible solutions:
- Refer to manufacturer’s guidelines on where to set the counterweight of your tonearm. If the counterweight can be set within a range of numbers (between 3 and 5 grams, for example), set it to the lowest number first and gradually increase the weight until the needle stops skipping.
- Check the settings provided with the needle and cartridge for the height of the tonearm, and make sure that the tonearm is completely parallel with the record. If you need to set the weight or height to more than the recommended amount, your technique or needles could be at fault:
- Make sure that you’re cueing the record back and forth in the curved direction of the record. If you push and pull horizontally rather than in a curve, this action may make the needle jump.
- Old, worn needles are more prone to skipping.
I hear a really strange humming noise coming from my turntables
You may not have connected the ground wire. Make sure that it’s securely attached to the earth/ground connector on the back of the mixer.
Why is everything distorting badly when I play a CD?
Check whether you’ve accidentally inserted the outputs of your CD decks into the phono inputs of the mixer. If you have, plug into the line input instead.
Why is everything really quiet when using my turntables, even when everything is turned up to maximum?
Make sure that you’ve plugged your turntables into the phono input. If you’ve put them into the line input, they’ll be very quiet.
Everything sounds nice through the mixer but distorts through the amp
Answer the following questions:
- Have you turned up the input level on the amp too high? Turn it down a bit; see whether that helps.
- How strong a level are you sending out of the mixer? Take a look at where the LEDs on the mixer are flashing; try not to play the music above +5 decibels on the scale, because it may cause distortion.
- Have you plugged into the phono inputs of the amplifier by accident? Change the connections to plug into one of the line inputs.
Music is playing through the mixer, but I can’t get any music into the PC
Try the following:
- Make sure that the speakers on your computer are turned on and all volume controls (including the computer’s) are turned up.
- Check the connections and ensure that you’ve plugged the output from the mixer to the line input of the soundcard. You may find a mic input right next to the line input, so double-check that you didn’t plug into the wrong place when you were fumbling behind the PC.
- Check the meters on the recording software. They’ll be bouncing up and down if they’re receiving a signal.
- Check the record control (which you can access through the volume control icon on the taskbar). Double-check that you’ve selected line input and that the input level is set to at least 75 per cent.
- Have a quick read of the manual that came with the software and the soundcard to see whether you need to do something special.
I’m able to record what’s going in, but nothing is coming back out of the PC
Check that you’ve connected the line out from the soundcard and not plugged into the mic or line in by accident. Check the volume control found in the taskbar, too. Make sure that you haven’t checked the mute box thinking it was the select box from the record control (I do this all the time).
Why doesn’t my recording device seem to record anything when connected directly to the mixer?
Answer these three questions:
- Did you accidentally use the booth output to send to the recording device, but turned the booth output volume off? If so, switch the cables over to record out, which is preferable to turning up the booth output.
- Is the input level control on the recording device switched to accept the line input and turned up to an appropriate level?
- Does your recording device need to be in record mode in order to register any input? This isn’t common on domestic recorders; on a lot of professional equipment, however, if a CD/DAT/MiniDisc is in the machine, you need to press the record button on its own to get the device into record mode. (The machine only starts recording when you press record and play together.) This tells the electronics to accept a signal in rather than just play a signal out.