Chapter 14
Grasping the Basics of Mixing
In This Chapter
![]() Discovering the essence of club DJing
Discovering the essence of club DJing
![]() Working out the tempo of your tunes – beats per minute
Working out the tempo of your tunes – beats per minute
![]() Finding the first beat of a tune with confidence
Finding the first beat of a tune with confidence
![]() Starting your tunes so the beats play in time
Starting your tunes so the beats play in time
![]() Using the pitch control to match tempos
Using the pitch control to match tempos
![]() Getting to grips with headphone cueing techniques
Getting to grips with headphone cueing techniques
DJs play music. They play music that people want to dance to, and play music that keeps people on the dance floor. This is the most important part of DJing, no matter what genre you play.
Adding to this skill of picking the right music, house, trance and electronic dance music DJs employ a technique called beatmatching to make the bass drum beats of two different records play at the same time. That way, when the DJ mixes from one record to another, the people on the dance floor don’t have to adjust their dancing rhythm, and the music flows all night.
In this chapter, you’ll discover all the tools and skills you need to beatmatch manually, so you can do it on turntables and CD decks, and won’t need to reach for the sync button in DJing software (see Chapter 9 for more about this).
The secret of successful beatmatching is simple: good concentration and lots of practice – no special tricks required (well, there is one – described at the end of this chapter). The great news is that after you’ve invested your time and concentration to master beatmatching, the skill sticks to you like glue.
Knowing What Beatmatching’s All About
Matching beats is a very simple concept, but it’s an important core skill. Although certain kinds of music don’t lend themselves to beatmatching – for example rock music, which only tends to use beatmatching once in a while as a special trick – if you want to play in a club where the DJ is expected to beatmatch records to mix them together, you’d better develop the skill!
Beatmatching is essential for the trance and house DJ not only to aid with smooth, seamless transitions from tune to tune, but also for the physical effect on the people on the dance floor.
 When beatmatching DJs progress through the set, playing different tunes and different styles, the music gradually plays faster and faster until it reaches what I call the sweet spot. This sweet spot occurs when the bass beat from the music matches the speed of the heartbeats of the people dancing. This speed can be anything between 130 and 145 beats per minute (bpm) for most music, but can be more depending on the music genre.
When the speeds of the pounding bass beats and the thumping heartbeats get closer and closer, the combination of pulsating rhythms begins to do strange things to the bodies and emotions of the people on the dance floor. With time, this euphoric moment is commonly signified by a hands in the air moment on the dance floor. It makes me sweat a bit, but that’s just me …
Importantly, even if you consider this phenomenon as some kind of voodoo mind control, you need to understand that you should play at a tempo where people are enjoying themselves and comfortable dancing on the dance floor.
Other genres of music can affect the people on the dance floor, too – but usually only on a song-by-song basis. The right rock tune at the right speed can really blow off the roof – but this isn’t the same thing as the pounding, pulsating beats of a series of great trance tunes putting the people on the dance floor into a euphoric, trance-like state.
Discovering How to Beatmatch
Your choice of format doesn’t matter – CD, vinyl, software or anything else; the mechanics of beatmatching are the same. Once you learn the technique on any of these formats, the technique is the same – only the controls are different.
In this chapter I describe how to perform beatmatching with reference to vinyl and CD DJing. Please check Chapter 6 if you need more information about using controls on turntables, and Chapter 8 if you need more details about using CD decks.
Digital DJs using controllers may find their on-screen layouts and controls very similar to those on a CD deck; digital DJs using a digital vinyl system will find that the techniques I describe using traditional turntables are what they need to follow. Check out Chapter 9 for more on digital DJ setups, so you can be sure you know what to do for your equipment.
Choosing skills over thrills
As a digital DJ, the option to use sync controls to let the software take care of the skill of beatmatching rather than doing it yourself can be very tempting. A school of thought that I agree with says that letting technology take care of the hard stuff means you can concentrate on the music you’re playing. But trust me, beatmatching is only hard at the beginning. When you get good at it, you’ll be able to beatmatch two tunes in 20 seconds or less. Even if you still want to use the software sync function, take time to learn how to beatmatch manually, so you know what to do if the software doesn’t get it right!
Setting up your equipment
A few basic settings and requirements can help you master the fundamentals of mixing comfortably (jump back to Chapter 10 if you’re not sure about some of the mixer controls):
- Make sure that your DJ setup is switched on and hooked into an amplifier. (Check out Chapter 12 and 13 for more on connecting up.) Don’t worry about headphones for now; you get to use them later.
- Use two copies of the same tune (preferably something that has a simple, constant beat from the very beginning).
The reason for using two copies of the same tune is that when both pitch controls are at zero, they’ll both play at exactly the same speed. This fact means that you don’t have to worry about one tune playing faster than the other yet, and makes getting to grips with starting your tunes and keeping them in time a lot easier.
- Set your mixer so that you can hear both tunes at the same time and at the same volume. (Typically, this requirement means moving the cross-fader into the middle, and setting both vertical channel faders to maximum, with the gain and equaliser (EQ) controls set the same on both channels.)
The reason you set the mixer to hear both tunes at the same time is so that you only have to worry about working with the tunes – you don’t waste time and concentration trying to adjust the controls on the mixer.
This method may sound messy at first, and your dog may leave the room in protest, but don’t worry – you’ll move on to proper mixing soon, and the dog needed to stretch his legs anyway.
By using two copies of the same tune, you may experience a phenomenon known as phasing. When two identical sounds play over each other, their sound waves combine and then cancel each other out to make it sound like your music is playing through a jet engine. This can seem a little distracting at first, but when you begin to hear this phasing sound, it’s proof that you’re getting the bass beats closer to playing together – this is actually a great help when learning how to beatmatch! When you move on to using two different tunes, you won’t need to worry about phasing happening any more (although you may want to use this natural effect instead of using a phaser or flanger effect on a mixer). Check out Chapter 10 for information about effects on mixers.
Locating the first bass beat
Every journey begins with a step, and every beatmatch begins with a beat. To start with, find a tune with a solid, clear bass drum beat right from the beginning. (In a perfect world, all records would start with a constant bass beat, making beatmatching a lot easier.) See my website at www.recess.co.uk for music you can download for this purpose.
Whether you’ve chosen a tune with the beat at the beginning or picked one that has its first beat 45 seconds in, the following points can help you locate the first bass beat so that the needle is cued up (ready to play) or the CD/software is waiting at the very instant the first beat is about to play:
- Listening for the beat:
Vinyl DJs: The first option is to simply start the tune from the beginning and wait until you hear the first beat. When you hear the first beat, place your finger on the record to stop it, and slowly play it backwards by hand. As you play the record backwards, you hear the part of the record you’ve just heard playing in reverse. (Don’t be overly concerned about revealing any satanic messages when doing this; dance music doesn’t tend to contain any.) If you use a tune that starts with a beat from the beginning, the last thing you hear when playing backwards is that beat. The instant the beat goes silent is where you want to leave the needle.
CD DJs: Pause the CD when you hear the first beat and then play the tune backwards (your CD deck will have a certain way of doing this; check out Chapter 8 for more) until you get to the beginning of the bass beat. Then store that point as your cue (start) point – often by pressing the cue button, but check what to press on your CD deck in order to do this.
- Winding to the beat:
Vinyl DJs: If you’re impatient or in a rush, you can turn the record around really fast with your finger until your hear the brrrrrrrrrrrp noise of beats playing really fast and then play the record backwards until you find the very first of those beats.
CD DJs: If you have a CD deck with a large rotating platter that emulates the sound of a turntable, you can do the same as vinyl DJs. If you only have buttons that skip through the tune, press and hold the search button until you hear the bass beats starting to play very fast, and then play the tune backwards until you locate the first of those beats.
- Looking for the beat:
Vinyl DJs: Take a close look at a record and you can see a lot of rings of different shades of grey and black (the target light on your deck shows up this shading). The darker parts of the record are where it doesn’t have as much information cut into the groove and is likely to not contain a beat. Look at the beginning of the record where the rings change from dark to light – the lighter shaded area contains more sound information and is probably where the beat starts. Place the needle where the dark and light rings join. If you can hear the beat, spin the record backwards until the beats stop, or if you still hear the introduction, play the record forwards until you find the first beat.
CD DJs: If you have a wave display on your CD decks or software – which has a series of peaks and troughs to show the louder and quieter parts of the tune – refer to your wave display to find where the big peaks begin; that’s likely to be where the beats start.
Digital DJs: Most DJing programs have an onscreen waveform that lets you see your music. The big peaks in figure 14-1 below are beats. Load up your tune and look for the first big peak – that’s likely to be the first bass beat.
- Letting the machine do it for you:
CD DJs: Some CD decks will hunt out the very first sound in the tune and set the cue point automatically for you. This isn’t always the first beat, though, so do check where the cue is set.
Digital DJs: DJing software can do a similar thing, but instead of the first sound, it looks at the waveform of the music and knows where the first bass beat is because of the size of the peak, and sets the cue point there.
Starting your tunes in time
When you’ve happily found the first beat in a tune, choose a deck, make sure the pitch is set to zero and get ready to start. (I’m left-handed, so I seem to always start on the left.)
For vinyl DJs (and digital DJs using a digital vinyl system):
- Place your finger on the outer inch of the vinyl.
Notice I didn’t say press – just place your finger; you only need a little pressure.
- Press the start button.
Due to the wonder of slipmats, the turntable turns underneath the record while you’re still holding it (if it doesn’t, shame on you for buying cheap equipment).
Now the easy part.
- Take your finger off the record.
Glorious bass drums should now flood through your speakers.
CD DJs (and digital DJs using controllers): No need for three steps for you – just press play!
- While the tune is playing, listen to it. Don’t simply hear it – take a moment to really listen to what’s happening (this is called listening with an active ear). Really concentrate on listening to the bass drums.
You should pick up that the bass drum has two different sounds. One of them is just a bass drum on its own, and the other one is normally the bass drum combined with another sound – usually a clap or a snap-sounding drum called a snare drum). Listen and notice the difference in emphasis between the first beat of the bass drum (represented by B in my rather basic DJ beat notation that follows) and the second beat of the bass drum (represented by BC to show that it’s B combined with another sound):
B BC B BC B BC B BC
- When you’re comfortable with the sounds of the beat, move over to the other deck and check that the pitch is set to zero. (Vinyl DJs: go back to steps 1 and 2 for this new deck.)
The first beat that you’ve located on your tune and are ready to start from is normally the bass drum on its own. You’re about to try starting this first beat at the same time as the single bass beat plays from the tune that’s currently playing through the speakers.
Have a listen again. Make sure that you know what bass beat sound you want to start on. At this early stage, you may find that counting the beats in your head is helpful: ‘1 – 2, 1 – 2, 1 – 2’ or ‘bass – snare, bass – snare, bass – snare’.
The record is poised, ready to go; the platter is still spinning underneath; you’re now sure that you know the sound of the beat you want to start on.
- Let go of the record (CD/digital controller DJs: press play).
Chances are, one of three things happens:
- You get it right first time – both beats play at the same time. Well done! Give it a few more goes to make sure that you’ve really got the knack.
- In your haste, you let go/pressed start too early, and the two bass beats sound like a galloping horse when they play together. Don’t worry; it’s easily done. Take the needle off (CD/digital DJs: return to your cue point; check out Chapter 8 if you’re unsure how), head back to Step 1 and have another go.
- You’re over-cautious, wait too long, start the tune too late and the beats sound like a train-crash together. Again, very easily done. Just go back to the first step and try it again.
The good news is that a small timing error may not be all your fault. Before you get too frustrated at not getting your tunes to start in time, check out a couple of external factors:
- Give a little push. When using vinyl, you may find that waiting too long happens more often than not, which is common. The good news is that the delay may be nothing to do with when you let go of the record, but more to do with the motor in the turntable.
When you attempt to start the beats in time, even though the slipmat does its job and the platter still turns underneath the record, if you just lift your finger off the record to start it playing, the motor can still take a fraction of a second to get the turntable up to full speed (known as lag).
The more powerful the turntable’s motor, the less lag and the quicker it gets up to speed, but even the best of decks can introduce a tiny delay. (All you CD and controller DJs are allowed a smug smile at this point.)
 To get around motor lag, don’t just let go of the record – give it a gentle push too. How much of a push you have to give the record is just as much a knack as starting it at the right time, but like everything else with beatmatching, you’ll get this knack with practice.
 - Make sure that you’ve really got that beat! The other common cause of not starting the beat in time is not having the needle or cue point at the very beginning of the first beat.
For CD and digital controller DJs, this is just about listening to or looking carefully for the sounds of the beats as you try to find the very beginning of the first bass beat. For vinyl DJs and CD DJs who have platters on their CD decks with vinyl emulation, to get used to finding exactly where the beat is, play a second or two’s duration of the tune backwards and forwards, as if you were scratching slowly. The beat will make a boom – woomp – boom – woomp noise as you rock it back and forth.
To improve the timing when you eventually release the record, perform this rocking (scratching) motion at the same time as the other tune plays its bass beats. Scratch forward when the other tune only plays a bass beat, and backwards as the other tune plays the bass and snare/clap beat. Then, when you want to start the tune, just let go!
With all the noise around you in a DJ booth, you can have difficulty hearing the first bass beat if it isn’t a solid thump. By rocking a record back and forth through the needle, you’re giving your brain more information to help it pick out the bass sound from all the other noise.
Try this rocking technique a few times as you practise starting the record in time. You’ll be amazed at how quickly you get used to working the vinyl (a fancy-pants way of saying using and touching the record).
 Your parents may have told you never to touch records and to treat them with care, which is right for their Beethoven LPs but not for DJing. Moving the needle off and on the record, finding the first beat and starting it playing at the right time, are skills that go towards making you more comfortable with your DJ tools. Just keep your hands clean and show some care (don’t drop the needle from a great height or rip it right across the record) and your tunes will be with you for a long time.
Adjusting for errors
When you make a timing error starting the beats, starting over again is perfect when you’re developing your skills, but it’s not how experienced DJs deal with theses errors.
Try starting the beat again – but from now on, if you make a timing error, use the following methods to bring the bass beats back in time (that is, make them play at the same time). Experiment with all of the following methods and find the one that you’re most comfortable with. Importantly, you need to find the error-adjustment method that suits you best, giving you consistent, positive results.
- Starting too soon: If you start the new tune too early, its bass beats will play before the bass beats on the tune to which you’re trying to match the beats. So you need to temporarily slow the new tune down a little to get it in time.
CD DJs and digital controller DJs should have some form of pitch bend controls which do exactly this. If you have one, press and hold the pitch bend button until the beats play in time, and then release the button to return to the correct speed. CD decks and controllers with platters can have slightly different ways of doing this. For example, on Pioneer CDJs, you rotate an outer ring on the platter to make the tune play faster or slower in short speed bumps. Read your manual!
DJs using vinyl (including digital vinyl systems) can place a finger on the dimpled ring running around the side of the spinning platter to add a little friction. This slows the speed at which the turntable turns and eventually slows it down enough so that the beats play at the same time. When the beats play in time, take your finger off the dimples to return the record to normal speed. The amount of pressure to add to the dimples takes a little getting used to, and if you’re ticklish try not to giggle – it doesn’t look professional!
- Starting too late: Vinyl DJs who start the tune too late, so the beats on the new tune play after those of the one to which they’re trying to match, can try a couple of methods to speed up the record:
- Tightly grab the turntable’s centre spindle, which pokes through the record, with your thumb and middle fingers, and turn that around to make the turntable turn faster than normal.
- Place your finger lightly on the label at around the 6 o’clock position, and push that around to give the record a helping hand to play a little faster. This is my preferred method.
CD and controller DJs can use their pitch bend controls to temporarily speed up the tune.
 A technique some DJs use to fix starting errors on CD decks or turntables is to use the pitch control as a pitch bend. Boosting or cutting the speed by briefly moving the pitch control by quite a large amount works well at this initial stage of learning to beatmatch, because you only need to return the control to zero in order to make the tunes play at the same speed again. But by the time you start using the pitch control to make your tunes play faster or slower to match the speed at which the other tunes are playing (see ‘Using the Pitch Control’, later in this chapter), it’ll be a lot harder to return the control back to exactly where you originally set it.
No matter which method you use, try to be gentle when making these timing adjustments. If you press down too hard on the side of the turntable, it’ll grind to a halt! Or if you push the label around too hastily, you may knock the needle out of the groove or zip forwards through the tune by 20 seconds. Some CD decks and controllers pitch bend more the harder you press the buttons or rotate the platters, so work out how heavy handed you need to be.
Knowing which record to adjust
When you need to alter the speed of a tune to make the beats go back in time, you almost always adjust the tune that isn’t playing through the speakers yet – the cued track, which you normally listen to in your headphones. If you were to speed up or slow down the live track that people can hear through the speakers, they might start shouting, ‘Sack the DJ!’ (a phrase that strikes fear into the heart of any DJ). If both tunes are playing through the speakers when you’re mixing one tune into the other, adjust the quieter of the two tunes.
In some instances (usually with a tune with a constant note playing), speeding up or slowing down the quieter tune sounds terrible because of the pitch hiccup to the note playing, but practice gives you the experience to know which tune to change.
Using the Pitch Control
After you’re comfortable starting your tunes in time (see the earlier section ‘Starting your tunes in time’), the next step in beatmatching is to follow the same process using the same two tunes, but this time one of them starts playing at a different speed to the other one, so you can get used to working with the pitch control.
At this stage of getting to grips with beatmatching, the advantage of using the same two tunes as in the first exercise is that if you’re really stuck, you can compare the pitch controls of both decks to help match the speeds. With enough practice, you’ll no longer need to do this. Don’t worry: you’ll move on to other tunes soon.
Understanding bpm
In order to use the pitch control correctly, it’s useful to know how it affects the speed of the music, and how to calculate these changes of speed.
Beats per minute (bpm) are a way to describe how fast (known as the tempo) your tunes play. The name gives it away: the bpm is the number of beats that occur in one minute.
As a very broad generalisation, house music is recorded with a bpm between 110 and 130 bpm, trance music ranges mostly between 130 and 145, and hard-house/happy hardcore can be well in excess of that. Other genres of music, like rock, pop, jazz and so on, have wider ranges of bpm. Even looking at just one artist like Aerosmith, ‘Crazy’ is a ballad at 54 bpm, whereas ‘Young Lust’ rocks out at 189 bpm!
Calculating bpm
When you try to beatmatch two different tunes, knowing the bpm of each one before you start helps you to make an educated guess about how much you need to adjust the pitch control.
You can adopt two main approaches for calculating bpm:
- Use a beat counter. A beat counter is a useful DJ backup tool that automatically calculates and displays the bpm of the tune for you. Stand-alone beat counters can cost between £70 and £200, or if you have a smartphone, you can find cheap (and even free) beat counter apps. If you’re thinking about bpm counters and you haven’t chosen your mixer yet, it makes good financial sense to look at a mixer with built-in bpm counters. Instead of buying a basic mixer and an expensive stand-alone bpm counter, use the combined money to afford a really good mixer with built-in bpm counters.
- Use counters on CD decks or software. Another added feature on DJ software and some CD decks is that they’ll show the bpm on a display. Usually, as you adjust the pitch control to adjust the speed the tune plays at, the bpm display will change to show the new tempo.
- Calculate the bpm yourself. The free approach. It doesn’t take long, and is easy to do. Set the tune to zero pitch and get a stopwatch ready. Hit start, and count how many bass beats you hear for 30 seconds. If you counted a beat as you started the watch, subtract one and double the figure – that calculates the beats per minute for that track.
For example, if you counted 67 beats in 30 seconds and counted a beat as you hit start, the bpm would be 66 beats x 2 = 132. If you counted 60.5 beats in 30 seconds, and started counting from the first beat after you started the stopwatch, the bpm would be 60.5 beats x 2 = 121 bpm.
You can count the beats for an entire minute, of course, but you’ll probably find that the difference between the 30-second and 60-second count isn’t noticeable enough to warrant counting for longer.
If you can get into a routine of calculating the bpm of your tunes as you buy them, you’ll always be on top of your calculations.
After you’ve been DJing for a few months and your skill has developed, you’ll find you don’t have to worry about knowing exact bpm values any more. Quite quickly, you’ll not only develop the skill to tell instantly whether a tune is faster or slower than the one playing, but you’ll find you’ve developed an incredible memory of the general tempo of your records before you play them, and won’t need to refer to calculations. Another reason why practising and spending time with your tunes is essential!
Matching the pitch setting
Some turntables have numbers written down the side of the pitch slider. These numbers don’t, in fact, show how many bpm you can add or subtract. The numbers show the percentage increase/decrease of the turntable rotation, and therefore the percentage change to the original bpm of the tune. On Technics 1210mkII turntables, the pitch slider is zero when in the middle, +8 when moved closest to you and –8 when moved away from you to the farthest point (assuming you don’t have your turntables sideways for scratching – see Chapter 17).
CD decks and DJing software sometimes give you the choice of a much wider range of pitch adjustment. At the press of a button on Pioneer CDJ decks, you can choose between +/–6 per cent or +/–100 per cent pitch range. As a result, these pitch sliders aren’t usually numbered. Instead they have lines on them that split the slider into segments. Using a little maths, you can work out the ballpark figure of your pitch setting. For example, if either side of the pitch slider is split into five segments, and you’ve set it to +/–100 per cent, each segment covers 20 per cent.
If you play a 130 bpm tune and set the pitch control to +4, you’re not adding 4 bpm, you’re adding 4 per cent to the original bpm. Four per cent of 130 is 5.2, which means the 130 bpm tune now plays at 135.2 bpm.
Here’s an example of how to calculate where to set the pitch control on the cued track (the track you want to play next) in order for it to match the live track that’s currently playing through the speakers to the crowd:
- The live track is a 130 bpm tune with its pitch set to +2 per cent. This means that the tune is playing at around 132.5 bpm (2 per cent of 130 bpm is 2.6, which I round down to 2.5 bpm).
- The cued track is 138 bpm. You therefore need to slow this tune down by around 5.5bpm to make it close in bpm to the live track. Because it’s best to deal in rough estimates with the first adjustment to the pitch control (see ‘Taking your eyes off the pitch control’, later in this chapter), this means taking the pitch control down to around –4 per cent to slow it down enough, before moving on to some fine tuning.
All hands (back) on decks
Enough theory. Go back to your decks and try the following method, still using two copies of the same tune:
- Slide the pitch control on your live track to about +3 per cent.
- Leave the pitch setting on the cued track at zero, and start its first bass beat at the same time as the live track’s single bass beat.
You’ll notice that the beats start to drift apart and play out of time very quickly.
- Change the pitch on the slower tune to +3 per cent.
Fortunately, you can cheat for now. Because you can see that the live track is set to +3 per cent, you know that you need to set the pitch on the identical cued track to the +3 per cent mark in order to get the beats playing at the same speed.
- Have another go at starting the beats in time, but this time don’t stop the cued track if the beats start to drift apart.
Treat it in the same way as a starting error. You know (for now) that you need to set the pitch control to +3 per cent, so do so and then use your chosen error-correction technique (see ‘Adjusting for errors’, earlier in this chapter) to get the beats to play at the same time again.
You may get lucky and set the pitch precisely the first time, but most often you’ll find that the beats start to drift apart after ten seconds or so, because even though you’ve moved the pitch control to the +3 per cent mark, the pitch control may not be totally accurate, or you’re very slightly off 3 per cent.
So far this has all been just for practice, of course. The steps have been designed to help you listen out for the sound of beats that are drifting out of time with each other. When you use two different tunes with different bpm, you won’t have the option to cheat by looking at the pitch control on the other deck to know whether you need to speed up or slow down the new tune. So things start to get a little trickier. You need to be able to tell whether the cued track is running too fast or too slowly in order to make the beats play in time again, using your ears instead of your eyes. You work this out by listening to the sound that the bass drums make together.
Playing too slowly or too fast
If you can hear that a record is slipping out of time before anyone else can, and if you can react to it and fix it before anyone hears it, you’ll be as good at beatmatching as any top-class DJ. Even digital DJs who use the sync function need to have this skill, so they can catch and fix any software sync errors. However, knowing whether a tune is playing too fast or too slowly is by far the hardest part of DJing. How to work this out is the question I most commonly get asked, and the hardest thing for a lot of new DJs to figure out. The good news is: like other skills in DJing, once you get it you never lose it.
The reason some new DJs have difficulty making this judgement is that they haven’t spent time training their ears to listen out for the audio clues that provide the answer. This is one danger of using the sync function in DJ software. If you only ever use the sync function, you skip past the chance to learn the vital skill of listening for audio clues. Even if you think you won’t need it, spend time practising the following method. Listen to and concentrate on the sound that plays when a tune is running too fast or too slowly.
At this stage, you’re still playing two identical tunes through the speakers at the same time, so you’ll need to adjust your mixer in order to help you judge whether your cued track is playing too slowly or too fast. Reduce one of the channel faders so that it’s set to about three-quarters of the volume of the other channel. Now that one beat is quieter than the other, you can work out which beat is playing first – the loud (cued) one or the quiet (live) one.
The reason I suggest this setting is because it’s similar to how I set my headphones when beatmatching. I have the cued track (the one I’m about to mix in) playing loudly, and, assuming the mixer has a headphone mix control, I play the live track (the one currently playing through the speakers) at a much lower volume at the same time. See ‘Introducing Your Headphones’, later in this chapter, if you want to know why that’s my preferred setting.
Sounding out the difference
I’ve discovered that the best way to describe what to listen for is by using onomatopoeic words (words that you can associate with sounds): l’Boom and B’loom. (Please bear with me here … I haven’t gone mad.)
Simply, when the cross-fader is in the middle, the louder cued tune is beating away at full volume: Boom Boom Boom Boom … The live tune is playing quieter than the cued track; instead of sounding like a loud Boom, it’s a softer loom sound: loom loom loom loom. (Honestly, bear with me, it does makes sense when you put this into practice, I promise.)
This means that the two sounds you hear that let you know whether to speed up or slow down the cued track are:
- B’loom: When the louder ‘Boom’ tune (the cued tune) plays too fast, you hear its beat first – and the sound you hear is B’loom, B’loom, B’loom, B’loom.
- l’Boom: When the cued tune is too slow and plays after the live track, it sounds like l’Boom, l’Boom, l’Boom, l’Boom.
Being able to hear the sounds of both bass drum beats with all the rest of the music playing takes a fair bit of concentration, but spend some time practising and you’ll realise that I’m not as mad as I sound. It’s slightly easier when using two different tunes, because the bass drums will sound different anyway, but regardless, B’loom and l’Boom are your beatmatching buddies.
Go back a couple of pages to the previous step of playing the live track at +3 per cent. Then, starting at 0 per cent, adjust the pitch on the cued track so the speeds are similar. Listen carefully to the sound that the bass drums are making when the beats are almost matched. Listen especially for l’Boom or B’loom, and try to work out whether your cued ‘Boom’ track is running too slowly or too fast.
If you got it wrong and slowed down a track that was already playing too slowly, that’s okay! Just remember the sound that you heard that made you think that it was playing too fast and re-associate that with playing too slowly!
This technique takes practice and concentration, and you may want to adopt a trial-and-error approach for a while. Go back to 0 pitch on both of the tunes, slow one of them down and listen to the sound the bass beats make – then speed one up, listen to that sound and take note of the difference.
Taking your eyes off the pitch control
When you’re used to hearing the different sounds that beats make when they’re playing too fast or too slowly, the next step is to match the beats by adjusting the pitch control without looking at where the other deck’s pitch control is set, using only your ears as your guide.
Using identical tunes, increase the pitch control on the live one, but this time with something covering the reading, so you know that it’s increased but you can’t cheat by looking at where the pitch control is set. A bit childish, I know, but from now on your cheating DJ days are over.
To match the pitch control on the cued tune to this new setting, I consider four different ranges of adjustment:
- Large, rough adjustments to get somewhere close
- Medium adjustments (about 1–2 per cent on the pitch slider) to get closer
- Small adjustments (about 1/4 of 1 per cent) to finalise it
- Minute adjustments (millimetres) for fine tuning during the mix
For example:
- If the cued tune starts to play too slowly immediately, increase the pitch control by about 4 per cent and perform your preferred error-correction method to get the beats playing at the same time (see ‘Adjusting for errors’, earlier in this chapter).
- If you then hear B’loom when you stop the error correction (which means you’ve speeded up too much, but the beats aren’t drifting apart as fast as they were in the last step), reduce the pitch a little, by about 1 per cent.
- If the beats now take about ten seconds to play noticeably too slowly, and you begin to hear l’Boom sounds this time, increase the pitch by about 1/4 of 1 per cent.
- If you’re almost there, but after 20 seconds you start to hear B’loom again (the louder, cued tune is playing too fast), correct the error and decrease the pitch by the tiniest amount. Nudging it to move by only a millimetre is sometimes all that it takes.
Introducing Your Headphones
When first developing your beatmatching skills (see the preceding sections), playing both tunes through the speakers at the same time makes it a lot easier to hear clearly and instantly whether you’ve managed to get the bass beats to play in time. Sadly, you don’t get that option when mixing for an audience or when recording a demo CD because, as you already know, playing both tunes through the speakers at the same time sounds awful. So I think that it’s time to take the stabilisers off and start to work out whether the beats are in sync (playing at the same time) through your headphones from now on. Your neighbours and dog will thank you for this.
Switching over to headphone control
In order to start making the best use of the headphones, you need to set up your mixer so that you only hear the live track playing through the amplifier’s speakers, and you only start to hear the cued track playing through the speakers when you move the cross-fader towards the cued track’s channel.
Set your mixer like this:
- Cross-fader all the way over to the live track’s side
- Gain controls, EQ settings and channel faders on both channels set identically (so both records play at the same volume, with the same amount of bass/mid/high frequencies playing)
- Headphone cue buttons set to hear the cued track in the headphones
If you’re unsure how any of these settings affect the sound through your mixer, or for detailed explanations of the different cueing options, refer to Chapter 10.
Cueing in your headphones
Making the pitch adjustments to the cued track in the headphones while listening to the live track through the speakers isn’t easy to do at first. Cueing in your headphones (finding where you want to start in a track and also setting the pitch control during the beatmatching process) is another key skill of beatmatching that, once gained, stays with you forever. At first it can feel a bit like patting your head and rubbing your tummy, or juggling four chainsaws while singing – though not quite as dangerous.
Cueing with single-ear monitoring
The most popular way to cue in the headphones is with single-ear monitoring. Quite simply, you cover only one ear with the headphones playing the cued track, leaving the other ear clear to listen to the live track through the speakers. This way, you can hear both tracks and compare them in your head.
Cueing with headphone mix
A headphone mix control can help you to hear the B’loom, l’Boom sounds (see the earlier section ‘Playing too slowly or too fast’) in the headphones. This helps when single-ear monitoring, or you can put the headphones on both ears to more easily hear whether the beats are playing in time.
When single-ear monitoring with the cued track playing at a good volume in your headphones, the headphone mix lets you play the live track quietly over it (what I call bleeding in) so you can hear the B’loom or l’Boom bass beat clues in your headphones. If you hear B’loom, the cued track is playing too fast; if you hear l’Boom, your cued track is playing too slowly. See the earlier section ‘Playing too slowly or too fast’ if you need to go over this technique.
When you get halfway through the mix and the cued track is now the louder tune through the speakers, you may want to swap the headphone cue controls so that the cued track now becomes the live track (and is the quieter one), and the tune that was the live track now plays more loudly in the headphones and becomes the cued track. This now means that when you hear B’loom, the tune you’re mixing out of (which is now the cued track) is playing too fast, and when you hear l’Boom, it’s playing too slowly.
Apart from helping to spot the l’Boom and B’loom indicators, the other advantage of a headphone mix is that you can do a trial mix with both ears of your headphones on before letting anyone hear your mix. Some records just don’t play well with others, and listening to a mix first in your headphones can be a great safety net, preventing a poor choice of tunes to mix together.
If you’re going to check the beats and maybe even perform the mix with both of your ears inside the headphones, periodically take them off, just so you can hear the music playing to the dance floor. You may think that you’re performing the best mix in the world, when in reality the people on the dance floor can only hear distortion and noise.
Headphone mix isn’t a vital option on the mixer, but every little bit helps – especially when beginning your beatmatching development!
Cueing with split cue
Another headphone monitoring option is split cue, where one ear of the headphones plays the cued tune and the other ear plays the live tune.
This technique is almost identical to single-ear monitoring, where one ear is in the headphones and one ear is open to the live tune, except that the live tune is a lot clearer through headphones than from the speakers on the dance floor.
There’s no right or wrong method for cueing in your headphones. The headphone cueing section on your home mixer can have an enormous effect on your cueing style, as can the room or club you’re playing in. I suggest that you practise how to beatmatch with single-ear monitoring first, because it’s the most common technique, but choose the method you prefer and make sure that you’re happy with it.
Knowing how to use all three kinds of headphone cueing makes you a well-rounded DJ. If you can only mix using single-ear monitoring, the first time you play in a club that doesn’t have a monitor in the DJ booth and you get a delay that’s caused by the distance between the main speakers and the DJ booth, you’re going to struggle. If you’re faced with this situation but the mixer has a split cue control, which gets around the delay problem, knowing how to mix using split control can save you from a potentially embarrassing set!
Centring your head with a stereo image
Listening to two tunes at the same time and comparing their bass beats to tell you whether they’re playing at the same time takes a lot of concentration. Your brain isn’t normally in situations where it needs to listen and react to two things at the same time, so at first it tries to shut one of them out; therefore listening to two tunes at the same time may take some getting used to. The trick to getting this right is how you set the volume in your headphones.
When you put your headphones on both ears to listen to music, you should notice that the music seems to be playing in the middle of your head. This sensation is known as the stereo image, and is the voodoo magic of stereo sound.
If you monitor the live and cued track using single-ear monitoring, the perfect volume at which to set your headphones is when you’ve created a similar stereo image in your head between the live speakers and the headphone, as shown in Figure 14-1.
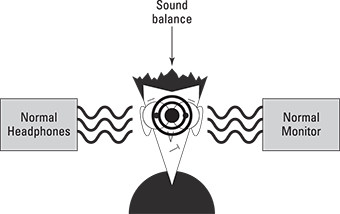
Figure 14-1: The joy of stereo: balancing the headphone and speaker volumes gives a perfect stereo image, as though both cups of the headphones are on your head.
DJs who use split cue can use the gain control to match the volume of the cued track in one ear of the headphones to that of the live track in the other ear. See Chapter 10 if you want more information about gain controls.
If the headphone is louder than the loudspeaker, or the other way around, its sound becomes the more dominant, throwing the balance of the stereo image; your brain then finds it much harder to concentrate on the bass beats from both records. Figure 14-2 gives you an idea of this imbalance.
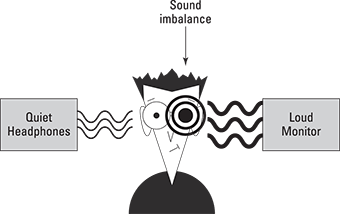
Figure 14-2: When the loudspeaker is louder, the music ends up off centre. If the headphone is too loud, the stereo image is off centre in the other direction.
You can adopt this technique in reverse, which is why you turn up the TV volume when you’re being nagged at home – when the TV’s louder, it’s harder to hear the person nagging you!
When listening to two copies of the same record, you really get the chance to discover what I’m saying in regards to stereo image. Set both records to zero pitch, start them playing at the same time (you’re great at that now, I trust) and adjust the headphone volume louder and quieter. Close your eyes and listen to where the sound appears in your head. When you have a balance of volume between the live speaker and the headphone, the music creates a near-perfect stereo image in the middle of your head.
You won’t often need to mix the same tune into itself, though, and when you play different tunes they won’t create the same perfect stereo sound in your head. However, the bass beat is the key and is what you need to concentrate on. Even though the rest of the tune is different, all you need in order to create a stereo image in your head is the bass beat.
If you’re having difficulty concentrating on the bass beats, or if the tune you’re playing doesn’t have a solid Boom Boom Boom Boom bass beat, listen to the bass and snare/clap combined beat instead (see ‘Starting your tunes in time’, earlier in this chapter). The snare drum or clap adds a sharper, clearer sound that some people find easier to pick out from the rest of the tune.
Practising with your headphones
To get used to using your headphones to monitor your tunes, go back to your DJ setup and, if you haven’t already, set the mixer so you can hear the live track through the speakers and the cued track through your headphones.
Then go back to the beginning of this chapter and work on the basics of starting beats and matching pitch settings – from the basics of how to locate the bass beat to starting the new tune at the right time, working out when you need to speed up or slow down a tune in order to match pitch settings and listening out for the l’Boom, B’loom indicators – all the time, listening to the cued track in your headphones and the live track through the speakers.
When you’re confident with cueing in the headphones and can comfortably tell whether the beats are in time this way, you can start creating long mixes without the beats of the tunes drifting apart, and will give yourself more time to spend creating impressive, professional-sounding mixes.
Using new tunes
At last.
The confidence you’ve gained matching the beats of the same two tunes in your headphones means you can easily move on to beatmatching two different tunes.
You may still want to use one of the tunes you’ve been practising with, but throw a new tune on the other deck. The good news is that you’ve already developed the skills and the ear to be able to match the beats of this new tune to those of the older one. The only things you have to think about are the sounds of the bass beats on this new tune, and whether its bpm means you need to speed it up or slow it down in order to match the bass beats of both tunes.
If you take a while to get beatmatching right, that’s fine. Trying to concentrate on two completely different tunes is a little more difficult, but give yourself time to practise and focus on what you’re doing, and it’ll fall into place very quickly.
Quick Beatmatching
At the beginning of this chapter, I wrote that there was a trick to make beatmatching a lot easier. The trick is removing the guesswork about whether your new (cued) tune needs to be speeded up or slowed down in order to match the beats of the live tune playing through the speakers. You still need to know what to listen out for in order to make small adjustments, but this technique will let you get the beats of two tunes playing at pretty much the same time within 10 to 20 seconds.
You can use this method right at the beginning of your development when learning how to beatmatch, with both tunes playing through the speakers at the same time, or in a more traditional DJing situation, monitoring in the headphones. The outcome is just as effective. This is how:
- With the live tune playing through the speakers, set the pitch control on the cued tune (the next one you want to play) to maximum.
This takes all the guesswork out of deciding whether you need to speed up or slow down the tune to get the beats matched. Because you start the new tune way too fast, you know you just have to slow down the tune.
- With the cued track playing a lot faster than the live track, perform your chosen error-correction method to slow the cued tune down. You’ll have to press hard enough to slow down the track by quite a lot to get the beats playing at the same time (or as close as you can get them). At the same time as manually slowing down the tune with your hand or pitch bends, reduce the pitch control.
As you reduce the pitch control, you’ll find you won’t have to press quite so hard on the side of the turntable or press the pitch bend button on CD decks or DJ software/controllers quite as hard or for quite as long to keep the tune playing slowly enough to keep the beats matched.
- The closer you get to the correct pitch setting, the lighter and lighter your error correction needs to be.
- When you feel you no longer need to error correct, stop – and stop adjusting the pitch control.
The beats should be almost matched.
- Make tiny error corrections and adjustments to the pitch control in order to keep the beats playing in sync. (Listen out for the B’loom and l’Boom sounds to help with this.)
Using this method, you should be able to get from Step 1 to Step 4 in about ten seconds. Step 5 may still take a little bit of time, but this is an incredibly effective way to beatmatch two tunes.
Some people use this method for every mix they do, and nothing’s wrong with that. However, in time, when you become more experienced with beatmatching and can easily remember more about the speed of your tunes, you won’t need such a ‘hail Mary’ approach to your beatmatching.