
High Contrast
Before a photographer can begin to create personally meaningful images, he must establish a relationship with his materials and techniques. Perhaps because I came to photography from printmaking, I felt the need to slow the photographic process down. I wanted to generate my images in stages.
Working time is a crucial factor in my creativity. Typically, with conventional photography, the game is over in one-sixtieth of a second. After that initial instant of exposure, the photographer’s efforts are directed almost exclusively towards its preservation. The image has been recorded and the photographer has, while developing and printing, relatively little opportunity to improve it.
I discovered that by combining high-contrast emulsions with my own photo-collage techniques, I can slow the photographic process down to a comfortable speed. I use high-contrast litho film as an intermediate step between my original continuous-tone negative and my final print. While this introduces the complexity of additional steps, increased complexity is the price paid for increased control.
When I work, there are few “decisive moments.” Indeed, there are many indecisive ones. I don’t like to make all my decisions at the shooting stage. After I have exposed a negative and proofed it, I work slowly, continuing to make decisions and transformations.
Litho film is well suited to my personal visual interests and to my work habits. I am fascinated by the extensive visual possibilities it offers within the inherent limitations of the medium. Because it is a film, it can be effectively reversed from positive to negative and back again. It can be cut, scraped, scratched, sandwiched, painted on, drawn on, and otherwise mutilated in a variety of ways.
Rarely do I look for, or shoot, complete images. I think of myself as a collector of interesting fragments. Later, these fragments are integrated, and often simplified or purified, by translation to litho film. I usually work on a dozen pieces at the same time, often combining new images with old ones. Occasionally, an image in process will be set aside for a year or two until I can find the missing link that completes it.
Many critics regard high-contrast photography as a gimmick, a trick used to save an otherwise dull picture. One of my college instructors described it as “a fad.” In that same year, 1967, I think it died as a fad. When you experiment with a process, if the final image is unsuccessful, the technique is likely to be branded a gimmick. If the final image is strong, the technique will be hailed as innovative.
Any such label is of course simplistic. High-contrast film is a medium within a medium. I am constantly amazed at the variety of images possible with this material and at the individualistic character of the images produced by different photographers using it. Sadly, few photographers use high contrast creatively. But this medium is still relatively new, and the future will certainly bring further refinement of high-contrast photography as an art form. As in any medium of artistic expression, the end product can only be as expressive as the artist.
How to Make a High-Contrast Print
The procedure described below is a simple method of transposing an image from a continuous-tone negative to an extremely high-contrast film: litho film. A litho negative can be effectively enlarged onto photographic paper, a conversion that will transform all tonal values to total black or total white. Neutral gray tones are either dropped out of the image entirely or reduced to distinct black granular dots.
Litho film is available in standard and extra-large sheet film sizes. It can be handled in the darkroom under red safelight, as though it were photographic enlarging paper. It is fast enough to respond to either enlargement or contact printing.
Most people associate the word film with a negative image that comes from the camera. In the same way, the word print is associated with a positive image on paper. Actually, either a positive or a negative image can be recorded on either paper or film. When working with litho film materials, it becomes necessary to transfer images both positive and negative. Most continuous-tone and litho films are negative-acting materials and will reverse the tones in the image they receive.
To produce a final high-contrast print from a continuous-tone original negative, two intermediate steps are necessary: a positive image is made by printing the original negative onto litho film; then that film positive is transferred, by contact printing, to a second piece of litho film. The resulting high-contrast negative can be projected onto enlarging paper for a final print.
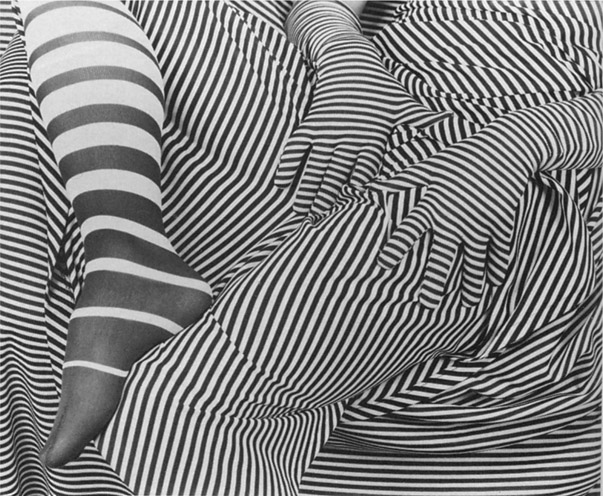
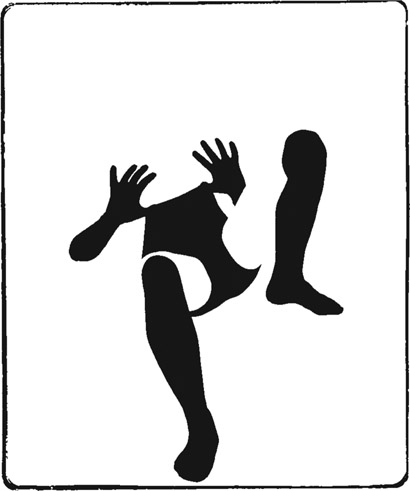
This print of a model dressed in striped clothing was made on normal-contrast paper from a Tri-X 120 negative.
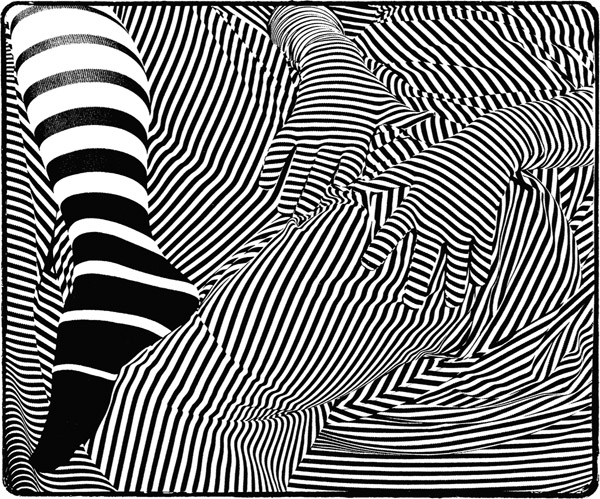
The graphic simplicity of this print, made from the same 120 negative, is the result of a darkroom conversion onto litho film.
The Materials
1. Contact Frame. Basic darkroom equipment is sufficient for most work with litho film. Because a good deal of contact printing will be come necessary, a spotlessly clean, tight-fitting print frame is necessary. A vacuum frame is even better, if you have access to one.
2. Litho Film. Several manufacturers produce litho film under a number of brand names for use in the printing industry. The best known and most readily available is Kodalith Film, manufactured by the Eastman Kodak Company. Other manufacturers of litho film in clude DuPont, GAF, 3M, and Agfa. Litho film can be purchased from any photo supplier that carries a graphic arts line. Because each manufacturer produces many types of litho film, it is best to ask either for a specific catalog number or for the most basic type a supplier might stock.
3. Litho Film Developer. In addition to the film, a special developer is needed. There are several commercially prepared litho developers, which are similar and often interchangeable. It is advisable, however, to use the developer recommended by the manufacturer for the litho film you have selected. It should be mixed and stored as the directions indicate.
4. Safelight. Most litho films are orthochromatic, or color blind to red. Use red ortho safelight filters. The Kodak filter is desig nated 1A.
Setting Up
Begin by changing your safelight filters. A safelight about 1.5 meters above the developer and another near the enlarger should be equipped with 1A filters. All other standard yellow safelights will be safe if kept at a distance of at least 2.5 meters from the film.
The chemical setup is simple. With the exception of the special litho developer and a simplified wash technique, processing is the same as for conventional black-and-white printing. Use flat-bottomed trays slightly larger than the size film you intend to use.
The litho developer parts A and B, if they are purchased in powder form, should be mixed separately and allowed to cool to room temperature before use. A working solution of developer is prepared by mixing together, in the quantity needed, equal amounts of A and B stock solution. There should be solution in the tray to a depth of at least 15mm. The combined solution begins gradually to exhaust after 30 min at a rate determined by the use and amount mixed. It should comfortably develop the equivalent of fifteen 8x10 sheets per liter.
A standard stop bath and paper-strength fixer follow the developer. All chemistry should be between 18° and 24° C. A deep tray is sufficient for washing. A final tray should contain a film-strength solution of a wetting agent, such as Kodak Photo-Flo.

Special materials needed to make prints on litho film.
Making a Film Positive and Negative
Making a Film Positive
1. Set up your enlarger as you would to make proof sheets. Several frames of your negatives can be exposed simultaneously, but it is best to begin by testing one at a time to determine accurately the best exposure time.
2. Dust the print frame and negative carefully
3. Place unexposed litho film below the selected negative, emulsion to emulsion, in the print frame. The lighter-colored side of the litho film is the emulsion side.
4. Expose after placing the print frame under the enlarger and setting the timer. The exposure time will be approximately the time you would use for proof sheets on photo paper.
5. Develop the film. Slip the exposed film into the developer, emulsion side up. Rock the tray very gently to provide adequate agitation; rocking can be done by randomly lifting corners and sides of the tray. Full development, which results in total opacity in the dark areas, should take between 2 and 2½ min. Slight overdevelopment can be tolerated in some images, but underdevelopment will result in streaks. As the development begins, there is no visible image for the first half minute. Gradually, a faint image begins to appear. The image will darken at a uniform rate for an additional 1 to 1½ minutes. Watch the white areas of the image. When development is complete, they should show a barely perceptible trace of brownish-pinkish tone. If the image comes up too fast, reduce the exposure time and try again. Insufficient density after 2½ min of development indicates a need for increased exposure time.
6. Lift the film out by one corner after development is complete. Let it drip for 2 or 3 sec, and put it into the stop bath.
7. Stop bath. Gently agitate the film in the stop bath for about 10 sec, then transfer it to the fixer.
8. Fix the film. Agitate the film in the fixer gently and constantly. After about a minute the light areas of the image will begin to clear. Make a mental note of the amount of time it takes to reach total clearing. The total fixing time should be at least twice the clearing time.
9. Rinse the film and inspect it against reflected white light. Accurate judgment of the developing time requires some experience. Our eyes are relatively insensitive to red light, and the density will appear much greater in the developer than it will against the white light. It is always necessary to check the image in white light after fixing.
10. Wash the film in a deep tray for 3 min. For films that must have a long life, such as a final litho negative, the wash time should be increased to a full 10 min. If several film prints are to be washed, it is best to wash them one at a time to avoid scratching.
11. Photo-Flo and dry. After washing the film, immerse it in the wetting agent solution for 15 sec; then hang it by one corner in a dust-free area to dry.

This is a film positive made by contact printing the original camera negative on litho film.
Making a Litho Film Negative and a Final High-Contrast Print
1. Contact print the completed and dried positive, emulsion to emulsion, with a fresh piece of litho film.
2. Repeat the same processing procedure.
3. After the negative is dry, trim it to fit into the enlarger’s negative carrier. This high-contrast negative can be printed on almost any type of enlarging paper.
4. Your own standard chemical setup for paper printing can be used to produce high-contrast enlargements on paper. Richer blacks can be obtained by mixing a stronger developing dilution, for example, Kodak Dektol 1:1.

Contact prints on litho film can be trimmed to fit your enlarger’s negative carrier. This is particularly handy if your enlarger will not accommodate sheet film sizes.
If you are using litho film for the first time, begin by using the basic technique for producing a high-contrast print as an exercise, to gain familiarity with the materials. With some experience it is possible to intensify or subdue certain images by modifying this process. Any experimental technique that is applicable to conventional film or paper can be successfully applied to litho film. In addition, there are several processes that are unique to high-contrast film. The modifications described in the following pages demonstrate the versatility of the film as a creative material and represent a few of the numerous aesthetic decisions that must be made as complexity is introduced into the medium.
Enlarging the litho film negative shown above results in this final high-contrast print.
Selecting a Working Film Size
One of the first decisions you must make concerns the treatment of detail. Often you must choose between detailed description and abstraction of the subject. The size of the intermediate film prints used will have a profound effect on the quality of the image. The basic method described on the previous pages utilizes the least amount of film and produces the greatest degree of image simplification, particularly if the original negative is 35mm.
If a great deal of detail in the image is desired, and you can afford the film, enlarging from your original negative onto a large piece of litho film will give a much greater amount of detail than simple contact printing. An 8x10 litho enlargement can be contact printed on a second piece of film. This final negative can be printed by contact with enlarging paper for the final print. With this modification of the technique, a considerable amount of detail will be carried in the tone areas. Gray tones will be represented by the grain patterns recorded on the original negative. These patterns, rather than being soft, blurry gray dots, as they would appear in a continuous-tone print, become hard-edged black dots. Accurate enlarger focusing on the litho film is critical.
Intermediate levels of detail and tone can be held by intermediate-sized internegatives. Many prefer, for aesthetic and economic reasons, to do most internegative work on 4x5 film and then enlarge the last step. The contact and enlarging modes of image transfer can be mixed together in several combinations, depending on the exact degree of detail rendition you desire.

The care with which you focus your enlarger affects both the sharpness of image detail and the overall contrast.
Only a slight shift in enlarger focus was required to change the appearance of the grain this dramatically.
Basic Darkroom Controls
A Good Film Print
A good litho film positive or negative should not transmit light through the dark areas. The first positive may show a very slight brownish tone, but if it is overly brown, it indicates un derdevelopment or exhausted developer. There should be no evidence of streaks or wave patterns.
A few clear specks will be present in the dark areas of the film. These are caused by dust particles settling on the film during handling, and occur even in the cleanest of darkrooms. If these dust specks, or pinholes, are extensive, reclean the film and glass contact surfaces.
Ordinarily, all film prints should be sharp. There are two major causes of unsharp prints: lack of precise enlarger focus and poor contact in the print frame. Litho film is very particular about the sharpness of the detail it receives: the slightest blur will have a drastic effect on both the detail and the contrast in the final image.

Uneven pressure from the printing frame between original negative and litho film can cause unsharp areas like these.

The result of good printing-frame pressure throughout the process is shown in this detail.
A similarly unsharp image results from poor contact between litho negative and paper in the final step of the process.
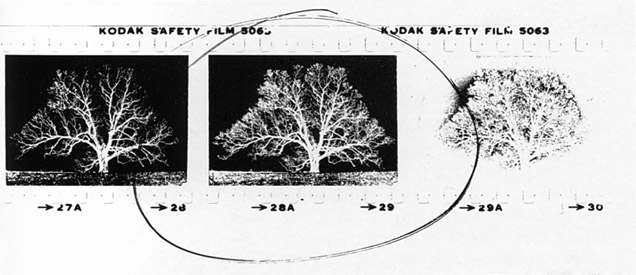
The Effects of Varying Density by Exposure
Normally, the exposure and development of litho film should be sufficient to keep the light areas of the image totally clear and the dark areas totally opaque. It is possible, however, within these limits, to vary the distribution of these blacks and whites by varying the exposure time.
As with conventional enlarging, increased exposure will yield a darker image. Density affects both the mood and the tone distribution. Decisions about density should be made in the first stage of transfer to the high-contrast film. Any major modification after that time can be made only by retouching. Enlarging time and not development time should be considered the main variable. The length of development should be regarded only as a subtle control.

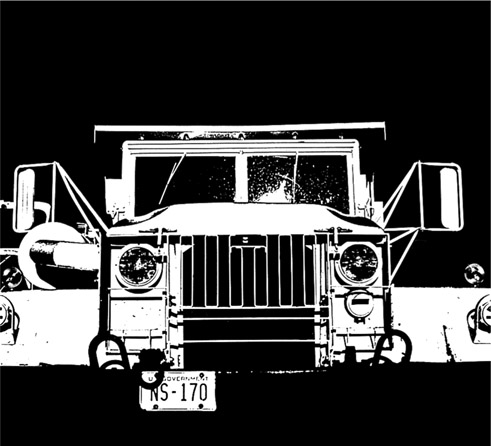
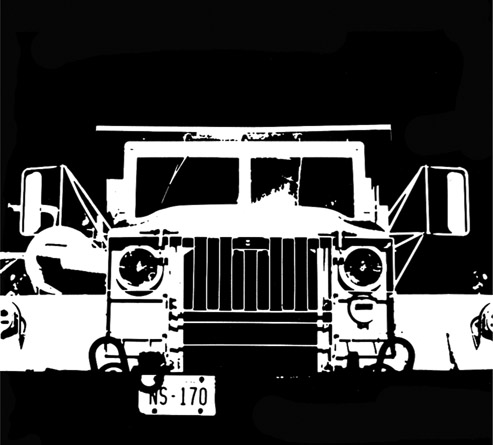
Detail in the car was washed out by exposing correctly for the tree area during printing from the negative.
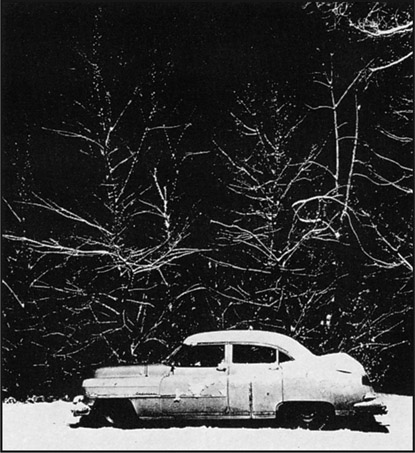
When an exposure is used that reveals detail in the car, the tree area drops into darkness.

Through the use of conventional burning and dodging techniques, all areas of the print are allowed to show detail. The foreground area was given extra exposure, and the trees in the background were given less than normal.
Retouching Litho Film
Litho film is a rugged material and can withstand retouching in either its positive or its negative state. Retouching, at its simplest, consists of painting out the small dust specks on the final negative. In its more complex application, however, retouching can be used to transform completely the content and character of the original image. Your own application of these techniques will depend on your skill, patience, and visual interests.
Retouching Materials
Most of these materials are available from larger art supply stores:
1. Small bottle of red liquid opaque.
2. A #2 or #3 sable detail brush.
3. Medium size X-acto knife with #22 blade.
4. Large sewing needle or lithographer’s scribing needle.
5. Cellophane tape of good quality.
6. Roll of red lithographer’s tape or black opaque masking tape.
• Lighted surface to work on, such as an or slide viewer or light table.
• Black construction paper or orange plastic litho mask.

Materials needed for retouching litho film.
Opaque
Opaque is a red, claylike, masking paint available from most graphic arts dealers and some art stores. It is possible to use it directly from the jar, but if you intend to do very much work with it, it is best to prepare it as professional lithographers do. Stir it completely and pour it into a shallow plastic container. Small plastic lids, such as the type that top a small can of peanuts, will work well for this purpose. This pooled opaque should be allowed to dry for about two days before use. Then drip a few drops of water into the middle of the dried cake, and gently swish the water around with the detail brush until the liquid reaches the consistency of light cream. Turn the tip of the brush to form a point. Apply the opaque in a single, even stroke. In the places where the opaque is applied, light will be blocked from transmission through the film. Thus, scratches and dust specks can be easily blocked out in opaque areas. In fact, any detail you wish to block can simply be painted over. The solution should be applied thickly enough to cover evenly in one stroke. If it is too thick it will crack off or interfere with the contact-printing process. If it is too thin it will not adhere to the film.
If extensive retouching is required, work on a glass surface lighted from below, such as a transparency viewer. There should also be some overhead light so that you can see the paint on the tip of the brush.
Opaque dries rapidly unless the work area is extremely humid. If desired, drying speed can be increased by adding three or four drops of rubbing alcohol to the opaque paste.

Orange plastic lithographer’s masking material, available from a printers’ supply store, provides an easy way to mask out large areas. It is completely opaque to the unexposed film, and is easily cut and taped in place.
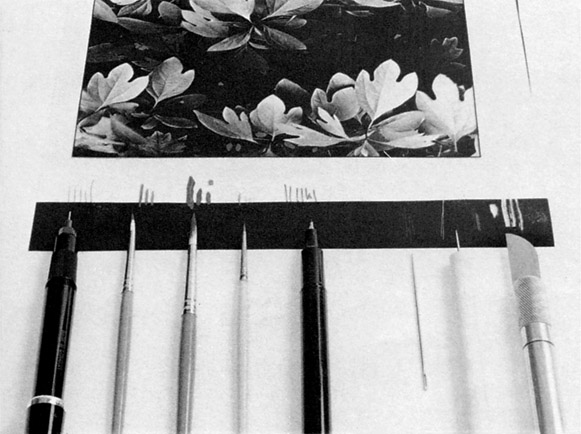
Retouching tools and the marks they make. From left to right: technical pen with acetate ink, three small brushes with opaque, permanent marker, sewing needle, lithographer’s scriber, X-acto knife with #22 blade.
It is usually best to do opaquing work on the base side of the film. The solution is water soluble and can be removed with a damp cloth if you make a mistake.
Opaque is most efficiently used for small detail or edge areas. Larger areas should be blocked by the application of black or red tape or an orange mask cut to fit the shape of the particular area.
It is possible to purchase special felt-tip pens containing a red lacquer intended to serve the same purpose as opaque. Their convenience is questionable, as it often takes two coats to block light transmission adequately.
Scraping and Stippling
Some photographers prefer to work with chemical reducers to remove unwanted areas on the film. Because of the density of the litho image, it is easier and less complicated to mask out unwanted areas or neatly scrape the emulsion from the base of the film with an X-acto knife, which must be equipped with a rounded #22 blade. The very tip of this blade, held at the correct angle, works well for removing even the smallest details.
You can simulate small areas of grain on the film by using the point of the blade or a lithographer’s needle to make little nicks through the emulsion. This stippling technique, similar to spotting a final print on paper, is useful for camouflaging imperfections in the granular areas.
Drawing on Film
Litho film is an ideal medium for combining photographic and hand-drawn imagery. Drawing can be imaginatively added to internegatives by using a large sewing needle to scribe through an opaque area. You can draw on clear areas with a thin-nibbed opaque lacquer pen or technical pen filled with ink suitable for drawing on acetate. It is even possible to draw on the litho film prior to development with a masked penlight flashlight. As the state of the image is reversed, the orientation of the drawing also changes: white lines on black become black lines on white, and vice versa. Drawing can also be used to repair or reconstruct partial images.
Photomontage
The high-contrast process lends itself to composite application. The similarity of rendition can give shots taken at different times and places an increased visual compatibility. This montage technique is based on methods and materials used by printers in preparation of art work, photographs, and type for offset printing.

The fence will be cut with scissors from this enlargement on final-size litho film.

The plant on this sheet of film will be extracted and combined in the next step with the fence.

The two selected fragments and the border are secured in place on an acetate sheet with cellophane tape.

The acetate paste-up is printed on litho film. The very light lines caused by the cut edges and cellophane tape that show up on the negative can be painted out with opaque before the final print is made.
Arrange and study fragments or complete photos, selected and printed to final size, on a clean sheet of clear acetate until you achieve a desirable composite image. The acetate sheet should be the full size of the final print. Then secure the pieces in place by neatly taping them down, emulsion side up, on the acetate. Use small pieces of cellophane tape, and do not let the tape edges cross image areas. You can produce a thin frame by using 1/64² chart tape applied to the back side of the acetate; a piece of graph paper placed under the film is useful as a guide for positioning the tape lines. You can also draw border lines directly on the acetate sheet or scribe them through the film in the negative state.

When the montage is complete, contact print the acetate and its attachments, emulsion to emulsion, on a piece of litho film. You will need to opaque out the thin lines formed by the cut edges and the cellophane tape, along with the dust specks, before contact printing the final negative on photo paper to produce the final image.
Composites can be made in either the negative or the positive contact film stages. Positive and negative elements can also be applied to the same work. It is often useful when making a complex montage to make one or two extra contact film printings along the way to check on the progress of the imagery and aid in retouching as you work. This is possible in most images because there is very little quality lost in the introduction of extra film generations.
Three different camera negatives went into this simple composite. The litho film caused the tone of the snow to drop out entirely. The split-framing, which does not indicate the original shape of the frame, has been used as a design device.
Photomontage Examples

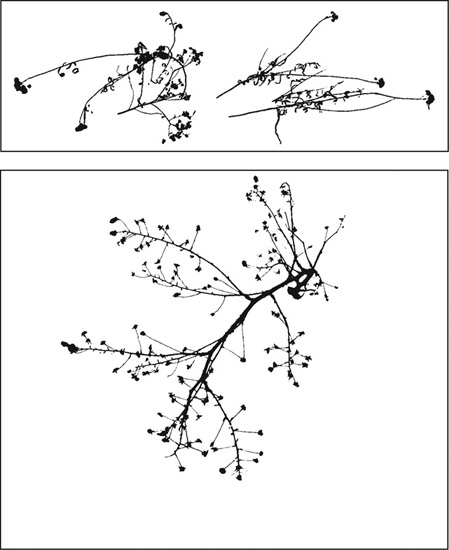
The weeds and the bird were photographed separately, silhouetted against a light sky to provide a white background. The borders were created using chart tape, and the film fragments were assembled inside them.

Six different camera negatives were used to make this complex composite image. The forest was generated from three different photographs of one toy tree. The spaceship negative was made of an old metal toy. The vapor trail was extracted from a photograph of a real airplane doing aerobatics. The star negative was generated by photographing pinholes in a backlighted sheet of paper with the camera intentionally out of focus. The spaceship, the vapor trail, the sky, and each tree were separate components, and assembling them required great patience and attention to detail.
Masking
Masking is the most complex process described in this chapter, but it is actually more difficult to think about than it is to do. You can incorporate an image within a different background, other than pure black or white, by a series of steps known as masking. These steps are necessary to create a clear area in the background film into which to insert the foreground image. This clear space must exactly match the outline shape of the foreground object. Accordingly, the technique requires skill in hand brush work to accommodate anything but the simplest shapes.
The first step in the process is printing the foreground object, in positive, against a clear field. It helps if the object was photographed against a bright sky, snow, or a white backdrop. To avoid having to retouch cut lines, it is best to print the object in the size and location it will occupy in the final print. There should be a clear field the total size of the final print surrounding the object. When this piece of film is dry, completely opaque out the object on the base side of the film. If the original object is in silhouette, there is very little opaquing work to do, since the objective is to create a total silhouette. This silhouette against a clear field serves as a mask as it is contact printed against a negative litho print of the desired background. The resulting film print is a positive background with a clear space for the foreground image.
Remove the opaque carefully from the foreground image with a damp cloth. Dry this film and then accurately register it to the prepared background. Tape the two pieces together and contact print them to produce the final negative.
If you have skillfully opaqued the foreground object, there will be a near-perfect match. If there are small imperfections surrounding the foreground image, they can be retouched by scraping and stippling. The final negative is then ready for contact printing on photo paper.

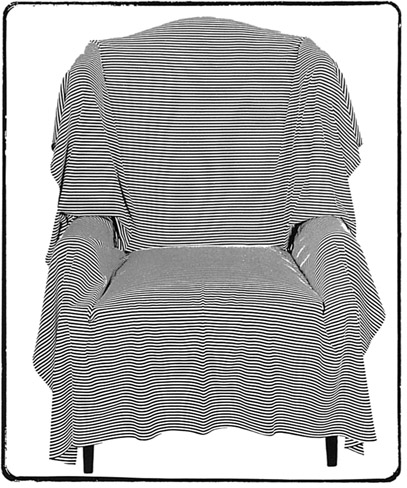
1. Continuous-tone print of a chair with a striped cover.

4. Continuous-tone print of a model posing in striped clothing on the chair. The chair itself and the model’s head have been covered with a white sheet to simplify retouching.
2. Litho film positive enlarged directly onto final-size litho film from the camera negative.

3. Litho film negative made by contact printing from the litho film positive (2).

5. Litho film positive of the model enlarged directly onto final-size litho film from the camera negative. All remaining areas of unwanted tone were cut out or scraped off the film so that only the image of the clothing remains.
6. Litho film positive (5) painted over carefully with opaque.

7. Litho film print made by contact printing from a sandwich of the chair negative (3) and the opaqued model positive (6).

8. Final litho negative contact printed from a sandwich of the chair negative with the clear space (7) and the opaqued model positive (6) after the opaque was washed off.
9. The final print is the result of contact printing the final litho negative (8) on photographic paper.
Tone Separation and Tone-Line
Tone Separation
Tone separation, often called posterization, is a technique of making, usually by enlargement, three or more density renditions of the original negative. See The Effects of Varying Density by Exposure, p. 117. These film positives, light, medium, and dark, are marked for registration and then contact printed to produce complementary litho negatives. Each negative carries a different tonal distribution. They can be used in several ways. Most commonly, the negatives are contact printed, one at a time and in register, on a single piece of photographic paper; the paper is developed after the three separate exposures have been made. To provide a visual separation of the three densities, the print is given differing amounts of exposure through each negative. Light, medium, and dark exposures should correspond to the appropriate negative. Extensive exposure and registration testing is required. The technique rarely produces in teresting results in its black-and-white appli cation, but the negatives can be printed through a variety of filters onto color paper or by using multi-color proofing or printmaking processes.

1. Litho film positive enlarged from a normal camera negative.

2. Litho film negative made by contact printing from the positive (1).
Tone-Line
The tone-line technique is a contact-printing procedure that will transform a high-contrast image into a line impression. The term itself is actually a misnomer: the line generated accurately describes the exterior and interior contours, but eliminates all of the tones.
By carefully sandwiching matching positive and negative litho prints base to base in a print frame, covering the frame with a sheet of translucent white plastic, and exposing the whole package, it is possible to produce a line image similar to an outline ink drawing. By registering the positive and negative base to base, transparent vertical channels are formed between dark areas on the two films. The plastic diffuses the light, redirecting it through these slots onto the unexposed litho film below and magically forming the line image.
Select a negative. Objects that are silhouetted or very graphic in appearance work well with this process.
Make a positive litho film print. It is usually best to work with 4x5 or 8x10 film.
Make a matching negative by contact printing with the positive. It is important that the two prints have matching densities.
Align the two prints base to base; use a light table if possible. If the films are of matching density and are correctly positioned, there will be a complete cancellation of light transmission when the sandwich is viewed through a lupe, or magnifier. Tape the two prints together securely with cellophane tape.
Set the enlarger lens at its widest aperture. Set the timer for 30 to 60 sec, depending on the intensity of the enlarger bulb, and raise the head of the enlarger so that it projects a light cone of sufficient size to cover the print.
Place the joined film sheets in the frame so that the layer with the greatest dark area is in contact with the emulsion side of an unex-posed sheet of litho film. It is possible to substitute enlarging paper, but printing on a litho internegative allows for retouching and reversal of the image.
Place the print frame in position under the enlarger, and cover it with a sheet of thin, translucent, white Plexiglas. The design of most frames allows for sufficient space between the plastic and the glass.
Expose the print.
If you don’t have a piece of white Plexiglas handy, you can obtain an identical result by manually directing the light into the clear channels of the litho sandwich. You can accomplish this by systematically making a series of exposures while holding the print frame under the enlarger at a 45° angle to the lens. The aperture should be set at f/16 and the timer between 15 and 30 sec. The timer should be activated 8 times to complete the exposure: one full exposure is made for each side and corner. The frame needn’t be held perfectly still for each interval, but the 45° angle must be maintained.

3. Positive tone-line made from a sandwich of the matching positive (1) and negative (2) litho film prints. The enlarger light was directed through translucent Plexiglas.

4. Negative tone-line contact printed from the positive tone-line (3).
The thickness and detail of the line formed depends on several factors: the original film format, the quality and character of the subject matter, the size of the litho film used, the quality of the pressure contact in the print frame, and the length of exposure and development. Because of this large number of variables, experimentation is necessary to perfect the technique.
It is possible to register a positive and negative that do not have matching densities, which will produce a tone-line that varies in thickness and detail. It is also possible to combine a litho positive with a continuous-tone negative.
The first tone-line print on litho film will produce a black line on a clear field. This can be printed directly on photographic paper, or it can be reversed by contact printing on an additional piece of litho film. Retouch undesirable areas before you make a final print. An image produced by tone-line can be an effective finished print; it can be combined with tone separation; or it can become a base for drawing or other manipulations.
Screens and Backgrounds
It is possible, through masking, tone separation, or simple sandwich contact, to incorporate patterns into litho images. These patterns can be introduced in several ways, most obviously by placing the pattern or screen over the litho film and projecting or contact printing the image through it. There are commercially prepared texture screens, homemade screens, and a multitude of tone screens and patterns made for graphic artists to use in layout work. These artist’s tone screens are inexpensive and can be contact printed directly onto litho film without removing the adhesive backing. Once you have printed the screen on litho film, it can be reused in either its positive or its negative state. Two or more screens can be overlapped to produce interesting moiré configurations.
Found Screens
Various other materials can be effectively contact printed directly onto litho film to produce original patterns.
Homemade screens produced by contact printing directly onto litho film include:
- Lace
- Fabric
- Wire or die-cut screens and grills
- Decorative glass
- Skeletonized leaves
- Spatter-painted acetate sheet
- Prints from greased skin
- Papers

Commercially available artists’ tone screen.

The overlapping of two artists’ tone screens.

Patterned paper, fashioned into a miniature room with dollhouse windows. The room was photographed and printed on litho film to create a background.
Photographed Screens
Interesting backgrounds can be photographed and combined with other images as needed. Inexpensive paperback books of full-page decorative and geometric patterns are readily available. The best approach to serious photomontage work is to make continuous-tone negatives of interesting found backgrounds as the opportunities arise.
Homemade screens photographed and then later enlarged onto litho film include:
- Interior and exterior walls
- Wallpaper sample books
- Images from TV sets
- Gravel
- Roofing material
- Sandpaper
- Tree bark
- Rock
- Billboards with layers of torn paper
- Moving water
- Sky
- Moss and other plant forms
- Wood
- Snow

Graph paper combined with photographs taken from a TV screen.

Clouds photographed from an airliner window, combined with stars fabricated in the studio.
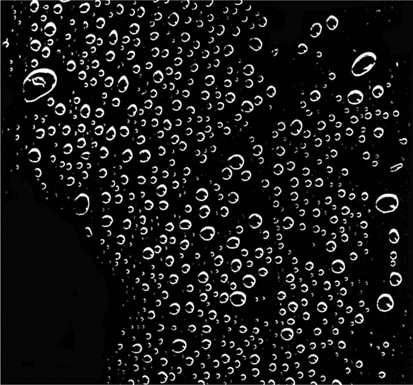
Raindrops on a black plastic garbage bag.
Other Applications
Further Techniques
Litho film can be used as an intermediate step for facilitating and intensifying any black-and-white and many color experimental materials and processes. It can be successfully substituted for conventional film or paper when working with photograms or Sabattier images. It can also be utilized as an intermediate step when working creatively with x-rays, infrared, dye transfer, or color proofing materials, such as Diazo, Color-Key, and Kwik-Print.
When archivally washed, the film can be used as a final material itself. The back side can be painted in, coloring-book style, with poster paints or acrylics. Litho positives can be developed in diluted litho developer or paper developer, to produce subtle brown tones. The positives, after processing, can be mounted on thin, translucent Plexiglas. Even without trans-illumination, prints of this type can produce a soft glow that is quite pleasing. Some photographers have used thick-base (4556) Kodalith in combination with clear Plexiglas sheets to produce three-dimensional photosculpture.
Many antique photographic processes and most photoprintmaking procedures rely heavily on litho film as an intermediate step. These processes usually cannot accommodate middle tones, and the image must be produced using standard litho or halftone techniques.
Halftones
A halftone is a litho film image that renders apparent continuous tone by converting shades of gray into varying sizes of black dots. The coarse screen used by newspapers can be seen with the unaided eye, but you need a magnifying glass to see the dots in the photographs reproduced in this book. Halftone dot patterns are normally produced by exposing litho film through a commercially manufactured halftone screen. These screens sell for several hundred dollars each and so are beyond the scope of this book.
A Kodak product called Autoscreen Ortho Film [no longer available] combines the features of litho film and the halftone screen, producing halftone dots automatically when exposed and developed like litho film.

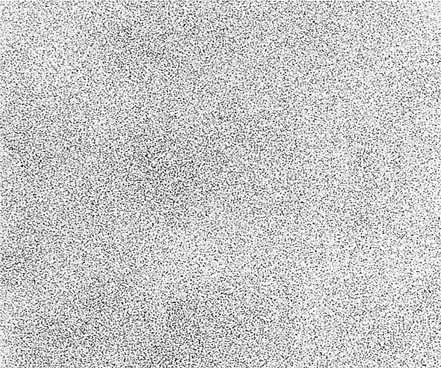
Greatly enlarged, this halftone pattern shows the varying sized dots used to give the impression of continuous tone on high-contrast materials.

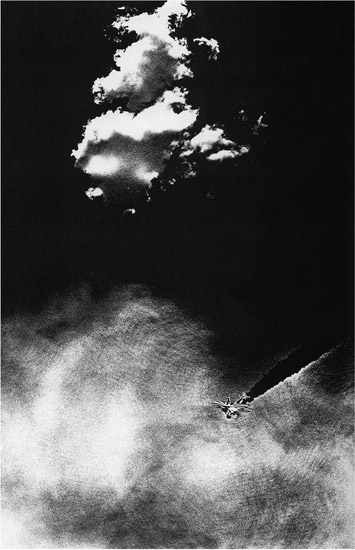
1. This photograph was taken from a sailplane on fine-grain 120 film. The transfer to litho film raised the contrast and sharpness of the grain pattern.

2. The original litho positive (1) was contact printed on another piece of litho film to produce a negative. A small section of that negative was enlarged to show the tapestry of solid black dots.

3. The enlargement (2) was contact printed to produce another negative. Enlargement of the second negative produced this abstracted image.
Light and Shadow Contrast
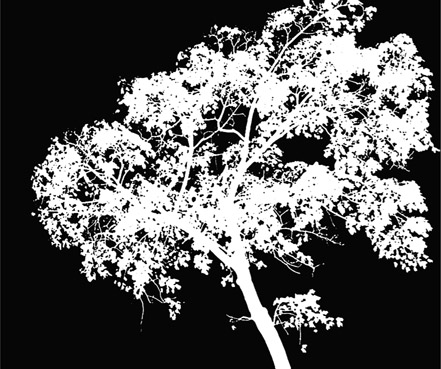
Light, of course, is the real medium of photography. If the light is not interesting in the original scene, it won’t be interesting in the litho image. Light and shadow are the key elements in the description of the image on film. Hard, directional, contrasty light produces dark, hard-edged shadows. The darker the shadows, the more likely they are to become black spaces in the high-contrast rendition. Highlight areas will tend to block up and become white spaces in the final print. When shooting under these conditions, try to visualize the abstracting process that will take place during the conversion to high contrast. Darks become jet black; lights become paper white. The recorded description of silhouette and shadow edges will gain in graphic emphasis. As in any photograph, tonality is described on film by the combined effect of light, shade, and local color value. Any medium tone will drop into black, white, or a speckled granular area, depending on camera format and light and color conditions. Color value can be modified to a limited degree by filters on the camera. These are particularly useful in shooting green foliage, which has a tendency to turn black: a yellow-green filter will keep leaves light enough to render sufficient detail; infrared film is also useful for this application. Subjects that are basically black and white to begin with can produce startling graphic effects.
Combining Techniques
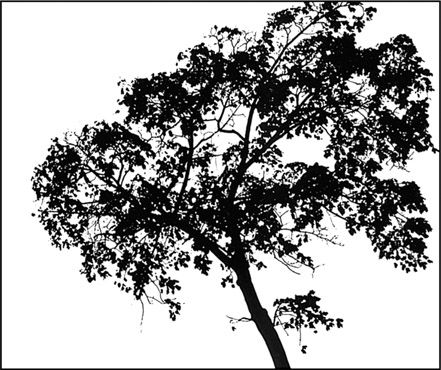
Litho film images can be readily combined with texture screens, as shown by this combination of a tone-line image of a tree with a homemade dot screen.
1. Litho film positive enlarged from a camera negative.
2. Litho film negative made from the litho positive (1).

3. Tone-line positive made by combining the litho positive (1) and negative (2).
4. Texture screen made by spraying dense black ink on clear acetate.
5. Intermediate step made by contact printing from a sandwich of the litho film negative (2) and the screen (4).

6. Final print contact printed from a sandwich of the negative of the screened tree (5) and the tone-line positive (3).
Considerations When Photographing
Camera Format
It is possible to expose litho film directly in the camera. Darkroom conversion from a continuous-tone negative is less difficult, however, and will also provide you with greater latitude for image interpretation.
If for some special reason you want to shoot litho film directly, it can be loaded into film holders for view cameras or purchased in 35mm size in 100 ft rolls (Kodalith 6556, Type 35mm) and bulk-loaded. When exposing in the camera, it is advisable to bracket five expo sures at one-half-stop intervals. To avoid rec iprocity failure problems, bracket using aperture instead of shutter speed. Exposure is very critical and must be perfect to record a usable image.
When shooting conventional film for in tended transfer to litho film, the kind of camera you use makes a difference. The smaller the original negative, the less detail will be recorded. Formats of 35mm and smaller will produce a final image characteristically bold and graphic. As negative size is increased, there is a corresponding increase in image detail.
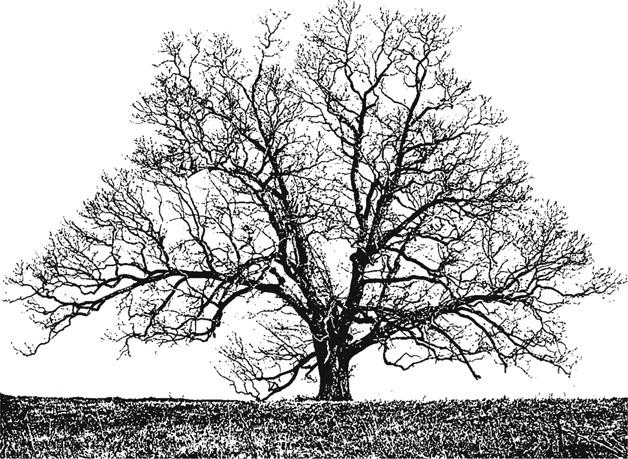
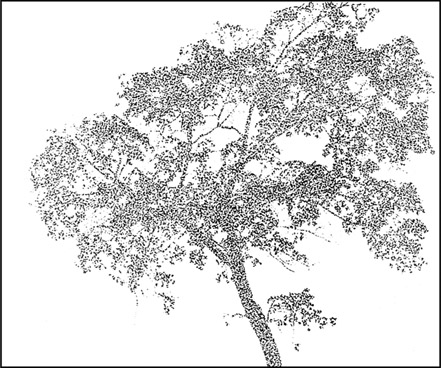
The camera format used to make the original negative can have a significant effect on the quality of the final image. The photograph was taken on 120 film and enlarged directly to its final size. The details and traces of tone are represented by granular areas.
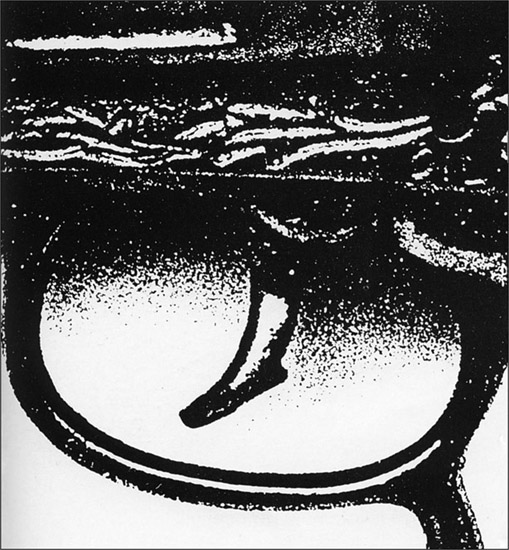
For purposes of comparison, this print was made from a 16mm negative made at the same time and printed on litho film in the same manner. The smaller-format film increases the apparent abstraction of the sub ject, a quality often desirable for a graphic effect.
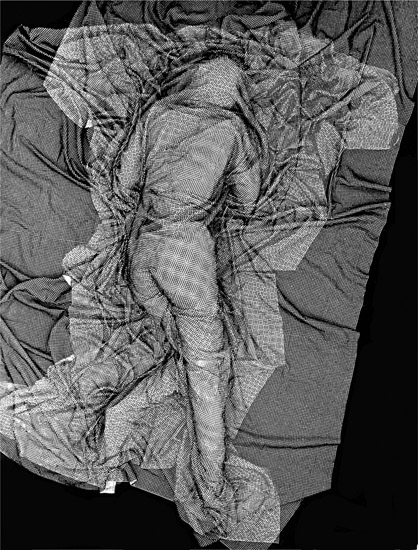
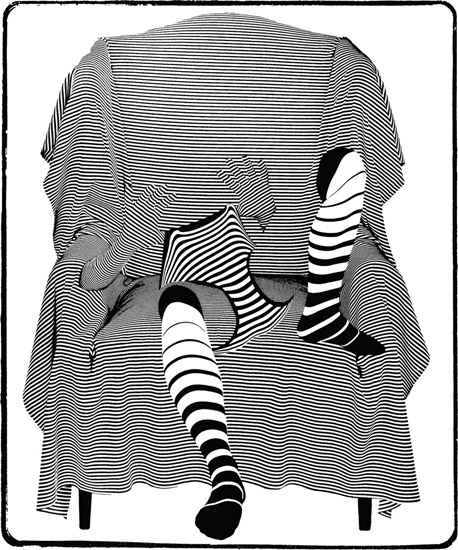
An overhead camera position was used in this multiple exposure made in the camera. The model was draped with patterned fabric for the first exposure. With the model maintaining the pose, the fabric was rearranged and a second exposure was made without advancing the film. New patterns defining the form of the figure were created wherever the patterns overlapped.
Shooting for Litho Printing
So far, discussion of technique has centered around the application of darkroom procedure to existing negatives, but it is likely that the best imagery will be produced by shooting specifically for the particular process involved. The image qualities and processes can be fine-tuned to complement each other.
Whether you are setting up shots or searching for interesting visual material with your camera, it is useful to have prior darkroom experience with this film. An afternoon of experimentation with litho materials and some old negatives will be a worthwhile initial experience. Try several techniques and apply them to a variety of imagery. Include contrasty and softly lit subject matter, and fuzzy as well as sharp negatives. Try working in large and small formats. Each of these variations will affect the character of the images produced later.
Development for Detail
Fine Line Developer
Fine Line Developer is a special product manufactured by Eastman Kodak to be used with standard litho film. Its use will help to create, as in the illustration on p. 141, a high-contrast film image with the finest possible detail and grain. For best results, place the litho sheet film in a flat-bottomed darkroom tray containing Fine Line Developer mixed as directed. Agitate the film very gently for the first 45 sec and then leave the tray absolutely motionless for the remaining 2 min of development. The effect is quite subtle. A similar result can be obtained by diluting the standard developer with half its volume of water, or by adding slightly more of the standard B solution and letting the working solution oxidize in the tray for an hour before use. The fine-grain examples in this chapter were produced using diluted standard developer.
Kodak Fine Line Developer is no longer available.

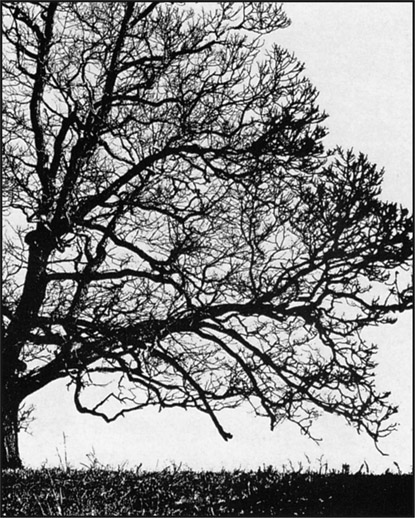
The treatment of this image was as described on p. 141, for maximum preservation of detail. Taken in soft, diffuse light with full exposure of the original negative, it was enlarged to final size on the first intermediate film sheet.

This is the result of developing the litho film in fine-line developer, in addition to the treatment described above.

Simplicity vs. Detail
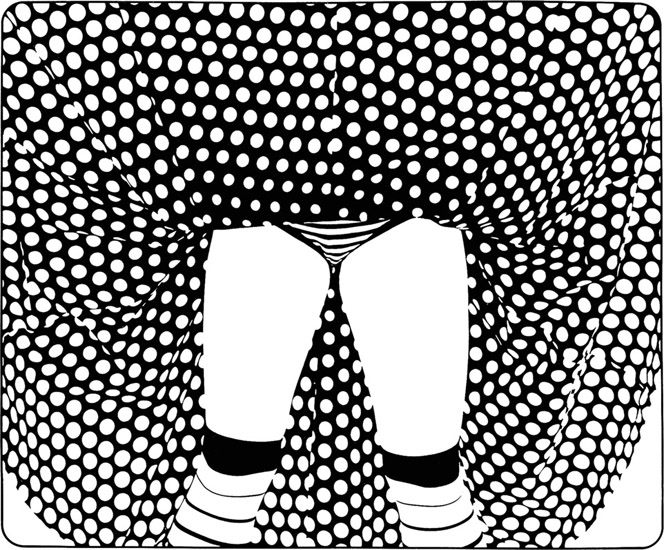
The form of the model’s body and clothing are described solely by the patterns of the fabric. There are no gray tones, shadows, or textures. The pattern alone bears the message of the image. This simplification of an original photograph is the most immediately apparent use for litho film and high-contrast printing.
Maximum Simplification for Graphic Effect
1. Use a small-format camera and fast film.
2. Select objects that are black and white or dark and light to begin with.
3. Look for hard directional light, producing sharp, dark shadows or throwing the subject into silhouette.
4. Slightly underexpose and overdevelop original continuous-tone film.
5. Use regular formula litho developer.
6. Convert the image to litho film by the direct contact process. Enlargement on paper should be the last step.

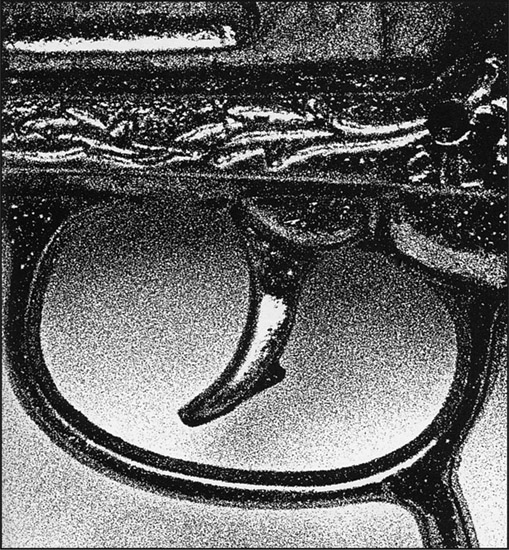
The form of the fruit is described by texture, subtle tonality, and shadow. The litho film, through careful processing, has preserved most of the detail in the original camera negative, but the enhanced sharpness and grain give this print a unique quality. The tones are actually small black dots producing the illusion of grays. The sense of infinitesimal detail heightens the illusion of realism in an effect totally opposite to that of the illustration on the facing page.
Maximum Detail for Realistic Effect
1. Use a large-format camera and medium- or slow-speed film.
2. Select objects of medium color value; filter if necessary.
3. Look for soft diffused light, soft light shadows.
4. Expose original continuous-tone film normally, and develop for normal or slightly less than normal time.
5. Develop the litho film positive to preserve the fine grain. (See Development for Detail, p. 138.)
6. Make the largest possible internegatives. First transfer the image to litho film, by enlargement; then contact print to make the final litho negative. It is possible to increase grain fineness and detail further by making the first enlargement on final-size, continuous-tone sheet film. The sheet film is then contact printed to produce the final litho negative.