Chapter 5
Using the Flash
Your 70D has a flip-up electronic flash unit built in, but you can also use an external flash (or, “strobe” or “Speedlite”), either mounted on the 70D’s accessory shoe or used off-camera and linked with a cable or triggered by a slave light (which sets off a flash when it senses the firing of another unit). This chapter deals primarily with using the camera’s built-in flash; the options and permutations of working with one or more external flash units are so vast that squeezing more than an overview into a compact book would be impossible. You’ll find the equivalent of more than 100 pages of coverage in my full-size book, David Busch’s Canon EOS 70D Guide to Digital SLR Photography. And David Busch’s Guide to Canon Flash Photography is even more comprehensive.
Consider using electronic flash:
![]() When you need extra light. Flash provides extra illumination in dark environments where existing light isn’t enough for a good exposure, or is too uneven to allow a good exposure even with the camera mounted on a tripod.
When you need extra light. Flash provides extra illumination in dark environments where existing light isn’t enough for a good exposure, or is too uneven to allow a good exposure even with the camera mounted on a tripod.
![]() When you don’t need a precise preview of lighting effects. Although some external units have a modeling flash feature that gives a preview of the strobe’s effects, the “modeling” flash may not give you a precise look at what you’re going to get. Unless you’re using a studio flash with a full-time modeling lamp, electronic flash works best when you are able to visualize its effects in your mind, or don’t need a precise preview.
When you don’t need a precise preview of lighting effects. Although some external units have a modeling flash feature that gives a preview of the strobe’s effects, the “modeling” flash may not give you a precise look at what you’re going to get. Unless you’re using a studio flash with a full-time modeling lamp, electronic flash works best when you are able to visualize its effects in your mind, or don’t need a precise preview.
![]() When you need to stop action. The brief duration of electronic flash serves as a very high “shutter speed” when the flash is the main or only source of illumination for the photo. Your 70D’s shutter speed may be set for 1/250th second during a flash exposure, but if the flash illumination predominates, the effective exposure time will be the 1/1,000th to 1/50,000th second or less duration of the flash, because the flash unit reduces the amount of light released by cutting short the duration of the flash. However, if the ambient light is strong enough, it may produce a secondary, “ghost” exposure, as I’ll explain later in this chapter.
When you need to stop action. The brief duration of electronic flash serves as a very high “shutter speed” when the flash is the main or only source of illumination for the photo. Your 70D’s shutter speed may be set for 1/250th second during a flash exposure, but if the flash illumination predominates, the effective exposure time will be the 1/1,000th to 1/50,000th second or less duration of the flash, because the flash unit reduces the amount of light released by cutting short the duration of the flash. However, if the ambient light is strong enough, it may produce a secondary, “ghost” exposure, as I’ll explain later in this chapter.
![]() When you need flexibility. Electronic flash’s action-freezing power allows you to work without a tripod in the studio (and elsewhere), adding flexibility and speed when choosing angles and positions. Flash units can be easily filtered, and, because the filtration is placed over the light source rather than the lens, you don’t need to use high-quality filter material.
When you need flexibility. Electronic flash’s action-freezing power allows you to work without a tripod in the studio (and elsewhere), adding flexibility and speed when choosing angles and positions. Flash units can be easily filtered, and, because the filtration is placed over the light source rather than the lens, you don’t need to use high-quality filter material.
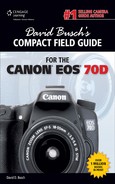
![]() When you can use—or counter—flash’s relatively shallow “depth-of-light” (the inverse square law). Electronic flash units don’t have the sun’s advantage of being located 93 million miles from the subject, and suffer from the effects of their proximity. The inverse square law dictates that as a light source’s distance increases from the subject, the amount of light reaching the subject falls off proportionately to the square of the distance. In plain English, that means that a flash or lamp that’s twelve feet away from a subject provides only one-quarter as much illumination as a source that’s six feet away (rather than half as much). (See Figure 5.1.) You can use this effect to separate subjects located at different distances thanks to the differing amount of illumination each receives. But when you want a larger area blanketed more evenly with illumination, you have to counter the effects of the inverse square law with supplemental lighting, slow shutter speeds (which allow ambient light to register along with the flash), or by repositioning your subjects so all are within your flash’s depth-of-light coverage.
When you can use—or counter—flash’s relatively shallow “depth-of-light” (the inverse square law). Electronic flash units don’t have the sun’s advantage of being located 93 million miles from the subject, and suffer from the effects of their proximity. The inverse square law dictates that as a light source’s distance increases from the subject, the amount of light reaching the subject falls off proportionately to the square of the distance. In plain English, that means that a flash or lamp that’s twelve feet away from a subject provides only one-quarter as much illumination as a source that’s six feet away (rather than half as much). (See Figure 5.1.) You can use this effect to separate subjects located at different distances thanks to the differing amount of illumination each receives. But when you want a larger area blanketed more evenly with illumination, you have to counter the effects of the inverse square law with supplemental lighting, slow shutter speeds (which allow ambient light to register along with the flash), or by repositioning your subjects so all are within your flash’s depth-of-light coverage.
Figure 5.1 A light source that is twice as far away provides only one-quarter as much illumination.
Using the Built-in Flash
The Canon EOS 70D’s built-in flash is a handy accessory because it is available as required, without the need to carry an external flash around with you constantly. This section explains how to use the flip-up flash in the various Basic Zone and Creative Zone modes.
Basic Zone Flash
When the 70D is set to one of the Basic Zone modes (except for Landscape, Sports, or Flash Off modes), the built-in flash will pop up when needed to provide extra illumination in low-light situations, or when your subject matter is backlit and could benefit from some fill flash. The flash doesn’t pop up in Landscape mode because the flash doesn’t have enough reach to have much effect for pictures of distant vistas in any case; nor does the flash pop up automatically in Sports mode, because you’ll often want to use shutter speeds faster than 1/250th second and/or be shooting subjects that are out of flash range. Pop-up flash is disabled in Flash Off mode for obvious reasons.
If you happen to be shooting a landscape photo and do want to use flash (say, to add some illumination to a subject that’s closer to the camera), or you want flash with your sports photos, or you don’t want the flash popping up all the time when using one of the other Basic Zone modes, switch to an appropriate Creative Zone mode and use that instead.
Creative Zone Flash
When you’re using a Creative Zone mode, you’ll have to judge for yourself when flash might be useful, and flip it up yourself by pressing the Flash button on the side of the pentamirror housing. The behavior of the internal flash varies, depending on which Creative Zone mode you’re using.
![]() P. In this mode, the 70D fully automates the exposure process, giving you subtle fill flash effects in daylight, and fully illuminating your subject under dimmer lighting conditions. The camera selects a shutter speed from 1/60th to 1/250th second and sets an appropriate aperture.
P. In this mode, the 70D fully automates the exposure process, giving you subtle fill flash effects in daylight, and fully illuminating your subject under dimmer lighting conditions. The camera selects a shutter speed from 1/60th to 1/250th second and sets an appropriate aperture.
![]() Av. In Aperture-priority mode, you set the aperture as always, and the 70D chooses a shutter speed from 30 seconds to 1/250th second. Use this mode with care, because if the camera detects a dark background, it will use the flash to expose the main subject in the foreground, and then leave the shutter open long enough to allow the background to be exposed correctly, too. If you’re not using an image-stabilized lens, you can end up with blurry ghost images even of non-moving subjects at exposures longer than 1/30th second, and if your camera is not mounted on a tripod, you’ll see these blurs at exposures longer than about 1/8th second even if you are using IS.
Av. In Aperture-priority mode, you set the aperture as always, and the 70D chooses a shutter speed from 30 seconds to 1/250th second. Use this mode with care, because if the camera detects a dark background, it will use the flash to expose the main subject in the foreground, and then leave the shutter open long enough to allow the background to be exposed correctly, too. If you’re not using an image-stabilized lens, you can end up with blurry ghost images even of non-moving subjects at exposures longer than 1/30th second, and if your camera is not mounted on a tripod, you’ll see these blurs at exposures longer than about 1/8th second even if you are using IS.
To disable use of a slow shutter speed with flash, access Flash Sync Speed in Av Mode in the Flash Control screen found in the Shooting 2 menu, and change from the default setting Auto to either 1/250-1/60sec. Auto or 1/250sec. (fixed).
![]() Tv. When using flash in Tv mode, you set the shutter speed from 30 seconds to 1/250th second, and the 70D will choose the correct aperture for the correct flash exposure. If you accidentally set the shutter speed higher than 1/250th second, the camera will reduce it to 1/250th second when you’re using the flash.
Tv. When using flash in Tv mode, you set the shutter speed from 30 seconds to 1/250th second, and the 70D will choose the correct aperture for the correct flash exposure. If you accidentally set the shutter speed higher than 1/250th second, the camera will reduce it to 1/250th second when you’re using the flash.
![]() M/B. In Manual or Bulb exposure modes, you select both shutter speed (30 seconds to 1/250th second) and aperture. The camera will adjust the shutter speed to 1/250th second if you try to use a faster speed with the internal flash. The E-TTL II system will provide the correct amount of exposure for your main subject at the aperture you’ve chosen (if the subject is within the flash’s range, of course). In Bulb mode, the shutter will remain open for as long as the release button on top of the camera is held down, or the release of your remote control is activated.
M/B. In Manual or Bulb exposure modes, you select both shutter speed (30 seconds to 1/250th second) and aperture. The camera will adjust the shutter speed to 1/250th second if you try to use a faster speed with the internal flash. The E-TTL II system will provide the correct amount of exposure for your main subject at the aperture you’ve chosen (if the subject is within the flash’s range, of course). In Bulb mode, the shutter will remain open for as long as the release button on top of the camera is held down, or the release of your remote control is activated.
Flash Range
The illumination of the 70D’s built-in flash varies with distance, focal length, and ISO sensitivity setting.
![]() Distance. The farther away your subject is from the camera, the greater the light fall-off, thanks to the inverse square law discussed earlier. Keep in mind that a subject that’s twice as far away receives only one-quarter as much light, which is two f/stops’ worth.
Distance. The farther away your subject is from the camera, the greater the light fall-off, thanks to the inverse square law discussed earlier. Keep in mind that a subject that’s twice as far away receives only one-quarter as much light, which is two f/stops’ worth.
![]() Focal length. The built-in flash “covers” only a limited angle of view, which doesn’t change. So, when you’re using a lens that is wider than the default focal length, the frame may not be covered fully, and you’ll experience dark areas, especially in the corners. As you zoom in using longer focal lengths, some of the illumination is outside the area of view and is “wasted.” (This phenomenon is why some external flash units, such as the 580EX II or 600EX-RT, “zoom” to match the zoom setting of your lens to concentrate the available flash burst onto the actual subject area.)
Focal length. The built-in flash “covers” only a limited angle of view, which doesn’t change. So, when you’re using a lens that is wider than the default focal length, the frame may not be covered fully, and you’ll experience dark areas, especially in the corners. As you zoom in using longer focal lengths, some of the illumination is outside the area of view and is “wasted.” (This phenomenon is why some external flash units, such as the 580EX II or 600EX-RT, “zoom” to match the zoom setting of your lens to concentrate the available flash burst onto the actual subject area.)
![]() ISO setting. The higher the ISO sensitivity, the more photons captured by the sensor. So, doubling the sensitivity from ISO 100 to 200 produces the same effect as, say, opening up your lens from f/8 to f/5.6.
ISO setting. The higher the ISO sensitivity, the more photons captured by the sensor. So, doubling the sensitivity from ISO 100 to 200 produces the same effect as, say, opening up your lens from f/8 to f/5.6.
Flash Control Menus
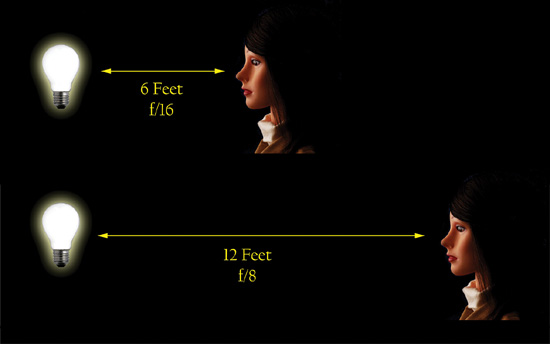
Here’s a recap of this multi-level menu entry, described in Chapter 3. It includes six settings in the Shooting 2 menu for controlling the Canon EOS 70D’s built-in, pop-up electronic flash unit, as well as dedicated Canon Speedlites you can attach to the camera (see Figure 5.2).
Flash Firing
This menu entry has two options: Enable and Disable. It can be used to activate or deactivate the built-in electronic flash and any attached external electronic flash unit. When disabled, the flash cannot fire even if you accidentally elevate it, or have an accessory flash attached and turned on. However, you should keep in mind that the AF-assist beam can still be used. If you want to disable that, too, you’ll need to turn it off using C.Fn III-04. Disabling the flash here does so for all exposure modes, and so is a better choice than using the Basic Zone Flash Off setting of the Mode Dial.
E-TTL II Metering
The second choice in the Flash Control menu allows you to choose the type of exposure metering the 70D uses for electronic flash. You can select the default Evaluative metering, which selectively interprets the 63 metering zones in the viewfinder to intelligently classify the scene for exposure purposes. Alternatively, you can select Average, which melds the information from all the zones together as an average exposure. You might find this mode useful for evenly lit scenes, but, in most cases, exposure won’t be exactly right and you may need some flash exposure compensation adjustment.
Figure 5.2 The Flash Control menu entry (left) has four setting submenus for the built-in flash, plus settings for external units when attached. The External Flash Function Setting menu is shown at right.
Flash Sync Speed in AV Mode
You can select the flash synchronization speed that will be used when working in Aperture-priority mode. Choose from Auto (the 70D selects the shutter speed from 30 seconds to 1/250th second), to a range embracing only the speeds from 1/250th to 1/60th second, or fixed at 1/250th second.
Normally, in Aperture-priority mode when using flash, you specify the f/stop to be locked in. The exposure is then adjusted by varying the output of the electronic flash. Because the primary exposure comes from the flash, the main effects of the shutter speed selected is on the secondary exposure from the ambient light on the scene. Your choices include:
![]() Auto. This is your best choice under most conditions. The 70D will analyze your scene and choose a shutter speed that balances flash exposure and available light. For example, if the camera determines that a flash exposure requires an aperture of f/5.6, and then determines that the background illumination is intense enough to produce an exposure 1/30th second at f/5.6, it might choose that slow shutter speed to provide a balanced exposure. As you might guess, the chief problem with Auto is that the 70D can choose a shutter speed that is slow enough to cause ghost images, as discussed earlier in this chapter. Don’t use Auto if the ambient light is bright and your subject is far from the camera—that combination can lead to large f/stops and slow shutter speeds. (Use a tripod in such situations.) On the other hand, if your subject is fairly close to the camera—10 feet or closer—Auto will rarely get you into trouble.
Auto. This is your best choice under most conditions. The 70D will analyze your scene and choose a shutter speed that balances flash exposure and available light. For example, if the camera determines that a flash exposure requires an aperture of f/5.6, and then determines that the background illumination is intense enough to produce an exposure 1/30th second at f/5.6, it might choose that slow shutter speed to provide a balanced exposure. As you might guess, the chief problem with Auto is that the 70D can choose a shutter speed that is slow enough to cause ghost images, as discussed earlier in this chapter. Don’t use Auto if the ambient light is bright and your subject is far from the camera—that combination can lead to large f/stops and slow shutter speeds. (Use a tripod in such situations.) On the other hand, if your subject is fairly close to the camera—10 feet or closer—Auto will rarely get you into trouble.
![]() 1/250-1/60 Sec Auto. If you want to ensure that a slow shutter speed won’t be used, activate this option to lock out shutter speeds slower than 1/60th second.
1/250-1/60 Sec Auto. If you want to ensure that a slow shutter speed won’t be used, activate this option to lock out shutter speeds slower than 1/60th second.
![]() 1/250 Sec (Fixed). This setting ensures that the 70D will always select 1/250th second. You’ll end up with pitch-black backgrounds much of the time, but you won’t have to worry about ghost images.
1/250 Sec (Fixed). This setting ensures that the 70D will always select 1/250th second. You’ll end up with pitch-black backgrounds much of the time, but you won’t have to worry about ghost images.
Built-in Flash Settings
There are four main choices for this menu choice. You cannot select Built-in Flash Settings if an external flash is attached to the accessory shoe. A message will pop up explaining that this menu option has been disabled.
However, that does not mean that you can’t use an external flash; your add-on flash unit must be used off-camera and not attached to the 70D’s accessory shoe. Indeed, this menu entry has additional settings that apply when using an off-camera wireless external flash, such as Channel and Firing Group. Here’s a quick summary of the main built-in flash selections, plus additional options that appear when you change the Built-in Flash setting to one of the two wireless flash modes.
![]() Flash mode. This entry allows you to choose from automatic exposure calculation (E-TTL II) or manual flash exposure.
Flash mode. This entry allows you to choose from automatic exposure calculation (E-TTL II) or manual flash exposure.
![]() E-TTL II. You’ll leave Flash Mode at this setting most of the time. In this mode, the camera fires a pre-flash prior to the exposure, and measures the amount of light reflected to calculate the proper settings. When you’ve selected the E-TTL II Flash mode, you can also choose either Evaluative or Average metering methods. If you select Manual Flash or MULTI Flash (which are only available when using an external flash), that option is removed from the menu.
E-TTL II. You’ll leave Flash Mode at this setting most of the time. In this mode, the camera fires a pre-flash prior to the exposure, and measures the amount of light reflected to calculate the proper settings. When you’ve selected the E-TTL II Flash mode, you can also choose either Evaluative or Average metering methods. If you select Manual Flash or MULTI Flash (which are only available when using an external flash), that option is removed from the menu.
![]() Manual Flash. Use this setting when you want to specify exactly how much light is emitted by the flash units, and don’t want the 70D’s E-TTL II exposure system to calculate the f/stop for you. When you activate this option, the two flash exposure compensation entries are replaced by internal and external flash output scales (the built-in and external flash units are represented by icons). You can select from 1/4 to 1/128th power for the built-in flash, and 1/1 to 1/128th power for the external flash. A blue indicator appears under the previous setting, and a white indicator under your new setting, a reminder that you’ve chosen reduced power. Click on External flash func. setting, then click ETTL and select M or Multi with the multi-controller.
Manual Flash. Use this setting when you want to specify exactly how much light is emitted by the flash units, and don’t want the 70D’s E-TTL II exposure system to calculate the f/stop for you. When you activate this option, the two flash exposure compensation entries are replaced by internal and external flash output scales (the built-in and external flash units are represented by icons). You can select from 1/4 to 1/128th power for the built-in flash, and 1/1 to 1/128th power for the external flash. A blue indicator appears under the previous setting, and a white indicator under your new setting, a reminder that you’ve chosen reduced power. Click on External flash func. setting, then click ETTL and select M or Multi with the multi-controller.
![]() Shutter sync. You can choose 1st curtain sync, which fires the pre-flash used to calculate the exposure before the shutter opens, followed by the main flash as soon as the shutter is completely open. This is the default mode, and you’ll generally perceive the pre-flash and main flash as a single burst. Alternatively, you can select 2nd curtain sync, which fires the pre-flash as soon as the shutter opens, and then triggers the main flash in a second burst at the end of the exposure, just before the shutter starts to close. (If the shutter speed is slow enough, you may clearly see both the pre-flash and main flash as separate bursts of light.) This action allows photographing a blurred trail of light of moving objects with sharp flash exposures at the beginning and the end of the exposure. This type of flash exposure is slightly different from what some other cameras produce using 2nd curtain sync.
Shutter sync. You can choose 1st curtain sync, which fires the pre-flash used to calculate the exposure before the shutter opens, followed by the main flash as soon as the shutter is completely open. This is the default mode, and you’ll generally perceive the pre-flash and main flash as a single burst. Alternatively, you can select 2nd curtain sync, which fires the pre-flash as soon as the shutter opens, and then triggers the main flash in a second burst at the end of the exposure, just before the shutter starts to close. (If the shutter speed is slow enough, you may clearly see both the pre-flash and main flash as separate bursts of light.) This action allows photographing a blurred trail of light of moving objects with sharp flash exposures at the beginning and the end of the exposure. This type of flash exposure is slightly different from what some other cameras produce using 2nd curtain sync.
If you have an external compatible Speedlite attached, you can also choose High-speed sync (if available with that flash), which allows you to use shutter speeds faster than 1/250th second, using the External Flash Function Setting menu.
![]() Flash exposure compensation. You can use the Quick Control screen (press the Q button) and enter flash exposure compensation. If you’d rather adjust flash exposure using a menu, you can do that here. Select this option with the SET button, then dial in the amount of flash EV compensation you want using the multi-controller pad. The EV that was in place before you started to make your adjustment is shown as a blue indicator, so you can return to that value quickly. Press SET again to confirm your change, then press the MENU button twice to exit.
Flash exposure compensation. You can use the Quick Control screen (press the Q button) and enter flash exposure compensation. If you’d rather adjust flash exposure using a menu, you can do that here. Select this option with the SET button, then dial in the amount of flash EV compensation you want using the multi-controller pad. The EV that was in place before you started to make your adjustment is shown as a blue indicator, so you can return to that value quickly. Press SET again to confirm your change, then press the MENU button twice to exit.
![]() Wireless functions. These choices appear when you’ve selected Custom Wireless, and include Mode, Channel, Firing Group, and other options used only when you’re working in wireless mode to control an external flash. If you’ve disabled wireless functions, the other options don’t appear on the menu.
Wireless functions. These choices appear when you’ve selected Custom Wireless, and include Mode, Channel, Firing Group, and other options used only when you’re working in wireless mode to control an external flash. If you’ve disabled wireless functions, the other options don’t appear on the menu.
Ghost Images
The difference between triggering the flash when the shutter just opens, or just when it begins to close might not seem like much. But whether you use 1st curtain sync (the default setting) or 2nd curtain sync (an optional setting) can make a significant difference to your photograph if the ambient light in your scene also contributes to the image.
At faster shutter speeds, particularly 1/250th second, there isn’t much time for the ambient light to register, unless it is very bright. It’s likely that the electronic flash will provide almost all the illumination, so 1st curtain sync or 2nd curtain sync isn’t very important. However, at slower shutter speeds, or with very bright ambient light levels, there is a significant difference, particularly if your subject is moving, or the camera isn’t steady.
In any of those situations, the ambient light will register as a second image accompanying the flash exposure, and if there is movement (camera or subject), that additional image will not be in the same place as the flash exposure. It will show as a ghost image and, if the movement is significant enough, as a blurred ghost image trailing in front of or behind your subject in the direction of the movement.
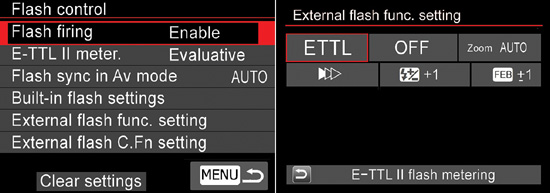
As I noted, when you’re using 1st curtain sync, the flash’s main burst goes off the instant the shutter opens fully (a pre-flash used to measure exposure in auto flash modes fires before the shutter opens). This produces an image of the subject on the sensor. Then, the shutter remains open for an additional period (30 seconds to 1/250th second, as I said). If your subject is moving, say, toward the right side of the frame, the ghost image produced by the ambient light will produce a blur on the right side of the original subject image, making it look as if your sharp (flash-produced) image is chasing the ghost. For those of us who grew up with lightning-fast superheroes who always left a ghost trail behind them, that looks unnatural (see Figure 5.3).
Figure 5.3 1st curtain sync produces an image that trails in front of the flash exposure (top), while 2nd curtain sync creates a more “natural looking” trail behind the flash image.
So, Canon uses 2nd curtain sync to remedy the situation. In that mode, the shutter opens, as before. The shutter remains open for its designated duration, and the ghost image forms. If your subject moves from the left side of the frame to the right side, the ghost will move from left to right, too. Then, about 1.5 milliseconds before the second shutter curtain closes, the flash is triggered, producing a nice, sharp flash image ahead of the ghost image.
External Flash Function Setting
This menu is available only when you have a compatible dedicated Canon Speedlite electronic flash attached and switched on. The settings available are shown at right in Figure 5.2. If you press the INFO. button while adjusting flash settings, both the changes made to the settings of an attached external flash and to the built-in flash will be cleared.
![]() Flash mode. This entry allows you to set the flash mode for the external flash, from E-TTL II, Manual flash, and MULTI flash. The first two are identical to the modes described earlier. The third, MULTI flash, allows stroboscopic/repeating flash effects, and will be described next. The remaining three are optional metering modes available with certain flash units, such as the 580EX II, and are available for those who might need one of those less sophisticated flash metering systems. TTL measures light bouncing back from your subject through the lens to calculate exposure but, unlike E-TTL II, does not use a pre-flash or intelligent evaluation of the measurements to adjust for different types of scenes.
Flash mode. This entry allows you to set the flash mode for the external flash, from E-TTL II, Manual flash, and MULTI flash. The first two are identical to the modes described earlier. The third, MULTI flash, allows stroboscopic/repeating flash effects, and will be described next. The remaining three are optional metering modes available with certain flash units, such as the 580EX II, and are available for those who might need one of those less sophisticated flash metering systems. TTL measures light bouncing back from your subject through the lens to calculate exposure but, unlike E-TTL II, does not use a pre-flash or intelligent evaluation of the measurements to adjust for different types of scenes.
![]() Wireless functions. These functions are available when using wireless flash. This setting allows you to enable or disable wireless functions. You can choose Wireless: Off, Wireless: On (Optical Transmission), or Wireless: On (Radio Transmission). The last choice is shown and available only when using a radio-capable triggering device or flash, such as the 600EX-RT.
Wireless functions. These functions are available when using wireless flash. This setting allows you to enable or disable wireless functions. You can choose Wireless: Off, Wireless: On (Optical Transmission), or Wireless: On (Radio Transmission). The last choice is shown and available only when using a radio-capable triggering device or flash, such as the 600EX-RT.
![]() Flash Zoom. Some flash units can vary their coverage to better match the field of view of your lens at a particular focal length. You can allow the external flash to zoom automatically, based on information provided, or manually, using a zoom button on the flash itself. This setting is disabled when using a flash like the Canon 270EX II, which does not have zooming capability. You can select Auto, in which case the camera will tell the flash unit the focal length of the lens, or choose individual focal lengths including 24mm, 28mm, 35mm, 50mm, 70mm, 80mm, and 105mm. The 600EX-RT offers an additional setting of 200mm.
Flash Zoom. Some flash units can vary their coverage to better match the field of view of your lens at a particular focal length. You can allow the external flash to zoom automatically, based on information provided, or manually, using a zoom button on the flash itself. This setting is disabled when using a flash like the Canon 270EX II, which does not have zooming capability. You can select Auto, in which case the camera will tell the flash unit the focal length of the lens, or choose individual focal lengths including 24mm, 28mm, 35mm, 50mm, 70mm, 80mm, and 105mm. The 600EX-RT offers an additional setting of 200mm.
![]() Shutter synchronization. As with the 70D’s internal flash, you can choose 1st curtain sync, which fires the flash as soon as the shutter is completely open (this is the default mode). Alternatively, you can select 2nd curtain sync, which fires the flash as soon as the shutter opens, and then triggers a second flash at the end of the exposure, just before the shutter starts to close. If a compatible Canon flash, such as the Speedlite 580EX II or 600EX-RT is attached and turned on, you can also select High-speed sync. and shoot using shutter speeds faster than 1/250th second. HSS does not work in wireless mode.
Shutter synchronization. As with the 70D’s internal flash, you can choose 1st curtain sync, which fires the flash as soon as the shutter is completely open (this is the default mode). Alternatively, you can select 2nd curtain sync, which fires the flash as soon as the shutter opens, and then triggers a second flash at the end of the exposure, just before the shutter starts to close. If a compatible Canon flash, such as the Speedlite 580EX II or 600EX-RT is attached and turned on, you can also select High-speed sync. and shoot using shutter speeds faster than 1/250th second. HSS does not work in wireless mode.
![]() Flash exposure compensation. You can add/subtract exposure compensation for the external flash unit, in a range of −2 to +2 EV. Dial in the amount of flash EV compensation you want using the multi-selector. The EV that was in place before you started to make your adjustment is shown as a blue indicator, so you can return to that value quickly.
Flash exposure compensation. You can add/subtract exposure compensation for the external flash unit, in a range of −2 to +2 EV. Dial in the amount of flash EV compensation you want using the multi-selector. The EV that was in place before you started to make your adjustment is shown as a blue indicator, so you can return to that value quickly.
![]() Flash exposure bracketing. Flash Exposure Bracketing (FEB) operates similarly to ordinary exposure bracketing, providing a series of different exposures to improve your chances of getting the exact right exposure, or to provide alternative renditions for creative purposes.
Flash exposure bracketing. Flash Exposure Bracketing (FEB) operates similarly to ordinary exposure bracketing, providing a series of different exposures to improve your chances of getting the exact right exposure, or to provide alternative renditions for creative purposes.
If you enable wireless flash, additional options appear in this menu.
![]() Channel. All flashes used wirelessly can communicate on one of four channels. This setting allows you to choose which channel is used. Channels are especially helpful when you’re working around other Canon photographers; each can select a different channel so one photographer’s flash units don’t trigger those of another photographer.
Channel. All flashes used wirelessly can communicate on one of four channels. This setting allows you to choose which channel is used. Channels are especially helpful when you’re working around other Canon photographers; each can select a different channel so one photographer’s flash units don’t trigger those of another photographer.
![]() Master flash. You can enable or disable use of the external flash as the master controller for the other wireless flashes. When set to enable, the attached external flash is used as the master; when disabled, the external flash becomes a slave unit triggered by the 70D’s built-in flash.
Master flash. You can enable or disable use of the external flash as the master controller for the other wireless flashes. When set to enable, the attached external flash is used as the master; when disabled, the external flash becomes a slave unit triggered by the 70D’s built-in flash.
![]() Flash Firing Group. Multiple flash units can be assigned to a group. This choice allows specifying which groups are triggered, A/B, A/B plus C, or All. The 600EX-RT offers additional groups when using radio control mode, Groups D and E.
Flash Firing Group. Multiple flash units can be assigned to a group. This choice allows specifying which groups are triggered, A/B, A/B plus C, or All. The 600EX-RT offers additional groups when using radio control mode, Groups D and E.
![]() A:B fire ratio. If you select A/B or A/B plus C, this option appears, and allows you to set the proportionate outputs of Groups A and B, in ratios from 8:1 to 1:8.
A:B fire ratio. If you select A/B or A/B plus C, this option appears, and allows you to set the proportionate outputs of Groups A and B, in ratios from 8:1 to 1:8.
![]() Group C exposure compensation. If you select A/B plus C, this option appears, too, allowing you to set flash exposure compensation separately for Group C flashes.
Group C exposure compensation. If you select A/B plus C, this option appears, too, allowing you to set flash exposure compensation separately for Group C flashes.
External Flash Custom Function Setting
Many external Speedlites from Canon include their own list of Custom Functions, which can be used to specify things like flash metering mode and flash bracketing sequences, as well as more sophisticated features, such as modeling light/flash (if available), use of external power sources (if attached), and functions of any slave unit attached to the external flash. This menu entry allows you to set an external flash unit’s Custom Functions from your 70D’s menu.
Clear External Flash Custom Function Setting
This entry allows you to zero-out any changes you’ve made to your external flash’s Custom Functions, and return them to their factory default settings.
Learning about MULTI Flash
The MULTI flash setting makes it possible to shoot cool stroboscopic effects with units that offer this repeating effect. The flash fires several times in quick succession. You can use the capability to produce multiple images of moving objects, to trace movement (say, your golf swing). When you’ve activated MULTI flash, three parameters appear on the External Flash Function Setting menu. They include:
![]() Frequency/Times per second. This figure specifies the number of bursts per second. With the built-in flash, you can choose (theoretically) 1 to 199 bursts per second. The actual number of flashes produced will be determined by your flash count (which turns off the flash after the specified number of flashes), flash output (higher output levels will deplete the available energy in your flash unit), and your shutter speed.
Frequency/Times per second. This figure specifies the number of bursts per second. With the built-in flash, you can choose (theoretically) 1 to 199 bursts per second. The actual number of flashes produced will be determined by your flash count (which turns off the flash after the specified number of flashes), flash output (higher output levels will deplete the available energy in your flash unit), and your shutter speed.
![]() Flash count/number of shots. This setting determines the number of flashes in a given burst, and can be set from 1 to 50 flashes.
Flash count/number of shots. This setting determines the number of flashes in a given burst, and can be set from 1 to 50 flashes.
![]() Power level. Adjust the output of the flash for each burst, from 1/4 to 1/128th power.
Power level. Adjust the output of the flash for each burst, from 1/4 to 1/128th power.
These factors work together to determine the maximum number of flashes you can string together in a single shot. The exact number will vary, depending on your settings.
High-Speed Sync
High-speed sync is a special mode that allows you to synchronize an external flash (but not the built-in flash) at all shutter speeds, rather than just 1/250th second and slower. The entire frame is illuminated by a series of continuous bursts as the shutter opening moves across the sensor plane, so you do not end up with a horizontal black band. HSS is especially useful in three situations, all related to problems associated with high ambient light levels: eliminating ghosts with moving images, improving fill flash by allowing the use of higher shutter speeds outdoors, and using fill flash in Tv mode, when the 70D would select shutter speeds higher than 1/250th second.
To activate HSS using the 580EX II or 600EX-RT, just follow these steps:
1. Attach the flash. Mount/connect the external flash on the 70D, using the hot shoe or a cable. (HSS cannot be used in wireless mode, nor with a flash linked through an adapter that provides a PC/X terminal.)
2. Power up. Turn the flash and camera on.
3. Select HSS in the camera. Set the External Flash Function Setting in the camera to HSS as the 70D’s sync mode.
a. Choose Flash Control in the Shooting 2 menu.
b. Select External Flash Func. Setting.
c. Navigate to the Shutter Sync. Entry, press SET, and choose High-Speed (at the far right of the list). Press SET again to confirm.
4. Choose HSS on the flash. Activate HSS (FP flash) on your attached external flash. With the 580EX II, press the High-speed sync button on the back of the flash unit (it’s the second from the right under the LCD). With the 600EX-RT, press Function Button 4 (Sync), located at the far right of the row of four buttons just under the LCD.
5. Confirm HSS is active. The HSS icon will be displayed on the flash unit’s LCD (at the upper-left side with the 580EX II), and at bottom left in the 70D’s viewfinder. If you choose a shutter speed of 1/250th second or slower, the indicator will not appear in the viewfinder, as HSS will not be used at slower speeds.
6. View minimum/maximum shooting distance. Choose a distance based on the maximum shown in the line at the bottom of the flash’s LCD display (from 0.5 to 18 meters).
7. Shoot. Take the picture. To turn off HSS, press the button on the flash again. Remember that you can’t use MULTI flash or Wireless flash when working with High-speed sync.
Using External Electronic Flash
Canon offers a broad range of accessory electronic flash units for the EOS 70D. They can be mounted to the flash accessory shoe, or used off-camera with a dedicated cord that plugs into the flash shoe to maintain full communications with the camera for all special features. (Non-dedicated flash units, such as studio flash, can be connected using a PC terminal adapter slipped into the flash shoe.) They range from the Speedlite 600EX-RT and 580EX II, which can each correctly expose subjects up to 17 feet away at f/11 and ISO 100, to the 270EX, which is good out to 8 feet at f/11 and ISO 100. (You’ll get greater ranges at even higher ISO settings, of course.) There are also two electronic flash units specifically for specialized close-up flash photography.
Speedlite 600EX-RT
This flagship of the Canon accessory flash line (and most expensive at about $549) is the most powerful unit the company offers, with a GN of 197, and a manual/automatic zoom flash head that covers the full frame of lenses from 24mm wide angle to 200mm telephoto. (There’s a flip-down wide-angle diffuser that spreads the flash to cover a 14mm lens’s field of view, too.) The 600EX-RT shares its basic features with the 580EX II, described next.
The killer feature of this unit is the new wireless two-way radio communication between the camera and this flash (or ST-E3-RT wireless controller and the flash) at distances of up to 98 feet. You can link up to 15 different flash units with radio control, using five groups (A, B, C, D, and E), and no line-of-sight connection is needed. (You can hide the flash under a desk or in a potted plant.) With the latest Canon cameras having a revised “intelligent” hot shoe (which includes the 70D), a second 600EX-RT can be used to trigger a camera that also has a 600EX-RT mounted, from a remote location. That means you can set up multiple cameras equipped with multiple flash units to all fire simultaneously!
The 600EX-RT maintains backward compatibility with optical transmission used by earlier cameras. However, it’s a bit pricey for the average EOS 70D owner, who is unlikely to be able to take advantage of all its features. If you’re looking for a high-end flash unit and don’t need radio control, I still recommend the Speedlite 580EX II (described next), which remains in the line.
Remember that with the 600EX-RT, you can’t use radio control and some other features unless you own at least two of these Speedlites, or one 600EXRT plus the ST-E3-RT, which costs half as much. Radio control is possible only between a camera that has a 600EX-RT or ST-E3-RT in the hot shoe, and an additional 600EX-RT flash or ST-E3-RT.
Some 18 Custom Functions of the 600EX-RT can be set using the 70D’s External Flash C.Fn Setting menu. Additional Personal Functions must be specified on the flash itself. The 70D-friendly functions include:
C.Fn-00 |
Distance indicator display (Meters/Feet) |
C.Fn-01 |
Auto power off (Enabled/Disabled) |
C.Fn-02 |
Modeling flash (Enabled-DOF preview button/Enabled-test firing button/Enabled-both buttons/Disabled) |
C.Fn-03 |
FEB Flash exposure bracketing auto cancel (Enabled/Disabled) |
C.Fn-04 |
FEB Flash exposure bracketing sequence (Metered > Decreased > Increased Exposure/Decreased > Metered > Increased Exposure) |
C.Fn-05 |
Flash metering mode (E-TTL II-E-TTL/TTL/External metering: Auto/External metering: Manual) |
C.Fn-06 |
Quickflash with continuous shot (Disabled/Enabled) |
C.Fn-07 |
Test firing with autoflash (1/32/Full power) |
C.Fn-08 |
AF-assist beam firing (Enabled/Disabled) |
C.Fn-09 |
Auto zoom adjusted for image/sensor size (Enabled/Disabled) |
C.Fn-10 |
Slave auto power off timer (60 minutes/10 minutes) |
C.Fn-11 |
Cancellation of slave unit auto power off by master unit (Within 8 Hours/Within 1 Hour) |
C.Fn-12 |
Flash recycling on external power (Use internal and external power/Use only external power) |
C.Fn-13 |
Flash exposure metering setting button (Speedlite button and dial/Speedlite dial only) |
C.Fn-20 |
Beep (Enable/Disable) |
C.Fn-21 |
Light Distribution (Standard, Guide Number Priority, Even Coverage) |
C.Fn-22 |
LCD panel illumination (On for 12 seconds, Disable, Always On) |
C.Fn-23 |
Slave Flash Battery Check (AF-assist beam/Flash Lamp, Flash Lamp only) |
The Personal Functions available include the following. Note that you can set the LCD panel color to differentiate at a glance whether a given flash is functioning in Master or Slave mode.
P.Fn-01 |
LCD panel display contrast (Five levels of contrast) |
P.Fn-02 |
LCD panel illumination color: Normal (Green, Orange) |
P.Fn-03 |
LCD panel illumination color: Master (Green, Orange) |
P.Fn-04 |
LCD panel illumination color: Slave (Green, Orange) |
P.Fn-05 |
Color filter auto detection (Auto, Disable) |
P.Fn-06 |
Wireless button toggle sequence (Normal>Radio>Optical, Normal< >Radio, Normal< >Optical) |
P.Fn-07 |
Flash firing during linked shooting (Disabled, Enabled) |
Speedlite 580EX II
This deposed flagship of the Canon accessory flash line offers a GN of 190, and a manual/automatic zoom flash head that covers the full frame of lenses from 24mm wide angle to 105mm telephoto. (There’s a flip-down, wide-angle diffuser that spreads the flash to cover a 14mm lens’s field of view, too.) All angle specifications given by Canon refer to full-frame sensors, but this flash unit automatically converts its field of view coverage to accommodate the crop factor if you also use it on a cropped sensor camera like the EOS 7D. (Handy if you own both.)
Like the 600EX-RT, this unit offers full-swivel, 180 degrees in either direction, and has its own built-in AF-assist beam and an exposure system that’s compatible with the nineteen focus points of the 70D. Powered by economical AA-size batteries, the unit recycles in 0.1 to 6 seconds, and can squeeze 100 to 700 flashes from a set of batteries.
The 580EX II automatically communicates white balance information to your camera, allowing it to adjust WB to match the flash output. You can even simulate a modeling light effect: When you press the depth-of-field preview button on the 70D, the 580EX II emits a one-second burst of light that allows you to judge the flash effect. If you’re using multiple flash units with Canon’s wireless E-TTL system, this model can serve as a master flash that controls the slave units you’ve set up (more about this later) or function as a slave itself.
It’s easy to access all the features of this unit, because it has a large backlit LCD panel on the back that provides information about all flash settings. There are 14 Custom Functions that can be controlled from the flash or camera, numbered from 00 to 13.
These functions are (the first setting is the default value):
C.Fn-00 |
Distance indicator display (Meters/Feet) |
C.Fn-01 |
Auto power off (Enabled/Disabled) |
C.Fn-02 |
Modeling flash (Enabled-DOF preview button/Enabled-Test firing button/Enabled-Both buttons/Disabled) |
C.Fn-03 |
FEB Flash exposure bracketing auto cancel (Enabled/Disabled) |
C.Fn-04 |
FEB Flash exposure bracketing sequence (Metered > Decreased > Increased Exposure/Decreased > Metered > Increased Exposure) |
C.Fn-05 |
Flash metering mode (E-TTL/II-E-TTL/TTL/External metering: Auto/External metering: Manual) |
C.Fn-06 |
Quickflash with continuous shot (Disabled/Enabled) |
C.Fn-07 |
Test firing with autoflash (1/32/Full power) |
C.Fn-08 |
AF-assist beam firing (Enabled/Disabled) |
C.Fn-09 |
Auto zoom adjusted for image/sensor size (Enabled/Disabled) |
C.Fn-10 |
Slave auto power off timer (60 minutes/10 minutes) |
C.Fn-11 |
Cancellation of slave unit auto power off by master unit (Within 8 Hours/Within 1 Hour) |
C.Fn-12 |
Flash recycling on external power (Use internal and external power/Use only external power) |
C.Fn-13 |
Flash exposure metering setting button (Speedlite button and dial/Speedlite dial only) |
Speedlite 430EX II
This less pricey electronic flash has a GN of 141, with automatic and manual zoom coverage from 24mm to 105mm, and the same wide-angle pullout panel found on the 580EX II that covers the area of a 14mm lens on a full-frame camera, and automatic conversion to the cropped frame area of the 70D and other 1.6X crop Canon dSLRs. The 430EX II also communicates white balance information with the camera, and has its own AF-assist beam. Compatible with Canon’s wireless E-TTL system, it makes a good slave unit, but cannot serve as a master flash. It, too, uses AA batteries, and offers recycle times of 0.1 to 3.7 seconds for 200 to 1,400 flashes, depending on subject distance.
Speedlite 320EX
One of two new flash units (with the Speedlite 270EX II, described next) introduced early in 2011, this $249 flash has a GN of 105. Lightweight and more pocket-sized than the 430EX II or 580EX II, this bounceable (both horizontally and vertically) flash has some interesting features, including a built-in LED video light that can be used for shooting movies with the 70D, or as a modeling light or even AF-assist beam when shooting with live view. Canon says that this efficient LED light can provide up to four hours of illumination with a set of AA batteries. It can be used as a wireless slave unit, and has a new flash release function that allows the shutter to be triggered remotely with a two-second delay.
Speedlite 270EX II
This $170 ultra-compact unit is Canon’s entry-level Speedlite, and suitable for 70D owners who want a simple strobe for occasional use, without sacrificing the ability to operate it as a wireless slave unit. With a GN of 89, it provides a little extra pop for fill flash applications. It has vertical bounce capabilities of up to 90 degrees, and can be switched between Tele modes to Normal (28mm full-frame coverage) at a reduced guide number of 72.
The 270EX II functions as a wireless slave unit triggered by any Canon EOS unit or flash (such as the 580 EX II) with a Master function. It also has the new flash release function with a two-second delay that lets you reposition the flash. There’s a built-in AF-assist beam, and this 5.5-ounce, 2.6 × 2.6 × 3-inch unit is powered by just two AA-size batteries.
Elements of Wireless Flash
Complete instruction in using the 70D wireless flash capabilities is beyond the scope of this Compact Field Guide (even a basic description would require more than half the pages in this book). Nor is there room to discuss radio transmission capabilities offered by the latest 600EX-RT unit. However, I’m going to provide a few checklists you can use as reminders once you’ve mastered the basics. You’ll find more detailed instructions in the manual furnished with your external flash.
NOT A TUTORIAL
I repeat: this section is a review you can use out in the field. It is not intended to teach you how to use wireless flash. You should gain some familiarity with the 70D’s wireless capabilities from your camera manual or the manual furnished with your flash, or my full-length book on the 70D, which has an entire chapter on wireless flash.
Here are some of the key concepts to electronic flash and wireless flash that I’ll be describing in this chapter. Learn what these are, and you’ll have gone a long way toward understanding how to use wireless flash. You need to understand the various combinations of flashes that can be used, how they can be controlled individually and together, and why you might want to use multiple and off-camera flash units. I’m going to address all these points in this section.
Flash Combinations
Your 70D’s built-in flash can be used alone, or in combination with other external flash units.
![]() Built-in flash used alone. Your built-in flash can function as the only flash illumination used to take a picture.
Built-in flash used alone. Your built-in flash can function as the only flash illumination used to take a picture.
![]() Built-in flash used simultaneously with off-camera flash. You can use the off-camera flash as a main light and supply fill light from the built-in flash to produce interesting effects and pleasing portraits.
Built-in flash used simultaneously with off-camera flash. You can use the off-camera flash as a main light and supply fill light from the built-in flash to produce interesting effects and pleasing portraits.
![]() Built-in flash used as a trigger only for off-camera flash. Use the 70D’s built-in wireless flash controller to command single or multiple Speedlites for studio-like lighting effects, without having the pop-up flash contribute to the exposure itself.
Built-in flash used as a trigger only for off-camera flash. Use the 70D’s built-in wireless flash controller to command single or multiple Speedlites for studio-like lighting effects, without having the pop-up flash contribute to the exposure itself.
Controlling Flash Units
There are multiple ways of controlling flash units, both through direct or wired connections and wirelessly.
![]() Direct connection. The built-in flash is triggered electronically when a picture is taken. External flash units can also be controlled directly, either by plugging them into the accessory shoe on top of the camera or by linking them to a camera with a dedicated flash cord that in turn attaches to the accessory hot shoe. When used in these modes, the camera has full communication with the flash, which can receive information about zoom lens position, correct exposure required, and the signals required to fire the flash. There also exist accessory shoe adapters that provide a PC/X connection, allowing non-dedicated strobes, such as studio flash units, to be fired by the camera. These connections are “dumb” and convey no information other than the signal to fire.
Direct connection. The built-in flash is triggered electronically when a picture is taken. External flash units can also be controlled directly, either by plugging them into the accessory shoe on top of the camera or by linking them to a camera with a dedicated flash cord that in turn attaches to the accessory hot shoe. When used in these modes, the camera has full communication with the flash, which can receive information about zoom lens position, correct exposure required, and the signals required to fire the flash. There also exist accessory shoe adapters that provide a PC/X connection, allowing non-dedicated strobes, such as studio flash units, to be fired by the camera. These connections are “dumb” and convey no information other than the signal to fire.
![]() Dedicated wireless optical/infrared signals. In this mode, external flash units communicate with the camera through a pre-flash, which is used to measure exposure prior to the “real” flash burst an instant later, providing camera/flash communication similar to that of a direct connection.
Dedicated wireless optical/infrared signals. In this mode, external flash units communicate with the camera through a pre-flash, which is used to measure exposure prior to the “real” flash burst an instant later, providing camera/flash communication similar to that of a direct connection.
![]() Dedicated wireless infrared signals. Some devices, such as the accessory-shoe-mounted Canon ST-E2 Speedlite Transmitter, can communicate with dedicated flash units through infrared signals. Although the ST-E2 costs about $350, it’s still less expensive than using a unit like the 580EX II as a master controller, particularly when use of the on-camera flash as a master is not desired.
Dedicated wireless infrared signals. Some devices, such as the accessory-shoe-mounted Canon ST-E2 Speedlite Transmitter, can communicate with dedicated flash units through infrared signals. Although the ST-E2 costs about $350, it’s still less expensive than using a unit like the 580EX II as a master controller, particularly when use of the on-camera flash as a master is not desired.
![]() Canon and third-party IR and radio transmitters. The 600EX-RT and ST-E3-RT units from Canon can communicate using radio signals as well as infrared. In addition, some excellent wireless flash controllers that use IR or radio signals to operate external flash units are available from sources like PocketWizard and RadioPopper. One advantage some of these third-party units have is the ability to dial in exposure/output adjustments from the transmitter mounted on the accessory shoe of the camera.
Canon and third-party IR and radio transmitters. The 600EX-RT and ST-E3-RT units from Canon can communicate using radio signals as well as infrared. In addition, some excellent wireless flash controllers that use IR or radio signals to operate external flash units are available from sources like PocketWizard and RadioPopper. One advantage some of these third-party units have is the ability to dial in exposure/output adjustments from the transmitter mounted on the accessory shoe of the camera.
![]() Optical slave units. A relatively low-tech/low-versatility option is to use optical slave units that trigger the off-camera flash units when they detect the firing of the main flash. Slave triggers are inexpensive, but dumb: they don’t allow making any adjustments to the external flash units, and are not compatible with the 70D’s E-TTL II exposure system. Moreover, you should make sure that the slave trigger responds to the main flash burst only, rather than a pre-flash, using a so-called digital mode. Otherwise, your slave units will fire before the main flash, and not contribute to the exposure.
Optical slave units. A relatively low-tech/low-versatility option is to use optical slave units that trigger the off-camera flash units when they detect the firing of the main flash. Slave triggers are inexpensive, but dumb: they don’t allow making any adjustments to the external flash units, and are not compatible with the 70D’s E-TTL II exposure system. Moreover, you should make sure that the slave trigger responds to the main flash burst only, rather than a pre-flash, using a so-called digital mode. Otherwise, your slave units will fire before the main flash, and not contribute to the exposure.
Key Wireless Concepts
There are three key concepts you must understand before jumping into wireless flash photography: Channels, Groups, and Flash Ratios. Here is an explanation of each:
![]() Channel controls. Canon’s wireless flash system offers users the ability to determine on which of the possible channels the flash units can communicate. The channels are numbered 1, 2, 3, and 4, and each flash must be assigned to one of them. Each of the flash units you are working with should be assigned to the same channel, because the slave Speedlites will respond only to a master flash that is on the same channel.
Channel controls. Canon’s wireless flash system offers users the ability to determine on which of the possible channels the flash units can communicate. The channels are numbered 1, 2, 3, and 4, and each flash must be assigned to one of them. Each of the flash units you are working with should be assigned to the same channel, because the slave Speedlites will respond only to a master flash that is on the same channel.
![]() Groups. Canon’s wireless flash system lets you designate multiple flash units in separate groups, (as many as three groups with the 70D’s built-in controller), labeled A, B, and C. All the flash units in all the groups use the same channel and all respond to the same master controller, but you can set the output levels of each group separately.
Groups. Canon’s wireless flash system lets you designate multiple flash units in separate groups, (as many as three groups with the 70D’s built-in controller), labeled A, B, and C. All the flash units in all the groups use the same channel and all respond to the same master controller, but you can set the output levels of each group separately.
![]() Flash ratios. This ability to control the output of one flash (or set of flashes) compared to another flash or set allows you to produce lighting ratios. You can control the power of multiple off-camera Speedlites to adjust each unit’s relative contribution to the image, for more dramatic portraits and other effects.
Flash ratios. This ability to control the output of one flash (or set of flashes) compared to another flash or set allows you to produce lighting ratios. You can control the power of multiple off-camera Speedlites to adjust each unit’s relative contribution to the image, for more dramatic portraits and other effects.
Wireless Flash Made Easy
The EOS 70D has an easy wireless flash mode. Just choose Wireless Func. in the Built-in Flash settings to access options for controlling single or multiple off-camera flash units. You need to follow these steps with your external flash units first:
1. Set the wireless Speedlite to slave mode. The first step is to set the off-camera flash to slave mode. The procedure differs for each individual flash model. For the 580EX II, press the Zoom button for two seconds until the display flashes, then rotate the control dial on the flash until the Slave indicator blinks on the LCD. Press the control dial’s center button to confirm your choice.
2. Assign a channel. All units must use the same channel. The default Channel is 1. If you need to change to a different communications channel, do so using the instructions for your particular flash unit. With the 580EX II, press the Zoom button several times until the CH indicator flashes. Then rotate the control dial on the flash until the channel you want appears on the LCD. Press the control dial center button to confirm your choice.
3. Assign slave to a group. If you want to use a flash ratio to adjust the output of some slave units separately, you’ll want to assign the slave flash to a group, either Group A (the default) or Group B. All units within a particular group fire at the same proportionate level. And remember that all flash units on a particular channel are controlled by the same master flash, regardless of the group they belong to. Set the group according to the instructions for your particular flash. For the 580EX II, press the Zoom button until the A flashes on the LCD. Then rotate the control dial on the flash to choose B. Press the control dial center button to confirm your choice.
4. Position the off-camera flash units, with the Speedlite’s wireless sensor facing the camera/master flash. Indoors, you can position the external flash up to 33 feet from the master unit; outdoors, keep the distance to 23 feet or less. The external flash will emit a red blinking signal to show it is set and waiting for the camera to trigger it.