
Chapter 4
Set-up Menu, Custom Functions, and My Menu Settings
This chapter shows you how and why to use each of the options in the Set-up, Custom Functions, and My Menu sections of your 70D’s menu system.
Set-up Menu Options
There are four yellow/gold-coded Set-up menus where you make adjustments on how your camera behaves during your shooting session, as differentiated from the Shooting menu, which adjusts how the pictures are actually taken. Your choices include the following:
![]() Select Folder
Select Folder
![]() File Number
File Number
![]() Auto Rotate
Auto Rotate
![]() Format Card
Format Card
![]() Eye-Fi Settings
Eye-Fi Settings
![]() Auto Power Off
Auto Power Off
![]() LCD Brightness
LCD Brightness
![]() LCD Off/On Button
LCD Off/On Button
![]() Date/Time/Zone
Date/Time/Zone
![]() Language
Language
![]() GPS Device Settings
GPS Device Settings
![]() Video System
Video System
![]() Feature Guide
Feature Guide
![]() Touch Control
Touch Control
![]() INFO. Button Display Options
INFO. Button Display Options
![]() Wi-Fi
Wi-Fi
![]() Wi-Fi Function
Wi-Fi Function
![]() Sensor Cleaning
Sensor Cleaning
![]() Battery Info.
Battery Info.
![]() Certification Logo Display
Certification Logo Display
![]() Custom Shooting Mode
Custom Shooting Mode
![]() Clear All Camera Settings
Clear All Camera Settings
![]() Copyright Information
Copyright Information
![]() Firmware Ver.
Firmware Ver.
Select Folder
Options: Select Folder, Create Folder
Choose this menu option, the first on the Set-up 1 menu (see Figure 4.1) to create a folder where the images you capture will be stored on your memory card, or to switch between existing folders. Just follow these steps:
1. Choose Select Folder. Access the option from the Set-up 1 menu.
2. View list of available folders. The Select Folder screen pops up with a list of the available folders on your memory card, with names like 100CANON, 101CANON, etc.
3. Choose a different folder. To store subsequent images in a different existing folder, use the multi-controller pad to highlight the label for the folder you want to use. When a folder that already has photos is selected, two thumbnails representing images in that folder are displayed at the right side of the screen.
4. Confirm the folder. Press SET to confirm your choice of an existing folder.
5. Create new folder. If you’d rather create a new folder, highlight Create Folder in the Select Folder screen and press SET. The name of the folder that will be created is displayed, along with a choice to Cancel or OK creating the folder. Press SET to confirm your choice.
6. Exit. Press MENU to return to the Set-up 1 menu.

The folders your 70D creates always follow the nnnCANON convention. You can also use your computer to create folders with names that depart from this arrangement, as long as you adhere to the camera’s general rules for memory card folder names. Here’s how to create folders with personalized names:
1. Access memory card from your computer. There are two ways to do this.
a. USB link. Plug the USB cable into the port on the left side of the 70D and connect to a USB connector on your computer. In Windows, the 70D will appear as a generic digital camera icon. A similar icon will appear on the Mac OSX desktop.
b. Use a card reader. Remove the card from the 70D and insert it in a card reader attached to your computer. The card will appear as just another drive.
2. Open the camera/memory card in your computer. A folder called DCIM will appear at the top level. All the folders your 70D can access must be located inside the DCIM folder.
3. Create a new folder within the DCIM folder. Although you’re not limited to the nnnCANON arrangement, you must adhere to the rules in the steps that follow.
4. Type in a three-digit folder number. You can use any three numbers from 100 to 999, as long as those numbers are not already in use on that memory card. In other words, you can’t have folders named 101CANON and 101SPAIN.
5. Add a five-character description of your choice. You can use any uppercase or lowercase letters from A to z, plus the underscore character (to represent a space). You cannot use an actual space, or any other characters, even if your computer allows them in a file name. An invalid folder name will end up being “invisible” to the 70D, even if it actually exists on your memory card.
File Number
Options: Continuous, Automatic Reset, Manual Reset
The 70D will automatically apply a file number to each picture you take, using consecutive numbering for all your photos over a long period of time, spanning many different memory cards, starting over from scratch when you insert a new card, or when you manually reset the numbers. Numbers are applied from 0001 to 9999, at which time the camera creates a new folder on the card (100, 101, 102, and so forth), so you can have 0001 to 9999 in folder 100, then numbering will start over in folder 101.
The camera keeps track of the last number used in its internal memory. That can lead to a few quirks you should be aware of. For example, if you insert a memory card that had been used with a different camera, the 70D may start numbering with the next number after the highest number used by the previous camera. On the surface, the numbering system seems simple enough: In the menu, you can choose Continuous, Automatic Reset, or Manual Reset.
![]() Continuous. If you’re using a blank/reformatted memory card, the 70D will apply a number that is one greater than the number stored in the camera’s internal memory. If the card is not blank and contains images, then the next number will be one greater than the highest number on the card or in internal memory. (In other words, if you want to use continuous file numbering consistently, you must always use a card that is blank or freshly formatted.)
Continuous. If you’re using a blank/reformatted memory card, the 70D will apply a number that is one greater than the number stored in the camera’s internal memory. If the card is not blank and contains images, then the next number will be one greater than the highest number on the card or in internal memory. (In other words, if you want to use continuous file numbering consistently, you must always use a card that is blank or freshly formatted.)
![]() Automatic Reset. If you’re using a blank/reformatted memory card, the next photo taken will be numbered 0001. If you use a card that is not blank, the next number will be one greater than the highest number found on the memory card. Each time you insert a memory card, the next number will either be 0001 or one higher than the highest already on the card.
Automatic Reset. If you’re using a blank/reformatted memory card, the next photo taken will be numbered 0001. If you use a card that is not blank, the next number will be one greater than the highest number found on the memory card. Each time you insert a memory card, the next number will either be 0001 or one higher than the highest already on the card.
![]() Manual Reset. The 70D creates a new folder numbered one higher than the last folder created, and restarts the file numbers at 0001. Then, the camera uses the numbering scheme that was previously set, either Continuous or Automatic Reset, each time you subsequently insert a blank or non-blank memory card.
Manual Reset. The 70D creates a new folder numbered one higher than the last folder created, and restarts the file numbers at 0001. Then, the camera uses the numbering scheme that was previously set, either Continuous or Automatic Reset, each time you subsequently insert a blank or non-blank memory card.
Auto Rotate
Options: Camera/Computer, Computer Only, Off
You can turn this feature On or Off. When activated, the 70D rotates pictures taken in vertical orientation on the LCD screen so you don’t have to turn the camera to view them comfortably. However, this orientation also means that the longest dimension of the image is shown using the shortest dimension of the LCD, so the picture is reduced in size. You have three options. The image can be autorotated when viewing in the camera and on your computer screen using your image editing/viewing software. The image can be marked to autorotate only when reviewing your image in your image editor or viewing software. This option allows you to have rotation applied when using your computer, while retaining the ability to maximize the image on your LCD in the camera. The third choice is Off. The image will not be rotated when displayed in the camera or with your computer. Note that if you switch Auto Rotate off, any pictures shot while the feature is disabled will not be automatically rotated when you turn Auto Rotate back on; information embedded in the image file when the photo is taken is used to determine whether autorotation is applied. (See Figure 4.2.)
Figure 4.2 Choose auto rotation both in the camera and on your computer display (top); only on your computer display (middle); or no automatic rotation (bottom).

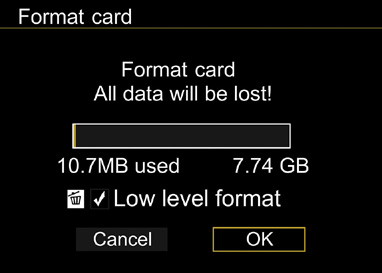
Format Card
Options: Cancel, OK
Use this item to erase everything on your memory card and set up a fresh file system ready for use. When you select Format Card, you’ll see a display like Figure 4.3, showing the capacity of the card, how much of that space is currently in use, and two choices at the bottom of the screen to Cancel or OK (proceed with the format). A yellow-gold bar appears on the screen to show the progress of the formatting step. (The optional low-level format invoked with the Trash button is a slower, but more thorough reformatting that can help restore a memory card that has picked up some bad sectors that aren’t locked out by the normal format step.)
Figure 4.3 You must confirm the format step before the camera will erase a memory card.
Eye-Fi Settings
Options: Enable, Disable, Connection Info (when enabled)
This is the first of two “hidden” menus, and appears only when you have an Eye-Fi wireless transmitter SD card inserted in the 70D. (The second hidden menu is the Movie Settings menu, which appears only when the power switch is set to the Movie position.)
When an Eye-Fi card is present in the camera, the menu choices are Enable and Disable, which turn the 70D’s use of the card’s transmission capabilities on and off. If you select Enable, an additional menu choice appears, Connection Info., which shows the status of the card’s link with available wireless networks.
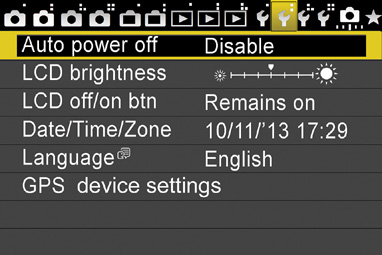
Auto Power Off
Options: 1 min., 2 min., 4 min., 8 min., 15 min., 30 min., Disable
This menu entry, the first on the second Set-up menu tab (see Figure 4.4), allows you to determine how long the 70D remains active before shutting itself off. You can select 1 min., 2 min., 4 min., 8 min., 15 min., 30 min., or Off. However, even if the camera has shut itself off, if the power switch remains in the On position, you can bring the camera back to life by pressing the shutter button halfway, or several other buttons, including the DISP., MENU, or Playback buttons.
LCD Brightness
Options: Adjust Brightness (Seven levels)
Choose this menu option to view a thumbnail image accompanied by a gray-scale strip. Use the left/right multi-controller pad to adjust the brightness to a comfortable viewing level. Brighter settings use more battery power, but can allow you to view an image on the LCD outdoors in bright sunlight. When you have the brightness you want, press the SET button to lock it in and return to the menu. (See Figure 4.5.)
LCD Off/On Button
Options: Remains On, Shutter Btn
When composing images in shooting mode, the shooting settings display on the LCD monitor remains on until you turn it off by pressing the INFO. button. This entry allows you to switch from the default Remains On setting to the Shutter Btn option, which turns off the monitor display when you press the shutter button halfway, and switches it back on when you release the button.
Some prefer to have the settings screen shown all the time, or until they turn it off or on manually using the INFO. button; the Remains On option provides that behavior. But, ordinarily, when you’re pressing the shutter release halfway, you’re peering through the viewfinder and can’t see or don’t need the shooting settings display anyway, so the Shutter Btn option may be a good choice. For example, if you’re shooting under reduced light levels, you may prefer to have the LCD monitor display switch off automatically as you make an exposure (eliminating a potential distraction), then re-appear between shots.
Figure 4.5 Adjust LCD brightness for easier viewing under varying ambient lighting conditions.

Date/Time/Zone
Options: Set Date, Time, Daylight Savings Time, Time Zone
Use this option to set the date and time, which will be embedded in the image file along with exposure information and other data. As first outlined in Chapter 1, you can set the date and time by following these steps:
1. Access this menu entry from the Set-up 2 menu.
2. Rotate the QCD to move the highlighting down to the Date/Time entry.
3. Press the SET button to access the Date/Time setting screen.
4. Rotate the QCD to select the value you want to change. When the gold box highlights the month, day, year, hour, minute, or second format you want to adjust, press the SET button to activate that value. A pair of up/down pointing triangles appears above the value.
5. Rotate the QCD to adjust the value up or down. Press the SET button to confirm the value you’ve entered.
6. Repeat steps 4 and 5 for each of the other values you want to change. The date format can be switched from the default mm/dd/yy to yy/mm/dd or dd/mm/yy; you can turn Daylight Saving Time on or off, and choose an appropriate time zone.
7. When finished, rotate the QCD to select either OK (if you’re satisfied with your changes) or Cancel (if you’d like to return to the Set-up 2 menu without making any changes). Press SET to confirm your choice.
8. When finished setting the date and time, press the MENU button to exit, or just tap the shutter release.
Language
Options: 25 Languages
Choose from 25 languages for menu display. Use the multi-controller pad to highlight the language you want to select. Press the SET button to activate. Your choices include English, German, French, Dutch, Danish, Portuguese, Finnish, Italian, Ukrainian, Norwegian, Swedish, Spanish, Greek, Russian, Polish, Czech, Magyar, Romanian, Turkish, Arabic, Thai, Simplified Chinese, Traditional Chinese, Korean, and Japanese.
If you accidentally set a language you don’t read and find yourself with incomprehensible menus, don’t panic. Just choose the fifth option from the top of the Set-up 2 menu, and select the idioma, sprache, langue, or kieli of your choice. English is the first selection in the list.
GPS Device Settings
Options: Auto time setting, Position Update timing, GPS Information Display, GPS Logger
This entry allows you to adjust the settings of the optional Canon GP-E2 GPS device (a roughly $400 add-on). Or, you can disable GPS functions entirely. This menu option is available only when the device is mounted on your camera. A Set-up entry appears that allows you to access four different parameters:
![]() Auto time setting. The 70D can use time data embedded in the GPS signal to set the camera’s internal clock accurately. You can choose Auto Update to set the time automatically whenever the camera is powered up and GPS data is available; Disable this function; or Set Now to update immediately.
Auto time setting. The 70D can use time data embedded in the GPS signal to set the camera’s internal clock accurately. You can choose Auto Update to set the time automatically whenever the camera is powered up and GPS data is available; Disable this function; or Set Now to update immediately.
![]() Position update timing. Use this to specify the interval the GPS device uses to update position information. Choose from every 1, 5, 10, 15, 30 seconds, or every 1, 2, or 5 minutes. Select a shorter interval when you are moving and/or accuracy is critical, or a longer interval to save power, when GPS reception is not optimal, or you are shooting from one position for a longer period.
Position update timing. Use this to specify the interval the GPS device uses to update position information. Choose from every 1, 5, 10, 15, 30 seconds, or every 1, 2, or 5 minutes. Select a shorter interval when you are moving and/or accuracy is critical, or a longer interval to save power, when GPS reception is not optimal, or you are shooting from one position for a longer period.
![]() GPS information display. This entry simply displays a screen of current GPS information, including latitude, longitude, elevation, UTC time (essentially Greenwich Mean Time), and Satellite reception strength/status.
GPS information display. This entry simply displays a screen of current GPS information, including latitude, longitude, elevation, UTC time (essentially Greenwich Mean Time), and Satellite reception strength/status.
![]() GPS logger. Allows you to enable or disable tracking of GPS position data, transfer log data to your memory card for later manipulation by an appropriate software program, or to delete the camera’s current GPS log.
GPS logger. Allows you to enable or disable tracking of GPS position data, transfer log data to your memory card for later manipulation by an appropriate software program, or to delete the camera’s current GPS log.
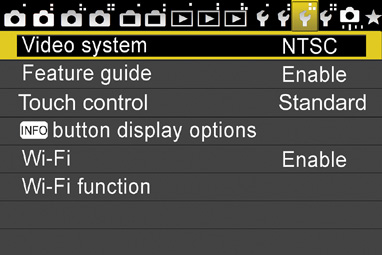
Video System
Options: NTSC/PAL
This setting, the first on the Set-up 3 menu (see Figure 4.6), controls the output of the 70D through the AV cable when you’re displaying images on an external standard-definition television or monitor. You can select either NTSC, used in the United States, Canada, Mexico, many Central, South American, and Caribbean countries, much of Asia, and other countries; or PAL, which is used in the UK, much of Europe, Africa, India, China, and parts of the Middle East.
Feature Guide
Options: Enable, Disable
The Feature Guide is an easy pop-up description of a function or option that appears when you change the shooting mode or use the Quick Control screen to select a function, switch to live view, movie making, or playback. The instructional screen quickly vanishes in a few seconds. You can use this setting to enable or disable the Feature Guide.
Touch Control
Options: Standard, Sensitive, Disable
Use this entry to adjust the LCD touch screen feature. If you find yourself accidentally triggering commands by touching the screen or frequently touch the wrong settings and want to turn it off, you can do so. I often disable touch screen control when I am wearing gloves. Choose from Standard or Sensitive response, or Disable.
INFO. Button Display Options
Options: Displays Camera Settings, Electronic Level, Displays Shooting Functions
The INFO. button on the back panel of the Canon EOS 70D by default alternates between the Camera Settings, Shooting Functions, and Electronic Level information displays. If one is shown, press the INFO. button to see the other. If you’d rather have only one or two of those screens shown, choose INFO. button from the Set-up 3 menu and change from the default Normal Disp. to either Camera Set. or Shoot. Func. After that, only the display you specified will be shown. Follow these steps:
1. When you select the menu entry, the INFO. button display options screen appears with three choices (described next). Use the Quick Control Dial or multi-controller to highlight any of the three and press SET to mark or unmark that option.
2. Always mark at least one of the three: Camera Settings, Electronic Level, or Shooting Functions. The 70D won’t allow you to disable all of the display options.
3. When finished, press the SET button to confirm your changes.
4. Press SET to OK or Cancel and exit the screen. (If you exit in any other way, your changes will not be entered.) Once you’ve left this options screen, you can press MENU or tap the shutter release to return to shooting mode.
5. Thereafter, the 70D will cycle among the choices you’ve activated, plus a blank screen, each time you press the INFO. button.
Wi-Fi
Options: Enable, Disable
Use this entry to enable or disable the EOS 70D’s built-in Wi-Fi capabilities. Turning Wi-Fi off will save power if you don’t need the feature. You’ll also need to turn off Wi-Fi if you want to shoot movies, or need to connect your camera to a computer using the USB/Digital terminal, as those features are not possible when Wi-Fi is turned on.
Wi-Fi Function
This entry allows you to activate Wi-Fi features. Because Wi-Fi options are quite complex and require some knowledge of networking, please consult the GPS/Wi-Fi manuals supplied with the 70D for more complete descriptions and troubleshooting. I’ll try to get you started in this Field guide.
![]() Transferring images between the camera and a computer.
Transferring images between the camera and a computer.
![]() Connecting to a smart phone.
Connecting to a smart phone.
![]() Linking to your computer using the EOS Utility.
Linking to your computer using the EOS Utility.
![]() Printing directly from a Wi-Fi-compatible printer.
Printing directly from a Wi-Fi-compatible printer.
![]() Uploading images to web pages on the Internet.
Uploading images to web pages on the Internet.
![]() Viewing images on a DLNA (Digital Living Network Alliance) device, such as your smart TV, home media server, or even a smart phone that can connect through your home network.
Viewing images on a DLNA (Digital Living Network Alliance) device, such as your smart TV, home media server, or even a smart phone that can connect through your home network.
To activate and begin using the 70D’s Wi-Fi capabilities, just follow these steps:
1. Enable Wi-Fi. Navigate to the Set-up 3 menu and select Wi-Fi. Highlight Enable in the screen that appears and press SET.
2. Access Functions. Scroll down and select the Wi-Fi Function entry. The first time you use Wi-Fi Functions, a screen will pop up prompting you to enter a nickname for your camera. The sidebar that follows explains how to enter the nickname.
3. Select function. When your camera has acquired a nickname, a screen shown in Figure 4.7 appears. Use the Quick Control Dial to navigate to the Wi-Fi function you want to activate and press SET. Choose from:
![]() Transferring images between the camera and a computer.
Transferring images between the camera and a computer.
![]() Connecting to a smartphone.
Connecting to a smartphone.
![]() Linking to your computer using the EOS Utility.
Linking to your computer using the EOS Utility.
![]() Printing directly from a Wi-Fi-compatible printer.
Printing directly from a Wi-Fi-compatible printer.
![]() Uploading images to web pages on the Internet.
Uploading images to web pages on the Internet.
![]() Viewing images on a DLNA (Digital Living Network Alliance) device, such as your smart TV, home media server, or even a smart phone that can connect through your home network.
Viewing images on a DLNA (Digital Living Network Alliance) device, such as your smart TV, home media server, or even a smart phone that can connect through your home network.
![]() Pressing INFO. to adjust general settings, including editing a previously entered nickname, viewing error details, and clearing all Wi-Fi settings. Your camera’s MAC (Media Access Control) address is also displayed. That’s the “label” the network uses to identify individual wireless devices that are connected. You probably won’t need it unless you need to block a particular MAC address from access to a network for some reason, or simply want to use your router’s screens to see what devices are connected.
Pressing INFO. to adjust general settings, including editing a previously entered nickname, viewing error details, and clearing all Wi-Fi settings. Your camera’s MAC (Media Access Control) address is also displayed. That’s the “label” the network uses to identify individual wireless devices that are connected. You probably won’t need it unless you need to block a particular MAC address from access to a network for some reason, or simply want to use your router’s screens to see what devices are connected.
4. Enter parameters. Each of the modes has its own set of parameters.
Figure 4.7 Wi-Fi Function screen.

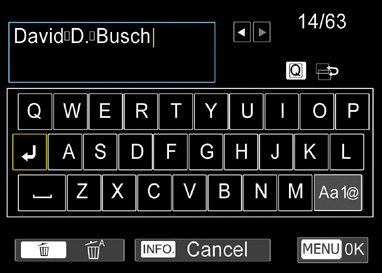
ENTERING TEXT
The entry screen has two sections, the entered text area, and an alphabetical character selection area. (See Figure 4.10. in the Copyright section later in this chapter for the screen) Press the Q button to toggle between the two. In the selection area, navigate to the character you want to add and press SET. You can enter up to 16 characters in your nickname (such as “Canon 70D”). Press the Trash button to erase a character, the INFO. button to cancel text entry, and MENU to finish and confirm your nickname by selecting OK on the screen that pops up. If you later want to change the nickname, press the INFO. button when the Wi-Fi Function screen is displayed.
Transferring Images Between Cameras
You can easily transfer JPEG images and movie files between Canon cameras introduced in 2012 or later that have built-in wireless functions (your 70D cannot communicate with cameras that have Wi-Fi capabilities solely through an Eye-Fi card). Note that the destination camera must support a transmitted video file’s movie format to display it. Your 70D can connect to only one other Canon camera at a time. To exchange images with another camera, one at a time, just follow these steps:
1. Choose image transfer. Navigate to the Wi-Fi Function menu in the Set-up 3 menu and select the Transfer Imgs Between Cameras icon.
2. Make connection. A screen appears that says “Start connection on target camera.” Switch to the other camera and activate the connection there. (Refer to the instructions for the destination camera if necessary to carry out this step.)
3. Connection established. If a connection cannot be established, a warning appears. Otherwise, as soon as the connection is made, the 70D registers the nickname of the target camera and connection information for re-use to pair the two cameras in the future.
4. Files displayed. The image files on your camera are displayed so you can select which images to transmit.
5. Specify image file. Use the multi-controller pad’s left/right buttons to scroll among the available images, and press the SET button to select it. You can press the Index/Reduce button and rotate the Main Dial to the left to switch to an index/thumbnail display, or to the right to return to single-image display.
6. Resize (optional). You don’t need to transmit the full-resolution image. Press the left/right multi-controller buttons and choose Resize Image.
7. Start transfer. When the size of the image to be sent is shown, select Send Img Shown and press SET to start the transfer. A progress screen is displayed during the transmission.
8. Send additional images. Repeat Steps 5–7 to send additional images.
9. Terminate connection. Press the MENU button to display the transfer confirmation screen, select OK, and press SET to end the transfer connection.
You can also select a batch of up to 50 individual files and send them in one group.
Connecting to a Smartphone
Your 70D can use its Wi-Fi connection to interface with a smartphone using an app that’s available for both iOS and Android operating systems. Navigate to your phone’s App Store or Google Play and download the free Canon EOS Remote application. The camera and phone connect through a wireless LAN, either an external network (such as your home network, or one at a hotel or other site), or using the camera as an access point (so that no separate network is required). The latter mode is especially convenient, because you can use it anywhere if the camera and phone are located within range of the 70D’s network capabilities. To link up through your camera’s internal access point, just follow these steps:
1. Enable Wi-Fi in the Set-up 3 menu, then navigate to the Wi-Fi Function entry.
2. Choose the Connect to Smartphone option.
3. Select Camera Access Point Mode from the Connection Method screen that appears next.
4. The Network Settings screen pops up. In virtually all cases, you can select Easy Connection. Choose Manual Connection only if you are knowledgeable about setting up LANs and have some special reason for wanting to make all the settings yourself.
5. A message appears displaying the name of the 70D’s internal access point (the SSID, or service set identifier and an encryption key). This will be the nickname you chose for the camera earlier.
6. Switch to your smartphone and use its settings utility to connect to the camera’s access point. You’ll be asked for a password, which will be the encryption key displayed on the camera.
7. A screen will appear on the camera’s LCD with the message “Start the EOS app on the smartphone.” The 70D’s SSID (nickname), the encryption key (password), IP address, and Mac address will also be displayed. For most of us, that data is just informational, and needed only by networking gurus with special applications for it.
8. Launch the EOS Remote app. It will automatically search for camera access points and display the name of your detected camera. Tap the name of the camera on the screen of the smartphone.
9. When pairing is complete, a message appears on the 70D’s LCD monitor offering to connect to the smartphone. Choose OK and press SET.
10. The current settings needed to link the 70D and your smartphone are stored in the camera, and given the name SET1. You can change this name to something else by highlighting the current settings label and pressing SET. The 70D’s text entry screen, described earlier, appears. Once settings are stored, reconnecting the camera to that smartphone is as simple as choosing the settings name from the camera, and activating the camera’s access point on the phone.
11. Once the camera and smartphone are linked, you can use the phone to view images or control the camera remotely.
12. Terminate the connection by highlighting Exit on the screen displayed on the camera and pressing SET, then confirming by choosing OK and pressing SET once again.
When accessing the 70D through the EOS Remote utility on the smartphone, you can carry out the following functions:
![]() Camera Image Viewing: View the images stored on the 70D’s memory card on the smartphone. You can also save any of those images on the smartphone; both JPEG and RAW images on the camera are stored on your camera in S2 JPEG format. You can also delete images stored on the camera’s memory card remotely from the smartphone.
Camera Image Viewing: View the images stored on the 70D’s memory card on the smartphone. You can also save any of those images on the smartphone; both JPEG and RAW images on the camera are stored on your camera in S2 JPEG format. You can also delete images stored on the camera’s memory card remotely from the smartphone.
![]() Remote Shooting: You can view the 70D’s Live View image on the smartphone, make various camera settings, and take pictures remotely.
Remote Shooting: You can view the 70D’s Live View image on the smartphone, make various camera settings, and take pictures remotely.
![]() Remote Settings: You can change the settings of the EOS Remote app using the settings (gear-shaped) icon. Options include name of the device (the smartphone), changing image display thumbnail size, automatic live view, display of AF button, and setting of the 70D’s clock.
Remote Settings: You can change the settings of the EOS Remote app using the settings (gear-shaped) icon. Options include name of the device (the smartphone), changing image display thumbnail size, automatic live view, display of AF button, and setting of the 70D’s clock.
Remote Control with EOS Utility
The third way to connect your EOS 70D to an external device wirelessly is through the EOS Utility installed on your computer. The EOS Utility allows remote operation of your camera over a wireless connection, including image capture and other operations. Wireless movie shooting is disabled. Note that the bundled EOS Utility also allows controlling the camera over a wired connection by linking it to a computer with the digital/USB cable furnished with the 70D.
Before you can operate your 70D wirelessly from a computer, the two devices must be paired. You’ll need the WFTPairing application from your Canon Digital Solutions CD. Then, just follow these steps (which will use the most automatic way; as mentioned above, you LAN gurus are free to enter your own parameters for network, authentication, and other settings):
1. With Wi-Fi enabled, access the Wi-Fi Function entry in the Set-up 3 menu and choose Remote Control (EOS Utility), which is the third icon from the left on the top row.
2. The Wireless LAN Setup Method screen appears. Choose Find Network and press SET twice.
3. The 70D will search for available networks while a Busy… notice is displayed.
4. Press SET and use the controls to scroll down among available networks (if you have more than one), and press SET to select it. If your networks aren’t found, you can choose Search Again, or, if you’re one of those LAN gurus, you can select Enter Connection and work your way through a maze of choices (Infrastructure or Ad Hoc network; Open System, Shared Key, WPA-PSK, WPA2-PSK authentication; and none or WEP encryption). If you don’t understand that alphabet soup, you probably shouldn’t be messing with it.
5. Press SET to OK your selection, then choose the key (password) format of the target network (if it’s not an open system). You’ll probably just choose the default 8 to 63 ASCII characters, which are most commonly used for LAN passwords.
6. Press SET once more and you’ll be whisked to the 70D’s text entry screen, where you can enter the password for your network. When finished, press the MENU button to confirm.
7. The Busy… notice will appear again, and you’ll be asked to set your IP address, either using a Manual Setting or, in most cases, selecting the Auto Setting and allowing your network to specify the IP address.
8. Press SET twice more and a Start Pairing Devices screen appears on the LCD monitor. That’s your cue to begin working with the pairing application on your computer. Select OK and press SET, and a screen appears (the numerals in the EOS name will vary, as they represent the last six digits of the MAC address of the camera).
9. A dialog box will pop up on your computer when the WFTPair software detects your camera. Its name, MAC address, and IP address will be displayed. Highlight the camera name, and click Connect.
10. When the computer is paired, a screen appears. Press SET to confirm.
11. You’ll be given the opportunity to save the settings for this linkup in the screen; highlight Settings Name, press SET, and you’ll get another visit to the 70D’s text entry screen to choose a name. Exit that screen, as always, by pressing MENU, then use OK to work your way out of the wireless LAN function screens. You can now control your camera wirelessly using your computer’s EOS Utility.
When the EOS Utility is active, the same controls available when the 70D and your computer are linked over the digital/USB cable are available. You can choose from an Accessories pane, which offers access features including the WFT Utility (for making advanced communications changes), and the Picture Style Editor (used to create and modify Picture Styles). The other pane, Control Camera, has five options labeled:
![]() Starts to download images. Transfers images from your camera to the computer, loading them into Digital Photo Professional.
Starts to download images. Transfers images from your camera to the computer, loading them into Digital Photo Professional.
![]() Lets you select and download images. Provides a preview of the images on your memory card and lets you select and download only those you choose.
Lets you select and download images. Provides a preview of the images on your memory card and lets you select and download only those you choose.
![]() Camera settings/Remote shooting. This choice produces a panel on your computer with complete controls for operating the camera wirelessly using the mode selected on the Mode Dial, including adjusting shutter speed and/or aperture (if the mode allows it), setting white balance and ISO, exposure mode and compensation, image quality, and other parameters. Three menu tabs allow making changes for the Shooting menu, Flash Control menu, and Set-up menu. The Remote Live View window even allows you to view what the camera’s sensor is seeing. All the most important camera features for remote shooting are available over the wireless link.
Camera settings/Remote shooting. This choice produces a panel on your computer with complete controls for operating the camera wirelessly using the mode selected on the Mode Dial, including adjusting shutter speed and/or aperture (if the mode allows it), setting white balance and ISO, exposure mode and compensation, image quality, and other parameters. Three menu tabs allow making changes for the Shooting menu, Flash Control menu, and Set-up menu. The Remote Live View window even allows you to view what the camera’s sensor is seeing. All the most important camera features for remote shooting are available over the wireless link.
![]() Register background music. Shows a list of .wav music files stored on your camera, and allows you to add and register additional clips, edit the track name, and play the clips.
Register background music. Shows a list of .wav music files stored on your camera, and allows you to add and register additional clips, edit the track name, and play the clips.
![]() Set up web services. You can create and/or log into a Canon Image Gateway account, described later.
Set up web services. You can create and/or log into a Canon Image Gateway account, described later.
Printing from Wi-Fi Printer
Many (perhaps most) printers today have built-in wireless capabilities, allowing you to print out directly from your computer without a physical link between the computer and printer. The EOS 70D adds the same function to your camera/printer setup, so you can make hard copies of your images from files in your camera without the bother of transferring them to a computer first. All you need is your 70D and a PictBridge-compatible printer that conforms to the DPS over IP standard. To use this feature, you must:
![]() Configure your printer for wireless printing. The instructions vary from printer to printer, so you should consult your printer manual for the procedures. Once you’ve done this, you’ll be able to print photos from your camera, plus files from your computer and other compatible devices, such as smartphones. Wireless printing is not limited to camera-to-printer communications.
Configure your printer for wireless printing. The instructions vary from printer to printer, so you should consult your printer manual for the procedures. Once you’ve done this, you’ll be able to print photos from your camera, plus files from your computer and other compatible devices, such as smartphones. Wireless printing is not limited to camera-to-printer communications.
![]() Link your camera to the printer. The procedures are the same as those mentioned earlier. You can use your camera’s built-in access point. A list of detected printers is displayed, and, as before, you can save the camera-printer connection to a setting for re-use later. Multiple printer connections can be registered.
Link your camera to the printer. The procedures are the same as those mentioned earlier. You can use your camera’s built-in access point. A list of detected printers is displayed, and, as before, you can save the camera-printer connection to a setting for re-use later. Multiple printer connections can be registered.
![]() Printing images. Once linked, you can print by pressing the Playback button and scrolling to the image you want to output. Select printing parameters, number of prints, and other settings just as you would for printing over a wired connection to a PictBridge printer.
Printing images. Once linked, you can print by pressing the Playback button and scrolling to the image you want to output. Select printing parameters, number of prints, and other settings just as you would for printing over a wired connection to a PictBridge printer.
Uploading to a Web Service
This wireless option allows you to select images and upload them to the Canon Image Gateway, a free service. You can register online through your computer and through this entry. Once you’ve become a member, you can upload photos, create photo albums, and use other Canon Image Gateway services. The site also can interface with other web services you have an account with, including e-mail, Twitter, YouTube, and Facebook.
Before you can interface with the Canon gateway wirelessly, you must connect your camera and computer using the conventional digital/USB connection, log onto the Gateway through the “globe” icon, and configure the camera’s settings to allow access to the Web services. (Remember that Wireless capabilities must be set to Disable any time you want to use a wired connection between your camera and computer.)
Then, you can remove the direct link, turn wireless features back on, and connect to your computer through the wireless access methods described earlier in this chapter. Still images can be uploaded to the Gateway, and movies to You-Tube. Images can be uploaded directly to Facebook, or shared with Facebook and Twitter users by posting a link back to the Canon Image Gateway location of the files. As with the image transfer features described earlier, you can resize images before uploading, and send photos one by one or in batches.
Viewing Images on DLNA Devices
If you have a DLNA (Digital Living Network Alliance) compatible TV, game machine (such as PlayStation or XBox), smartphone, or other device labeled as a “media player,” you can view the images in your camera on that display. Consult your destination device’s instructions for setting the media display component to receive information from your camera. You can then connect the 70D and the DLNA device using connection controls similar to those described earlier.
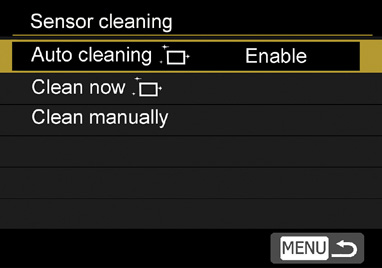
Sensor Cleaning
Option: Auto Cleaning, Clean Now, Clean Manually
This is the first entry in the Set-up 4 menu (see Figure 4.8). One of the Canon EOS 70D’s most useful features is the automatic sensor cleaning system that reduces or eliminates the need to clean your camera’s sensor manually using brushes, swabs, or bulb blowers. Canon has applied anti-static coatings to the sensor and other portions of the camera body interior to counter charge buildups that attract dust. A separate filter over the sensor vibrates ultrasonically each time the 70D is powered on or off, shaking loose any dust, which is captured by a sticky strip beneath the sensor.
Use this menu entry to enable or disable automatic sensor cleaning on power up (select Auto Cleaning) or to activate automatic cleaning during a shooting session (select Clean Now). (See Figure 4.9.) You can also choose the Clean Manually option to flip up the mirror and clean the sensor yourself with a blower, brush, or swab. If the battery level is too low to safely carry out the cleaning operation, the 70D will let you know and refuse to proceed, unless you use the optional AC Adapter Kit ACK-E6.
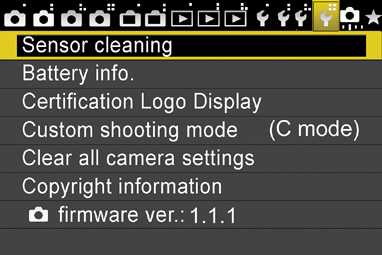
Figure 4.9 Sensor cleaning options.
Battery Info.
This entry is an exceptionally useful feature that allows you to view battery condition information and performance, and track the data among several different batteries. Your EOS 70D can keep track of multiple LP-E6 batteries because each of them is given a unique serial number (which is printed on an included sticker you can affix to the battery). The camera reads this serial number and stores information about each of the batteries that you use and have “registered” separately. I always recommend owning at least two and, preferably, three or more batteries. That’s especially true if you use the Battery Grip BG-E14, which holds two battery packs itself. I also own the 5D Mark III, and 6D, which all use the same battery, so I’m able to justify four batteries to shuttle between my three cameras.
This feature makes it possible to see exactly how each battery you own is performing, allows you to rotate them to even out the usage, and helps you know when it’s time to replace a battery. When you select this menu choice, a Battery Info screen with a wealth of information will appear (if you use two LP-E6 packs in a battery grip, information about both packs will appear):
![]() Battery position. The second line of the screen includes an icon that shows where the battery currently being evaluated is installed (usually the hand grip if you’re not using the BG-E6).
Battery position. The second line of the screen includes an icon that shows where the battery currently being evaluated is installed (usually the hand grip if you’re not using the BG-E6).
![]() Power type. Next to the position icon is an indicator that shows the model number of the battery installed, or shows that the DC power adapter is being used instead.
Power type. Next to the position icon is an indicator that shows the model number of the battery installed, or shows that the DC power adapter is being used instead.
![]() Remaining capacity. The Battery check icon appears showing the remaining capacity visually, along with a percentage number that reads out in 1% increments. You can use this as a rough gauge of how much power you have remaining. If you’re in the middle of an important shooting session, you might want to switch to a fully charged battery at the 25%–33% level to avoid interruptions at the worst probable time. (If you’re using six AA batteries in the BG-E13 grip instead of LP-E6 packs, only this battery capacity notice will appear; the other indicators are not shown.)
Remaining capacity. The Battery check icon appears showing the remaining capacity visually, along with a percentage number that reads out in 1% increments. You can use this as a rough gauge of how much power you have remaining. If you’re in the middle of an important shooting session, you might want to switch to a fully charged battery at the 25%–33% level to avoid interruptions at the worst probable time. (If you’re using six AA batteries in the BG-E13 grip instead of LP-E6 packs, only this battery capacity notice will appear; the other indicators are not shown.)
![]() Shutter count. Displays how many times the shutter has been actuated with the current charged battery. This info can help you learn just how much certain features cost you in terms of power. For example, if a battery has only 50 percent of its power remaining, but you’ve taken only a few dozen photos, you know that your power is being sapped by picture review, lots of autofocus, frequent image stabilization because of lower shutter speeds, or (a major culprit) that flash you’ve been using. While in most cases knowledge is power, in this instance knowledge can help you save power, with a tip-off to use fewer juice-sapping features if the current battery pack must be stretched as far as possible.
Shutter count. Displays how many times the shutter has been actuated with the current charged battery. This info can help you learn just how much certain features cost you in terms of power. For example, if a battery has only 50 percent of its power remaining, but you’ve taken only a few dozen photos, you know that your power is being sapped by picture review, lots of autofocus, frequent image stabilization because of lower shutter speeds, or (a major culprit) that flash you’ve been using. While in most cases knowledge is power, in this instance knowledge can help you save power, with a tip-off to use fewer juice-sapping features if the current battery pack must be stretched as far as possible.
![]() Recharge performance. This indicator shows how well your battery pack is accepting and holding a charge. Three green bars mean that the pack’s performance is fine; two bars show that recharge performance is degraded a little. A red bar indicates that your pack is on its last legs and should be replaced soon. To lengthen the service time of your batteries, you might want to rotate usage among several different packs, so they all “age” at roughly the same rate.
Recharge performance. This indicator shows how well your battery pack is accepting and holding a charge. Three green bars mean that the pack’s performance is fine; two bars show that recharge performance is degraded a little. A red bar indicates that your pack is on its last legs and should be replaced soon. To lengthen the service time of your batteries, you might want to rotate usage among several different packs, so they all “age” at roughly the same rate.
Registering Your Battery Packs
The EOS 70D can “remember” information about up to six LP-E6 battery packs, and provide readouts of their status individually. To register the battery currently in your camera, follow these steps:
1. Access the Battery Info. screen from the Set-up 4 menu.
2. Press the INFO. button, located to the left of the LCD screen.
3. Information about the current battery, including its serial number and the current date will be shown on a new screen.
4. Choose Register to log the battery; if the pack has already been registered, you can choose Delete Info. to remove the battery from the list. (You’d want to do this if you already had registered the limit of six batteries and want to add another one.)
5. Press SET to add the battery to the registry.
6. If you’re deleting a battery, the 70D shows you a Battery Info. delete screen instead. (You can delete a battery pack without having that battery installed in the camera—which could come in handy if you lose one.) Just select the battery (by serial number) and delete.
7. Press MENU to back out of any of the Battery Info. screens.
8. Once a battery has been registered, you can check on its remaining capacity at any time (even if it isn’t currently installed in the 70D) from the Battery Info page. The camera remembers and updates the status of each registered battery whenever it is inserted in the 70D. The date the battery was last used is also shown.
Certification Logo Display
Options: None
This cryptic entry, the third on the Set-up 4 menu, is used by Canon to display the logos of some of the certification organizations that have approved the 70D’s specifications. You’ll find others on the bottom of the camera itself. As a camera user, you don’t really care about certifications, but Canon added this entry as a way of updating any new credentials through a firmware update, thus avoiding the need to change the labels/engravings on the camera body itself. So now you know.
Custom Shooting Mode (C Mode)
Options: Register settings in Mode Dial C position
This entry allows you to register your EOS 70D’s current camera shooting settings and file them away in the C position on the Mode Dial. Doing this overwrites any settings previously stored at the Camera user position. You can also clear the settings for the C “slot,” returning them to their factory default values.
Table 4.1 shows the settings you can store:
Table 4.1 Stored Camera User Settings


Register your favorite settings for use in a particular situation. Keep in mind that individualized My Menu settings are not stored in the C user slot. You can have only one roster of My Menu entries available for all of the Mode Dial’s positions, including C.
This menu choice has only two options: Register (which stores your current settings in the C slot) and Clear settings (which erases the settings). Note that you must use this menu entry to clear your settings; when using C mode, the Clear All Camera Settings option in the Set-up 4 menu is disabled. The Clear all Custom Func. (C.Fn) option in the Custom Functions menu is disabled as well.
To perform either of these tasks, just follow these steps:
1. Make your settings. Set the EOS 70D to an exposure mode other than Scene Intelligent Auto.
2. Access camera user settings. Navigate to the Custom Shooting Mode (C mode) option in the Set-up 4 menu, and press SET.
3. Choose function. Rotate the Quick Control Dial to choose Register if you want to store your 70D’s current settings in C; or select Clear Settings if you want to erase the settings. Press SET to access the settings screen for your choice.
4. Store/Clear settings. The individual screens for storing/clearing are virtually identical. Use the QCD to highlight Mode Dial: C, and press SET to store or clear the settings for that position. (You’ll be given a choice to proceed or cancel first.)
5. Auto update. Keep in mind that if you change a setting while using the custom shooting mode and want to retain the new settings, your stored settings can be automatically updated to reflect the modifications. Select Auto Update Set. and choose Enable to activate this option. If you’d rather retain your custom settings until you manually decide to update, select Disable instead.
6. Exit. When you confirm, you’ll be returned to the Set-up 4 menu. Press the MENU button or tap the shutter release button to exit the menu system entirely.
Clear All Camera Settings
Options: Clear settings
This menu choice resets all the settings to their default values. Regardless of how you’ve set up your EOS 70D, it will be adjusted for One-Shot AF mode, Automatic AF point selection, Evaluative metering, JPEG Fine Large image quality, automatic ISO, sRGB color mode, automatic white balance, and Standard Picture Style. Any changes you’ve made to exposure compensation, flash exposure compensation, and white balance will be canceled, and any bracketing for exposure or white balance nullified. Custom white balances and Dust Delete Data will be erased. Remember, Custom Functions and Camera User Settings will not be cleared. If you want to cancel those, as well, you’ll need to use the Camera User Setting option (described previously) and the Custom Functions clearing option.
Copyright Information
Options: Display Copyright Info, Enter Author’s Name, Enter Copyright Details, Delete Copyright Information
This setting allows you to enter copyright information that will be embedded in the image file with the other Exif (Exchangeable Image Format) information. It has four choices:
![]() Display Copyright Info. Shows the current author and copyright data.
Display Copyright Info. Shows the current author and copyright data.
![]() Enter Author’s Name. Produces a text entry screen like the one shown in Figure 4.10.
Enter Author’s Name. Produces a text entry screen like the one shown in Figure 4.10.
Figure 4.10 Text entry screen.
![]() Enter Copyright Details. Produces the same text entry screen, allowing you to enter copyright details. Oddly enough, no copyright symbol is available (although the @ sign is provided so you can type in your e-mail address!). Many just use the parentheses and a lowercase c: (c). However, you should know that this is, strictly speaking, not legal. The legit substitute for the actual copyright symbol are the characters Copr. or the full term Copyright.
Enter Copyright Details. Produces the same text entry screen, allowing you to enter copyright details. Oddly enough, no copyright symbol is available (although the @ sign is provided so you can type in your e-mail address!). Many just use the parentheses and a lowercase c: (c). However, you should know that this is, strictly speaking, not legal. The legit substitute for the actual copyright symbol are the characters Copr. or the full term Copyright.
![]() Delete Copyright Information. Removes the current copyright information (both author and copyright data). Once you delete the data, or if you haven’t entered it yet, this option and the Display Copyright Info. option are grayed out and unavailable.
Delete Copyright Information. Removes the current copyright information (both author and copyright data). Once you delete the data, or if you haven’t entered it yet, this option and the Display Copyright Info. option are grayed out and unavailable.
Firmware Version
Options: View Version, Update Firmware
You can see the current firmware release in use in the menu listing. If you want to update to a new firmware version, insert a memory card containing the binary file, and press the SET button to begin the process.
Custom Functions Menu
Custom Functions let you customize the behavior of your camera using three function groups: C.Fn I: Exposure, C.Fn II: Autofocus, and C.Fn III: Operation/Others. There is also a Clear All choice in the Custom Functions menu. If you don’t like the default way the camera carries out certain tasks, you just may be able to do something about it. The Roman numeral divisions within a single screen with a single line of choices seem odd until you realize that some other more upscale Canon EOS models separate each of these groups into separate screens (with larger numbers of options). For example, my 5D Mark III has four separate C.Fn menus with a total of 14 different adjustable functions.
Each of the Custom Functions is set in exactly the same way, so I’m not going to bog you down with a bunch of illustrations showing how to make this setting or that. One quick run-through using Figure 4.11 should be enough. Here are the key parts of the Custom Functions screen:
![]() Custom Function category. At the top of the settings screen is a label, such as C. Fn I: Exposure, that tells you which category that screen represents.
Custom Function category. At the top of the settings screen is a label, such as C. Fn I: Exposure, that tells you which category that screen represents.
![]() Name of currently selected Custom Function. The current function appears in the second line of the screen. Use the touch screen (tap the left or right triangle icons on either side of the top two lines of the screen) or use the left/right multi-controller buttons to select the function you want to adjust.
Name of currently selected Custom Function. The current function appears in the second line of the screen. Use the touch screen (tap the left or right triangle icons on either side of the top two lines of the screen) or use the left/right multi-controller buttons to select the function you want to adjust.
Figure 4.11 Each C.Fn screen has two to four settings, represented by the second row of numbers at the bottom of the screen. The currently selected function in the first row of numbers at the bottom of the screen has an orange line above it.
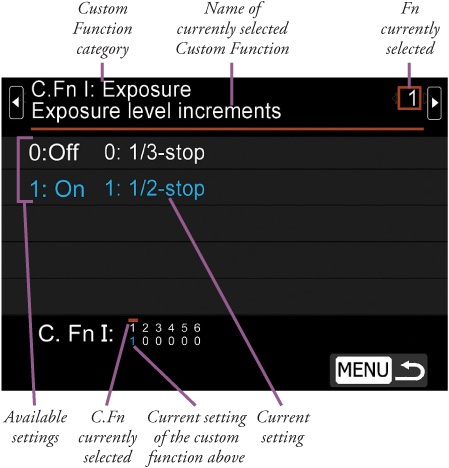
![]() Function currently selected. The function number appears in two places. In the upper-right corner you’ll find a box with the current function clearly designated. In the lower half of the screen are two lines of numbers. The first row, C.Fn currently selected, has a series of numbers representing the Custom Functions available in that category. For example, in the C.Fn I: Exposure category there will be six numbers (from 1 to 6). The second row shows the value of the current setting (such as option 1, option 2, or option 3) of the custom function in the row above. If the setting is other than the default value (a zero), it will be colored blue. The currently selected function will have an orange line above it.
Function currently selected. The function number appears in two places. In the upper-right corner you’ll find a box with the current function clearly designated. In the lower half of the screen are two lines of numbers. The first row, C.Fn currently selected, has a series of numbers representing the Custom Functions available in that category. For example, in the C.Fn I: Exposure category there will be six numbers (from 1 to 6). The second row shows the value of the current setting (such as option 1, option 2, or option 3) of the custom function in the row above. If the setting is other than the default value (a zero), it will be colored blue. The currently selected function will have an orange line above it.
![]() Available settings. Within the alternating medium gray/dark gray blocks appear numbered setting options. The current setting is highlighted in blue. You can use the up/down multi-controller pad to scroll to the option you want and then choose SET to select it; then press MENU to back out of the Custom Functions menus.
Available settings. Within the alternating medium gray/dark gray blocks appear numbered setting options. The current setting is highlighted in blue. You can use the up/down multi-controller pad to scroll to the option you want and then choose SET to select it; then press MENU to back out of the Custom Functions menus.
![]() Current setting. Underneath each Custom Function is a number from 0 to 4 that represents the current setting for that function.
Current setting. Underneath each Custom Function is a number from 0 to 4 that represents the current setting for that function.
![]() Fn Currently Selected. When a function is selected, the currently selected option appears in a highlighted box in the upper-right corner of the screen. As you scroll up and down the option list, the setting in the box changes to indicate an alternate value.
Fn Currently Selected. When a function is selected, the currently selected option appears in a highlighted box in the upper-right corner of the screen. As you scroll up and down the option list, the setting in the box changes to indicate an alternate value.
C.Fn I-01: Exposure Level Increments
Options: 0: 1/3 stop, 1: 1/2 stop
This setting tells the 70D the size of the “jumps” it should use when making exposure adjustments—either one-third or one-half stop. The increment you specify here applies to f/stops, shutter speeds, EV changes, and autoexposure bracketing.
![]() 0: 1/3 stop. Choose this setting when you want the finest increments between shutter speeds and/or f/stops. For example, the 70D will use shutter speeds such as 1/60th, 1/80th, 1/100th, and 1/125th second, and f/stops such as f/5.6, f/6.3, f/7.1, and f/8, giving you (and the autoexposure system) maximum control.
0: 1/3 stop. Choose this setting when you want the finest increments between shutter speeds and/or f/stops. For example, the 70D will use shutter speeds such as 1/60th, 1/80th, 1/100th, and 1/125th second, and f/stops such as f/5.6, f/6.3, f/7.1, and f/8, giving you (and the autoexposure system) maximum control.
![]() 1: 1/2 stop. Use this setting when you want larger and more noticeable changes between increments, as when you’re shooting HDR images. The 70D will apply shutter speeds such as 1/60th, 1/125th, 1/250th, and 1/500th second, and f/stops including f/5.6, f/6.7, f/8, f/9.5, and f/11. These coarser adjustments are useful when you want more dramatic changes between different exposures.
1: 1/2 stop. Use this setting when you want larger and more noticeable changes between increments, as when you’re shooting HDR images. The 70D will apply shutter speeds such as 1/60th, 1/125th, 1/250th, and 1/500th second, and f/stops including f/5.6, f/6.7, f/8, f/9.5, and f/11. These coarser adjustments are useful when you want more dramatic changes between different exposures.
C.Fn I-02: ISO Speed Setting Increments
Options: 0: 1/3 stop, 1: 1 stop
This setting determines the size of the “jumps” made when adjusting ISO—either one-third or one full stop. The larger increment can help you leap from one ISO setting to one that’s twice (or half) as sensitive with one click.
![]() 0: 1/3 stop. Choose this setting when you want the finest increments between shutter speeds and/or f/stops. For example, the 70D will use typical ISO values such as 100, 125, 160, 200, and so forth.
0: 1/3 stop. Choose this setting when you want the finest increments between shutter speeds and/or f/stops. For example, the 70D will use typical ISO values such as 100, 125, 160, 200, and so forth.
![]() 1: 1 stop. Use this setting when you want larger and more noticeable changes between increments. The 70D will apply speeds such as 100, 200, 400, 800, and so forth. These coarser adjustments are useful when you want more dramatic changes between different exposures.
1: 1 stop. Use this setting when you want larger and more noticeable changes between increments. The 70D will apply speeds such as 100, 200, 400, 800, and so forth. These coarser adjustments are useful when you want more dramatic changes between different exposures.
C.Fn I-03: Bracketing Auto Cancel
Options: 0: On, 1: Off
Here you can specify whether you want automatic bracketing to continue until you deactivate it, or you want it to be cancelled when the camera is switched off or perform any of several other functions.
![]() 0: On. When Auto Cancel is activated (the default), AEB (Auto Exposure Bracketing) and WB-BKT (White Balance Bracketing) are cancelled when you turn the 70D off, change lenses, use the flash, or change memory cards; when Auto Cancel is deactivated, bracketing remains in effect until you manually turn it off or use the flash.
0: On. When Auto Cancel is activated (the default), AEB (Auto Exposure Bracketing) and WB-BKT (White Balance Bracketing) are cancelled when you turn the 70D off, change lenses, use the flash, or change memory cards; when Auto Cancel is deactivated, bracketing remains in effect until you manually turn it off or use the flash.
![]() 1: Off. When Auto Cancel is switched off, the AEB and WB-BKT settings will be kept even when the power switch is turned to the OFF position. The flash still cancels autoexposure bracketing, but your settings are retained.
1: Off. When Auto Cancel is switched off, the AEB and WB-BKT settings will be kept even when the power switch is turned to the OFF position. The flash still cancels autoexposure bracketing, but your settings are retained.
C.Fn I-04: Bracketing Sequence
Options: 0: 0-+; 1: -0+, 2: +0-
You can define the sequence in which AEB and WB-BKT series are exposed. For exposure bracketing, you can determine whether the order is metered exposure, decreased exposure, increased exposure or decreased exposure, metered exposure, increased exposure. Or with white balance bracketing, if your bias preference is set to Blue/Amber in the White Balance Shift/Bracketing adjustments in the Shooting 3 menu, the white balance sequence when option 0 is selected will be current WB, more blue, more amber. If your bias preference is set to Magenta/Green, then the sequence for option 0 will be current WB, more magenta, more green.
![]() 0: 0 - +. Exposure sequence is metered exposure, decreased exposure, increased exposure (0, -, +). White balance sequence is current WB, more blue/more magenta (depending on how your bias is set), more amber/more green (ditto).
0: 0 - +. Exposure sequence is metered exposure, decreased exposure, increased exposure (0, -, +). White balance sequence is current WB, more blue/more magenta (depending on how your bias is set), more amber/more green (ditto).
![]() 1: - 0 +. The sequence is decreased exposure, metered exposure, increased exposure (-, 0, +). White balance sequence is more blue/more magenta, current WB, more amber/more green.
1: - 0 +. The sequence is decreased exposure, metered exposure, increased exposure (-, 0, +). White balance sequence is more blue/more magenta, current WB, more amber/more green.
![]() 2: + 0 -. The sequence is increased exposure, metered exposure, decreased exposure (-, 0, +). White balance sequence is more amber/more green, current WB, more blue/more magenta.
2: + 0 -. The sequence is increased exposure, metered exposure, decreased exposure (-, 0, +). White balance sequence is more amber/more green, current WB, more blue/more magenta.
C.Fn I-05: Number of Bracketed Shots
Options: 0: 3 shots, 1: 2 shots, 2: 5 shots, 3: 7 shots
Choose how many shots will be exposed in a bracket sequence.
![]() 0: 3 shots. With this default value, three shots will be exposed in the sequence. This is the best general-purpose setting, and often used when one-third, two-thirds, or one full stop bracketing is specified in the Expo. Comp./AEB entry in the Shooting 3 menu.
0: 3 shots. With this default value, three shots will be exposed in the sequence. This is the best general-purpose setting, and often used when one-third, two-thirds, or one full stop bracketing is specified in the Expo. Comp./AEB entry in the Shooting 3 menu.
![]() 1: 2 shots. If you feel you need just one alternate exposure, two shots might be enough. I use this setting when I’m confident that the metered exposure will be fine, but I’d like one extra shot that’s slightly underex-posed or slightly overexposed by, say, one-third to two-thirds stops.
1: 2 shots. If you feel you need just one alternate exposure, two shots might be enough. I use this setting when I’m confident that the metered exposure will be fine, but I’d like one extra shot that’s slightly underex-posed or slightly overexposed by, say, one-third to two-thirds stops.
![]() 2: 5 shots. Five or more shots in a bracketed set are most useful when you’re venturing into HDR territory and need a broad range of exposures to merge. The 70D’s bracketing flexibility means that you can expose the bracketed set of five over a narrow range of 1 2/3 stops (using a 1/3 stop increment) or as wide as 6 stops (with a 3 stop increment between exposures). Some scenes suitable for HDR manipulation can benefit from such a broad range of exposures.
2: 5 shots. Five or more shots in a bracketed set are most useful when you’re venturing into HDR territory and need a broad range of exposures to merge. The 70D’s bracketing flexibility means that you can expose the bracketed set of five over a narrow range of 1 2/3 stops (using a 1/3 stop increment) or as wide as 6 stops (with a 3 stop increment between exposures). Some scenes suitable for HDR manipulation can benefit from such a broad range of exposures.
![]() 3: 7 shots. Although a seven-shot bracketed sequence will slow down your 70D if you’re shooting continuously (and fill up your memory card quickly), this option allows extremely fine-tuning of exposure, or, when capturing images for HDR processing, covering a very broad range of exposure variations.
3: 7 shots. Although a seven-shot bracketed sequence will slow down your 70D if you’re shooting continuously (and fill up your memory card quickly), this option allows extremely fine-tuning of exposure, or, when capturing images for HDR processing, covering a very broad range of exposure variations.
C.Fn I-06: Safety Shift
Options: 0: Disable, 1: Shutter speed/Aperture, 2: ISO speed
Ordinarily, both Aperture-priority and Shutter-priority modes work fine, because you’ll select an f/stop or shutter speed that allows the 70D to produce a correct exposure using the other type of setting (shutter speed for Av; aperture for Tv). However, when lighting conditions change, it may not be possible to select an appropriate setting with the available exposure options, and the camera will be unable to take a picture at all.
Safety Shift will make adjustments if your scene suddenly becomes too bright; although, in practice, you’ll find that the override will be needed most often when using Tv mode. It’s easier to “run out of” f/stops, which generally range no smaller than f/22 or f/32, than to deplete the available supply of shutter speeds, which can be as brief as 1/8,000th second.
![]() 0: Disable. Turn off Safety Shift. Your specified shutter speed or f/stop remains locked in, even if conditions are too bright or too dim for an appropriate exposure. Use this option if you’d prefer to have the shot taken at the shutter speed, aperture, or ISO you’ve selected under all circumstances, even if it means an improperly exposed photo. You might be able to salvage the photo in your image editor.
0: Disable. Turn off Safety Shift. Your specified shutter speed or f/stop remains locked in, even if conditions are too bright or too dim for an appropriate exposure. Use this option if you’d prefer to have the shot taken at the shutter speed, aperture, or ISO you’ve selected under all circumstances, even if it means an improperly exposed photo. You might be able to salvage the photo in your image editor.
![]() 1: Shutter speed/Aperture. Safety Shift is activated for Tv and Av modes. The 70D will adjust the preferred shutter speed or f/stop to allow a correct exposure. If you don’t mind having your camera countermand your orders, this option can save images that otherwise might be incorrectly exposed. Use when working with a shutter speed or aperture that are preferable, but aren’t critical.
1: Shutter speed/Aperture. Safety Shift is activated for Tv and Av modes. The 70D will adjust the preferred shutter speed or f/stop to allow a correct exposure. If you don’t mind having your camera countermand your orders, this option can save images that otherwise might be incorrectly exposed. Use when working with a shutter speed or aperture that are preferable, but aren’t critical.
![]() 2: ISO speed. This option operates in Program AE (P) mode as well as Tv and Av modes. Think of it as an “emergency” Auto ISO option. You can manually select your preferred ISO setting, and the 70D will generally stick with that, but can adjust the ISO setting if required to produce an acceptable exposure. If you’ve selected a minimum and maximum allowable ISO range in the ISO Speed Settings entry of the Shooting 3 menu, this setting will honor those limits unless your current manually selected ISO is outside those boundaries.
2: ISO speed. This option operates in Program AE (P) mode as well as Tv and Av modes. Think of it as an “emergency” Auto ISO option. You can manually select your preferred ISO setting, and the 70D will generally stick with that, but can adjust the ISO setting if required to produce an acceptable exposure. If you’ve selected a minimum and maximum allowable ISO range in the ISO Speed Settings entry of the Shooting 3 menu, this setting will honor those limits unless your current manually selected ISO is outside those boundaries.
For example, if you’ve chosen a minimum and maximum auto ISO range of ISO 200-800, this setting will stay within that range when adjusting ISO (even though you have Auto ISO off), but if your camera is currently manually set to ISO 100 or a value higher than ISO 800, it will go ahead and use the extra values, too.
C.Fn II-01: Tracking Sensitivity
Options: –2 to +2
The Autofocus Custom Functions are used to set important AF parameters, including those that cover speed of operation, focus or release priority during continuous shooting, and fine-tuning the focus characteristics of individual lenses. This first entry determines how quickly the AF system switches to a new subject entering the focus area when using AI Servo autofocus. Unlike the other Custom Functions described to this point, the Tracking Sensitivity parameter uses a sliding scale with five positions, from −2 (Locked On) to +2 (Responsive). Negative numbers allow you to retain focus on the original subject even if it briefly leaves the area covered by the focus points, making tracking easier. The drawback is that if the camera selects the wrong subject, there is a longer delay before the correct subject is captured. Positive numbers cause the AF system to more quickly switch to a new subject. However, such quick response can cause the camera to focus on the wrong subject. You should use each setting extensively to get a feeling for how it operates before making any changes. Each of these settings will show a hyphen mark when unset or a blue asterisk when the slider has been moved.
![]() 0: Versatile multi purpose setting. Use this default setting most of the time, as it works well with many moving subjects (and moving subject matter is why you selected AI Servo AF, isn’t it?). Use with any type of action that isn’t one of the special cases described next. It’s good for some motor sports, many track meet events, and action that’s moving toward or away from the camera.
0: Versatile multi purpose setting. Use this default setting most of the time, as it works well with many moving subjects (and moving subject matter is why you selected AI Servo AF, isn’t it?). Use with any type of action that isn’t one of the special cases described next. It’s good for some motor sports, many track meet events, and action that’s moving toward or away from the camera.
![]() –1: For subjects that accelerate or decelerate quickly. This setting is better for basketball and soccer, because you can have players racing toward you one instant, and crossing your field of view the next.
–1: For subjects that accelerate or decelerate quickly. This setting is better for basketball and soccer, because you can have players racing toward you one instant, and crossing your field of view the next.
![]() –2: Continue to track subject, ignoring possible obstacles. This setting could be your mainstay for football games, because you can track a running back, receiver, or another player of interest without having focus disrupted when a referee, coach, or another player passes between you. The camera will delay refocusing on the new object long enough to resume following the original subject.
–2: Continue to track subject, ignoring possible obstacles. This setting could be your mainstay for football games, because you can track a running back, receiver, or another player of interest without having focus disrupted when a referee, coach, or another player passes between you. The camera will delay refocusing on the new object long enough to resume following the original subject.
![]() +1: For erratic subjects moving quickly in any direction. This is my choice for hockey games and anything that involves skates—as well as small children and pets. It’s also excellent for that most difficult of subjects: birds in flight (often abbreviated to just BIF because photographers talk about the challenges of photographing pesky avians so frequently).
+1: For erratic subjects moving quickly in any direction. This is my choice for hockey games and anything that involves skates—as well as small children and pets. It’s also excellent for that most difficult of subjects: birds in flight (often abbreviated to just BIF because photographers talk about the challenges of photographing pesky avians so frequently).
![]() +2: Instantly focus on subjects suddenly entering the AF point areas. This setting is ideal when you’re photographing a relatively static scene in anticipation of a moving subject, such as a runner, skier, or bicyclist entering the frame. You could, for example, frame the finish line of a horse race, and the 70D would instantly lock focus on the winning steed as it crosses the line (or perhaps several horses if one wins “by a nose”). It’s also excellent for subjects that change speed and move erratically. I use this on children and small pets.
+2: Instantly focus on subjects suddenly entering the AF point areas. This setting is ideal when you’re photographing a relatively static scene in anticipation of a moving subject, such as a runner, skier, or bicyclist entering the frame. You could, for example, frame the finish line of a horse race, and the 70D would instantly lock focus on the winning steed as it crosses the line (or perhaps several horses if one wins “by a nose”). It’s also excellent for subjects that change speed and move erratically. I use this on children and small pets.
C.Fn II-02: Accel/Decel Tracking
Options: 0 to +2
This parameter determines how the AF system responds to sudden acceleration, deceleration, or stopping. Your choices are 0 (for subjects that move at a constant speed) to 2 (for faster reactions to subjects that suddenly change speed). Lower values can cause the camera to be “fooled” if a subject that was moving consistently suddenly stops; focus may change to the position where the subject would have been if it’d kept moving. A higher value may cause inconsistent focus with subjects that move at a constant speed. Each of these settings will show a hyphen mark when unset or a blue asterisk when the slider has been moved.
![]() 0. Use this setting for subjects that move at a constant speed, without sudden acceleration, deceleration, or unexpected stops, such as relay racers at a track meet.
0. Use this setting for subjects that move at a constant speed, without sudden acceleration, deceleration, or unexpected stops, such as relay racers at a track meet.
![]() 1. This setting is better for basketball and other sports where the pace remains fairly constant, but players do slow down or stop when they reach their destination on the field or court.
1. This setting is better for basketball and other sports where the pace remains fairly constant, but players do slow down or stop when they reach their destination on the field or court.
![]() 2. Very erratic movements can be tracked effectively with this setting. I use it for small children in conjunction with a +2 tracking sensitivity.
2. Very erratic movements can be tracked effectively with this setting. I use it for small children in conjunction with a +2 tracking sensitivity.
C.Fn II-03: AI Servo 1st Image Priority
Options: Release priority, Equal priority, Focus priority
This setting determines the point at which the 70D locks in focus when you push the shutter button all the way down when taking a series of photographs. Remember that if you’re using a small f/stop with extended depth-of-field, your chances of getting a shot with acceptable depth-of-field are improved at any of these settings. Use the Quick Control Dial to move the indicator to any of three positions. Each of these settings will show a hyphen mark when unset or a blue asterisk when the slider has been moved.
![]() Release priority. The shutter will fire immediately, even if sharp focus has not yet been achieved. Use this setting when getting the shot—any shot—is crucial, and a slightly out-of-focus image would be preferable to none at all. Whether you’re a photojournalist or a proud parent snapping Baby’s first steps, you’d probably prefer not to miss the shot because the camera is still fine-tuning focus. The 70D focuses so quickly that, unless your subject is low in contrast or otherwise problematic, release priority will probably give you a good shot nearly all the time. Remember that if you’re using a small f/stop with extended depth-of-field, your chances of getting a shot with acceptable depth-of-field are improved even though you’re using release priority.
Release priority. The shutter will fire immediately, even if sharp focus has not yet been achieved. Use this setting when getting the shot—any shot—is crucial, and a slightly out-of-focus image would be preferable to none at all. Whether you’re a photojournalist or a proud parent snapping Baby’s first steps, you’d probably prefer not to miss the shot because the camera is still fine-tuning focus. The 70D focuses so quickly that, unless your subject is low in contrast or otherwise problematic, release priority will probably give you a good shot nearly all the time. Remember that if you’re using a small f/stop with extended depth-of-field, your chances of getting a shot with acceptable depth-of-field are improved even though you’re using release priority.
![]() Equal priority. If focus is important to you, try out this balanced setting that will give the camera a little extra time—but not too much—and improve your chances of getting a precisely focused image without inordinate delay.
Equal priority. If focus is important to you, try out this balanced setting that will give the camera a little extra time—but not too much—and improve your chances of getting a precisely focused image without inordinate delay.
![]() Focus priority. Sometimes, accurate focus is all-important, and with a leisurely shooting pace you might not mind waiting an extra fraction of a second while the AF system “hunts” to achieve precise autofocus when faced with the occasional more difficult subject. I tend to use this setting for everything except action shots and birds-in-flight, because my speedy 70D usually doesn’t introduce much of a delay as it autofocuses.
Focus priority. Sometimes, accurate focus is all-important, and with a leisurely shooting pace you might not mind waiting an extra fraction of a second while the AF system “hunts” to achieve precise autofocus when faced with the occasional more difficult subject. I tend to use this setting for everything except action shots and birds-in-flight, because my speedy 70D usually doesn’t introduce much of a delay as it autofocuses.
C.Fn II-04: AI Servo 2nd Image Priority
Options: Shooting speed priority, Equal priority, Focus priority
Most of us have an itchy trigger finger, so the first photograph in a series may not capture the decisive moment. When shooting bursts, the 70D can continue to fine-tune focus for the second and subsequent images in the series, using the priority you set here. The parameters are similar to those of the previous setting. Each of these settings will show a hyphen mark when unset or a blue asterisk when the slider has been moved.
![]() Shooting speed priority. Since this is the second (or ongoing) shot, the shutter has already fired at least once, so this setting tells the camera to keep the same focus setting and continue capturing images. Note that you can select this option regardless of what parameter you’ve specified for the first shot. So, if you’ve chosen focus priority for the initial image, selecting this setting is a safe bet if your subject is not moving quickly enough to require additional focus fine-tuning. But if you selected release priority for the first image, using this setting may mean that the first and all subsequent images may be a little (or a lot) out of focus.
Shooting speed priority. Since this is the second (or ongoing) shot, the shutter has already fired at least once, so this setting tells the camera to keep the same focus setting and continue capturing images. Note that you can select this option regardless of what parameter you’ve specified for the first shot. So, if you’ve chosen focus priority for the initial image, selecting this setting is a safe bet if your subject is not moving quickly enough to require additional focus fine-tuning. But if you selected release priority for the first image, using this setting may mean that the first and all subsequent images may be a little (or a lot) out of focus.
![]() Equal priority. This balanced setting allows you to express your trust that the 70D will provide a reasonable compromise between speed and focus for all images captured after the first.
Equal priority. This balanced setting allows you to express your trust that the 70D will provide a reasonable compromise between speed and focus for all images captured after the first.
![]() Focus priority. Selecting this option can slow down the continuous shooting speed of your camera, but will almost ensure getting a series of shots that are in optimum focus.
Focus priority. Selecting this option can slow down the continuous shooting speed of your camera, but will almost ensure getting a series of shots that are in optimum focus.
C.Fn II-05: AF-Assist Beam Firing
Options: 0: Enable, 1: Disable, 2: Enable external flash only, 3: IR AF Assist beam only
This setting determines when bursts from an electronic flash are used to emit a pulse of light that helps provide enough contrast for the EOS 70D to focus on a subject. You can select Enable to use an attached Canon Speedlite to produce a focus assist beam. Use Disable to turn this feature off if you find it distracting. Keep in mind that if you select Enable and the Speedlite’s own AF-Assist Beam Firing is set to Disable, the AF-assist beam will not be emitted (the flash’s setting takes precedence).
![]() 0: Enable. The AF-assist light is emitted by the camera’s external flash whenever light levels are too low for accurate focusing using the ambient light.
0: Enable. The AF-assist light is emitted by the camera’s external flash whenever light levels are too low for accurate focusing using the ambient light.
![]() 1: Disable. The AF-assist illumination is disabled. You might want to use this setting when shooting at concerts, weddings, or darkened locations where the light might prove distracting or discourteous.
1: Disable. The AF-assist illumination is disabled. You might want to use this setting when shooting at concerts, weddings, or darkened locations where the light might prove distracting or discourteous.
![]() 2: Enable external flash only. The assist beam of the external flash is used exclusively.
2: Enable external flash only. The assist beam of the external flash is used exclusively.
![]() 3: IR AF Assist beam only. Some Canon flash units, such as the Speedlite 600EX-RT, have a near-infrared pattern assist beam. Select this option to disable visible light flashes and activate only the less-obtrusive IR beam.
3: IR AF Assist beam only. Some Canon flash units, such as the Speedlite 600EX-RT, have a near-infrared pattern assist beam. Select this option to disable visible light flashes and activate only the less-obtrusive IR beam.
C.Fn II-06: Lens Drive When AF Impossible
Options: 0: Continue Focus Search, 1: Stop Focus Search
When a scene has little inherent contrast (say, a blank wall or the sky) or if there isn’t enough illumination to allow determining contrast accurately (in low light levels, or with lenses having maximum apertures of less than f/5.6), a lens may be unable to achieve autofocus. Very long telephoto lenses suffer from this syndrome because their depth-of-field is so shallow that the correct point of focus may zip past during the AF process before the AF system has a chance to register it.
Use this setting to tell the 70D either to keep trying to focus if AF seems to be impossible or to stop seeking focus. Your choices are as follows:
![]() 0: Continue Focus Search. The 70D will keep trying to focus, even if the effort causes the lens to become grossly out of focus. Use this default setting if you’d prefer that the lens keep trying. Sometimes you can point the lens at an object with sufficient contrast at approximately the same distance to let the AF system lock on, then reframe your original subject with the hope that accurate focus will now be achieved.
0: Continue Focus Search. The 70D will keep trying to focus, even if the effort causes the lens to become grossly out of focus. Use this default setting if you’d prefer that the lens keep trying. Sometimes you can point the lens at an object with sufficient contrast at approximately the same distance to let the AF system lock on, then reframe your original subject with the hope that accurate focus will now be achieved.
![]() 1: Stop Focus Search. When this option is selected, the camera will stop trying to focus uselessly, allowing you to attempt to manually bring the subject into focus. This setting is best for very long telephoto lenses (around 400mm and up), because they encounter AF difficulties more than most lenses, and are less likely to benefit from extended “hunting.”
1: Stop Focus Search. When this option is selected, the camera will stop trying to focus uselessly, allowing you to attempt to manually bring the subject into focus. This setting is best for very long telephoto lenses (around 400mm and up), because they encounter AF difficulties more than most lenses, and are less likely to benefit from extended “hunting.”
C.Fn II-07: Select AF Area Selection Mode
Options: Manual Selection: 1 pt AF, Manual Selection: Zone AF, Auto Selection: 19 pt AF
Specify which of the AF area selection modes you want to be available. You can place a check mark next to one, two, or all three of the modes.
![]() Manual selection: 1 pt AF. You can manually select a single AF point. Note that this option is mandatory and cannot be unchecked.
Manual selection: 1 pt AF. You can manually select a single AF point. Note that this option is mandatory and cannot be unchecked.
![]() Manual select.: Zone AF. You can select one of five zones for focusing.
Manual select.: Zone AF. You can select one of five zones for focusing.
![]() Auto selection: 19 pt AF. The 70D selects focus points from the full 19 AF points available.
Auto selection: 19 pt AF. The 70D selects focus points from the full 19 AF points available.
C.Fn II-08: AF Area Selection Method
Options: 0: AF Area Selection button→AF Area Selection Mode button, 1: AF Area Selection button→Main Dial
This setting allows you to choose the control used for changing the AF Area Selection method.
![]() 0: AF Area Selection button→AF Area Selection Mode button. Press the AF Area Selection button (at the upper-right corner of the back panel of the camera) or the AF Area Selection Mode button (located just northwest of the Main Dial). Subsequently, pressing the AF Area Selection Mode button changes the AF area selection mode.
0: AF Area Selection button→AF Area Selection Mode button. Press the AF Area Selection button (at the upper-right corner of the back panel of the camera) or the AF Area Selection Mode button (located just northwest of the Main Dial). Subsequently, pressing the AF Area Selection Mode button changes the AF area selection mode.
![]() 1: AF Area Selection button→Main Dial. Press the AF Area Selection button (at the upper-right corner of the back panel of the camera) or the AF Area Selection Mode button (located just northwest of the Main Dial). Subsequently, rotating the Main Dial changes the AF area selection mode. When the Main Dial’s behavior is defined this way, use the multi-controller pad to adjust the AF point horizontally.
1: AF Area Selection button→Main Dial. Press the AF Area Selection button (at the upper-right corner of the back panel of the camera) or the AF Area Selection Mode button (located just northwest of the Main Dial). Subsequently, rotating the Main Dial changes the AF area selection mode. When the Main Dial’s behavior is defined this way, use the multi-controller pad to adjust the AF point horizontally.
C.Fn II-09: Orientation Linked AF Point
Options: 0: Same for both vertical and horizontal, 1: Select separate AF points
One outstanding new feature of the EOS 70D is the ability to specify different AF area selection modes for horizontal and vertically oriented scenes. This ability is useful because the kinds of things we shoot in each orientation tend to be different. In horizontal mode, we may be shooting landscapes and other scenes where the emphasis is on the middle or lower half of the frame. With the camera rotated to vertical orientation (in my case for, say, basketball games, portraits, or fashion photography), we may prefer to concentrate focus on a different zone, such as the upper half of the frame. Custom Function C.Fn II-09 allows you to do that. You can elect to use the same manually selected AF point/zone for vertically and horizontally composed shots—or to select a different point/zone for vertical and horizontal shots.
![]() 0: Same for both vertic./horiz. The manually selected AF point that you specify is used for any camera orientation.
0: Same for both vertic./horiz. The manually selected AF point that you specify is used for any camera orientation.
![]() 1: Select separate AF points. The focus point you select will be memorized for each of three camera orientations: horizontal, vertical with the camera grip upward, and vertical with the camera grip pointing downward. The 70D will switch to that selected point whenever you rotate the camera to one of those positions, until you manually select a different focus point when using a particular orientation. For example, you might want a focus point in the upper third of the frame when shooting a portrait, but prefer a more centrally located focus point when capturing close-up images of flowers.
1: Select separate AF points. The focus point you select will be memorized for each of three camera orientations: horizontal, vertical with the camera grip upward, and vertical with the camera grip pointing downward. The 70D will switch to that selected point whenever you rotate the camera to one of those positions, until you manually select a different focus point when using a particular orientation. For example, you might want a focus point in the upper third of the frame when shooting a portrait, but prefer a more centrally located focus point when capturing close-up images of flowers.
C.Fn II-10: Manual AF Point Selection Pattern
Options: 0: Stops at AF area edges, 1: Continuous
Used in Single Point AF (Manual Selection) and 19-point Automatic Selection with AI Servo AF. As you move the selected AF point manually, you can specify that the selection either stops at the outer edge of the frame or wraps around to the opposite AF point.
![]() 0: Stops at AF area edges. Use this if you frequently set the AF point at an edge of the frame and you don’t want the selection to “jump” to the opposite side if you move it too far.
0: Stops at AF area edges. Use this if you frequently set the AF point at an edge of the frame and you don’t want the selection to “jump” to the opposite side if you move it too far.
![]() 1: Continuous. Use this if you simply want to speed up AF point selection movement.
1: Continuous. Use this if you simply want to speed up AF point selection movement.
C.Fn II-11: AF Point Display During Focus
Options: 0: Selected (constant), 1: All (constant), 2: Selected (pre-AF, focused), 3: Selected (focused), 4: Disable display
This setting simply allows you to specify whether you want the selected AF point to be highlighted in red.
![]() 0: Selected (constant). The AF point selected by you or the camera is always displayed. You’ll use this default setting most of the time, because it’s useful to be able to see exactly which part of the frame is being used to calculate focus.
0: Selected (constant). The AF point selected by you or the camera is always displayed. You’ll use this default setting most of the time, because it’s useful to be able to see exactly which part of the frame is being used to calculate focus.
![]() 1: All (constant). All 19 AF points are displayed, all the time.
1: All (constant). All 19 AF points are displayed, all the time.
![]() 2: Selected (pre-AF, focused). Selected AF points are displayed only when selecting AF points, when the camera is ready to shoot before AF operation, and when focus is achieved (except when AI Servo AF is being used).
2: Selected (pre-AF, focused). Selected AF points are displayed only when selecting AF points, when the camera is ready to shoot before AF operation, and when focus is achieved (except when AI Servo AF is being used).
![]() 3: Selected (focused). The selected AF points are displayed only when selecting AF points or when focus is achieved (except when AI Servo AF is being used).
3: Selected (focused). The selected AF points are displayed only when selecting AF points or when focus is achieved (except when AI Servo AF is being used).
![]() 4: Disable display. I often use this setting when the AF point highlighting is distracting, or when I’m photographing a scene with lots of red and the highlighting won’t be readily visible, anyway.
4: Disable display. I often use this setting when the AF point highlighting is distracting, or when I’m photographing a scene with lots of red and the highlighting won’t be readily visible, anyway.
C.Fn II-12: VF Display Illumination
Options: 0: Auto, 1: Enable, 2: Disable
Tells the 70D to highlight the AF points and alignment grid in red in the viewfinder when focus is achieved. With all three options, there is no illumination when AI Servo AF is used. In addition, pressing the AF Area Selection Button or AF Area Selection Mode button illuminates the AF points and grid regardless of which of these options you have chosen.
![]() 0: Auto. AF points and grid are illuminated under low light when focus is achieved.
0: Auto. AF points and grid are illuminated under low light when focus is achieved.
![]() 1: Enable. AF points and grid are illuminated when focus is achieved under all lighting conditions.
1: Enable. AF points and grid are illuminated when focus is achieved under all lighting conditions.
![]() 2: Disable. AF points and grid are not illuminated when focus is achieved.
2: Disable. AF points and grid are not illuminated when focus is achieved.
C.Fn II-13: AF Microadjustment
Options: 0: Disable, 1: All by same amount, 2: Adjust by Lens
This setting makes it possible to fine-tune the focus of individual lenses, or all your lenses. Your options are as follows:
![]() 0: Disable. You can turn off AF microadjustment, effectively canceling any adjustments you’ve made for your lenses.
0: Disable. You can turn off AF microadjustment, effectively canceling any adjustments you’ve made for your lenses.
![]() 1: All by same amount. Set a front/back focus amount from –20 to +20, and it will be applied to all your lenses when AF Microadjustment is enabled.
1: All by same amount. Set a front/back focus amount from –20 to +20, and it will be applied to all your lenses when AF Microadjustment is enabled.
![]() 2: Adjust by Lens. The EOS 70D is able to electronically recognize which Canon EF lens is mounted on the camera, and apply a specific amount of adjustment to each particular lens.
2: Adjust by Lens. The EOS 70D is able to electronically recognize which Canon EF lens is mounted on the camera, and apply a specific amount of adjustment to each particular lens.
C.Fn III-01: Dial Direction During Tv/Av
Options: 0: Normal, 1: Reverse direction
The C.Fn III: Operation/Others category includes the settings that you can use to set other parameters, such as viewfinder warnings. This first setting reverses the result when rotating the Quick Control Dial and Main Dial when using Shutter-priority or Aperture-priority (Tv and Av). That is, rotating the Main Dial to the right will decrease the shutter speed rather than increase it; f/stops will become larger rather than smaller. Use this if you find the default rotation scheme in Tv and Av modes are not to your liking. Activating this option also reverses the dial direction in Manual exposure mode. In other shooting modes, only the Main Dial’s direction will be reversed.
![]() 0: Normal. The Main Dial and Quick Control Dial change shutter speed and aperture normally.
0: Normal. The Main Dial and Quick Control Dial change shutter speed and aperture normally.
![]() 1: Reverse direction. The dials adjust shutter speed and aperture in the reverse direction when rotated.
1: Reverse direction. The dials adjust shutter speed and aperture in the reverse direction when rotated.
C.Fn III-02: Multi Function Lock
Options: Main Dial, Quick Control Dial, Multi-controller
Your 70D includes a Lock switch just south of the Quick Control Dial. Slide it upward when you want to prevent the use of the Quick Control Dial, Main Dial, or multi-controller pad in the center of the QCD from accidentally changing a setting. You can select any or all three of the controls to lock, while freeing the others (or none) to act normally. I use this sometimes when I am using manual exposure, especially when I’m fumbling around in a darkened environment, and don’t want to unintentionally manipulate my settings. The Multi Function Lock screen has one option for each control; highlight the control and press SET to lock or unlock it. A check mark appears next to the control’s name when it’s locked, and an L/Lock indicator appears in the view-finder, top-panel LCD, and shooting settings display. Even if you’ve locked the QCD, its touchpad functions can still be used during movie shooting even if Silent LV Shooting l has been activated in the Movie 1 menu.
![]() Main Dial. Locks the Main Dial only.
Main Dial. Locks the Main Dial only.
![]() Quick Control Dial. Locks the QCD only.
Quick Control Dial. Locks the QCD only.
![]() Multi-controller. Locks the multi-controller pad only.
Multi-controller. Locks the multi-controller pad only.
C.Fn III-03: Warnings in Viewfinder
Options: Monochrome Picture Style, WB Correction, ISO Expansion, Spot metering
This useful function lets you individually enable or disable four different view-finder warnings, allowing you to reduce the amount of clutter in your field of view as you frame an image, while retaining the warnings that you really, really want to remain in effect. Mark any or all with a check mark by highlighting the option and pressing SET. Your choices include warnings for the following:
![]() Monochrome Picture Style. If you shoot JPEG most of the time, you might want a tip-off that you’ve set the camera in black-and-white mode, because color information cannot be added in post-processing. If you generally shoot RAW or RAW+JPEG, you won’t care, because the RAW image retains the color information.
Monochrome Picture Style. If you shoot JPEG most of the time, you might want a tip-off that you’ve set the camera in black-and-white mode, because color information cannot be added in post-processing. If you generally shoot RAW or RAW+JPEG, you won’t care, because the RAW image retains the color information.
![]() WB Correction. It’s easy to dial in some white balance correction, and easier to forget that you’ve done so. This warning will let you know—again, very important when shooting JPEG only.
WB Correction. It’s easy to dial in some white balance correction, and easier to forget that you’ve done so. This warning will let you know—again, very important when shooting JPEG only.
![]() ISO Expansion. The 70D makes you manually enable the highest high and low ISO settings through ISO expansion. While the availability of these extreme settings isn’t normally a problem, if you feel you’re likely to need a tip-off, you can activate this warning.
ISO Expansion. The 70D makes you manually enable the highest high and low ISO settings through ISO expansion. While the availability of these extreme settings isn’t normally a problem, if you feel you’re likely to need a tip-off, you can activate this warning.
![]() Spot metering. Most users rely on the intelligence of Evaluative metering, and use Spot metering only occasionally. Because exposure results can vary so much when Spot metering is in effect, this warning can be helpful.
Spot metering. Most users rely on the intelligence of Evaluative metering, and use Spot metering only occasionally. Because exposure results can vary so much when Spot metering is in effect, this warning can be helpful.
C.Fn III-04: Custom Controls
Options: Assignable controls
If you’re eager to totally confuse any poor soul who is not equipped to deal with a custom-configured 70D (or, perhaps, even yourself), Canon allows you to redefine the behavior of no less than ten different controls in interesting, and potentially hilarious ways. Just highlight any of the nine options, press SET to view the functions you can assign, and make your choice. You can truly manipulate your camera to work in a way that’s fastest and most efficient for you. There are dozens of combinations of control possibilities. Press the Trash button from the Custom Controls screen to return all your settings to the default values shown in Table 4.2.
Clear All Custom Func. (C.Fn)
Select this entry and choose Cancel (if you chicken out) or OK to return all your Custom Functions to their default values. But don’t panic—your matrix of Custom Controls is retained. If you want to zero out those settings, you’ll need to do it within the Custom Controls Custom Function, using the Trash button.
My Menu
The Canon EOS 70D has a great feature that allows you to define your own menu, with just the items listed that you want. Remember that the 70D always returns to the last menu and menu entry accessed when you press the MENU button. So you can set up My Menu to include just the items you want, and jump to those items instantly by pressing the MENU button. To create your own My Menu, you have to register the menu items you want to include.


1. Press the MENU button and use the left/right multi-controller pad to select the My Menu tab. When you first begin, the personalized menu will be empty except for the My Menu Settings entry. Press the SET button to select it. You’ll then see a screen like the one shown in Figure 4.12.
2. Use the up/down multi-controller pad to select Register, then press the SET button.
3. Use the up/down multi-controller pad to scroll down through the continuous list of all menu entries that can be registered to find one you would like to add. Press SET.
4. Confirm your choice by selecting OK in the next screen and pressing SET again.
5. Continue to select up to six menu entries for My Menu.
6. When you’re finished, press the MENU button twice to return to the My Menu screen to see your customized menu, which might look like Figure 4.13.
In addition to registering menu items, you can perform other functions at the My Menu settings screen:
![]() Changing the order. Choose Sort to reorder the items in My Menu. Select the menu item to be moved and press the SET button. Press the up/down multi-controller pad to move the item up and down within the menu list. When you’ve placed it where you’d like it, press the MENU button to lock in your selection and return to the previous screen.
Changing the order. Choose Sort to reorder the items in My Menu. Select the menu item to be moved and press the SET button. Press the up/down multi-controller pad to move the item up and down within the menu list. When you’ve placed it where you’d like it, press the MENU button to lock in your selection and return to the previous screen.
Figure 4.12 In the My Menu settings screen you can add menu items, delete them, and specify whether My Menu always pops up when the MENU button is pressed.

Figure 4.13 You can add one to six menu entries to My Menu. Three added entries are shown.
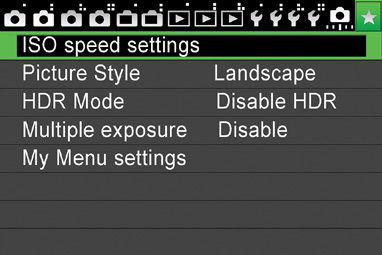
![]() Delete/Delete All Items. Use these to remove an individual menu item or all menu items you’ve registered in My Menu.
Delete/Delete All Items. Use these to remove an individual menu item or all menu items you’ve registered in My Menu.
![]() Display from My Menu. As I mentioned earlier, the 70D (almost) always shows the last menu item accessed. That’s convenient if you used My Menu last, but if you happen to use another menu, then pressing the MENU button will return to that item instead. If you enable the Display from My Menu option, pressing the MENU button will always display My Menu first. You are free to switch to another menu tab if you like, but the next time you press the MENU button, My Menu will come up again. Use this option if you work with My Menu a great deal and make settings with other menu items less frequently.
Display from My Menu. As I mentioned earlier, the 70D (almost) always shows the last menu item accessed. That’s convenient if you used My Menu last, but if you happen to use another menu, then pressing the MENU button will return to that item instead. If you enable the Display from My Menu option, pressing the MENU button will always display My Menu first. You are free to switch to another menu tab if you like, but the next time you press the MENU button, My Menu will come up again. Use this option if you work with My Menu a great deal and make settings with other menu items less frequently.