Chapter 6
Shooting Live View and Movies
Live view and shooting movies with the 70D go hand in hand: you need to activate live view to display the current scene as viewed on the lens on the LCD. Thereafter, you can take still photos by pressing the shutter release button, or activate Movie mode and shoot video. While capturing movies, you can still press the shutter release and take a still photo. This chapter tells you how to use live view first, and then explains the movie-shooting options.
Enabling Live View
You need to take some steps before using live view or shooting movies. This workflow prevents you from accidentally using live view when you don’t mean to, thus potentially losing a shot, and it also helps ensure that you’ve made all the settings necessary to successfully use the feature efficiently. Here are the steps to follow:
1. Choose a shooting mode. Live view works with any exposure mode, including Scene Intelligent Auto and Creative Auto. You can even switch from one Basic Zone mode to another or from one Creative Zone mode to another while live view is activated. (If you change from Basic to Creative, or vice versa while live view is on, it will be deactivated and must be restarted.)
2. Enable live view. You’ll need to activate live view by choosing the Live View Shoot. setting from the Live View Shooting menu (when the Mode Dial is set to a Creative Zone mode; if you’re using a Basic Zone mode, an abbreviated list of live view options is found in the Live View Shooting menu). Press SET and use the QCD or multi-controller pad to select Enable and press the SET button again to exit.
3. Choose other live view functions. Select from the other live view functions in the Live View Shooting menu (described next), then press the MENU button to exit from the Live View Function Settings menu. Make sure you’re using a Creative Zone mode if you want to view the full array of live view function options.
4. Select live view or movie shooting. Press the Live View button on the right side of the viewfinder to begin or end live view. Rotate the Stills/Movie switch located to the right of the viewfinder to the Movie position if you want to shoot video instead of stills.
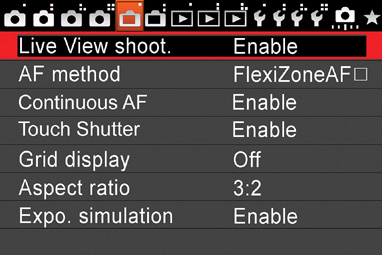
Here are the options available from the two Live View Shooting menus. Figure 6.1 shows the Live View Shooting 1 menu; the second Live View Shooting menu (not shown) has only two entries, Silent LV Shoot. and Metering Timer.
![]() Live View Shooting. Enables/disables live view shooting. Disabling live view does not affect movie shooting.
Live View Shooting. Enables/disables live view shooting. Disabling live view does not affect movie shooting.
![]() AF Method. Select Face Detection + Tracking mode, FlexiZone-Multi mode, FlexiZone-Single mode, and Quick mode autofocus options.
AF Method. Select Face Detection + Tracking mode, FlexiZone-Multi mode, FlexiZone-Single mode, and Quick mode autofocus options.
![]() Continuous AF. Enable or disable continuous autofocus. The camera will refocus continually even while the shutter release button is not partially depressed, and then more quickly lock in on your subject when you do activate autofocus. This “prefocus” mode speeds up the AF process, but depletes your battery more quickly. If you switch AF to Quick Mode, Continuous AF is disabled and must be reactivated when you change to a non–Quick Mode method. You should turn this feature off before sliding the lens switch to the Manual focus position.
Continuous AF. Enable or disable continuous autofocus. The camera will refocus continually even while the shutter release button is not partially depressed, and then more quickly lock in on your subject when you do activate autofocus. This “prefocus” mode speeds up the AF process, but depletes your battery more quickly. If you switch AF to Quick Mode, Continuous AF is disabled and must be reactivated when you change to a non–Quick Mode method. You should turn this feature off before sliding the lens switch to the Manual focus position.
Figure 6.1 Live view function settings can be found in the Live View Shooting menus.
![]() Touch Shutter. Enable or Disable the Touch Shutter feature, which allows you to specify a point of focus, activate AF, and take a picture with a tap on the touch screen.
Touch Shutter. Enable or Disable the Touch Shutter feature, which allows you to specify a point of focus, activate AF, and take a picture with a tap on the touch screen.
![]() Grid Display. Overlays Grid 1 on the screen to help you compose your image and align vertical and horizontal lines; Grid 2, which consists of four rows of six boxes; or Grid 3, which adds diagonal lines.
Grid Display. Overlays Grid 1 on the screen to help you compose your image and align vertical and horizontal lines; Grid 2, which consists of four rows of six boxes; or Grid 3, which adds diagonal lines.
![]() Aspect Ratio. Allows you to choose an aspect ratio, or proportions of your image, from 3:2, 4:3, 16:9, or 1:1. JPEG images will be stored using the selected ratio; RAW images will be saved using the default 3:2 proportions, but the desired cropping can be restored in your image-editing software.
Aspect Ratio. Allows you to choose an aspect ratio, or proportions of your image, from 3:2, 4:3, 16:9, or 1:1. JPEG images will be stored using the selected ratio; RAW images will be saved using the default 3:2 proportions, but the desired cropping can be restored in your image-editing software.
![]() Exposure Simulation. This option determines whether the live view image mimics the exposure level of the final image, or whether a bright image is shown that may be easier to view under high ambient lighting conditions.
Exposure Simulation. This option determines whether the live view image mimics the exposure level of the final image, or whether a bright image is shown that may be easier to view under high ambient lighting conditions.
![]() Enable. The live view image corresponds to the brightness level of the actual image using the current exposure/exposure compensation settings.
Enable. The live view image corresponds to the brightness level of the actual image using the current exposure/exposure compensation settings.
![]() During DOF Preview. The live view image is adjusted to simulate your exposure settings only when you press the depth-of-field preview button. This is a handy mode to use if you want the LCD monitor to remain as bright as possible, but retain the ability to preview exposure effects by pressing a button.
During DOF Preview. The live view image is adjusted to simulate your exposure settings only when you press the depth-of-field preview button. This is a handy mode to use if you want the LCD monitor to remain as bright as possible, but retain the ability to preview exposure effects by pressing a button.
![]() Disable. The live view image is always shown at standard brightness.
Disable. The live view image is always shown at standard brightness.
![]() Silent LV Shooting. This choice, and Metering Timer, are found on the Live View Shooting 2 menu (not shown) and reduces the noise level, using either of two modes. Mode 1 produces a quieter shooting sound level in Live View mode, and enables continuous shooting at up to 4.1 fps. Mode 2 separates the ker from the clunk sounds. Press the shutter release all the way, and the camera emits a small click as the picture is taken. When you release the button at least halfway, a discreet second click is heard. The camera ignores this setting if you’re using a remote control, and defaults to Mode 1. Disable turns off silent shooting.
Silent LV Shooting. This choice, and Metering Timer, are found on the Live View Shooting 2 menu (not shown) and reduces the noise level, using either of two modes. Mode 1 produces a quieter shooting sound level in Live View mode, and enables continuous shooting at up to 4.1 fps. Mode 2 separates the ker from the clunk sounds. Press the shutter release all the way, and the camera emits a small click as the picture is taken. When you release the button at least halfway, a discreet second click is heard. The camera ignores this setting if you’re using a remote control, and defaults to Mode 1. Disable turns off silent shooting.
![]() Metering Timer. Specify how long the metering system remains active before switching off. You can select 4, 16, or 30 seconds, plus 1, 10, or 30 minutes. Tap the shutter release to restart the timer.
Metering Timer. Specify how long the metering system remains active before switching off. You can select 4, 16, or 30 seconds, plus 1, 10, or 30 minutes. Tap the shutter release to restart the timer.
Once you’ve enabled live view, you can continue taking pictures normally through the 70D’s viewfinder. When you’re ready to activate live view, press the Live View/Movie button on the back of the camera, to the immediate right of the viewfinder window (and marked in red). The mirror will flip up, and the sensor image will appear on the LCD. Press the INFO. button to cycle among a display that is blank (except for the image), one that contains basic shooting information, a full display with settings, and one that adds a live histogram. (See Figure 6.2.)
Figure 6.2 Live View screen with full information shown.

In addition to the icons shown in the figure, additional information may be visible on the screen, depending on what focus or other mode you are working with, or optional accessories you are using:
![]() Focus points. If you’ve set focus to Quick mode, the same 19 focus points visible in the viewfinder will be shown on the LCD for reference. You can select any of these points with the multi-controller pad, and when the 70D activates autofocus by flipping down the mirror, the selected point in the optical system will be used to focus. In focus modes other than Quick mode, the active focus point will be shown.
Focus points. If you’ve set focus to Quick mode, the same 19 focus points visible in the viewfinder will be shown on the LCD for reference. You can select any of these points with the multi-controller pad, and when the 70D activates autofocus by flipping down the mirror, the selected point in the optical system will be used to focus. In focus modes other than Quick mode, the active focus point will be shown.
![]() Switch to Auto Selection. In Quick mode, an icon will appear at the lower-left side of the touch screen that can be tapped to change to autofocus point selection.
Switch to Auto Selection. In Quick mode, an icon will appear at the lower-left side of the touch screen that can be tapped to change to autofocus point selection.
![]() AEB/FEB. These icons will appear next to the Exp. Sim indicator when you’re using autoexposure bracketing or flash exposure bracketing with an external flash unit.
AEB/FEB. These icons will appear next to the Exp. Sim indicator when you’re using autoexposure bracketing or flash exposure bracketing with an external flash unit.
![]() Highlight Tone Priority. If activated, a D+ will be shown next to the ISO indicator.
Highlight Tone Priority. If activated, a D+ will be shown next to the ISO indicator.
Focusing in Live View/Movie Modes
Press the AF-ON button or press the shutter button halfway to activate autofocus using the currently set live view autofocus mode. Those modes are Live “Face Detection” mode, FlexiZone-Multi, FlexiZone-Single, and Quick mode. You can access them from the AF entry of the Live View and Movie menus, or the Quick Control screen (see Figure 6.3).
Figure 6.3 Select a focus method.

When using any of 103 compatible lenses, the 70D is able to employ its new Dual Pixel CMOS AF system in Live View mode while shooting stills and movies. This phase detection system works much more quickly than the more traditional contrast detection system. An array of special pixels, which cover 80 percent of the frame horizontally and vertically, provide the same type of split-image rangefinder phase detection AF that is available when using the optical viewfinder. The most important aspect of the system is that it doesn’t rob the camera of any imaging resolution. It would have been possible to place AF sensors between the pixels used to capture the image, but that would leave the sensor with less area with which to capture light. Keep in mind that CMOS sensors, unlike earlier CCD sensors, have more on-board circuitry that already consumes some of the light-gathering area. Microlenses are placed above each photosensitive site to focus incoming illumination on the sensor and to correct for the oblique angles from which some photons may approach the imager. (Older lenses, designed for film, are the worst offenders in terms of emitting light at severely oblique angles; newer “digital” lenses do a better job of directing photons onto the sensor plane with a less “slanted” approach.)
With the Dual Pixel CMOS AF system, the same photosites capture both image and autofocus information. Each pixel is divided into two photodiodes, facing left and right when the camera is held in horizontal orientation (or above and below each other in vertical orientation; either works fine for auto-focus purposes). Each pair functions as a separate AF sensor, allowing a special integrated circuit to process the raw autofocus information before sending it on to the 70D’s digital image processor, which handles both AF and image capture. For the latter, the information grabbed by both photodiodes is combined, so that the full photosensitive area of the sensor pixel is used to capture the image.
While traditional contrast detection frequently involves frustrating “hunting” as the camera continually readjusts the focus plane trying to find the position of maximum contrast, adding Dual Pixel CMOS AF phase detection allows the 70D to focus smoothly, which is important for speed, and essential when shooting movies (where all that hunting is unfortunately captured for posterity). Movie Servo AF tracking is improved, allowing shooting movies of subjects in motion. The system works with (at this writing) 103 different lenses, both current and previously available optics, and works especially well with lenses that have speedy USM or STM motors.
You can also use manual focus. To change the focus mode while using live view, you can press the AF button and rotate the Main Dial to choose the mode you want, highlighted on the live view screen. I’ll describe each of these separately.
Face Detection+Tracking Mode
This mode also use the relative sharpness of the image as it appears on the sensor to determine focus. The 70D will search the frame for a human face and attempt to focus on the face. Like Live mode, this method is less precise, and usually takes longer than Quick mode. To autofocus using Live (Face Detection) mode, follow these steps:
1. Set lens to autofocus. Make sure the focus switch on the lens is set to AF.
2. Activate live view. Press the Start/Stop button. Select Face Detection.
3. (Live) Face detection. A frame will appear around a face found in the image. If only one face is detected, the frame will be green; if more than one face is found, the frame will be white and have left/right triangles flanking it. (See Figure 6.4, left.) In that case, use the multi-controller to move the frame to the face you want to use for focus. If no face is detected, the AF focus frame will be displayed and focus will be locked into the center.
4. Focus. Press the AF-ON button to focus the camera on the face within the positioned Face Detection frame. When focus is locked in, the AF frame will turn green and the beeper, if activated, will chime. (See Figure 6.4, right.) If focus cannot be achieved, the AF frame will turn orange.
5. Press and hold the shutter release to take the picture. Press the shutter release all the way down to take the picture.
FlexiZone-Multi Mode
This mode allows focusing over a wide area. It’s very similar to the FlexiZone-Multi mode available when not using live view. In automatic selection mode, the camera selects one of 31 AF points. The 70D can automatically select the focus area from up to 31 different AF positions in the frame, or any of nine different zones you select.
Figure 6.4 If multiple faces are found (left), the bracket can be moved among them. When focus is achieved (right), the bracket turns green.

FlexiZone-Single Mode
To autofocus using FlexiZone-Single mode, follow these steps:
1. Set lens to autofocus. Make sure the focus switch on the lens is set to AF.
2. Activate live view. Press the Start/Stop button.
3. Choose AF point. Use the multi-controller pad to move the AF point anywhere you like on the screen, except for the edges. Press the SET or Trash button to return the AF point to the center of the screen.
4. Select subject. Compose the image on the LCD so the selected focus point is on the subject.
5. Press and hold the AF-ON button. When focus is achieved, the AF frame turns green, and you’ll hear a beep if the sound has been turned on in the Shooting 1 menu. If the 70D is unable to focus, the AF point turns orange instead.
6. Take picture. Press the shutter release all the way down to take the picture.
Quick Mode
This mode uses phase detection, as described in Chapter 5. It temporarily interrupts Live View mode to allow the EOS 70D to focus the same AF sensor used when you focus through the viewfinder. Because the step takes a second or so, you may get better results using this autofocus mode when the camera is mounted on a tripod. If you handhold the 70D, you may displace the point of focus achieved by the autofocus system. It also simplifies the operation if you use One-Shot focus and center the focus point. You can use AI Servo and Automatic or Manual focus point selection, but if the focus point doesn’t coincide with the subject you want to focus on, you’ll end up with an out-of-focus image. Just follow these steps:
1. Set lens to autofocus. Make sure the focus switch on the lens is set to AF.
2. Activate live view. Press the Start/Stop button. Small boxes representing the optical AF system’s 19 focus points will be shown. Select One-Shot AF mode.
3. Choose AF area selection mode. Press the AF area selection button (upper-right corner of the back of the camera).
4. Choose AF point. Use the multi-controller to select the specific AF point from those available. You can also use the Main Dial to move the AF point horizontally, or the QCD to move it vertically. You can press SET to toggle back and forth between the center AF point and automatic point selection.
5. Select subject. Compose the image on the LCD so the selected focus point is on the subject.
6. Press the shutter release halfway. The LCD will blank as the mirror flips down, reflecting the view of the subject to the phase detection AF sensor.
7. Wait for focus. When the 70D is able to lock in focus using phase detection, a beep (if activated) will sound. If you are handholding the 70D, you may hear several beeps as the AF system focuses and refocuses with each camera movement. Then, the mirror will flip back up, and the live view image reappears. The AF focus point will be highlighted in green on the LCD. If focus was impossible, the AF point will blink in orange.
8. Take picture. Press the shutter release all the way down to take the picture. (You can’t take a photo while Quick mode AF is in process, until the mirror flips back up.)
Manual Mode
Focusing manually on an LCD screen isn’t as difficult as you might think, but Canon has made the process even easier by providing a magnified view. Just follow these steps to focus manually.
1. Set lens to manual focus. Make sure the focus switch on the lens is set to MF.
2. Move magnifying frame. Use the multi-controller to move the focus frame that’s superimposed on the screen to the location where you want to focus. You can press the SET or Trash button to center the focus frame in the middle of the screen.
3. Press the Magnify button. The area of the image inside the focus frame will be magnified 5X. (See Figure 6.5.) Press the Magnify button again to increase the magnification to 10X. A third press will return you to the full-frame view. The enlarged area is artificially sharpened to make it easier for you to see the contrast changes, and simplify focusing. When zoomed in, press the shutter release halfway and the current shutter speed and aperture are shown in orange. If no information at all appears, press the INFO. button.
4. Focus manually. Use the focus ring on the lens to focus the image. When you’re satisfied, you can zoom back out by pressing the Magnify button.
Figure 6.5 You can manually focus the center area, which can be zoomed in 5X or 10X.

Final Image Simulation
When Exp. Sim. is displayed in white on the live view screen, it indicates that the LCD screen image brightness is an approximation of the brightness of the image that will be captured. If the Exp. Sim. display is blinking, it shows that the screen image does not represent the appearance of the final image because the light level is too dim or too bright. When using flash or bulb exposure, or night scene modes, the Exp. Sim. indicator is dimmed out to show you that the LCD image is not being adjusted to account for the actual exposure.
The 70D applies any active Picture Style settings to the LCD image, so you can have a rough representation of the image as it will appear when modified. Sharpness, contrast, color saturation, and color tone will all be applied. In addition, the camera applies the following parameters to the live view image shown:
![]() White balance/white balance correction
White balance/white balance correction
![]() Creative filters
Creative filters
![]() Shoot by ambience/lighting/scene choices
Shoot by ambience/lighting/scene choices
![]() Metering mode/Exposure
Metering mode/Exposure
![]() Auto lighting optimization
Auto lighting optimization
![]() Peripheral illumination correction
Peripheral illumination correction
![]() Chromatic aberration correction
Chromatic aberration correction
![]() Highlight Tone Priority
Highlight Tone Priority
![]() Aspect ratio
Aspect ratio
![]() Depth-of-field when DOF button is pressed
Depth-of-field when DOF button is pressed
Silent Shooting
Although Silent Shooting is far from a stealth photography mode, it does produce a quieter shutter noise than what you get when not in Live View mode. That’s because the mirror has already been flipped out of the way, so the sound produced primarily comes from the opening and closing of the shutter. You can activate silent shooting from the Live View function settings in the Live View Shooting 2 menu. You have three choices:
![]() Mode 1. This mode reduces the noise level of the shutter, but allows taking several shots in succession, including continuous shooting (at roughly 7.0 fps).
Mode 1. This mode reduces the noise level of the shutter, but allows taking several shots in succession, including continuous shooting (at roughly 7.0 fps).
![]() Mode 2. This mode reduces the noise even further by delaying the action when you press the shutter release down (only a slight click is heard). When you let up slightly on the shutter release, the shot is taken, producing another soft click. Continuous shooting is not possible in Mode 2.
Mode 2. This mode reduces the noise even further by delaying the action when you press the shutter release down (only a slight click is heard). When you let up slightly on the shutter release, the shot is taken, producing another soft click. Continuous shooting is not possible in Mode 2.
![]() Disable. Turns off the feature, producing the normal shutter noise sounds. This mode should be used if you’re working with a tilt/shift lens, or an extension tube. Although you’ll hear two clicks when using this mode, only one picture will be exposed. If you use flash, Mode 1 and Mode 2 are automatically disabled.
Disable. Turns off the feature, producing the normal shutter noise sounds. This mode should be used if you’re working with a tilt/shift lens, or an extension tube. Although you’ll hear two clicks when using this mode, only one picture will be exposed. If you use flash, Mode 1 and Mode 2 are automatically disabled.
Quick Control
Press the Q button or tap the Q icon at the upper right of the touch screen while using a Creative Zone in live view, and you can adjust any of the values shown in the left and right-hand columns. These include AF mode, Drive mode, White Balance, Picture Style, Auto Lighting Optimizer settings, Image quality settings, and Built-in flash functions. Figure 6.6 shows the focus mode adjustment screen that appears. If you’re using a Basic Zone mode, you can change AF mode, self-timer settings, and several other settings, depending on the Basic Zone mode you are using:
![]() Shoot by ambience. Can be changed when using Creative Auto, Portrait, Landscape, Close-Up, Sports, and Night Portrait modes.
Shoot by ambience. Can be changed when using Creative Auto, Portrait, Landscape, Close-Up, Sports, and Night Portrait modes.
![]() Shoot by lighting or scene type. Can be changed in Portrait, Landscape, Close-Up, and Sports modes.
Shoot by lighting or scene type. Can be changed in Portrait, Landscape, Close-Up, and Sports modes.
![]() Blurring/Sharpening the background. Can be changed in Creative Auto mode.
Blurring/Sharpening the background. Can be changed in Creative Auto mode.
![]() Automatic Flash Firing. Can be changed in Creative Auto mode; it is set automatically in Scene Intelligent Auto, Auto (Flash Off), Portrait, Close-Up, and Night Portrait modes.
Automatic Flash Firing. Can be changed in Creative Auto mode; it is set automatically in Scene Intelligent Auto, Auto (Flash Off), Portrait, Close-Up, and Night Portrait modes.
Figure 6.6 Focus mode adjustment Quick Control screen.

![]() Flash on at all times (Fill flash). Can be set in Creative Auto mode.
Flash on at all times (Fill flash). Can be set in Creative Auto mode.
![]() Flash Off. Can be set in Creative Auto mode; it is set automatically in Auto (Flash Off), Landscape, and Sports modes.
Flash Off. Can be set in Creative Auto mode; it is set automatically in Auto (Flash Off), Landscape, and Sports modes.
![]() Drive mode, continuous shooting. Can be set in Creative Auto, Portrait, and Sports modes.
Drive mode, continuous shooting. Can be set in Creative Auto, Portrait, and Sports modes.
Shooting Movies
The Canon EOS 70D can shoot full HD movies with stereo sound at 1920 × 1080 resolution, or Standard HD video at 1280 × 720 resolution. VGA movies can also be shot at 640 × 480 resolution.
In some ways, the camera’s Movie mode is closely related to the 70D’s Live View still mode. In fact, the 70D uses live view type imaging to show you the video clip on the LCD as it is captured. Many of the functions and setting options are the same, so the information in the previous sections will serve you well as you branch out into shooting movies with your camera.
To shoot in Movie mode, just rotate the On/Off/Movie switch to the red Movie position. The live view screen shown in Figure 6.7 appears. Press the Live View/Movie shooting button to begin/end capture. That’s quite simple, but there are some additional things you need to keep in mind before you start:
![]() Choose your resolution. The 70D can capture movies in Full High Definition (1920 × 1080 pixel) resolution at 30, 25, or 24 fps; Standard High Definition (1280 × 720 at 60/50 fps); and 640 × 480 resolution at 30 or 25 fps. I’ll show you how to specify resolution in the next section.
Choose your resolution. The 70D can capture movies in Full High Definition (1920 × 1080 pixel) resolution at 30, 25, or 24 fps; Standard High Definition (1280 × 720 at 60/50 fps); and 640 × 480 resolution at 30 or 25 fps. I’ll show you how to specify resolution in the next section.
Figure 6.7 The live view screen in Movie mode.

![]() You can still shoot stills. Press the shutter release all the way down at any time while filming movies in order to capture a still photo. Movie shooting will stop for about one second (leaving a one-second gap) while a still image is captured, but will resume automatically after the picture is taken. The 70D will use the Image Quality settings you specify in the Shooting 1 menu, and will operate only in Single shooting drive mode (Continuous shooting or Self-timer delays are not possible). The flash is disabled. You can also extract a 2MP, 1MP, or .3MP image from your movie clips using ZoomBrowser. Still photos are stored as separate files.
You can still shoot stills. Press the shutter release all the way down at any time while filming movies in order to capture a still photo. Movie shooting will stop for about one second (leaving a one-second gap) while a still image is captured, but will resume automatically after the picture is taken. The 70D will use the Image Quality settings you specify in the Shooting 1 menu, and will operate only in Single shooting drive mode (Continuous shooting or Self-timer delays are not possible). The flash is disabled. You can also extract a 2MP, 1MP, or .3MP image from your movie clips using ZoomBrowser. Still photos are stored as separate files.
![]() Use the right card. You’ll want to use a fast memory card, at least a Class 6 SDHC card; a Class 10 card is even better. Slower cards may not work properly. Choose a memory card with at least 4GB capacity (8GB or 16GB are preferable). If the card you are working with is too slow, a five-level thermometer-like “buffer” indicator may appear at the right side of the LCD, showing the status of your camera’s internal memory. If the indicator reaches the top level because the buffer is full, movie shooting will stop automatically.
Use the right card. You’ll want to use a fast memory card, at least a Class 6 SDHC card; a Class 10 card is even better. Slower cards may not work properly. Choose a memory card with at least 4GB capacity (8GB or 16GB are preferable). If the card you are working with is too slow, a five-level thermometer-like “buffer” indicator may appear at the right side of the LCD, showing the status of your camera’s internal memory. If the indicator reaches the top level because the buffer is full, movie shooting will stop automatically.
![]() Use a fully charged battery. Canon says that a fresh battery will allow about one hour of filming at normal (non-Winter) temperatures.
Use a fully charged battery. Canon says that a fresh battery will allow about one hour of filming at normal (non-Winter) temperatures.
![]() Image stabilizer uses extra power. If your lens has an image stabilizer, it will operate at all times (not just when the shutter button is pressed halfway, which is the case with still photography) and use a considerable amount of power, reducing battery life. You can switch the IS feature off to conserve power. Mount your camera on a tripod, and you don’t need IS anyway.
Image stabilizer uses extra power. If your lens has an image stabilizer, it will operate at all times (not just when the shutter button is pressed halfway, which is the case with still photography) and use a considerable amount of power, reducing battery life. You can switch the IS feature off to conserve power. Mount your camera on a tripod, and you don’t need IS anyway.
![]() Silent running. You can connect your 70D to a television or video monitor while shooting movies, and see the video portion on the bigger screen as you shoot. However, the sound will not play—that’s a good idea, because, otherwise, you could likely get a feedback loop of sound going. The sound will be recorded properly and will magically appear during playback once shooting has concluded.
Silent running. You can connect your 70D to a television or video monitor while shooting movies, and see the video portion on the bigger screen as you shoot. However, the sound will not play—that’s a good idea, because, otherwise, you could likely get a feedback loop of sound going. The sound will be recorded properly and will magically appear during playback once shooting has concluded.
MOVIE TIME
I’ve standardized on 16GB SDHC cards when I’m shooting movies; these cards will give you 44 minutes of recording at 1920 × 1080 Full HD resolution. (Figure 330MB per minute of capture.) A 4GB card, in contrast, offers just 11 minutes of shooting at the Full HD setting.
Movie Settings
The Movie Settings menus can be summoned by the MENU button only when the 70D has been set to Movie mode (rotate the On/Off/Movie switch to the Movie position). The four settings on the Movie 1 menu (see Figure 6.8) include:
![]() AF Method. Three of the four AF modes available in live view, as described earlier in this chapter, are options. Select Face Detection+ Tracking mode, FlexiZone-Multi mode, or FlexiZone-Single mode. Quick mode autofocus is not available when capturing video.
AF Method. Three of the four AF modes available in live view, as described earlier in this chapter, are options. Select Face Detection+ Tracking mode, FlexiZone-Multi mode, or FlexiZone-Single mode. Quick mode autofocus is not available when capturing video.
![]() Movie Servo AF. This is roughly the equivalent of live view’s Continuous AF mode, which you can enable or disable. The camera will refocus continually even while the shutter release button is not partially depressed, and then more quickly lock in on your subject when you do activate auto-focus. This “prefocus” mode speeds up the AF process, but depletes your battery more quickly. Turn Movie Servo AF off before sliding the lens switch to the Manual focus position.
Movie Servo AF. This is roughly the equivalent of live view’s Continuous AF mode, which you can enable or disable. The camera will refocus continually even while the shutter release button is not partially depressed, and then more quickly lock in on your subject when you do activate auto-focus. This “prefocus” mode speeds up the AF process, but depletes your battery more quickly. Turn Movie Servo AF off before sliding the lens switch to the Manual focus position.
Keep in mind that this continual refocusing process can produce motor noise that will be picked up by the 70D’s microphones. You should use an extra-quiet STM lens or connect an external microphone positioned farther away from the lens to minimize lens operation noise. You can temporarily halt continual focusing (for example, when the correct focus point has been achieved and you don’t expect it to change during the shot) by tapping the Servo AF icon in the lower left of the LCD screen. Pressing the Flash button has the same effect. You can also use C.Fn III-04 Custom Controls to assign the AF Stop function to a button, as described in Chapter 4.
Figure 6.8 The Movie 1 menu has four entries.

![]() Silent LV Shooting. Reduces the noise level when shooting still photos while in Movie mode. You can specify Mode 1, which produces a quieter shooting sound level in Live View mode. Mode 2 separates the ker from the clunk sounds. Press the shutter release all the way, and the camera emits a small click as the picture is taken. When you release the button at least halfway, a discreet second click is heard. The camera ignores this setting if you’re using a remote control, and defaults to Mode 1. Disable turns off silent shooting.
Silent LV Shooting. Reduces the noise level when shooting still photos while in Movie mode. You can specify Mode 1, which produces a quieter shooting sound level in Live View mode. Mode 2 separates the ker from the clunk sounds. Press the shutter release all the way, and the camera emits a small click as the picture is taken. When you release the button at least halfway, a discreet second click is heard. The camera ignores this setting if you’re using a remote control, and defaults to Mode 1. Disable turns off silent shooting.
![]() Metering Timer. Specify how long the metering system remains active before switching off. You can select 4, 16, or 30 seconds, plus 1, 10, or 30 minutes. Tap the shutter release to restart the timer.
Metering Timer. Specify how long the metering system remains active before switching off. You can select 4, 16, or 30 seconds, plus 1, 10, or 30 minutes. Tap the shutter release to restart the timer.
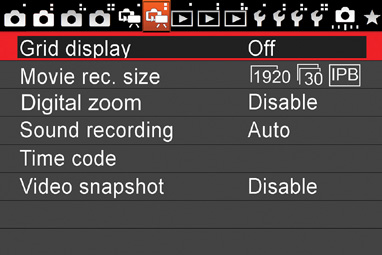
The Movie 2 menu is shown in Figure 6.9:
![]() Grid Display. Overlays Grid 1 on the screen to help you compose your image and align vertical and horizontal lines; Grid 2, which consists of four rows of six boxes; or Grid 3, which adds diagonal lines.
Grid Display. Overlays Grid 1 on the screen to help you compose your image and align vertical and horizontal lines; Grid 2, which consists of four rows of six boxes; or Grid 3, which adds diagonal lines.
![]() Movie Rec. Size. Choose either 1920 × 1080 (full HD) or 1280 × 720 pixels (standard HD). Full HD is available in either 30 or 24 fps variations, and Standard HD can be shot at 60 fps. All using progressive scan (1080p or 720p) with your choice of All-I or IPB compression schemes. You can also select VGA resolution shooting at 30 fps with IPB compression. I’ll explain these variations later in the chapter. (Substitute 25 fps and 50 fps for 24/60 fps, respectively, if you live in a country that does not use the US-standard NTSC video system.)
Movie Rec. Size. Choose either 1920 × 1080 (full HD) or 1280 × 720 pixels (standard HD). Full HD is available in either 30 or 24 fps variations, and Standard HD can be shot at 60 fps. All using progressive scan (1080p or 720p) with your choice of All-I or IPB compression schemes. You can also select VGA resolution shooting at 30 fps with IPB compression. I’ll explain these variations later in the chapter. (Substitute 25 fps and 50 fps for 24/60 fps, respectively, if you live in a country that does not use the US-standard NTSC video system.)
![]() Digital Zoom. This feature allows you to digitally zoom in during capture to produce a 3X to 10X telephoto effect when shooting in full HD mode. You should use a tripod to minimize camera shake from the high magnifications used.
Digital Zoom. This feature allows you to digitally zoom in during capture to produce a 3X to 10X telephoto effect when shooting in full HD mode. You should use a tripod to minimize camera shake from the high magnifications used.
Figure 6.9 The Movie 2 menu has six entries.
When activated, pressing the multi-controller pad’s up/down buttons produces a zoom bar, with the up key zooming in and the down key zooming out. Movie Servo AF is disabled in this mode, and FlexiZone-Single AF, fixed at the center point, is always used. Autofocus may be slower, because contrast detect AF is always used in this mode. ISO speed is limited to ISO 6400 or less.
![]() Sound Recording. Choose Auto, Manual, or Disable; plus enable or disable wind filter and/or attenuator. In Basic Zone modes, your choices are On and Off (for automatic levels), and the wind filter will automatically be activated.
Sound Recording. Choose Auto, Manual, or Disable; plus enable or disable wind filter and/or attenuator. In Basic Zone modes, your choices are On and Off (for automatic levels), and the wind filter will automatically be activated.
![]() Auto. The 70D sets the audio level for you.
Auto. The 70D sets the audio level for you.
![]() Manual. Choose from 64 different sound levels. Select Rec Level and rotate the QCD while viewing the decibel meter at the bottom of the screen to choose a level that averages −12 dB for the loudest sounds.
Manual. Choose from 64 different sound levels. Select Rec Level and rotate the QCD while viewing the decibel meter at the bottom of the screen to choose a level that averages −12 dB for the loudest sounds.
![]() Disable. Shoot silently, and add voice over, narration, music, or other sound later in your movie-editing software.
Disable. Shoot silently, and add voice over, narration, music, or other sound later in your movie-editing software.
You can use your 70D’s built-in microphone or plug in a stereo microphone into the 3.5mm jack on the side of the camera. An external microphone is a good idea because the built-in microphone can easily pick up camera operation, such as the autofocus motor in a lens.
![]() Wind filter. Choose between Enable and Disable. Enable to reduce the effects of wind noise on the microphone. This also reduces low (bass) tones in the sound recording. If wind is not a problem, you’ll get better quality audio with this option disabled. Even better is to use an external microphone with a wind shield.
Wind filter. Choose between Enable and Disable. Enable to reduce the effects of wind noise on the microphone. This also reduces low (bass) tones in the sound recording. If wind is not a problem, you’ll get better quality audio with this option disabled. Even better is to use an external microphone with a wind shield.
![]() Attenutator. Even if you are using Auto audio levels, or setting an appropriate level manually, a sudden loud sound can cause distortion. If you find that these disruptive noises are occurring, set the Attenuator to Enable. Otherwise, you’ll get better sound quality with the Attenuator disabled.
Attenutator. Even if you are using Auto audio levels, or setting an appropriate level manually, a sudden loud sound can cause distortion. If you find that these disruptive noises are occurring, set the Attenuator to Enable. Otherwise, you’ll get better sound quality with the Attenuator disabled.
![]() Time code. This is a reference used during editing to match up video clips and audio precisely during editing. I’ll explain the Time Code options in the next section.
Time code. This is a reference used during editing to match up video clips and audio precisely during editing. I’ll explain the Time Code options in the next section.
![]() Video snapshot. Video snapshots are movie clips, all the same length, assembled into video “albums” as a single continuous movie. You can choose a fixed length of 2, 4, or 8 seconds for all clips in a particular album. You can select Enable or Disable; when the feature is enabled you can also specify Album Settings, Snapshot Length, Create a New Album, or Add to an Existing Album.
Video snapshot. Video snapshots are movie clips, all the same length, assembled into video “albums” as a single continuous movie. You can choose a fixed length of 2, 4, or 8 seconds for all clips in a particular album. You can select Enable or Disable; when the feature is enabled you can also specify Album Settings, Snapshot Length, Create a New Album, or Add to an Existing Album.
Capturing Video/Sound
To shoot movies with your camera, just follow these steps:
1. Change to Movie mode. Rotate the On/Off/Movie switch to the Movie setting.
2. Focus. Use the autofocus or manual focus techniques described in the preceding sections to achieve focus on your subject.
3. Begin filming. Press the Live View button to begin shooting. A red dot appears in the upper-right corner of the screen to show that video/sound are being captured. The access lamp also flashes during shooting.
4. Changing shooting functions. As with live view, you can change settings or review images normally when shooting video.
5. Lock exposure. You can lock in exposure by pressing the Index/Reduce button on top of the 70D, located just aft of the Main Dial. Unlock exposure again by pressing the button once more.
6. Stop filming. Press the Live View button again to stop filming.
7. View your clip. Press the Playback button (located to the bottom right of the LCD). You will see a still frame with the clip timing and a symbol telling you to press the SET button to see the clip. A series of video controls appear at the bottom of the frame. Press SET again and the clip begins. A blue thermometer bar progresses in the upper-left corner as the timing counts down. Press SET to stop at any time.
GETTING INFO
The information display shown on the LCD monitor screen when shooting movies is almost identical to the one displayed during live view shooting. The settings icons in the left column show the same options, which can be changed in Movie mode, too, except that the Drive mode choice is replaced by an indicator that shows the current movie resolution and time remaining on your memory card.
Video Snapshots
Video snapshots are movie clips, all the same length, assembled into video albums as a single movie. You can choose a fixed length of 2, 4, or 8 seconds for all clips in a particular album. Use the 2-second length to compile mini-movies of fast-moving events, such as parades. The 8-second length is ideal for landscapes and many travel clips, because the longer scenes give you time to absorb all the interesting things to see. The 4-second clips are an excellent way to show details of a single subject, such as a cathedral or monument when traveling, or an overview of the action at a sports event.
Activate the video snapshot feature in the Movie 2 menu, as described above. Then, follow these steps:
1. Begin an album. In Movie mode, press the Live View/Movie button. The 70D will begin shooting a clip, and a set of blue bars will appear at the bottom of the frame showing you how much time remains before shooting stops automatically.
2. Save your clip as a video snapshot album. A confirmation appears at the bottom of the LCD. Press the left/right multi-controller pad to choose the left-most icon, Save as Album.
3. Press SET. Your first clip will be saved as the start of a new album.
4. Shoot additional clips. Press the Movie button to shoot more clips of the length you have chosen, and indicated by the blue bars at the bottom of the frame. At the end of the specified time, the confirmation screen will appear again. (See Figure 6.10.)
5. Add to album or create new album. Select the left-most icon again if you want to add the most recent clip to the album you just started. Alternatively, you can press the left/right multi-controller pad to choose the second icon from the left, Save as a New Album. That will complete your previous album, and start a new one with the most recent clip.
Or, if you’d like to review the most recent clip first to make sure it’s worth adding to an album, select the Playback Video Snapshot icon (second from the right) and review the clip you just shot. You can then Add to Album, Create New Album, or Delete the clip. (See Figure 6.11.)
Figure 6.10 Capturing a video clip.

Figure 6.11 Save your clip as a video snapshot album.

6. Delete most recent clip. If you decide the most recent clip is not one you’d like to add to your current album, you can select Do Not Save to Album/Delete without Saving to Album (the right-most icon).
7. Switch from Video Snapshots to conventional movie clips. If you want to stop shooting video snapshots and resume shooting regular movie clips (of a variable length), navigate to the Movie 2 menu again, and disable Video Snapshot.
Playback and Editing
You can play back your video snapshots from the confirmation screen. Or, you can exit Movie mode and review your stills and images and play any of them back by pressing the Playback button located underneath the Q button. A movie or album will be marked with a movie camera icon in the upper-left corner. Press the SET button to play back a movie or album when you see this icon. When viewing thumbnails, the movie will be identified by a marking on the left edge that looks like sprocket holes. Pause on such a frame, press SET to view the icon above, and then press SET again to start the movie.
As a movie or album is being played back, a screen of options appears at the bottom of the screen, as shown in Figure 6.12.
Figure 6.12 Options appear as a movie is being played back.

When the icons are shown, use the left/right multi-controller pad to highlight one, and then press the SET button to activate that function:
![]() Playback time. Shows the time elapsed for the current clip.
Playback time. Shows the time elapsed for the current clip.
![]() MENU. Exits playback mode.
MENU. Exits playback mode.
![]() Playback. Begins playback of the movie or album. To pause playback, press the SET button again. That restores the row of icons so you can choose a function.
Playback. Begins playback of the movie or album. To pause playback, press the SET button again. That restores the row of icons so you can choose a function.
![]() Slow motion. Displays the video in slow motion.
Slow motion. Displays the video in slow motion.
![]() First frame. Jumps to the first frame of the video, or the first scene of an album’s first video snapshot.
First frame. Jumps to the first frame of the video, or the first scene of an album’s first video snapshot.
![]() Previous frame. Press SET to view previous frame; hold down SET to rewind movie.
Previous frame. Press SET to view previous frame; hold down SET to rewind movie.
![]() Next frame. Press SET to view next frame; hold down SET to fast forward movie.
Next frame. Press SET to view next frame; hold down SET to fast forward movie.
![]() Last frame. Jumps to the last frame of the video, or the last scene of the album’s last video snapshot.
Last frame. Jumps to the last frame of the video, or the last scene of the album’s last video snapshot.
![]() Edit. Summons an editing screen (see Figure 6.13).
Edit. Summons an editing screen (see Figure 6.13).
![]() Background music/volume. Select to turn background music on/off. Rotate the Main Dial to adjust the volume of the background music.
Background music/volume. Select to turn background music on/off. Rotate the Main Dial to adjust the volume of the background music.
Figure 6.13 The editing screen allows you to snip off the beginning or end of a video clip.

While reviewing your video, you can trim from the beginning or end of your video clip by selecting the scissors symbol. Press the SET button to access editing features. The icons that appear have the following functions:
![]() Trim beginning. Trims off all video prior to the current point.
Trim beginning. Trims off all video prior to the current point.
![]() Trim end. Removes video after the current point.
Trim end. Removes video after the current point.
![]() Play back video. Play back your video to reach the point where you want to trim the beginning or end.
Play back video. Play back your video to reach the point where you want to trim the beginning or end.
![]() Save. Saves your video to the memory card. A screen appears offering to save the clip as a New File, or to Overwrite the existing movie with your edited clip.
Save. Saves your video to the memory card. A screen appears offering to save the clip as a New File, or to Overwrite the existing movie with your edited clip.
![]() MENU. Exits editing mode.
MENU. Exits editing mode.
![]() Adjust volume. Modifies the volume of the background music.
Adjust volume. Modifies the volume of the background music.
Tips for Shooting Better Video
There are a number of different things to consider when planning a video shoot:
Use a Shooting Script/Storyboards
A shooting script is nothing more than a coordinated plan that covers both audio and video and provides order and structure for your video. A detailed script will cover what types of shots you’re going after, what dialogue you’re going to use, audio effects, transitions, and graphics. A storyboard is a series of panels providing visuals that help you visualize locations, placement of actors/actresses, props, and furniture. It also helps show how you want to frame or compose a shot.
Advance a Story
A lot of the work will come after you shoot, when your video is assembled using a movie-editing program like iMovie or Windows Movie Maker. Audio and video should always be advancing the story. While it’s okay to let the camera linger from time to time, it should only be for a compelling reason and only briefly. It only takes a second or two for an establishing shot to impart the necessary information, and the same goes for a dramatic stare. Provide variety too. Change camera angles and perspectives often and never leave a static scene on the screen for a long period of time.
Keep Transitions Basic
Fancy transitions that involve exotic “wipes,” dissolves, or cross fades take too long for the average viewer and make your video ponderous. Save dissolves to show the passage of time (it’s a cinematic convention that viewers are used to and understand).
Composition
Movie shooting calls for careful composition, and, in the case of HD video format, that composition must be framed by the 16:9 aspect ratio of the format. Static shots where the camera is mounted on a tripod and everything’s shot from the same distance are a recipe for dull videos.
![]() Establishing shot. This composition, shown at left in Figure 6.14, establishes the scene and tells the viewer where the action is taking place.
Establishing shot. This composition, shown at left in Figure 6.14, establishes the scene and tells the viewer where the action is taking place.
![]() Medium shot. This shot is composed from about waist to headroom (some space above the subject’s head). It’s useful for providing variety from a series of close-ups and also makes for a useful first look at a speaker. (See Figure 6.14, right.)
Medium shot. This shot is composed from about waist to headroom (some space above the subject’s head). It’s useful for providing variety from a series of close-ups and also makes for a useful first look at a speaker. (See Figure 6.14, right.)

![]() Close-up. The close-up, usually described as “from shirt pocket to head room,” provides a good composition for someone talking directly to the camera. (See Figure 6.15, left.)
Close-up. The close-up, usually described as “from shirt pocket to head room,” provides a good composition for someone talking directly to the camera. (See Figure 6.15, left.)
![]() Extreme close-up. This shot has been described as the “big talking face” shot. Styles and tastes change over the years and now the big talking face is much more commonly used (maybe people are better looking these days?) and so this view may be appropriate. (See Figure 6.15, right.)
Extreme close-up. This shot has been described as the “big talking face” shot. Styles and tastes change over the years and now the big talking face is much more commonly used (maybe people are better looking these days?) and so this view may be appropriate. (See Figure 6.15, right.)

![]() “Two” shot. A two shot shows a pair of subjects in one frame. They can be side by side or one in the foreground and one in the background. Subjects can be standing or seated. (See Figure 6.16, left.) A “three shot” is the same principle except that three people are in the frame.
“Two” shot. A two shot shows a pair of subjects in one frame. They can be side by side or one in the foreground and one in the background. Subjects can be standing or seated. (See Figure 6.16, left.) A “three shot” is the same principle except that three people are in the frame.
![]() Over-the-shoulder shot. Long a tool of interview programs, the “over-the-shoulder shot” uses the rear of one person’s head and shoulder to serve as a frame for the other person. This puts the viewer’s perspective as that of the person facing away from the camera. (See Figure 6.16, right.)
Over-the-shoulder shot. Long a tool of interview programs, the “over-the-shoulder shot” uses the rear of one person’s head and shoulder to serve as a frame for the other person. This puts the viewer’s perspective as that of the person facing away from the camera. (See Figure 6.16, right.)

Lighting for Video
Much like in still photography, how you handle light pretty much can make or break your videography. You can significantly improve the quality of your video by increasing the light falling in the scene. An inexpensive shoe mount video light, which will easily fit in a camera bag, can be found for $15 or $20. You can even get a good quality LED video light for less than $100. Work lights sold at many home improvement stores can also serve as video lights since you can set the camera’s white balance to correct for any colorcasts. Much of the challenge depends upon whether you’re just trying to add some fill light on your subject versus trying to boost the light on an entire scene. A small video light in the camera’s hot shoe mount or on a flash bracket will do just fine for the former. It won’t handle the latter.
Lighting can either be hard (direct) light or soft (diffused). Hard light is good for showing detail, but can also be very harsh and unforgiving. “Softening” the light, but diffusing it somehow, say, with an umbrella or white cardboard reflector, can reduce the intensity of the light but make for a kinder, gentler light as well.