
Chapter 3
Shooting and Playback Menu Settings
The Shooting and Playback menus determine how the 70D uses many of its shooting features to take a photo, and how it displays images on review. The Live View Shooting and Movie menus are covered in Chapter 6.
Anatomy of the Canon EOS 70D’s Menus
Press the MENU button on the upper-left edge of the camera to access the menu system. The most recently accessed menu will appear, as in Figure 3.1. When you’re using any Mode Dial option other than Scene modes, Scene Intelligent Auto and Creative Auto, there are 15 menu tabs. Different menu tabs are provided, depending on the shooting mode.
In this chapter, I’m going to explain all the tabs and all the menu entries, and not take the time to mention which of those are not available when using Scene and other modes. The automatic modes are intended for situations when you don’t want full control over your 70D’s operation, anyway, and menu limitations go with the territory. The 70D’s tabs are color-coded: red for Shooting, Live View Shooting, and Movie menus; blue for Playback menus; amber for Set-up menus; brown for Custom menus, and green for the My Menu tab. The currently selected menu’s icon is white within a background corresponding to its color code. All the inactive menus are dimmed. Movie and Live View Shooting menus will be described in Chapter 6, which deals with those topics.
![]() Menu tabs. In the top row of the menu screen, the menu that is currently active will be highlighted as described earlier. One, two, three, or four dots in the tab lets you know if you are in, say Set-up 1, Set-up 2, Set-up 3, or Set-up 4. Just remember that the red camera icons stand for still, live view, and movie shooting options; the two blue right-pointing triangles represent playback options; the four yellow wrench icons stand for set-up options; the brown camera icon represents Custom Functions; and the green star stands for personalized menus defined for the star of the show—you.
Menu tabs. In the top row of the menu screen, the menu that is currently active will be highlighted as described earlier. One, two, three, or four dots in the tab lets you know if you are in, say Set-up 1, Set-up 2, Set-up 3, or Set-up 4. Just remember that the red camera icons stand for still, live view, and movie shooting options; the two blue right-pointing triangles represent playback options; the four yellow wrench icons stand for set-up options; the brown camera icon represents Custom Functions; and the green star stands for personalized menus defined for the star of the show—you.
![]() Selected menu item. The currently selected menu entry within a given tab will have a black background and will be surrounded by a box the same hue as its color code.
Selected menu item. The currently selected menu entry within a given tab will have a black background and will be surrounded by a box the same hue as its color code.
![]() Other menu choices. The other menu items visible on the screen will have a dark gray background.
Other menu choices. The other menu items visible on the screen will have a dark gray background.
![]() Current setting. The current settings for visible menu items are shown in the right-hand column, until one menu item is selected (by choosing SET). At that point all the settings vanish from the screen except for those dealing with the active menu choice.
Current setting. The current settings for visible menu items are shown in the right-hand column, until one menu item is selected (by choosing SET). At that point all the settings vanish from the screen except for those dealing with the active menu choice.
When you’ve moved the menu highlighting with the touch screen or up/down multi-controller pad to the menu item you want to work with, choose SET to select it. A submenu with a list of options for the selected menu item will appear. Within the submenu options, you can scroll up or down with the up/down multi-controller pad to choose a setting, and then press SET to confirm the choice you’ve made. Press the MENU button again or tap the shutter release button to exit.
Figure 3.1 The 70D’s menus are arranged in a series of up to 15 tabs.

Shooting Menu Options
The options you’ll find in the red-coded Shooting menus include the following:
![]() Image Quality
Image Quality
![]() VF Grid Display
VF Grid Display
![]() Viewfinder level
Viewfinder level
![]() Beep
Beep
![]() Release Shutter without Card
Release Shutter without Card
![]() Image Review
Image Review
![]() Lens Aberration Correction
Lens Aberration Correction
![]() Flash Control
Flash Control
![]() Red-Eye Reduction
Red-Eye Reduction
![]() Mirror Lockup
Mirror Lockup
![]() Exposure Compensation/AEB (Automatic Exposure Bracketing)
Exposure Compensation/AEB (Automatic Exposure Bracketing)
![]() ISO Speed Settings
ISO Speed Settings
![]() Auto Lighting Optimizer
Auto Lighting Optimizer
![]() White Balance
White Balance
![]() Custom White Balance
Custom White Balance
![]() WB Shift/BKT
WB Shift/BKT
![]() Color Space
Color Space
![]() Picture Style
Picture Style
![]() Long Exposure Noise Reduction
Long Exposure Noise Reduction
![]() High ISO Speed Noise Reduction
High ISO Speed Noise Reduction
![]() Highlight Tone Priority
Highlight Tone Priority
![]() Dust Delete Data
Dust Delete Data
![]() Multiple Exposure
Multiple Exposure
![]() HDR Mode
HDR Mode
Image Quality
Options: Resolution; JPEG Compression; JPEG, RAW, or both You can choose the image quality settings used by the 70D to store its files. You have three choices to make:
![]() Resolution. The number of pixels captured determines the absolute resolution of the photos you shoot with your 70D. Your choices range from 20 megapixels (Large or L), measuring 5472 × 3648 pixels; 8.9 megapixels (Medium or M), measuring 3648 × 2432 pixels; 5 megapixels (Small 1 or S1), measuring 2736 × 1824 pixels; 2.5 megapixels (Small 2 or S2), measuring 1920 × 1280 pixels; and 350,000 pixels (Small 3 or S3), measuring 720 × 480. You can also choose RAW-only sizes of RAW (5472 × 3648 pixels; 20MP); M-RAW (4104 × 2736; 11MP); or S-RAW (2736 × 1824; 5 MP).
Resolution. The number of pixels captured determines the absolute resolution of the photos you shoot with your 70D. Your choices range from 20 megapixels (Large or L), measuring 5472 × 3648 pixels; 8.9 megapixels (Medium or M), measuring 3648 × 2432 pixels; 5 megapixels (Small 1 or S1), measuring 2736 × 1824 pixels; 2.5 megapixels (Small 2 or S2), measuring 1920 × 1280 pixels; and 350,000 pixels (Small 3 or S3), measuring 720 × 480. You can also choose RAW-only sizes of RAW (5472 × 3648 pixels; 20MP); M-RAW (4104 × 2736; 11MP); or S-RAW (2736 × 1824; 5 MP).
![]() JPEG compression. To reduce the size of your image files and allow more photos to be stored on a given memory card, the 70D uses JPEG compression to squeeze the images down to a smaller size. This compacting reduces the image quality a little, so you’re offered your choice of Fine compression and Normal compression. The symbols help you remember that Fine compression (represented by a quarter-circle) provides the smoothest results, while Normal compression (signified by a stair-step icon) provides “jaggier” images.
JPEG compression. To reduce the size of your image files and allow more photos to be stored on a given memory card, the 70D uses JPEG compression to squeeze the images down to a smaller size. This compacting reduces the image quality a little, so you’re offered your choice of Fine compression and Normal compression. The symbols help you remember that Fine compression (represented by a quarter-circle) provides the smoothest results, while Normal compression (signified by a stair-step icon) provides “jaggier” images.
![]() JPEG, RAW, or both. You can elect to store only JPEG versions of the images you shoot or you can save your photos as uncompressed, loss-free RAW files, which consume about four times as much space on your memory card (up to 20MB per file). Or, you can store both at once as you shoot. Many photographers elect to save both a JPEG and a RAW file, so they’ll have a JPEG version that might be usable as-is, as well as the original “digital negative” RAW file in case they want to do some processing of the image later. You’ll end up with two different versions of the same file: one with a JPG extension, and one with the CR2 extension that signifies a Canon RAW file.
JPEG, RAW, or both. You can elect to store only JPEG versions of the images you shoot or you can save your photos as uncompressed, loss-free RAW files, which consume about four times as much space on your memory card (up to 20MB per file). Or, you can store both at once as you shoot. Many photographers elect to save both a JPEG and a RAW file, so they’ll have a JPEG version that might be usable as-is, as well as the original “digital negative” RAW file in case they want to do some processing of the image later. You’ll end up with two different versions of the same file: one with a JPG extension, and one with the CR2 extension that signifies a Canon RAW file.
To choose the combination you want, access the menus, scroll to Image Quality, and press the SET button. Spin the Main Dial to choose from: -- (no RAW), RAW, M RAW, or S RAW. Rotate the QCD to select one of the JPEG choices: -- (no JPEG), Large, Medium, or Small in Fine or Normal compression (represented by smooth and stepped icons, respectively), plus Small 2 or Small 3 JPEG, at the resolutions listed above. A red box appears around the currently selected choice. If you choose -- for both RAW and JPEG, then JPEG Fine will be used.
VF Grid Display
Options: Enable, Disable
This menu item allows you to enable or disable a grid of three horizontal and four vertical lines (the two center lines are interrupted by the focus area brackets) in the optical viewfinder that give you finer control over the placement of images in your frame. You can keep horizons and architectural features level using this optional viewfinder display.
Viewfinder Level
Options: Hide, Show
In addition to the electronic level that can be activated on the LCD monitor, the 70D has two levels accessible in the viewfinder. One is a simple icon display you can review while shooting and best suited for handheld shooting, as it is available all the time when activated. A second electronic level, which uses the autofocus points in the viewfinder, can be activated momentarily by pressing a button assigned to activate that function using the C.Fn III-04 (Custom Controls) entry in the Custom menu. Select Operation/Others, Custom Controls, highlight DOF Preview Button, and assign VF Electronic Level to that button. Then, each time you press the DOF button, the advanced view-finder level will appear. You’d want to use this version when the camera is mounted on a tripod, because the more precise positioning is not needed all the time when the camera is relatively fixed. The also operates in vertical orientation, using AF points that run across the short dimension of the viewfinder.
Beep
Options: Enable, Touch to Disable, Disable
The 70D’s internal beeper provides a helpful chirp to signify various functions, such as the countdown of your camera’s self-timer. You can switch it off if you want to avoid the beep because it’s annoying, impolite, or distracting (at a concert or museum), or undesired for any other reason. The Touch to Disable option turns off the beep only for functions using the touch screen.
Release Shutter without Card
Options: Enable, Disable
This entry in the Shooting 1 menu gives you the ability to snap off “pictures” without a memory card installed—or to lock the camera shutter release if that is the case. When using the “demo” mode, the message “No Card in Camera” appears overlaid on the review image on the LCD.
Image Review
Options: Off, 2 sec., 4 sec., 8 sec., Hold
You can adjust the amount of time an image is displayed for review on the LCD after each shot is taken. You can elect to disable this review entirely (Off), or choose display times of 2 sec., 4 sec., or 8 sec. You can also select Hold, an indefinite display, which will keep your image on the screen until you use one of the other controls, such as the shutter button or Main Dial. Turning the review display off or choosing a brief duration can help preserve battery power. However, the 70D will always override the review display when the shutter button is partially or fully depressed, so you’ll never miss a shot because a previous image was on the screen.
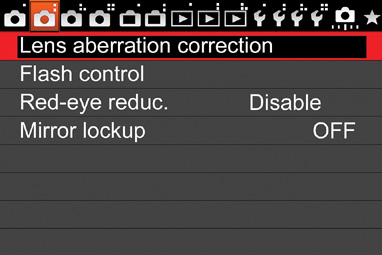
Lens Aberration Correction
Options (Peripheral illumination): Enable, Disable
Options (Chromatic aberration): Enable, Disable
This is the first entry in the Shooting 2 menu (see Figure 3.2). With certain lenses, under certain conditions, your images might suffer from one of two aberrations, both of which can be partially corrected by activating the correction items offered in this menu entry.
Figure 3.2 The Shooting 2 menu.
Peripheral Illumination Correction
One defect is caused by a phenomenon called vignetting, which is a darkening of the four corners of the frame because of a slight amount of fall-off in illumination at those nether regions. This menu option allows you to activate Peripheral Illumination Correction, a clever feature built in to the 70D that partially (or fully) compensates for this effect.
Chromatic Aberration
The second defect involves fringes of color around backlit objects, produced by chromatic aberration, which comes in two forms: longitudinal/axial, in which all the colors of light don’t focus in the same plane; and lateral/transverse, in which the colors are shifted to one side. Your 70D has a database of information about certain lenses, similar to the one provided for peripheral illumination correction.
When this feature is enabled, the 70D will automatically correct images taken with one of the supported lenses to reduce or eliminate the amount of color fringing seen in the final photograph.
If lens aberration correction information for your lens is not registered in the camera, you can remedy that deficit using the EOS Utility. Just follow these steps:
1. Link up your camera. Connect your 70D to your computer using the USB cable supplied with the camera.
2. Launch the EOS Utility. Load the utility and click on Camera Settings/Remote Shooting from the splash screen that appears.
3. Select the Shooting menu. It’s located on the menu bar located about midway in the control panel that appears on your computer display. The Shooting menu icon is the white camera on a red background.
4. Click on the Lens Aberration Correction choice and choose your lens. Select the category containing the lens you want to register from the panels at the top of the new screen; then place a check mark next to all the lenses you’d like to register in the camera.
5. Confirm your choice. Click OK to send the data from your computer to the 70D and register your lenses.
6. Activate correction. When a newly registered lens is mounted on the camera, you will be able to activate the anti-vignetting feature for that lens from the Shooting 2 menu (see Figure 3.3).
Figure 3.3 Choose the aberration to correct.

Flash Control
Options: Flash Firing, E-TTL II Metering, Flash Sync Speed in Av Mode, Built-in Flash Settings, External Flash Function Settings, External Flash C.Fn Setting, Clear Settings
This multi-level menu entry includes settings for controlling the Canon EOS 70D’s built-in, pop-up electronic flash unit, as well as accessory flash units you can attach to the camera (see Figure 3.4). Here are your main options.
Figure 3.4 The Flash Control menu entry submenus.

Flash Firing
Use this option to enable or disable the built-in electronic flash. You might want to totally disable the 70D’s flash (both built-in and accessory flash) when shooting in sensitive environments, such as concerts, in museums, or during religious ceremonies. When disabled, the flash cannot fire even if you accidentally elevate it, or have an accessory flash attached and turned on. If you turn off the flash here, it is disabled in any exposure mode. You can also select Flash Off from the Mode Dial.
E-TTL II Metering
You can choose Evaluative (Matrix) or Average metering modes for the electronic flash exposure meter. Evaluative looks at selected areas in the scene to calculate exposure, and is the best choice for most images because it attempts to interpret the type of scene being shot; Average calculates flash exposure by reading the entire scene, and it is possibly a good option if you want exposure to be calculated for the overall scene.
Flash Sync Speed in AV mode
You can select the flash synchronization speed that will be used when working in Aperture-priority mode; choose from Auto (the 70D selects the shutter speed from 30 seconds to 1/250th second), to a range embracing only the speeds from 1/250th to 1/60th second, or fixed at 1/250th second.
Normally, in Aperture-priority mode when using flash, you specify the f/stop to be locked in. The exposure is then adjusted by varying the output of the electronic flash. Because the primary exposure comes from the flash, the main effect of the shutter speed selected is on the secondary exposure from the ambient light on the scene.
Auto is your best choice under most conditions. The 70D will choose a shutter speed that balances the flash exposure and available, ambient light. The 1/250th to 1/60th second setting locks out slower shutter speeds, preventing blur from camera/subject movement in the secondary (“ghost”) exposure. However, the background may be rendered dark, if the flash is not strong enough to illuminate it. The 1/250th second (fixed) setting further reduces the chance of getting those blurry ghosts, but there is more of a chance the background will be dark.
Built-in Flash Settings
There are a total of five possible choices for this menu screen, plus Clear Settings. The additional options are grayed out unless you’re working in wireless flash mode.
![]() Flash mode. This entry allows you to choose from automatic exposure calculation (E-TTL II) or manual flash exposure.
Flash mode. This entry allows you to choose from automatic exposure calculation (E-TTL II) or manual flash exposure.
![]() Shutter sync. Available only in Normal Firing mode, you can choose 1st curtain sync, which fires the pre-flash used to calculate the exposure before the shutter opens, followed by the main flash as soon as the shutter is completely open. This is the default mode, and you’ll generally perceive the pre-flash and main flash as a single burst. Alternatively, you can select 2nd curtain sync, which fires the pre-flash as soon as the shutter opens, and then triggers the main flash in a second burst at the end of the exposure, just before the shutter starts to close. (If the shutter speed is slow enough, you may clearly see both the pre-flash and main flash as separate bursts of light.) This action allows photographing a blurred trail of light of moving objects with sharp flash exposures at the beginning and the end of the exposure. This type of flash exposure is slightly different from what some other cameras produce using 2nd curtain sync. I’ll explain how it works in Chapter 5.
Shutter sync. Available only in Normal Firing mode, you can choose 1st curtain sync, which fires the pre-flash used to calculate the exposure before the shutter opens, followed by the main flash as soon as the shutter is completely open. This is the default mode, and you’ll generally perceive the pre-flash and main flash as a single burst. Alternatively, you can select 2nd curtain sync, which fires the pre-flash as soon as the shutter opens, and then triggers the main flash in a second burst at the end of the exposure, just before the shutter starts to close. (If the shutter speed is slow enough, you may clearly see both the pre-flash and main flash as separate bursts of light.) This action allows photographing a blurred trail of light of moving objects with sharp flash exposures at the beginning and the end of the exposure. This type of flash exposure is slightly different from what some other cameras produce using 2nd curtain sync. I’ll explain how it works in Chapter 5.
If you have an external compatible Speedlite attached, you can also choose High-speed sync, which allows you to use shutter speeds faster than 1/250th second, using the External Flash Function Setting menu, described next and explained in Chapter 5.
![]() Flash exposure compensation. If you’d rather adjust flash exposure using a menu than with the ISO/Flash exposure compensation button, you can do that here. Select this option with the SET button, then dial in the amount of flash EV compensation you want using the multi-controller. The EV that was in place before you started to make your adjustment is shown as a blue indicator, so you can return to that value quickly. Use SET again to confirm your change, then tap MENU or press the MENU button twice to exit.
Flash exposure compensation. If you’d rather adjust flash exposure using a menu than with the ISO/Flash exposure compensation button, you can do that here. Select this option with the SET button, then dial in the amount of flash EV compensation you want using the multi-controller. The EV that was in place before you started to make your adjustment is shown as a blue indicator, so you can return to that value quickly. Use SET again to confirm your change, then tap MENU or press the MENU button twice to exit.
![]() Wireless functions. These choices appear when you’ve enabled Wireless operation. I’m going to leave the explanation of these options for Chapter 5.
Wireless functions. These choices appear when you’ve enabled Wireless operation. I’m going to leave the explanation of these options for Chapter 5.
External Flash Function Settings
You can access this menu only when you have a compatible electronic flash attached and switched on. If you press the INFO. button while adjusting flash settings, both the changes made to the settings of an attached external flash and to the built-in flash will be cleared. These options are quite complex, so I’m going to save the description of them for Chapter 5.
External Flash Custom Function Setting
Many external Speedlites from Canon include their own list of Custom Functions, which can be used to specify things like flash metering mode and flash bracketing sequences, as well as more sophisticated features, such as modeling light/flash (if available), use of external power sources (if attached), and functions of any slave unit attached to the external flash. This menu entry allows you to set an external flash unit’s Custom Functions from your 70D’s menu. (See Figure 3.5.)
Figure 3.5 External flash units can be controlled from the Canon EOS 70D using this menu.

Clear Settings
This entry allows you to zero-out any changes you’ve made to your flash’s settings, and return them to their factory default settings. You can individually clear built-in flash settings, external flash settings, and external flash’s Custom Function settings.
Red-Eye Reduction
Options: Disable, Enable
Although your 70D has a partially effective red-eye reduction flash mode, it is unable, on its own, to totally eliminate the red-eye effects that occur when an electronic flash (or, rarely, illumination from other sources) bounces off the retinas of the eye and into the camera lens. Animals seem to suffer from yellow or green glowing pupils, instead; the effect is equally undesirable. The effect is worst under low-light conditions (exactly when you might be using a flash) as the pupils expand to allow more light to reach the retinas. The best you can hope for is to reduce or minimize the red-eye effect.
The best way to truly eliminate red-eye is to raise the flash up off the camera so its illumination approaches the eye from an angle that won’t reflect directly back to the retina and into the lens. The extra height of the built-in flash may not be sufficient, however. If you’re working with your 70D’s built-in flash, your only recourse may be to switch the Red-eye reduction feature menu choice. It causes a lamp on the front of the camera to illuminate with a half-press of the shutter release button, which may cause your subjects’ pupils to contract, decreasing the amount of the red-eye effect. You may have to ask your subject to look at the lamp to gain maximum effect.
Mirror Lockup
Options: Enable, Disable
This option allows you to flip up the 70D’s mirror prior to exposure. Note that the camera has a second mirror lockup option available under Sensor Cleaning in the Set-up 4 menu. You should be extra careful not to confuse the two. Here is the difference:
![]() Mirror Lockup. This option is used while shooting. When enabled from this menu entry, the camera flips the mirror up out of the way when you press the shutter button down all the way. At that point, the viewfinder image will vanish (the mirror is no longer reflecting the image toward the focus screen), and a blinking mirror-up icon appears on the LCD panel. Shooting function settings and menu adjustments are disabled at this point. You must press the shutter release fully a second time to actually take the photo. The net result is that the (minor) vibration caused by the action of the mirror is eliminated, which can be important when shooting with a very long telephoto lens, or taking close-ups.
Mirror Lockup. This option is used while shooting. When enabled from this menu entry, the camera flips the mirror up out of the way when you press the shutter button down all the way. At that point, the viewfinder image will vanish (the mirror is no longer reflecting the image toward the focus screen), and a blinking mirror-up icon appears on the LCD panel. Shooting function settings and menu adjustments are disabled at this point. You must press the shutter release fully a second time to actually take the photo. The net result is that the (minor) vibration caused by the action of the mirror is eliminated, which can be important when shooting with a very long telephoto lens, or taking close-ups.
![]() Clean Manually. Select Clean Manually from the Sensor Cleaning entry in the Set-up 4 menu. The mirror will flip up immediately and the shutter will open, exposing the sensor. You can then safely clean your sensor using your favorite method. The shutter won’t close and the mirror won’t flip down until you power off the camera. The function can’t be activated unless your battery or external source has enough power to maintain this configuration.
Clean Manually. Select Clean Manually from the Sensor Cleaning entry in the Set-up 4 menu. The mirror will flip up immediately and the shutter will open, exposing the sensor. You can then safely clean your sensor using your favorite method. The shutter won’t close and the mirror won’t flip down until you power off the camera. The function can’t be activated unless your battery or external source has enough power to maintain this configuration.
Exposure Compensation/Automatic Exposure Bracketing
Options: 1/3 stop / 1/2-stop increments, plus/minus 5 stops (plus/minus 2 stops for AEB)
This is the first menu entry in the Shooting 3 menu. (See Figure 3.6.) To use this option, just select Exposure comp./AEB, press SET, and then:
![]() Add or subtract exposure compensation. When the screen shown in Figure 3.7 is visible, press the left/right multi-controller pad to subtract or add exposure. You can bypass the menu entirely when the Shooting Settings screen is visible by pressing the Av button (to the right of the LCD) and rotating the Main Dial.
Add or subtract exposure compensation. When the screen shown in Figure 3.7 is visible, press the left/right multi-controller pad to subtract or add exposure. You can bypass the menu entirely when the Shooting Settings screen is visible by pressing the Av button (to the right of the LCD) and rotating the Main Dial.
Figure 3.6 The Shooting 3 menu.
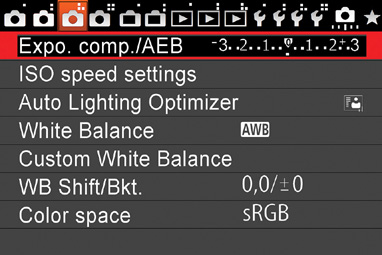
Figure 3.7 Add or subtract exposure compensation, or set the range of the three bracketed exposures.

![]() Activate exposure bracketing. When the screen is visible, rotate the Main Dial to spread the three blocks representing the bracketed exposures by the size of the bracket increment you want. Then, optionally, use the touch screen or multi-controller pad to shift the bracket so the center exposure is less or more than the base exposure calculated by the camera.
Activate exposure bracketing. When the screen is visible, rotate the Main Dial to spread the three blocks representing the bracketed exposures by the size of the bracket increment you want. Then, optionally, use the touch screen or multi-controller pad to shift the bracket so the center exposure is less or more than the base exposure calculated by the camera.
As you take pictures, the amount of bracketing will be shown as three indicators in the analog exposure display that flash when the shutter release button is pressed halfway. When AEB is activated, the three bracketed shots will be exposed in this sequence: metered exposure, decreased exposure, increased exposure. To cancel bracketing, select this menu option again, and use the left multi-selector button to converge all the bracket indicators once more.
ISO Speed Settings
Options: ISO Speed, ISO Speed Range, Auto ISO Range, Minimum Shutter Speed
Use this entry to select a specific ISO speed using a menu instead of the top-panel ISO button/menus, or to limit the range of ISO settings and shutter speeds that the camera selects automatically. The four subentries include:
![]() ISO Speed. You can choose Auto (the 70D will choose an ISO sensitivity appropriate for the light levels/exposure settings you’ve specified) or a fixed sensitivity from ISO 100 to ISO 12800, in one-third stop increments (for example, ISO 100, 125, or 160). If ISO expansion has been enabled using the ISO Speed Range choice (next), you can also choose H (25600 equivalent).
ISO Speed. You can choose Auto (the 70D will choose an ISO sensitivity appropriate for the light levels/exposure settings you’ve specified) or a fixed sensitivity from ISO 100 to ISO 12800, in one-third stop increments (for example, ISO 100, 125, or 160). If ISO expansion has been enabled using the ISO Speed Range choice (next), you can also choose H (25600 equivalent).
![]() ISO Speed Range. This option lets you specify both a minimum and maximum ISO sensitivity that can be selected manually using the ISO Speed option (above). Perhaps you have a preferred range and don’t want to accidentally use any ISO setting below ISO 100 or higher than ISO 3200. You can specify those limits here. Available ranges are ISO 100–12800 for the minimum and ISO 200–H for the maximum, if you expand the ISO range to H (equivalent of ISO 25600).
ISO Speed Range. This option lets you specify both a minimum and maximum ISO sensitivity that can be selected manually using the ISO Speed option (above). Perhaps you have a preferred range and don’t want to accidentally use any ISO setting below ISO 100 or higher than ISO 3200. You can specify those limits here. Available ranges are ISO 100–12800 for the minimum and ISO 200–H for the maximum, if you expand the ISO range to H (equivalent of ISO 25600).
![]() Auto ISO Range. Ordinarily, the 70D will select only ISO sensitivities between ISO 100 and ISO 12800. In Auto ISO mode, you can use the QCD to set the minimum to ISO 100 to ISO 6400 and the maximum up to H (ISO 25600 equivalent), using whole stop limits (for example, ISO 100, 200, or 400, but not ISO 125 or 160). Note that you can’t set a minimum that’s higher than the maximum, or vice versa. This option allows advanced shooters to enable automated ISO selection within limits they can tightly control. If you were shooting indoor sports in Shutter-priority (Tv) mode, you might want to specify a 1/500th second shutter speed, and allow the camera to adjust the ISO between, say, ISO 400 and ISO 3200. Limits you set here will also be applied to the ISO Speed Safety Shift feature.
Auto ISO Range. Ordinarily, the 70D will select only ISO sensitivities between ISO 100 and ISO 12800. In Auto ISO mode, you can use the QCD to set the minimum to ISO 100 to ISO 6400 and the maximum up to H (ISO 25600 equivalent), using whole stop limits (for example, ISO 100, 200, or 400, but not ISO 125 or 160). Note that you can’t set a minimum that’s higher than the maximum, or vice versa. This option allows advanced shooters to enable automated ISO selection within limits they can tightly control. If you were shooting indoor sports in Shutter-priority (Tv) mode, you might want to specify a 1/500th second shutter speed, and allow the camera to adjust the ISO between, say, ISO 400 and ISO 3200. Limits you set here will also be applied to the ISO Speed Safety Shift feature.
![]() Minimum Shutter Speed. Use this when working with Program (P) or Aperture-priority (Av) modes to specify the slowest shutter speed that will be used when Auto ISO is enabled. (In Shutter-priority [Tv] mode, you always choose the shutter speed.) This option ensures that the Auto ISO changes will kick in before the camera reduces the shutter speed below a value you select. You can choose speeds from 1 second to 1/250th second. For example, perhaps you are shooting indoor sports and elect to choose Aperture-priority instead of Shutter-priority (say, your lens works better at f/4 than its maximum aperture of f/2.8, and you want to work with f/4 all the time). Set 1/250th second as a minimum shutter speed, and if a correct exposure calls for a shutter speed slower than that at f/4, Auto ISO will be used to boost the sensitivity instead.
Minimum Shutter Speed. Use this when working with Program (P) or Aperture-priority (Av) modes to specify the slowest shutter speed that will be used when Auto ISO is enabled. (In Shutter-priority [Tv] mode, you always choose the shutter speed.) This option ensures that the Auto ISO changes will kick in before the camera reduces the shutter speed below a value you select. You can choose speeds from 1 second to 1/250th second. For example, perhaps you are shooting indoor sports and elect to choose Aperture-priority instead of Shutter-priority (say, your lens works better at f/4 than its maximum aperture of f/2.8, and you want to work with f/4 all the time). Set 1/250th second as a minimum shutter speed, and if a correct exposure calls for a shutter speed slower than that at f/4, Auto ISO will be used to boost the sensitivity instead.
However, if you’ve handicapped the 70D by selecting an Auto ISO range that doesn’t include a sensitivity high enough, the camera will override this setting and use a shutter speed lower than the minimum you specify anyway. The camera assumes (rightly or wrongly) that your upper ISO boundary is more important than your lower shutter speed limit. The lesson here is that if you really, really want to enforce a minimum shutter speed when using Auto ISO, make sure your upper limit is high enough. Note that the Minimum Shutter Speed setting is ignored when using flash.
Auto Lighting Optimizer
Options: Disable, Low, Standard, High
The Auto Lighting Optimizer provides a partial fix for images that are too dark or flat. Such photos typically have low contrast, and the Auto Lighting Optimizer improves them—as you shoot—by increasing both the brightness and contrast as required. The feature can be activated in Program, Aperture-priority, and Shutter-priority modes. You can select from four settings: Standard (the default value, which is always selected when using Scene Intelligent Auto and Creative Auto modes), plus Low, High, and Disable. Press the INFO. button to add/remove a check mark icon that indicates the Auto Lighting Optimizer is disabled during manual exposure. Since you’re likely to be specifying a particular exposure in Manual mode, you probably don’t want the optimizer to interfere with your settings, so disabling the feature is the default.
White Balance
Options: Auto, Six Presets, Custom, Color Temperature
If automatic white balance or one of the six preset settings available (Daylight, Shade, Cloudy, Tungsten, White Fluorescent, or Flash) aren’t suitable, you can set a custom white balance using this menu option or a specific color temperature value. If you choose the “K” entry, you can select an exact color temperature from 2,500K to 10,000K using the Main Dial.
Of course, unless you own a specialized tool called a color temperature meter, you probably won’t know the exact color temperature of your scene. However, knowing the color temperatures of the six preset options can help you if you decide to tweak them by choosing a different color temperature setting. The values used by the 70D are as follows:
![]() Auto (AWB). 3000–7000K
Auto (AWB). 3000–7000K
![]() Daylight. 5200K
Daylight. 5200K
![]() Shade. 7000K
Shade. 7000K
![]() Cloudy. 6000K
Cloudy. 6000K
![]() Tungsten. 3200K
Tungsten. 3200K
![]() White fluorescent. 4000K
White fluorescent. 4000K
![]() Flash. 6000K
Flash. 6000K
![]() Custom. 2000–10000K
Custom. 2000–10000K
![]() Color temperature. 2500–10000K (Settable in 100K increments)
Color temperature. 2500–10000K (Settable in 100K increments)
Custom White Balance
Options: Manually set white balance
You can set a Custom white balance using this menu option. The custom setting you establish will then be applied whenever you select Custom using the WB button.
To set the white balance to an appropriate color temperature under the current ambient lighting conditions, follow these steps:
1. Focus manually (with the lens set on MF) on a plain white or gray object, such as a card or wall, making sure the object fills the spot metering circle in the center of the viewfinder.
2. Take a photo.
3. Press the MENU button and select Custom White Balance from the Shooting 3 menu.
4. The reference image you just took appears. If you want to use a different picture, use the touch screen or multi-controller pad to navigate to the photo you’d like to use.
5. Choose SET to store the white balance of the image as your custom setting.
6. If the selected image can be used to record white balance, a message will appear: Use WB data from this image for Custom WB. You can select Cancel or OK.
If the 70D can’t use the image you select, a different message appears: Correct WB may not be obtained with the selected image. In that case, choose a different photo or go back to Step 1.
7. Once you’ve stored an image’s white balance, henceforth, you can access this customized setting from the White Balance menu.
White Balance Shift and Bracketing
Options: White balance correction, White balance bracketing
White balance shift allows you to dial in a white balance color bias along the blue/amber (yellow) dimensions, and/or magenta/green scale. In other words, you can set your color balance so that it is a little bluer or yellower (only), a little more magenta or green (only), or a combination of the two bias dimensions. You can also bracket exposures, taking several consecutive pictures each with a slightly different color balance biased in the directions you specify.
The process is a little easier to visualize if you look at Figure 3.8. The center intersection of lines BA and GM (remember high school geometry!) is the point of zero bias. Move the point at that intersection using the left/right and up/down multi-controller pad to locate it at any point on the graph using the blue/amber (yellow) and green/magenta coordinates. The amount of shift will be displayed in the SHIFT box to the right of the graph.
Figure 3.8 Use the Main Dial to specify color balance bracketing using green/magenta bias or to specify blue/amber (yellow) bias. The up/down and left/right multi-controller pad can be used to maneuver the bracketing into any quadrant.
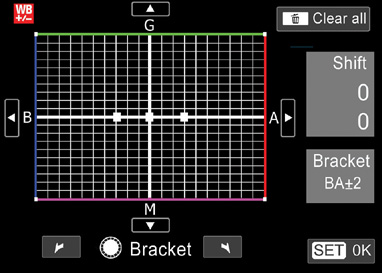
White balance bracketing is like white balance shifting, only the bracketed changes occur along the bias axis you specify. The three squares in Figure 3.8 show that the white balance bracketing will occur in two stop steps along the blue/amber (yellow) axis. The amount of the bracketing is shown in the lower box to the right of the graph.
This form of bracketing is similar to exposure bracketing, but with the added dimension of hue instead of brightness/darkness. Bias bracketing can be performed in any JPEG-only mode. You can’t use RAW or RAW+JPEG, because the RAW files already contain the information needed to fine-tune the white balance and white balance bias.
White Balance Bracketing
Follow these steps to bracket white balance:
1. Activate white balance shift/bracketing. Select WB SHIFT/BKT from the Shooting 3 menu.
2. Choose the amount of the WB bracketing. Rotate the Main Dial to select the amount of shift (how much each photo will vary). Spin to the right to separate the three indicator dots by 1 to 3 increments in the horizontal blue/amber axis. Spin to the left to separate the three dots in the vertical green/magenta direction. The bracket amount (BA) will be shown in the BKT box at the right side of the screen.
3. Select the WB bias. Unless you adjust the white balance bias, the bracketing will take place along one axis only; that is, blue-to-amber changes or green-to-magenta changes. Each type of adjustment progresses from the center neutral point that’s the intersection of axes BA and GM. You can use the touch screen or up/down multi-controller pad to add some bias to the white balance bracketing (described next).
4. Confirm your white balance bracketing. Press INFO. to cancel the WB shift/bracketing changes you’ve made, or press SET to confirm the setting and return to the Shooting 3 menu.
5. Take your bracket sets. Subsequent pictures you take will have their white balance bracketed in sets of three, using the parameters you’ve just entered. The order will be Standard WB (representing the middle dot of the three); more blue/more magenta (either the left or top dot, depending on whether you used the blue/amber or magenta/green axes); more amber/more green.
![]() Tip
Tip
If you use the 70D’s continuous shooting feature, you can snap off all three shots in a bracket set quickly and automatically. Note that if High ISO speed noise reduction is set to On in the Custom Functions menu (described in Chapter 4), WB bracketing is disabled.
Color Space
Options: sRGB, Adobe RGB
When you are using one of the Creative Zone modes, you can select one of two different color spaces, which define a specific set of colors that can be applied to the images your 70D captures. The Color Space menu choice applies directly to JPEG images shot using Creative Zone exposure modes (P, Tv, Av, M, and A-DEP). When you’re using Basic Zone modes, the 70D uses the sRGB color space for all the JPEG images you take. RAW images are a special case. They have the information for both sRGB and Adobe RGB, but when you load such photos into your image editor, it will default to sRGB (with Basic Zone shots) or the color space specified here (for Creative Zone pictures) unless you change that setting while importing the photos.
Picture Style
Options: Auto, Standard, Portrait, Landscape, Neutral, Faithful, Monochrome, User Def 1, User Def 2, User Def 3
This is the first entry in the Shooting 4 menu. (See Figure 3.9.) The Picture Styles feature allows you to customize the way your 70D renders its photos. Use the touch screen or multi-controller pad to move through the list of available styles. As each style is highlighted, its current settings for Sharpness, Contrast, Saturation, and Color Tone are shown at the top of the screen. Press SET to activate the style of your choice. Press the INFO. button, as described below, to adjust these settings.
You’ll primarily use this menu item to define or redefine your Picture Styles. (See Figure 3.10.) You can also set up Picture Styles using the 70D’s Picture Styles editor within the Digital Photo Pro software.
Figure 3.9 The Shooting 4 menu.

Figure 3.10 Ten different Picture Style settings are available from this scrolling menu; these six plus four styles not shown.

Picture Styles are extremely flexible. Canon has set the parameters for the five predefined color Picture Styles and the single monochrome Picture Style to suit the needs of most photographers. But you can adjust any of those “canned” Picture Styles to settings you prefer. Better yet, you can use those three User Definition files to create brand-new styles that are all your own.
![]() Sharpness. This parameter determines the apparent contrast between the outlines or edges in an image, which we perceive as image sharpness. You can adjust the sharpness of the image between values of 0 (no sharpening added) to 7 (dramatic additional sharpness). When adjusting sharpness, remember that more is not always a good thing. A little softness is necessary (and is introduced by a blurring “anti-alias” filter in front of the sensor) to reduce or eliminate the moiré effects that can result when details in your image form a pattern that is too close to the pattern of the sensor itself. As you boost sharpness, moiré can become a problem, plus, you may end up with those noxious “halos” that appear around the edges of images that have been oversharpened.
Sharpness. This parameter determines the apparent contrast between the outlines or edges in an image, which we perceive as image sharpness. You can adjust the sharpness of the image between values of 0 (no sharpening added) to 7 (dramatic additional sharpness). When adjusting sharpness, remember that more is not always a good thing. A little softness is necessary (and is introduced by a blurring “anti-alias” filter in front of the sensor) to reduce or eliminate the moiré effects that can result when details in your image form a pattern that is too close to the pattern of the sensor itself. As you boost sharpness, moiré can become a problem, plus, you may end up with those noxious “halos” that appear around the edges of images that have been oversharpened.
![]() Contrast. Use this control, with values from −4 (low contrast) to +4 (higher contrast) to change the number of middle tones between the deepest blacks and brightest whites. Low contrast settings produce a flatter-looking photo, while high-contrast adjustments may improve the tonal rendition while possibly losing detail in the shadows or highlights.
Contrast. Use this control, with values from −4 (low contrast) to +4 (higher contrast) to change the number of middle tones between the deepest blacks and brightest whites. Low contrast settings produce a flatter-looking photo, while high-contrast adjustments may improve the tonal rendition while possibly losing detail in the shadows or highlights.
![]() Saturation. This parameter, adjustable from −4 (low saturation) to +4 (high saturation), controls the richness of the color, making, say, a red tone appear to be deeper and fuller when you increase saturation, and tend more toward lighter, pinkish hues when you decrease saturation of the reds. Boosting the saturation too much can mean that detail may be lost in one or more of the color channels, producing what is called “clipping.”
Saturation. This parameter, adjustable from −4 (low saturation) to +4 (high saturation), controls the richness of the color, making, say, a red tone appear to be deeper and fuller when you increase saturation, and tend more toward lighter, pinkish hues when you decrease saturation of the reds. Boosting the saturation too much can mean that detail may be lost in one or more of the color channels, producing what is called “clipping.”
![]() Color tone. This adjustment has the most effect on skin tones, making them either redder (0 to –4) or yellower (0 to +4).
Color tone. This adjustment has the most effect on skin tones, making them either redder (0 to –4) or yellower (0 to +4).
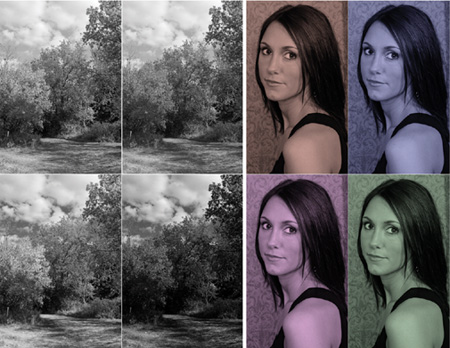
![]() Filter effect (monochrome only). Filter effects, accessed by pressing the INFO. button, do not add any color to a black-and-white image. Instead, they change the rendition of gray tones as if the picture were taken through a color filter. (See Figure 3.11, left.)
Filter effect (monochrome only). Filter effects, accessed by pressing the INFO. button, do not add any color to a black-and-white image. Instead, they change the rendition of gray tones as if the picture were taken through a color filter. (See Figure 3.11, left.)
![]() Toning effect (monochrome only). Using toning effects, also accessed by pressing the INFO. button, preserves the monochrome tonal values in your image, but adds a color overlay that gives the photo a sepia, blue, purple, or green cast. (See Figure 3.11, right.)
Toning effect (monochrome only). Using toning effects, also accessed by pressing the INFO. button, preserves the monochrome tonal values in your image, but adds a color overlay that gives the photo a sepia, blue, purple, or green cast. (See Figure 3.11, right.)
Figure 3.11 Filter effects: Left, clockwise from upper left: No filter; yellow filter; red filter; and green filter. Toning effects: Right, clockwise from upper left: Sepia; blue; green; and purple.
The predefined Picture Styles are as follows (The first six were shown previously in Figure 3.10.):
![]() Auto. Adjusts the color to make outdoor scenes look more vivid, with richer colors.
Auto. Adjusts the color to make outdoor scenes look more vivid, with richer colors.
![]() Standard. This Picture Style, the default, applies a set of parameters useful for most picture taking. These parameters are applied automatically when using Basic Zone modes other than Portrait or Landscape.
Standard. This Picture Style, the default, applies a set of parameters useful for most picture taking. These parameters are applied automatically when using Basic Zone modes other than Portrait or Landscape.
![]() Portrait. This style boosts saturation for richer colors when shooting portraits, particularly of women and children, while reducing sharpness slightly to provide more flattering skin texture. The Basic Zone Portrait setting uses this Picture Style. You might prefer the Faithful style for portraits of men when you want a more rugged or masculine look, or when you want to emphasize character lines in the faces of older subjects of either gender.
Portrait. This style boosts saturation for richer colors when shooting portraits, particularly of women and children, while reducing sharpness slightly to provide more flattering skin texture. The Basic Zone Portrait setting uses this Picture Style. You might prefer the Faithful style for portraits of men when you want a more rugged or masculine look, or when you want to emphasize character lines in the faces of older subjects of either gender.
![]() Landscape. This style increases the saturation of blues and greens, and increases both color saturation and sharpness for more vivid landscape images. The Basic Zone Landscape mode uses this setting.
Landscape. This style increases the saturation of blues and greens, and increases both color saturation and sharpness for more vivid landscape images. The Basic Zone Landscape mode uses this setting.
![]() Neutral. This Picture Style is a less saturated and lower contrast version of the Standard style. Use it when you want a more muted look to your images, or when the photos you are taking seem too bright and contrasty (say, at the beach on a sunny day).
Neutral. This Picture Style is a less saturated and lower contrast version of the Standard style. Use it when you want a more muted look to your images, or when the photos you are taking seem too bright and contrasty (say, at the beach on a sunny day).
![]() Faithful. The goal of this style is to render the colors of your image as accurately as possible, roughly in the same relationships as seen by the eye.
Faithful. The goal of this style is to render the colors of your image as accurately as possible, roughly in the same relationships as seen by the eye.
![]() Monochrome. Use this Picture Style to create black-and-white photos in the camera.
Monochrome. Use this Picture Style to create black-and-white photos in the camera.
Selecting Picture Styles
Canon makes selecting a Picture Style very easy, and, to prevent you from accidentally changing an existing style when you don’t mean to, divides selection and modification functions into two separate tasks. One way to select a Picture Style is to choose Picture Style from the Shooting 4 menu and press SET to produce the main Picture Style menu screen. Use the up/down multi-controller pad to choose from the nine choices. Press SET to activate the style of your choice.
Defining Picture Styles
You can change one of the existing Picture Styles or define your own whenever the Shooting 4 menu version of the Picture Styles menu or the pop-up selection screen shown are visible. Just press the INFO. button when either screen is on the LCD. Follow these steps:
1. Select Style. Use the multi-controller pad to scroll to the style you’d like to adjust.
2. Choose Detail Set. Press the INFO. button to choose Detail Set. If you’re coming from the Shooting 4 menu, the screen that appears next will look like the one shown in Figure 3.12 for the six color styles (but not the monochrome style) or three User Def styles. If you’ve accessed the adjustment screen by pressing the Picture Styles button first, the screen looks much the same, but has blue highlighting instead of red.
3. Specify parameter to change. Use the multi-controller pad to scroll among the four parameters. Default Set. at the bottom of the screen restores the values to the preset numbers.
Figure 3.12 Adjusting Picture Style details.

4. Adjust parameters. Change the values of one of the four parameters. If you’re redefining one of the default presets, the menu screen will look like the figure, which represents the Landscape Picture Style. Use the touch screen or multi-controller pad to move the triangle to the value you want to use. Note that the previous value remains on the scale, represented by a gray triangle. This makes it easy to return to the original setting if you want.
5. Confirm change. Choose SET to lock in that value, then press the MENU button two times to back out of the menu system.
Any Picture Style that has been changed from its defaults will be shown in the Picture Style menu with blue highlighting the altered parameter. A quick glance at the Picture Style menu will show you which styles and parameters have been changed.
Making changes in the Monochrome Picture Style is slightly different, as the Saturation and Color Tone parameters are replaced with Filter Effect and Toning Effect options. (Keep in mind that once you’ve taken a photo using a Monochrome Picture Style, you can’t convert the image back to full color.) You can choose from Yellow, Orange, Red, Green filters, or None, and specify Sepia, Blue, Purple, or Green toning, or None. You can still set the Sharpness and Contrast parameters that are available with the other Picture Styles.
Adjusting Styles with the Picture Style Editor
The Picture Style Editor allows you to create your own custom Picture Styles, or edit existing styles, including the Standard, Landscape, Faithful, and other predefined settings already present in your EOS 70D. You can change sharpness, contrast, color saturation, and color tone—and a lot more—and then save the modifications as a PF2 file that can be uploaded to the camera, or used by Digital Photo Professional to modify a RAW image as it is imported.
Getting More Picture Styles
I’ve found that careful Googling can unearth other Picture Styles that helpful fellow EOS owners have made available, and even a few from the helpful Canon company itself, such as Studio Portrait, Snapshot Portrait, Nostalgia, Clear, Twilight, Emerald, and Autumn hues.
Long Exposure Noise Reduction
Options: Disable, Auto, Enable
This entry allows you to enable or disable long exposure noise reduction, or allow the 70D to evaluate your scene and decide whether to use this noise-canceling adjustment. Visual noise is that graininess that shows up as multicolored specks in images, and this setting helps you manage it. In some ways, noise is like the excessive grain found in some high-speed photographic films. However, while photographic grain is sometimes used as a special effect, it’s rarely desirable in a digital photograph.
Noise can be produced from high ISO settings. As the captured information is amplified to produce higher ISO sensitivities, some random noise in the signal is amplified along with the photon information. Increasing the ISO setting of your camera raises the threshold of sensitivity so that fewer and fewer photons are needed to register as an exposed pixel. Yet, that also increases the chances of one of those phantom photons being counted among the real-life light particles, too.
![]() Disable. This setting disables long exposure noise reduction. Use this setting when you want the maximum amount of detail present in your photograph, even though higher noise levels will result. This setting also eliminates the extra time needed to take a picture caused by the noise reduction process. If you plan to use only lower ISO settings (thereby reducing the noise caused by ISO amplification), the noise levels produced by longer exposures may be acceptable. For example, you might be shooting a river spilling over rocks at ISO 100 with the camera mounted on a tripod, using a neutral-density filter and long exposure to cause the pounding water to blur slightly. To maximize detail in the non-moving portions of your photos, you can switch off long exposure noise reduction. Because the noise-reduction process used with Auto and Enable can effectively double the time required to take a picture, Disable is a good setting to use when you want to avoid this delay when possible.
Disable. This setting disables long exposure noise reduction. Use this setting when you want the maximum amount of detail present in your photograph, even though higher noise levels will result. This setting also eliminates the extra time needed to take a picture caused by the noise reduction process. If you plan to use only lower ISO settings (thereby reducing the noise caused by ISO amplification), the noise levels produced by longer exposures may be acceptable. For example, you might be shooting a river spilling over rocks at ISO 100 with the camera mounted on a tripod, using a neutral-density filter and long exposure to cause the pounding water to blur slightly. To maximize detail in the non-moving portions of your photos, you can switch off long exposure noise reduction. Because the noise-reduction process used with Auto and Enable can effectively double the time required to take a picture, Disable is a good setting to use when you want to avoid this delay when possible.
![]() Auto. The 70D examines your photo taken with an exposure of one second or longer, and if long exposure noise is detected, a second, blank exposure is made and compared to the first image. Noise found in the “dark frame” image is subtracted from your original picture, and only the noise-corrected image is saved to your memory card.
Auto. The 70D examines your photo taken with an exposure of one second or longer, and if long exposure noise is detected, a second, blank exposure is made and compared to the first image. Noise found in the “dark frame” image is subtracted from your original picture, and only the noise-corrected image is saved to your memory card.
![]() Enable. When this setting is activated, the 70D applies dark frame subtraction to all exposures longer than one second. You might want to use this option when you’re working with high ISO settings (which will already have noise boosted a bit) and want to make sure that any additional noise from long exposures is eliminated, too. Noise reduction will be applied to some exposures that would not have caused it to kick in using the Auto setting.
Enable. When this setting is activated, the 70D applies dark frame subtraction to all exposures longer than one second. You might want to use this option when you’re working with high ISO settings (which will already have noise boosted a bit) and want to make sure that any additional noise from long exposures is eliminated, too. Noise reduction will be applied to some exposures that would not have caused it to kick in using the Auto setting.
![]() Tip
Tip
While the “dark frame” is being exposed, the LCD screen will be blank during Live View mode, and the number of shots you can take in Continuous shooting mode will be reduced. White balance bracketing is disabled during this process.
High ISO Speed Noise Reduction
Options: Disable, Low, Standard, High, Multi Shot Noise Reduction
The other type of noise results from using higher ISO settings. This entry allows you to specify just how much or how little of this noise reduction to apply, which can be a valuable option because noise reduction does eliminate detail while blurring the amount of noise. The default is Standard noise reduction, but you can specify Low or High noise reduction, or disable noise reduction entirely. At lower ISO values, noise reduction improves the appearance of shadow areas without affecting highlights; at higher ISO settings, noise reduction is applied to the entire photo. Note that when the High option is selected, the maximum number of continuous shots that can be taken will decrease significantly, because of the additional processing time for the images.
![]() Disable. No additional noise reduction will be applied.
Disable. No additional noise reduction will be applied.
![]() Low. A smaller amount of noise reduction is used. This will increase the grainy appearance, but preserve more fine image detail.
Low. A smaller amount of noise reduction is used. This will increase the grainy appearance, but preserve more fine image detail.
![]() Standard. At lower ISO values, noise reduction is applied primarily to shadow areas; at higher ISO settings, noise reduction affects the entire image.
Standard. At lower ISO values, noise reduction is applied primarily to shadow areas; at higher ISO settings, noise reduction affects the entire image.
![]() High. More aggressive noise reduction is used, at the cost of some image detail, adding a “mushy” appearance that may be noticeable and objectionable. Because of the image processing applied by this setting, your continuous shooting maximum burst will decrease significantly.
High. More aggressive noise reduction is used, at the cost of some image detail, adding a “mushy” appearance that may be noticeable and objectionable. Because of the image processing applied by this setting, your continuous shooting maximum burst will decrease significantly.
![]() Multi Shot Noise Reduction. The 70D takes four shots and combines them into a single JPEG image with reduced noise.
Multi Shot Noise Reduction. The 70D takes four shots and combines them into a single JPEG image with reduced noise.
Highlight Tone Priority
Options: Disable/Off, Enable/D+
This setting concentrates the available tones in an image from the middle grays up to the brightest highlights, in effect expanding the dynamic range of the image at the expense of shadow detail. You’d want to activate this option when shooting subjects in which there is lots of important detail in the highlights, and less detail in shadow areas. Highlight tones will be preserved, while shadows will be allowed to go dark more readily (and may exhibit an increase in noise levels). Bright beach or snow scenes, especially those with few shadows (think high noon, when the shadows are smaller) can benefit from using Highlight Tone Priority. Your choices:
![]() Disable/OFF. The 70D’s normal dynamic range is applied. Note that when Highlight Tone Priority is switched off, the related Auto Lighting Optimizer setting (discussed earlier in this chapter) functions normally.
Disable/OFF. The 70D’s normal dynamic range is applied. Note that when Highlight Tone Priority is switched off, the related Auto Lighting Optimizer setting (discussed earlier in this chapter) functions normally.
![]() Enable/D+. Highlight areas are given expanded tonal values, while the tones available for shadow areas are reduced. The ISO 100 sensitivity setting is disabled and only ISO 200 to ISO 25600 (or ISO 200-12800 for movies) are available. You can tell that this restriction is in effect by viewing the D+ icon shown in the viewfinder, on the ISO Selection screen, and in the shooting information display for a particular image. Image noise may slightly increase as the camera manipulates the image. Note that this setting disables the Auto Lighting Optimizer.
Enable/D+. Highlight areas are given expanded tonal values, while the tones available for shadow areas are reduced. The ISO 100 sensitivity setting is disabled and only ISO 200 to ISO 25600 (or ISO 200-12800 for movies) are available. You can tell that this restriction is in effect by viewing the D+ icon shown in the viewfinder, on the ISO Selection screen, and in the shooting information display for a particular image. Image noise may slightly increase as the camera manipulates the image. Note that this setting disables the Auto Lighting Optimizer.
Dust Delete Data
Options: None (Captures data used to erase dust spots)
This menu choice lets you “take a picture” of any dust or other particles that may be adhering to your sensor. The 70D will then append information about the location of this dust to your photos, so that the Digital Photo Professional software can use this reference information to identify dust in your images and remove it automatically. You should capture a Dust Delete Data photo from time to time as your final line of defense against sensor dust.
To use this feature, select Dust Delete Data. Select OK and choose SET. The camera will first perform a self-cleaning operation by applying ultrasonic vibration to the low-pass filter that resides on top of the sensor. Then, a screen will appear asking you to press the shutter button. Point the 70D at a solid white card with the lens set on manual focus and rotate the focus ring to infinity. When you press the shutter release, the camera takes a photo of the card using Aperture-priority and f/22 (which provides enough depth-of-field [actually, in this case depth-of-focus] to image the dust sharply). The “picture” is not saved to your memory card but, rather, is stored in a special memory area in the camera. Finally, a Data Obtained screen appears. If the 70D was unable to capture the data, you’ll be asked to repeat the process. Make sure the camera is pointed at a plain white surface that’s evenly illuminated.
The Dust Delete Data information is retained in the camera until you update it by taking a new “picture.” The 70D adds the information to each image file automatically.
Multiple Exposure
Options: Multiple Exposure, Multi-Expos Ctrl, Number of Exposures, Continue Multi Exposure
This option lets you combine two to nine separate images into one photo without the need for an image editor like Photoshop, and can be an entertaining way to return to those thrilling days of yesteryear, when complex photos were created in the camera itself. In truth, prior to the digital age, multiple exposures were a cool, groovy, far-out, hep/hip, phat, sick, fabulous way of producing composite images. Today, it’s more common to take the lazy way out, snap two or more pictures, and then assemble them in an image editor like Photoshop.
Multiple exposures cannot be captured if white balance bracketing, HDR shooting, or movie-making modes are in use. Before you begin snapping your own multiexposures, you’ll need to set your parameters using the following options.
Multiple Exposure
The Disable option deactivates the multiexposure feature, but you can quickly choose either of the two On variations. This is the “master control” that allows you to turn multiple exposure on and off (leaving the other parameters you’ve set unchanged).
![]() Disable. Deactivates multiple exposure.
Disable. Deactivates multiple exposure.
![]() Enable. Turns multiple exposure functions on.
Enable. Turns multiple exposure functions on.
Multi-Expos Ctrl
This essential parameter can determine how successful your multiple exposure is, by controlling how each individual exposure is merged with the overlapping portions of the other images in the series. The Multi-Exposure Control feature allows you to specify how the images are combined with these choices:
![]() Additive. Each individual shot in the series is by default given the full exposure. This is useful when backgrounds are totally black and the subject is moving and does not overlap. The effect was to combine three separate images into one image.
Additive. Each individual shot in the series is by default given the full exposure. This is useful when backgrounds are totally black and the subject is moving and does not overlap. The effect was to combine three separate images into one image.
However, you can manually adjust the amount of exposure each shot is given by dialing in exposure compensation, making this mode useful for overlapping images as well. The customary procedure is to specify –1 stop exposure compensation for two shots, –1.5 EV for three-shot multiple exposures, and –2 EV for four-shot multis. Manually calculating the amount of negative exposure compensation allows you to fine-tune the look of overlapping images.
![]() Average. Choose this option and the 70D will apply appropriate negative exposure compensation for you, based on the number of exposures you’re combining into a single image. If your multiple exposures happen to be of the same scene (rather than separate subjects), the camera will attempt to ensure that the background receives the equivalent of a full exposure.
Average. Choose this option and the 70D will apply appropriate negative exposure compensation for you, based on the number of exposures you’re combining into a single image. If your multiple exposures happen to be of the same scene (rather than separate subjects), the camera will attempt to ensure that the background receives the equivalent of a full exposure.
No. of Exposures
You can choose from 2 to 9 exposures in each multiple exposure set. There is no selection screen for this option; highlight it and spin the QCD to choose the number of exposures. I recommend starting out with three multiple exposures when you begin exploring this tool; you’ll quickly discover picture opportunities that call for more combined shots in a single image.
Continue Multiple Exposure
Choose 1 Shot Only or Continuously. Choose the former if you want to take a single multiple exposure series and then return to normal shooting with Multiple Exposure then disabled. Select Continuously if you plan to shoot a batch of different multiple exposures and don’t want to return to the menu system to reactivate the feature after each shot.
MULTI NOTES
Some special conditions are required for your 70D to shoot multiple exposures. Some features are disabled, and others are locked in at particular values.
![]() Auto Lighting Optimizer, Highlight Tone Priority, and Peripheral Illumination/Chromatic Aberration Correction are disabled, and the Standard Picture Style will be used if you’ve chosen the Auto Picture Style setting. Multiple exposures are disabled if your camera is connected to a computer or printer via the USB cable.
Auto Lighting Optimizer, Highlight Tone Priority, and Peripheral Illumination/Chromatic Aberration Correction are disabled, and the Standard Picture Style will be used if you’ve chosen the Auto Picture Style setting. Multiple exposures are disabled if your camera is connected to a computer or printer via the USB cable.
![]() Most settings used for the first shot in a series are locked in for all subsequent images in that series, including image recording quality, ISO sensitivity, Picture Style, high ISO noise reduction, and color space.
Most settings used for the first shot in a series are locked in for all subsequent images in that series, including image recording quality, ISO sensitivity, Picture Style, high ISO noise reduction, and color space.
![]() Other functions that cannot be changed while shooting multiple exposures will be dimmed in the camera menu.
Other functions that cannot be changed while shooting multiple exposures will be dimmed in the camera menu.
HDR Mode
Options: Adjust Dynamic Range, Continuous HDR, Auto Image Align
This menu entry has three subentries you can adjust:
![]() Adjust Dynamic Range. Select Disable HDR, allow the camera to select a dynamic range automatically, or select the range yourself to achieve a particular look. You can choose plus/minus 1, 2, or 3 EV.
Adjust Dynamic Range. Select Disable HDR, allow the camera to select a dynamic range automatically, or select the range yourself to achieve a particular look. You can choose plus/minus 1, 2, or 3 EV.
![]() Continuous HDR. Choose 1 Shot Only if you plan to take just a single HDR exposure and want the feature disabled automatically thereafter, or Every Shot to continue using HDR mode for all subsequent exposures until you turn it off. This is similar to the multiple exposure option described earlier.
Continuous HDR. Choose 1 Shot Only if you plan to take just a single HDR exposure and want the feature disabled automatically thereafter, or Every Shot to continue using HDR mode for all subsequent exposures until you turn it off. This is similar to the multiple exposure option described earlier.
![]() Auto Image Align. You can choose Enable to have the camera attempt to align all three HDR exposures when shooting handheld, or select Disable when using a tripod. The success of the automatic alignment will vary, depending on the shutter speed used (higher is better), and the amount of camera movement (less is better!).
Auto Image Align. You can choose Enable to have the camera attempt to align all three HDR exposures when shooting handheld, or select Disable when using a tripod. The success of the automatic alignment will vary, depending on the shutter speed used (higher is better), and the amount of camera movement (less is better!).
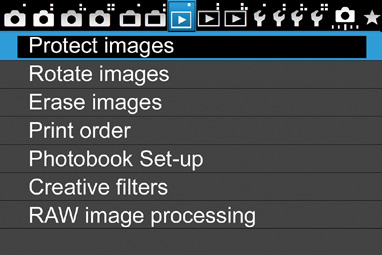
Playback Menu Options
The three blue-coded Playback menus are where you select options related to the display, review, transfer, and printing of the photos you’ve taken. The choices you’ll find include the following:
![]() Protect Images
Protect Images
![]() Rotate Image
Rotate Image
![]() Erase Images
Erase Images
![]() Print Order
Print Order
![]() Photobook Set-up
Photobook Set-up
![]() Creative Filters
Creative Filters
![]() RAW Image Processing
RAW Image Processing
![]() Resize
Resize
![]() Rating
Rating
![]() Slide Show
Slide Show
![]() Image Jump with Main Dial
Image Jump with Main Dial
![]() Highlight Alert
Highlight Alert
![]() AF Point Display
AF Point Display
![]() Playback Grid
Playback Grid
![]() Histogram Display
Histogram Display
![]() Movie Play Count
Movie Play Count
![]() Ctrl over HDMI
Ctrl over HDMI
Protect Images
Options: Protect images from erasure
This is the first entry in the Playback 1 menu. (See Figure 3.13.) If you want to keep an image from being accidentally erased (either with the Erase button or by using the Erase images menu), you can mark that image for protection. To protect one or more images, press the MENU button and choose Protect. Then use the touch screen or multi-controller pad to view the image to be protected. Choose SET to apply the protection. A key icon will appear at the upper edge of the information display while still in the protection screen, and when reviewing that image later. To remove protection, repeat the process. You can scroll among the other images on your memory card and protect/unprotect them in the same way. Image protection will not save your images from removal when the card is reformatted. Your choices include:
![]() All Images in Folder
All Images in Folder
![]() Unprotect All Images in Folder
Unprotect All Images in Folder
![]() All Images on Card
All Images on Card
![]() Unprotect All Images on Card
Unprotect All Images on Card
Rotate Image
Options: Rotate vertical images
You can set the 70D to automatically rotate images taken in a vertical orientation using the Auto Rotate option in the Set-up 1 menu. You can manually rotate an image during playback using this menu selection. Select Rotate from the Playback menu, use the touch screen or left/right multi-controller pad to page through the available images on your memory card until the one you want to rotate appears, then press SET. The image will appear on the screen rotated 90 degrees. Press SET again, and the image will be rotated 270 degrees.
Erase Images
Options: Remove images
Choose this menu entry and you’ll be given three choices: Select and Erase Images, All Images in Folder, and All Images on Card. The first option displays the most recent image. Press SET to mark or unmark an image for deletion (a check mark will appear in a box next to a trash can symbol, with a running total of selected images). Then, use the touch screen or multi-controller pad to view other images and mark/unmark them for deletion. If you try to mark a protected image for deletion, a warning -- Protected -- appears on the screen.
When finished marking pictures, press the Trash button, and you’ll see a screen that says Erase Selected Images with two options, Cancel and OK. Choose OK, then choose SET to erase the images, or select Cancel and choose SET to return to the selection screen. Press the MENU button to unmark your selections and return to the menu.
The All Images on Card choice removes all the pictures on the card, except for those you’ve marked with the Protect command, and does not reformat the memory card.
Print Order
Options: Choose images to be printed using DPOF
The 70D supports the DPOF (Digital Print Order Format) that is now almost universally used by digital cameras to specify which images on your memory card should be printed, and the number of prints desired of each image. This information is recorded on the memory card, and can be interpreted by a compatible printer when the camera is linked to the printer using the USB cable, or when the memory card is inserted into a card reader slot on the printer itself. Photo labs are also equipped to read this data and make prints when you supply your memory card to them.
Photobook Set-up
You can select up to 998 images on your memory card, and then use the EOS Utility to copy them all to a specific folder on your computer. This is a handy way to transfer only specific images to a particular folder, and is especially useful when you’re collecting photos to assemble in a photobook. Your choices include:
![]() Select images. You can mark individual images from any folder on your memory card.
Select images. You can mark individual images from any folder on your memory card.
![]() All images in folder. Mark all the images in a particular folder for transfer.
All images in folder. Mark all the images in a particular folder for transfer.
![]() Clear all in folder. Unmark all the images in a folder.
Clear all in folder. Unmark all the images in a folder.
![]() All images on card. Mark all the images on the memory card for transfer to the specific folder.
All images on card. Mark all the images on the memory card for transfer to the specific folder.
![]() Clear all on card. Unmark all the images on the card.
Clear all on card. Unmark all the images on the card.
Once you marked the images you want to transfer to the specified folder, use the EOS Utility to copy them.
Creative Filters
This menu entry allows you to apply some interesting effects to images you’ve already taken, and save a copy alongside the original. When you select this menu entry, you’ll be taken to a screen that allows you to choose an image to modify. You can scroll through the available images with the multi-controller pad or press the Index/Reduce button to view thumbnails and select from those. Only images that can be edited are shown. Then, press SET, and choose the filter you want to apply from a list at the bottom of the screen using the left/right multi-selector buttons. Press SET to activate the filter, then use the touch screen or navigational buttons again to adjust the amount of the effect (or select the area to be adjusted using the miniature effect). Press SET once more to save your new image.
The seven effects include the following:
![]() Grainy B/W. Creates a grainy monochrome image. You can adjust contrast among Low, Normal, and Strong settings.
Grainy B/W. Creates a grainy monochrome image. You can adjust contrast among Low, Normal, and Strong settings.
![]() Soft Focus. Blur your image using Low, Normal, and Strong options.
Soft Focus. Blur your image using Low, Normal, and Strong options.
![]() Fish-eye Effect. Creates a distorted, curved image.
Fish-eye Effect. Creates a distorted, curved image.
![]() Art Bold Effect. Produces a three-dimensional oil painting effect. You can adjust contrast and saturation.
Art Bold Effect. Produces a three-dimensional oil painting effect. You can adjust contrast and saturation.
![]() Water Painting Effect. Gives you soft colors like a watercolor painting, and allows you to adjust color density.
Water Painting Effect. Gives you soft colors like a watercolor painting, and allows you to adjust color density.
![]() Toy Camera Effect. Darkens the corners of an image, much as a toy camera does, and adds a warm or cool tone (or none), as you wish.
Toy Camera Effect. Darkens the corners of an image, much as a toy camera does, and adds a warm or cool tone (or none), as you wish.
![]() Miniature Effect. This is a clever effect, and it’s hampered by a misleading name and the fact that its properties are hard to visualize (which is not a great attribute for a visual effect). This tool doesn’t create a “miniature” picture, as you might expect. What it does is mimic tilt/shift lens effects that angle the lens off the axis of the sensor plane to drastically change the plane of focus, producing the sort of look you get when viewing some photographs of a diorama, or miniature scene.
Miniature Effect. This is a clever effect, and it’s hampered by a misleading name and the fact that its properties are hard to visualize (which is not a great attribute for a visual effect). This tool doesn’t create a “miniature” picture, as you might expect. What it does is mimic tilt/shift lens effects that angle the lens off the axis of the sensor plane to drastically change the plane of focus, producing the sort of look you get when viewing some photographs of a diorama, or miniature scene.
RAW Image Processing
You can produce JPEG versions of your full-size RAW images (but not M RAW or S RAW files) right in the camera. The original RAW shot is not modified. When you select this menu entry, only compatible RAW images are offered for your selection. Just follow these steps:
1. View RAW images. Rotate the QCD to scroll through compatible images. Press the Index/Reduce button and rotate the Main Dial counterclockwise to view a selection of index images instead.
2. Select image to process. Press SET to select an image for processing.
3. Specify parameters. A screen appears with a selection of parameters you can adjust. Navigate to the parameter you want to manipulate using the multi-selector.
![]() Brightness
Brightness
![]() White Balance
White Balance
![]() Picture Style
Picture Style
![]() Auto Lighting Optimizer
Auto Lighting Optimizer
![]() High ISO Noise Reduction
High ISO Noise Reduction
![]() Image Quality
Image Quality
![]() Color Space
Color Space
![]() Peripheral Illumination Correction
Peripheral Illumination Correction
![]() Distortion Correction
Distortion Correction
![]() Chromatic Aberration Correction
Chromatic Aberration Correction
4. Make adjustments. When a parameter is highlighted you can rotate the QCD or press SET to change the settings; press INFO. to reset the settings to the original values of the RAW image or press the Magnify button to zoom in on the image.
5. Save JPEG. Navigate to the Save icon at the bottom left of the screen and press SET. Choose OK to save as a new file, or Cancel to abort the process. If the original was shot using live view and an aspect ratio other than 3:2, the image will be displayed in those proportions, and the JPEG will be saved in that aspect ratio.
Resize
This is the first entry in the Playback 2 menu. (See Figure 3.14.) If you’ve already taken an image and would like to create a smaller version (say, to send by e-mail), you can create one from this menu entry. Just follow these steps:
1. Choose Resize. Select this menu entry from the Playback 2 menu.
2. View images to resize. You can scroll through the available images with the touch screen or multi-controller, or press the Index/Reduce button to view thumbnails and select from those. Only images that can be resized are shown. They include JPEG Large, Medium, Small 1, and Small 2 images. Small 3 and RAW images of any type cannot be resized.

3. Select an image. Choose SET to select an image to resize. A pop-up menu will appear on the screen offering the choice of reduced size images. These include M (Medium: 8MP, 3456 × 2304 pixels); S1 (Small 1: 4.5MP, 2592 × 1728 pixels); S2 (Small 2: 2.5MP, 1920 × 1280 pixels); or S3 (Small 3: .3MP, 720 × 480 pixels). You cannot resize an image to a size that is larger than its current size; that is, you cannot save a JPEG Medium image as JPEG Large.
4. Resize and save. Choose SET to save as a new file, and confirm your choice by selecting OK from the screen that pops up, or cancel to exit without saving a new version. The old version of the image is untouched.
Rating
Options: Apply star rating
If you want to apply a quality rating to images or movies you’ve shot (or use the rating system to represent some other criteria), you can use this entry to give particular images one, two, three, four, or five stars, or turn the rating system off. The Image Jump function can display only images with a given rating. Suppose you were photographing a track meet with multiple events. You could apply a one-star rating to jumping events, two stars to relays, three stars to throwing events, four stars to hurdles, and five stars to dashes. Then, using the Image Jump feature, you could review only images of one particular type.
With a little imagination you can apply the rating system to all sorts of categories. At a wedding, you could classify pictures of the bride, the groom, guests, attendants, and parents of the couple. If you were shooting school portraits, one rating could apply to First Grade, another to Second Grade, and so on. Given a little thought, this feature has many more applications than you might think. To use it, just follow these steps:
1. Choose the rating menu item.
2. Use the multi-controller pad to select an image or movie. Press the Index/Reduce button to display three images at once. Press the Magnify button to return to a single image.
3. When an image or movie is visible, press the up/down multi-controller buttons to apply a one- to five-star rating. The display shows how many images have been assigned each rating so far.
4. When finished rating, press the MENU button to exit.
Slide Show
Options: Playback Description, Display Time, Repeat, Transition Effect, Background Music
Slide Show is a convenient way to review images one after another, without the need to manually switch between them. To activate, just choose Slide Show from the Playback 2 menu. During playback, you can choose SET to pause the “slide show” (in case you want to examine an image more closely), or the INFO. button to change the amount of information displayed on the screen with each image. For example, you might want to review a set of images and their histograms to judge the exposure of the group of pictures. To set up your slide show, follow these steps:
1. Begin set up. Choose Slide Show from the Playback 2 menu, pressing SET to display the screen shown in Figure 3.15.
2. Choose image selection method. Rotate the Main Dial to All Images, and press SET. Then use the multi-controller pad to choose from All Images, Stills, Movies, or Date. If you select All Images, both movies and stills will show in the order captured. Press SET to activate that selection mode. If you selected All Images, skip to Step 4.
3. Choose images. If you’ve selected Date, press the INFO. button to produce a screen that allows you to select from the available image creation dates on your memory card. When you’ve chosen a date, press SET to confirm your choice.
Figure 3.15 Set up your slide show using this screen.

4. Choose Play time and Repeat options. Navigate to highlight Set up and press SET to produce a screen with playing time (1 sec., 2 sec., 3 sec., or 5 sec. per image), and repeating options (On or Off). When you’ve specified either value, press the MENU button to confirm your choice, and then MENU once more to go back to the main slide show screen.
5. Start the show. Highlight Start and press SET to begin your show. (If you’d rather cancel the show you’ve just set up, press MENU instead.)
6. Use show options during display. Press SET to pause/restart; INFO. to cycle among the four information displays described in the section before this one; MENU to stop the show.
Image Jump with Main Dial
Options: 1 image, 10 images, 100 images, Date, Folder, Movies, Stills, Rating
As first described in Chapter 1, you can leap ahead or back during picture review by swiping the touch screen or by rotating the Main Dial, using a variety of increments, which you can select using this menu entry. The jump method is shown briefly on the screen as you leap ahead to the next image displayed, as shown in Figure 3.16.
You can change the jump increment on the fly while reviewing images, simply by pressing the Q button and then selecting Jump using the up multi-controller button. Rotate the Main Dial when the message shown in the figure is visible to make the adjustment. Or, you can change the jump increment in this menu.
Figure 3.16 The jump method can be changed when you press the up multi-controller button during image review.

In either case, your options are as follows:
![]() 1 image. Rotating the Main Dial one click jumps forward or back 1 image.
1 image. Rotating the Main Dial one click jumps forward or back 1 image.
![]() 10 images. Rotating the Main Dial one click jumps forward or back 10 images.
10 images. Rotating the Main Dial one click jumps forward or back 10 images.
![]() 100 images. Rotating the Main Dial one click jumps forward or back 100 images.
100 images. Rotating the Main Dial one click jumps forward or back 100 images.
![]() Date. Rotating the Main Dial one click jumps forward or back to the first image taken on the next or previous calendar date.
Date. Rotating the Main Dial one click jumps forward or back to the first image taken on the next or previous calendar date.
![]() Folder. Rotating the Main Dial one click jumps forward or back to the first image in the next folder available on your memory card (if one exists).
Folder. Rotating the Main Dial one click jumps forward or back to the first image in the next folder available on your memory card (if one exists).
![]() Movies. Rotating the Main Dial one click jumps forward or back, displaying movies you captured only.
Movies. Rotating the Main Dial one click jumps forward or back, displaying movies you captured only.
![]() Stills. Rotating the Main Dial one click jumps forward or back, displaying still images only.
Stills. Rotating the Main Dial one click jumps forward or back, displaying still images only.
![]() Rating. Rotating the Main Dial one click jumps forward or back, displaying images by the ratings you’ve applied (as described next). Rotate the Main Dial to choose the rating parameter.
Rating. Rotating the Main Dial one click jumps forward or back, displaying images by the ratings you’ve applied (as described next). Rotate the Main Dial to choose the rating parameter.
Highlight Alert
Options: Enable, Disable
Choose Enable, and overexposed highlight areas will blink on the LCD screen during picture review. Set to Disable if you find this alert distracting. Many 70D users use the histogram displays during playback as a more precise indicator of over (and under) exposure. This is the first entry in the Playback 3 menu. (See Figure 3.17.)
AF Point Disp.
Options: Enable, Disable
Select Enable, and the exact AF point(s) used to determine focus will be highlighted in red. If automatic AF point selection was used, you may find multiple points highlighted.
Playback Grid
Options: 3 × 3, 6 × 4, 3 × 3 with diagonals
You can superimpose a 3 × 3, 6 × 4, or 3 × 3 plus diagonal lines grid over your image during playback, or disable the grid display entirely.
Figure 3.17 The Playback 3 menu.

Histogram Display
Options: Single image display, single image display+ Image-recording quality, Brightness/RGB Histogram display, Shooting Information display
The 70D can show either a brightness histogram or set of three separate Red, Green, and Blue histograms in the full information display during picture review, or, it can show you both types of histogram in the partial information display. This entry gives you those options.
Brightness histograms give you information about the overall tonal values present in the image. The RGB histograms can show more advanced users valuable data about specific channels that might be “clipped” (details are lost in the shadows or highlights). This menu choice determines only how they are displayed during picture review. The amount of information displayed cycles through the following list as you repeatedly press the INFO. button in Playback mode:
![]() Single image display. Only the image itself is shown, with basic shooting information displayed in a band across the top of the image, as you can see at upper left in Figure 3.18.
Single image display. Only the image itself is shown, with basic shooting information displayed in a band across the top of the image, as you can see at upper left in Figure 3.18.
![]() Single image display+Image-recording quality. Identical to Single image display, except that the image size, RAW format (if selected), and JPEG compression (if selected) are overlaid on the image in the lower-left corner of the frame.
Single image display+Image-recording quality. Identical to Single image display, except that the image size, RAW format (if selected), and JPEG compression (if selected) are overlaid on the image in the lower-left corner of the frame.
Figure 3.18 Press the INFO. button to cycle between Single image display (upper left); Single image display+Image-recording quality (not shown); Histogram display (upper right); Shooting information display with brightness histogram (bottom left); or RGB histogram (bottom right).
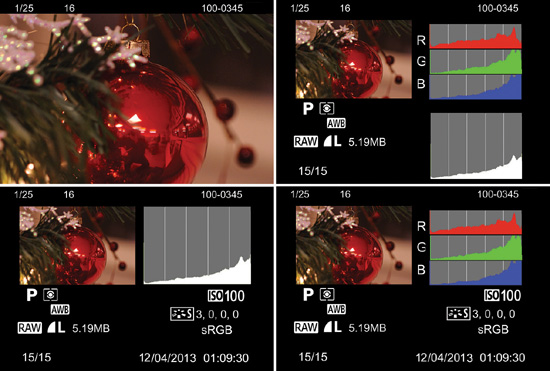
![]() Histogram display. Both RGB and brightness histograms are shown, along with partial shooting information. This menu choice has no effect on which histograms are shown in this display, which you can see at upper right in Figure 3.18.
Histogram display. Both RGB and brightness histograms are shown, along with partial shooting information. This menu choice has no effect on which histograms are shown in this display, which you can see at upper right in Figure 3.18.
![]() Shooting Information display. Full shooting data is shown, along with either a brightness histogram (bottom left in Figure 3.18) or RGB histogram (bottom right in Figure 3.18). The type of histogram on view in this screen is determined by the setting you make in this menu choice. Select Histogram from the Playback 3 menu and choose Brightness or RGB.
Shooting Information display. Full shooting data is shown, along with either a brightness histogram (bottom left in Figure 3.18) or RGB histogram (bottom right in Figure 3.18). The type of histogram on view in this screen is determined by the setting you make in this menu choice. Select Histogram from the Playback 3 menu and choose Brightness or RGB.
Movie Play Count
Options: Rec Time, Time Code display
Determines whether the movie recording and playback time (Rec Time) is shown on the screen, or whether the Time Code (an absolute positional marker/index) is displayed instead. If you change the Movie Play Count setting as described in Chapter 6, or here, the other will be changed automatically. You’ll find additional Time Code options in the Movie 2 menu, described in Chapter 6.
Ctrl over HDMI
Options: Disable, Enable
If you own an HDTV that is compatible with the HDMI CEC (Consumer Electronics Control), then you can use the set’s remote to control your camera’s playback functions when the two are connected using an HDMI cable. This menu item allows you to enable or disable this feature.
When active, all you need to do is connect your camera and the HDTV, which should automatically switch to the HDMI input attached to the EOS 70D. (Most HDTVs have several HDMI inputs; you may also have a switch or switchbox to select one of several inputs.) Press the Playback button on the camera, and you can view menus on your television that will allow you to select still images or movies, activate slide shows, and perform other functions. Note that some HDTVs also require you to activate the HDMI CEC capability using the set’s controls, and that not all HDMI CEC “compatible” televisions can interface with your camera. Your best bet is to just try it.
If you don’t have an HDTV, you can also view the output of your camera (but not control the camera) through your standard-definition television by using an optional Stereo AV Cable AVC/DC400ST cable to connect the A/V Out/Digital terminal of the camera to the red/white (audio) and yellow (composite video) jacks of your set. Press the Playback button to view. This menu entry has no effect when viewing your 70D’s video/audio output on a standard-definition television.