Now it’s time to fire up your Nikon D500 and take some photos. The easy part is turning on the power—the Off-On switch is on the right side, concentric with the shutter release button. Turn on the camera, and, if you mounted a lens and inserted a fresh battery and memory card—as I prompted you in the last chapter—you’re ready to begin. You’ll need to select a release mode, exposure mode, metering mode, and focus mode.
Choosing a Release Mode
This section shows you how to choose from Single frame, Continuous (low speed or high speed), Quiet shutter release, Quiet continuous shutter release, Self-timer, and a special vibration-damping Mirror Up (MUP) mode. Unless you have need of burst shooting or the self-timer, you can set your camera to Single frame mode and skip ahead to “Selecting an Exposure Mode” (next). Just press the release mode dial lock release button at the 11 o’clock position next to the release mode dial (at the top-left edge of the camera) and rotate to the first, or S position, if it’s been changed to something else. (See Figure 2.1.)
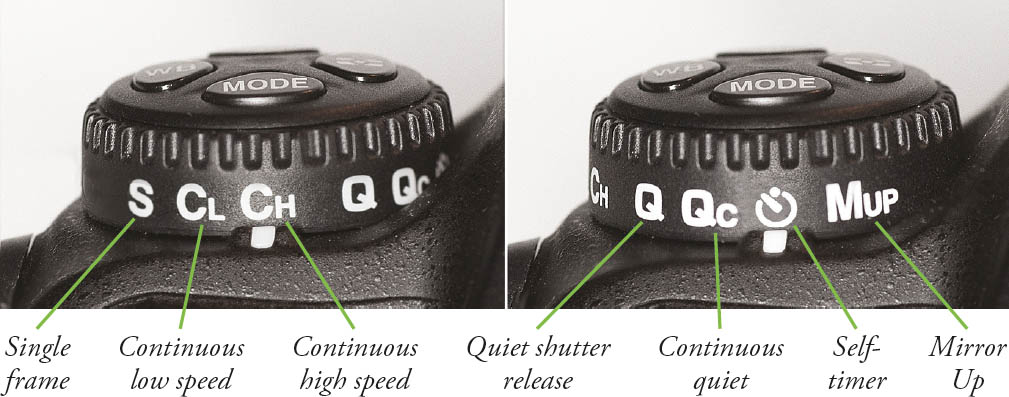
Figure 2.1 Hold down the lock release and rotate the dial to choose a release mode.
The shooting mode determines when (and how often) the D500 makes an exposure. If you’re a late-comer moving to the dSLR world from a point-and-shoot camera, you might have used a model that labels these options as drive modes, a term that dates back to the film era when cameras could be set for single shot or “motor drive” (continuous) shooting modes. Your D500 has seven release (shooting) modes: Single frame, Continuous low speed, Continuous high speed, Quiet shutter release, Quiet continuous shutter release, Self-timer, and Mirror Up. I’ll explain all these modes in more detail and provide tips for using them in particular situations in Chapter 4. The shooting modes are as follows:
- Single frame. In single shot mode, the D500 takes one picture each time you press the shutter release button down all the way. If you press the shutter and nothing happens (which is very frustrating!), you may be using a focus mode that requires sharp focus to be achieved before a picture can be taken. This is called focus priority, and is discussed in more detail under “Choosing a Focus Mode,” later in this chapter.
- Continuous low speed (CL). This “low speed” shooting mode can be set to produce bursts of 1 to 9 frames per second (the latter hardly qualifies as low speed). You can set the frame rate in Custom Setting d1. I use this setting when slicing a scene into tiny fragments of time isn’t necessary or desirable (say, I’m bracketing in multi-shot bursts, or don’t want a zillion versions of a scene that really isn’t changing that fast). Custom settings are explained in Chapter 12.
My recommendation: I find continuous low speed, set to 2 fps, to be particularly useful for street photography and photojournalism applications. Because the speed is so slow, you can use it like single frame most of the time and capture a single image by pressing the shutter release once and then lifting your finger. But if you find a subject that merits a more rapid-fire approach, you can keep the shutter release pressed down, and fire off several shots sequentially. That’s faster than switching from single to continuous mode, and you can avoid the intrusive, distracting “machine gun” approach.
- Continuous high speed (CH). This mode fires off shots at up to 10 fps. The frame rate can slow down as your D500’s memory buffer fills, which forces the camera to wait until some of the pictures you have already taken are written to the memory card, freeing up more space in the buffer. The frame rate may also decrease at shutter speeds slower than 1/250th second, when using high ISO or Auto sensitivity settings, small apertures, slow shutter speeds, when vibration reduction is active, or when some other operations force the D500 to work at a slightly slower interval.
- Quiet shutter release. This setting, marked with a Q symbol, activates the D500’s “quiet mode,” which silences the camera’s beep noise, reduces the sound the mirror makes when it flips back down, and delays that “noise” until you release the shutter button.
- Quiet continuous shutter release. The D500 captures images at up to 3 fps, at a slightly reduced noise level.
My recommendation: Use this setting when you want to grab images continuously (say, at a stage performance or a ceremony), but rapid-fire sounds would be obtrusive. This setting just may reduce the shutter noise to an acceptable level.
You’ll learn more about shooting HDTV movie clips with your D500 later in Chapter 15. But if you want to get started right away, it’s easy. Just select Live View mode by rotating the Lv switch located to the lower right of the LCD monitor on the back of the camera. Change from the camera icon at the 9 o’clock position to the movie camera icon at the 7 o’clock position. When you want to start shooting, press the movie record button (marked with a red dot), southwest of the shutter release button. Press the button again to stop shooting. That’s it!

Note
If you plan to dash in front of the camera to join the scene when working with the self-timer, consider using manual focus so the D500 won’t refocus on your fleeing form and produce unintended results. (Nikon really needs to offer an option to autofocus at the end of the self-timer cycle.) An alternative is to use one of the optional wireless remotes, including the WR-R10/WR-T10, WR-A10 or WR-1, because the camera focuses when you press the button (after you’ve ensconced yourself safely in the frame). The new SnapBridge feature of the D500 also allows you to control your camera remotely from a smart device app running on your iOS or Android phone. I have a special section on using SnapBridge in Chapter 6.
- Mirror Up (MUP). This mode delays the taking of the picture until after the mirror is flipped up out of the way (blanking the viewfinder), producing a short delay that also minimizes the effect of the mirror’s movement on a picture taken using a long shutter speed. When shooting with telephoto lenses or during close-up photography, a “long” shutter speed can be anything from 1/125th seconds to several seconds. (In practice, mirror movement has only an imperceptible effect on exposures longer than a second or two.) When MUP is activated, pressing the shutter release down all the way once lifts the mirror; pressing it a second time takes the picture and returns the mirror to its down position. To use MUP to take a picture after a delay, press the shutter just once. About 30 seconds after the mirror is raised, the camera will take the picture automatically, with no further action required on your part.
Note
The MUP facility is an offbeat way of producing a self-timer delay of 30 seconds, rather than the maximum 20 seconds that the D500’s self-timer feature provides. However, you can’t use this trick when working with live view (the mirror is already flipped up). If the release mode dial is set to MUP in live view, the picture will be taken immediately.
Selecting an Exposure Mode
This section shows you how to choose an exposure mode, by pressing the Mode button on the top-left shoulder of the camera and rotating the main command dial until the mode you want appears on the top LCD panel. If you already understand exposure modes, jump to the next section on choosing a metering mode.
The Nikon D500 has four manual and semi-automatic modes including Programmed-auto (or Program mode), Shutter-priority auto, Aperture-priority auto, and Manual exposure mode. These modes allow you to specify how the camera chooses its settings when making an exposure, for greater creative control.
If you’re very new to digital photography, you might want to set the camera to P (Program mode) and start snapping away. That mode will make all the appropriate settings for you for many shooting situations. If you have more photographic experience, you might want to opt for one of the semi-automatic modes. These, too, are described in more detail in Chapter 4. These modes all let you apply a little more creativity to your camera’s settings. To set the exposure mode, hold down the MODE button at the 6 o’clock position of the dial on the top-left shoulder of the D500, while rotating the main command dial. The current mode (P, S, A, or M) will appear on the monochrome LCD panel on top of the camera.
- P (Program). This mode allows the D500 to select the basic exposure settings, but you can still override the camera’s choices to fine-tune your image, while maintaining metered exposure, as I’ll explain in Chapter 4.
- S (Shutter-priority). This mode is useful when you want to use a particular shutter speed to stop action or produce creative blur effects. Choose your preferred shutter speed by rotating the main command dial when the meter is active, and the D500 will select the appropriate f/stop for you.
- A (Aperture-priority). Choose when you want to use a particular lens opening, especially to control sharpness or how much of your image is in focus. Specify the f/stop you want using the sub-command dial when the meter is “awake” (tap the shutter release to activate the meter, if necessary), and the D500 will select the appropriate shutter speed for you.
- M (Manual). Select when you want full control over the shutter speed and lens opening, either for creative effects or because you are using a studio flash or other flash unit not compatible with the D500’s automatic metering when using an attached electronic flash. Use the main command dial and sub-command dial when the exposure meter is active to specify the shutter speed and f/stop (respectively).
Choosing a Metering Mode
This section shows you how to choose the area the D500 will use to measure exposure, giving emphasis to the center of the frame; evaluating many different areas of the frame; or measuring light from a small spot in the center of the frame.
The metering mode you select determines how the D500 calculates exposure. You might want to select a particular metering mode for your first shots, although the default Matrix metering is probably the best choice as you get to know your camera. I’ll explain when and how to use each of the four metering modes later. To change metering modes, hold down the metering mode button, located at the 3 o’clock position of the dial on the top-left shoulder of the D500, while rotating the main command dial to select from among the choices that are displayed on the LCD monitor in the control panel (see Figure 2.2):
- Matrix metering. The standard metering mode; the D500 attempts to intelligently classify your image and choose the best exposure based on readings from a 180,000-segment RGB color sensor that interprets light reaching the viewfinder using a database of hundreds of thousands of patterns. If you prefer, Matrix metering can also incorporate face detection, activated by Custom Setting b5, as discussed in Chapter 12.
- Center-weighted metering. The D500 meters the entire scene, but gives the most emphasis to the central area of the frame, measuring about 8mm (by default; you can choose other sizes using Custom Setting b6, as I’ll describe in Chapter 12).
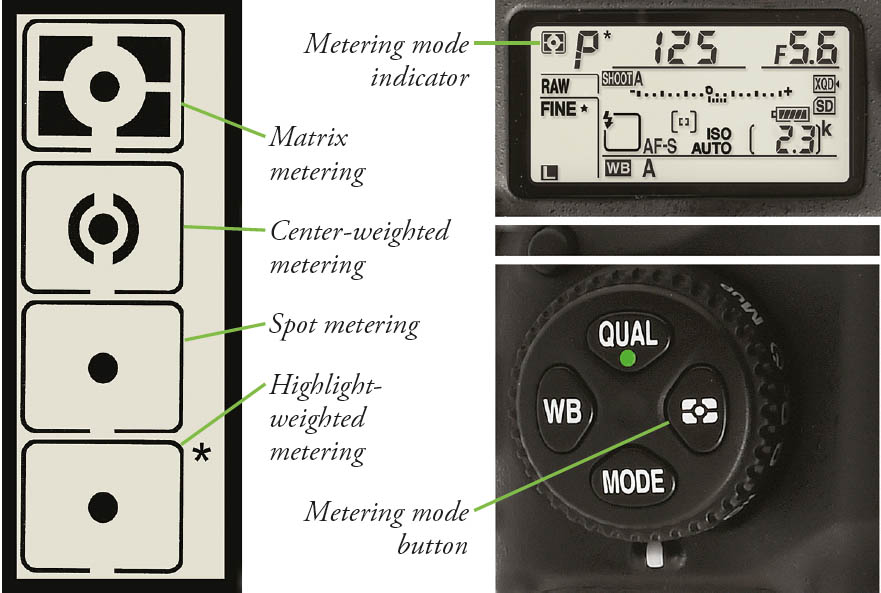
Figure 2.2 Hold down the Metering mode button (bottom right) while rotating the D500’s main command dial. The current mode will be shown on the monochrome LCD panel (top right) using one of the icons shown at left in the figure.
- Spot metering. Exposure is calculated from a smaller 3.5mm central spot, about 2.5 percent of the image area, centered on the current focus point.
- Highlight-weighted metering. Despite its icon (a “spot” accompanied by an asterisk), this is not a spot metering variation. Highlight-weighted uses a matrix measuring system to emphasize the highlights of an image, retaining detail in the brightest areas. This option is available only when using Nikon Type G, E, and D lenses. I’ll describe these types in Chapter 7.
You’ll find a detailed description of each of these modes in Chapter 4.
Choosing a Focus Mode
This section shows how to select when the D500 calculates focus: all the time (continuously), only once when you press a control like the shutter release button (single autofocus), or manually when you rotate a focus ring on the lens.
You can easily switch between automatic and manual focus by moving the AF/MF or M-AF/MF switch on the lens mounted on your camera. There is also an AF/M lever on the camera body. (See Figure 2.3.) When using autofocus, you have additional choices. You can select the autofocus mode (when the D500 measures and locks in focus) and autofocus pattern (which of the 55 user-selectable autofocus points from among the 153 available are used to interpret correct focus).
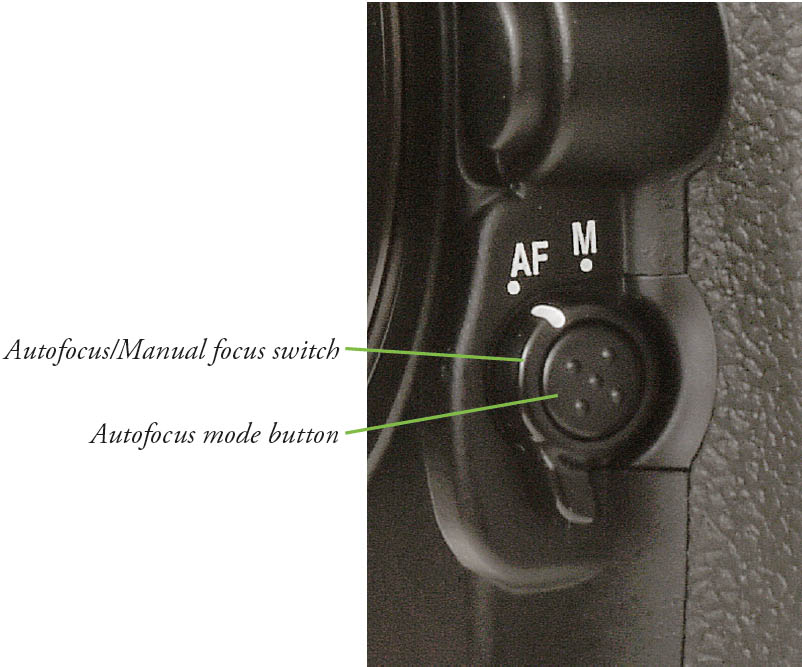
Figure 2.3 Activate autofocus mode on the camera body.
To specify when the D500 locks in focus, follow these steps:
- Activate autofocus. Make sure the camera is set for autofocus mode by sliding any MA/M or AF/M switch on the lens to the MA or AF position. The camera body AF/M switch (see Figure 2.3) must also be set in the AF position. Note that the autofocus/manual focus switches on the lens and camera body must agree; if either is set to manual focus, then the D500 defaults to manual focus regardless of how the other switch is set.
- Enter setting mode. Press and hold the autofocus mode button in the center of the AF/M switch.
- Choose AF mode. While holding down the AF-mode button, rotate the main command dial until AF-S or AF-C is shown on the topside monochrome control panel, as well as on the back-panel color LCD monitor when the information display screen is visible (press the Info button, located to the immediate right of the LCD monitor, at the bottom, to produce it). (See Figure 2.4.) While the button is held down, you’ll also see AFS or AFC at the bottom of the optical viewfinder. If you haven’t activated autofocus mode, as described in Step 1, nothing will happen while the button is pressed and the main command dial is rotated. The three focus modes are described in more detail next.
Tip
Nikon specifically warns against using lenses having the AF designation in their name with the lens switch set to M while the camera body switch is set to AF. The camera or lens might be damaged. Newer lenses, with the AF-S designation, are not affected.

Figure 2.4 The autofocus mode you select is displayed on the back-panel LCD monitor (here indicated by a green box) when the Info button is pressed.
The two autofocus modes are as follows:
- (AF-C) Continuous-servo autofocus. This mode, sometimes called continuous autofocus, or AF-C, sets focus when you partially depress the shutter button (or other autofocus activation button), but continues to monitor the frame and refocuses if the camera or subject is moved. This is a useful mode for photographing sports and moving subjects. Focus or release priority can be specified for AF-C mode using Custom Setting a1.
- (AF-S) Single-servo autofocus. This mode, sometimes called single autofocus, or AF-S, locks in a focus point when the shutter button is pressed down halfway (there are other autofocus activation button options, described in Chapter 13), and the focus confirmation light glows at bottom left in the viewfinder. The focus will remain locked until you release the button or take the picture. This mode is best when your subject is relatively motionless. As you’ll learn in Chapter 13, you can set your Nikon D500 using Custom Setting a2 so that the camera will not take a photo unless sharp focus is achieved (focus priority), or so that it will go ahead and snap a photo while still adjusting focus (release priority).
Choosing the Focus Area Mode
The Nikon D500 uses up to 153 different focus points to calculate correct focus, using one or more points selected automatically by the camera, or chosen by you from 55 that are directly selectable by the user. I’ll show you exactly where these focus areas are located in Chapter 5. To choose a focus area mode, follow these steps:
- Enter setting mode. Press and hold the autofocus mode button in the center of the AF/M switch.
- Rotate sub-command dial. The dial, on the front of the camera, can be used to select one of the six modes. The current AF-area mode chosen will be displayed on the top-panel LCD monitor, on the information display (see Figure 2.5, left), and an equivalent indicator in the viewfinder (see Figure 2.5, right). In addition, the autofocus zones that will be activated will appear and flash red in the frame area of the viewfinder. (Only S, Group, and Auto can be chosen when AF-S is selected.)
- Choose AF-area mode. For now, you should set to Auto-area AF (Auto) and allow the D500 to choose the focus zone for you.
The seven AF-area modes are as follows. You’ll find more information in Chapter 5.
- Single-point (AF-S or AF-C). The camera focuses on a point you select, using the multi selector directional buttons, when the AF point lock lever (located concentric with the multi selector pad) is not set to the L (lock) position.
- 25-point dynamic-area AF (AF-C only). You select the focus point from the 55 user-selectable points, and if the subject briefly departs from that point, the camera also uses information from surrounding AF points (25 points, total) to calculate focus.
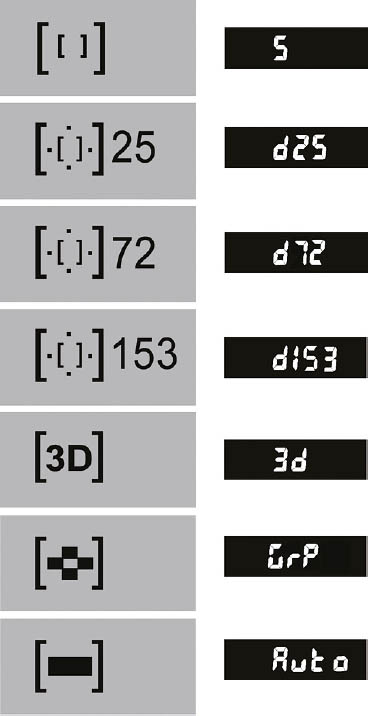
Figure 2.5 Focus area modes shown on the LCD monitor (left) and in the viewfinder (right) are, top to bottom, Single-point, 25-point dynamic-area AF, 72-point dynamic-area AF, 153-point dynamic-area AF, 3D-tracking, Group-area AF, and Auto-area AF.
- 72-point dynamic-area AF (AF-C only). You select the focus point from the 55 user-selectable points, and if the subject strays from that point, the camera also uses information from surrounding AF points (72 points, total) to calculate focus.
- 153-point dynamic-area AF (AF-C only). You select the focus point from the 55 user-selectable points, and if the subject moves within the frame, the camera also uses information from all 153 focus points to calculate focus.
- 3D-tracking (AF-C only). You select the focus point, and the camera will track your subject, using any of the other focus points, as needed. (Reminder: in AF-S mode, focus tracking is not used, as focus is locked in when you press the shutter release halfway.)
- Group-area AF (AF-S or AF-C). You select a group of focus points, displayed within the viewfinder as a set of four boxes arranged in a cross pattern.
- Auto-area AF (AF-S or AF-C). The D500 chooses a focus point without input from you.
Other Settings
This section describes some optional features you can select if you feel you need to choose the white balance, change the camera’s sensitivity setting, or delay taking a picture with the self-timer.
There are a few other settings you can make if you’re feeling ambitious, but don’t feel ashamed if you postpone using these features until you’ve racked up a little more experience with your D500.
Adjusting White Balance and ISO
If you like, you can custom-tailor your white balance (color balance) and ISO sensitivity settings. To start out, it’s best to set white balance (WB) to Auto, and ISO to ISO 200 for daylight photos, and ISO 400 for pictures in dimmer light. (Don’t be afraid of ISO 1600 or even higher, however; the D500 does a much better job of producing low-noise photos at higher ISOs than earlier generations.) You can adjust either one now by pressing the WB (for white balance) button on the top-left shoulder or ISO button on the top-right shoulder just aft of the On/Off switch, and rotating the main command dial until the setting you want is displayed near the bottom of the status LCD panel on top of the camera.
MAKING SETTINGS UNDER LOW LIGHT
When working under low light levels, you might experience some difficulty seeing the white balance, ISO, or other settings on the top-panel monochrome status LCD as you make them. You can always rotate the On/Off switch an additional push in the clockwise direction to illuminate the control panel backlight, but there is a better way. Instead, press the Info button (at the bottom of the right side of the camera to the right of the LCD monitor) to show the much larger and easier-to-read shooting information display on the color LCD monitor. Then press the WB or ISO button (or the button for whatever setting you’re changing) and rotate the appropriate dial until the value you want appears on the shooting information display. Indeed, you can press the Info button at any time to pop up this information screen, shown earlier in Figure 2.4, which is especially helpful when working with the camera on a tripod, or under dim illumination.
Using the Self-Timer
If you want to set a short delay before your picture is taken, you can use the self-timer. Press the lock release button to free the release mode dial, and rotate it until the self-timer icon appears next to the indicator line. Press the shutter release to lock focus and start the timer. The self-timer lamp on the front of the camera will blink and the beeper will sound (unless you’ve silenced it in the menus) until the final two seconds, when the lamp remains on and the beeper beeps more rapidly. The default delay is 10 seconds, but you can set it to 2, 5, 10, or 20 seconds using Custom Setting c3, as described in Chapter 12, which also describes additional self-timer options, including number of shots taken and interval between shots. As I mentioned earlier, you can also use the MUP release mode to get a 30-second delay.
Reviewing the Images You’ve Taken
Read this section when you’re ready to take a closer look at the images you’ve taken, and want to know how to review pictures and zoom in.
The Nikon D500 has a broad range of playback and image review options, and I’ll cover them in more detail in Chapter 11. For now, you’ll want to learn just the basics. Here is all you really need to know at this time, as seen in Figure 2.6:
- View image. Press the Playback button (marked with a white right-pointing triangle) at the extreme left corner of the back of the camera to display the most recent image on the LCD monitor.
- View additional images. Press the multi selector left or right to review additional images. Press right to advance to the next image, or left to go back to a previous image.
- Change information display. Press the multi selector button up or down to change among overlays of basic image information or detailed shooting information.
- Change magnification. Press the Zoom In button repeatedly to zoom in on the image displayed; the Zoom Out button reduces the image. (Both buttons are located to the left of the color LCD monitor.) A thumbnail representation of the whole image appears in the lower-right corner with a yellow rectangle showing the relative level of zoom. At intermediate zoom positions, the yellow rectangle can be moved around within the frame using the multi selector.
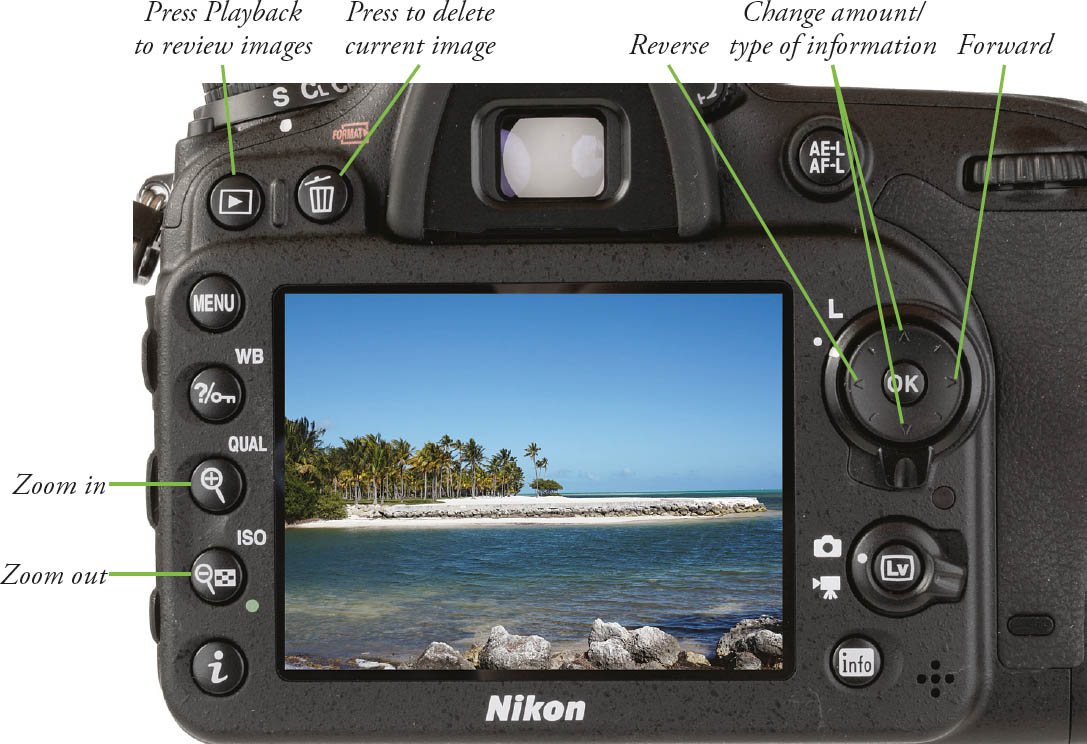
Figure 2.6 Review your images.
- Exit image review. Press the Playback button again, or just tap the shutter release button to exit playback view.
You’ll find information on viewing thumbnail indexes of images, automated playback, and other options in Chapter 8.
Transferring Photos to Your Computer
The final step in your picture-taking session will be to transfer the photos you’ve taken to your computer for printing, further review, or image editing. Your D500 allows you to print directly to PictBridge-compatible printers and to create print orders right in the camera, plus you can select which images to transfer to your computer. I’ll outline those options in Chapter 11.
I always recommend using a card reader attached to your computer to transfer files, because that process is generally a lot faster and doesn’t drain the D500’s battery. However, you can also use a cable for direct transfer, which may be your only option when you have the cable and a computer, but no card reader (perhaps you’re using the computer of a friend or colleague, or at an Internet café).
To transfer images from the camera to a Mac or PC computer using the USB cable:
- Turn off the camera.
- Pry back the rubber cover that protects the D500’s USB port, and plug the USB cable furnished with the camera into the USB port. (See Figure 2.7.)
- Connect the other end of the USB cable to a USB port on your computer.
- Turn on the camera. The operating system itself, or installed software such as Nikon Transfer or Adobe Photoshop Elements Transfer, usually detects the camera and offers to copy or move the pictures. Or, the camera appears on your desktop as a mass storage device, enabling you to drag and drop the files to your computer.
To transfer images from a memory card to the computer using a card reader, as shown in Figure 2.8:
- Turn off the camera.
- Open the memory card door and extract the Secure Digital card containing your photos.
- Insert the memory card into your memory card reader. Your installed software detects the files on the card and offers to transfer them. The card can also appear as a mass storage device on your desktop, which you can open and then drag and drop the files to your computer.
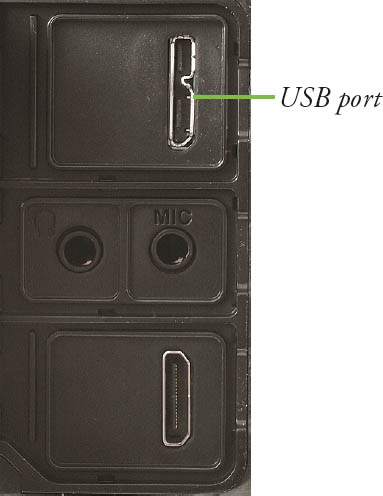
Figure 2.7 Images can be transferred to your computer using a USB cable connected to this port.
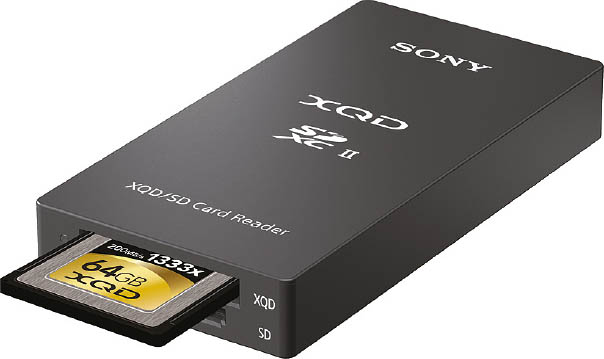
Figure 2.8 A card reader is the fastest way to transfer photos.
Changing Default Settings
This section is purely optional, especially for true beginners, who should skip it entirely for now, and return when they’ve gained some experience with this full-featured camera. This section is for the benefit of those who want to know now some of the most common changes I recommend to the default settings of your D500. Nikon has excellent reasons for using these settings as a default; I have better reasons for changing them.
Even if this is your first experience with a Nikon digital SLR, you can easily make a few changes to the default settings that I’m going to recommend, and then take your time learning why I suggest these changes when they’re explained in the more detailed chapters of this book. I’m not going to provide step-by-step instructions for changing settings here; I’ll give you an overview of how to make any setting adjustment, and leave you to navigate through the fairly intuitive D500 menu system to make the changes yourself.
Resetting the Nikon D500
If you want to change from the factory default values, you might think that it would be a good idea to make sure that the Nikon D500 is set to the factory defaults in the first place. After all, even a brand-new camera might have had its settings changed at the retailer, or during a demo. Unfortunately, Nikon doesn’t make it easy to reset all settings in the camera to their factory defaults. In fact, there are no fewer than four different ways to “reset” the D500, each of which does slightly different things.
- Two-button reset. This type of “rebooting” changes almost three dozen of the most basic settings in your camera, and is useful when you want to cancel the most common changes you make when adjusting your camera. It does not affect all Shooting menu settings (and then only for the current Shooting Bank, which I’ll describe shortly), or any of the Custom Settings memory banks. I’ll show you how to perform the two-button reset next.
- Shooting menu bank reset. The Photo Shooting Menu Bank entry has a separate Reset Shooting menu option that zeroes out the changes you’ve made to the default options for Banks A, B, C, or D.
- Custom Settings menu bank reset. The Custom Settings menu also has a separate Reset Custom Settings option that zeroes out most of the changes you’ve made to the default options to Custom Settings Banks A, B, C, or D. A two-button reset does not affect any of the settings in the Custom Settings menu banks. You must reset them separately.
- Setup menu reset. The Reset All Settings entry in the Setup Menu (described in Chapter 13), will restore almost all the camera’s settings to their factory defaults, including Copyright information and IPTC presets, but not Language or Time Zone/Date information. Before doing this type of reset, it’s a good idea to save your settings to a memory card using the Save/Load Settings entry in the Setup Menu.
Two-Button Reset
Just follow these steps to perform a two-button reset of the camera:
- Find reset buttons. Locate the QUAL button on the left shoulder of the camera, and the EV button on the top panel of the D500, just southeast of the shutter release button. Each is marked with a green dot. Figure 2.9 shows the two buttons highlighted in yellow.
- Start reset. Press and hold the two buttons for more than two seconds. The monochrome control panel switches off momentarily while the settings are reset.
- Release the two buttons. Your camera’s settings have been returned to the factory default, as described below.
Once a two-button reset has been performed, the following settings will be restored to their defaults. Only the settings shown are reset; those not shown retain their current settings. In addition, only the settings in the current Photo Shooting menu bank will be reset; the others are retained. (All these options are described in Chapters 11, 12, and 13):
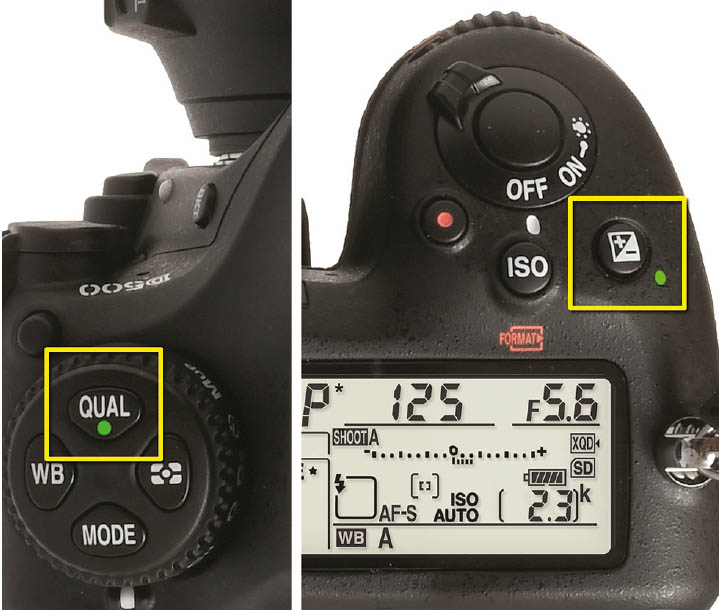
Figure 2.9 Perform a two-button reset by holding down the Zoom Out/ISO and EV buttons for more than two seconds.
PHOTO SHOOTING
- Extended photo menu banks: Off
- Image quality: JPEG Normal
- Image size: JPEG/TIFF Large; NEF RAW Large
- White balance:
Auto0: Normal
White balance fine tuning: A-B: 0; G-M: 0
Color temperature: 5000K
- HDR: Off
- Interval timer shooting: Off
- Flicker reduction: Off/Disable;
Indicator: On
MOVIE SHOOTING
- ISO sensitivity (Mode M):
ISO: 100
Auto ISO: Off
Max.: 51,200
- White balance: Same as Photo Shooting
- Active D-Lighting: Off
- Electronic VR: Off
OTHER SETTINGS
- Focus point: Center
- Autofocus mode: AF-S
- Autofocus area: Single point
- Live View AF area: Normal area
- Exposure mode: Program
- Flexible program: Off
- Metering: Matrix
- Exposure lock: Off
- Exposure compensation: Off
- Flash compensation: Off
- AE lock hold: Off
- Bracketing: Off
- Flash: Front-curtain sync
- FV (Flash value) lock: Off
- Multiple exposure: Off
- Exposure delay mode: Off
- +NEF: Off
- Multi selector power aperture: Disable
- Highlight display: Off
- Headphone volume: 15
Photo Shooting Menu/Movie Shooting Menu/Custom Settings Menu Reset
If you’d like to reset all the options in either the Photo Shooting menu banks A, B, C, or D, the single or Movie Shooting bank (there are no A, B, C, or D choices) and/or the Custom Settings menu banks A, B, C, or D, follow these steps:
- Access menus. Press the MENU button at the top of the array of five buttons located to the immediate left of the back-panel LCD monitor.
- Choose Photo Shooting, Movie Shooting, or Custom Settings menus. Press the multi selector down button to scroll down to either Shooting menu (represented by still camera and movie camera icons; the second and third icons from the top in the left column of the menus) or the Custom Settings menu (represented by a pencil icon; the fourth icon from the top). Press the right multi selector button to reveal the Photo Shooting, Movie Shooting, or Custom Settings menus.
- Access Reset. Use the down button to scroll to the entries labeled Photo Shooting Menu Bank, Reset Movie Shooting Menu, or Custom Settings Bank choices, then press the right button.
- Reset. Because the Movie Shooting menu doesn’t have banks, you’ll be presented immediately with the option of choosing Yes or No to reset the single bank. Highlight Yes and press OK. For the Photo Shooting and Custom Settings banks, you’ll be shown a choice of A, B, C, or D. Highlight the one you want to reset, and press the Trash button (to the left of the viewfinder), choose Yes and press OK to confirm.
- Repeat. If you want to reset other Photo Shooting or Custom Menu banks, repeat steps 3–4.
- Exit. When finished, press MENU or tap the shutter release to exit.
Recommended Default Changes
Although I won’t be explaining how to use the Nikon D500’s menu system in detail until Chapter 11, you can make some simple changes now. These general instructions will serve you to make any of the default setting changes I recommend next. To change any menu setting, follow these steps:
- Access menus. Press the MENU button at the top of the array of buttons located to the immediate left of the back-panel LCD monitor.
- Choose the main menu you need to access. Press the multi selector down button to scroll down to the menu containing the entry you want to change. The available menus include (from top to bottom in the left column of the Menu screen: Playback menu (right-pointing triangle icon); Photo Shooting menu (still camera icon); Movie Shooting menu (movie camera icon); Custom Settings menu (pencil icon); Setup menu (wrench icon); Retouch menu (paintbrush icon); My Menu (text page/text page with checkmark icon).
- Select main menu. Press the right multi selector button to choose the menu heading containing the submenu entry you want to change.
- Choose menu entry. Press the down multi selector button to move within the main menu to the entry you want to change. A scroll bar at the right side shows your progress through the menu, as all the main menus except for the Custom Settings menu and My Menu (if it contains fewer than five custom entries) have more items than can fit on a single screen.
- Choose options. Press the right multi selector button to choose the highlighted menu entry, and view a screen with options. Select the options you want, and press OK to confirm. Some menus allow you to confirm by pressing the right button again, or require you to move to a Done selection and choose that before exiting.
- Exit menus. Usually you can exit the menu system by pressing the MENU button. If an option has variations, I’ll explain them when I discuss each of the menu choices in Chapters 11, 12, and 13.
Nikon does an excellent job with specifying default values, but here are some of the changes I recommend you make to the defaults that Nikon sets up for you. There are only a few, and I have no changes to recommend for the Movie Shooting, Playback, and My Menu settings, which are fine the way they are for most people, nor for the Retouch menu, which doesn’t have parameters that can be stored.
Make these changes to the Photo Shooting menu entries listed:
- Image Quality. Change from JPEG Normal to JPEG Fine *, to produce better image quality. (The star indicates least compression, and best quality.)
- High ISO NR. Change from default Normal to Off, until you’ve had a chance to evaluate whether the D500 performs to your liking at high sensitivity settings. Off produces the least amount of noise reduction, but also doesn’t degrade the amount of detail as much as any of the On settings.
Make these changes to the Custom Settings and Setup menu entries listed:
- Custom Setting c2: Standby timer. If you shoot sports or other events where you don’t want the camera going to sleep and delaying your ability to snap off a shot now, change from the default 6 seconds to 30 seconds, 1 minute, 5 minutes, or 10 minutes. You’ll use more power, but won’t lose a shot from a split-second delay while the camera wakes up.
- Setup menu: Slot empty release lock. This controls what happens when you press the shutter release while no memory card is loaded in the camera. Change from the default OK: Enable Release to LOCK: Release Locked. Why would you want to be able to take pictures with no memory card in the camera, other than to demonstrate the camera or a few other reasons? Even though a DEMO label appears on the LCD monitor when you “take” pictures with no memory card inserted, it’s easy to overlook. Turn this capability to LOCK.
Shooting Tips
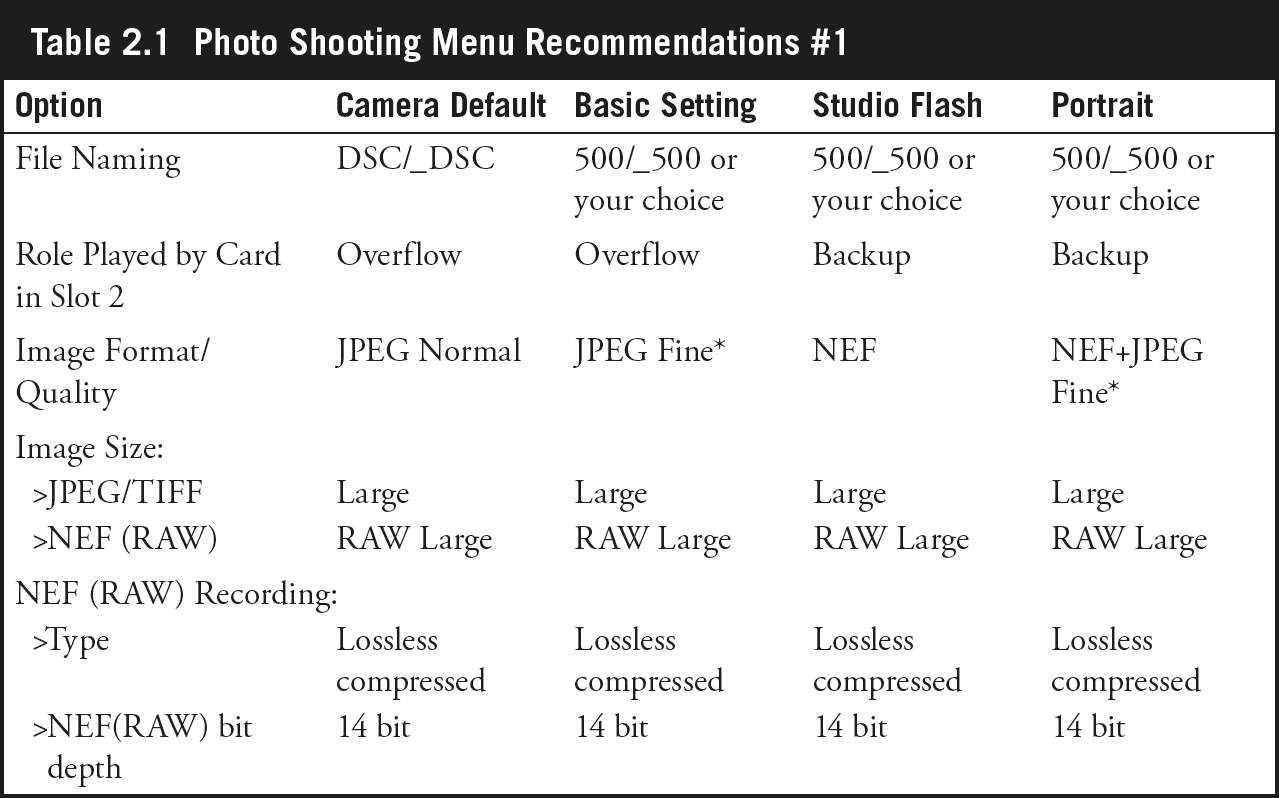
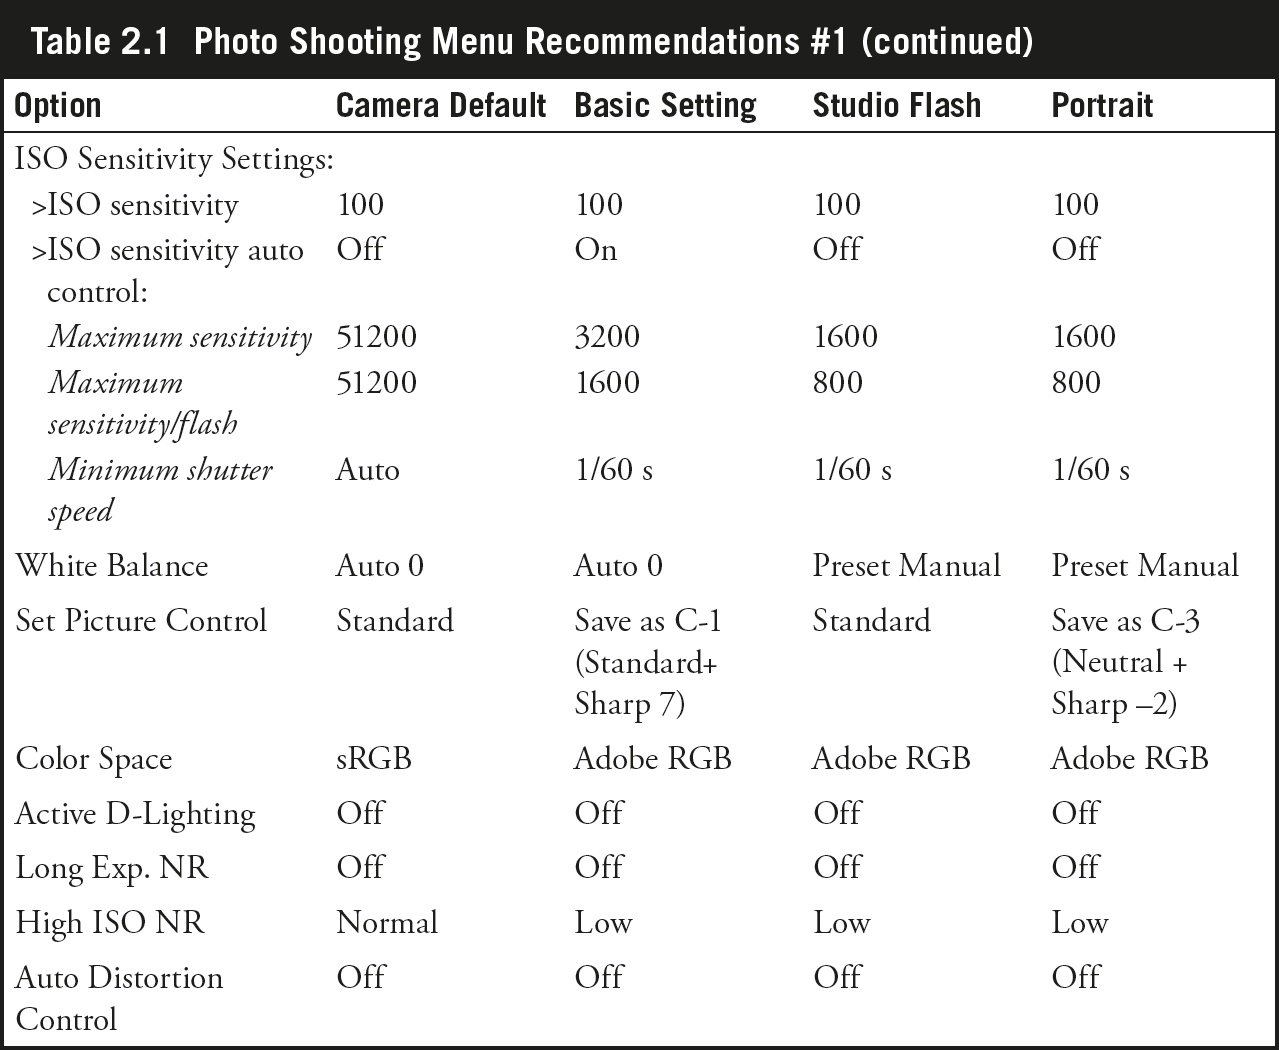
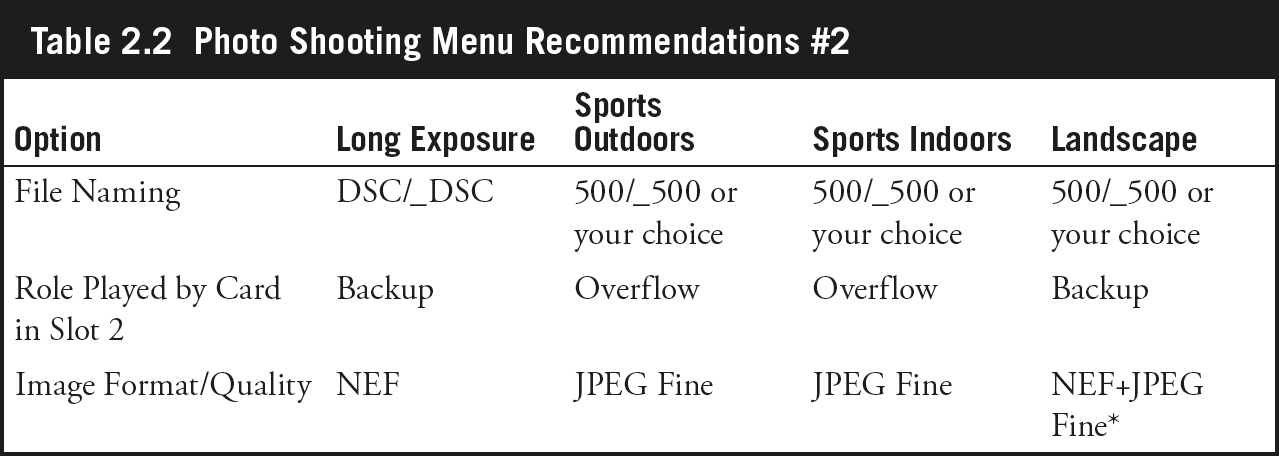
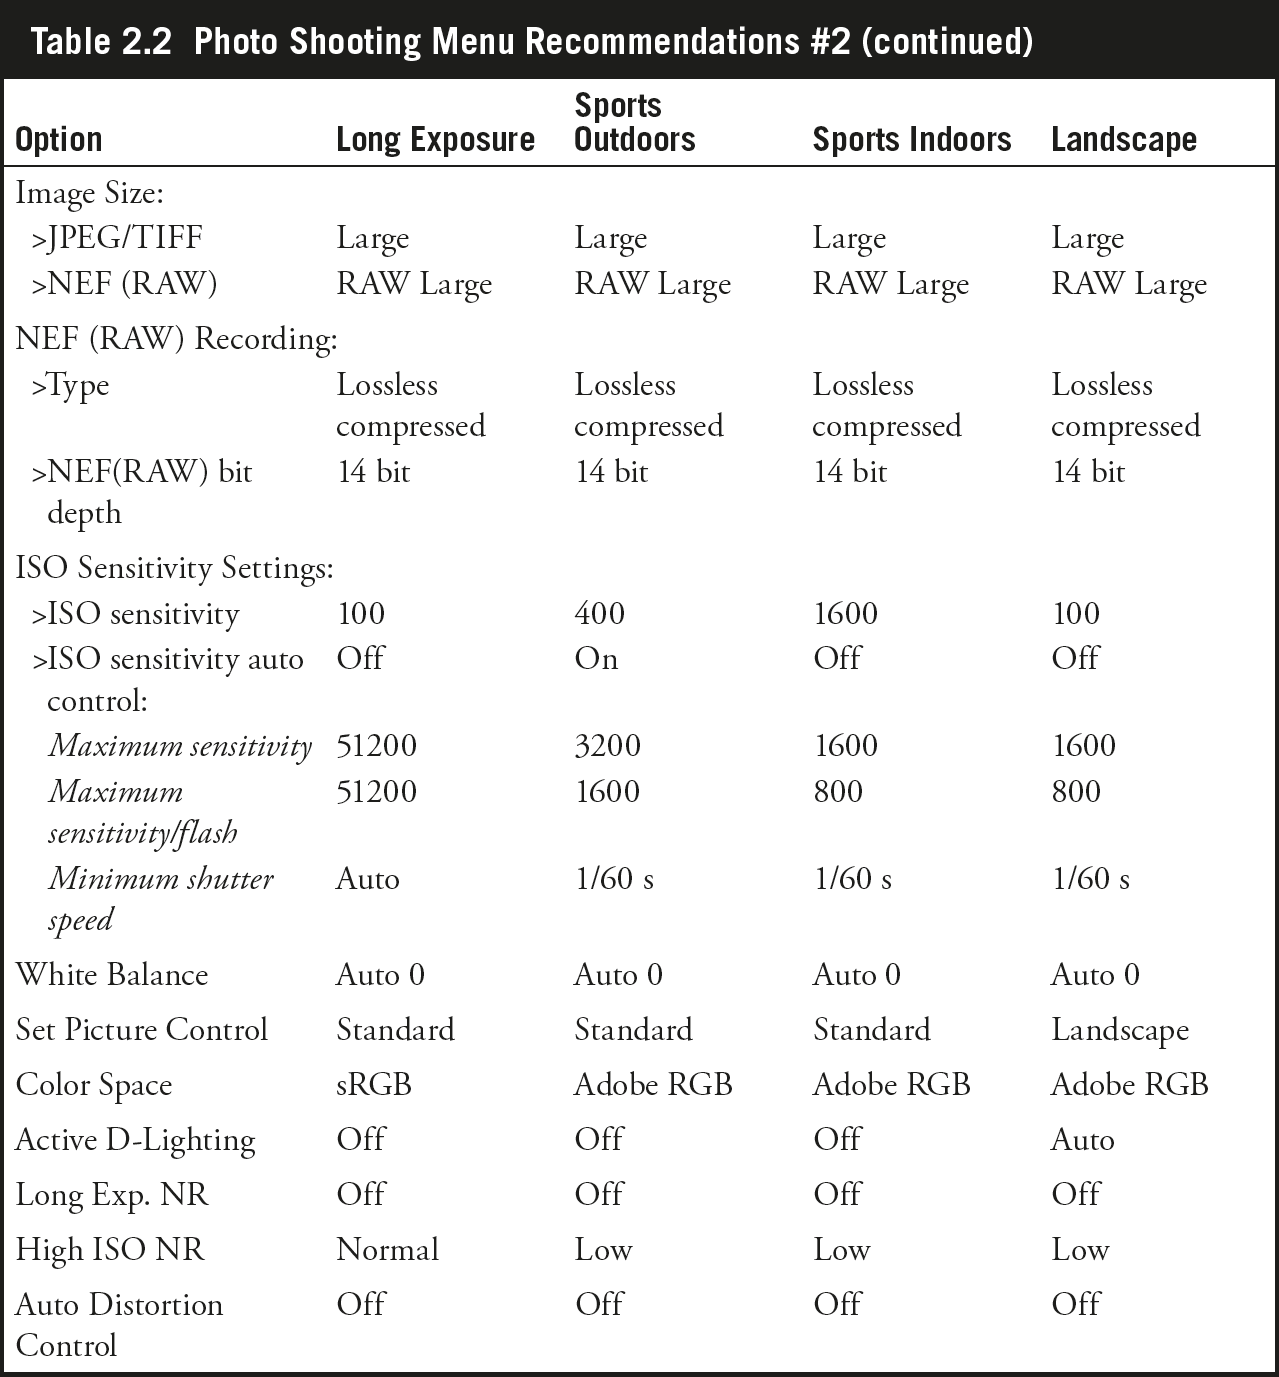
I’m ending this chapter with some tips on settings to use for different kinds of shooting, including recommended settings for some Photo Shooting and Custom Setting menu options. You can set up your camera to shoot the main type of scenes you work with, then use the charts that follow to make changes for other kinds of images. Most will set up their D500 for my basic settings, and adjust from there. I’m not going to provide recommendations for every menu setting, as many are simply personal preferences that don’t apply to everyone. Chapters 11, 12, and 13 provide more detailed recommendations.
Photo Shooting Menu Recommendations
I’ll list my Photo Shooting menu suggestions first. The Custom Setting menu recommendations are divided into the exact same categories but, of course, deal with different options. In the first table, the second column shows the default settings, as the D500 comes from the factory. (I have no specific recommendations for the Movie Shooting or Setup menus.)
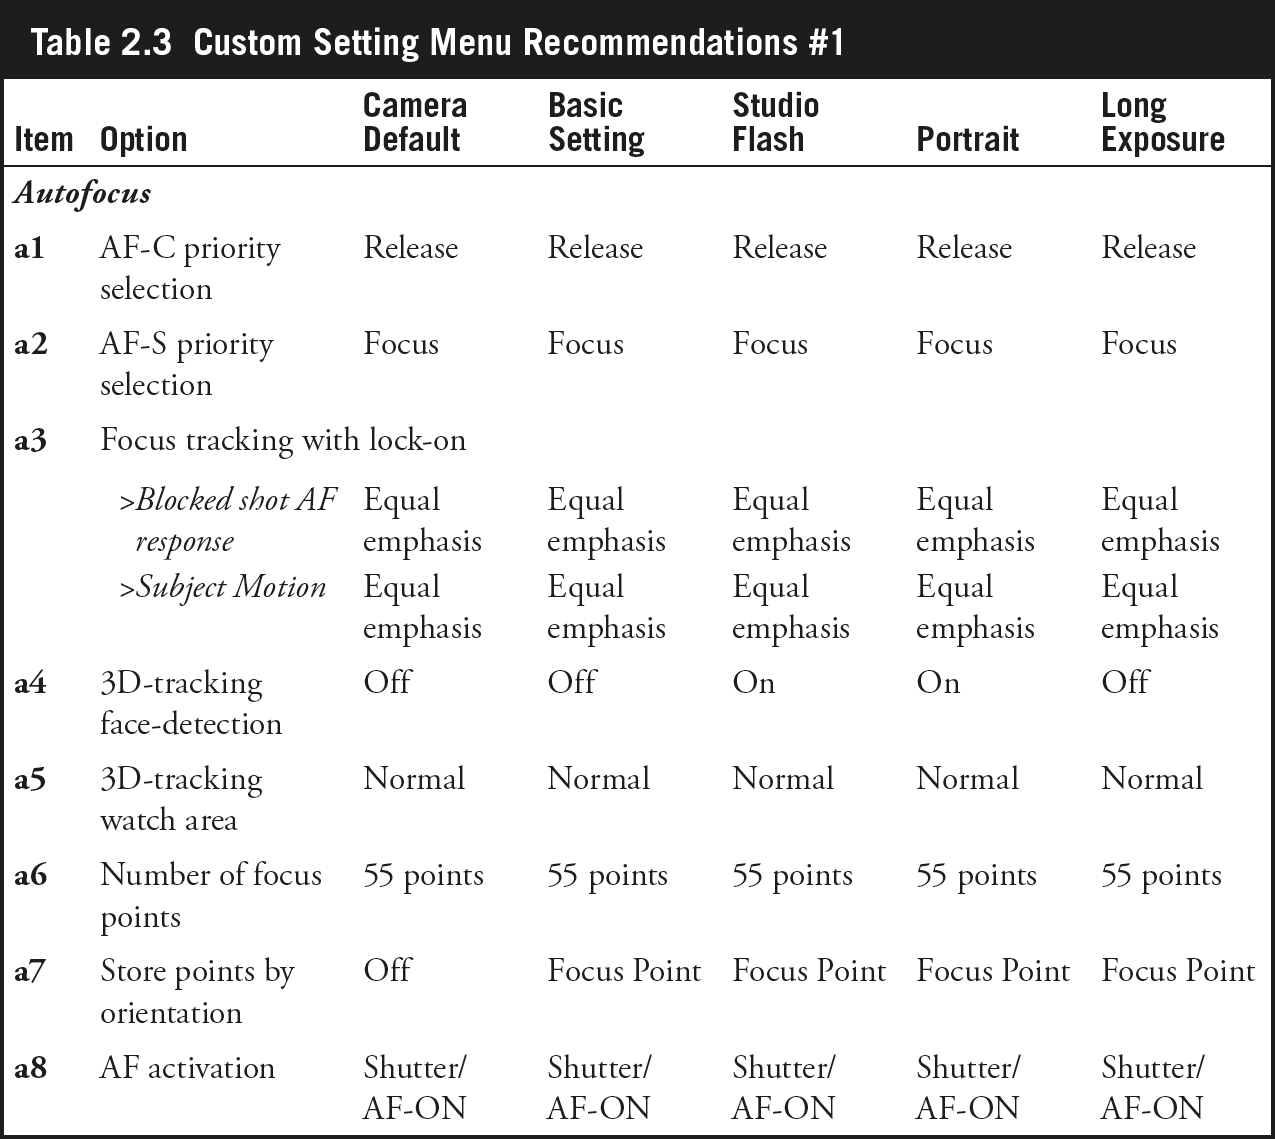
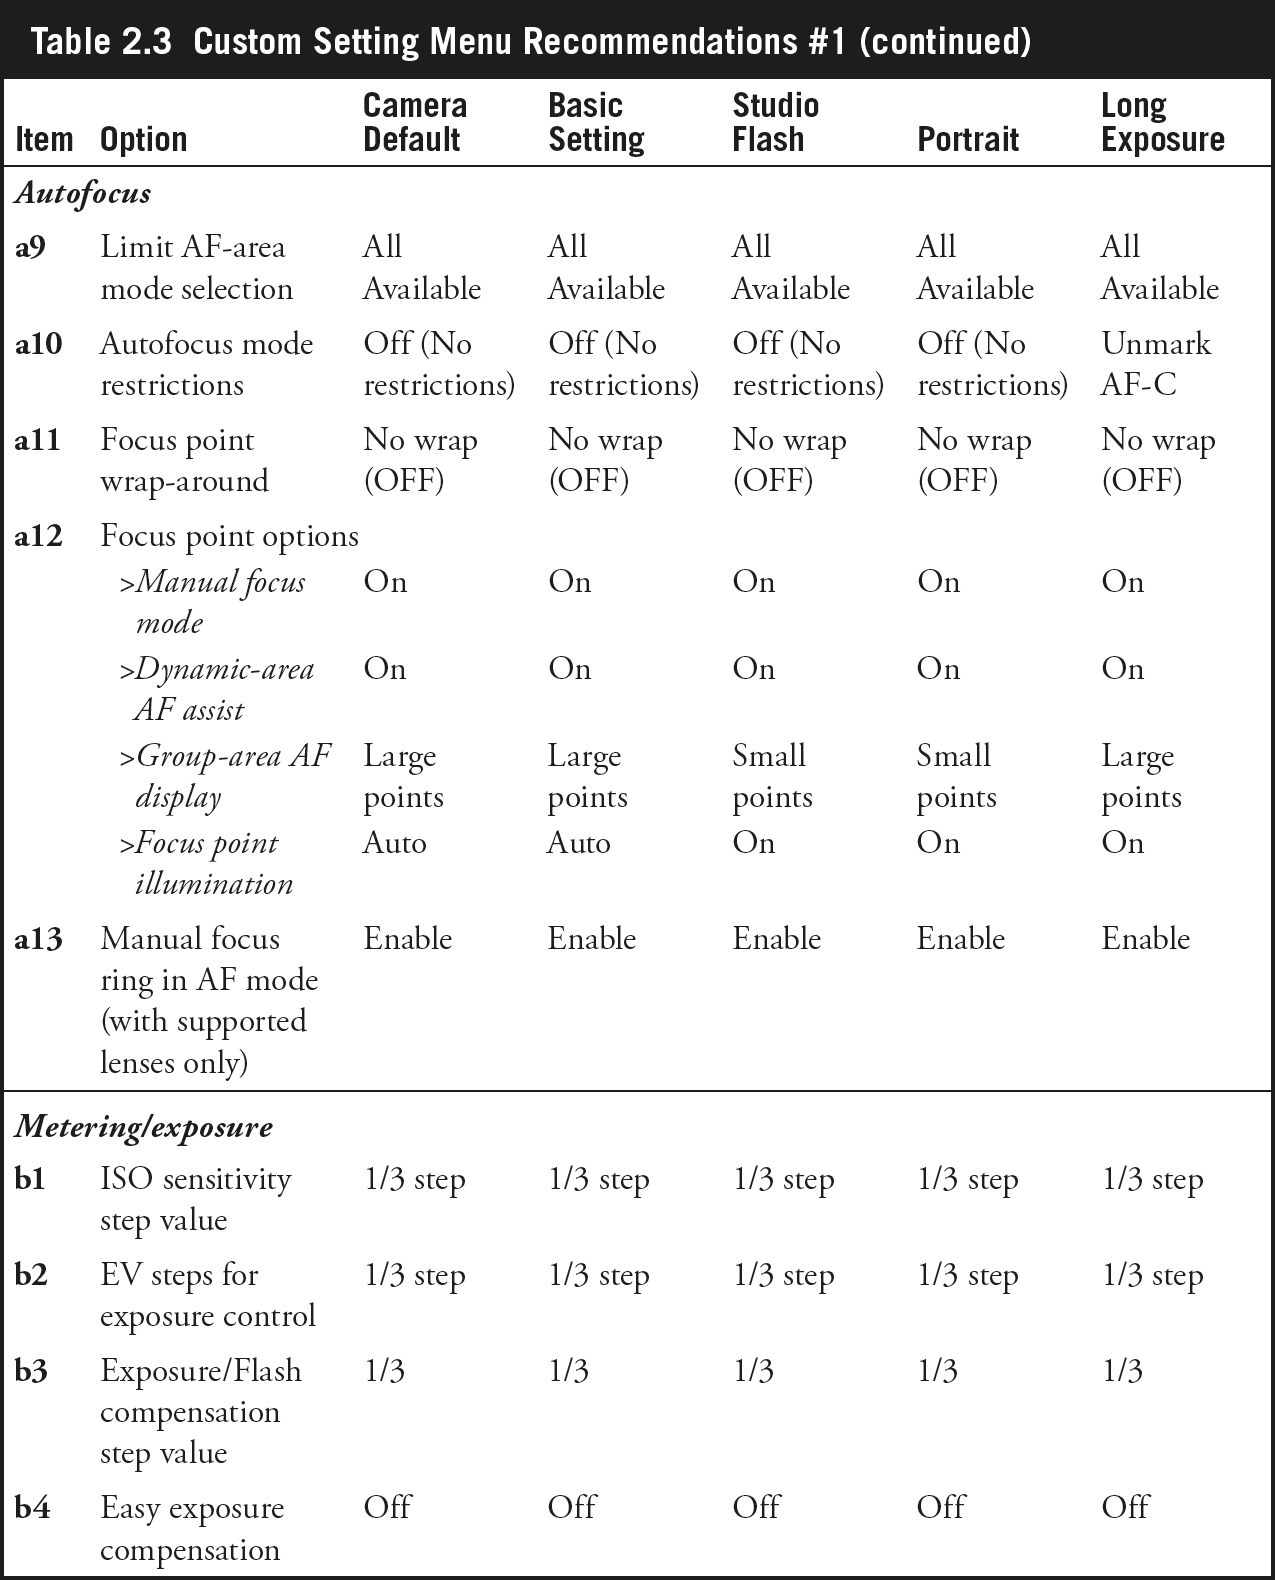
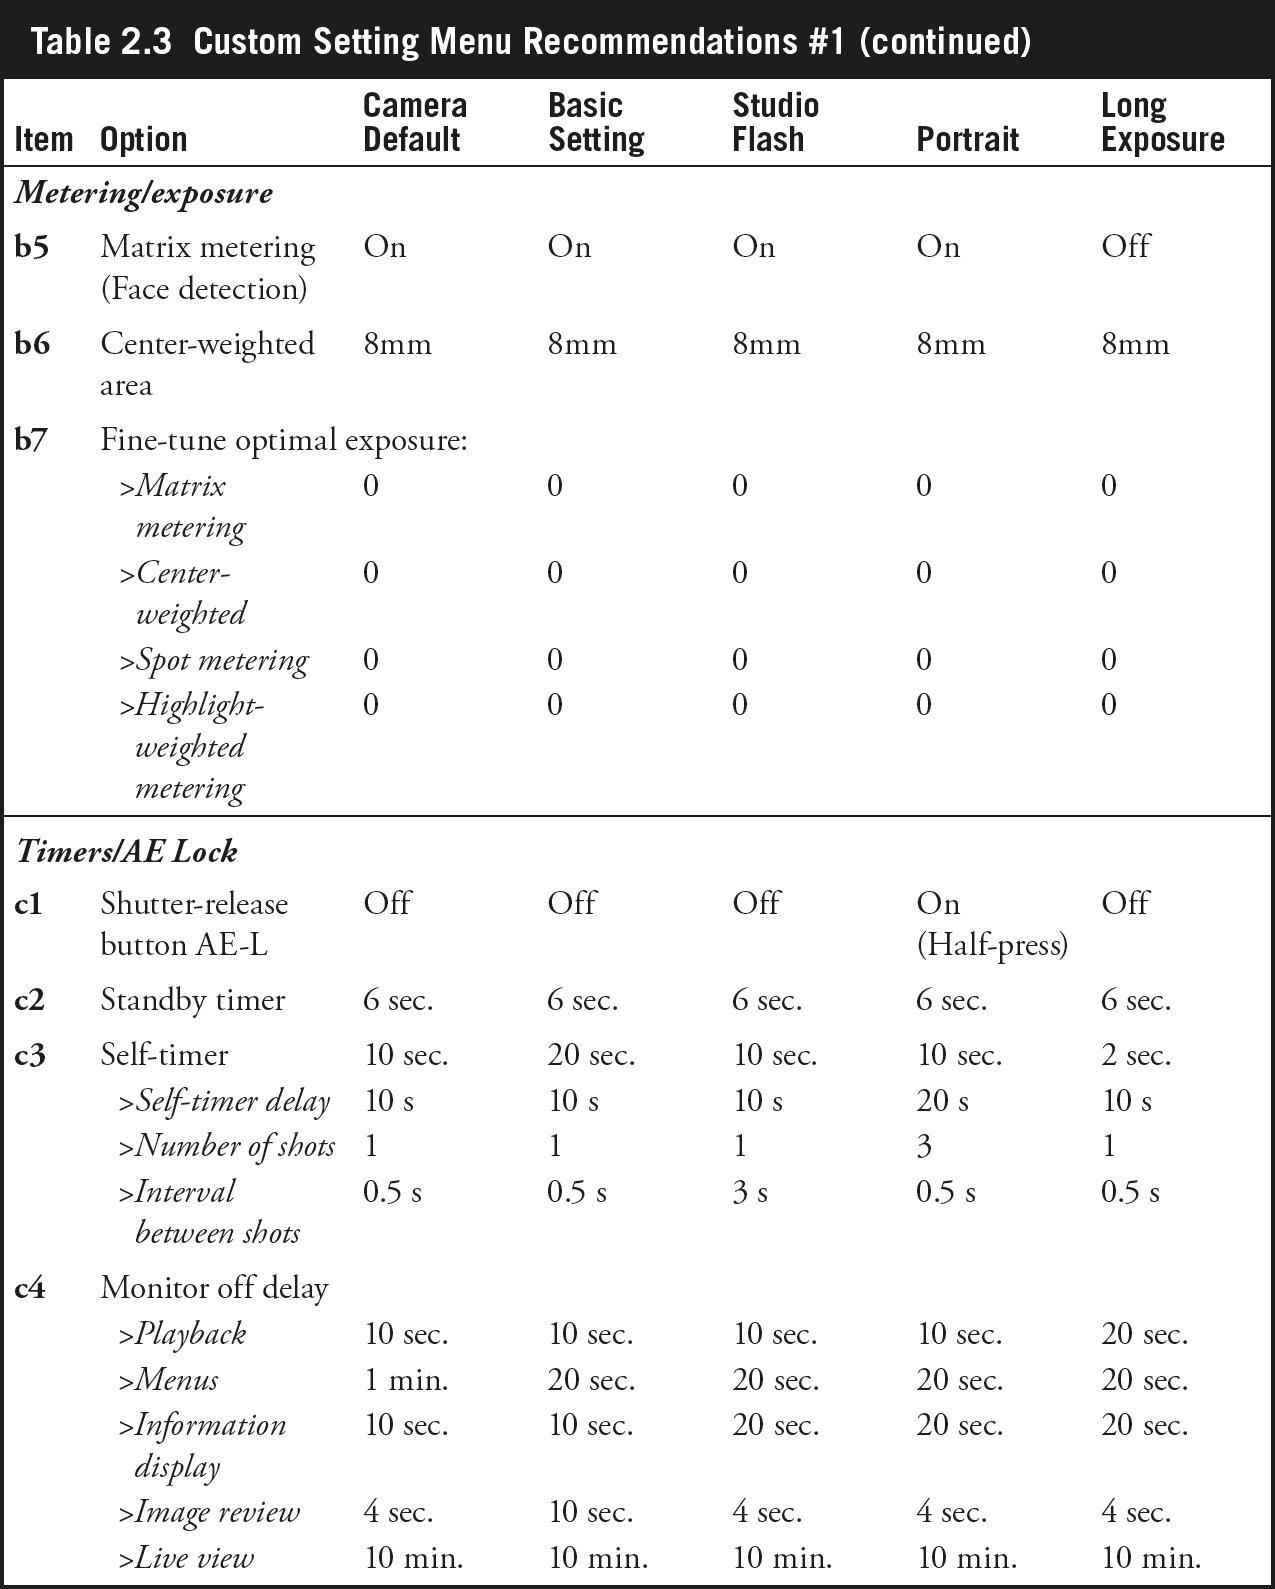
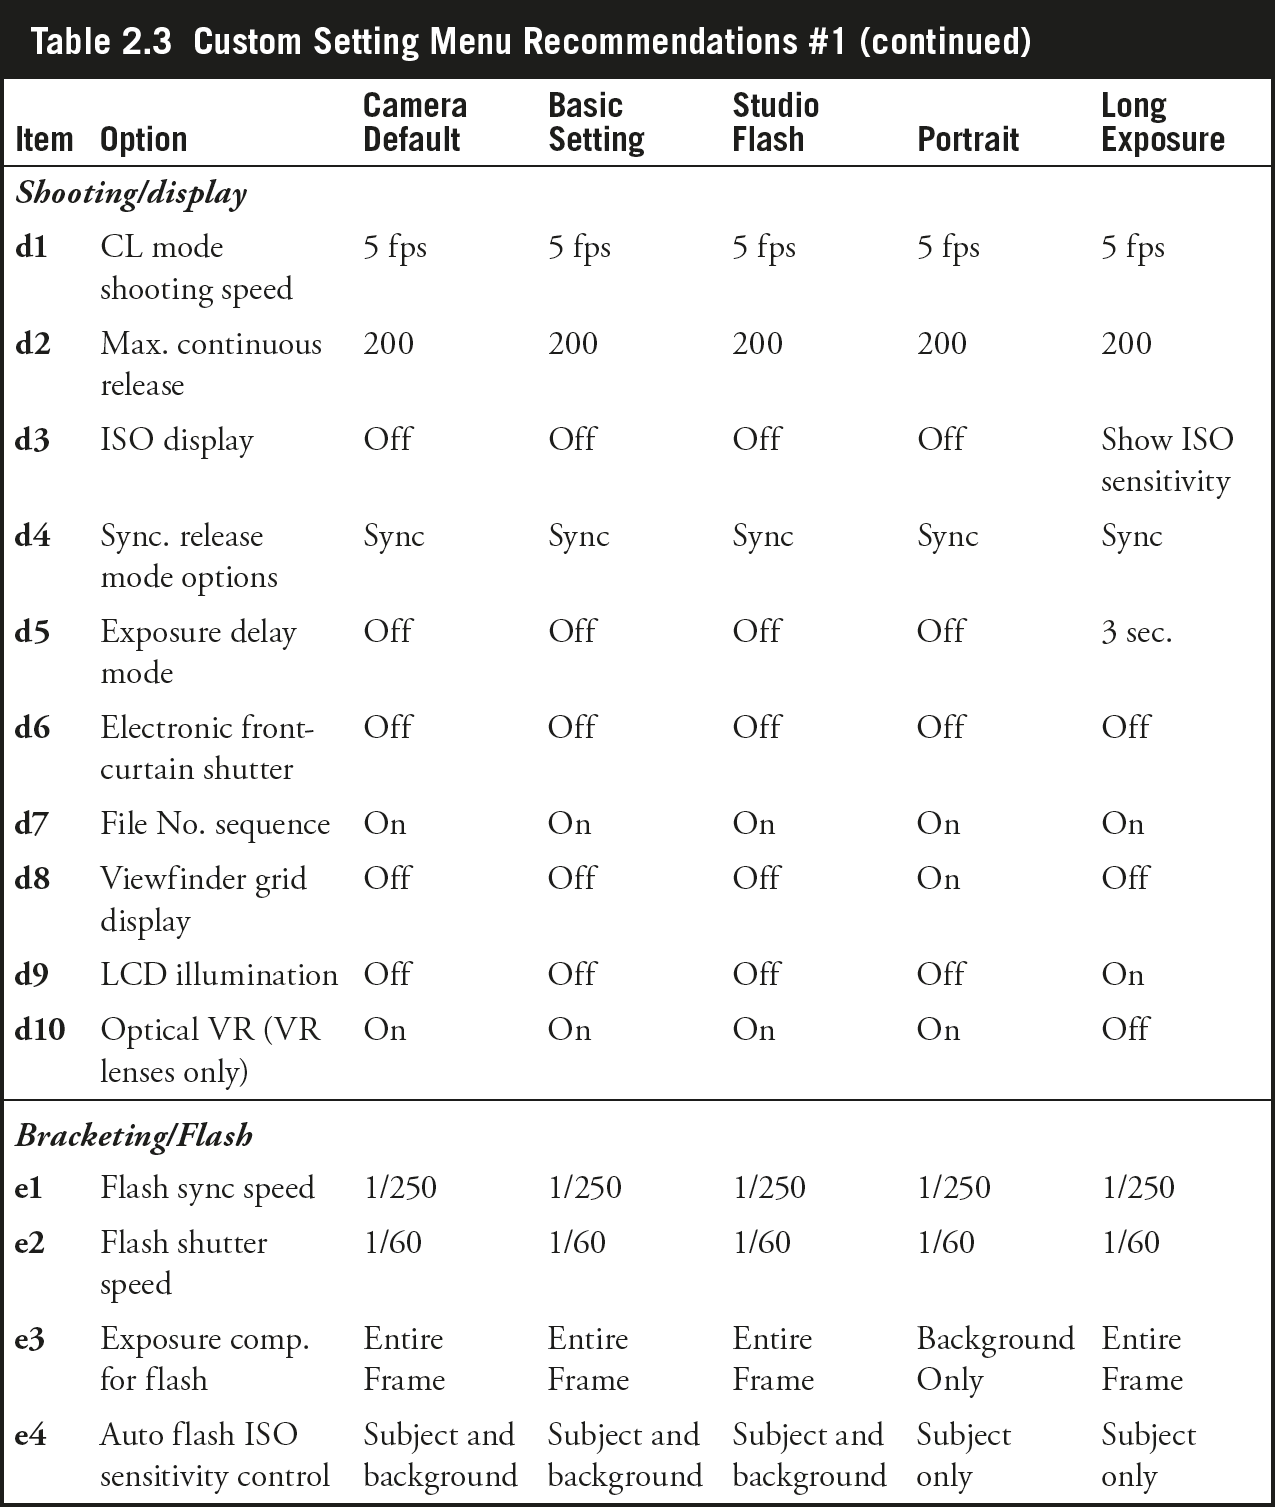
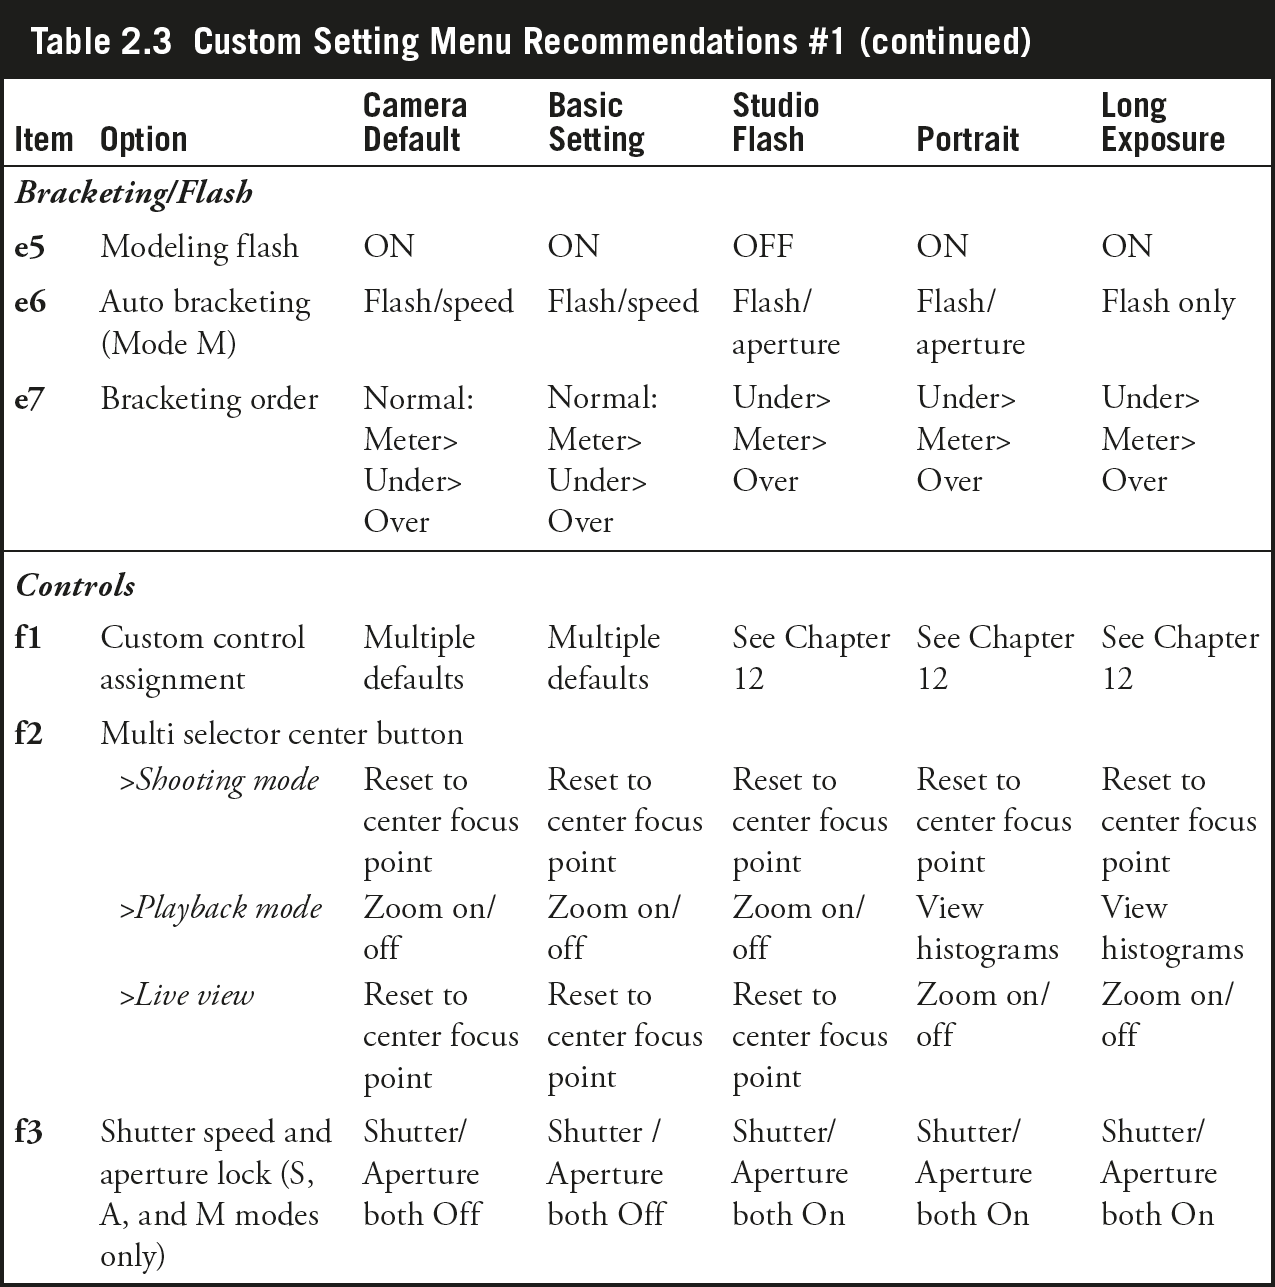
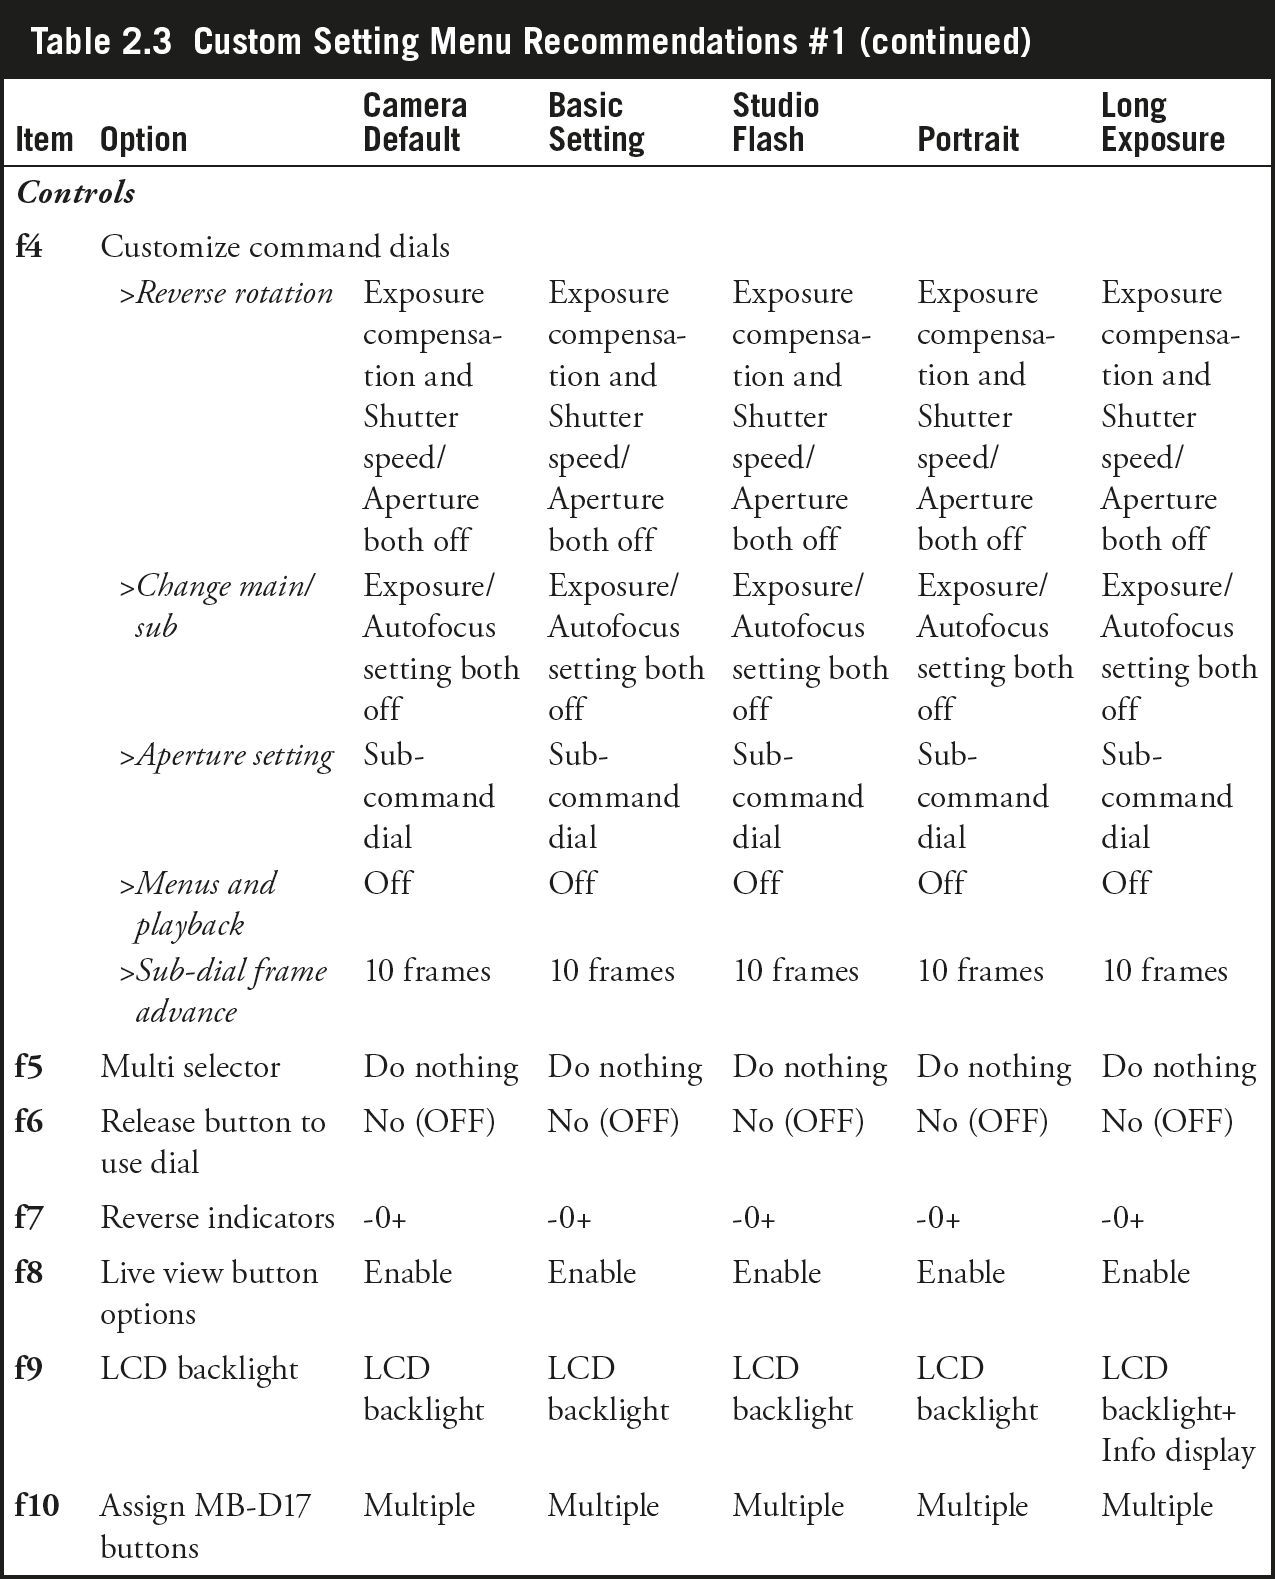
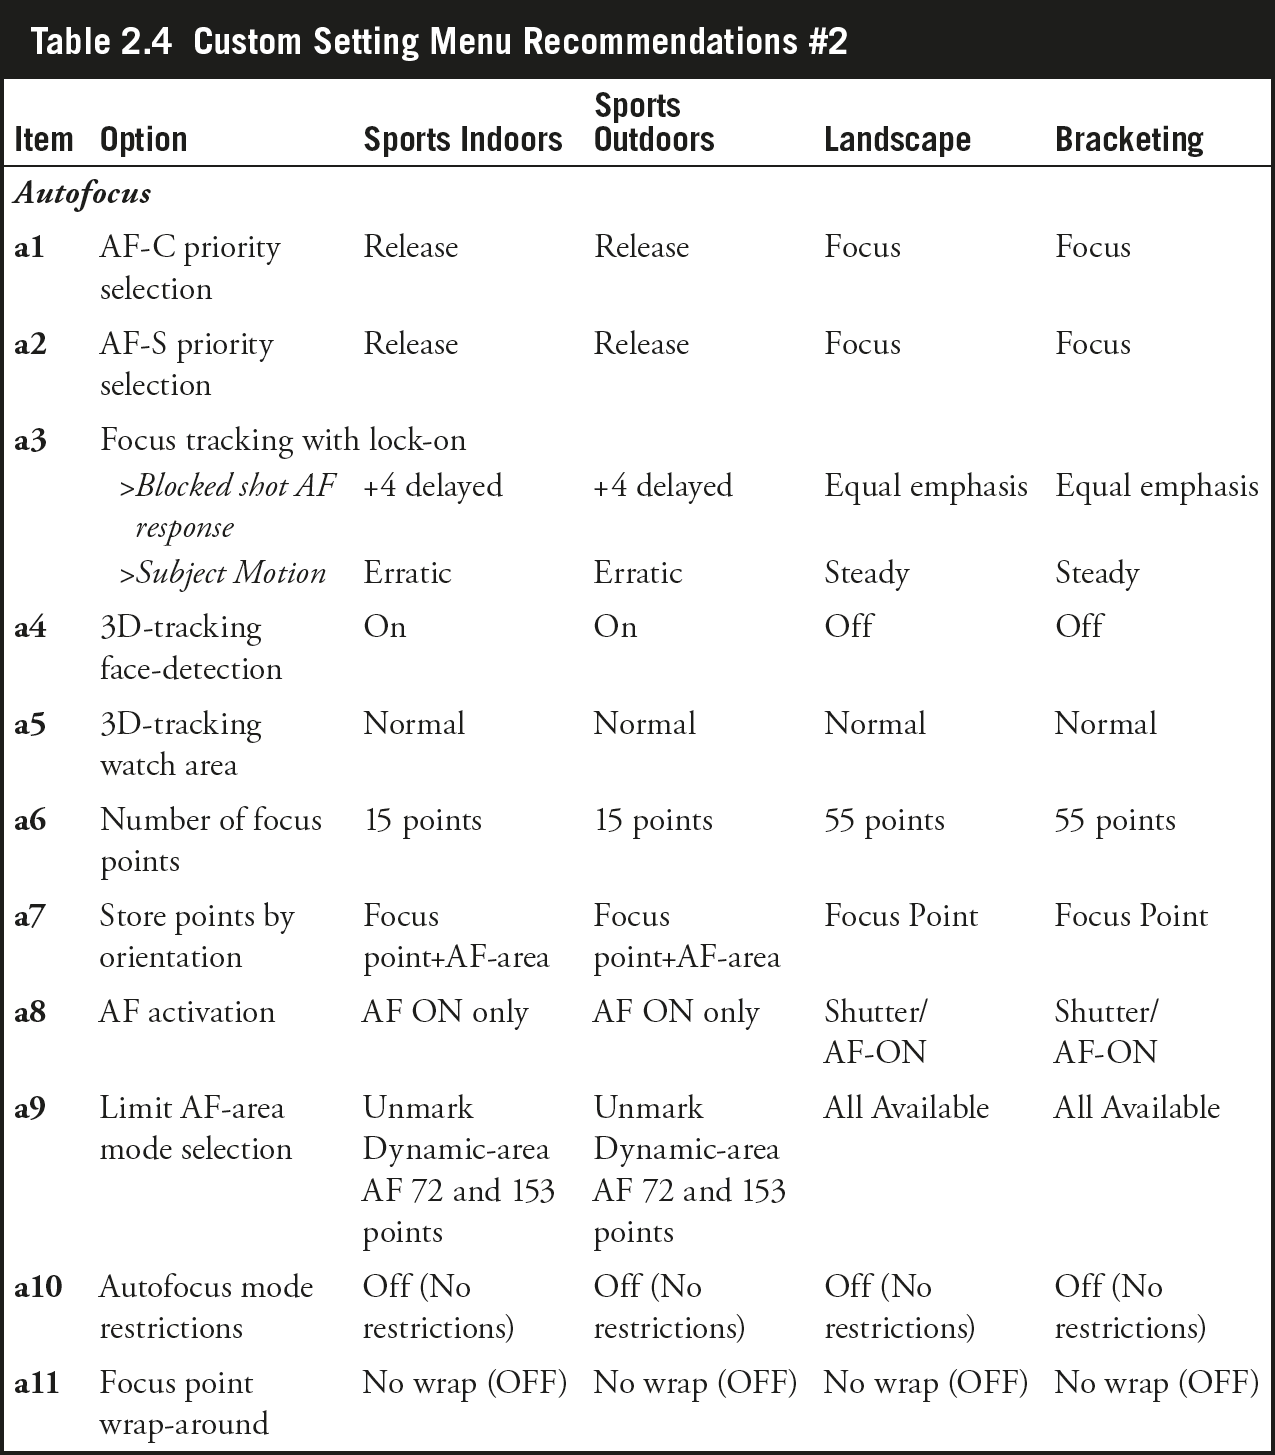
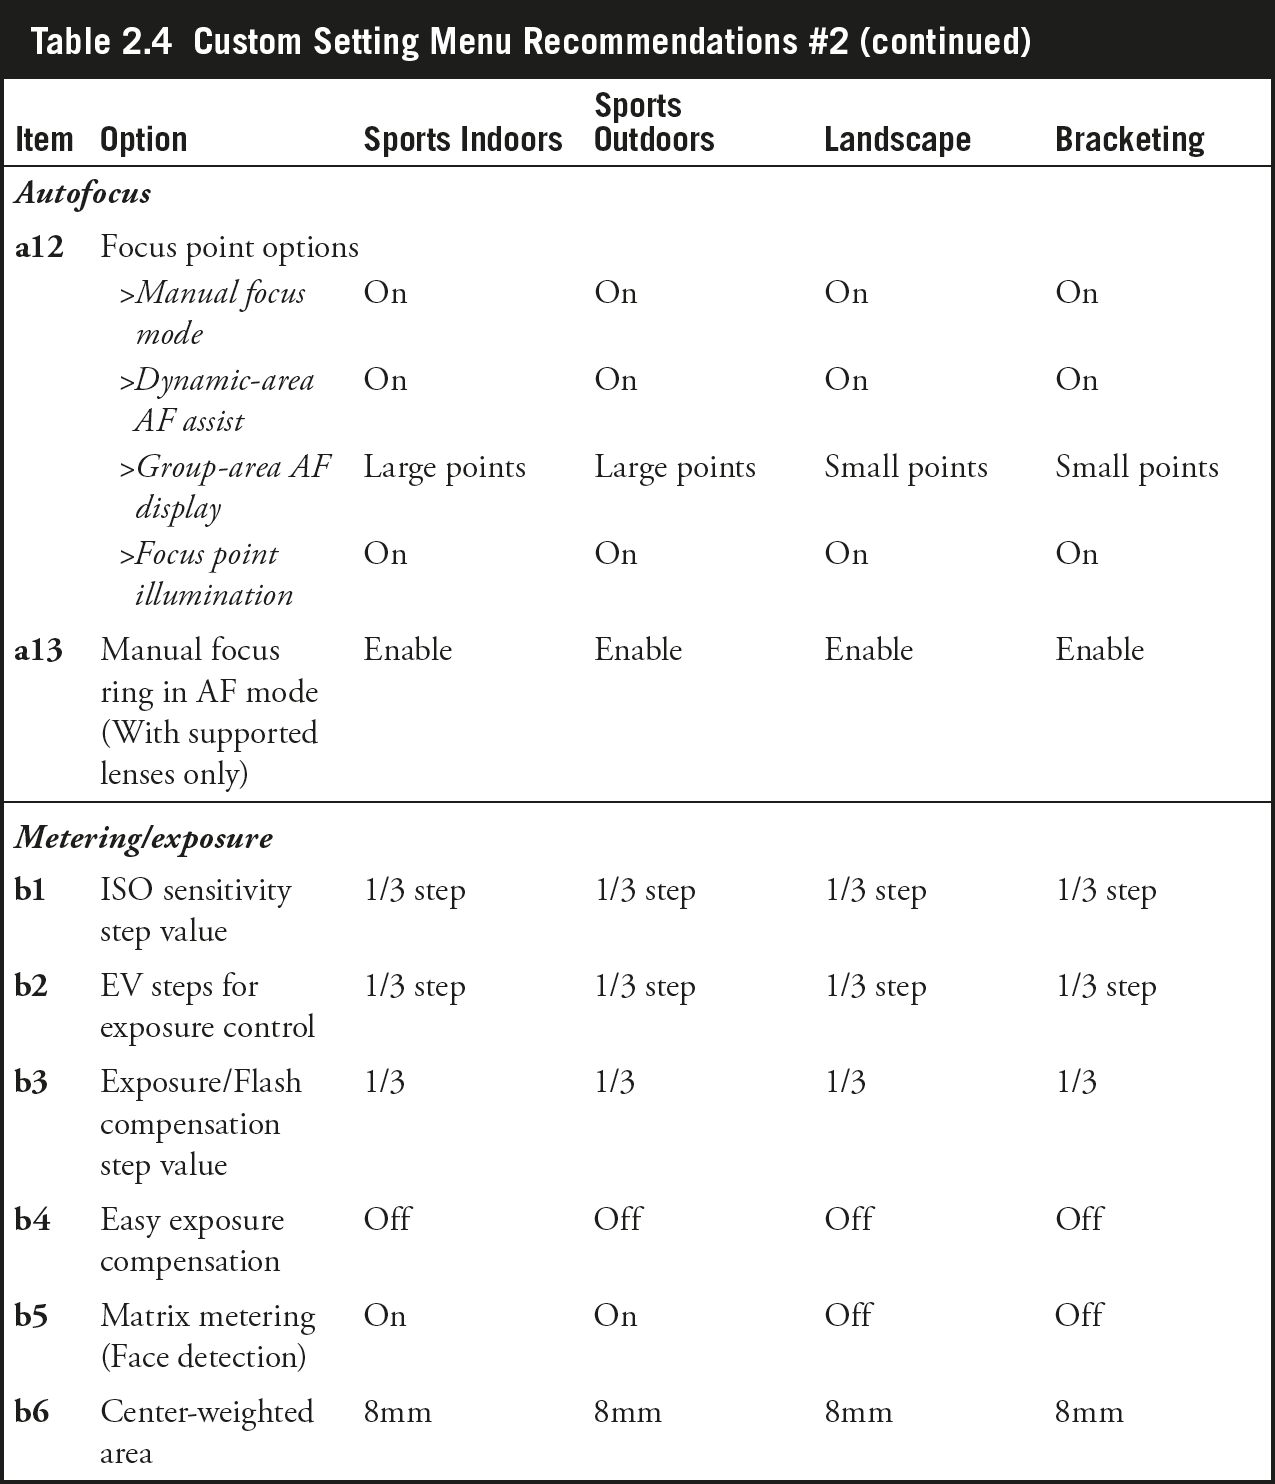
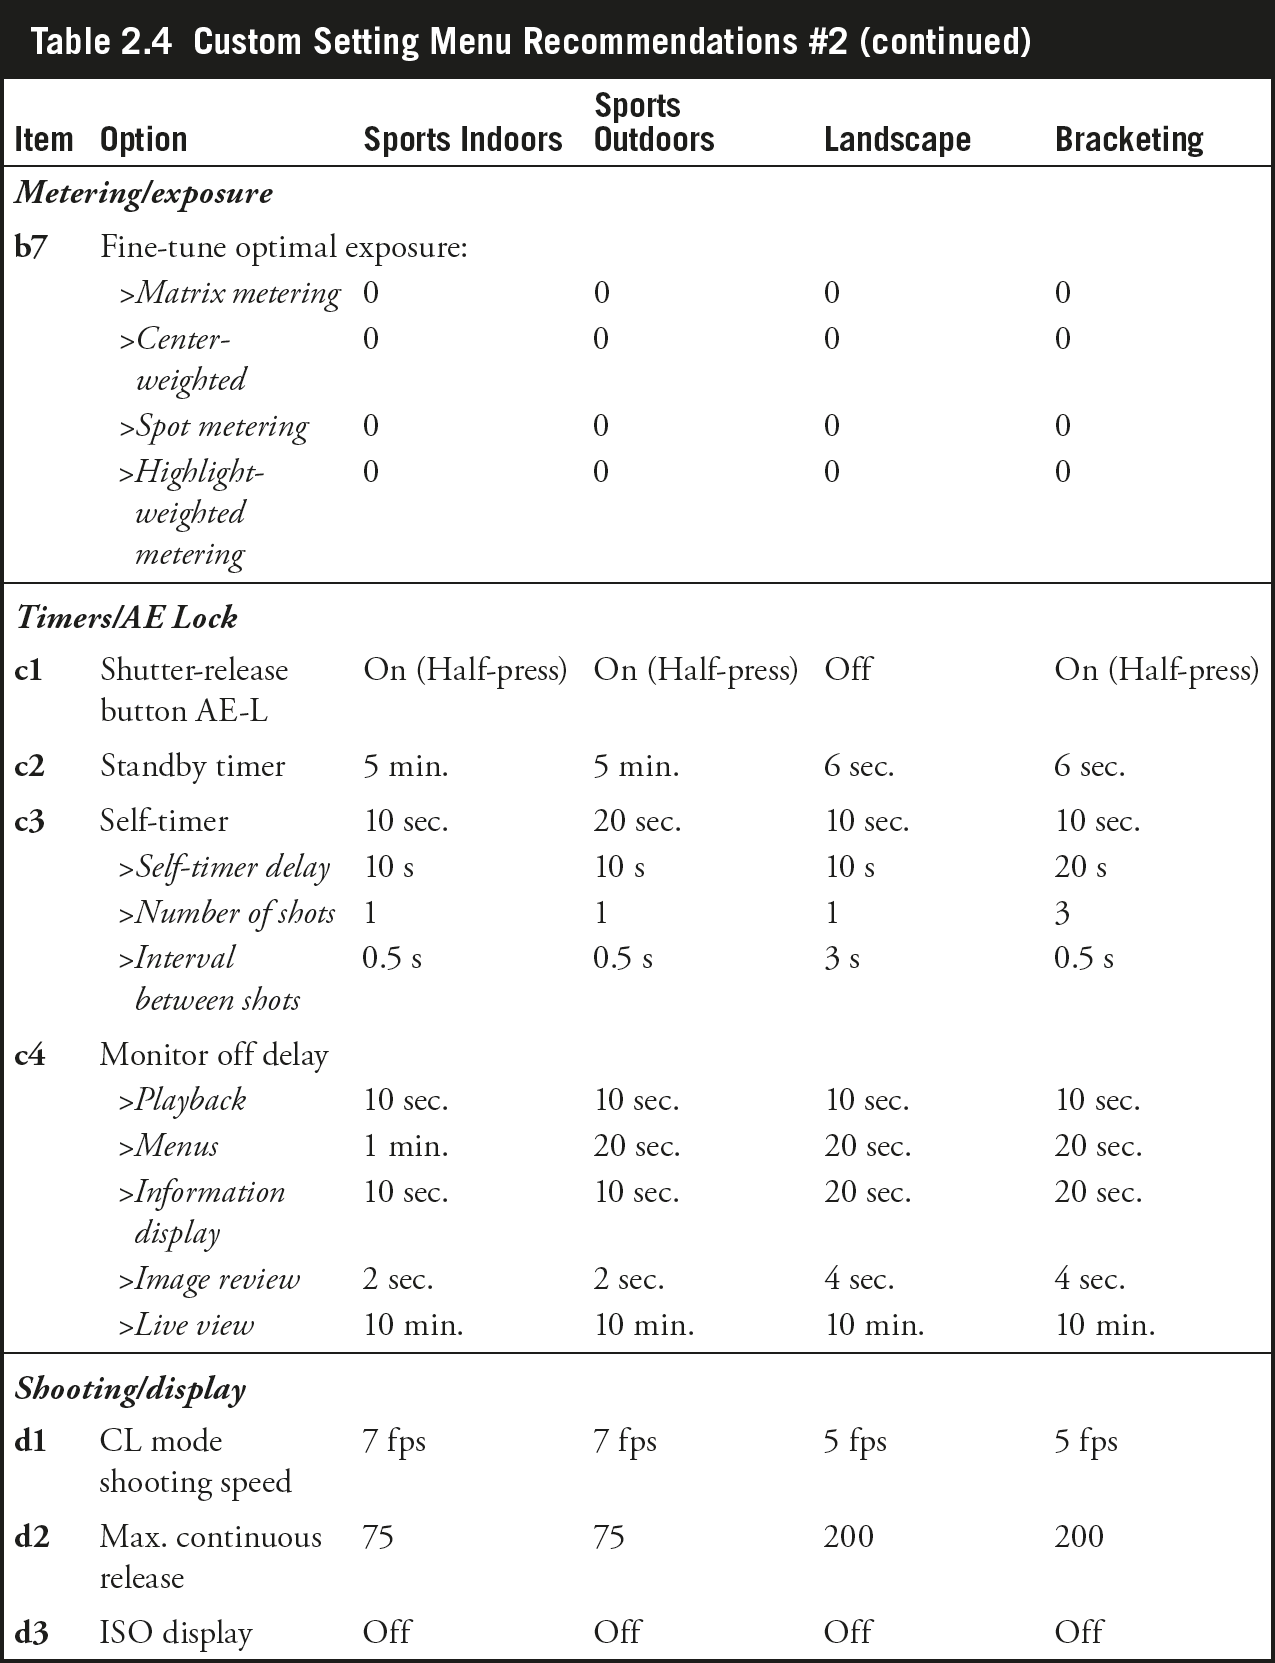
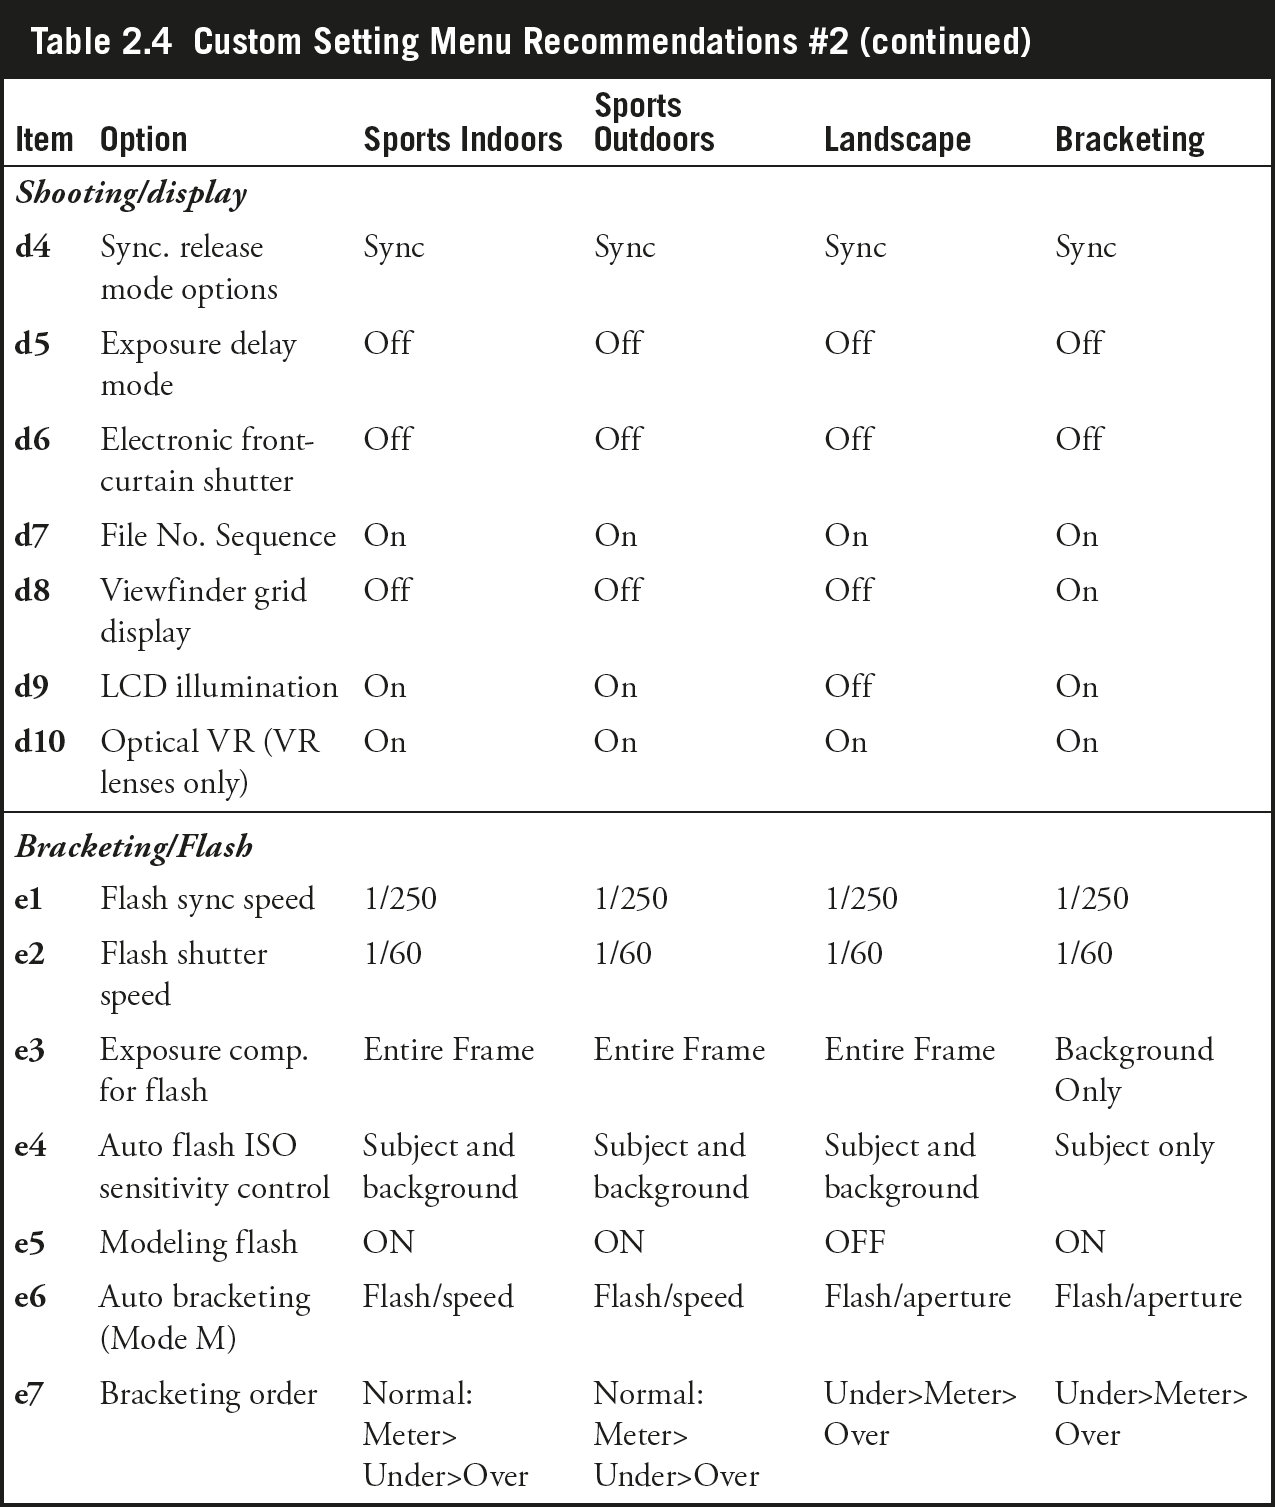
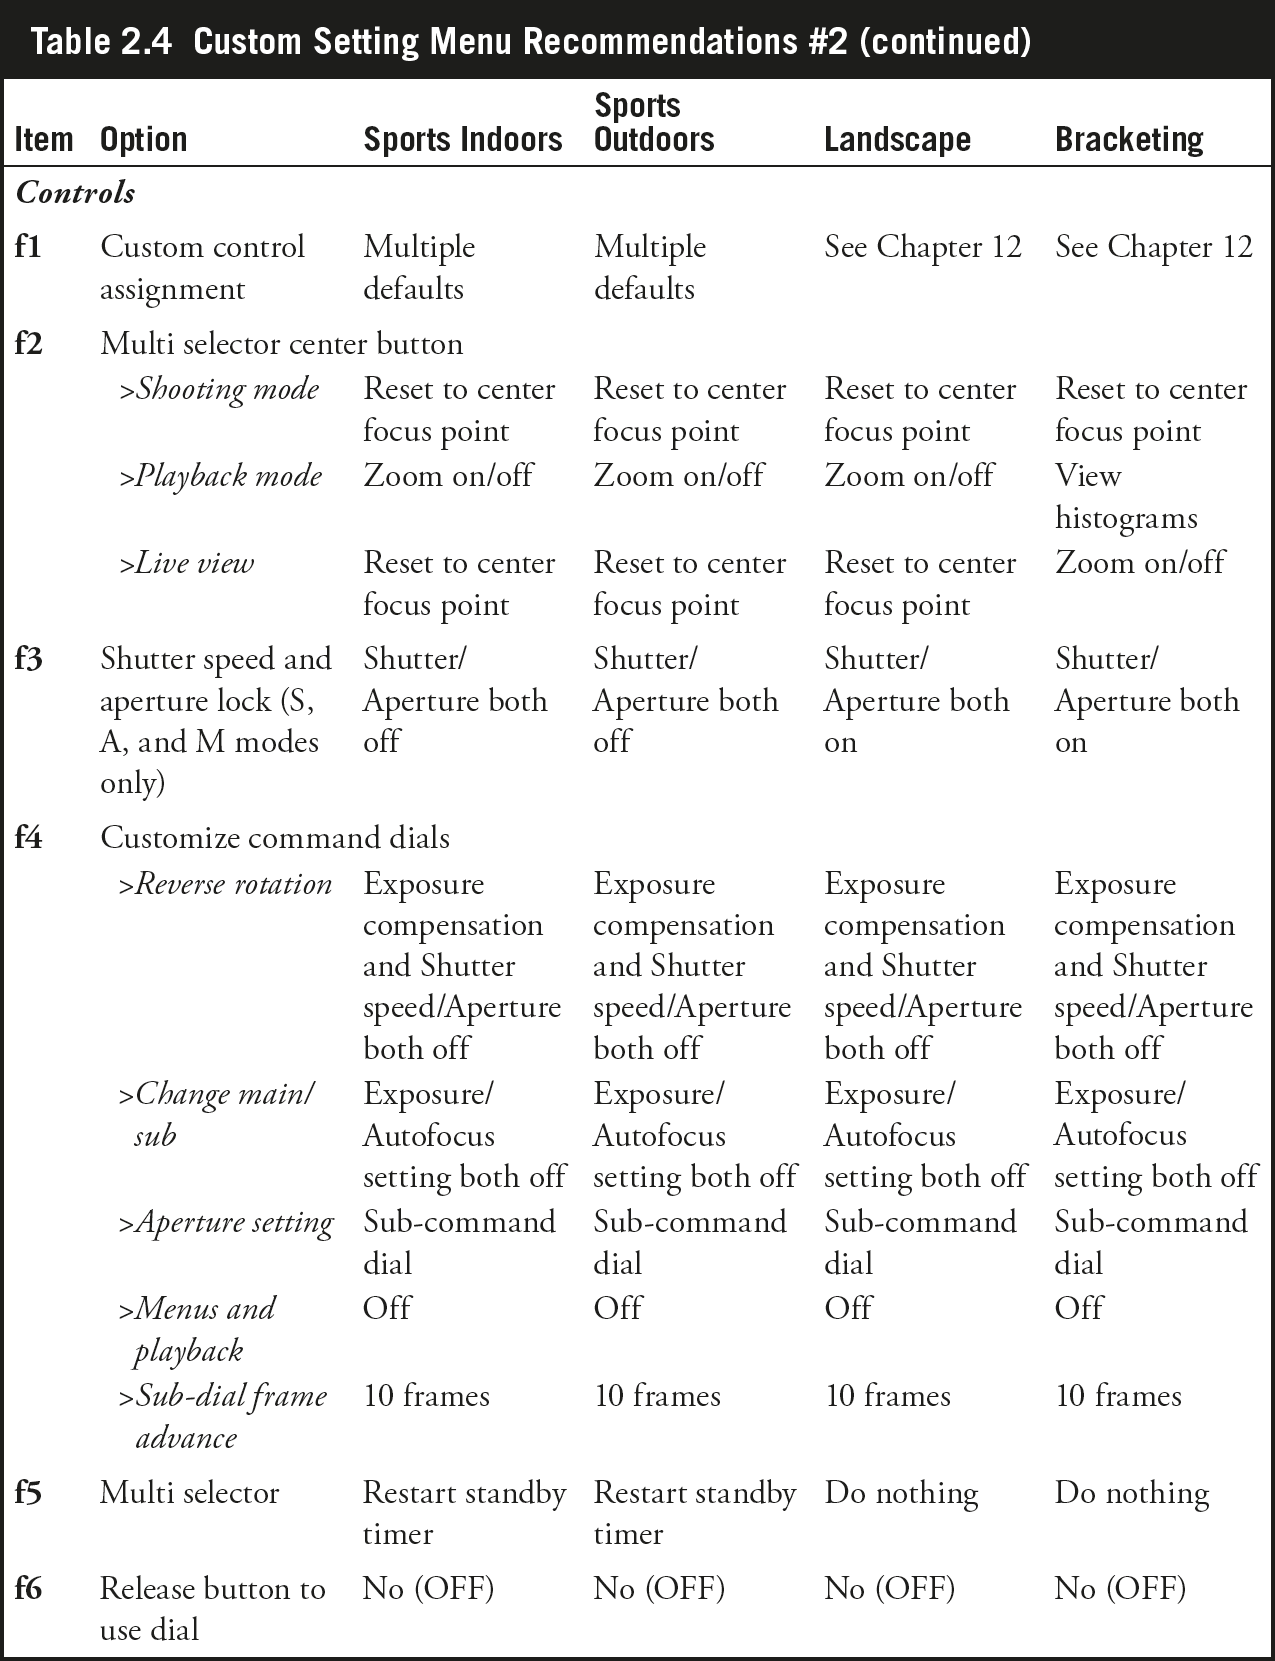
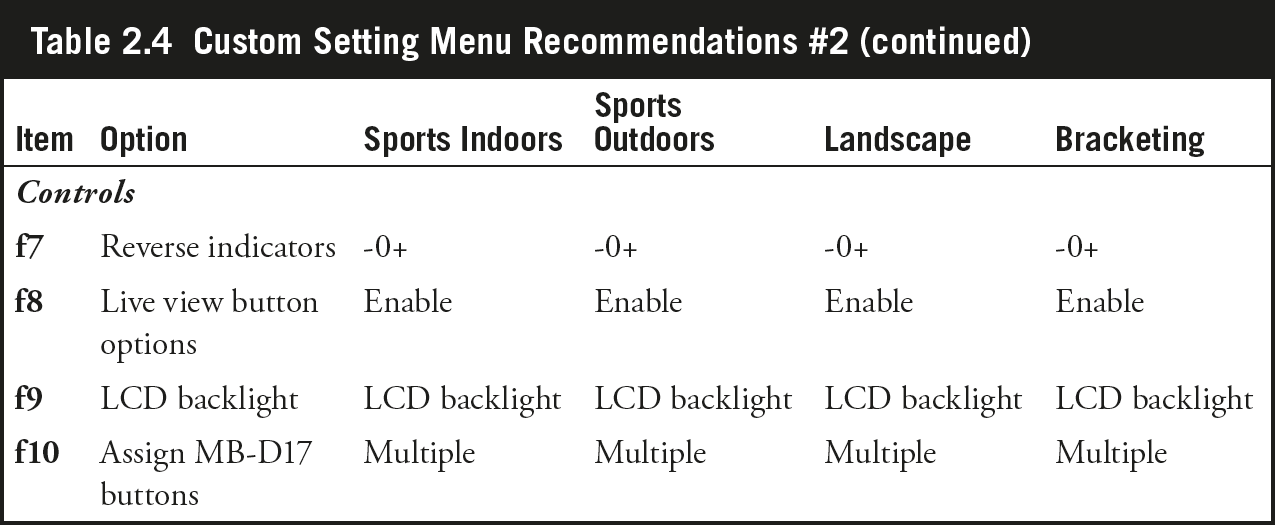
Custom Setting Menu Recommendations
Next come the Custom Setting menu recommendations. They are divided into the exact same categories, but with the addition of a new category for bracketed shots. And, of course, they all deal with different options. I don’t have any recommendations for CSM g Movie Settings, which assigns functions for movie shooting only; your preferences will depend entirely on what kind of video you capture.