
Google Classroom is a web service that enables teachers to set up and manage classes, organize class materials, and communicate easily with students. In this chapter, we will explore what Google Classroom is and how you can use it most effectively to organize classes in your school.
We will start by looking at how to sign in to Google Classroom and how to choose settings. We will then go through how to set up your classes, whether you are accepting provisioned classes or creating classes yourself. We will look at how to configure and manage classes, from adding materials all the way through archiving classes when you finish teaching them. On the way, we will dig into the details of how to communicate with students—setting and grading assignments, making announcements and posing questions, and contacting students via email.
Getting Started with Google Classroom
To get started with Google Classroom, go to classroom.google.com and sign in using your Google Education account.

The Classes page shows either your list of existing classes or a prompt to create or join your first class.
Classroom Main Menu: Click this button to display the main menu, which enables you to navigate to your classes and calendar and access the Settings page.
Create or join a class: Click this button to display a pop-up menu with a Join class item and a Create class item.
Google apps: Click this button to display a pop-up panel showing icons for the various Google apps. You can click an icon to launch an app.
Notifications: Click this button to display a pop-up panel showing your notifications.
- Google Account: Click this button to display a pop-up panel showing the name of the account under which you are signed in. This panel contains the following three buttons :
My Account: Click this button to display your account information in a new tab.
Add account: Click this button to start adding another account.
Sign out: Click this button to sign out of the account you are currently signed in to.
USING GOOGLE CLASSROOM ON OTHER PLATFORMS
Given that your school is using Chromebooks, its students and teachers will likely access Google Classroom mostly through the Chrome browser. However, Google Classroom also works with most major browsers and operating systems, so if your students or colleagues use PCs or Macs at home, they can access Classroom using browsers such as Microsoft Edge, Internet Explorer, Firefox, or Safari instead of Chrome.
Google Classroom is also available as an Android app and an Apple app. On Android, open the Play Store app and search for Google Classroom. On iOS, open the App Store app and search for Google Classroom . Verify that the result is from Google Inc.
Choosing Settings for Google Classroom

From the Settings page, you can customize your profile picture, manage your Google account settings, and choose which Google Classroom notifications to receive
Changing Your Profile Picture
To change your profile picture, click the Change button in the Profile box and then use the Select profile photo dialog box to select an existing photo or to take a new photo using the computer’s webcam. This profile picture will appear across all the Google services you use, and it is visible to anyone, so make sure you are happy with the picture you select.
Managing Your Google Account Settings
The Settings page in Classroom also gives you access to the settings for your Google account . Click the Manage button under the Account settings heading to open the settings for your Google account in a new Chrome tab. You can then go to a category of settings by clicking a heading, such as the Sign-in & security heading or the Personal info & privacy heading.
Choosing Which Google Classroom Notifications to Receive
To control which Google Classroom notifications you receive, set the switches in the Email category, the Comments category, and the Classes you teach category on the Settings page.
Receive email notifications: This switch is the master switch for email notifications. If you set this switch to Off, Google Classroom will hide all the other switches because those settings are not relevant.
Comments on your posts: Set this switch to On to receive notifications for comments that students (or teachers) post in response to your posts. Receiving notifications for these comments is usually helpful—for example, the notifications may help you quickly resolve any issues the students raise regarding questions or assignments you have set. If you review your classes regularly and you receive too many notifications, you may prefer to turn notifications off.
Comments that mention you: Set this switch to On to receive notifications of comments that mention you by your email address.
Late submissions of student work: Set this switch to On to receive a notification when a student submits work after the due date and time.
Resubmissions of student work: Set this switch to On to receive a notification when a student resubmits work. These notifications can help you avoid spending time marking the work that the student had previously submitted.
Invitations to co-teach classes: Set this switch to On to receive a notification when a teacher invites you to co-teach a class.
Scheduled post published or failed: Set this switch to On to receive a notification each time Google Classroom publishes one of your scheduled posts or fails to publish one. If you schedule many posts, you will receive a lot of notifications, but you may find them helpful as a reminder of what is current in the class. Notifications of failed posts are especially helpful, giving you a heads-up that there is a problem you need to fix.
When you finish choosing settings, return to the Classes page by clicking the Menu button and then clicking the Classes item on the menu.
Note
For configuring notifications, students also have the Receive email notifications master switch, the Comments on your posts switch, and the Comments that mention you switch. In place of the Classes you teach category, students have the Classes you’re enrolled in category, which contains four switches: the Work and other posts from teachers switch, the Returned work and grades from your teachers switch, the Invitations to join classes as a student switch, and the Due-date reminders for your work switch.
Setting Up Your Classes
Classes are the central component of Google Classroom. In this section, we will first examine how you accept provisioned classes, how you create classes manually, and how students join classes using class codes.
Accepting Provisioned Classes
If your school has set you up with provisioned classes, these classes will appear as class cards on the Classes page. You will need to accept each class by clicking the Accept button on its card, checking the details of the class on the page that appears, and then clicking the next Accept button.
Creating a Class
- 1.
Click the Create or join a class button on the toolbar to open the pop-up menu.
- 2.
Click the Create class button. The Create class dialog box will open (see Figure 8-3).
Note
If you are signed in to a Google account that is not a G Suite for Education account, the Using Classroom at a school with students? dialog box will open the first time you click the Create class button. If you are using Classroom privately (for example, for practice or evaluation), check the “I’ve read and understand the above notice, and I’m not using Classroom at a school with students” check box, and then click the Continue button. If you are at a school, click the Go Back button, sign into the G Suite for Education account, and then start creating the class.

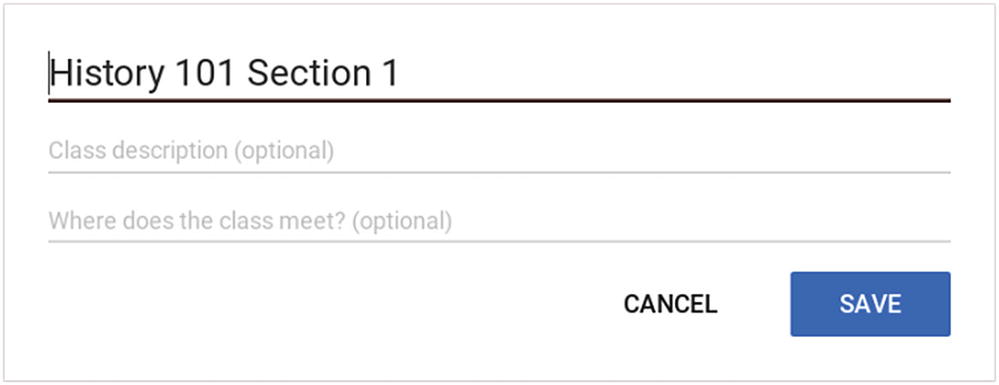
In the Create class dialog box, type the class name, the section, and the subject and then click the Create button
- 3.
Type the class name in the “Class name (required)” field.
- 4.
Click the “Section” field and type the section, if necessary.
- 5.
Click the “Subject” field and start typing the subject. A pop-up menu will open showing predefined subjects. You can then select the appropriate subject if it appears in the list; if not, finish typing the subject.
- 6.
Click the Create button. Google Classroom creates the class, and the page for the class appears in the Chrome tab. This page has three tabs: the Stream tab, which is displayed first (see Figure 8-4); the Students tab; and the About tab.

The class appears in a Chrome tab. The Stream tab is normally displayed at first.
Joining a Class
If you are a student rather than a teacher, you can join a class by using the class code that identifies the class. Normally, your teacher will give you the class code.
Note
As a teacher, you can use this procedure for joining a class as a student—for example, if a colleague invites you to her class to try the student experience.
- 1.
Click the Create or join a class button on the toolbar to open the pop-up menu.
- 2.
Click the Join Class button. The Join class dialog box will open (see Figure 8-5).

In the Join class dialog box, enter the class code provided by your teacher
- 3.
Type the class code in the “Class code” field.
- 4.
Click the Join button. The page for the class then appears, with the Stream tab displayed.
Note
For a student, the page for a class has three tabs: the Stream tab, the Classmates tab, and the About tab.
Navigating and Reorganizing Your Classes

Click the Classes item at the top of the Classroom Main Menu to return to the Classes page. You can click a class name in the Teaching section of the Classroom Main Menu to go straight to that class’ page.
Drag a class card to where you want it to appear.
Click the More Actions button (the three vertical dots) on the card you want to move and then click the Move item on the pop-up menu. In the Move class dialog box that opens (see Figure 8-8), click the To beginning button, the To end button, or the class after which you want to position the class.

Each class appears as a card on the Classes page. You can drag the class cards into your preferred order.

You can also move a class card by using the Move class dialog box
Configuring a Class on the Stream Tab
As you can see in Figure 8-4 (earlier in this chapter), the page for a class has three tabs: the Stream tab, the Students tab, and the About tab.
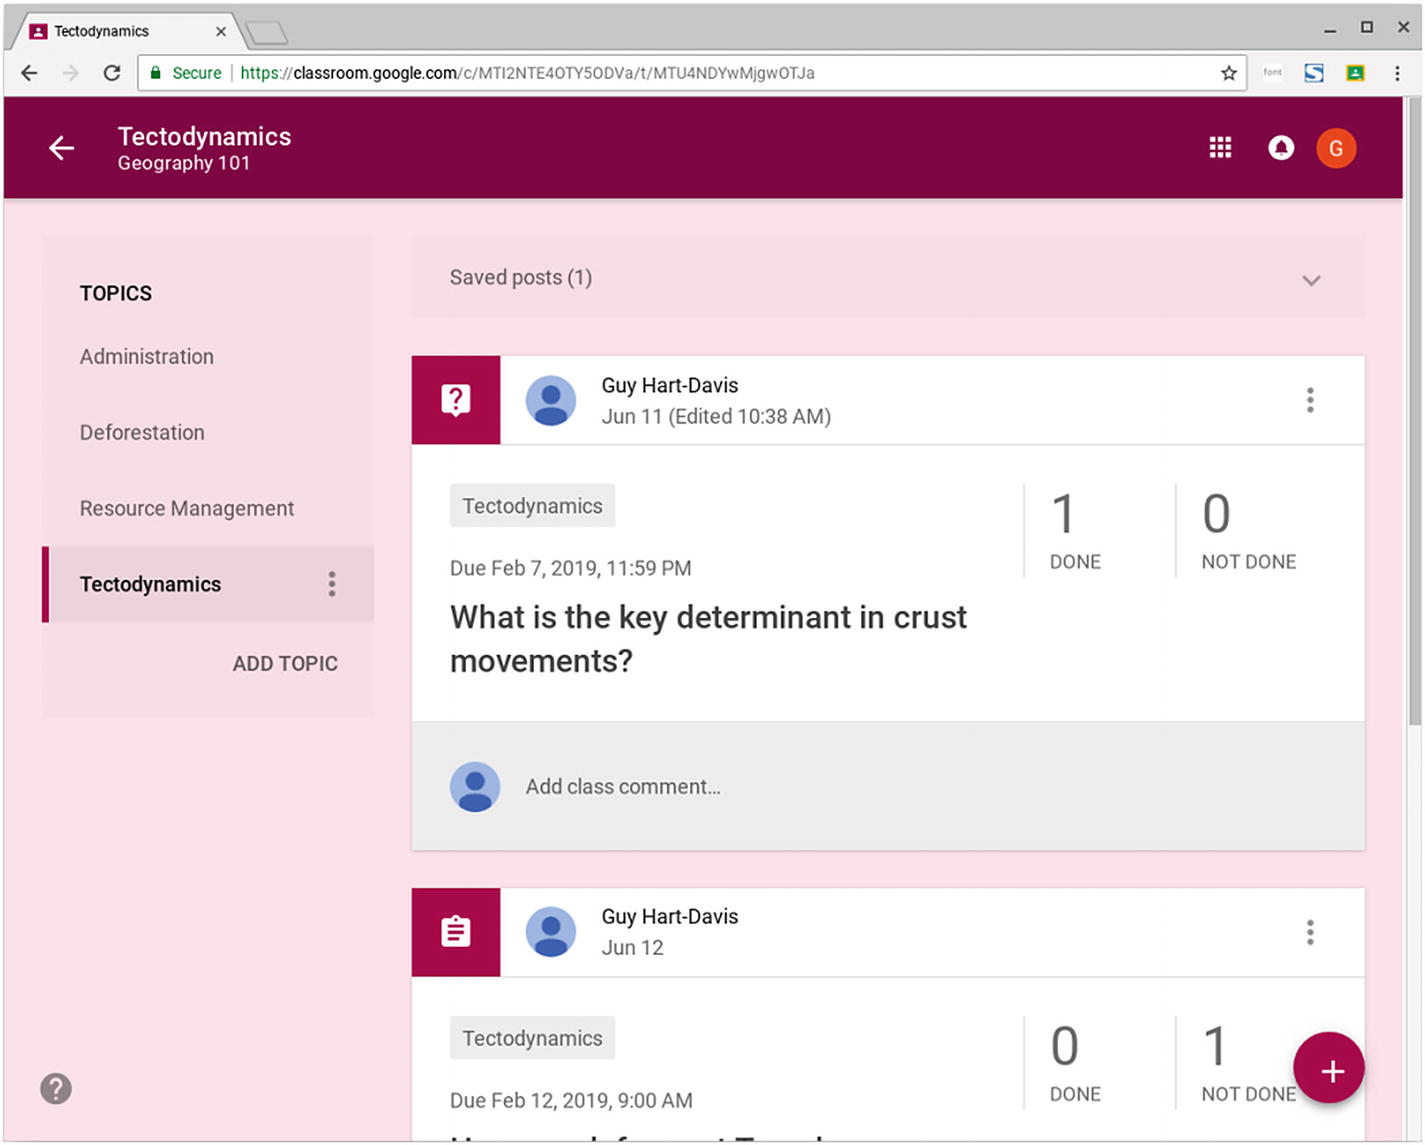
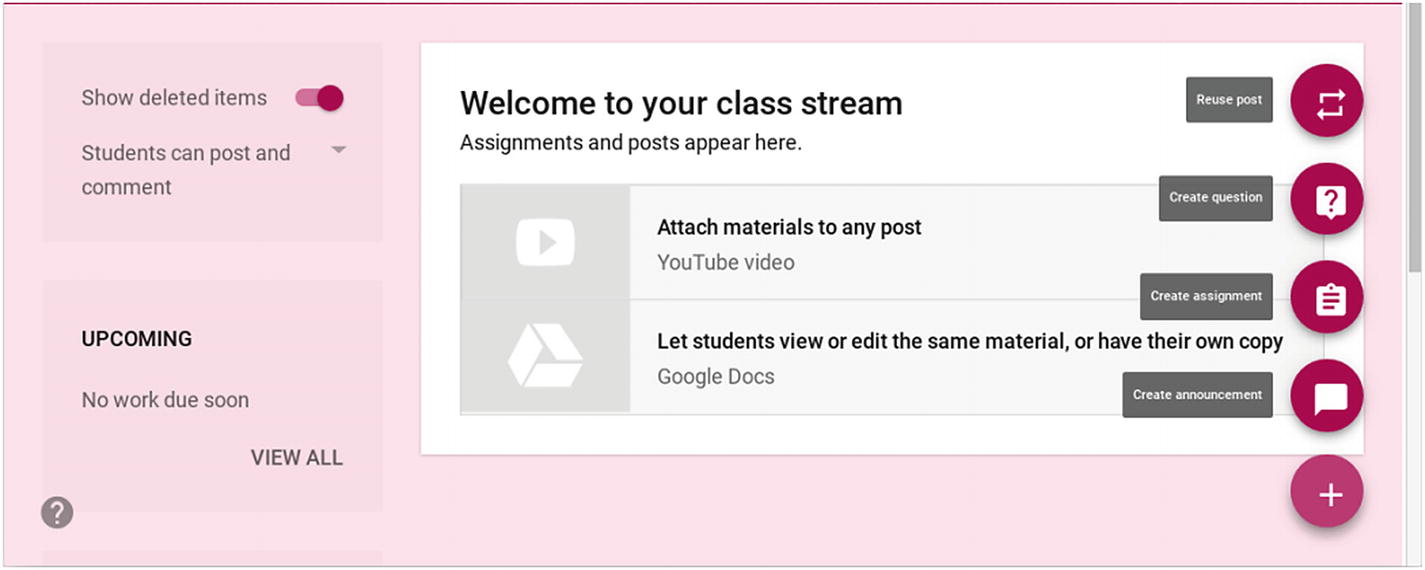
The Stream tab shows the assignments, posts, topics, and upcoming work for the class. When you have only just created a class, it will have none of these items. You will learn how to add assignments, posts, and topics later in this chapter.
Setting the Theme for the Class
Across the top of the Stream tab is the theme picture or pattern, with the class name, the section name, and your name and photo superimposed on the middle of the picture or pattern. You can change the theme by applying a preset picture or pattern or by uploading a photo of your own (or of your school’s).
- 1.
Click the Select theme button in the lower-right corner of the theme picture or pattern to display the Gallery dialog box (see Figure 8-9).

In the Gallery dialog box, click the Gallery tab or the Patterns tab, click the picture or pattern you want to use as the class theme, and then click the Select class theme button
- 2.
Click the Gallery tab if you want to use a picture for the theme, or click the Patterns tab if you want to apply a pattern.
- 3.
Click the picture or the pattern. A blue circle containing a white check mark appears on it.
- 4.
Click the Select class theme button. The picture or pattern appears across the top of the Stream tab.
To customize the theme with a photo you upload, follow these steps:
- 1.
Click the Upload photo button in the lower-right corner of the theme picture or pattern to display the Gallery dialog box. In this case, the Gallery dialog box contains only the Upload tab.
- 2.
Upload your photo in one of these ways:
Drag a photo from the desktop or a file-management window to the Drag a photo here placeholder.
Click the Select a photo from your computer button to display the Select a file to open dialog box. Navigate to the photo, click the photo, and then click the Open button.
- 3.
Click the Select class theme button. The photo appears across the top of the Stream tab.
Showing and Hiding Deleted Items
You can control whether deleted items appear in the class stream for you by setting the Show deleted items switch to On or Off.
Note
The Show deleted items switch works only on the teacher’s view of the class. Google Classroom does not display deleted items for students, even when this switch is set to On.
Normally, you will likely find it best to hide deleted items to keep the class stream looking as clean and uncluttered as possible. However, sometimes you may find it helpful to display deleted items to get a view of what has been removed.
Viewing Upcoming Items
The Upcoming box shows the list of upcoming assignments and questions for which you have set due dates. A teacher or student can click one of the links in the Upcoming box to display the assignment or question.
If you have just created the class, or if there are no date-bound items set for the near future, you will see the message “No work due soon” in the Upcoming box.
You can click the View All button to display the full list of assignments for the class.
Viewing and Managing the Topics List
The Topics box shows the topics the class contains so far. If you have just created the class, the message “No topics” will appear in the Topics box instead.

To add a topic manually, type its name in the Add topic dialog box and then click the Add button
Once you have added a topic , you can rename the topic or delete it by moving the pointer over it, clicking the More Actions button (the three vertical dots) that appears, and then clicking the Rename item or the Delete item on the menu.
Organizing Your Class Stream
Google Classroom automatically arranges the posts in your class stream in descending date order, so the newest posts appear at the top. Descending date order works pretty well as a default, but you will often need to reorganize items to make sure students see the most important items rather than just the newest items.
Move a post to the top of the stream
Delete unneeded posts
Filter the stream by topics
Moving a Post to the Top of the Stream
Your main tool for reorganizing the stream is the Move to Top command, which lets you move an item to the topmost position in the stream. To give this command, click the More Actions button (the three vertical dots) for the post and then click the Move to Top item on the pop-up menu.
Caution
Use the Move to Top command only when necessary because—unless students have turned off notifications—Google Classroom automatically sends each student a notification when you move a post to the top of the stream. Moving multiple items to the top, and shuffling them into your desired order, will launch a salvo of notifications.
Deleting Unneeded Posts
Another means of reorganizing the stream is to delete any posts that are no longer needed. Before deleting any item, make sure that it contains no associated items—such as comments or files—that it would be a better idea to keep.
Filtering the Stream by Topic
Topics box: In the Topics box on the left, click the topic you want to view.
Topic button: Click the topic button on a post.
Filtering by topic enables you to view only the posts tagged with the topic. You can switch to a different topic by clicking it in the Topics box, or click the Back button in the upper-left corner to return to the full stream.
Note
You can rename a topic by clicking the More Actions button (the three vertical dots) to its right in the Topics box and then clicking the Rename item on the pop-up menu. In the Rename topic dialog box that opens, type the new name and then click the Rename button. You can also delete a topic by clicking the More Actions button, clicking the Delete item on the pop-up menu, and then clicking the Delete button in the Delete topic? dialog box.
When you are ready to return to the Stream tab, click the Back button (the left-arrow button) in the upper-left corner of the screen.
Working on the Students Tab for a Class

The Students tab shows the students assigned to the class. If you have just created the class, it will have no students, as shown here.
Taking Actions from the Class Code Pop-Up Menu
Display: Click the Display item to display a pop-up showing the class code at a large size (see Figure 8-13). This is helpful for showing your students the class code so they can join it; you can also click the Full screen button to switch the pop-up to full screen for even easier viewing. Click the Close (X) button in the upper-right corner of the pop-up or the upper-left corner of the full-screen display to hide the class code again.

You can display the Class code pop-up to allow students to see the class code and join the class quickly. Click the Full screen button to switch the class code to full screen to make it even easier to see.
Copy: Click the Copy item to copy the class code to the Clipboard so that you can paste it elsewhere.
Reset: Click the Reset item to reset the class code—in effect, to generate a new code for the class. The usual reason to reset the class code is if students are having difficulty joining a class.
Disable: Click the Disable item to disable the class code, rendering it temporarily unusable. You might disable the class code once all the students have joined the class, and you want to make sure nobody else joins it. The word Disabled will appear in place of the Class code readout. When you are ready to re-enable the class code, click the Class code pop-up button and then click the Enable item on the pop-up menu .
Adding Students to the Class Using the Class Code
For the teacher, the easiest way of adding students to the class is by using the class code. If the students are physically present (for example, in the same room as you), you can open the Class code pop-up menu and click the Display item to display the class code at a large enough size for all to see; click the Full screen button if necessary. If the students are nearby, you can copy the class code and share it with them via a message.
Note
If students are unable to join the class using the class code, try resetting the class code. To do so, click the Class code pop-up menu and then click the Reset item.
Inviting Students to the Class
The other way to add students to the class is by inviting them via email. The invitation mechanism is based on Google Contacts, so each student you invite must already be one of your Google contacts. If your school has set up accounts centrally, your students should already be lined up for you to contact. If not, you will need to add the students manually in Google Contacts.
- 1.
Click the Invite Students button to display the Invite students dialog box (shown in Figure 8-14 with one student added and a search underway).

In the Invite students dialog box, type the name or email address of each student you want to invite to the class. After assembling the list, click the Invite button.
- 2.
In the box at the top, start typing the name or email address of the first student you want to add. The Search results section of the dialog box will show matching contact records.
- 3.
Click the appropriate record. It will then appear as a button at the top of the dialog box.
- 4.
Repeat steps 2 and 3 to add the other students to the list .
Note
If you want other teachers to join your class as students, you can invite them to the class by using the Invite students dialog box. For example, you might want some colleagues to see how the class looks from the student’s perspective. However, if you want to invite a teacher to join the class as a teacher, use the Invite Teachers button on the About tab instead.
- 5.
Click the Invite button. The Invite students dialog box closes. Classroom sends the invitations via email, and the names of the invited students appear in a list on the Students tab (see Figure 8-15).
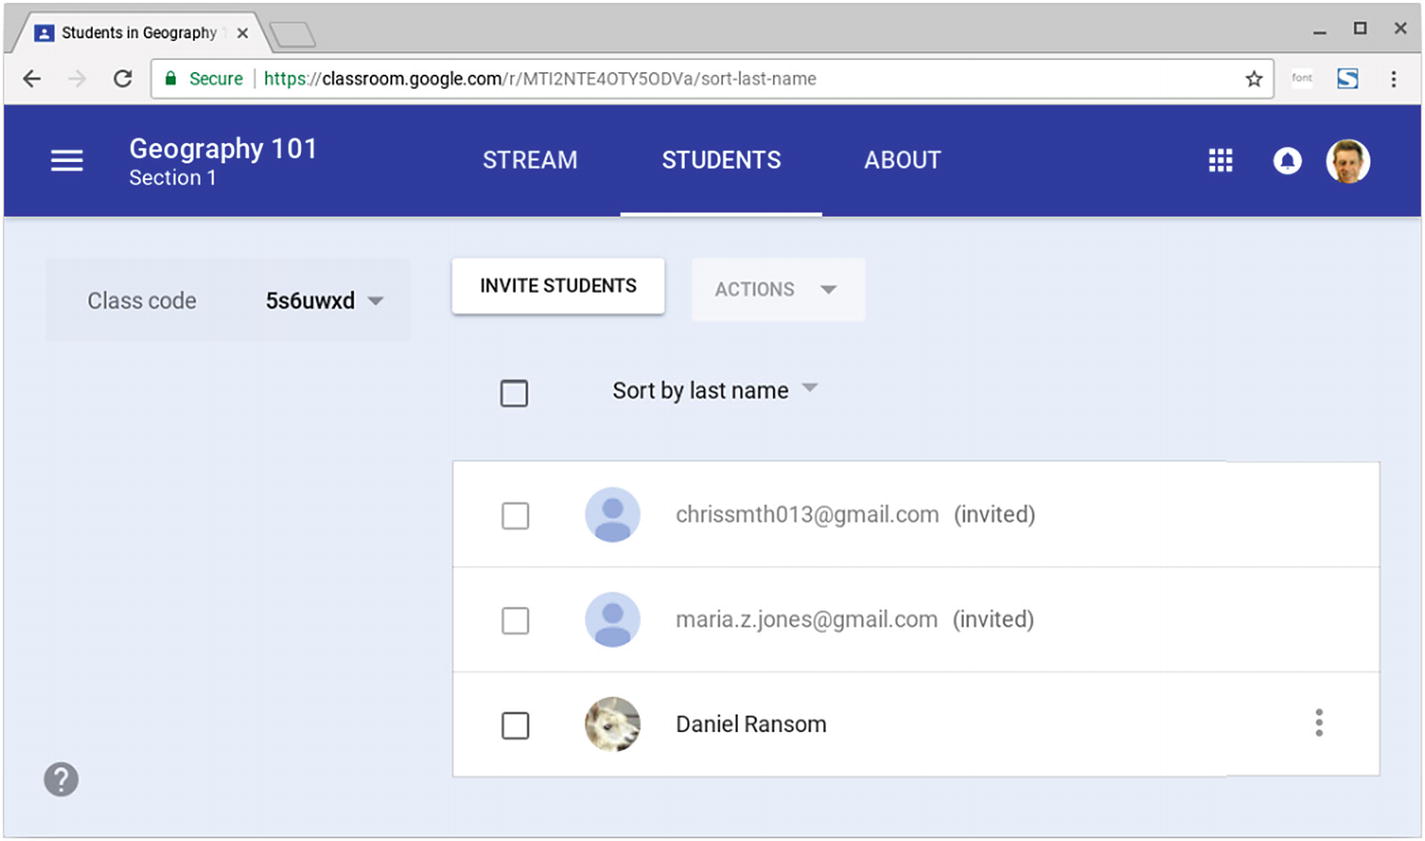
The students you invited appear on the Students tab. Until a student accepts the invitation to join the class, the listing shows a generic icon instead of the student’s picture, the email address rather than the name, and the status (invited).
At first, each student’s entry in the list appears in gray, showing the email address rather than the name, displaying a generic icon instead of the student’s picture, and with the status (invited) to its right, as you can see on the first two items on the figure. When the student accepts the invitation, the student’s picture replaces the generic icon, the student’s name appears in black, the status (invited) disappears, and the More Actions button appears, as you can see on the third item in the figure.
By default, Classroom sorts the students’ names by their last names. You can switch to sorting the students by their first names by clicking the pop-up menu above the list and then clicking the Sort by last name item.
To the left of each student’s entry is a check box that you can check when you need to take an action on the student, such as emailing the student or removing the student from the class. You can check the master check box above the list to check all the individual check boxes at once—for example, when you want to take an action on all the students in the class.
How the Student Joins the Class

The Join class? dialog box makes sure the student knows which Google account he is using. The student can click the Switch Account button to switch to a different account before joining the class.
Taking Actions on the Students in a Class
Email: Click this item to start an email message to the student or students in Gmail.
Note
You can also email an individual student by clicking the More Actions button (the three vertical dots) on the student’s row and then clicking the Email student item on the menu.
Remove: Click this item to remove the student or students from the class.
Note
Removing a student from a class does not remove the student’s work (which remains in the class folders) or any comments the student has posted (which remain in the class stream).
Mute: Click this item to mute the student or students. The Mute action is available only once the student has joined the class .
Working on the About Tab for a Class
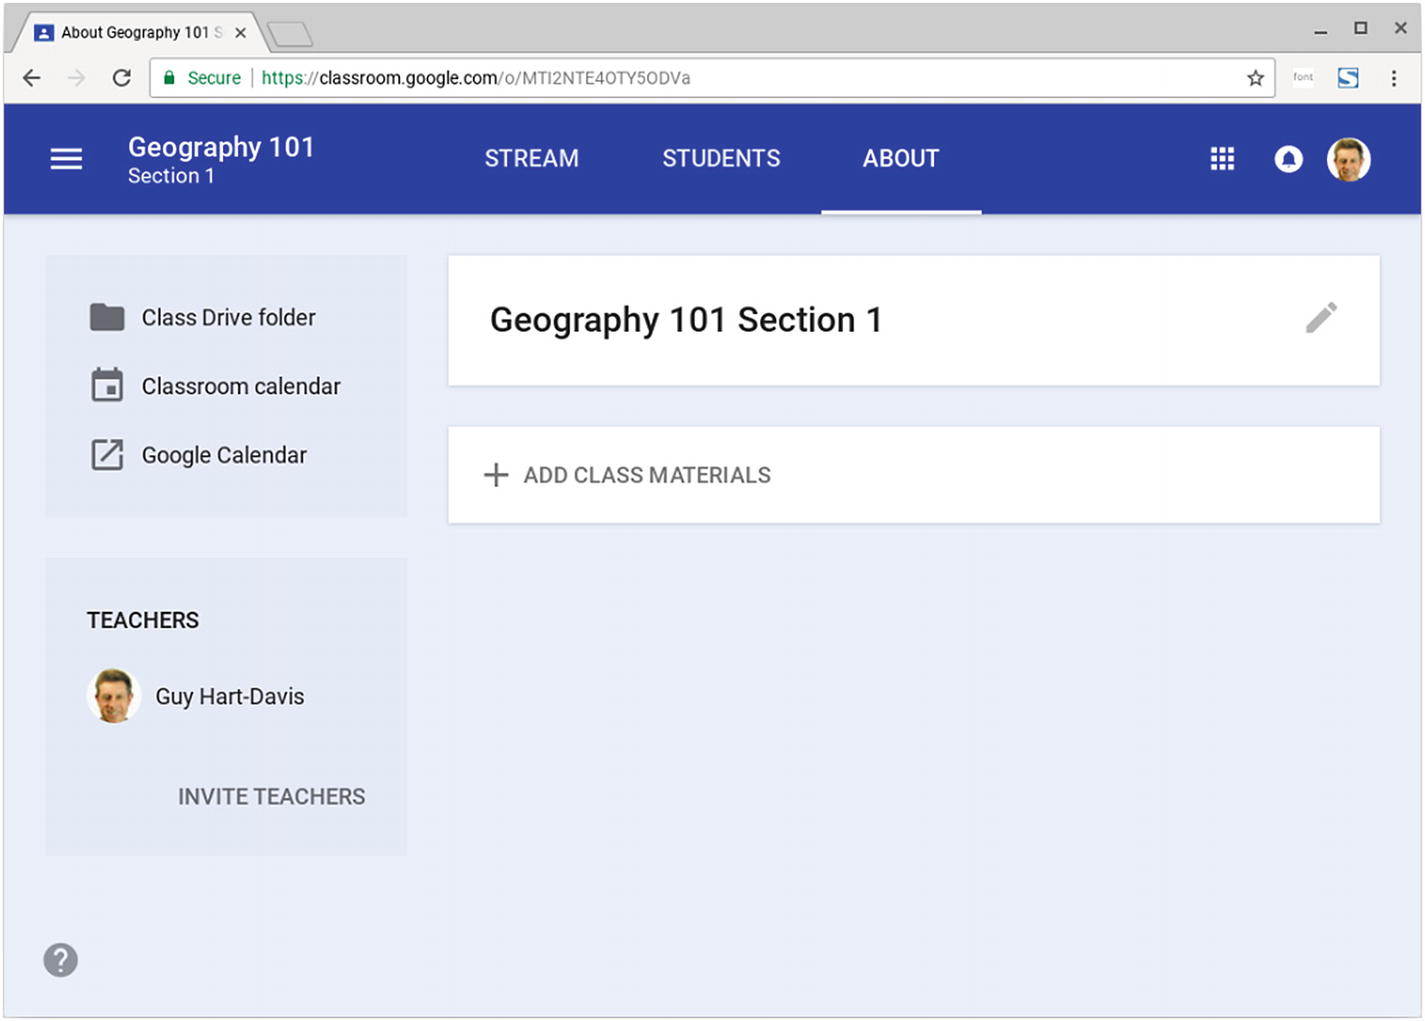
The About tab for a class enables you to edit the class’s information, manage resources and materials, and invite teachers
Adding Information About the Class
Class name and section: The class name and section comprise the formal name under which the class appears in Classroom. Unless you entered the class name and section wrongly in the first place, you likely do not need to change them.
Class description (optional): This is a field that you can use to make clear what the class covers.
Where does the class meet? (optional): This field enables you to specify the meeting place for the class.
After opening the class information for editing, you can add a class description and meeting place. Click the Save button when you finish.
After making your changes to the class information, click the Save button to save them.
Adding Materials to a Class
Attachment: You can attach a file by uploading it from your computer or by selecting it on Google Drive.
Google Drive: You can insert a file from Google Drive.
YouTube videos: You can add a link to one or more videos on YouTube.
Links: You can add a hyperlink to a web page or a local page.
- 1.
Click the Add Class Materials button. The controls shown in Figure 8-19 will appear.

Type the title for the item you are adding and then click the appropriate button to open a dialog box for specifying the item
- 2.
Type the title for the item in the Title box. Google Classroom then enables the Post button.
- 3.
Click the appropriate button for the type of item you want to add:
Attachment: Click this button to display the Insert files using Google Drive dialog box. As you can see in Figure 8-20, this dialog box has four tabs: the Upload tab, which enables you to upload files from your computer; the Recent tab, which shows recently used files on Google Drive; the My Drive tab, which shows all your files on Google Drive; and the Starred tab, which shows files you have marked with a star on Google Drive . Identify the files and then click the Upload button or the Add button.
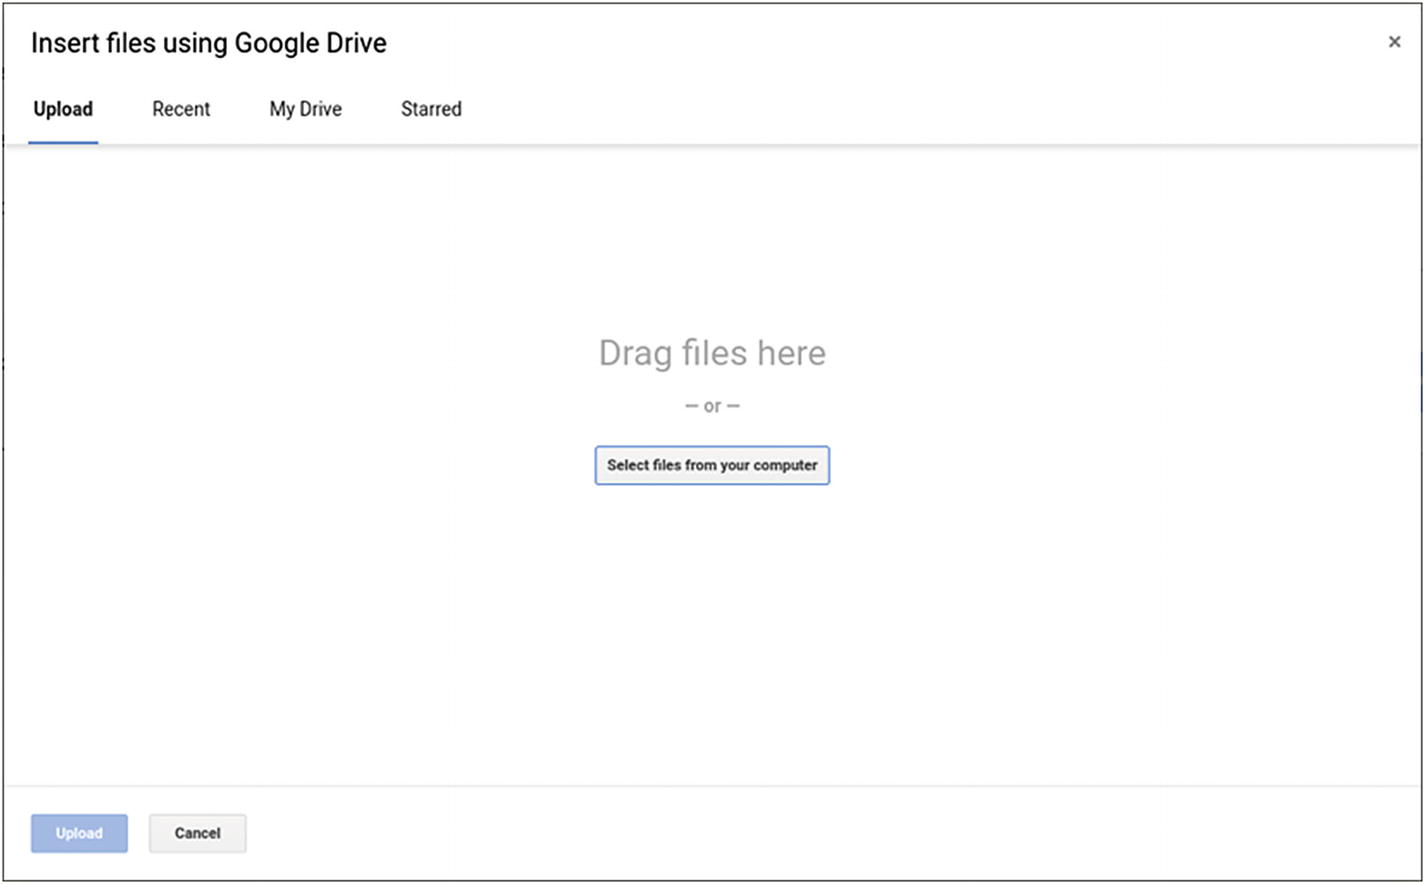 Figure 8-20
The Upload tab of the Insert files from Google Drive dialog box enables you to upload files by either dragging them to the dialog box or clicking the Select files from your computer button and selecting them
Tip
The Insert files using Google Drive dialog box enables you to search on the Recent tab, the My Drive tab, and the Starred tab. However, if you store many files on Google Drive, you may find it easiest to star those files you know you will need to work with frequently.
Google Drive: Click this button to display the Insert files using Google Drive dialog box—the same dialog box as opens when you click the Attachment button. On the Recent tab (shown in Figure 8-21), the My Drive tab (shown in Figure 8-22), and the Starred tab, you can restrict the display to particular file types—such as to the Documents file type or the Spreadsheets file type—by clicking the File type pop-up button and then clicking the appropriate item on the pop-up menu. You can also switch between Grid view and List view by clicking the Grid view button or the List view button (these two buttons replace one another). Select the file you want to add and then click the Add button.
 Figure 8-21
On the Recent tab of the Insert files using Google Drive dialog box, you can use the File type pop-up menu to display only specific file types, such as PDF files . You can click the List view button to switch from Grid view to List view.
 Figure 8-22
On the My Drive tab of the Insert files using Google Drive dialog box, you can click the Grid view button to switch from List view to Grid view. You can also click the Sort options button to select the sort criterion.
Note
On the My Drive tab or the Starred tab of the Insert files using Google Drive dialog box, you can change the sort method by clicking the Sort options button and then clicking the Last modified item, the Last modified by me item, the Last opened by me item, or the Name item on the pop-up menu.
YouTube: Click this button to display the Insert video dialog box (see Figure 8-23). This dialog box has two tabs: The Video search tab enables you to search for videos by typing keywords into the Search box, whereas the URL tab lets you paste in the URL for a specific video you want. Once you have located and selected the video you want, click the Add button to add it.
 Figure 8-23
On the Video search tab of the Insert video dialog box, type your search term and press the Enter key. You can then click a search result to select that video.
Link: Click this button to display the Add link dialog box (see Figure 8-24). Type or paste the link in the “Link” field and then click the Add Link button.
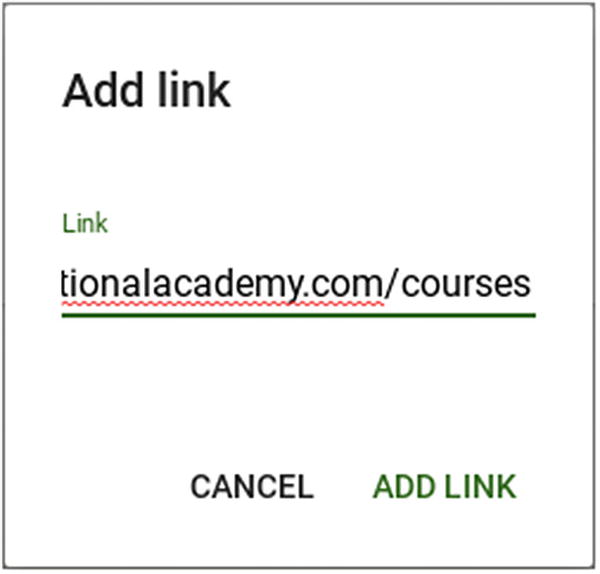 Figure 8-24
To add a link, type or paste the URL in the “Link” field of the Add link dialog box and then click the Add Link button
- 4.
After you have selected the file or link, the details will appear on the About tab in a box that has the title you assigned. You can then add other materials as needed; you can also click the Delete (X) button on the right of an item to remove that item. Figure 8-25 shows two items added.
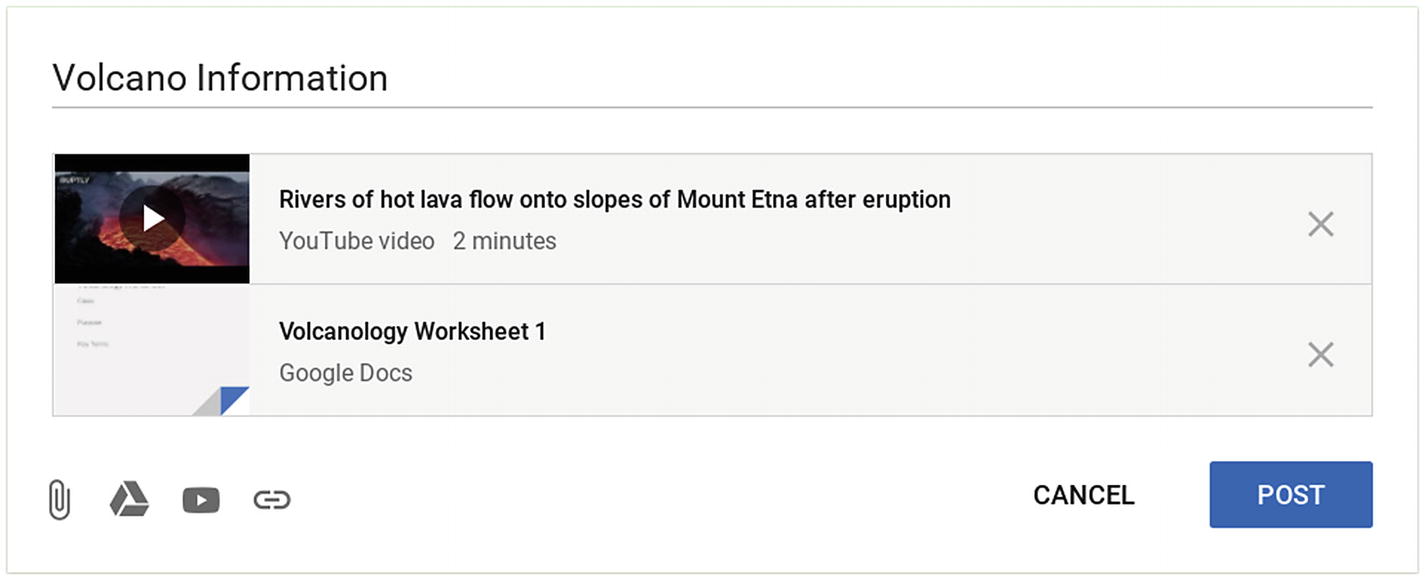 Figure 8-25
After adding all the materials, click the Post button to post them
- 5.
When you have added all the materials, click the Post button. Google Classroom will post the materials to the class, where students (and teachers) can access them.
SHARING a WEB PAGE WITH YOUR CLASS
As you have seen in the main text, you can give students access to a web page by adding a link to that page to the materials on the About tab.
A handy and quick way to share a web page with your class is to use the Share to Classroom extension in Chrome. Once you have installed this extension from the Web Store, you can navigate to the appropriate web page, click the Share to Classroom button toward the right end of the Chrome toolbar, and then select the class with which you want to share the web page.
Editing and Deleting Materials for a Class
After adding materials for a class, you can edit them or delete them as needed.
- 1.
Click the More Actions button for the box of materials you want to change and then click the Edit item on the pop-up menu. The box of materials will open in a dialog box (see Figure 8-26).

You can edit the box of materials by changing its title, adding items, or removing items
- 2.
Edit the title if necessary.
- 3.
To delete an individual item, click its Delete (X) button.
- 4.
To add an item, click the appropriate button in the lower-left corner of the dialog box and then follow the procedure explained earlier in this chapter.
- 5.
When you have finished making changes to the box of materials, click the Save button.
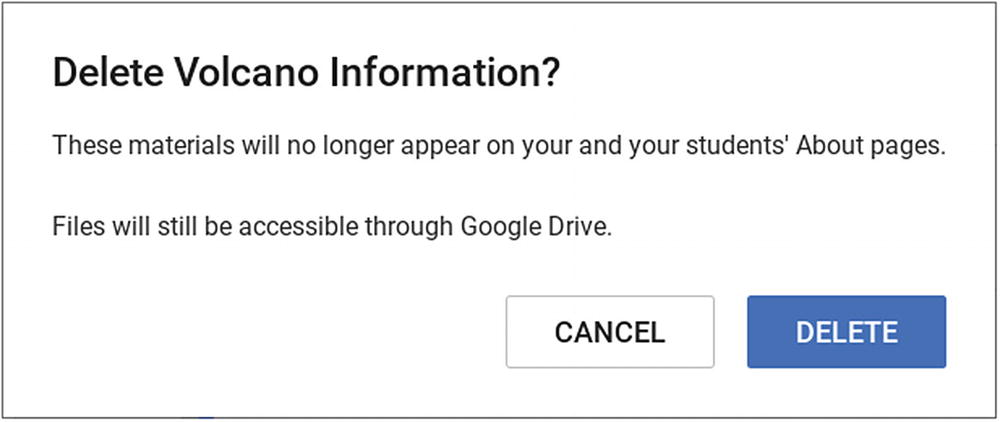
Click the Delete button in the Delete dialog box to delete a whole box of materials from the class
Inviting Teachers to the Class
When you want one or more other teachers to work with you on a class, you can invite the teacher or teachers to join the class. Inviting a teacher works in a similar way to inviting a student: The teacher must be one of your Google contacts, and Classroom sends the invitation to the teacher via Gmail.
Note
Each teacher you add to the class has the same privileges as you for that class.
- 1.
Click the Invite Teachers button in the Teachers box on the About tab for the class. The Invite Teachers dialog box will open.
- 2.
At the top of the dialog box, start typing the name or email address of the first teacher you want to invite. The Search results list will show matches.
- 3.
Click the appropriate match. A button for the teacher will appear at the top of the dialog box.
- 4.
Repeat steps 2 and 3 to add more teachers as needed.
- 5.
Click the Invite button. The Invite Teachers dialog box will close, and Classroom will send the invitations via Gmail .
Classroom adds the teacher or teachers to the Teachers list on the About tab. At first, each teacher’s entry appears as a generic icon and the email address, with a More Actions button to the right of it. When the teacher accepts the invitation by clicking the Join button in the “Invitation to co-teach” message she receives, her picture and name will replace the generic icon and the email address in the Teachers list.
Note
To remove a teacher from the class, click the More Actions button to the right of the teacher’s entry in the Teachers box and then click the Remove from class item on the menu.
Viewing Class Calendars
Google Classroom calendar: Assignments and questions for which you have set due dates appear in the calendar in Google Classroom.
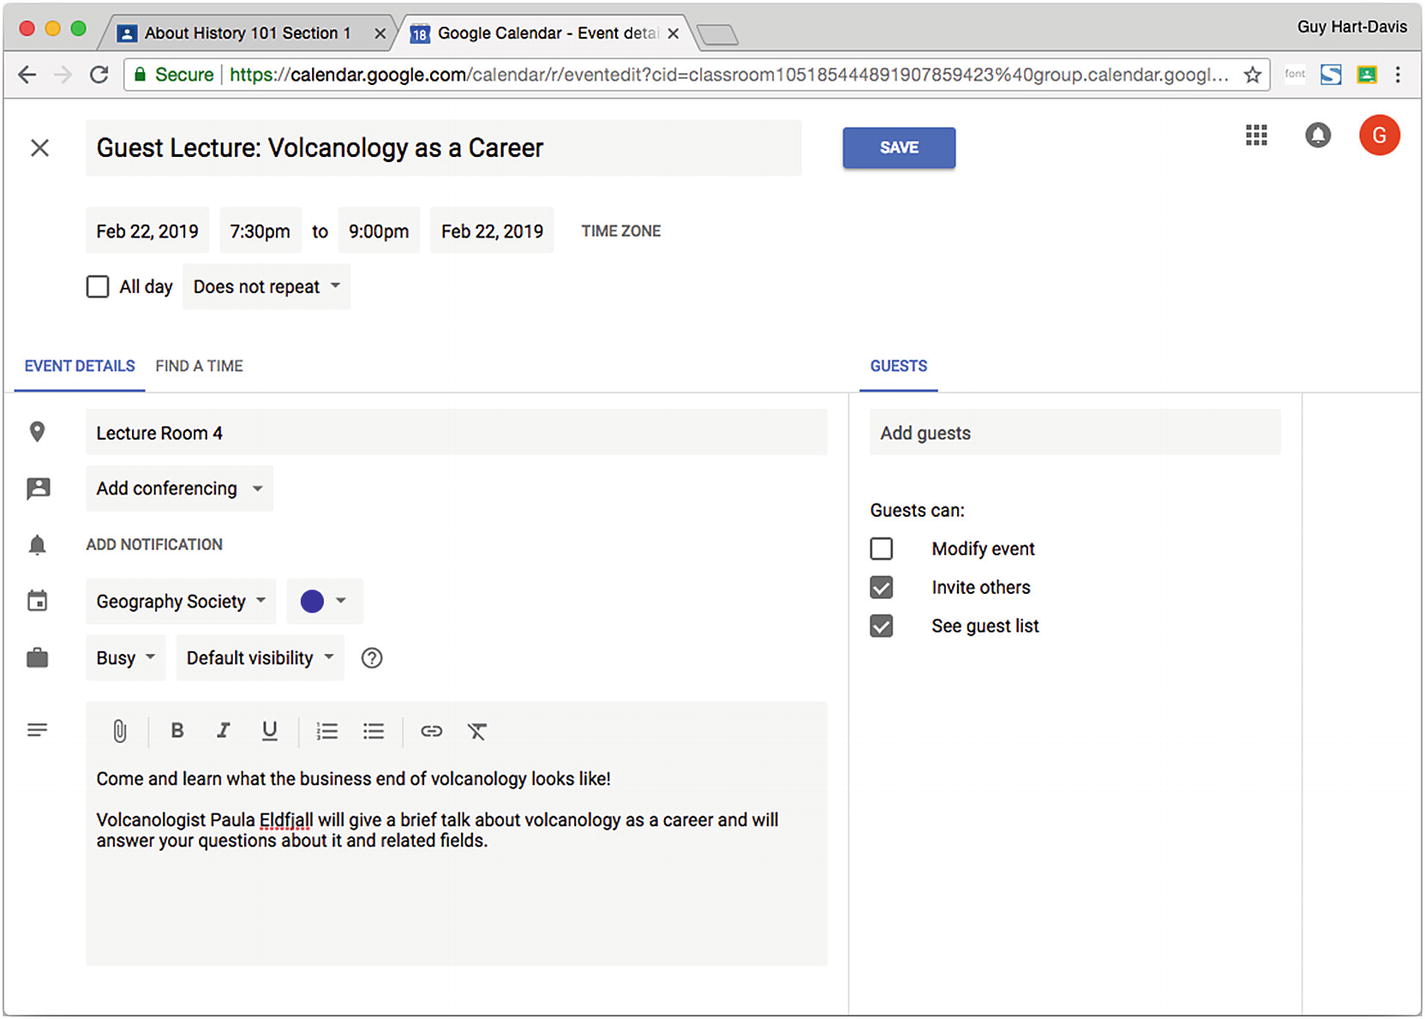
Google Calendar: Assignments and questions for which you have set due dates also appear in the class calendar in Google Calendar. You can also add other class-related events to the class calendar in Google Calendar. For example, you might add the dates of exams or special activities.
Viewing the Google Classroom Calendar
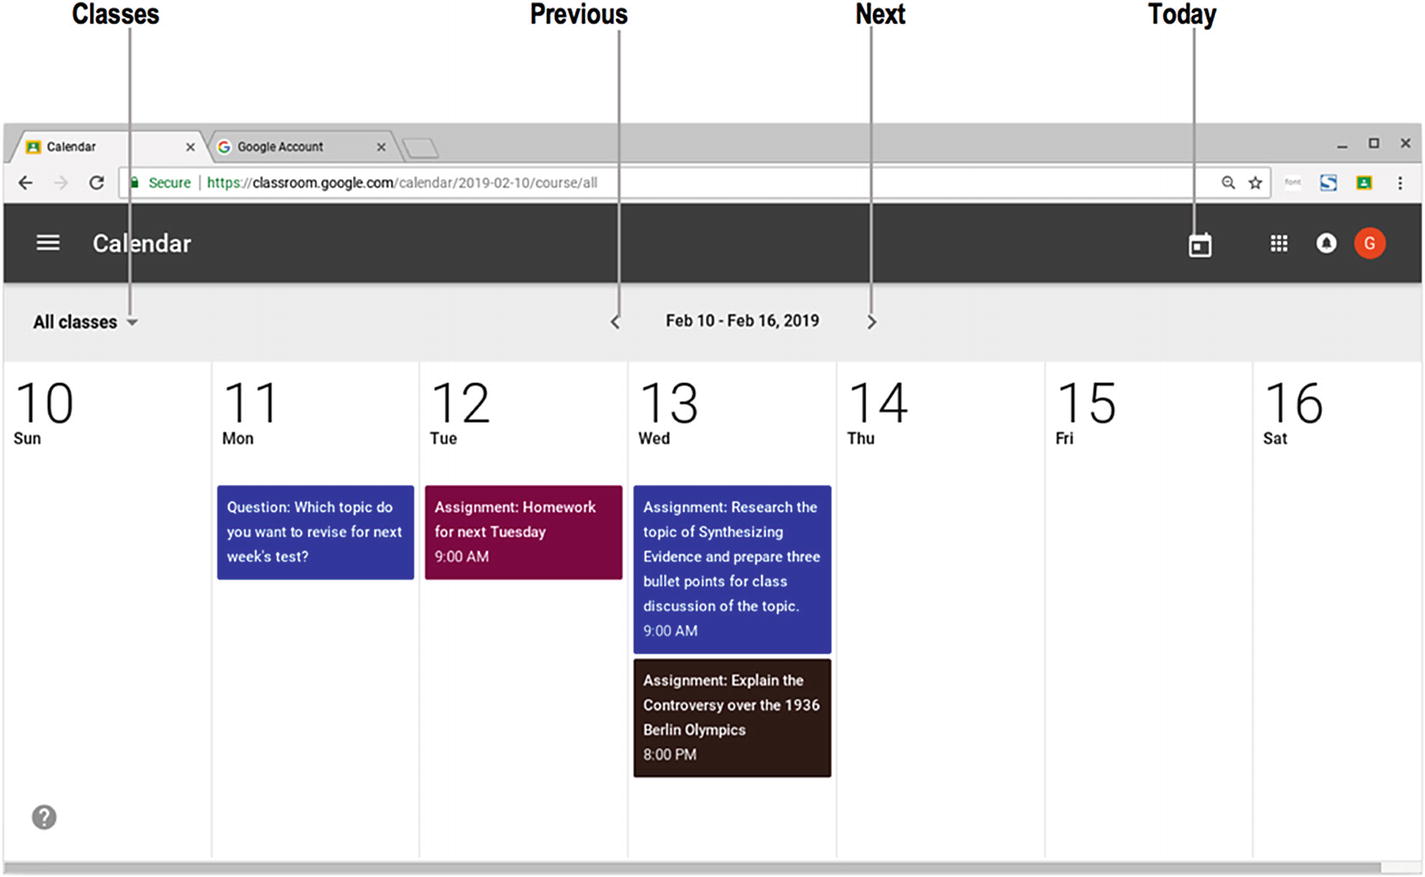
The Calendar page in Google Classroom provides an easy-to-read reference to the questions and assignments for which you have set due dates.
To control which classes appear, click the Classes pop-up menu under the Calendar heading and then click either the All classes item or the item for the class you want to view.
To choose the week shown, click the Previous button or the Next button as needed. You can click the Today button to jump to the week containing the current date .
Adding Class Events via Google Calendar

Your class calendars appear in the My calendars list in Google Calendar, which also shows date-bound assignments and questions. You can create a new event and assign it to a class calendar to share the event with the class members.
You can add an event to a class by selecting the class in the Calendars list in Google Calendar
Communicating with the Students in Your Classes
Announcement: An announcement is information that you post for the students. For example, you might announce an upcoming class trip.
Assignment: This is a task that you allocate to the students. For example, you might assign reading or homework.
Question: This is a question that you pose to the students—for example, to check their understanding of a particular point or to get feedback on a lesson.
Each type of post can contain items such as file attachments, links to files on Google Drive, links to videos on YouTube, or links to internal or external URLs.
Google Classroom uses largely similar interfaces for these three types of posts. To avoid unnecessary repetition, the first of the following subsections will show you how to use the post controls in detail. The following subsections will explain how to create the different kinds of posts, assuming you already know how to use the post controls.
Using the Post Controls
This section will show you how to use the post controls that Google Classroom provides for working with announcements, assignments, and questions and will show examples of each.
Starting a Post
- 1.
On the Classes page, click the card for the class. The Stream tab for the class appears.
- 2.
Click the Add (+) button in the lower-right corner to display the pop-up menu (see Figure 8-31).
To start creating a post, click the Add (+) button in the lower-right corner of the Stream tab and then click the appropriate button on the pop-up menu
- 3.
Click the appropriate item on the pop-up menu to display the corresponding dialog box. For example, click the Create assignment item to display the Assignment dialog box (see Figure 8-32).
Google Classroom displays the dialog box for the type of post you want to create—for example, the Assignment dialog box shown here
Choosing the Classes and Students for the Post
By default, Google Classroom addresses the post to the class from whose page you started the post. Google Classroom also addresses the post to all students by default.

Click the pop-up button to the right of the For readout and then check the box for each class that is to receive the post
As long as you are posting to only one class, you can choose which students within the class receive the post. To do so, click the right pop-up button on the For line. In the pop-up menu that opens, check or uncheck the “All students” check box as needed. You can then check or uncheck the check box for each individual student. If you need to post to only a few students, unchecking the “All students” check box and then checking the check box for each of those few students is usually quickest. If you need to post to most students, check the “All students” check box and then uncheck the check box for each student you want to omit.
Note
If you are posting to multiple classes, you can only post to all the students in those classes; you cannot post to individual students .
Entering the Title and Instructions for the Post
Each post has what is effectively its title , although the Google Classroom interface gives this field a different name depending on the type of item you are creating. For an assignment, the field is indeed called “Title”; for an announcement, the field is called “Share with your class”; and for a question, the field is called “Question.” The “Title” field or equivalent field appears in the list on the Stream tab and identifies the post.
Click the “Title” field or equivalent field for the post and type the title you want to appear. If the post includes an “Instructions” field, enter any instructions to help the students grasp what you want.
Note
The “Instructions” field is optional, but you will usually find that students benefit from clear instructions—even if the “Title” field seems to explain everything.
Entering the Due Date and Topic for the Post
Next, enter the due date for an assignment or a question, plus the topic for any post.
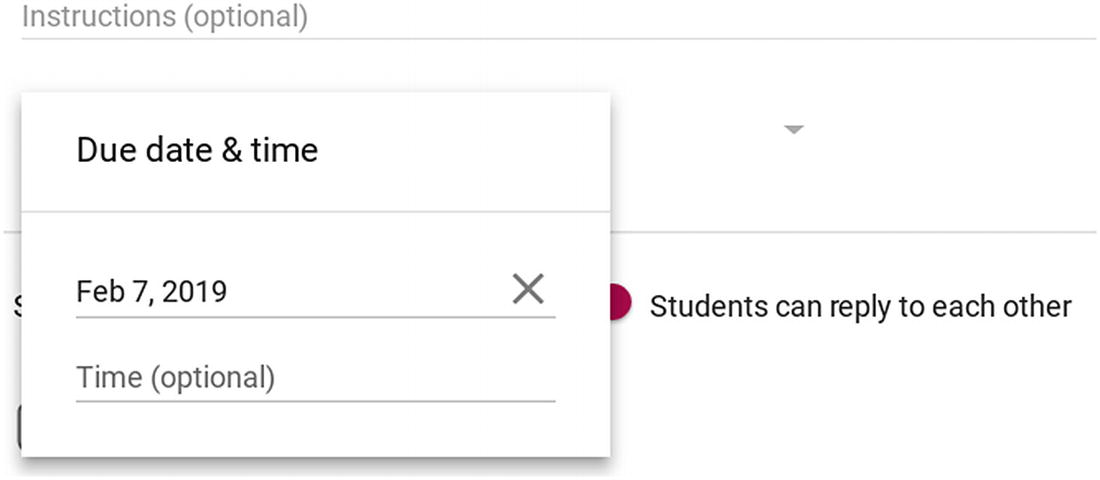
In the Due date & time pop-up panel, click the “Date” field and then click the due date on the calendar panel that appears. To set a due time, click the “Time (optional)” field and then type the due time.
To add the topic to any post, click the pop-up button to the right of the Topic readout, which typically is set to the No topic item by default. The pop-up menu lists each topic you have already added to the class, the default No topic item (which you can apply to remove the current topic), and the Create topic item, which you can click to enter a new topic.
Note
If you use the Create topic feature to create a new topic, Google Classroom will add the topic to the Topics list for the class.
Adding Materials to the Post
Attachment: You can attach a file by uploading it from your computer or by selecting it on Google Drive.
Google Drive: You can insert a file from Google Drive.
YouTube videos: You can add a link to one or more videos on YouTube.
Links: You can add a hyperlink to a web page or a local page.
To add materials to a post, click the Attach file button, the Google Drive button, the YouTube button, or the Add link button in the lower-left corner of the Assignment dialog box
Posting the Post, Scheduling the Post, or Saving It as a Draft
When you have finished entering the details for a post , double-check that everything is correct and then post it by clicking the main command button in the dialog box—for example, click the Ask button for a question or the Assign button for an assignment.
Note
If you find you need to delete the post, click the Delete button (the trash icon) to the left of the main command button in the post’s dialog box.
Instead of posting the post , you can schedule it to be posted later or save the post as a draft so you can finish it at another time.

In the Schedule dialog box for the post, such as the Schedule assignment dialog box, choose the date and time for posting the post and then click the Schedule button
To save the post as a draft, click the pop-up button to the right of the main command button and then click the Save draft item on the pop-up menu. Google Classroom saves the post as a draft and closes the dialog box.
When you are ready to resume work on a draft announcement, click the Saved posts button below the theme picture on the Stream tab. The Saved posts area expands, showing the Drafts box. Click the draft you want to reopen.
Adding a Class Comment to a Post
Students can post and comment: This is the default setting. If necessary, you can prevent individual students from posting and commenting by muting them.
Students can only comment: Choose this setting if you need to prevent all students from posting. You can prevent individual students from commenting by muting them.
Only teachers can post or comment: Choose this setting if you find that allowing students to post or comment generates too much traffic in the class. Choosing this setting has the same effect as muting all students.
To add a class comment, click the Add class comment button, type the comment in the text field that appears, and then click the Post button.
Replying to Student Comments
- 1.
Move the pointer over the class comment to which you want to reply. The Reply button (a left-curling arrow icon) and the More Actions button (the three vertical dots) appear.
- 2.
Click the Reply button . The reply field appears (see Figure 8-37). Google Classroom automatically includes the commenter’s email address.

To reply to a class comment, move the pointer over the comment, click the Reply button, type the reply, and then click the Post button
- 3.
Type your reply to the comment.
- 4.
Click the Post button. Your reply will appear underneath the related class comment.
MENTIONING A TEACHER OR STUDENT IN A POST
Google Classroom includes a feature for mentioning someone by name in a post or comment. To do so, type + or @ in the comment field and then start typing the person’s name. In the list of email addresses that appears, click the appropriate address and then finish the post or comment as usual.
When you mention someone in a post or comment, that person will receive an email notification of the mention unless they have turned off notifications .
Dealing with Private Comments
As well as posting class comments (if you permit students to do so), a student can also send you a private comment after you assign an assignment or a question. The student sends a private comment by opening the assignment or question, clicking the Add private comment link, typing the comment in the text field that appears, and then clicking the Post button.
A private comment appears in the Private comments box on the Student Answers tab for a question and the Student Work tab for an assignment. You can respond to the private comment by clicking the Add private comment link below it, typing your response, and then clicking the Post button.
Deleting Students’ Posts and Comments
As the teacher, you can delete the posts and comments that students make. To delete a post or comment, move the pointer over it, click the More Actions button (the three vertical dots) that appears, and then click the Delete item on the menu. In the Delete comment? dialog box or the Delete post? dialog box that appears, click the Delete button.
Muting a Student
The student cannot comment or post.
The student cannot reply to classmates’ work.
Other students cannot see the work that the muted student submits.
- 1.
Move the pointer over a post or comment from the student. The More Actions button (the three vertical dots) appears on the right of the post or comment.
- 2.
Click the More Actions button to open the menu and then click the Mute item on the pop-up menu. The Mute item includes the student’s name—for example, Mute Bill Smith. The Mute? dialog box then opens, also showing the student’s name (see Figure 8-38).

In the Mute? dialog box, check the “Also delete this comment” check box or the “Also delete this post” check box if necessary, and then click the Mute button
- 3.
Check the “Also delete this comment” check box or the “Also delete this post” check box if you want to get rid of the comment or post.
- 4.
Click the Mute button.
- 1.
Move the pointer over a post or comment from the student. The More Actions button (the three vertical dots) appears on the right of the post or comment.
- 2.
Click the More Actions button to open the menu and then click the Unmute item on the pop-up menu. The Unmute? dialog box then opens (see Figure 8-39), showing the student’s name in its title.
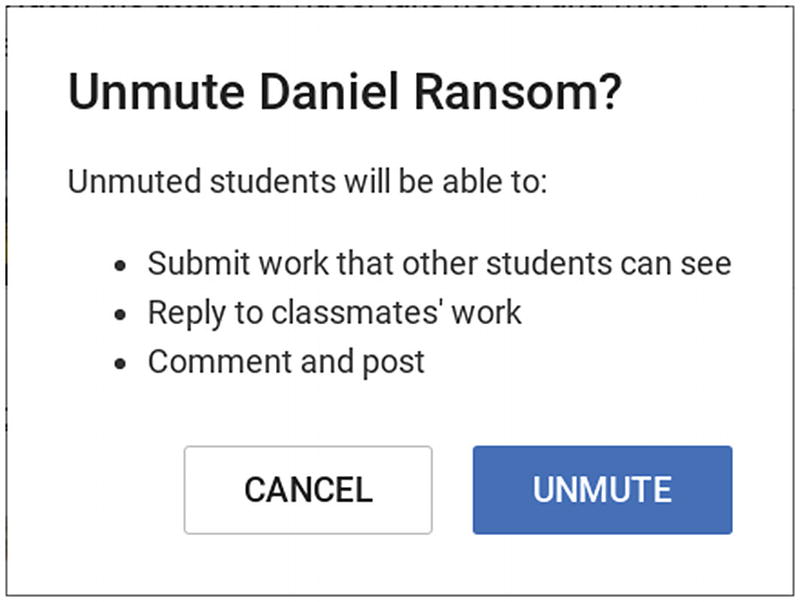
Click the Unmute button in the Unmute? dialog box to enable the student to participate fully in the class again
- 3.
Click the Unmute button.
Editing a Post
To edit a post, click the More Actions button (the three vertical dots) on the post’s card on the Stream tab and then click the Edit item on the pop-up menu. The post opens for editing in the same dialog box you used to create it—for example, the Announcement dialog box for an announcement. Make the changes needed and then click the Save button to save them.
Reusing a Post
Google Classroom makes it easy to reuse one of your earlier posts. Often, reusing a post is the quickest way of creating a new post, as you can pick up most of the existing settings—such as the classes, the students, and the topic—rather than having to set them up again from scratch. You can also change any of these items when reusing a post.
- 1.
On the Stream tab, click the Add (+) button to display the pop-up menu.
- 2.
Click the Reuse post item. The Select class dialog box opens (see Figure 8-40).
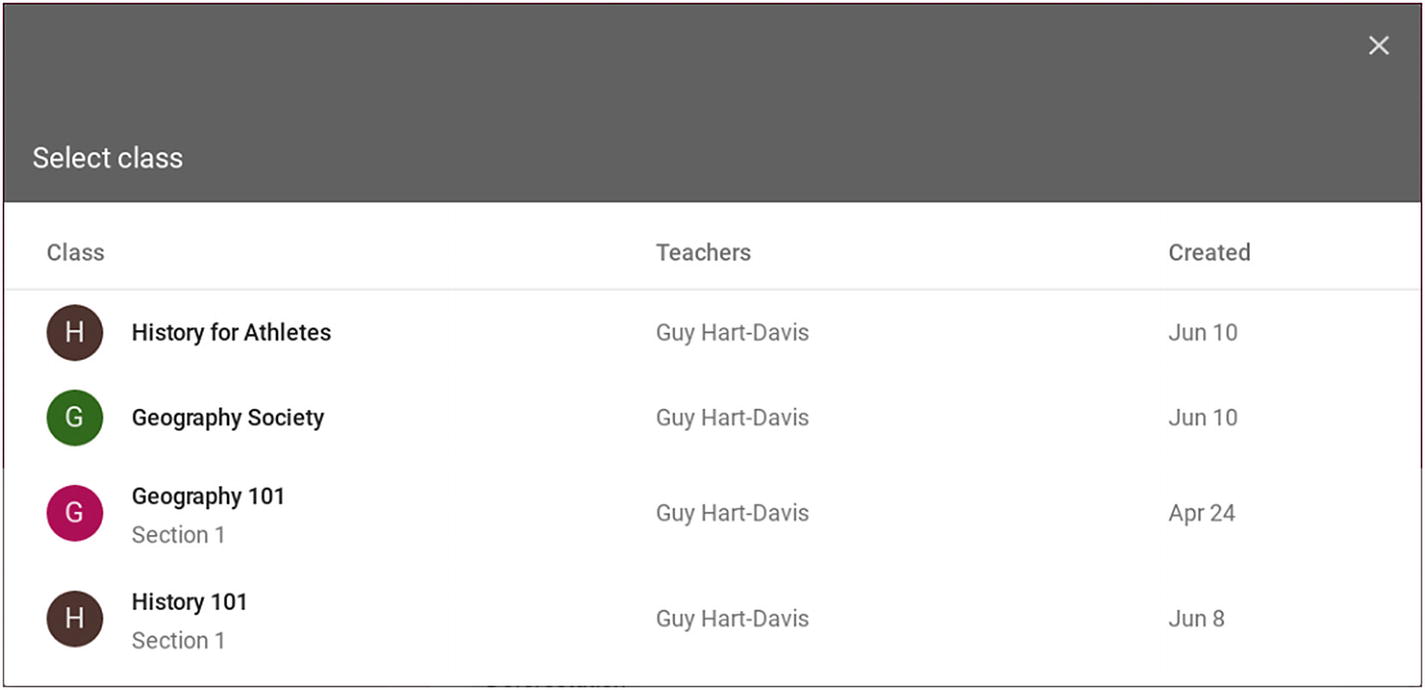
In the Select class dialog box, click the class that contains the post you want to reuse.
- 3.
Click the class that contains the post you want to reuse. The Select post dialog box opens, showing the posts in that class (see Figure 8-41).

In the Select post dialog box, click the post you want to reuse, check the “Create new copies of all attachments” check box if appropriate, and then click the Reuse button.
- 4.
Click the post you want to reuse.
- 5.
Check the “Create new copies of all attachments” check box if you want to include the attachments.
- 6.
Click the Reuse button. The item then appears in the corresponding dialog box. For example, a question appears in the Question dialog box.
- 7.
Edit the item as needed, using the techniques explained earlier in this chapter.
- 8.
Set a new due date for the item if appropriate.
- 9.
Click the main command button, such as the Ask button for a question. Google Classroom posts the item.
Deleting a Post

When deleting a post, make sure you know which associated items will be deleted, such as any grades and comments added to an assignment.
Making Announcements
In Google Classroom, an announcement is a post that does not include an assignment. An announcement can contain materials—such as files, YouTube videos, and links—if necessary.
Announcements are easy to communicate with students because they are hard to miss. First, announcements appear prominently at the top of the class stream. Second, each student automatically receives an email notification for each announcement by default; students can disable this notification if they want.
Note
This section assumes that you have read the previous section, “Using the Post Controls,” and that you therefore know how to use the standard controls for working with posts.
- 1.
On the Stream tab for the class, click the Add (+) button in the lower-right corner to display the pop-up menu.
- 2.
Click the Create announcement item. The Announcement dialog box opens (see Figure 8-43).
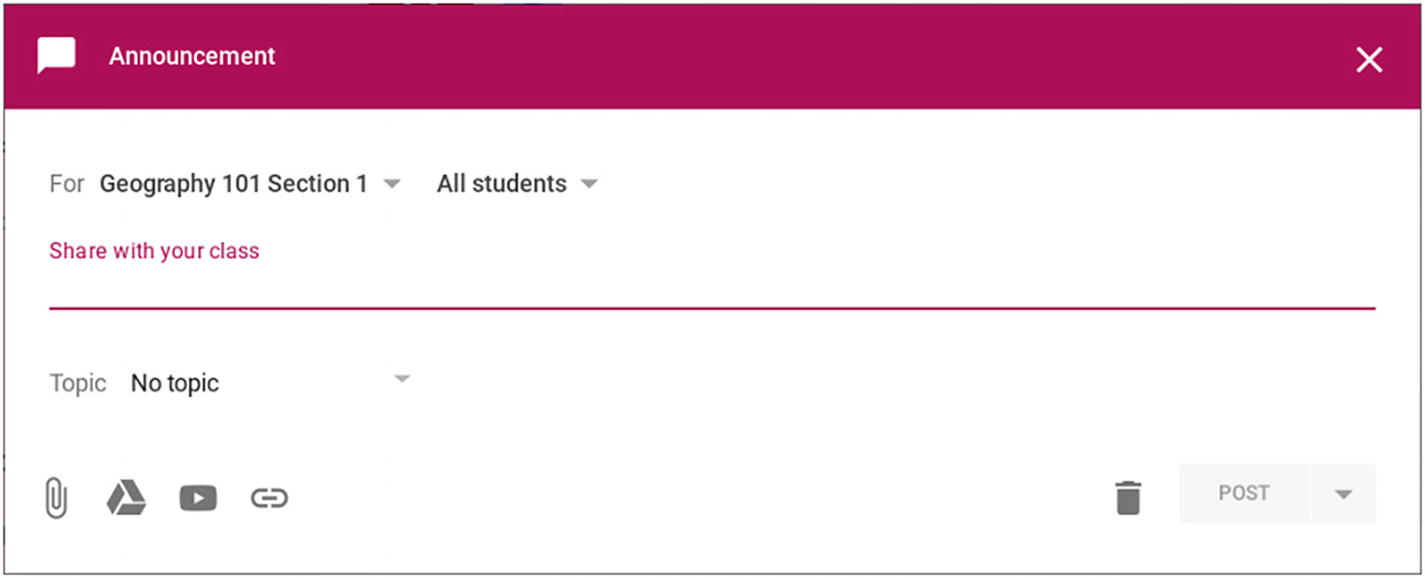
In the Announcement dialog box, enter the announcement’s title in the “Share with your class” field, choose the topic in the Topic pop-up menu, add any materials needed, and then click the Post button.
- 3.
By default, the For pop-up menu is set to the current class. Add other classes if necessary.
- 4.
By default, the second pop-up menu is set to All students. Change the recipients if necessary.
- 5.
In the “Share with your class” field, type the title for the announcement.
- 6.
Click the Topic pop-up menu and choose the topic. You can create a new topic if necessary.
- 7.
Add any materials needed to the announcement.
- 8.
Click the Post button to post the announcement.
Setting, Grading, and Returning Assignments
Google Classroom gives you tools that make it easy to set, collect, and manage assignments for your students. You can create an assignment either with or without a due date, provide the materials the students need to complete the assignment, and monitor how many students have submitted the assignment. Once a student has submitted work, you can grade it and return it.
Creating an Assignment
- 1.
On the Stream tab for the class, click the Add (+) button in the lower-right corner to display the pop-up menu.
- 2.
Click the Create assignment item. The Assignment dialog box opens (see Figure 8-44).

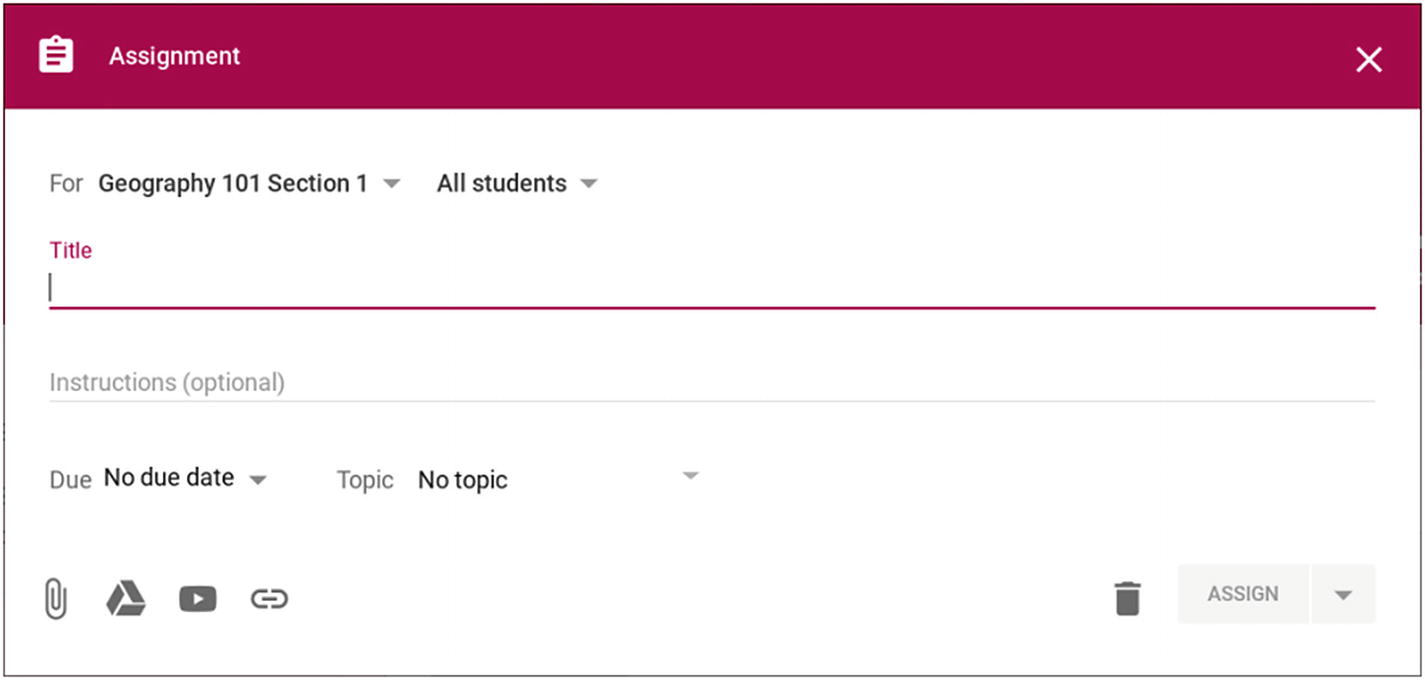
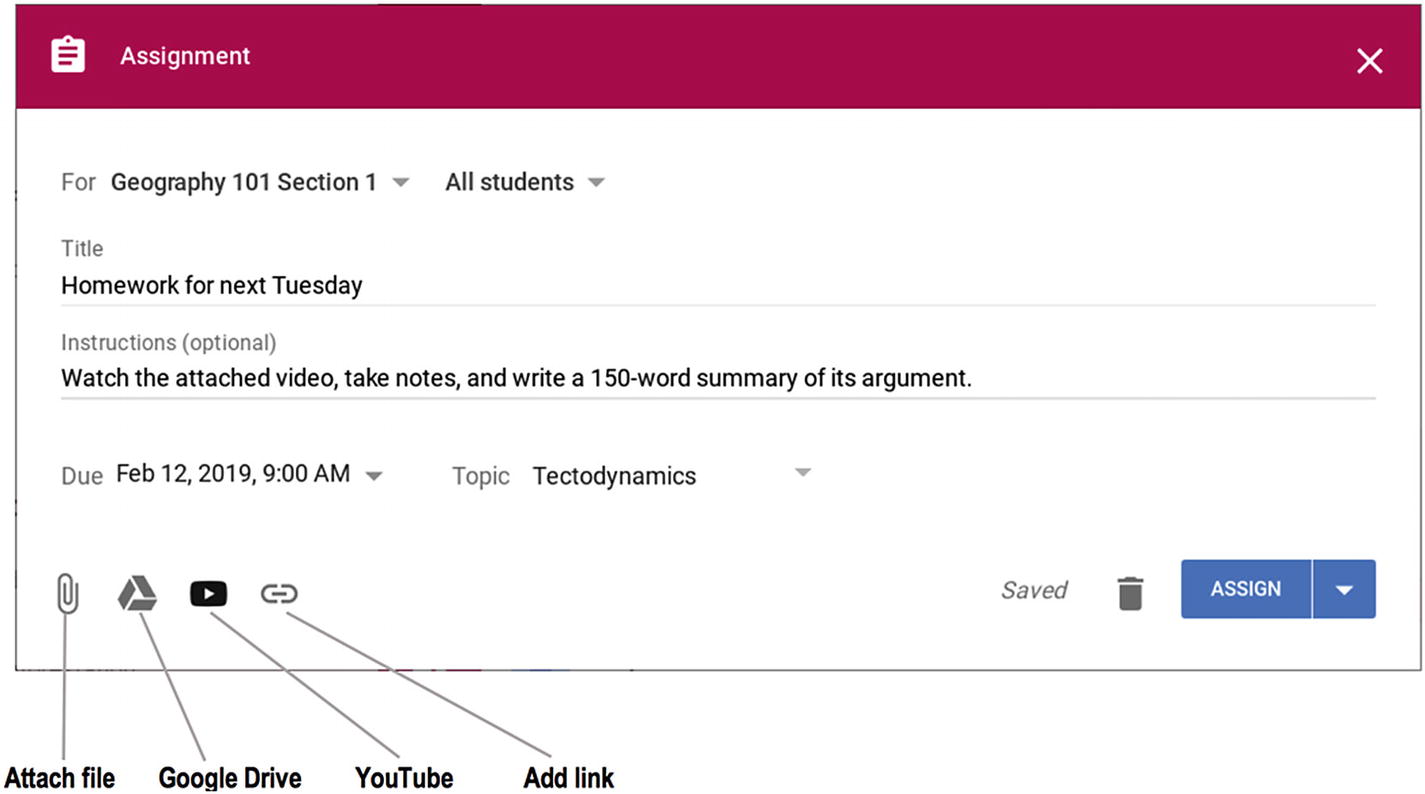
In the Assignment dialog box, you can optionally include instructions as well as the assignment title and any materials the students need to complete it
- 3.
By default, the For pop-up menu is set to the current class . Add other classes if necessary.
- 4.
By default, the second pop-up menu is set to All students. Change the recipients if necessary.
- 5.
In the Title box, type the title for the assignment.
- 6.
In the Instructions (optional) box, type any instructions to help the students understand exactly what you want them to do.
- 7.
To give a due date for the assignment, click the Due pop-up menu and then specify the date—and, if necessary, the time—in the Due date & time pop-up panel.
- 8.
Click the Topic pop-up menu and choose the topic. You can create a new topic if necessary.
- 9.
Add any materials needed to the assignment.
- 10.
Click the Assign button to post the assignment.
Tracking Students’ Progress on an Assignment
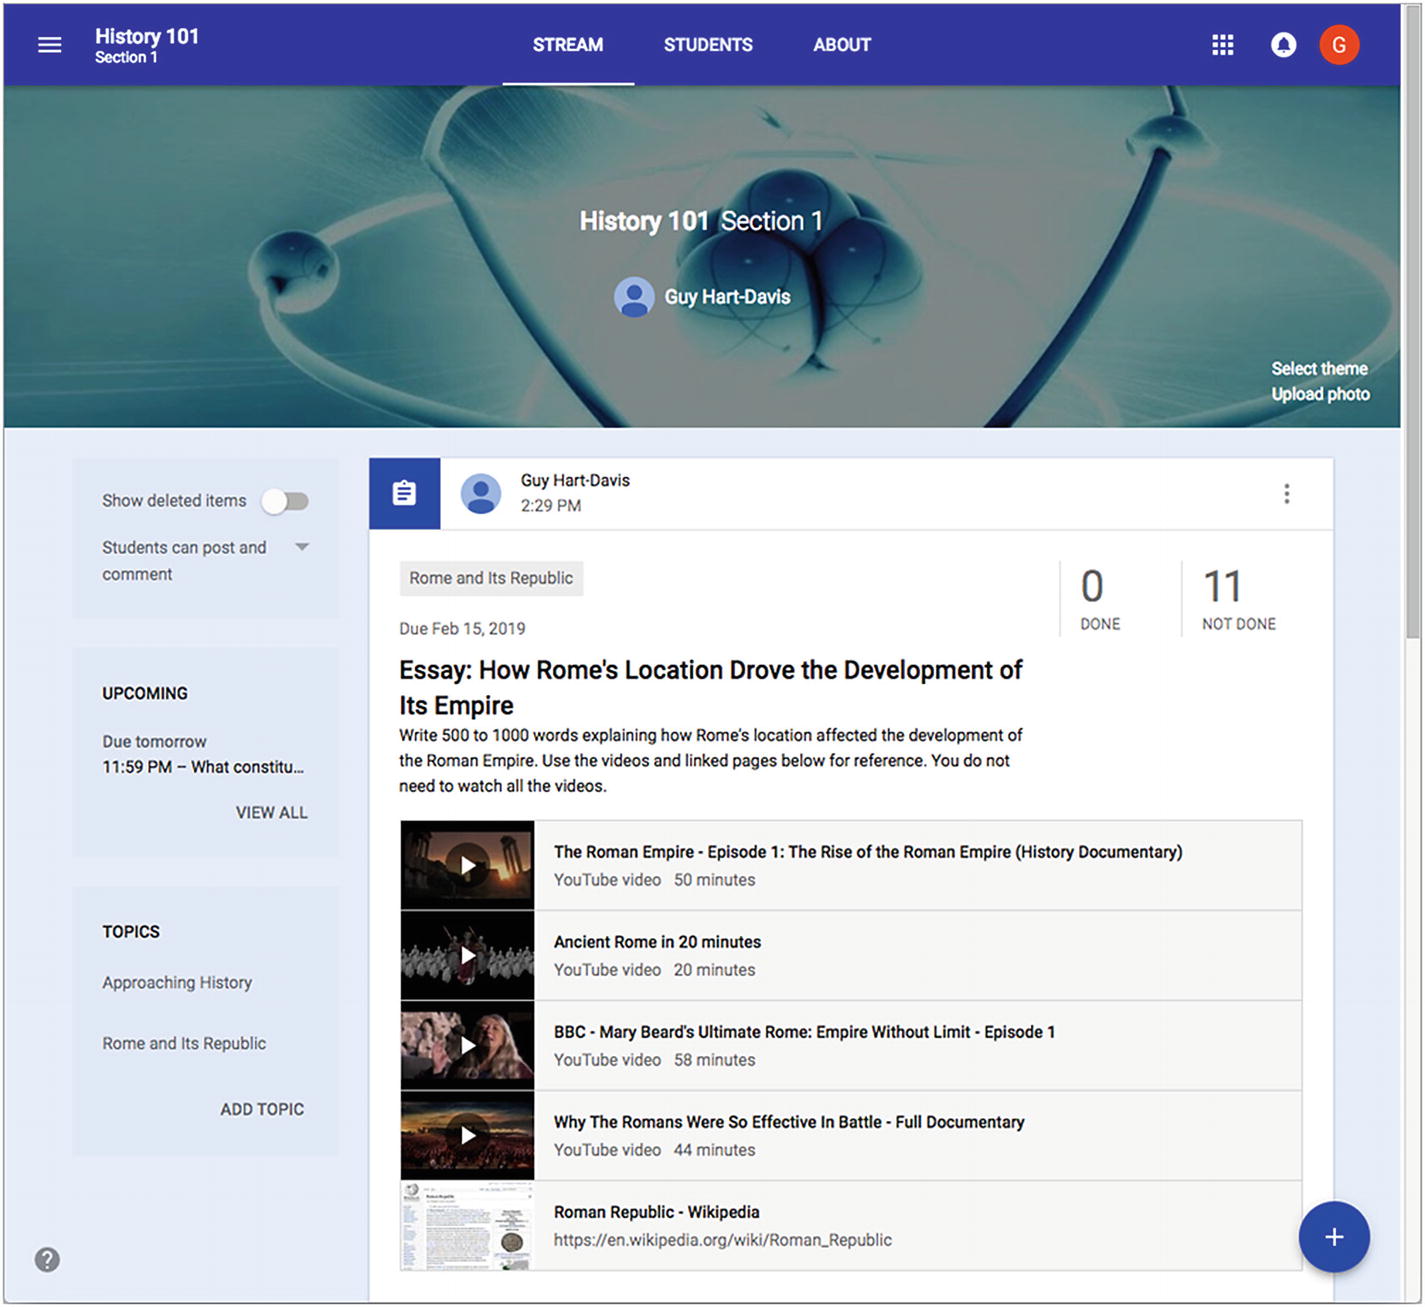
After you set an assignment, it appears on the Stream tab. The Done and Not Done readouts give you a quick reference to students’ progress on the assignment.
Select all: Click this check box to select the check boxes for all the students.
Email selected students: Click this button to start an email message in Gmail to the selected students. Gmail places the assignment’s name in the Subject field of the message.

The Student Work tab for an assignment shows details of which students have and have not submitted the assignment
Sort by: To control how Google Classroom sorts the students, click this pop-up menu and then click the Sort by last name item, the Sort by first name item, or the Sort by status item, as needed.
Point value: To change the number of points for the grading, type the new number in the text field, press the Enter key , and then click the Update button in the Update point value dialog box that opens (see Figure 8-47). To change the assignment to being an ungraded one, click the pop-up button, click the Ungraded item on the pop-up menu, and then click the Update button in the Update point value dialog box.
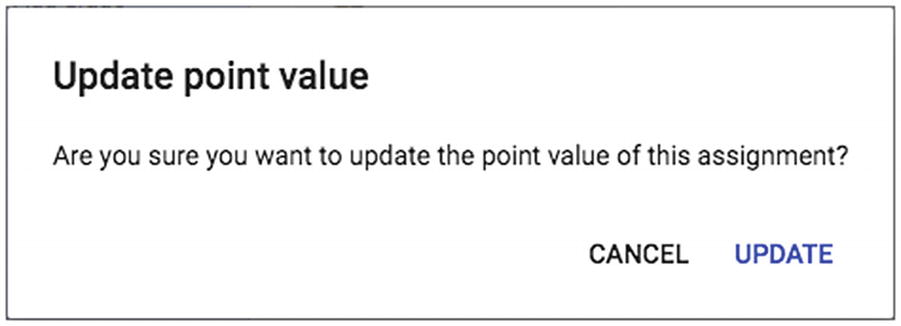
Click the Update button in the Update point value dialog box to change the point value of the assignment
Instructions: Click this tab to display the Instructions page for the assignment (see Figure 8-48). Here, you can edit the assignment by clicking the More Actions button (the three vertical dots) and then clicking the Edit item on the pop-up menu. You can also add a class comment by clicking the “Add class comment” field, typing the comment, and then clicking the Post button.
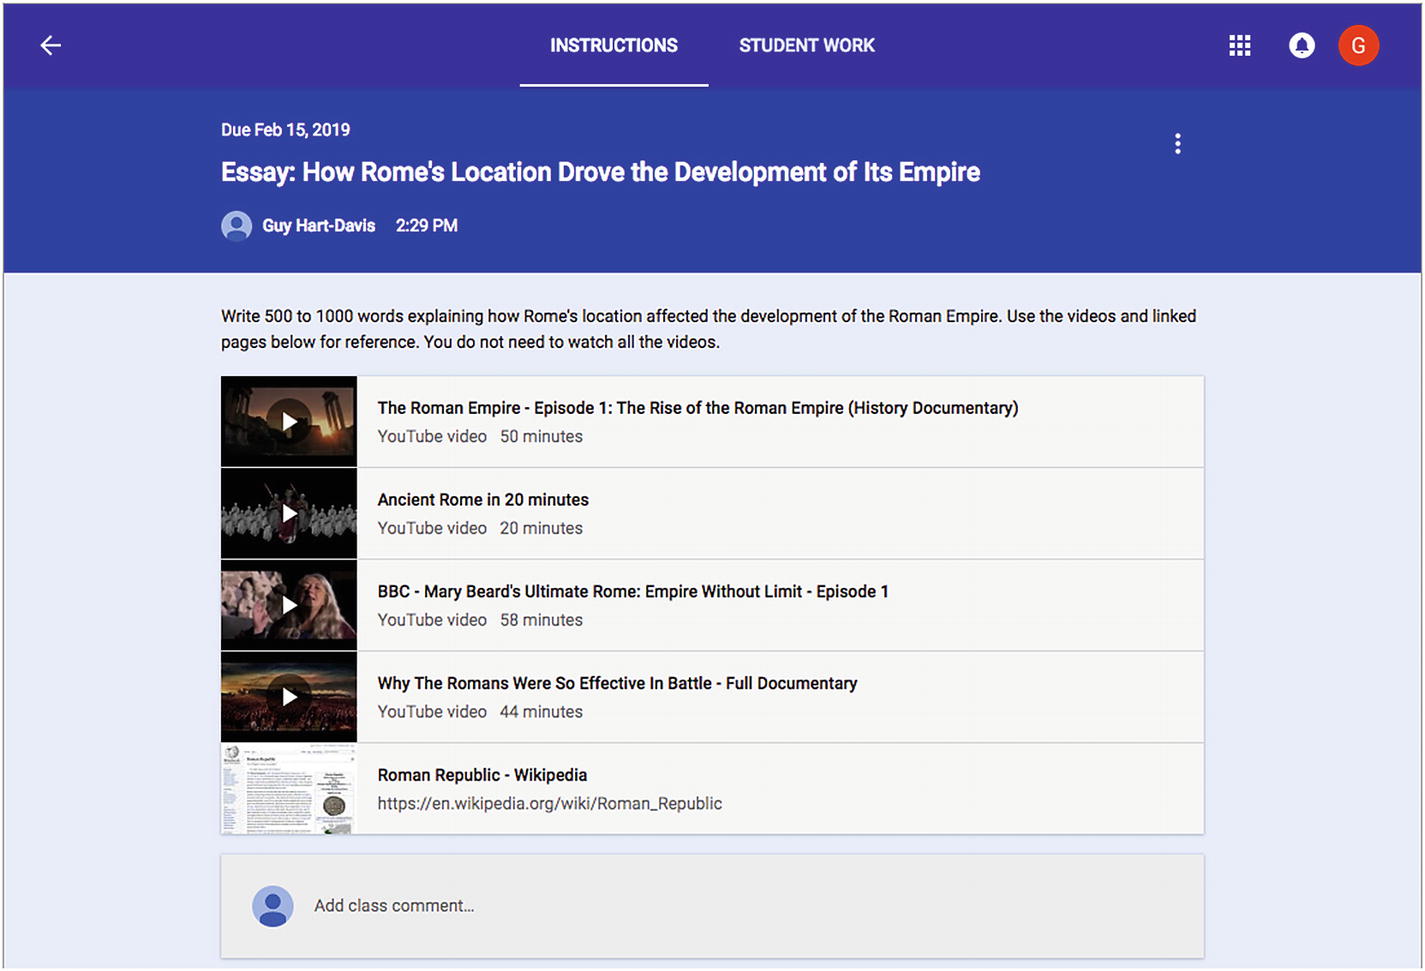
On the Instructions tab, you can review the assignment, edit it if necessary from the More Actions button, or add a class comment
Show: To change which students’ assignments are displayed, click this pop-up button and then click the All item, the Done item, the Not done item, or the Returned item, as needed.
Open folder for assignment: Click this button to open the folder for the assignment.
Actions: Click this icon to display the pop-up menu, and then click the Copy all grades to Google Sheets item, the Download all grades as CSV item, or the Download these grades as CSV item, as needed.
Grading and Returning an Assignment
- 1.
Click the student’s name in the left pane on the Student Work tab. The student’s work appears (see Figure 8-49).
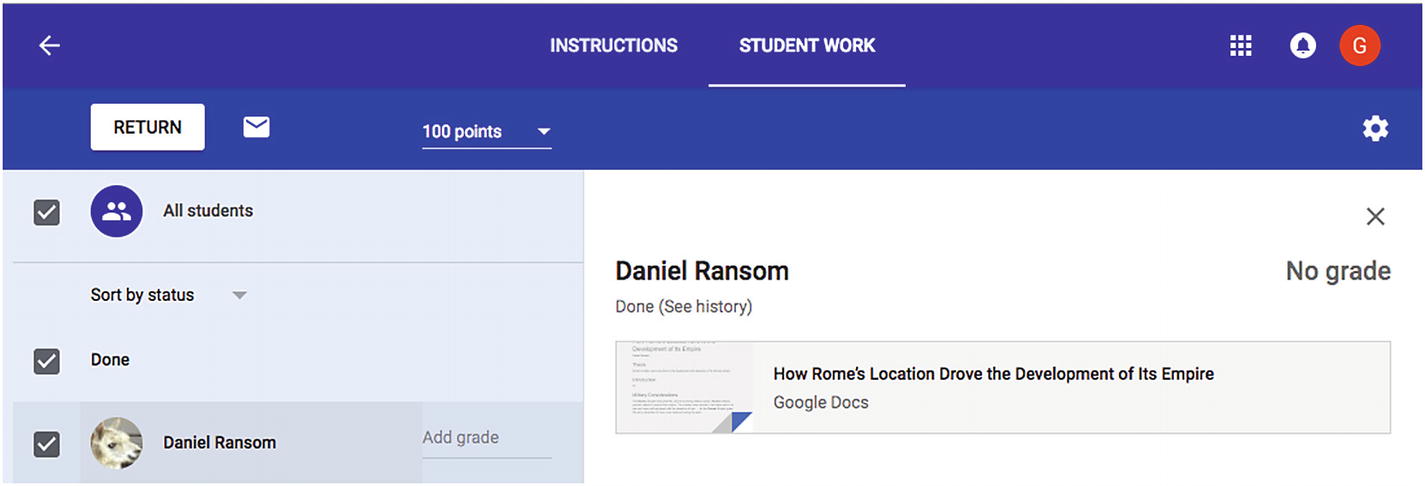
Click the student’s name in the left pane on the Student Work tab and then click the item you want to view.
- 2.
Click the item you want to view. The item opens in the appropriate app—for example, a Google Docs document opens in a Google Docs tab in the Chrome app.
- 3.
Once you have viewed the item, close its tab. The Chrome app returns you to the Student Work tab.
Note
You can add a private comment to the student by clicking the Add private comment button at the bottom of the Student Work tab, typing the comment, and then clicking the Post button.
- 4.
Click the Add grade box to the right of the student’s name and type the grade. You can use two decimal places if necessary; if you use more decimal places, Google Classroom will round the number to two decimal places.
- 5.
When you are ready to return the assignment, make sure the student’s check box in the left column is checked and then click the Return button. In the Return work? dialog box that opens (see Figure 8-50), look through the marks to make sure all looks well, type a private comment if necessary, and then click the Return button.
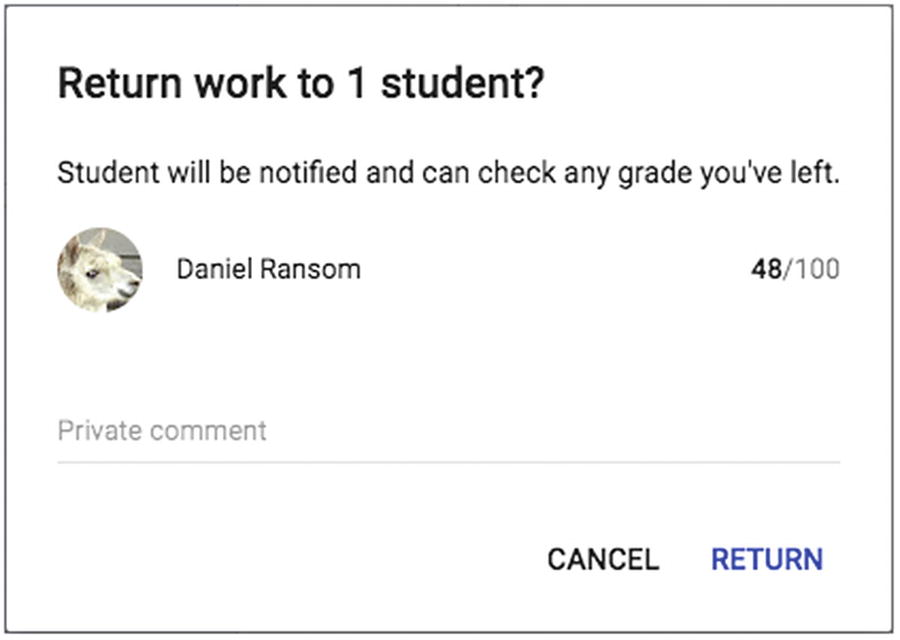
In the Return work? dialog box, type any private comment needed and then click the Return button.
Working with Questions
Google Classroom’s Questions feature enables you to pose either open-answer questions or multiple-choice questions to the students in your classes. Questions can be a great way both to check students’ knowledge and understanding of material and to get feedback on what is working well, what is not working well, or what students would find helpful in your classes.
Creating a Question
- 1.
On the Stream tab for the class, click the Add (+) button in the lower-right corner to display the pop-up menu.
- 2.
Click the Create question item. The Question dialog box opens (see Figure 8-51).

In the Question dialog box, enter the question itself, enter any instructions needed, and choose between a short answer and multiple choice. You can also control whether students can reply to each other and whether students can edit their answers.
- 3.
By default, the For pop-up menu is set to the current class. Add other classes if necessary.
- 4.
By default, the second pop-up menu is set to All students. Change the recipients if necessary.
- 5.
In the Question box, type the text of the question.
- 6.
In the Instructions (optional) box, type any instructions to help the students understand the context for the question and the types of responses you are looking for.
- 7.
To give a due date for the question, click the Due pop-up menu and then specify the date—and, if necessary, the time—in the Due date & time pop-up panel.
- 8.
Click the Topic pop-up menu and choose the topic. You can create a new topic if necessary.
- 9.
Click the pop-up menu below the Due pop-up menu and then click the Short answer item or the Multiple choice item as needed.
- 10.
For a short-answer question, set the two switches that appear:
Students can reply to each other: Set this switch to On if you want students to be able to discuss the question.
Students can edit answer: Set this switch to On if you want to allow students to edit their answers.
- 11.
For a multiple-choice question, click the Add option line and type each answer needed (see Figure 8-52), then set the “Students can see class summary” switch to On or Off as needed.

Enter the answers for a multiple-choice question by clicking the Add option line and typing each answer. Set the “Students can see class summary” switch to On or Off as required.
- 12.
Add any materials needed to the assignment.
- 13.
Click the Ask button to post the question.
Viewing and Grading Responses to a Question
View the responses: Click the question on the Stream tab to display the Student Answers tab for the question. The Student Answers tab (see Figure 8-53) works in a similar way to the Student Work tab for an assignment.
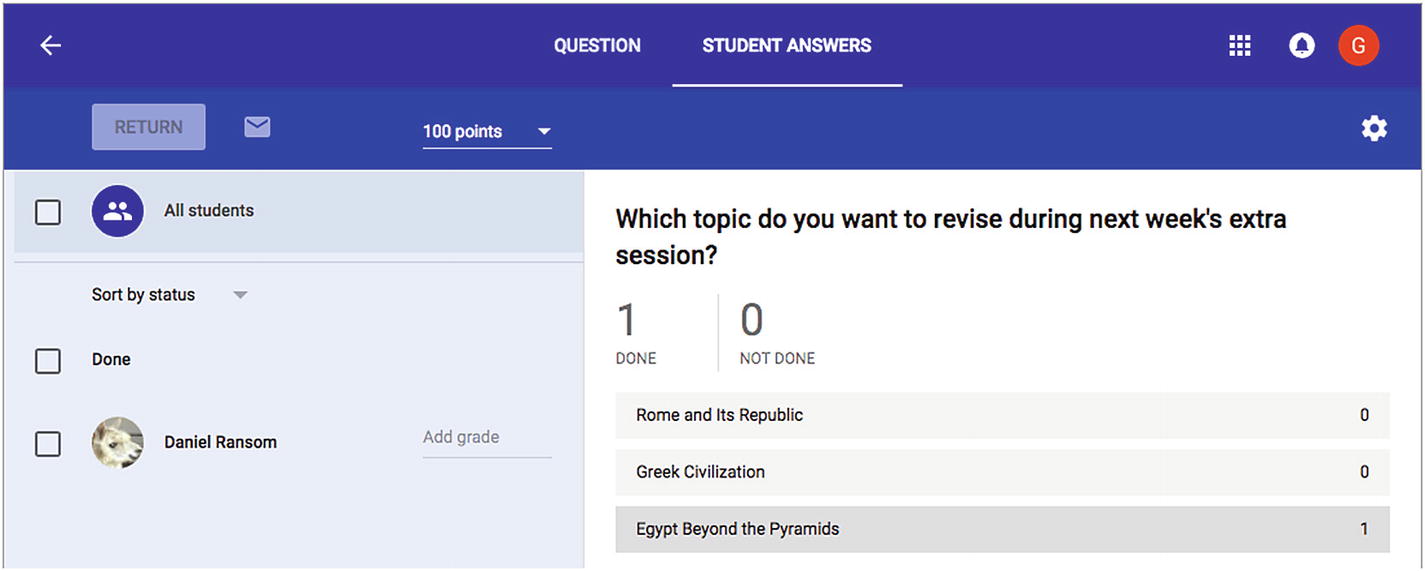
On the Student Answers tab for a question, you can view the answers to the question. You can also grade and return the answers if necessary.
Grade an answer: In the left pane, click the “Add grade” field for the appropriate student and then type the grade.
Return an answer: In the left pane, check the check box for the student or students and then click the Return button. In the Return work? dialog box, type any private comment needed and then click the Return button.
Emailing the Students in the Class
As long as Gmail is enabled, Google Classroom enables you to email an entire class of students or one or more individual students within the class.
To send email messages to students, you work through the class. Follow these steps:
- 1.
On the Classes page, click the card for the class that contains the student or students you want to email. The page for the class appears.
- 2.
Click the Student tab to display its contents.
- 3.
Depending on which student or students you want to email , take the appropriate action in the following sublist:
Email the whole class: Check the check box above the list of students, then click the Actions button and click the Email item on the pop-up menu.
Email multiple students: In the list of students, check the check box for each student you want to email. Then, click the Actions button and click the Email item on the pop-up menu.
Email a single student: In the list of students, click the More Actions button (the three vertical dots), and then click the Email item on the pop-up menu.
- 4.
In the Gmail tab that Google Classroom makes Chrome open, type the subject and text of the message.
- 5.
Optionally, attach files, links, or other items to the message.
- 6.
Click the Send button to send the message.
Archiving and Unarchiving Classes
When you have finished teaching a class, such as when a semester or the school year comes to its end, you can archive the class to move it to safe storage and remove it from your home page and your students’ home pages. When you need the class again, you can restore the class and start using it once more. If it turns out that you will never need an archived class again, you can delete it instead.
Note
Only teachers (including co-teachers) can archive classes; students cannot archive classes.
Understanding What Happens When You Archive a Class
The class and its materials are stored separately from your current classes: Classroom keeps the materials you have added to the class, the work the students have done, and the posts made to the class.
The class disappears from home pages: Classroom removes the class from the list of active classes on your home page and the students’ home pages.
The archived class is viewable but not usable: All teachers and students who were members of the class can view the archived class, but they cannot use the class unless a teacher unarchives it.
Class materials remain accessible in Google Drive: Any files that were added to the class remain accessible in Google Drive. For example, students can still retrieve assignments for archived classes.
Archiving a Class
- 1.
Click the Classroom Main Menu button and then click the Classes item to display the Classes page.
- 2.
Click the More Actions button (the three vertical dots) on the card for the class you want to archive and then click the Archive item. The Archive? dialog box opens (see Figure 8-54).
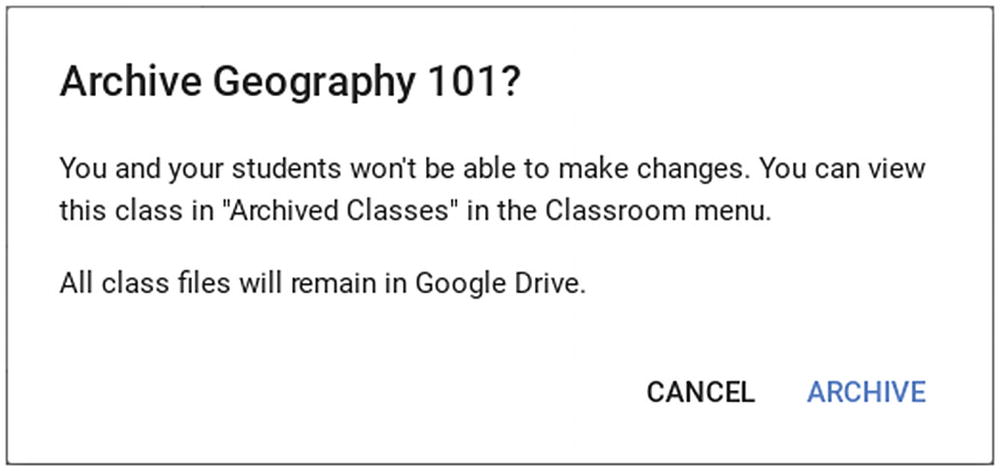
In the Archive? dialog box, verify that you have chosen the right class and then click the Archive button
- 3.
Make sure that you have chosen the right class to archive.
- 4.
Click the Archive button. Classroom archives the class and removes it from the Classes page.
Unarchiving a Class
- 1.
Click the Classroom Main Menu button and then click the Archived Classes item toward the bottom. The Archived Classes page appears.
- 2.
Click the More Actions button (the three vertical dots) on the card for the class you want to unarchive and then click the Restore item. The Restore class? dialog box opens (see Figure 8-55).
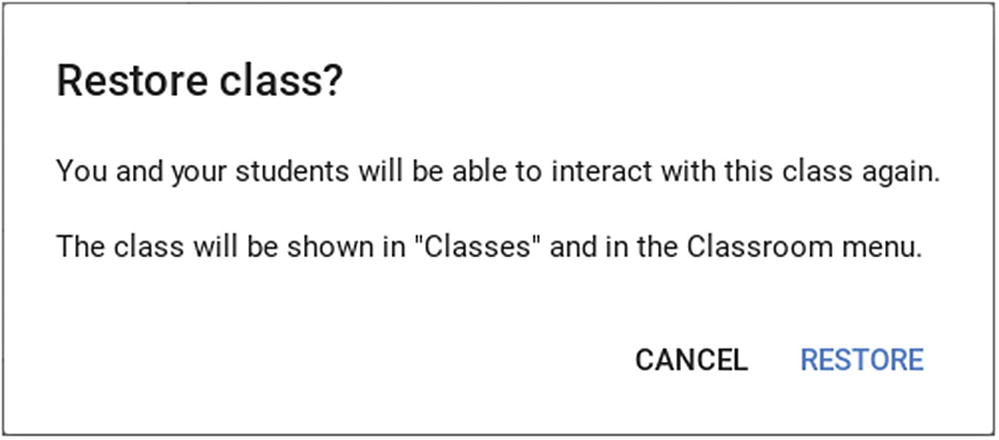
Click the Restore button in the Restore class? dialog box to restore the class from the archive to the Classes page and to active use
- 3.
Click the Restore button. Classroom restores the class and removes it from the Archived Classes page.
To start using the class, go back to the Classes page by clicking the Classroom Main Menu button and then clicking the Classes item.
Summary
In this chapter, you have learned how to use Google Classroom to organize classes in your school. You now know what Google Classroom is, what it enables you to do, and how to configure settings for the service. You can accept provisioned classes or create classes from scratch, add materials to the classes as needed, and communicate with your students via assignments, announcements, questions, and email messages.
In the next chapter, we will examine how to troubleshoot common problems with Chromebooks and keep your digital classrooms running.