We will begin looking at how to use Microsoft PowerApps and Microsoft Flow with SharePoint Server 2019 via the Microsoft On-Premises Data Gateway. Microsoft Flow and PowerApps are the recommended way of automating business processes and creating apps for SharePoint 2019 hybrid environments and SharePoint Online. Those services are still cloud-only services, meaning they only run in the cloud, but you can integrate them with on-premises data. This chapter will cover the installation of a highly available Data Gateway as well as examples of using PowerApps and Flow with on-premises SharePoint data.
Microsoft On-Premises Data Gateway
The Microsoft Data Gateway can be deployed on one or more servers in your on-premises environment. The Data Gateway may be configured to run under a specified Active Directory managed service account, Domain User account, or the default service account. Our scenario will be using a highly available, two node Data Gateway implementation using the default service account, NT SERVICEPBIEgwService. You may need use an alternate Active Directory account if you have an upstream proxy server that requires authentication. If you do encounter this scenario, use an Active Directory Managed Service account, like what was configured for SQL Server in Chapter 3 of this book.
In this scenario, we will be deploying the Data Management Gateway to CALDMG01 and CALDMG02. These servers are joined to the Active Directory domain and do not require any firewall ports to be open inbound from the public Internet. The servers are running Windows Server 2016. While Microsoft recommends an 8 core CPU and 8GB RAM, the exact sizing of the server will depend on your usage of the service.
As the gateway requires you to log into Office 365 from the server where it is installed, you may want to turn off the IE Enhanced Security Configuration for Users in the Server Manager, Local Server settings.
After downloading the gateway installer, run it on the first Data Management Gateway server. The installation will only ask you for the path to install the gateway to. Once the installation is complete, you will be prompted to enter an e-mail address associated with the gateway, as shown in Figure 15-1.
Figure 15-1
Specifying an e-mail address for the data gateway
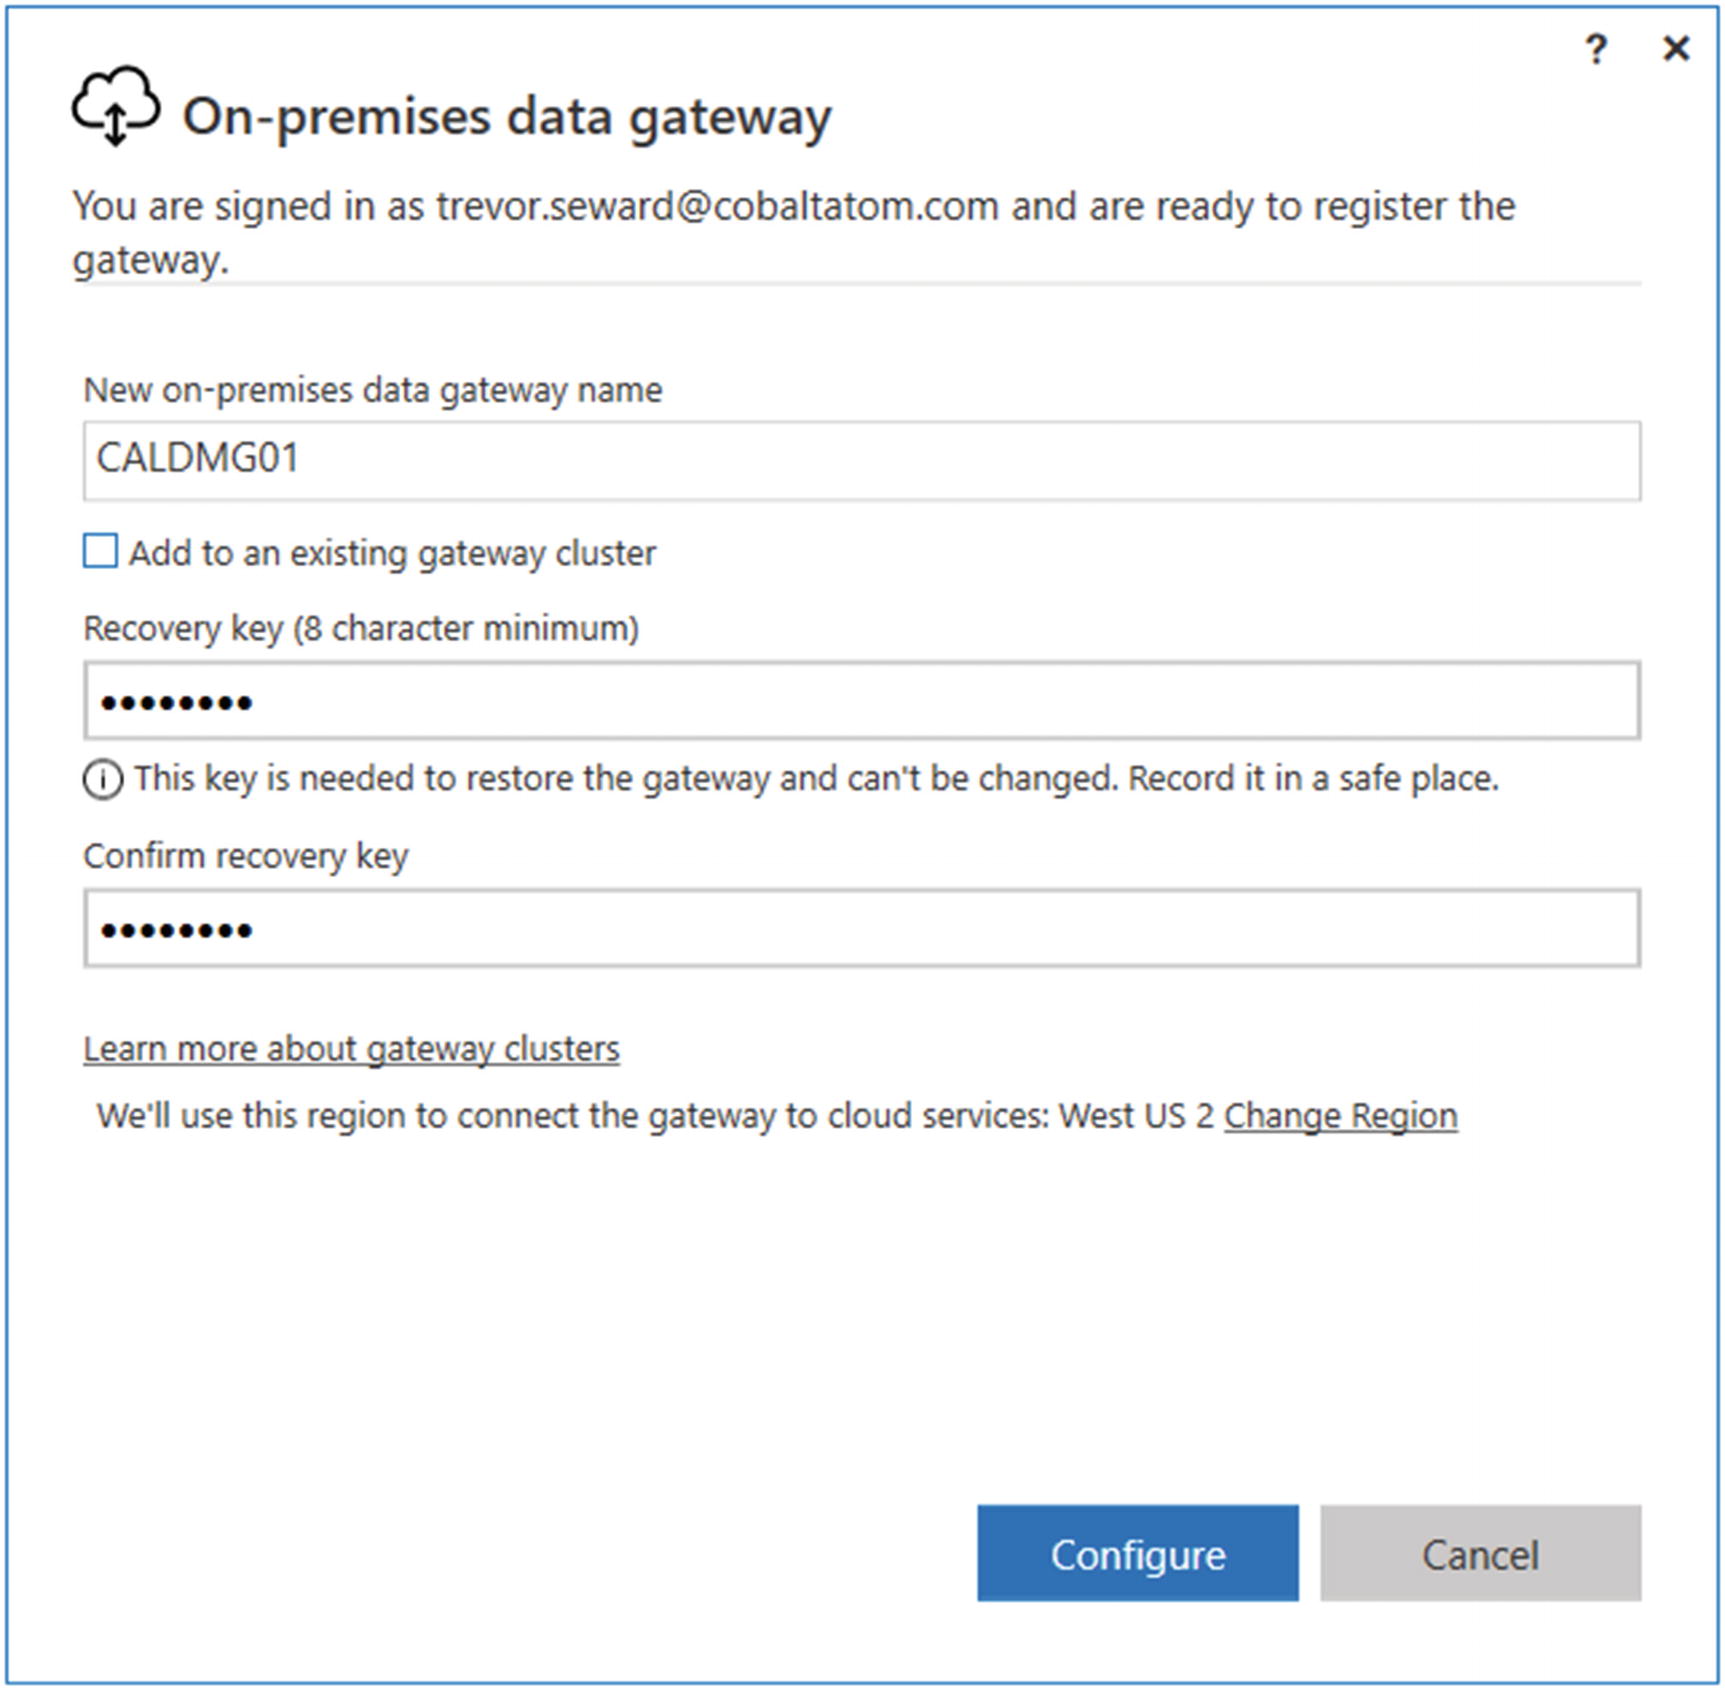
You will be prompted to sign into Office 365 using the e-mail address in Figure 15-1. Once the sign in has completed, we will be configuring the gateway. You will be prompted to create the name of the gateway. This is how the name will appear when connecting to the gateway from PowerApps or Flow. You will also need to specify a recovery key for the gateway, as shown in Figure 15-2. Keep this key in a safe location.
Figure 15-2
Configuring the data gateway
The on-premises gateway is configured at this point and the PowerApps, Microsoft Flow status should be green, as shown in Figure 15-3.
Figure 15-3
A successfully configured gateway
Additional options are available in the gateway settings, such as under Network, we can configure Azure Service Bus to use TLS 1.2.
To add an additional server to the Data Management Gateway, start the installation on the second server. Use the same sign in when prompted for an e-mail address as previously shown in Figure 15-1. After signing into the service, you will see a prompt to register a new gateway or migrate a gateway, as shown in Figure 15-4. Choose the option to register a new gateway.
Figure 15-4
When another gateway is detected, you will need to choose an option to register the gateway as new or migrate an existing gateway
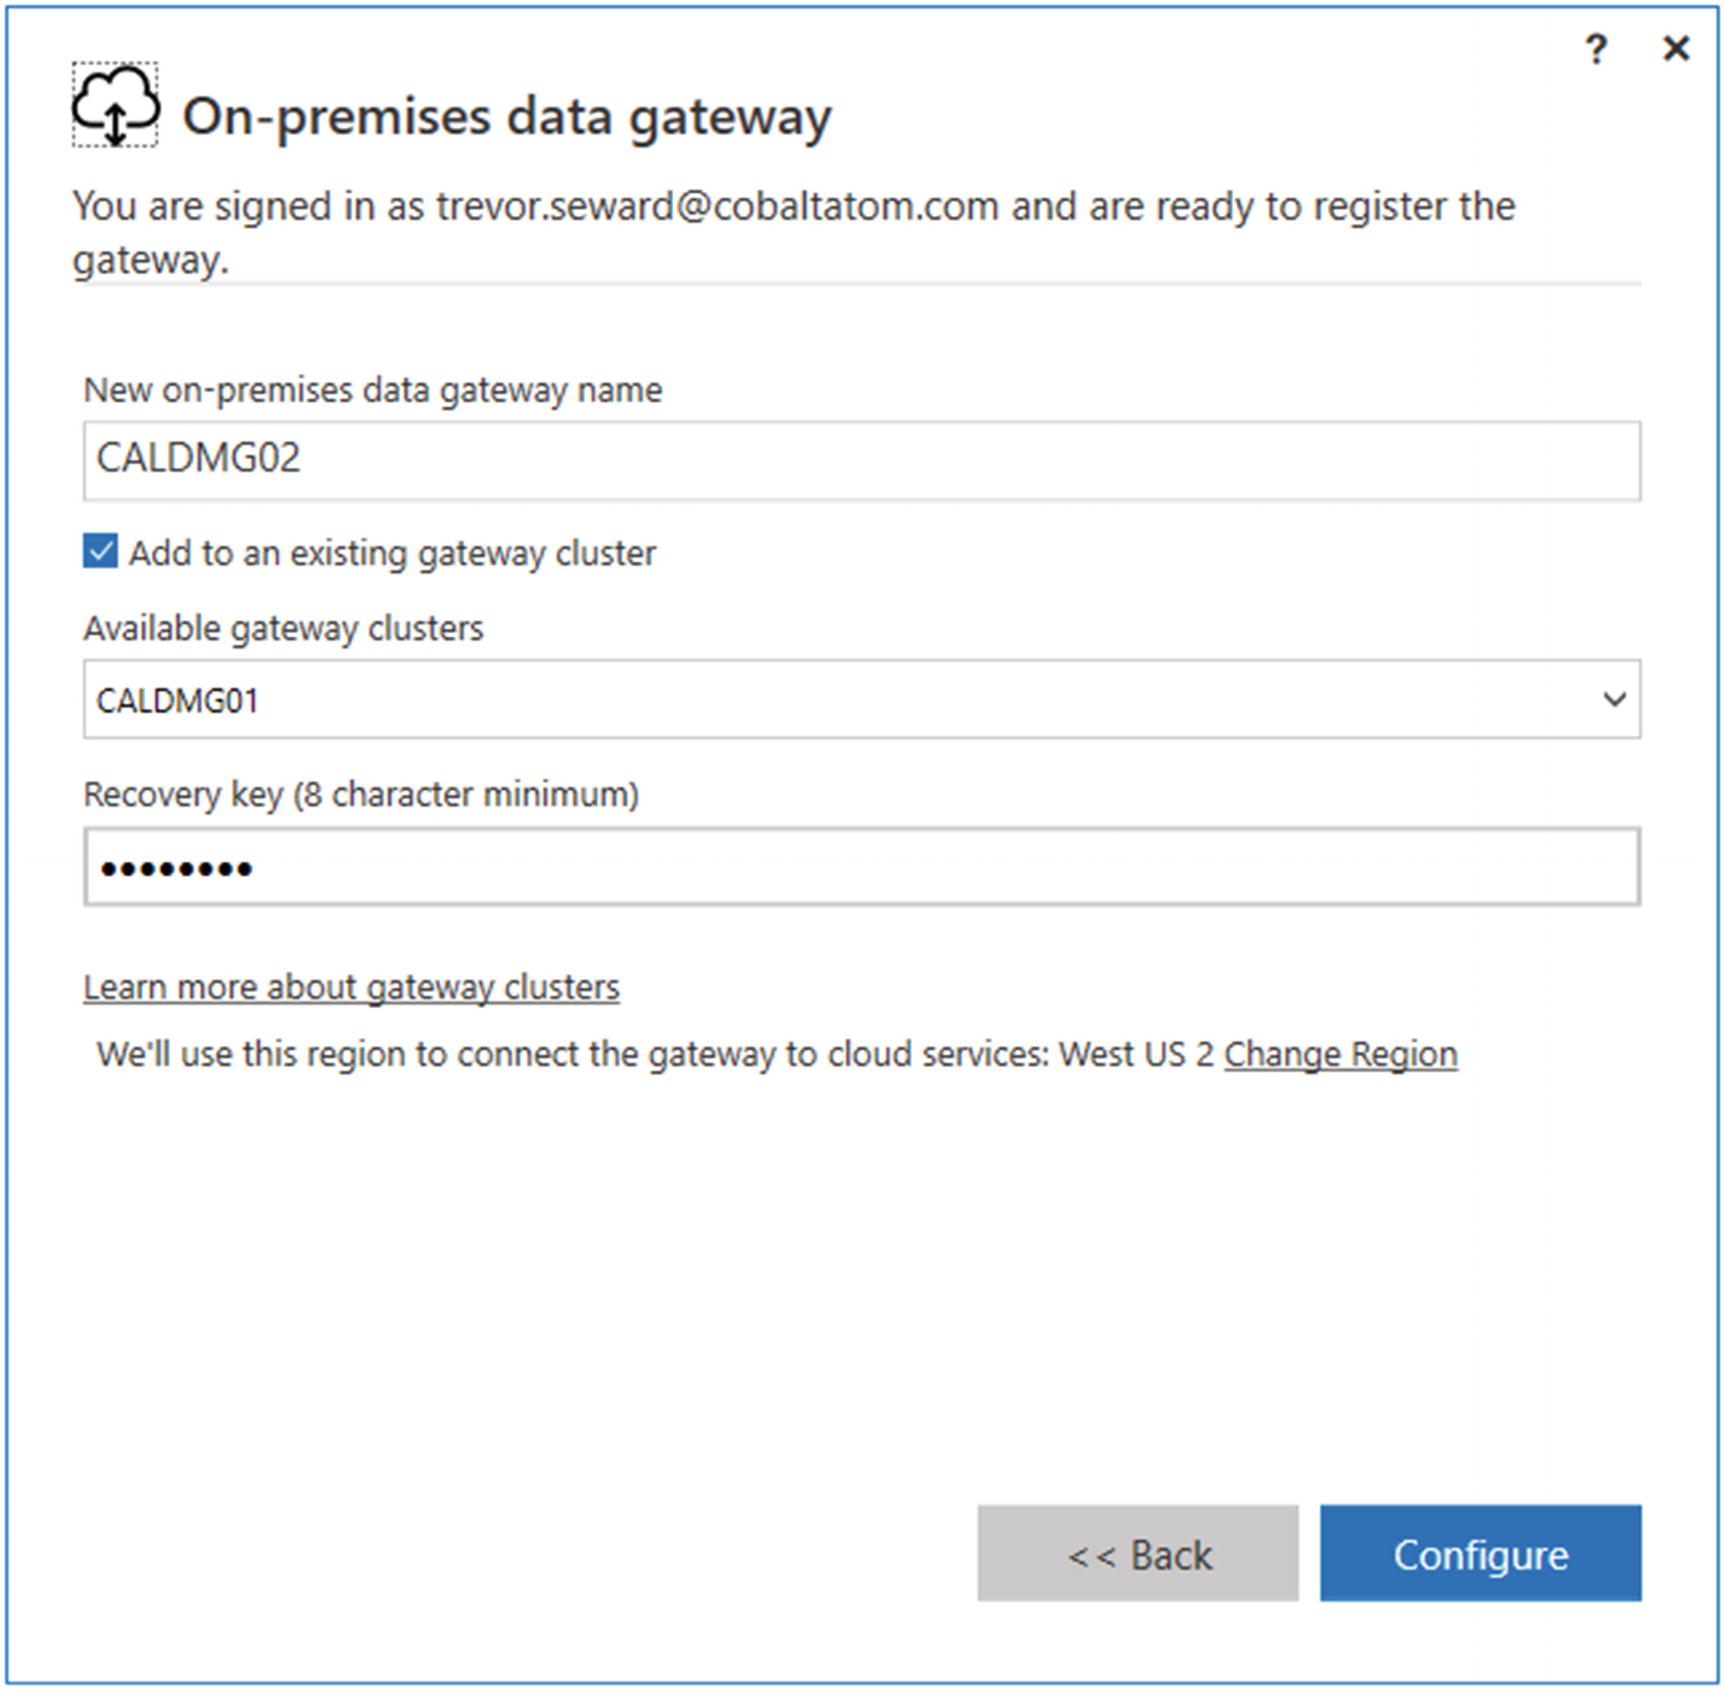
Enter a new gateway name and select the option to Add to an existing gateway cluster. Select the previous gateway we created and then enter the same recovery key we used to create the initial gateway, as shown in Figure 15-5.
Figure 15-5
Configuring the second data gateway
As previously shown in Figure 15-3, a successfully configured gateway will show as ready for PowerApps and Microsoft Flow. Note that if you configured the first gateway to use TLS 1.2 under the Network tab, you will also need to set that on any subsequently deployed gateways.
Gateway Administration
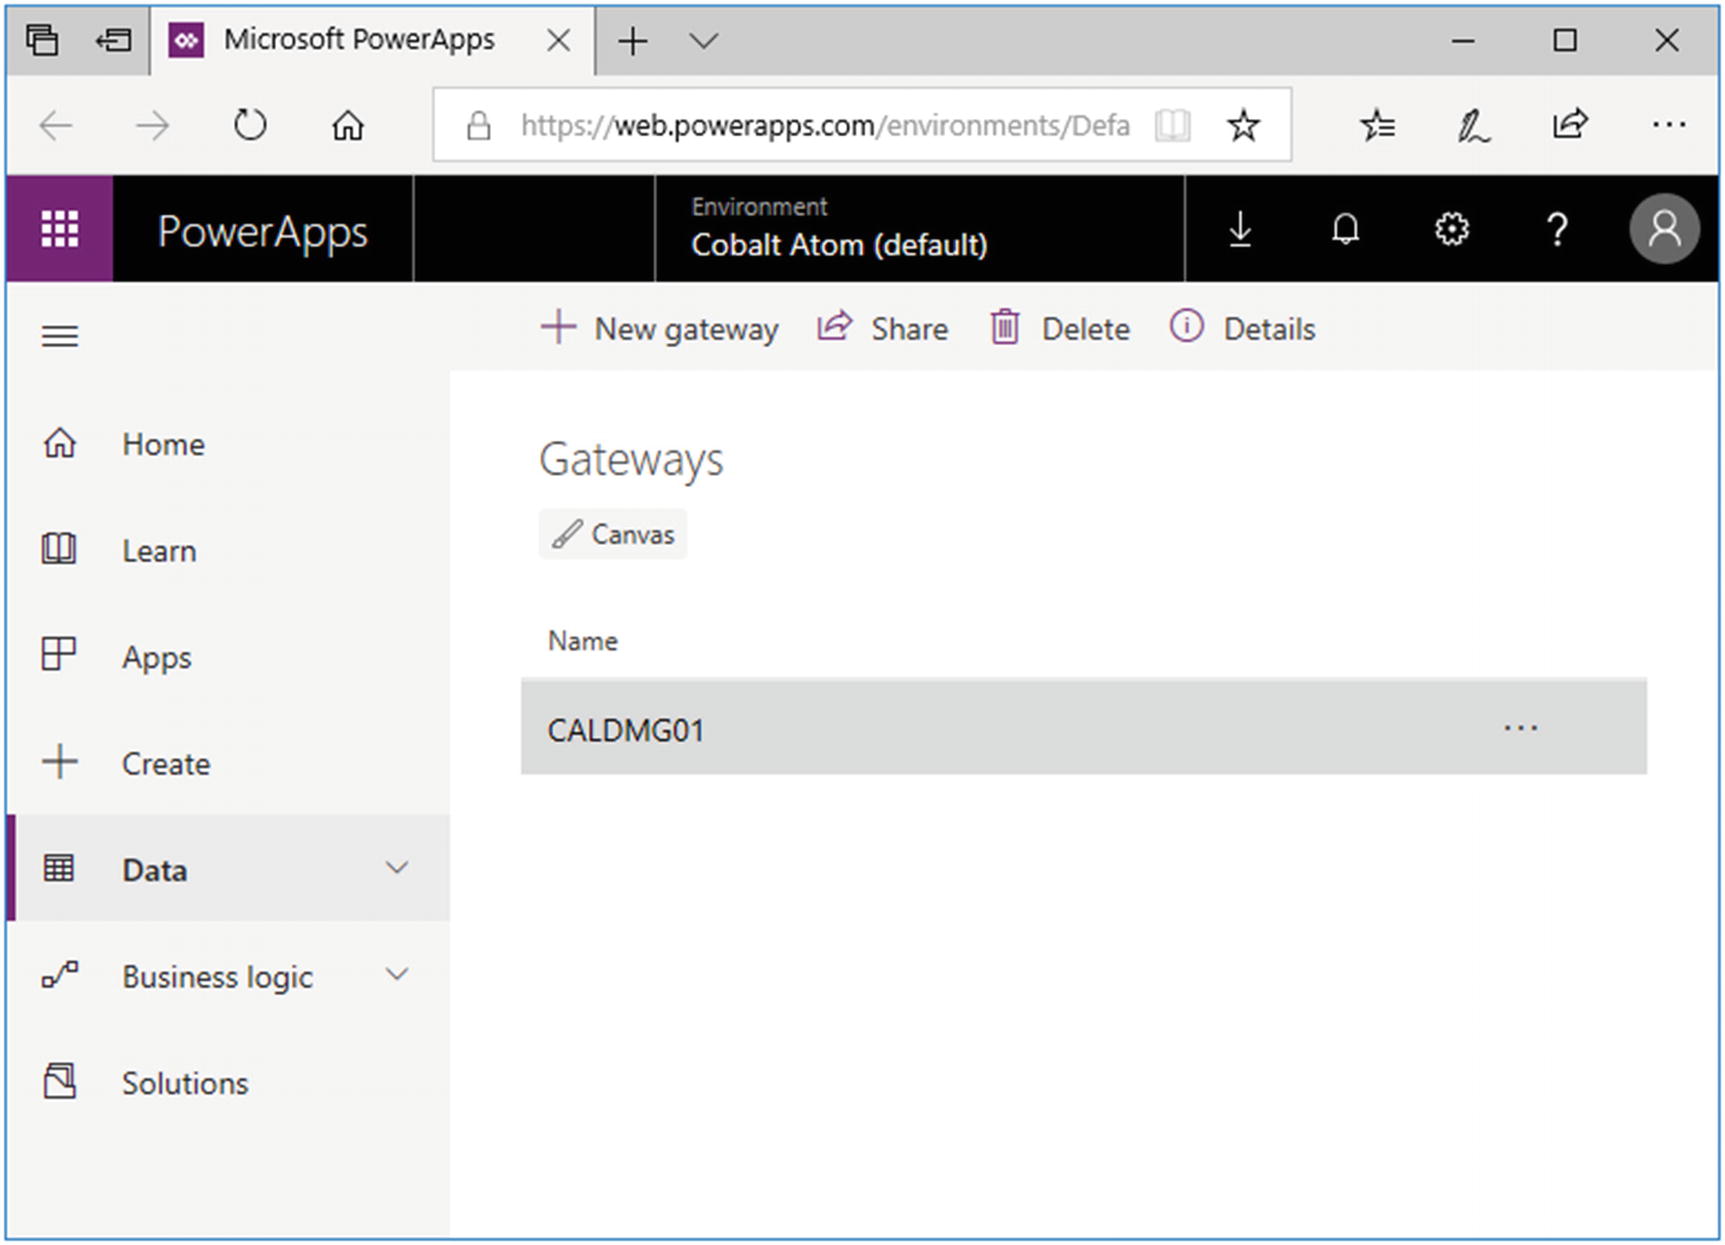
To check the status and administer the gateway, navigate to https://web.powerapps.com or https://flow.microsoft.com and sign in with the same account used to register the gateways with Office 365. On either service, in the left-hand navigation under Data, then Gateways you can administer all on-premises gateways. If you navigated to Microsoft Flow, you will be redirected to PowerApps to administer the gateway, as shown in Figure 15-6.
Figure 15-6
Administering the gateway from PowerApps
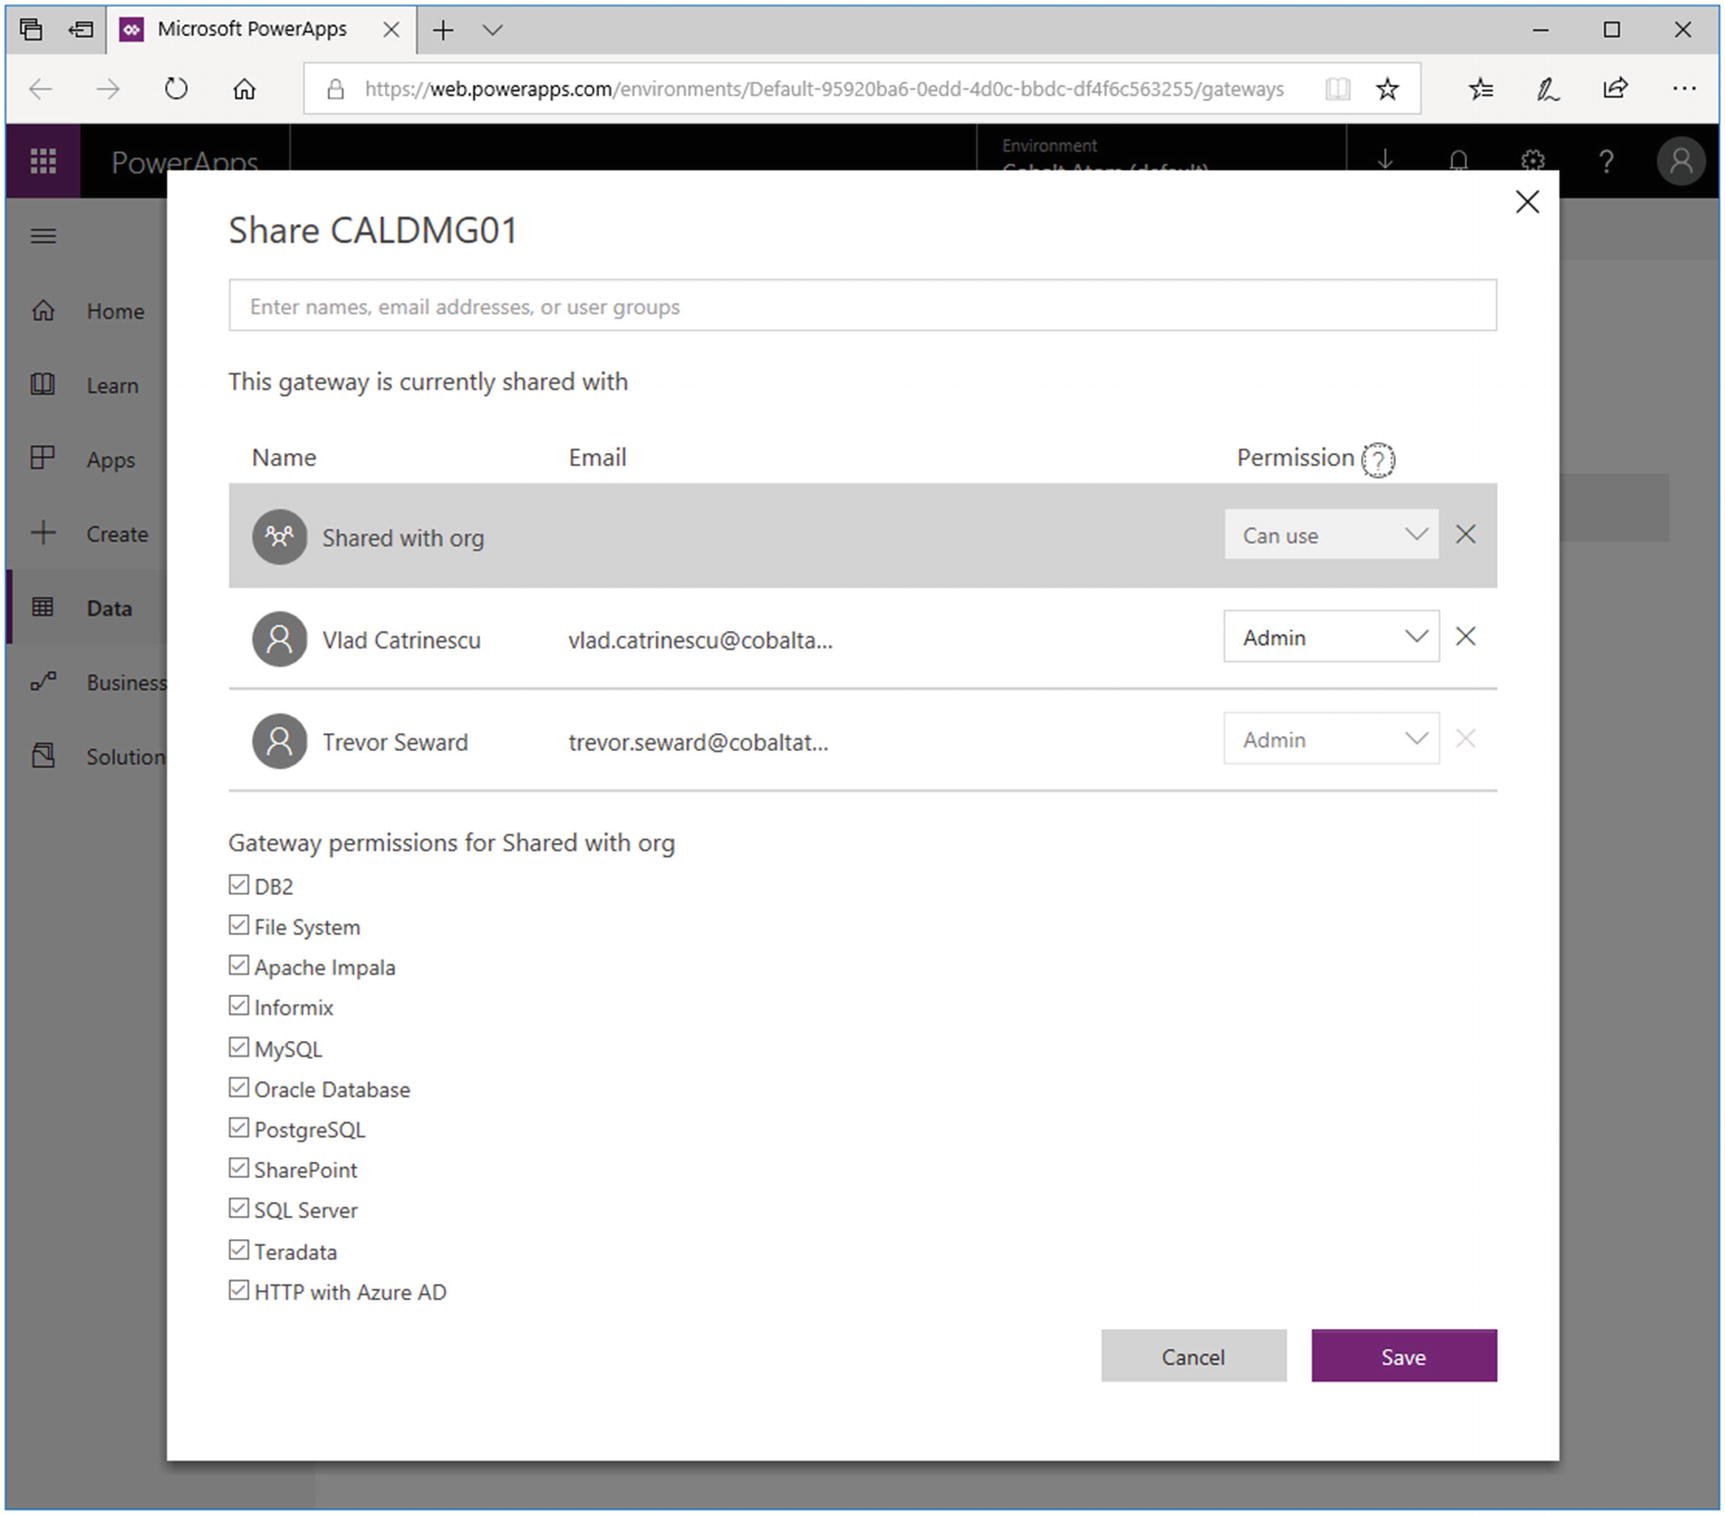
Clicking the Share button, you can add individual users with the capability to use the gateway including what type of services they may connect to. You can also allow the user to use the gateway but also share it. Finally, you can make them an administrator of the gateway. You can also share the gateway with all users in your organization who are synchronized to Azure AD and who are licensed for PowerApps, Power BI, or Flow, as shown in Figure 15-7.
Figure 15-7
Adding all users in the organization to the gateway
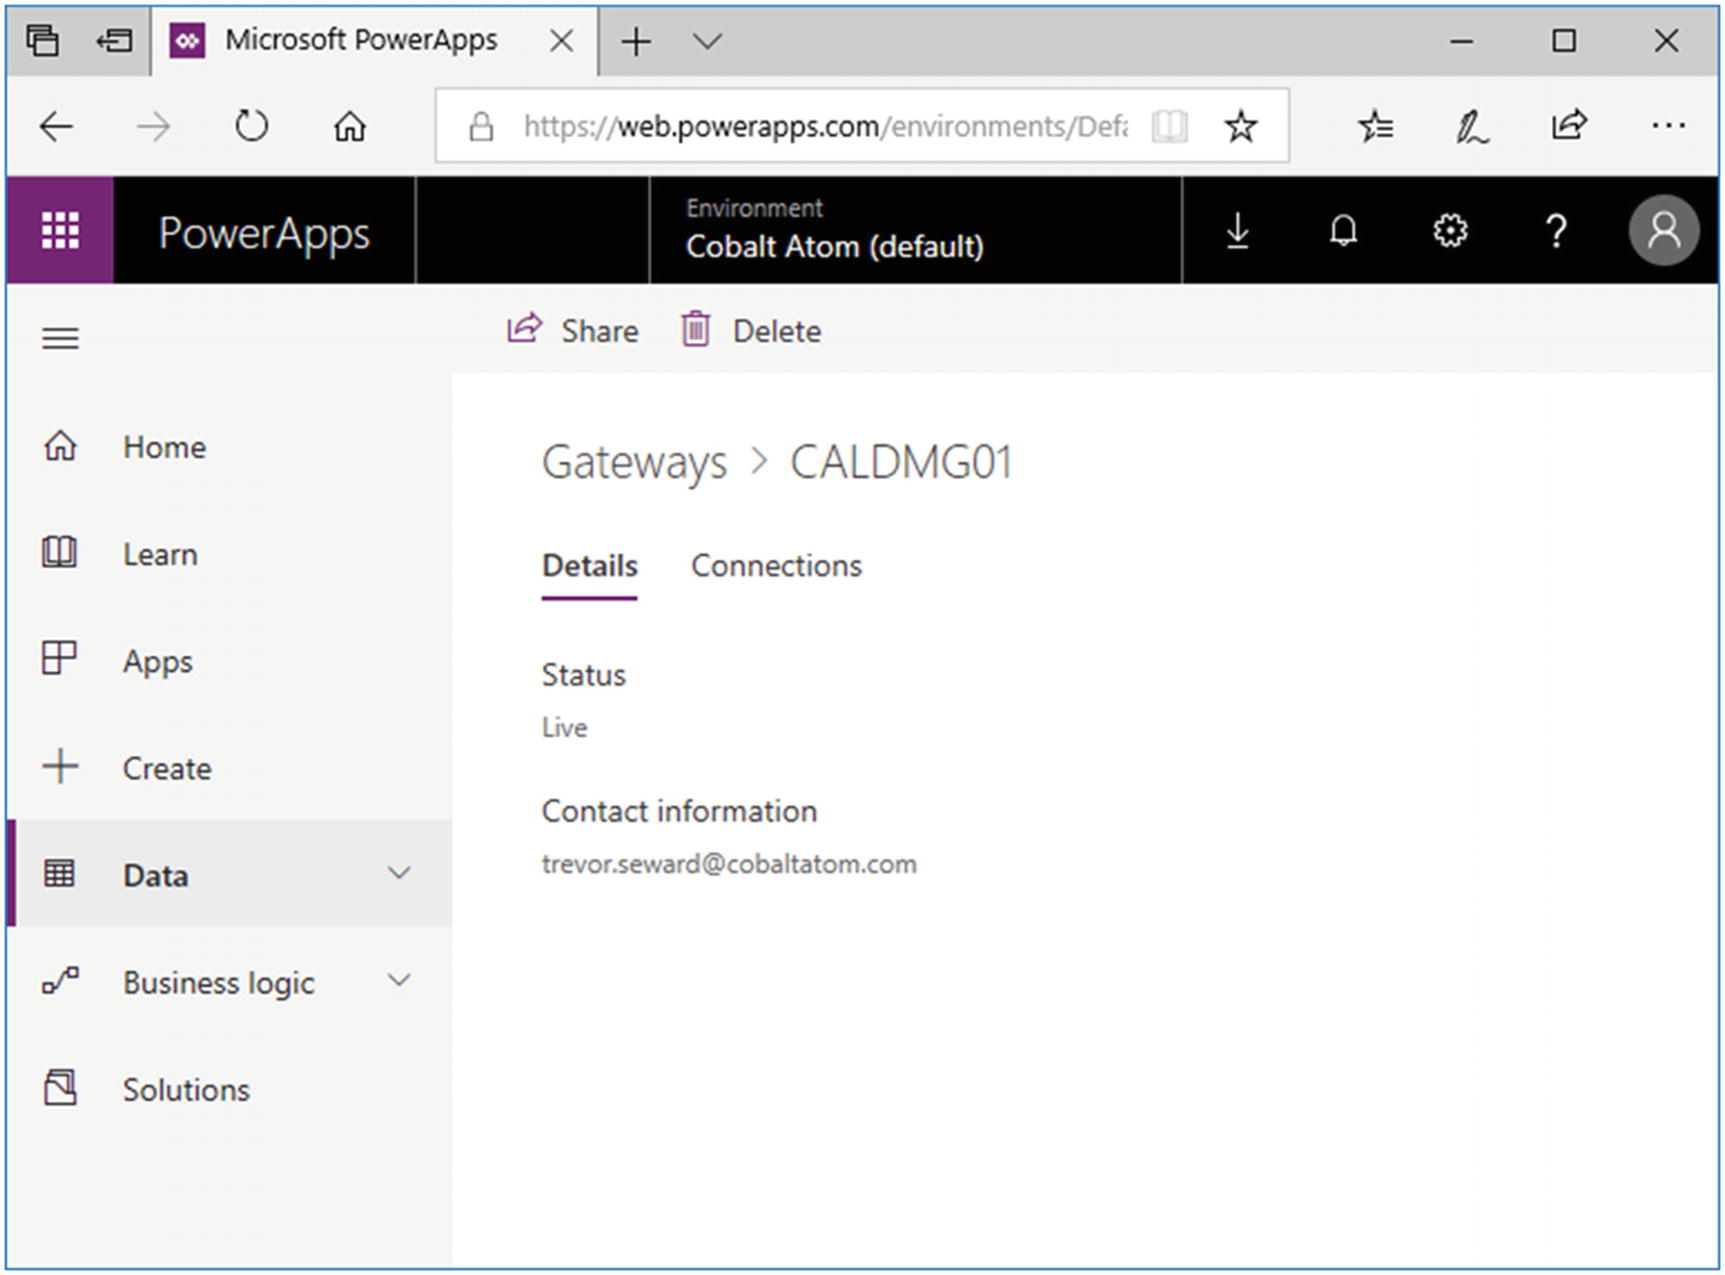
Clicking Details will show you the status of the connection to the gateway. If one or more gateways are online, the status will be Live, as shown in Figure 15-8.
Figure 15-8
One or more gateways are online
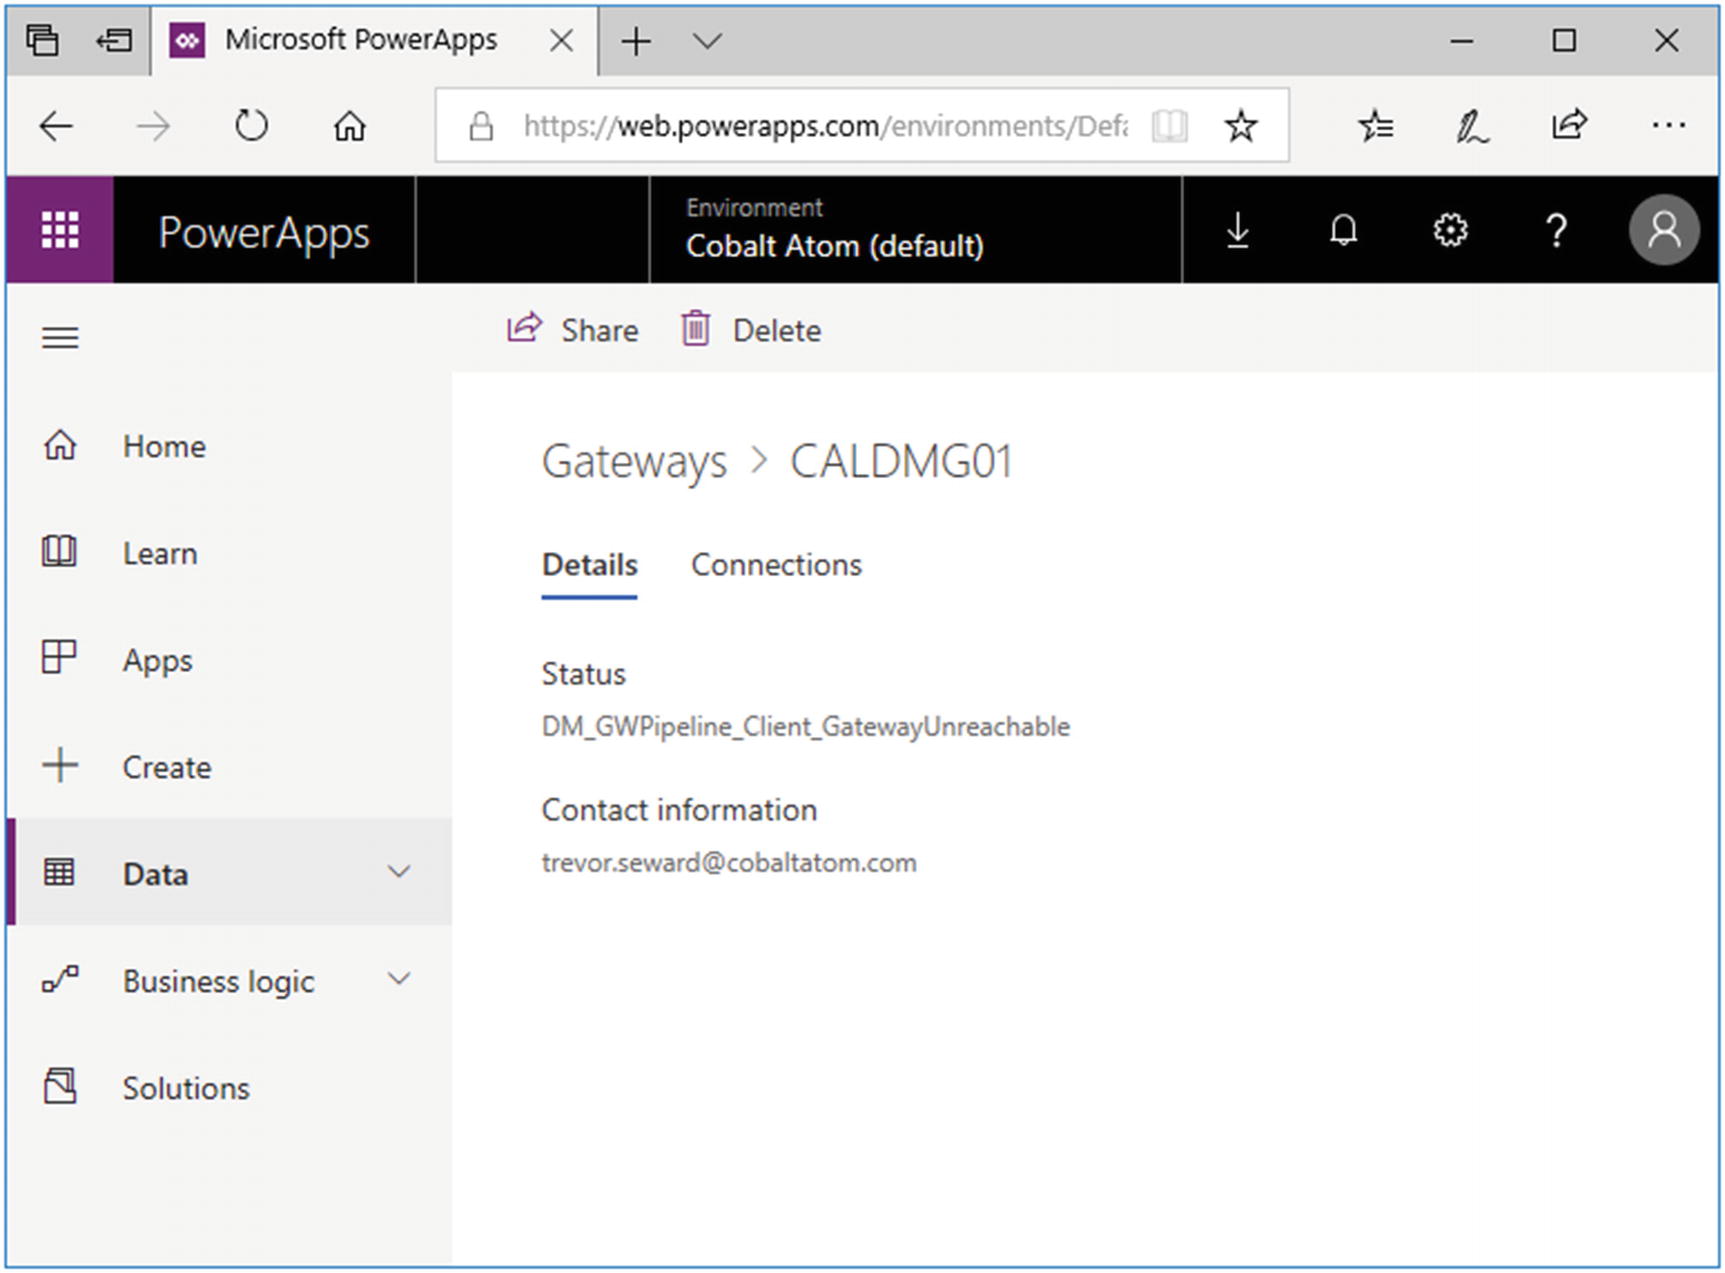
If all gateways are down, you will see an error, as shown in Figure 15-9. This may be caused due to the server or gateway service being in an offline state.
Figure 15-9
All gateways are in an unavailable state
PowerShell
The gateways may also be configured via PowerShell. By default, the PowerShell module is installed to “C:Program FilesOn-premises data gatewayOnPremisesDataGatewayHAMgmt.psm1”. You must first log into the gateway via PowerShell prior to using the other cmdlets available using Login-OnPremisesDataGateway. Use Get-OnPremisesDataGatewayClusters to retrieve the objectID (also called the ClusterObjectId) and the gatewayObjectId. There will be one gatewayObjectId per gateway server in the cluster. In this example, the output of Get-OnPremisesDataGatewayClusters shows my objectID as 12558961-deac-4142-9952-4e9325d63ad5 and my secondary servers gatewayObjectId as 6dc96cc6-70a8-48f9-90ae-b1305780841f. To find out if the Microsoft Data Gateway software is up to date, I can then run Get-OnPremisesDataGatewayStatus, shown as follows with the output:
Now that our Gateway is setup, let’s start building some workflows and applications, but before that, check if we have the right licensing!
Licensing Requirements
Effective February 1, 2019, Microsoft has implemented some changes regarding the licensing requirements to use Flow and PowerApps with On-Premises content. Check out the current licensing requirements at the time of implementation to make sure that
As always, we recommend talking to your Microsoft Licensing expert about the cases specific to your organization.
Workflows with Microsoft Flow
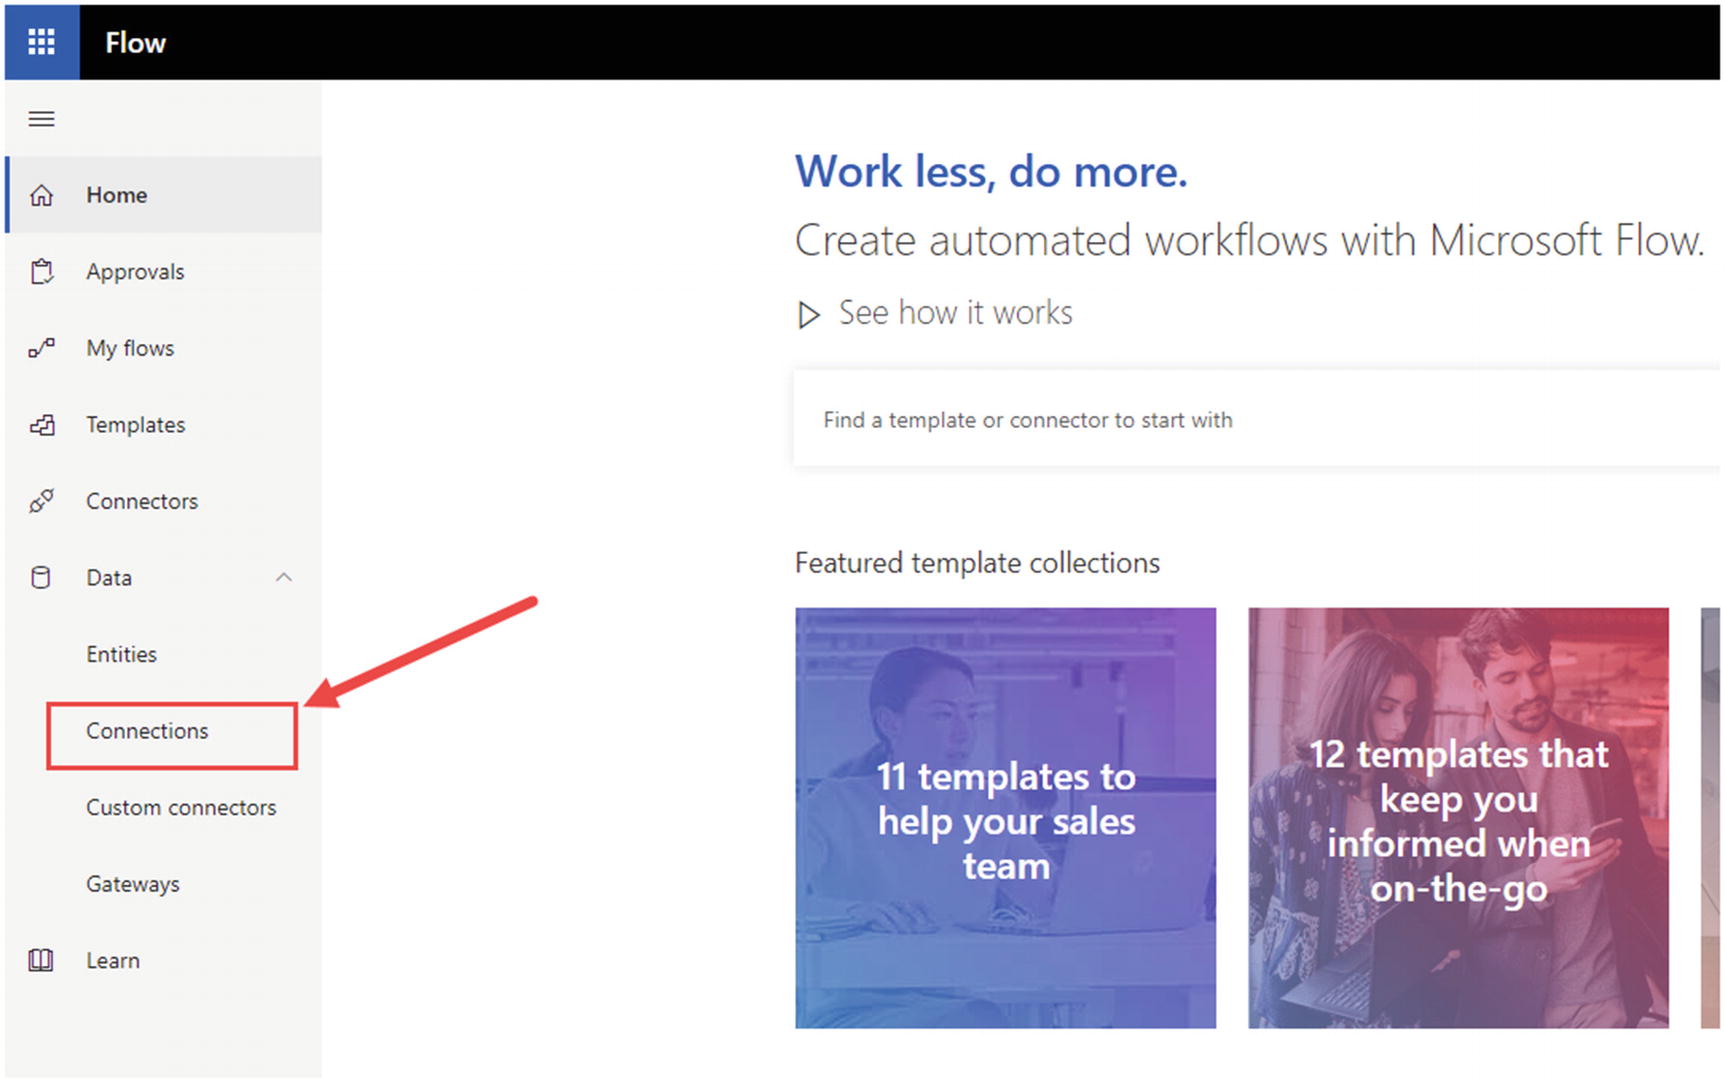
Microsoft Flow is the recommended way of doing workflows in Office 365, as well as hybrid SharePoint scenarios. Before creating our Flows, we need to create a connection to our On-Premises SharePoint 2019 Server. To create the connection, open the Flow Menu on the left, and navigate to Data, and then Connections as seen in Figure 15-10.
Figure 15-10
Connections In Microsoft Flow
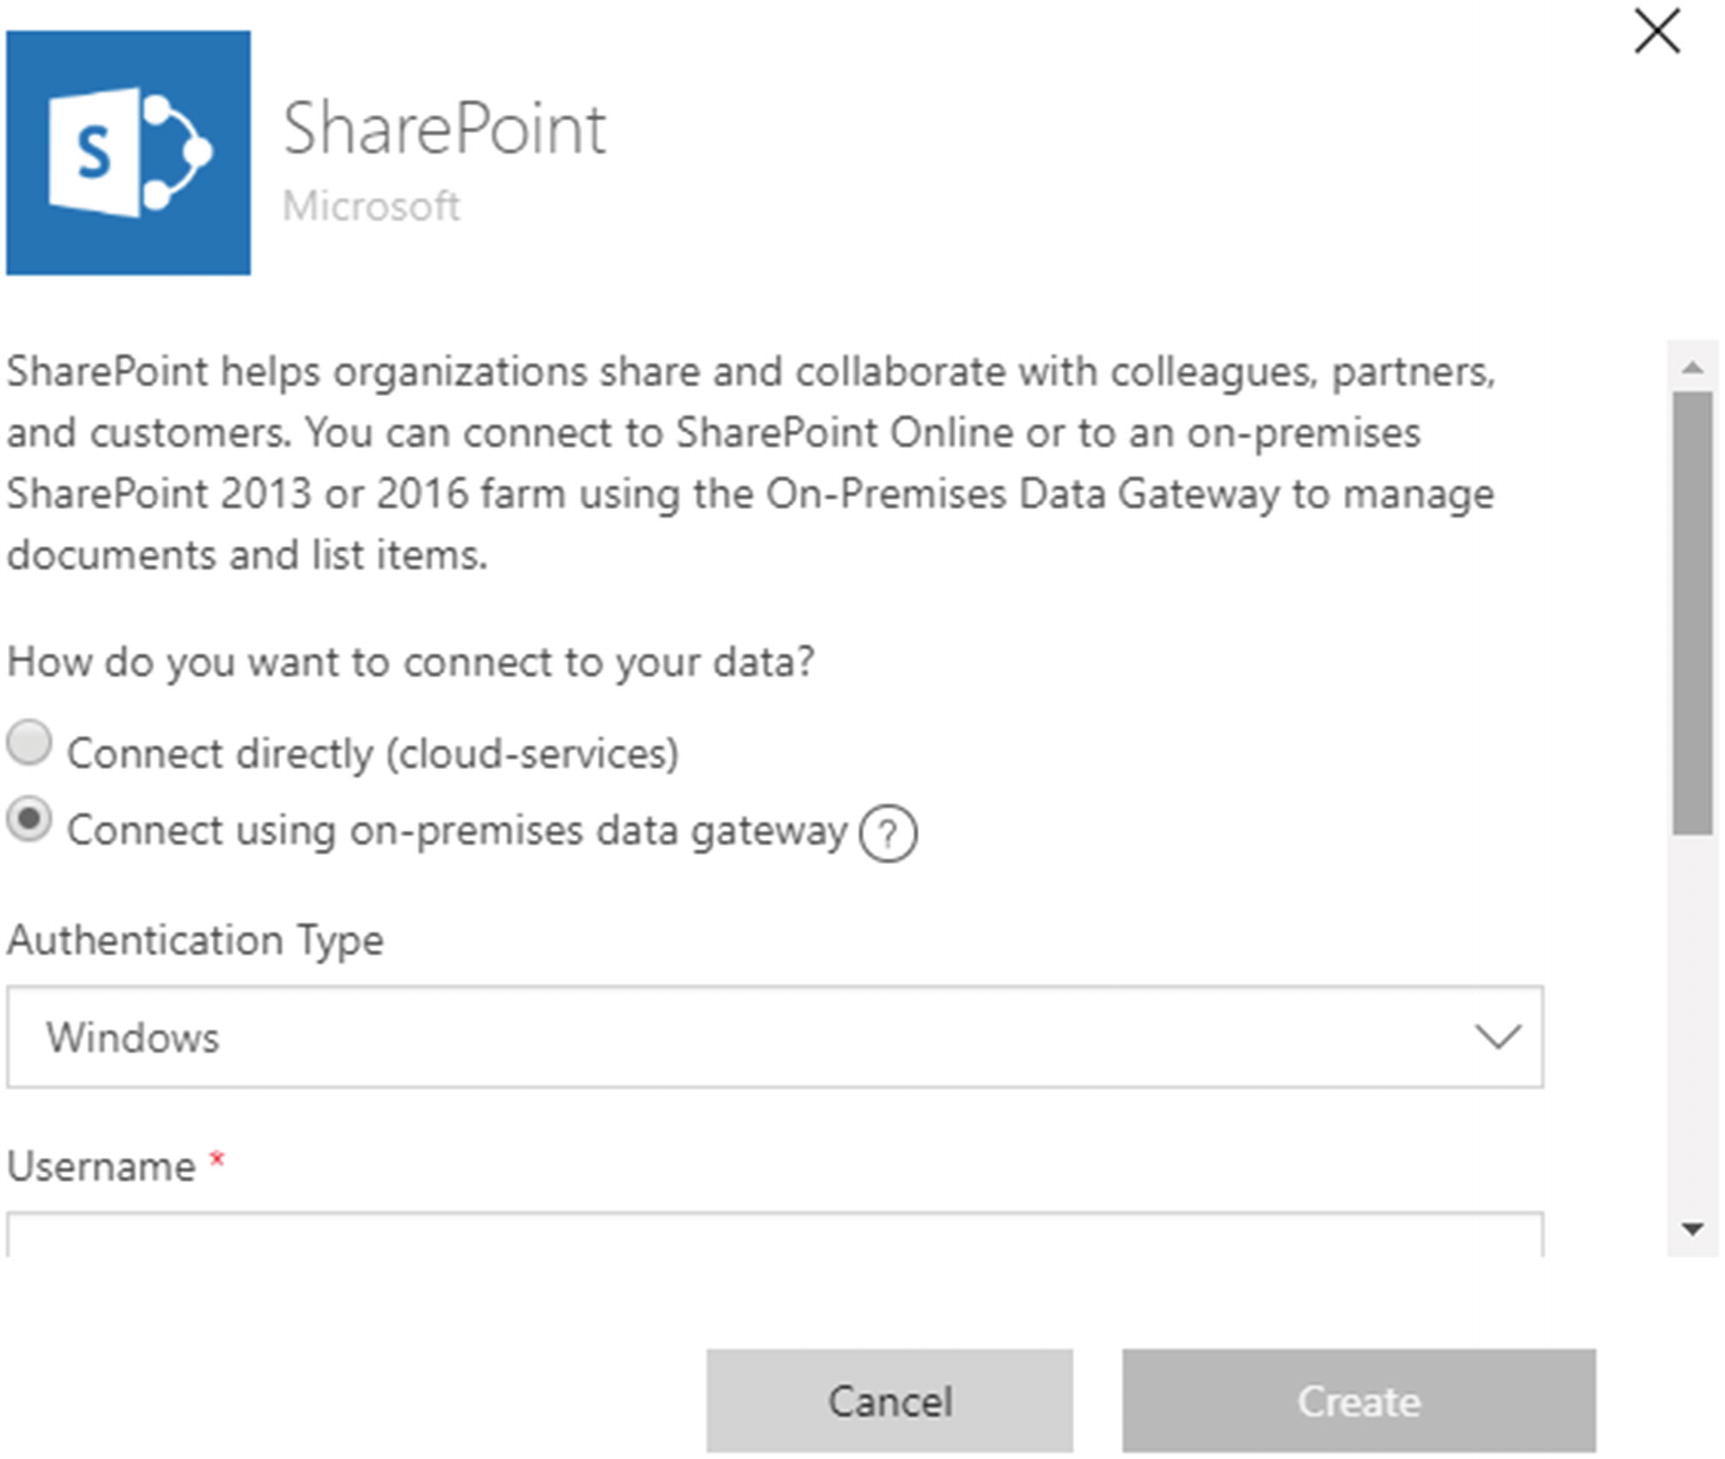
At the top of the page, click New Connection and select SharePoint from the list of available Connections. In the radio buttons, select the Connect using on-premises data gateway option as seen in Figure 15-11, and select Windows as the Authentication Type.
Figure 15-11
Creating a new connection for SharePoint On-Premises
After scrolling down, enter your on-premises Username and Password and select the Gateway you want to use when connecting on-premises as seen in Figure 15-12.
Figure 15-12
Creating a new connection to SharePoint On-Premises Part 2
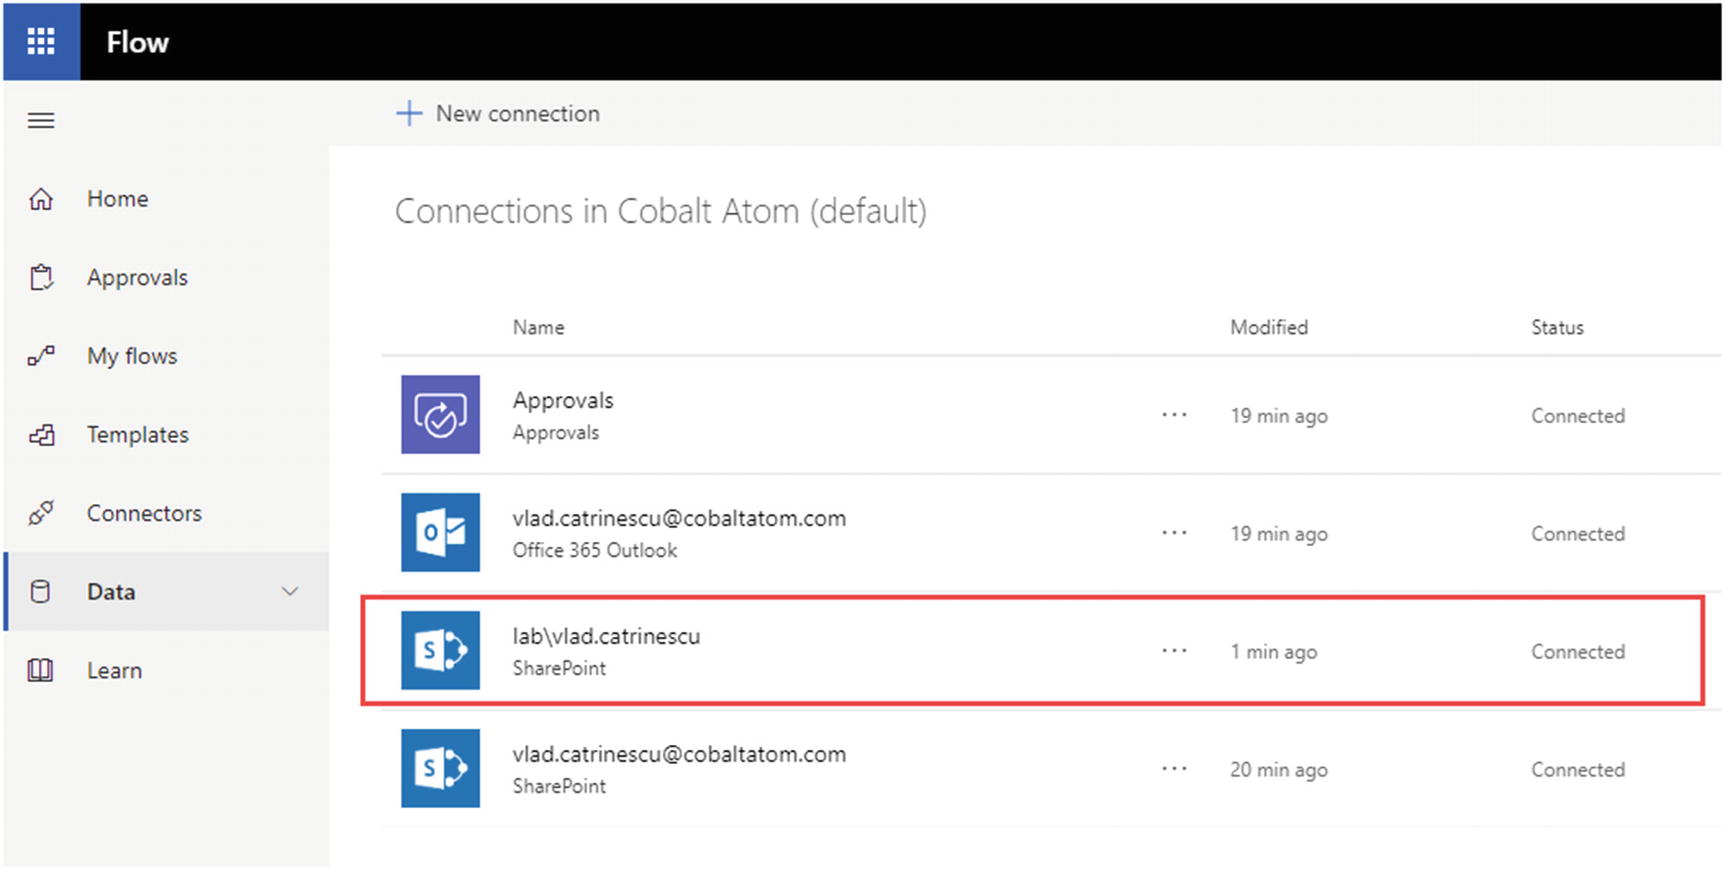
Once the connection is done, you will see a SharePoint connection with your domain credentials in the Connections tab in Microsoft Flow, like Figure 15-13. Depending on your prior usage of Microsoft Flow, you might have more or less connections than Figure 15-13.
Figure 15-13
The newly created On-Premises Connector in Microsoft Flow
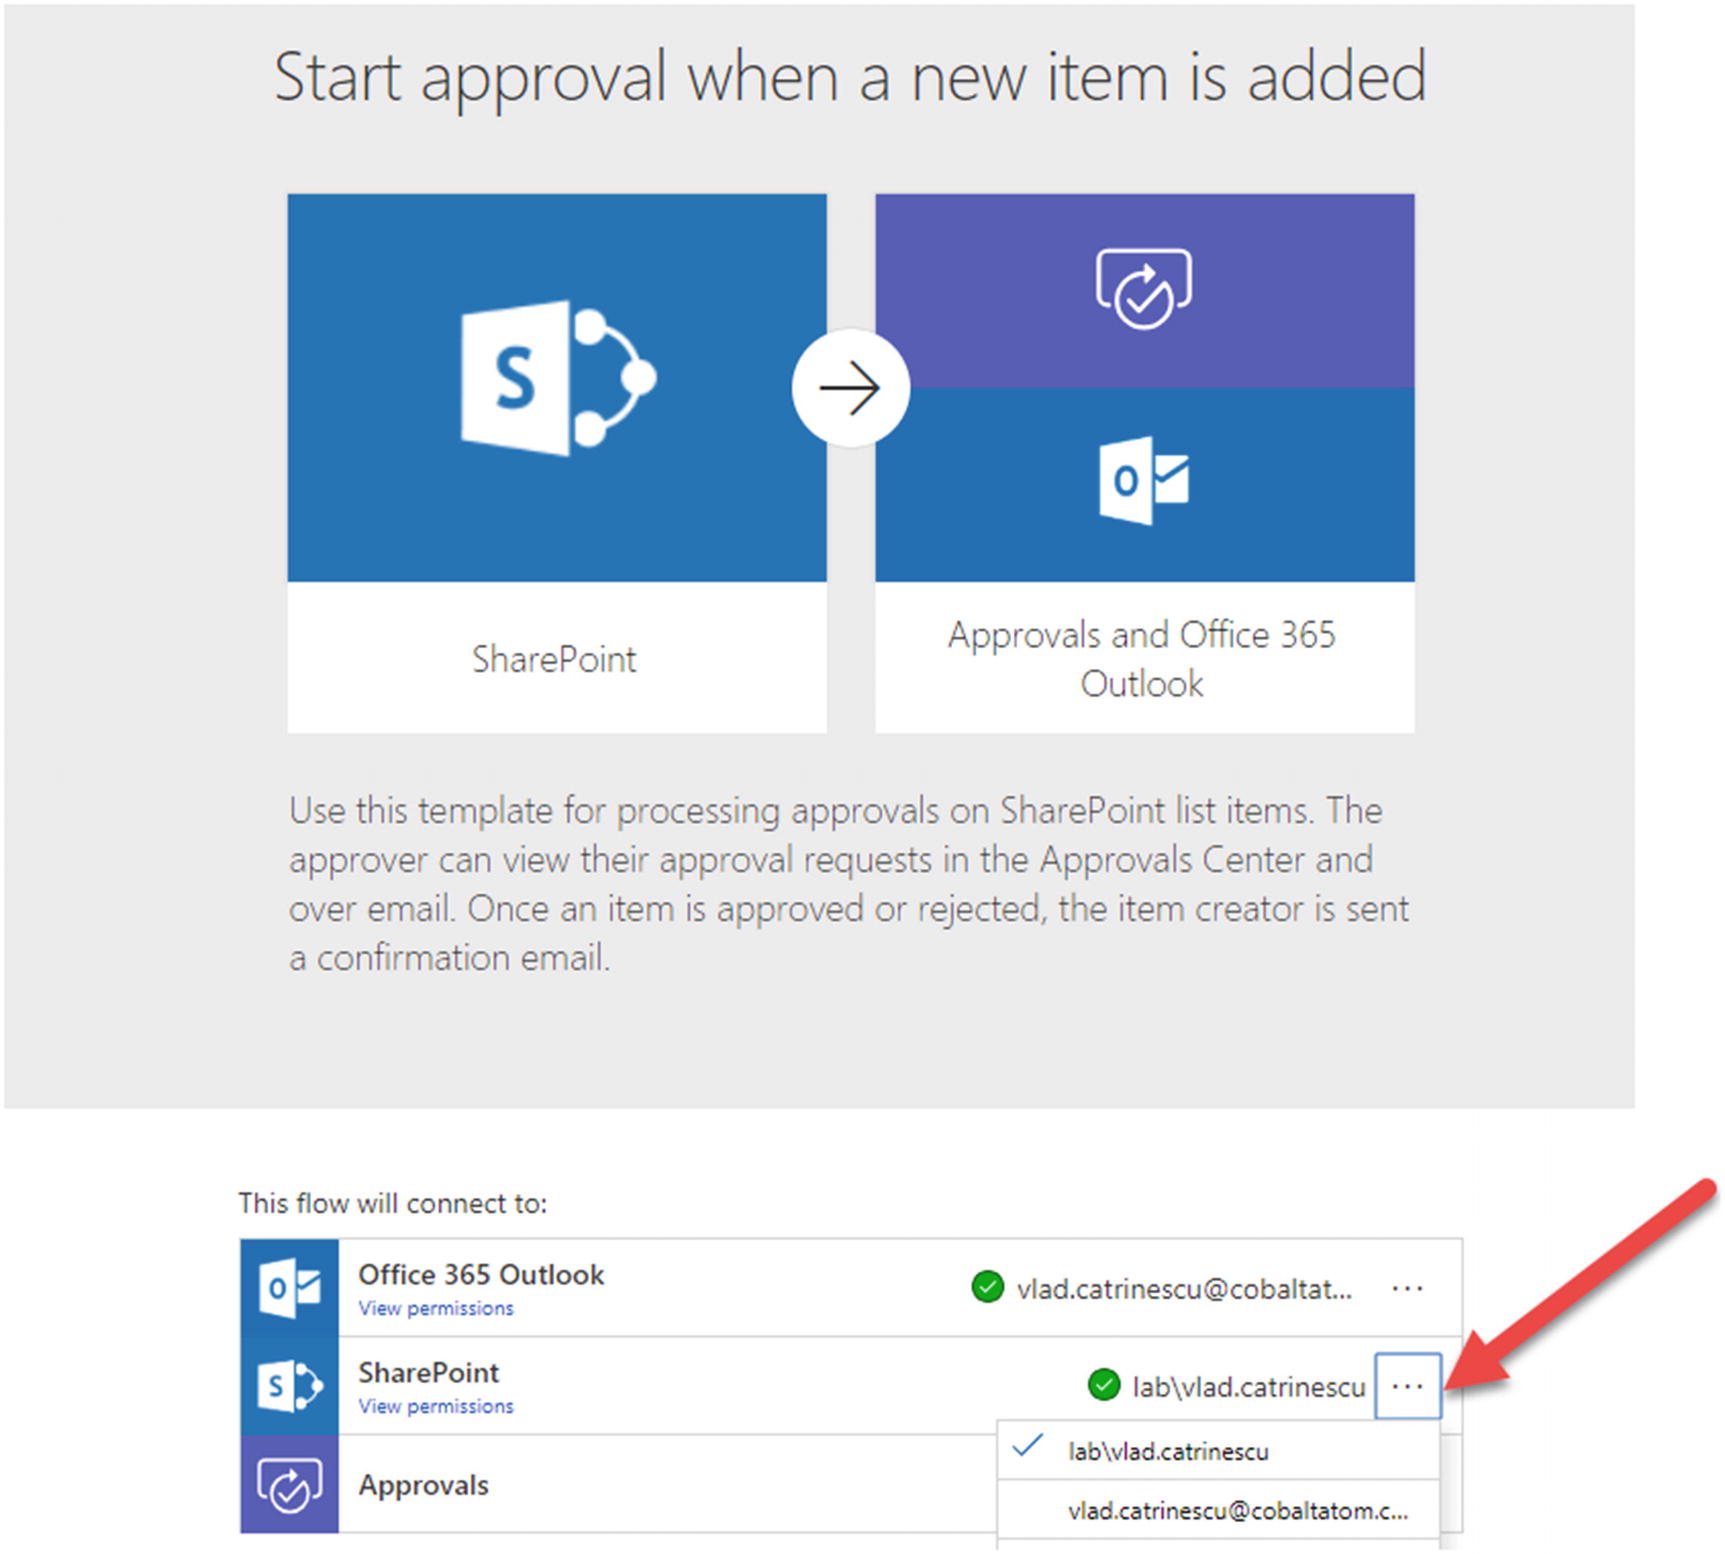
Now that our connector is ready, we can create our workflows. I will create a workflow starting from the Start approval when a new item is added template offered by Microsoft, and since I want to connect to my On-Premises SharePoint, it’s important to select the right connector for SharePoint. By default, the SharePoint Online connector will be selected, however by clicking the three dots next to it, you can select the SharePoint Connection with your domain credentials as seen in Figure 15-14.
Figure 15-14
Selecting the right connector when creating the Flow
You can then start creating your Flows as usual, and when entering an On-Premises Site Collection, Flow will be able to propose dynamic values as the Inventory list suggestion seen in Figure 15-15.
Figure 15-15
Flow proposes an On-Premises list
You can then test it out by adding an item on your On-Premises list, or the trigger that you configured, and the Flow should kick off within the SLA specified by your Flow Licensing. In Figure 15-16 you can see our Flow got triggered when a new item got added in the Inventory list of our On-Premises Site Collection.
Figure 15-16
Flow triggered successfully
Even if the integration with Microsoft Flow and On-Premises SharePoint is great, something that is missing from SharePoint 2019 in comparison to SharePoint Online is the ability to manually trigger Flows from On-Premises. There is no Flow button in SharePoint On-premises lists and Document Libraries, so triggers such as On Selected Item are available in Flow, but cannot be used with SharePoint On-Premises.
Now that we can create Workflows with Microsoft Flow, let’s look at PowerApps.
Business Apps with PowerApps
PowerApps is the recommended tool to create business applications in Office 365 and hybrid SharePoint Deployments. PowerApps shares a lot of back-end with Microsoft Flow, so if you have created the connection for our On-Premises SharePoint environment in Flow as we have done earlier in this chapter, you should also see it in your PowerApps Connections as seen in Figure 15-17.
Figure 15-17
SharePoint On-Premises connection in PowerApps
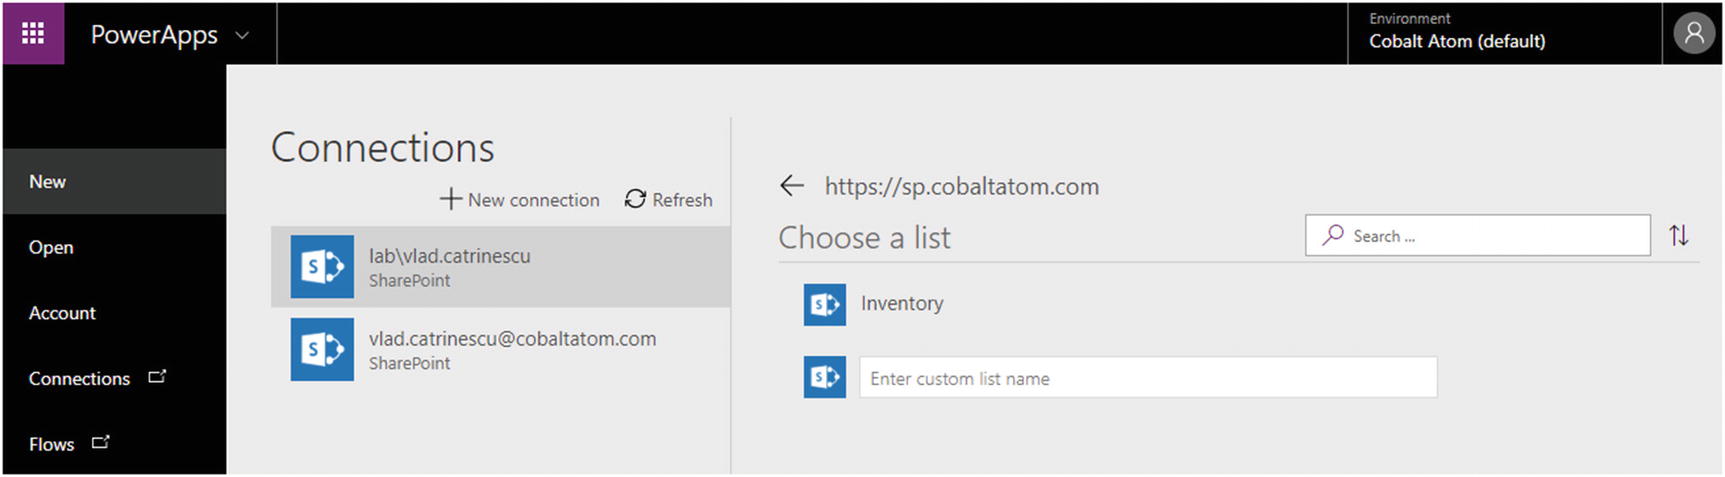
We can then start creating a blank application, or starting from a template, and in the Data Connections, both the SharePoint Online as well as SharePoint On-Premises connections will be displayed. Select the one that displays your on-premises domain credentials and enter the URL of your SharePoint On-Premises Site collection as seen in Figure 15-18, then click Go.
Figure 15-18
SharePoint On-Premises and Online connections
PowerApps should then be able to automatically suggest the lists available in that Site Collection as seen in Figure 15-19.
Figure 15-19
Lists in our On-Premises Site Collection
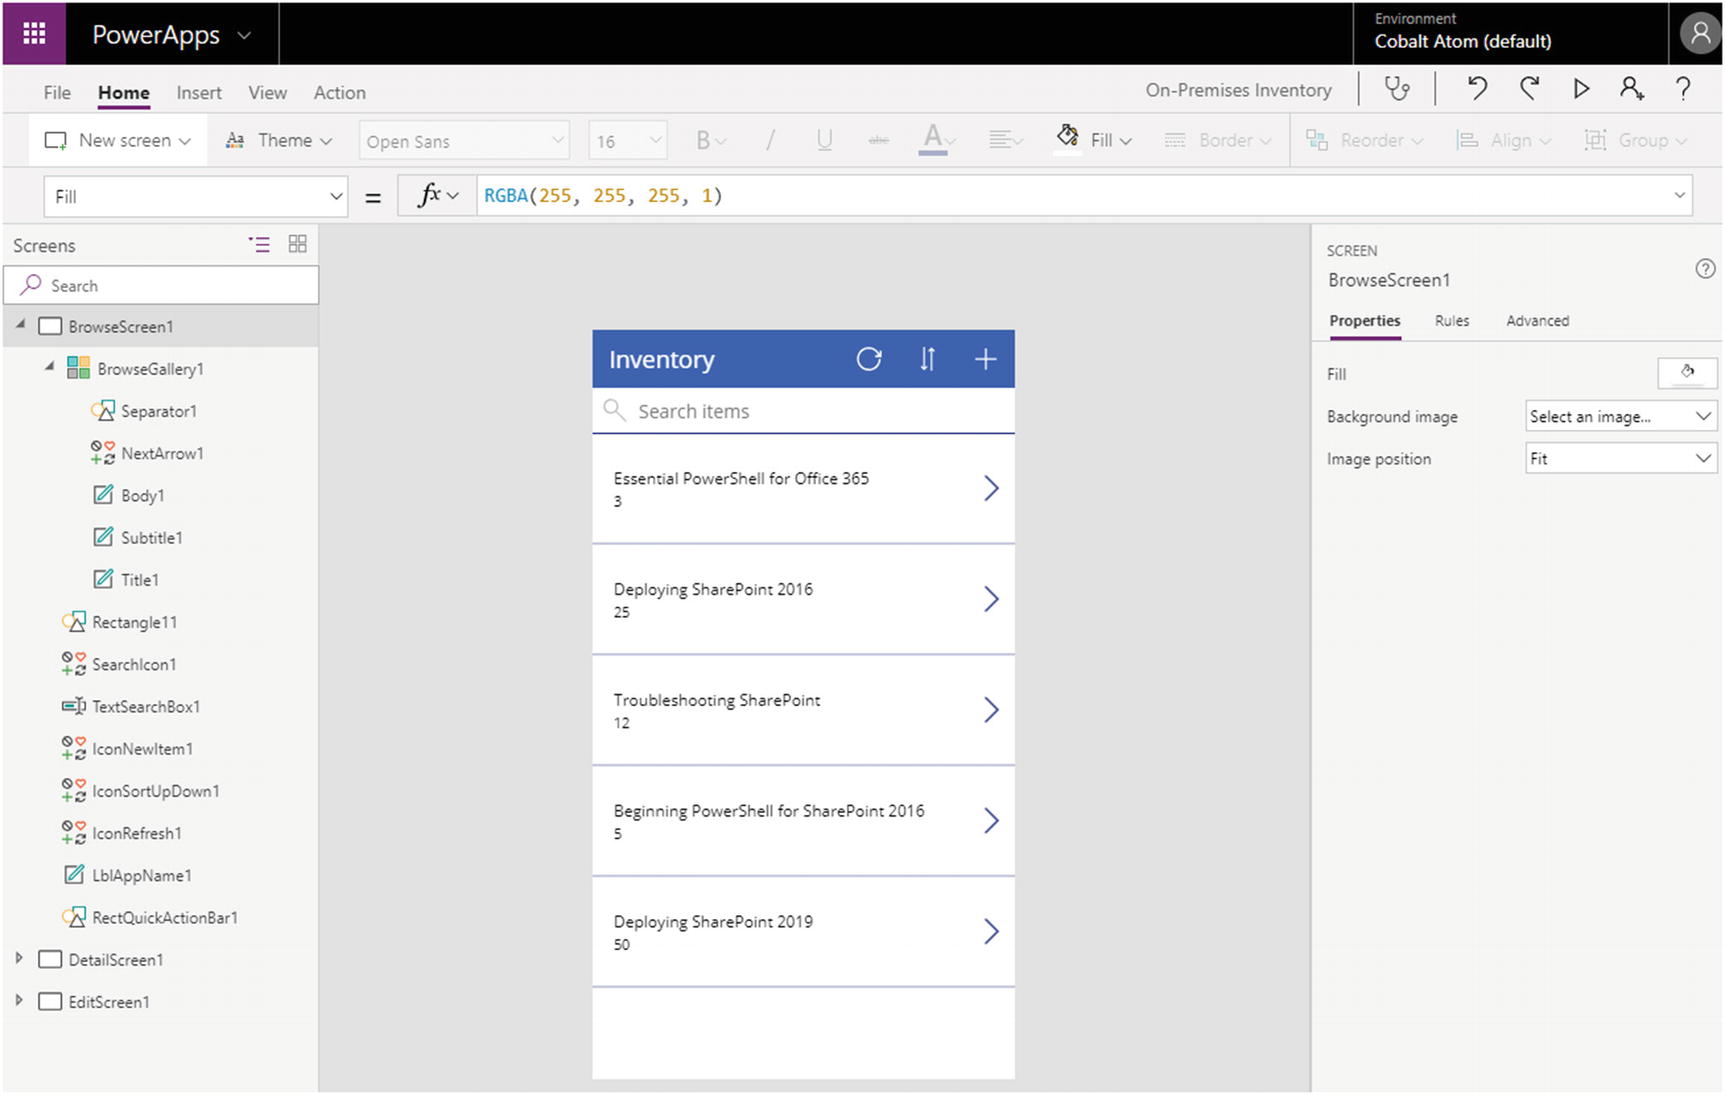
You are now able to create your business application using PowerApps with your On-Premises data. You can use the same knowledge as if the data was fully in SharePoint Online. You can view the PowerApps designer showing items from SharePoint On-Premises in Figure 15-20.
Figure 15-20
PowerApps Designer with SharePoint On-Premises items
After the app is published, you can also consume it from your mobile phone. In Figure 15-21, you can view the same application displaying On-Premises items on my Android phone.
Figure 15-21
On-Premises Items in PowerApps on an android phone
Like Microsoft Flow, while the integration between PowerApps and SharePoint Server 2019 is great, there are some features missing. One of the biggest one is the ability to customize SharePoint list forms using PowerApps and displaying those forms directly in the list.
We have now successfully created both workflows with Microsoft Flow and Business apps with PowerApps that consume content from our On-Premises SharePoint implementation.
Next Steps
In this chapter, we have learned how to install the On-Premises Data Gateway which allows us to use the latest business applications such as Flow and PowerApps in order to create workflows and applications with our on-premises content. With the connection done, users can simply consume those services without needing any additional knowledge other than the basics of Flow and PowerApps. If you want to learn more about Flow and PowerApps, Apress has a book on each subject that you can learn from.
Our next chapter will cover how to migrate content to SharePoint Server 2019.